fuel AUDI A7 2013 Owner's Manual
[x] Cancel search | Manufacturer: AUDI, Model Year: 2013, Model line: A7, Model: AUDI A7 2013Pages: 310, PDF Size: 77.45 MB
Page 217 of 310
sponges to prevent scratches. It is best
to use soapy water .
- You should remove debris (such as in
sects) from the headlight lenses on a
regular basis, for example when refuel
ing your vehicle. Never clean the head
lights w ith a dry cloth or sponge. Use a
wet cloth or sponge. It is best to use
soapy water .
@ For the sake of the environment
Only wash the vehicle in facilit ies specially
designed for that purpose. Th is w ill reduce
the risk of d irty water contaminated with
oil from entering the sewer system . In
some areas, washing veh icles outs ide of
t hese facilit ies is prohib ited.
Washing your vehicle with a power
washer
Cleaning the exterior of your car with a high
pressure power washer is safe as long as you
observe a few simple rules .
.,. Befo re using the power washe r, make sure
you have read and understood the WARN INGS ¢
A. in General information on
page 213.
.,. Always fo llow the operating instructions for
the power washer .
.,. Make sure that the jet on the spray hose
produces a "fan shaped spray" .
.,. Do
not ho ld the spray no zzle too close to
soft mate ria ls .
Keep a d istance from soft materials such as
rubber hoses or insulat ing mater ial as we ll as
sensors and camera lenses .
When clean ing the vehicle w it h a power wash
er
always follow the operating instructions.
This applies particularly to the operating pres
sure and the spraying distance . Do not po int
the spray directly at t he sea ls around the side
windows, aro und the doors, o n the rea r lid or
on the sunroof *. L ikew ise, do not point it di
rectly at tires, r ubber hoses, ins ulation mate
rial or sensors ¢
page 216. Hold the spray
Cleaning and protec tion 215
nozzle at least 1.3 ft (0.4 m) away from the
vehicle.
Do no t use a high-p ressure power w asher to
remove snow and ice .
Do not use a jet which sprays wate r in a d irect
stream o r one that has a rotating jet.
Water temperature should not exceed 140 °F
(60 °() .
A WARNING
Neve r wash t ires with a jet that sprays wa
ter in a direct stream . Thi s could cause in
v isible damage to the t ires and we aken
them, even if the spray is from a re lative ly
l ong dis tance and for a short time. Dam
aged and wea kened tires can fail and cause
accidents and personal in jury.
(D Note
To avoid damaging yo ur vehicle, a lways
make sure tha t the re is sufficien t distance
between the s pray head and soft materia ls
lik e rubber hoses, plastic parts and sound
deaden ing mater ia ls as well as sensors
and camera lenses. Never a im t he spray
head at the same point for a long time .
This also applies to cleaning headlights
and paint ed bumpers. Remembe r: the
closer the no zzle is to the surfa ce of the
m at eria l, the gre ater the s tress on the m a
terial.
Caring for vehicles with matte finish
paint
App lies to vehicles : wit h matte finish paint
Vehicles with matte finish paint require spe
cial care due to the characteristics of the
paint.
Washing by hand
T o avoid d amaging the pain t when washing,
first remove dust and la rge particles from
your vehicle . Insects, grease spots and finger
prints are best removed with a
special cleane r
for matte fin ish paint .
1111>
•
•
Page 218 of 310
216 Cleaning and protec tio n
Apply the product using a micr ofib er cl oth. To
avoid damaging the paint surface, do not use
too m uch pressure.
R inse the vehicle t ho roughly with water . Clean
the vehicle sta rting at the top and working to
ward the bottom using a
neutra l sh ampoo
and a soft mi crofiber cloth . Stop frequently to
rinse the cloth thoroughly.
C lean the wheels and sill panels last. Use a
clean
s pon ge on these areas .
R inse the vehicle tho roughly aga in and let it
a ir dry.
If there are any wa ter spo ts, they can
be removed using a
leather cloth .
Clean again with the spe cial clean er for matt e
finish paint
if ne cessary.
Removing stubborn d irt
B ird d ropping s or tree sap are best removed
with plenty of water and a m icrofiber cloth .
You should r inse
off ga soli ne res idue immedi
ately with plenty of water.
A WARNING
- Wash your ve hicle only when the ignition
is switched
off to reduce the risk of a
crash .
- Always read and heed all WARNINGS and othe r information
c:::> page 213.
([) Note
-Do not treat vehicle parts painted w ith
matte f inish paint us ing polish ing mate
r ials or hard wax. These products could
cause damage to the appea rance or sur
face that cannot be repaired.
- Never use p rotective wax.
It can destroy
the matte fin ish effect .
- Do not p lace any st ickers or magnetic
s igns on vehicle parts painted with
matte finish paint. The pa int could be
damaged when the st ickers or magnets
a re removed.
- To preven t pa int damage, do not wash
the veh icle in direct s unl igh t. -
To prevent damage to the pa int surface,
do not use insect remova l sponges,
rough kitchen sponges or sim ilar items .
- Yo u should remove debris (such as in
sects) from the headlight lenses on a
regu lar basis, for example when refuel
ing your vehicle. Only clean the head
lights using a wet cloth or sponge, never
a dry one. Cleaning with soapy water is
recommended.
(D Tips
For more information on special cleaning
products designed for matte finish paint,
seeyourAud idea~~
Sensors and camera lenses
- Remove snow with a hand brush and remove
ice with a de -icing spray that does not con
tain so lvents.
- Clean the senso rs (adaptive c ruise control*,
park ing system*) w ith a cleaning so lution
tha t does not contain so lvents and a soft
cloth .
- The camera lens or the area in front of the
camera lens is norma lly cleaned by the
windshield wipers (Audi active lane assist*)
or head light wipers (night vision system *).
If the lens or the area is exceptionally dirty,
clean the area with glass cleaner and a soft,
dry cloth .
(D Note
-If you wash your vehicle with a pressure
washer,
- make sure there is eno ugh distance to
sensors i n the fron t and rear bumper,
- do not clean the camera lenses and the
ar ea a round them with the p ress ure
washer.
- N ever use warm or hot wate r to remove
snow or i ce from the camera lens. This
cou ld cause the lens to crack.
- Never clean the camera lens wi th abra
sive products.
Page 226 of 310
224 Cleaning and protection
Engine compartment
Be especially careful when cleaning the en
gine compartment.
Al way s switch o ff t he ign ition b efore clean
ing the engi ne
c:> &. .
Plenum p ane l
Remove leaves from the plenum pane l in front
of the windshield under the engine compart
ment. This p revents the water drain holes
from becoming blocked, and it preven ts de
bris from enter ing the veh icle inter ior through
the heating and venti lation ducts.
Cor rosion protecti on
The engine compartment and transmission
have been corrosion-protected at the factory.
Good anti -corrosion treatment is very impor
tant, particular ly in the winter. If the vehicle
is frequent ly driven on sa lt treated roads, the
entire engine compartment and plenum panel
should be thoroughly cleaned at the end of
winter and retreated to prevent salt damage .
At the same time, the underside of the vehicle
should be washed as well.
If the engine compartment is cleaned at any
time with grease removing solut ions
1>, or if
you have the engine washed, the anti-corro
sion treatment is a lmost always removed as
well. It is therefore essential to have a long
l asting co rrosion protection reapp lied to all
surfaces, seams, joints and components in the
engine compartment .
&_ WARNING
Be aware: The engine compartment of any
motor vehicle is a potentially hazardous
area.
- Before working in the engine compart
ment, be sure to read the informat ion
c:> page 230.
- Before reaching into the front pane l, al
ways switch off the ignition. Otherwise,
1l Use o nly the co rrect cle anin g so lu ti on s. Never use gas
o lin e or d ie se l fuel.
the windshield wiper system could unin
tentionally be switched on, possibly
causing personal injury from the moving
wiper linkage .
- Never reach into the area around or
touch the rad iator fan. The auxiliary fan
is temperature controlled and can sw itch
on suddenly- even when the ignition is
off.
- Do not wash, wax or dry the eng ine with
the engine running. Mov ing or hot parts
could injure you.
- Do not clean the underside of the chas
sis, fenders, wheel covers, or other hard
to reach parts without protect ing your
hands and arms . You may cut yourself on
sharp-edged metal parts .
- Always read and heed all WARNINGS and
other info rmation
c:> page 213.
Page 227 of 310
Fuel supply and filling
your f uel tank
Gasoline
Fuel supply
Using the right fuel helps keep the environ
ment clean and prevents engine damage.
Fuel recommendation
The fuel recommended for you r vehicle is un
leaded premium
g rade gasolin e. See also
¢ page 287, Data . Audi recommends usi ng
TO P TI ER Deterge nt Gaso line wi th a minim um
oc ta ne ra ti ng of 9 1 AK I (9 5 RON). For more
in fo rmation on TO P TI ER De tergent Gaso line,
p lease go to the official website (www.toptier
gas.com).
The re commended g asoline octane r ating for
your engine can a lso be fo und o n a label loca t
e d on the ins ide of the fuel filler flap . This rat
ing may be specif ied as A KI or RO N.
Your veh icle m ay also be oper ated using un
l e aded regular gasoline with a minimum oc
tane rating of 87 AKI/91 RON . However, using
87 AKI/9 1 RO N octa ne f ue l w ill sli ghtly re
d uce eng ine perfo rmance .
Use unleaded gasoline only. Unleaded gaso
line is available th rougho ut the USA, Canada,
a nd in most E uropean cou ntries . We recom
mend that you do not ta ke yo ur vehicle to
areas or count ries where unleaded gasoline
may not be ava ilable.
F or mo re informat io n on refue ling your ve hi
cle, see ¢
page 226.
Octane rating
Octane r ati ng in dicates a gaso line's abili ty to
r es ist engine damaging "knock" ca used by
p remature ign ition and detonation. Therefore,
buy ing the correct grade of gaso line is very
i mportant to help prevent possible engine
damage and a loss of engine performance.
Gasoline most common ly used in the Unite d
States and Canada has the followin g octane
Fuel supply and filling your fuel tank 225
ra tings that can usu a lly be found on the fi ller
p ump :
- Premium Gr ade: 9 1 -9 6 AKI
- Regular Grade : 87 -90 AKI
Explanation of the abbreviations:
AKI = Anti K nock In d ex = (R+M )/2 = (RO N
+M ON)/2
RON= Resear ch O ctane Num ber
MO N= Motor Octane Number.
(D Note
- Do not use a ny fue l w it h octane rat ings
lower than 87 A KI or 9 1 RO N othe rwise
e xpensive engi ne damage w ill occur.
- Do
not use leaded gasoli ne . The use of
leaded gasolin e w ill severely damage
yo ur vehicl e's cata lytic co nve rter and its
ability to control exh aust em iss ions.
Blended gasoline
U se of gasoline containing alcohol or
MTBE (methyl tertiary butyl ether)
You may use unleaded g asoline blende d with
a lcohol o r MTBE (commonly re fer red to as
oxygenates) if the blende d mixture meets the
fo llow ing criteria:
Blend of gasoline methanol (wood alcohol or
methyl alcohol)
- Anti -kno ck index mus t be 87 A KI or higher.
- Blend must contain no mor e than 3% meth-
anol.
- Blend must co ntain more than 2% co-sol-
vents .
Blend of gasoline and ethanol (grain alcohol
or ethyl alcohol)
- Anti -knoc k index must be 87 A KI or higher.
- Blend must not conta in mo re tha n 10%
ethanol.
Blend of gasoline and MTBE
- Anti -knoc k index must be 87 AKI or higher . ll>-
•
•
Page 228 of 310
226 Fuel supply and filling your fuel tank
-Blend must contain not more than 15%
MTBE.
Seasonally adjusted gasoline
Many gasoline grades are blended to perform
espec ially we ll for winter or summer driv ing.
During seasonal change-over, we suggest that
you fill up at busy gas stat ions where the sea
sonal adjustment is more likely to be made in
time.
(CT) Note
- Methanol fuels which do not meet these
requirements may cause corrosion and
damage to plastic and rubber compo
nents in the fuel system .
- Do not use fuels that fai l to meet the
specified criteria in this chapter.
- If yo u are unable to determine whether
or not a particular fuel blend meets the
specifications, ask your service station or
its fuel sup plier.
- Do not use fuel for which the contents cannot be identified.
- Fuel system damage and performance
problems resulting from the use of fuels
different from those specified are not
the respons ibility of Audi and are not
covered under the New Vehicle or the Emission Control System Warranties.
- If you experience a loss of fuel economy
or driveability and performance prob l ems due to the use of one of these fuel
blends, we recommend that you switch
to unblended fuel.
Gasoline additives
A major concern among many auto manufac
turers is carbon deposit build- up caused by
the type of gasoline you use.
A lthough gasoline grades differ from one
manufacturer to another, they have certain
things in common. All gasoline g rades contain
substances that can cause deposits to co llect
on vital engine parts, such as fuel injectors
and intake valves. Although most gasoline
brands include additives to keep engine and fuel
systems clean, they a re not equally effec
tive .
A udi recommends using TOP TIER Detergent
Gasoline. For more information on TOP TIER
Detergent Gasoline, please go to the official
website (www.toptiergas.com).
After an extended period of using inadequate
f uels, carbon deposit build-ups can rob yo ur
engine of peak performance.
(D Note
'
Damage or malf u nct ion due to poor fuel
quality is not covered by the Aud i New Ve
hicle Limited Warranty.
Fuel tank
Fuel filler neck
The fuel filler neck is located on the right rear
s ide panel behind the fuel filler flap.
If the power locking system should fail, you
can still open the flap manually- for detailed
instructions see¢
page 228 .
You can find the fuel tank capacity of your ve
hicle in
Technical Data ¢ page 287.
The label on the inside of the fuel fi ller flap
tells you the correct fue l for your veh icle. For
more information about fuel specifications,
see ¢
page 225.
Your vehicle fuel tank has an on board refuel
li ng vapor recovery system. This feature helps
to prevent fuel vapors from escaping from the
tank and polluting the environment while you refuel your vehicle . In order to fill the tank
properly wh ile protecting the environment,
please fo llow this refueling procedure careful
ly.
.8, WARNING
Under normal operating cond itions, never
carry additional fuel containers in your car.
Gas canisters and other containers used to
transport fuel can be dangerous. Such con
tainers, full or empty, may leak and could
cause a fire in a collision. If you must
Page 229 of 310
transport fuel to use for your lawn mower,
snow blower, etc., be very careful and al
ways observe local and state laws regard
ing the use, transportation and storage of
such fuel containers. Make certain the con
tainer meets industry standards (ANSI/
ASTM F8S2 -86) .
@ Note
Never drive your vehicle until the fuel tank
is completely empty. The irregular supply
of fuel can cause misfiring. Gasoline could
enter the exhaust system and damage the
catalyt ic converter.
Refuelling
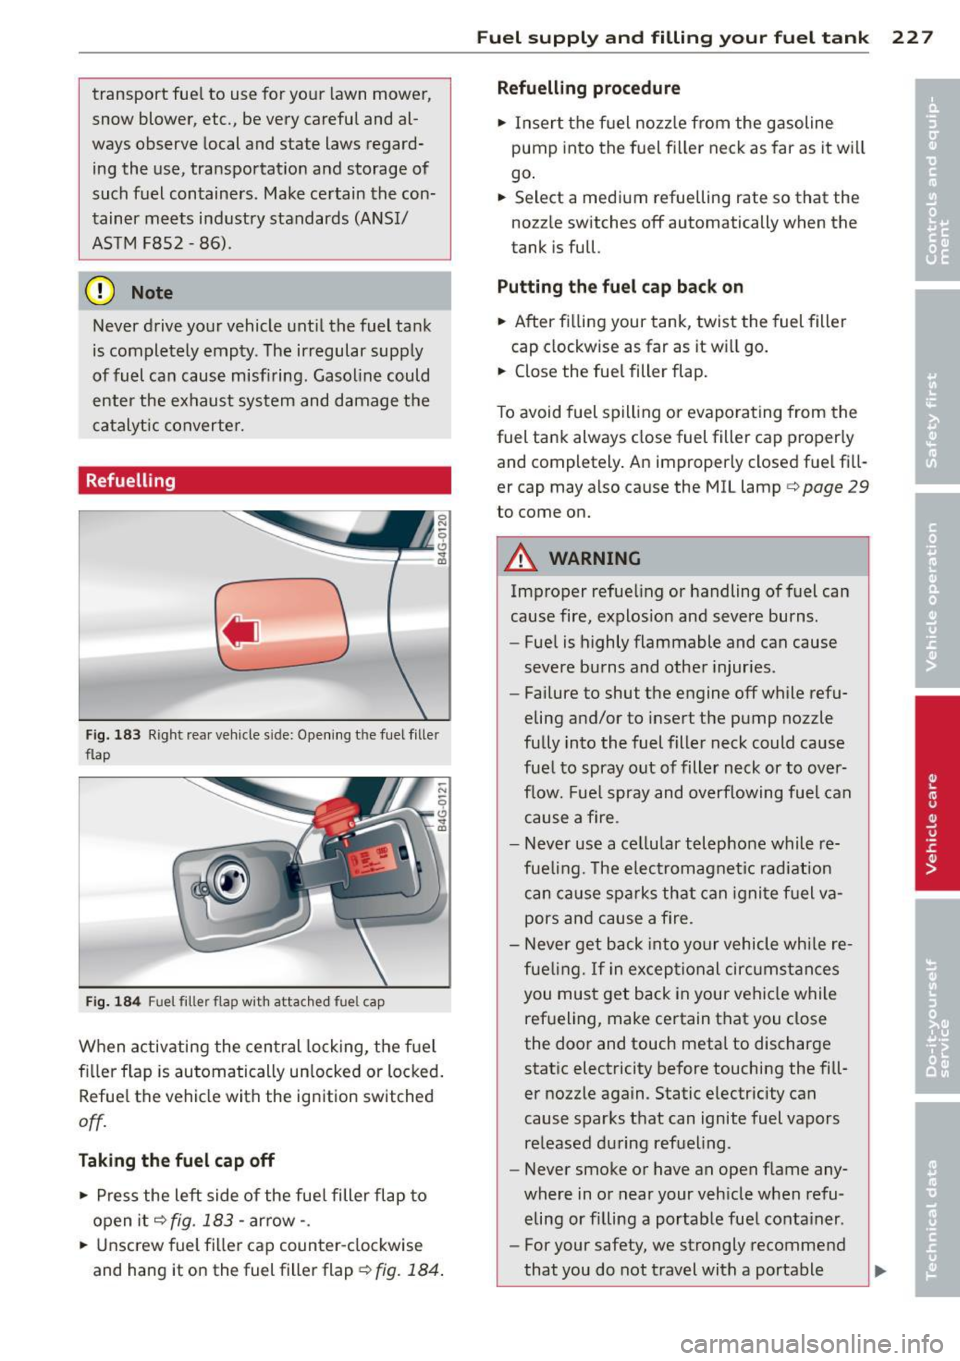
Fig. 183 Right rear vehicle s ide: Opening the fuel filler
flap
Fig. 184 Fuel filler flap with attached fuel cap
When activating the central locking, the fuel
f ill er flap is automatically un locked or locked.
Refuel the vehicle with the ignition switched
off.
Taking the fuel cap off
• Press the left side of the fuel filler flap to
open it¢
fig. 183 -arrow-.
• Unscrew fuel filler cap counter-clockwise
and hang it on the fuel filler flap~
fig. 184.
Fuel supply and filling your fuel tank 22 7
Refuelling procedure
• Insert the fuel nozzle from the gasoline
pump into the fuel filler neck as far as it will
go.
• Select a medium refuelling rate so that the
nozzle switches off automatically when the
tank is full.
Putting the fuel cap back on
• After filling your tank, twist the fuel filler
cap clockwise as far as it will go.
• Close the fuel filler flap.
To avoid fuel spill ing or evaporating from the
fuel tank always close fuel filler cap proper ly
and completely. An improperly closed fuel fill
er cap may also cause the MIL lamp ¢
page 29
to come on.
A WARNING
Improper refueling or handling of fuel can
cause fire, explosion and severe burns.
- Fuel is highly flammable and can cause
severe burns and other injuries.
- Failure to shut the engine off while refu
eling and/or to insert the pump nozzle
fully into the fuel filler neck could cause
fue l to spray out of filler neck or to over
flow. Fuel spray and overflowing fuel can
cause a fire.
- Never use a cellular telephone while re
fue ling. The electromagnet ic rad iation
can cause sparks that can ignite fuel va
pors and cause a fire.
- Never get back into your vehicle while re
fueling.
If in exceptional circumstances
you must get back in your vehicle while
refueling, make certain that you close
the door and touch metal to discharge static electricity before touching the fill
er nozzle again. Static electricity can
cause sparks that can ignite fuel vapors
released during refueling.
- Never smoke or have an open flame any
where in or near your vehicle when refu
eling or filling a portable fue l container.
- For your safety, we strongly recommend
that you do not travel with a portable
Page 230 of 310
228 Fuel supply and filling your fuel tank
fuel container in your vehicle. The con
tainer, full or empty may leak and could
cause a fire, especially in a crash.
- If, under exceptional circumstances, you
must transport a portable fuel container,
please observe the following:
- Never fill a portable fuel container
while it is anywhere in or on the vehicle
(for example, in the luggage compart
ment, or on the trunk). Static electrici
ty can bui ld up while filling and can ig
nite fuel vapors causing a fire .
- Always place a portable fuel container
on the ground before filling.
- Always keep the filler nozzle complete
ly inside the portable container before
and during filling.
- If filling a portable container made of
metal, the filler nozz le must always be
in contact with the container. This will
help prevent static electricity from dis
charging and cause a fire .
- Never spill fuel inside the vehicle or
luggage compartment. Fuel vapors are
highly flammable.
- Always observe local and state/provin
cial laws regarding the use, storage
and transportation of fuel conta iners .
- Make certain the fuel container meets
industry standards (ANSI/ ASTM
F8S2 -86) .
d) Note
If any fuel has spilled onto the car, it
should be removed immediately to prevent
damage to the paint.
@ For the sake of the environment
As soon as the correctly operated noz zle
switches off automatically for the first
time, the tank is full. Do not try to add
more fuel because fuel may spill out. In
addition, the expansion space in the fuel
tank will be filled -causing the fuel to
overflow when it becomes warm and pol
lute the environment.
(D Tips
-Running your engine whi le refue lling
may cause vapors to escape or even
cause fuel to spi ll out of the tank. This
would then shut off the fuel nozzle be
fore the tank is full.
- Do not refuel your vehicle with the igni
tion switched on. The fuel gauge may otherwise not ind icate the correct fuel
level after refuelling .
- The fuel filler flap of your vehicle is not
locked when you lock the vehicle from
the ins ide .
Fuel filler flap emergency release
You can open the fuel filler flap by hand if the
power locking system should fail.
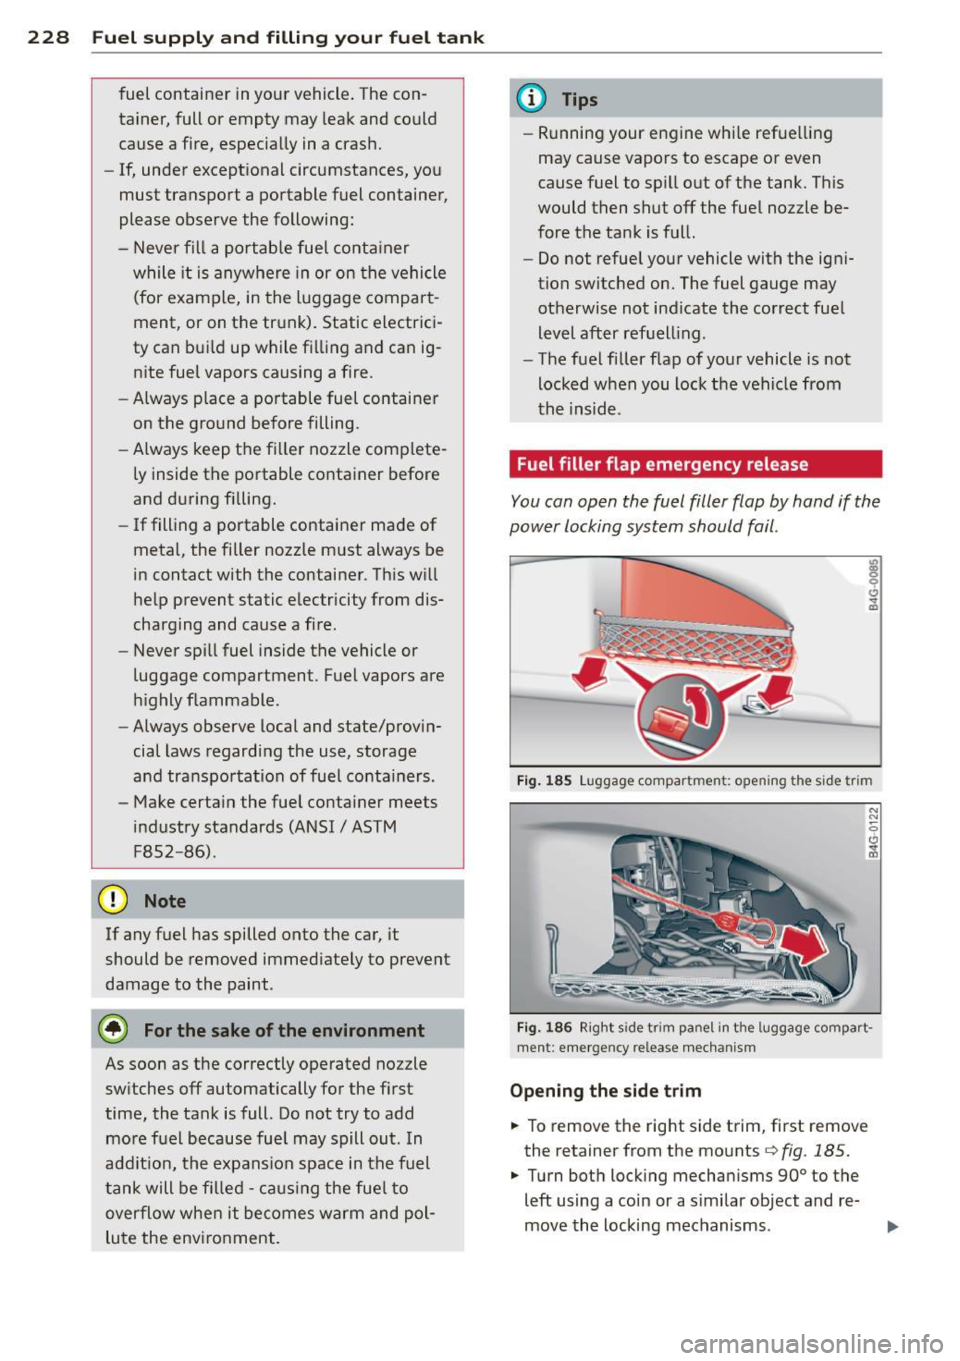
Fig. 185 Lug g ag e compar tmen t: o pe ning th e side tri m
N
N
0 <.:)
iii
Fig. 186 Rig ht s ide t rim p an el in t he luggage compart
ment : emer gen cy re lease mech anism
Opening the side trim
.. To r emove th e right side trim, first remove
the retainer from the mounts
¢ fig . 185.
.. Turn both locking mechanisms 90° to the
left using a coin or a similar object and re-
move the locking mechanisms. ..,_
Page 231 of 310
~ Tilt the retainer upward and pu ll the tr im
o ut. Lay the trim dow n on its side, because
there is an electrical wire on the back.
Fuel filler door emergency release
The eme rgency release mech an ism is loc ated
behind the right side t rim pa ne l in the lug
gage compartment .
~ Loosen the loop ¢ fig. 186 from the retain
er and then pull on the loop carefully ¢0.
~ Press on the left side of the fuel fi ller doo r
to open
¢fig. 183 .
(D Note
Onl y pull o n the loop un til you fee l resis t
ance. You will not hear it release. Other
w ise you cou ld damage the emergency re
lease mechanism.
Fuel supply and filling your fuel tank 229
•
•
Page 232 of 310
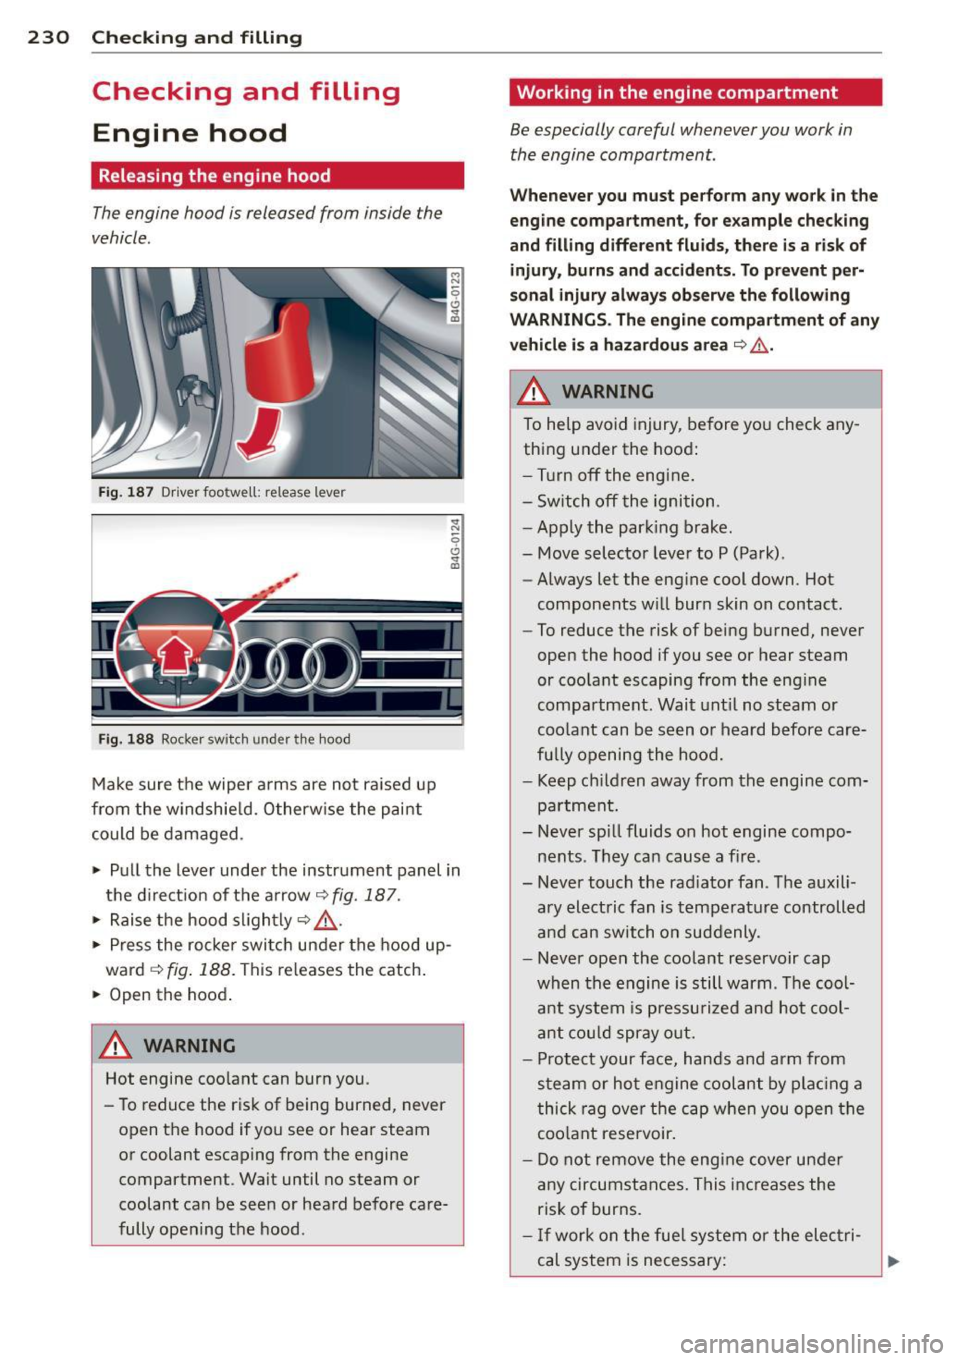
230 Checking and filling
Checking and filling Engine hood
Releasing the engine hood
The engine hood is released from inside the
vehicle .
Fig. 187 Driver foo twell: release lever
Fig. 188 Rocker switch un der the hood
Make sure the wiper arms are not raised up
from the windshield. Otherwise the paint
could be damaged .
.,. Pull the lever under the instrument panel in
the direction of the arrow
~ fig. 187.
.,. Raise the hood slightly~,&. .
... Press the rocker switch under the hood up
ward
~ fig. 188. This releases th e catch.
... Open the hood.
&_ WARNING
Hot engine coolant can burn you.
- To reduce the risk of being burned, never
open the hood if you see or hear steam
or coolant escaping from the engine compartment . Wait until no steam or
coolant can be seen or heard before care
fully opening the hood .
'Working in the engine compartment
Be especially careful whenever you work in
the engine compartment.
Whenever you must perform any work in the
engine compartment, for example checking
and filling different fluids, there is a risk of injury, burns and accidents. To prevent per
sonal injury always observe the following
WARNINGS. The engine compartment of any
vehicle is a hazardous area
~ ,&. .
A WARNING
To help avoid injury, before you check any
thing under the hood:
- Turn off the engine.
- Switch off the ignition .
- Apply the parking brake.
- Move selector lever to P (Park).
- Always let the engine cool down. Hot
components will burn skin on contact.
- To reduce the risk of being burned, never
open the hood if you see or hear steam
or coolant escaping from the engine
compartment. Wait until no steam or
coolant can be seen or heard before care
fully opening the hood.
- Keep children away from the engine com
partment.
- Never spill fluids on hot engine compo
nents . They can cause a fire .
- Never touch the radiator fan. The auxili
ary electric fan is temperature controlled
and can switch on suddenly .
- Never open the coolant reservoir cap
when the engine is still warm . The cool
ant system is pressurized and hot cool
ant could spray out.
- Protect your face, hands and arm from
steam or hot engine coolant by placing a
thick rag over the cap when you open the
coolant reservoir.
- Do not remove the engine cover under
any circumstances. This increases the
risk of burns.
- If work on the fuel system or the electri
cal system is necessary:
Page 236 of 310
234 Checking and filling
temperatures stay below freezing point for long periods.
Detergent additives in the oil w il l make fresh
oil look dark after the eng ine has been run
ning for a short time . This is norma l and is not
a reason to change the oi l more often than
recommended.
Damage or malfun ctions due to lack of
maintenance
It is essential that you change your oil at the
recommended intervals using only engine o il
that complies with Audi oi l standard
VW 502 00. Your Limited New Vehicle War
ranty does not cover damage or malfunctions
due to fail ure to fo llow recommended mainte
nance and use requ irements as set forth in
the Audi Owner's Manual and Warranty &
Maintenance booklet . Your dealer will have to
deny warranty coverage unless you present to
the dea ler proof in the form of Service or Re
pa ir Orders that all scheduled ma intenance
was performed in a timely manner.
Eng ine oil consumption
The engine in your vehicle depends on an ade
quate amount of oil to lubricate and cool all
of its moving parts.
In order to provide effective lubrication and
cool ing of internal engine components, all in
ternal combustion eng ines consume a certain
amount of oil. Oil consumption varies from
engine to engine and may change significantly
over the life of the engine. Typically, engines
with a specif ied break-in period (see
¢ page 204) consume more oil during the
break-in period than they consume after oil
consumption has stabilized.
Under norma l conditions, the rate of oil con
sumption depends on the quality and viscosity
of the oil, the RPM (revolutions per minute) at
which the engine is operated, the ambient
temperature and road condit ions . Further fac
tors are the amount of oil d ilution from water
condensat ion or fuel residue and the oxida
tion level of the oil. As any engine is subject to wear as mi
leage builds up, the oil consump
tion may increase over time until replacement
of worn components may become necessary.
With all these variables coming into play, no
standard rate of oil consumption can be es
tablished or specified. There is no alternative
to regu lar and frequent checking of the o il lev
el, see Note.
If the yellow engine oil leve l warning symbo l
in the instrument cluster
II lights up, you
sho uld check the oil leve l as soon as possible
c:> page 235. Top off the oil at your earliest
convenience
c:> page 235.
A WARNING '"---
Before you check anythi ng in the engine
compartment, always read and heed all
WARNINGS
c:> A in Working in the engine
compartment on page 230.
(D Note
Driving with an insufficient o il level is like
ly to cause severe damage to the engine.
(D Tips
- The oil pressure warning display . is
not an indicator of the oil level. Do not
rely on it. Instead, check the oil level in
your engine at regular intervals, pref
erably each time you refuel, and always
before going on a long trip.
- If you have th e impression your engine
consumes excessive amounts of oil, we
recommend that you consult your Audi
dealer to have the cause of your concern
properly diagnosed. Keep in mind that
the accurate meas urement of oil con
sumption requ ires great care and may
take some t ime. Your Audi dealer has in
structions about how to measure oil con
sumption accurately.
-