coolant level AUDI A7 2013 Owners Manual
[x] Cancel search | Manufacturer: AUDI, Model Year: 2013, Model line: A7, Model: AUDI A7 2013Pages: 310, PDF Size: 77.45 MB
Page 13 of 310
Instrument s and warning /indicator lights 11
Instruments and warning/indicator lights
Instruments
Instrument cluster and controls
The instrument cluster is your central source of information.
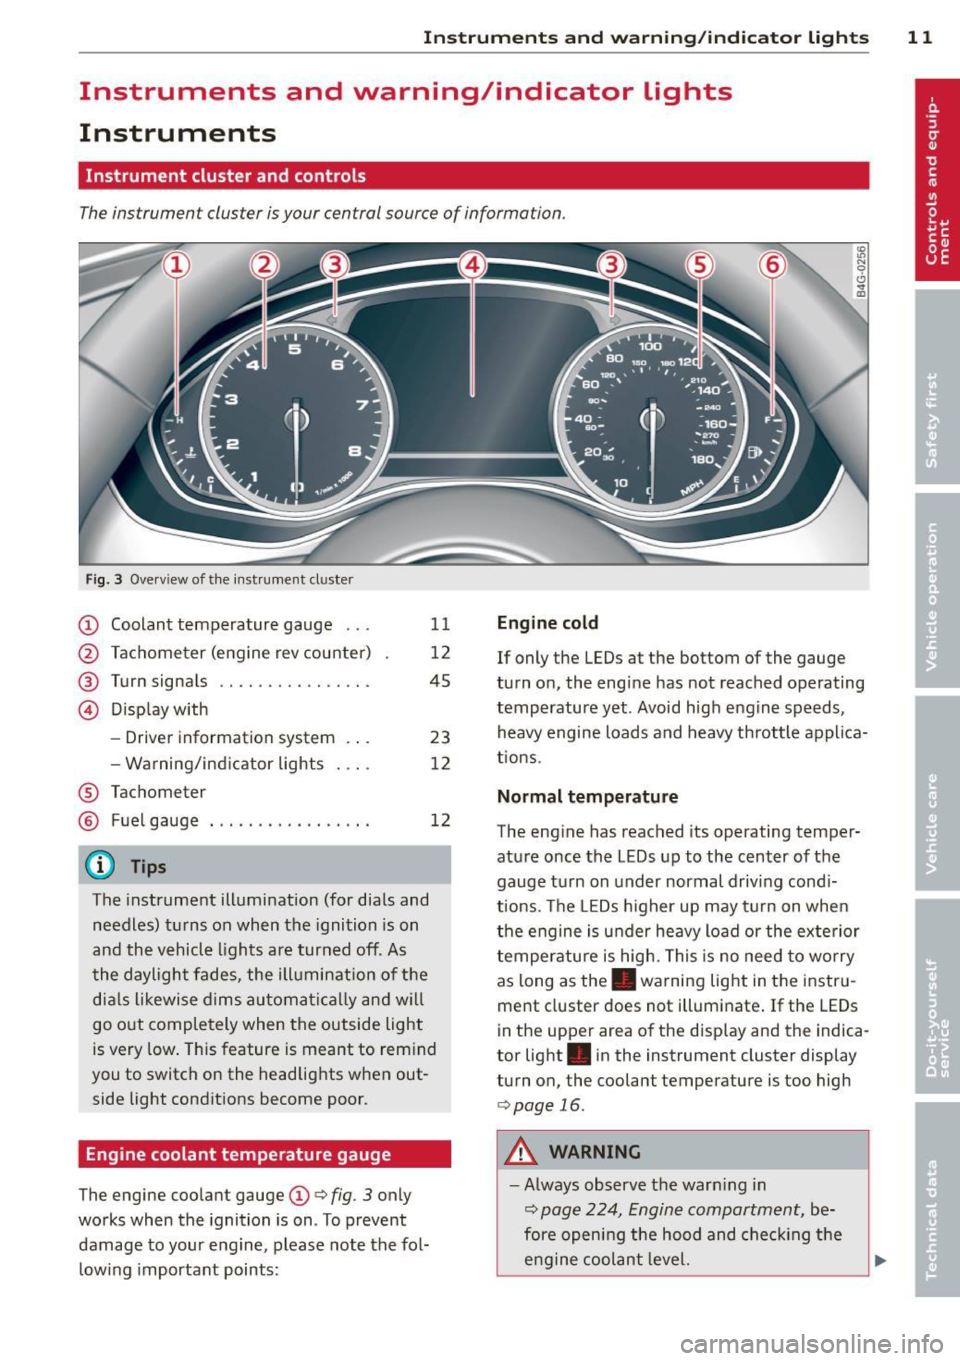
Fig. 3 Overv iew of the instrument cluster
CD Coolant temperature gauge .. .
@ Tachometer (eng ine rev counter)
@ Turn signals ............... .
11
12
45
@ Display with
®
®
-Driver information system .. .
- Wa rning/ind icator lights
Tachometer Fuel gauge
@ Tips
23
12
12
The instrument illumination (for dials and
needles) turns on when the ignition is on
and the vehicle lights are turned off. As
the daylight fades, the illumination of the
dials likewise dims automatically and wil l
go out completely when the outside light
is very low. This feature is meant to rem ind
you to switch on the headlights when out
side light conditions become poor.
Engine coolant temperature gauge
The engine coolant gauge CD¢ fig. 3 only
works when the ignition is on . To prevent
damage to your eng ine, please note the fol
l owing important points:
Engine cold
If only the LEDs at the bottom of the gauge
turn on, the eng ine has not reached operating
temperature yet . Avoid high engine speeds,
heavy engine loads and heavy throttle applica
tions.
Normal temperature
The engine has reached its operating temper
ature once the LEDs up to the center of the
gauge turn on under normal driving cond i
t ions. The LEDs higher up may turn on when
the engine is under heavy load or the exterior
temperature is high. This is no need to worry
as long as the. warning light in the instru
ment cluster does not illuminate. If the LEDs
in the upper area of the disp lay and the indica
tor light . in the instrument cluster display
turn on, the coolant temperature is too high
¢page 16.
A WARNING
-Always observe the warn ing in
¢ page 224, Engine compartment, be
fore opening the hood and checking the
engine coolant level.
Page 14 of 310
12 Instrum ent s and w arn ing /indic ato r light s
-Never open the engine hood if you see or
hear steam, or if you see engine coolant
dripping from the engine compartment.
You could burn yourself . Let the engine
cool off first until you can no longer see
o r hear steam or coo lant escaping.
@ Note
- Mounting additional lights or accessories
i n front of the a ir inlets reduces the cool
i ng effect of the rad iator . At h igh outside
temperatures or high eng ine load, the
engine could overheat.
- The front spo iler has been designed to
proper ly distribute the cooling air when
t h e ve hicle is moving.
If the spoiler is
dam aged, th is co uld red uce the cooling
effect and the engine co uld then over
heat . Ask your authorized Audi dea ler for
assistance .
Tachometer (engine rev counter)
The tachometer indicates the engine RPM
(revolutions per minutes).
If engine RP M drops be low 1,500, yo u should
downshift to the next lower gear. The red a rea
at the end of the sca le indicates maximum
perm iss ib le engine RPM after the break-in pe
riod. Before reaching this area, move these
lector lever to position D/S (Drive) or ease
your foot off the accelerator pedal.
(D Note
The tachometer needle should on ly br iefly
be in the red zone: you could damage your
engine! The beginn ing of the red zone var
ies depending on the engine .
@ For the sake of the environment
Upshifting early saves fuel and reduces en
gine noise.
Fuel gauge
The fuel gauge only works when the ignition is
on .
If the fuel level d rops below 2 . 6 ga llons (10 liters), the bottom LED turns red and the
indicator light
Em turns on
¢ page 22. The
bottom LED blinks red when the fuel level is
very low.
T he possible range based on the current fuel
level is shown in tab@<=>
fig. 4.
(D Note
Never run the tank completely dry. An ir
r egular supply of f uel can cause engine
misfiring and fuel could enter the ex haust
system . The catalytic converter could then
overheat and be damaged.
Warning/indicator lights
Description
The ind icator lights in the instrument cluster
blink or turn on. They indicate funct ions or
malfunc tions <=>,& .
Messages may appear with some indicato r
lights. A warning signal will sound at the
same t ime. The indicator lights and messages
in the center of the displays may be rep laced
by other d isplays . To show them again, select
the tab for ind icator lights and messages us
i ng the multifunction steering wheel
Q page 23. If t here are several malfunc
t ions, you can display them one at a time us
ing the thumbwheel.
Some indicato rs lights in the d isplay can tu rn
o n in severa l co lors.
A WARNING
- F ailure to heed w arning l igh ts and other
important vehicle in forma tion may res ult
in ser io us personal inj ury or vehicle dam
age .
- Whenever stalled or stopped for repair, move the vehicle a safe d istance off the
road, stop the engine, and turn on the
emergency flasher<=>
page 44.
-The engine compartment of any motor
veh icle is a potentially hazardous area.
Before you chec k anything in the engine
Page 18 of 310
16 Instrum ent s and w arn ing /indic ato r light s
&_ WARNING
-Always observe the warnings in
i=> page 224, Engine compartment, be
fore opening the hood and checking the brake flu id.
- Driv ing with low brake fluid is a safety
hazard. Stop the car and get professional
assistance.
- USA models: If the 1111 warn ing light,
the
G1 warning light and the m:11 warn
ing light come on together, the rea r
wheels co uld lock up first unde r hard
braking . Rear wheel lock-up can cause
loss of vehicle control and an accident.
Have your vehicle repaired immediately
by your authorized Aud i dea ler or a quali
fied workshop. Drive slowly and avoid
sudden, hard brake applications.
- Canada models: If the brake warn ing
light ., the
DJ warn ing light and the
ABS warning light
ii] come on together,
the rear wheels could lock up first unde r
hard bra king. Rear wheel lock-up can
cause loss of vehicle co ntrol and an acci
dent. Have yo ur vehicle repaired immed i
a tely by your authori zed A udi dealer or a
qualified workshop . Dr ive slowly and
avoid sudden, hard brake applicat ions.
- If the brake warning/indicator ligh t does
not go out afte r a few secon ds an d the
parking brake is released, or lights up
whi le you are driving, the fluid level in
the brake fluid reservoir is too low. If you believe that it is safe to do so, proceed
immediately at low speed to the nearest
authorized Audi dealer o r qualified repair
facility and have the brake system in
s pected.
- Always kee p in m ind that afte r several
brake applicat ions, yo u will need g reater
pressure on the b rake peda l to s top your
vehicle. Do no t re ly on stra ined brakes to
respond with maxim um stopping power
in critical situations . You must allow for
increased brak ing distances. The extra
distance used up by fad ing brakes could
lead to an acc ident.
PARK/( ®) Electromechanical parking
brake
The warning/indicator light monitors the
electromechanical parking brake .
If the indicato r light - (USA models)/ .
(Canada mode ls) turns on, the pa rking brake
was set. If the pa rking brake is set when the
igni tion is off, the indicator light turns off a f
te r abo ut 20 seconds .
The wa rning/i nd icator lig ht wi ll go out when
the pa rking bra ke is re leased.
- (USA models ) /. (Canada mod els)
Caution: Vehicle park ed too steep
If the indicator light b links and the message
appea rs, there is not enough braki ng power to
keep the vehicle from roll ing . The brakes have
overheated . The veh icle cou ld roll away eve n
on a sma ll incline .
Press brake pedal to release parking brake
To release the parking b rake, press the brake
peda l and press the button~ or start driving
with starting assist at the same time
i=> page 79.
Plea se relea se parking brake
T o re lease the p arki ng brake manually, p re ss
t h e brake peda l and press the button ~ at the
same time. The parki ng b rake only releases
automatica lly if the driver's safety belt is fas
tened .
Iii Parking brake!
If the Iii indicator lig ht tur ns on and th is
message appears, the re is a parki ng b rake
m alfunction . D rive to your au thori zed A udi
dealer or qualified workshop immediately to
have t he malfunction corrected .
-L Engine cooling system malfunction
A malfunction in the engine cooling system
must be repaired as soon as possible.
• Switch off engin e and check coolant level ..,.
Page 19 of 310
Instruments and warning/indicator lights 17
If the indicator light turns on and the mes
sage appears , the coo lant temperature is too
high or the coo lant level is too low.
.,. Pull
off the road.
.,. Stop the vehicle .
.,. Turn
off the engine.
.,. Check coo lant level
¢ page 23 7.
.,. Add coolant if necessary¢
page 238 .
.,. Continue driving only after the engine cool
ant warning/indicator light goes out .
.,. Contact your authorized Aud i dealer for as-
s istance if necessary .
If the engine coolant level is correct, then the radiator fan may be the cause of the malfunc
tion .
• Coolant temperature too high! Please let
engine run with vehicle stationary
If the indicator light turns on and the mes
sage appears in trailer mode*, let the engine
run at idle for a few m inutes to cool down.
A WARNING
- If your veh icle should break down for
mechanical or other reasons, park at a
safe distance from moving traffic, turn
off the engine and turn on the hazard
warning lights ¢
page 44, Emergency
flasher.
-
- Never open the hood if you see or hear
steam or coolant escaping from the en
gine compartment - you risk being scald
ed. Wait until you can no longe r see or
hear steam or coo lant escaping .
- The engine compartment of any vehicle
is a dangerous area. Before you perform
any work in the engine compartment,
turn of the engine and allow it to cool.
Follow the warning stickers¢
page 224,
Engine compartment.
Do not continue driving if the . symbol
illuminates. There is a ma lfunct ion in the
eng ine cooling system -you cou ld damage
your eng ine .
0 Battery
This warning/indicator light detects a mal
function in the generator or in the vehicle's
electrical system .
The .warning/ indicator light illuminates
when you switch on the ignition and must go
out after the engine has started .
• Alternator fault: Battery is not being
charged
If the indicator light turns on and the mes
sage appears, there is a malfunction in the generator or veh icle electrical system.
Drive to your authorized A udi dealer or quali
fied workshop immediate ly . Because the vehi
cle battery is discharg ing, turn
off all unnec
essary electrical equipment such as the rad io.
Seek professional assistance if the battery
charge level is too low.
t•i low battery: battery will be charged
while driving
If the indicator light turns on and the mes
sage appears, there may be limited starting
ability.
If this message turns
off after a little while,
the battery charged enough while driving.
If the message does not turn off, have your
a uthor ized Aud i dealer or qualified workshop
correct the malfunction.
~-Safety belts
This warning/indicator light reminds you to
put on your safety belt.
The . warn ing/ indicato r light illum inates
when the ignition is switched on to remind
the driver and any front passenger to put on
the safety be lt. Additiona lly, an acoustic warn
ing (gong) wi ll also sound.
For more Info rmation ¢
page 140, ~ Safety
belt warning light.
Page 239 of 310
Engine cooling system
Coolant
The engine coolant performs two functions: it
keeps the engine from overheating and it pro
te cts the engine from freezing in the winter .
The cooling system is sealed and generally re
qu ires little attention .
The cooling system has been filled at the fac
tory with a permanent coolant which does not need to be changed. The coolant consists of a
mixture of water and the manufacturer's gly
col-based coolant additive G13 ant ifreeze
w ith anticorrosion add itives (50% fo r USA
models; 60% for Canad ian models). This mix
ture bot h assu res the ne cessary frost protec
tion and protects metal components in the
engine's coo ling system from corrosion and
scaling. It also raises the boili ng po int of t he
coolant.
D o not red uce the concentration o f the coo l
ant in the summer by adding plain water .
The
proportion of coolant addit ive must be at
least 50% but not mo re than 60 %
to main
tain antifree ze protection and cooling efficien
cy. If the coolant frost protection is too low,
the coolant cou ld freeze and damage the veh i
cle heating and eng ine cooling system .
For year-round driving, antifree ze is added at
the factory for temperatures down to:
- -3 1°F (-35°C)USA
- -40 ° F ( - 4 0 °C) Canada.
A WARNING
Before yo u check anything in the engine
compartment , always read and heed a ll
WARNINGS
¢ & in Working in the engine
compartment on page 230.
(D Note
- Befo re winter sets i n, have the coolant
chec ked to see i f th e coo lant ad dit ive i n
you r vehicle is suffic ient to meet the cli
mate cond itions . T hi s is especially impor
ta nt if yo u live in a regi on whe re the w in-
-
Checkin g and fillin g 237
ter is ex treme ly co ld. If necessary, i n
crease t he p ro po rtion of coo lant additive
to 60%.
- W hen a dding coolant additive to yo ur
cooling system , remembe r:
- We recommend us ing on ly coo la nt ad
di tive G 12++ or G 13 (check the labe l)
fo r you r ve hicl e. This coolant additive is
a v ailabl e at author ized Aud i de alers.
Ot he r ty pes of antifree ze can signifi
cantly reduce corros ion p rotec tion. The
r es ulting co rrosion can cause a loss of
coolant and serio us engine damage .
- Do not add any ty pe of rad iator leak seal
ant to you r vehicle's engine coo lant .
Add ing radiator repair flu id may adverse
ly affect t he fu nction and performance of
your cooling system and cou ld result in
damage not covered by yo ur New Ve hicle
L imited Warranty .
Checking the engine coolant level
The engine coolant level can be checked with
a quick glance.
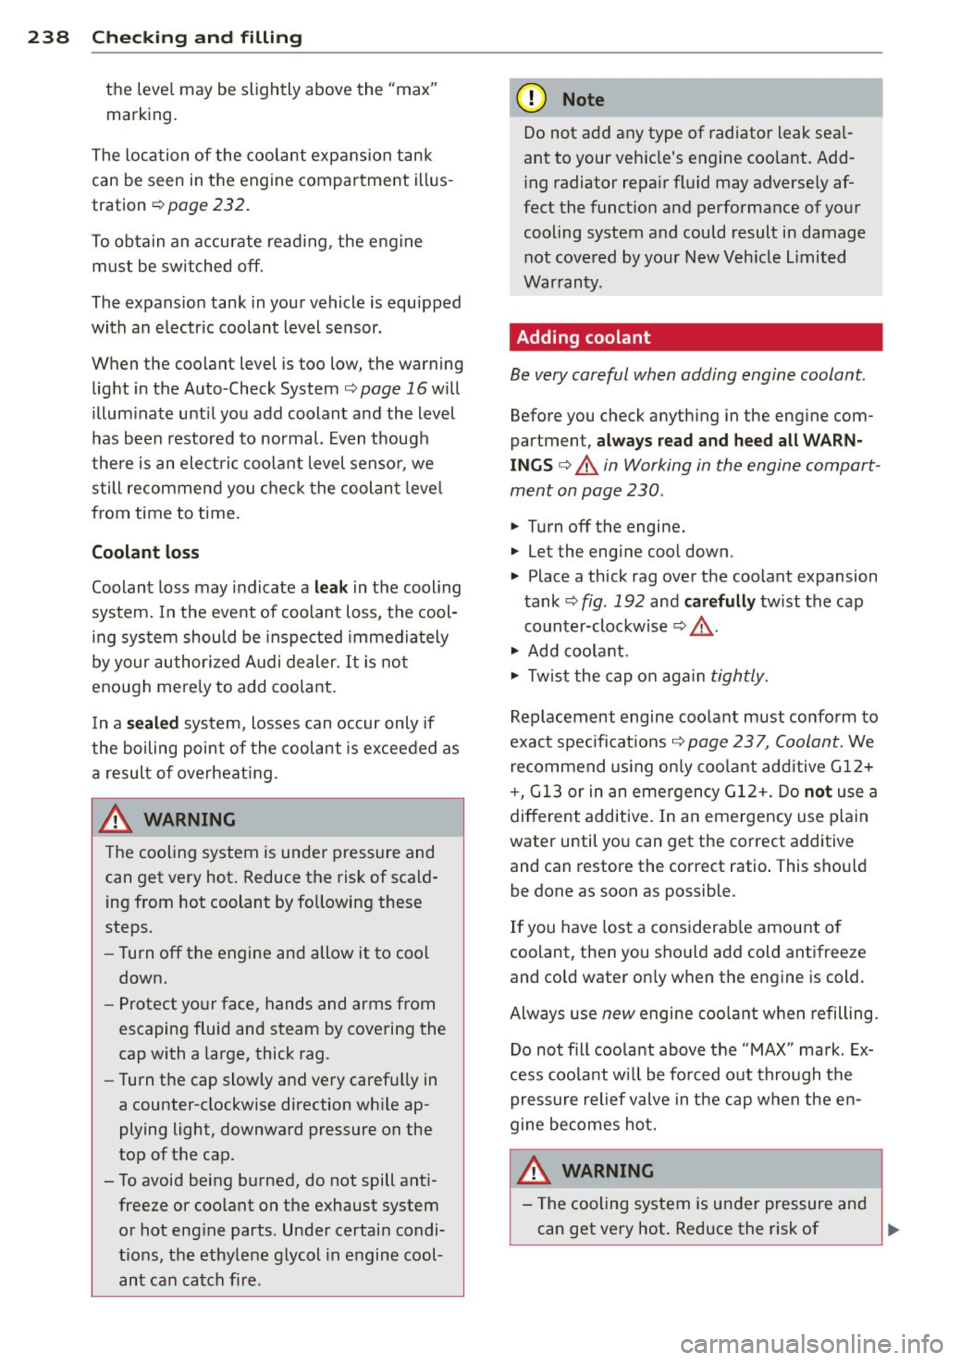
Fig. 19 2 Engine co mpart ment: cover on t he coo la nt
expansio n ta nk
Before you check a nyth ing in the eng ine com
partment,
always read and heed all WARN
INGS <=>&.
in Working in the engine compart
ment on page 230 .
.,. Park yo ur vehicle on a level surface .
.,. Switch off the ignition .
.,. Read the e ngine coolant level from the
coo la nt expansion tan k<=>
fig . 192,
¢ fig. 189 . With a cold engine, the coolant
level s hou ld be be tween the "m in" and
" max" mar kings. Whe n the engi ne is w arm,
Ill>-
Page 240 of 310
238 Checking and filling
the level may be slightly above the "max"
marking.
The location of the coolant expansion tank
can be seen in the engine compartment illus
tration
¢ page 232.
To obtain an accurate reading, the engine
must be switched off.
The expansion tank in your vehicle is equipped
with an electric coolant level sensor.
When the coolant level is too low, the warning light in the Auto-Check System¢
page 16 will
illuminate until you add coolant and the level
has been restored to normal. Even though
there is an electric coolant level sensor , we
still recommend you check the coolant level
from time to time.
Coolant loss
Coolant loss may indicate a leak in the cooling
system. In the event of coolant loss, the cool
ing system should be inspected immediately
by your authorized Audi dealer.
It is not
enough merely to add coolant.
In a
sealed system, losses can occur only if
the boiling point of the coolant is exceeded as
a result of overheating.
_& WARNING
The cooling system is under pressure and
can get very hot. Reduce the risk of scald
ing from hot coolant by following these
steps. -
- Turn off the engine and allow it to cool
down.
- Protect your face, hands and arms from
escaping fluid and steam by covering the
cap with a large, thick rag.
- Turn the cap slowly and very carefully in
a counter-clockwise direction while ap
plying light, downward pressure on the
top of the cap .
- To avoid being burned, do not spill anti freeze or coolant on the exhaust system
or hot engine parts. Under certain condi
tions, the ethylene glycol in engine cool
ant can catch fire .
(D Note
Do not add any type of radiator leak seal
ant to your vehicle's engine coolant. Add
ing radiator repair fluid may adversely af
fect the function and performance of your
cooling system and could result in damage not covered by your New Vehicle Limited
Warranty .
Adding coolant
Be very careful when adding engine coolant.
Before you check anything in the engine com
partment,
always read and heed all WARN
INGS ¢&. in Working in the engine compart
ment on page 230.
.. Turn off the engine .
.. Let the engine cool down.
.. Place a thick rag over the coolant expansion
tank ¢
fig. 192 and carefully twist the cap
counter-clockwise ¢,&. .
.,. Add coolant.
.. Twist the cap on again
tightly.
Replacement engine coolant must conform to
exact specifications ¢
page 23 7, Coolant. We
recommend using only coolant additive G12+
+, G13 or in an emergency G12+. Do
not use a
different additive. In an emergency use plain
water until you can get the correct additive
and can restore the correct ratio. This should
be done as soon as possible .
If you have lost a considerable amount of
coolant , then you should add cold antifreeze
and cold water only when the engine is cold.
Always use
new engine coolant when refilling.
Do not fill coolant above the "MAX" mark. Ex
cess coolant will be forced out through the
pressure relief valve in the cap when the en
gine becomes hot.
_& WARNING
-= -- The cooling system is under pressure and
can get very hot. Reduce the risk of ..,_
Page 241 of 310
scalding from hot coo lant by following
these steps.
- Turn
off the engi ne and a llow it to cool
down.
- Protect your face, hands and arms from
escapi ng fl uid and steam by cover ing
the cap with a large, thick rag .
- Turn the cap slowly and very ca refully
i n a cou nte r-clockw ise dir ect ion while
a pply ing lig ht, downwa rd p ress ure on
the top of the cap.
- To avo id being burned, do no t sp ill an
tifree ze o r coolan t on t he exh aust sys
tem or ho t engine parts . Un der certain
conditions, the ethylene glyco l in en
gine coolant can catch fire .
- Antifree ze is poisono us. Always store an
tifreeze in its or iginal co ntainer and we ll
o ut o f the reac h of children.
- If you drain the coolant , it must be
caught and safely stored in a p roper con
tainer clear ly marked "poison".
(D Note
- Coolant po llutes the env ironment and
could ca use a n engine fire . Excess coo l
ant wi ll be forced out through the pres
sure re lief va lve in the cap when the en
gine becomes hot.
- If, in an emergency, only water can be
added , the correct ratio between water
and antifreeze¢
page 237 must be re
stored as soon as possib le .
@ For the sake of the environment
Drained coolant should not be re used . Al
ways dispose of used c oolant while observ
ing all envir onmental regulations .
Radiator fan
The radiator fan switches on automa tically by
itself
An auxiliary e lectric radiator fa n switches on
and
off depending on coolant temperature
and other ve hicle operating conditions.
Checkin g and fillin g 239
After you switch the engine off, the auxi liary
fan can continue running for up to 10 minutes
- even w ith the ign ition off. It can even switch
o n again later by itself¢.& , if
- the temperature of the engine coo lant rises
due to the heat build- up from the engine in
the engi ne compartment, or
- the engine compa rtment heats up because
the vehicle is parked in intense sunlight.
&_ WARNING
--To reduce the risk of persona l in ju ry nev-
er touch the radiator fan .
- The a uxiliary electric fan is tempe rat ure
contro lled and can switch on suddenly
even when the engine is not ru nning.
- The a uxiliary radiator fan sw itches on a u
tomatically when the engine coo lant
reaches a certai n temperature and will
cont inue to ru n until the coo lant temper
atur e drops.
Brake fluid
Checking brake fluid level
N
N
N
.,; 0:, a,
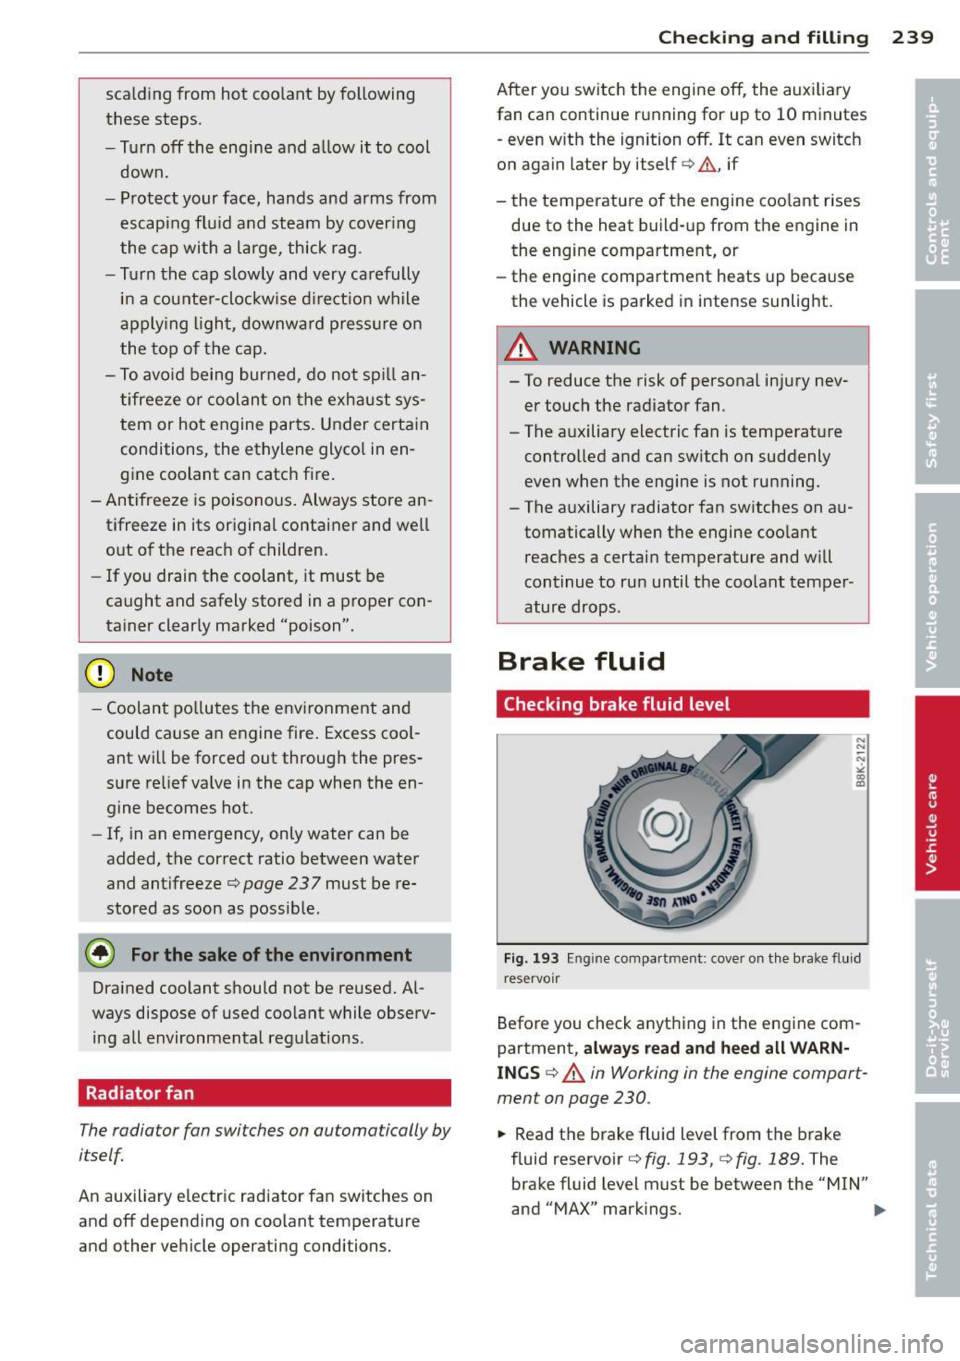
Fig. 193 Engin e co mpa rt m ent: cove r on t he bra ke fluid
reservo ir
Before you check anything in the eng ine com
partment,
alw ays r ead and heed all WARN
INGS c:> A in Working in the engine compart
ment on page 230 .
.. Read t he brake fluid level from the brake
fluid reservoir
c:> fig. 193, c:> fig. 189. The
brake fluid level must be between the "MIN"
and "MAX" markings. .,..
Page 293 of 310
-Always make sure the transm ission se
lector lever (automatic transmiss io n) is
in P (Park position) and the park bra ke is
applied.
@) For the sake of the environment
- Changing t he eng ine settings w ill ad
versely affect em ission levels. This is det
rimental to the environment and increas
es fuel consumption .
- Always observe env ironmental regula
tions when d isposing of old engine oil,
used brake fluid, dirty engine coolant,
spent batter ies or worn out t ires.
- Undeployed airbag modules and preten
s ioners might be classified as Perchlo
r ate Mate rial -spec ia l hand ling may ap
ply, see www.dts c.ca .gov/haza rdous
was te/perch lorate. When the veh icle or
parts of the res traint system in cl ud ing
a irbag modules safety be lts wit h preten
sioners are scrapped, all applicable laws
and regulations must be observed. Your
a uthorized Audi dea ler is familiar w ith
these requirements and we recommend
that you have your dea ler perform this
se rv ice for you .
Additional accessories,
modifications and
parts replacement
Additional accessories and parts
replacement
Always consult an authorized Audi dealer be
fore purchasing acce ssories.
Your veh icle inco rporates the latest safety de
sig n featu res e nsu ring a high standard of ac
tive and passive safe ty .
This safety could be comp romised by non-ap
p roved changes to the ve hicle. For this reason ,
if pa rts have to be replaced, please observe
t he following points when ins tall ing addition
a l accessories:
Con sumer In formation 29 1
Approved Audi accesso ries and genuine Aud i
parts are available from authorized A udi deal
ers.
T hese de alers a lso have the necessary facili
ties, tools and tra ined spec ialists to install the
parts and accessories proper ly .
A WARNING
Using the wrong spare pa rts or using non
approved accessories can cause damage to
the vehicle and ser ious persona l injury.
- Use on ly accessories express ly approved
by Audi and ge nuine Audi spare parts
- These parts and accessories have been
specially designed to be used on yo ur ve
hicle.
- Never install accessor ies such as tele
phone crad les or beverage ho lders o n air
bag covers or withi n the airbag deploy
ment zones . Do ing so will increase t he
ris k of injury if a irbags are triggered in an
accide nt!
- Before you check anything in the engine
compa rtment, always r ead and heed a ll
W ARNINGS ~
page 224.
(D Note
-If items other than genu ine A udi spare
par ts, add-on equipmen t and accessory
items are used o r if repair wo rk is not
performed a ccord ing to spe cified met h
ods, this ca n resu lt in s evere damage to
yo ur vehicle's engine and body (s uch as
co rrosion) and adversely affect yo ur vehi
cle's warranty .
- If emergency repairs mus t be performed
elsewhere, have the veh icle examined by
an authorized Aud i dealer as soon as
possible.
- The manufacturer cannot be held liable
for damage wh ich occ urs due to failure
to comply with these stipu lations.
•
•
Page 298 of 310

296 Index
Checking Engine coolant level ................ 237
Tire pressure . ............. ... .... . 252
Ch ild restra ints
Danger of using child restra ints in the
front seat . ................. ..... . 151
Where can I get additional information
about child restraints and their use? .. 193
Child restraint system anchors ... .... . 189
Child safety .. .. . .......... .. .. .... . 175
Convertible locking retractor .. .. .. .. . 186
Important safety instructions for using
chi ld safety seats ......... .. .. .... . 179
I mportant things to know when dr iving
with chi ldren . ............... .... . 175
Tether anchors ............ ... .... . 192
Tether straps ..................... 192
Child safety lock Rear doors .............. .. .. .... .. 40
Child safety seats .......... .... .... . 181
Booster seats . .......... ... .. .. ... 184
Convertible ch ild seats .... .. .. .. .. . 182
Convertible locking retractor .. .. .. ... 186
H ow do I proper ly install a child safety
seat in my vehicle? ...... .. .. .. .. .. . 179
I nfant seats .............. ... .... . 181
I nstalling . ............... ... .... . 186
Installing a child restraint using the
LATCH system ................ .... . 191
LATCH system ............ .... ..... 191
Lower anchorages ............ ..... 190
Mounting and releasing the anchorage
hook .. .. .. ... .... ...... ... ... .. . 191
Safety instructions . . . . . . . . . . . . . . . . . 179
Unused safety belts on the rear seat .. 181
Cigarette lighter . . . . . . . . . . . . . . . . . . . . . 58
C leaning
Head-up Display .............. .... . 220
Matte finish paint ............ .... . 215
C leaning and protection ..... .. .. .. .. . 213
A lcantara (synthet ic suede) .......... 223
Engine compartment ....... .... ... . 224
Exhaust tail pipes .......... ... .... . 219
Fabrics and fabric coverings .. .. ..... 220
Instrument panel ............. ..... 221
Interior . . . . . . . . . . . . . . . . . . . . . . . . . . 219
Leather .. .. ... .... ...... ... ... .. . 222
MMI display/controls .. ... ... .. .. ... 219 Plastic
and vinyl . . . . . . . . . . . . . . . . . . . 217
Plastic parts . . . . . . . . . . . . . . . . . . . . . . 221
Safety be lts ... .. ................ . 223
trim strips ................... .... 217
Trim strips ................... .... 217
Cleaning the Head-up Display ......... 220
Climate control Air vents .. .. .. .. ............. .. .. . 70
Climate controls . .. ............. .. .. . 68
Climate control (four-zone)
Operation ..... .. .. .............. .. 71
Climate control (three-zone) Operation . . . . . . . . . . . . . . . . . . . . . . . . . 69
Clock ...... .... .................... 27
Closing Rear lid . . . . . . . . . . . . . . . . . . . . . . . . . . . 38
Sliding/ti lting sunroof ............ .. . 42
Co ld tire inflation pressure .......... .. 250
Coming home . .. .. ............. .... . 45
Compact spare tire .............. .... 268
Compartments . . . . . . . . . . . . . . . . . . . . . . 59
Compliance . .. .. .. ............. .... 292
Consumer Information . . . . . . . . . . 138, 289
Consumption (fuel) ... ........... ... . 25
Contacting NHTSA ................. . 138
Convenience key . . . . . . . . . . . . . . . . . . . . . 36
Starting the engine ............ .... . 75
Stopping the engine (START ENG INE
STOP button) . . . . . . . . . . . . . . . . . . . . . . 77
Switching the ignition on ....... .. .. . 75
Unlocking and locking vehicle .. .. .. .. . 36
Convertib le child safety seats ... .... .. 182
Convertible locking retractor Activating ..... .. .. ........ ... .. .. 188
Deactivating . .. .. ... ....... ... .. .. 188
Using to secure a child safety seat 1.86, 188
Coolant
refer to Eng ine coolant .... ..... .. .. 237
Cooling mode (automatic climate control) 71
Cooling mode (climate control) . . . . . . . . . 69
Cruise control Changing speed ................... . 84
Presetting your speed . ...... ... .. .. . 84
Switching off . . . . . . . . . . . . . . . . . . . . . . 84
Switching on . . . . . . . . . . . . . . . . . . . . . . . 83
Warning/indicator lights ............ . 23
Page 300 of 310
298 Index
------------------------------------
Data .... ....... ......... ... .... . 28 7
Start-Stop-System . . . . . . . . . . . . . . . . . . 80
start ing .. .. ................ ..... .. 75
Starting with jumper cables .. .. ..... 279
Stopping . . . . . . . . . . . . . . . . . . . . . . . . . . 77
Engine compartment ........ .... ... . 232
C losing the hood . . . . . . . . . . . . . . . . . . 231
Opening the hood ................. 230
Safety instructions ........ .. .. .... . 230
Working in the engine compartment .. 230
Engine coolant .................... . 237
Adding coolant ............ ... .... . 238
Checking the engine coolant level . . . . . 23 7
Expansion tank ........... .. .. .. .. . 237
Malfunction symbol ....... .. .. .... .. 16
Radiator fan .............. ... .. .. . 239
Temperature gauge ........ ..... .. .. 11
Engine oil ... ................ ..... . 232
Adding .. .... ........... .... .... . 235
Additives . .. ............. .. .. .. ... 235
Changing .... ... .... .... .. .. .. .. . 236
Check ing the engine oil level .. .. .. .. . 235
I ndications and cond it ions requ iring ex-
tra checking .. ........... .. .. .... . 235
I ndicator light ........... .. .. .. .. .. 18
O il consumption .......... .... .... . 234
Oil grades . ................. ..... . 232
Oil level symbol .................... 21
Pressure malfunction ....... ... .. .. .. 18
Recommended oil check intervals ..... 235
Sensor defective . . . . . . . . . . . . . . . . . . . . 21
Specification and viscosity .. .. .. .. .. . 232
Engine sound .............. ... .... . 102
E ng ine speed limitation ....... .. .. .. . . 21
Engine start-stop mode
refer to Star t-Stop-System ... .. .. .. .. 82
Engine start system (indicator lights) . ... 18
Environment Break-in period ......... .. .. .. .. .. . 204
Cata lytic converter ........ .. .. .. .. . 205
Disposing of your vehicle battery . ... . 244
Driving at high speeds .............. 207
Driving to minimize pollution and noise 206
Fuel . .. .. ............... .. .. .... . 227
Fuel economy ............ .... .... . 206
Leaks under your vehicle ... .. .. .. .. . 230
Lett ing the vehicle stand and warm up . 207
Proper disposal of drained brake fluid . 240 Proper disposal of d
rained engine cool-
ant ..... ..... .. .. .............. . 238
Proper disposal of drained eng ine
oil . . . . . . . . . . . . . . . . . . . . . . . . . 235, 236
Recycling used engine oil ........ .... 23S
Unleaded fuel .. .. ................ . 22S
What should I do with an old battery? . 244
ESC (Electronic Stabilization Control) Warning/indicator lights ........ .. .. . 19
Event Data Recorder (EDR) ........ .. .. 196
Exhaust tail pipes .. .......... ...... . 219
Expansion tank .... ................ . 237
Exterior lighting . ... ............ .. .. . 43
Exterior mirrors Adjusting ..... .. .. ........ ...... .. 49
Dimming . . . . . . . . . . . . . . . . . . . . . . . . . . 50
Heating ...... ... .. .............. .. 49
Exterior temperature display ...... .. .. . 23
F
Fastening
Booster seats .. .. ............. .... 184
Convertible child safety seats . . . . . . . . 182
Infant seats ... .. ............. .... 181
Floor mats . ..... .. ................ . 13S
Foot pedals ..... .. ..... ........... . 13S
For the sake of the environment Gasoline fumes and the environment .. 227
Reducing engine noise by early upshift-
ing ...... .... ... .. ................ 11
Refueling ... .. .. ....... ...... .. .. 227
Sav ing fuel by early upsh ifting . .. .. .. . 11
Four- zone automatic climate control . .. . 71
Front airbags
Description .... .. ................ . 1S3
How they work ... ................ . 159
Frontal coll is ions and the laws of phys ics 141
Front seats . . . . . . . . . . . . . . . . . . . . . . . . . 52
Adjusting ... .. .. ....... ...... .. .. 132
Child restraints in the front seat ...... 151
Fuel Additives .. .... .. ............. .... 225
Blended gasoline .............. .... 225
Current consumption .............. .. 25
Economy messages (efficiency program) 26
Fuel filler flap emergency release ... .. 228