turn signal AUDI A7 2013 Owners Manual
[x] Cancel search | Manufacturer: AUDI, Model Year: 2013, Model line: A7, Model: AUDI A7 2013Pages: 310, PDF Size: 77.45 MB
Page 13 of 310
Instrument s and warning /indicator lights 11
Instruments and warning/indicator lights
Instruments
Instrument cluster and controls
The instrument cluster is your central source of information.
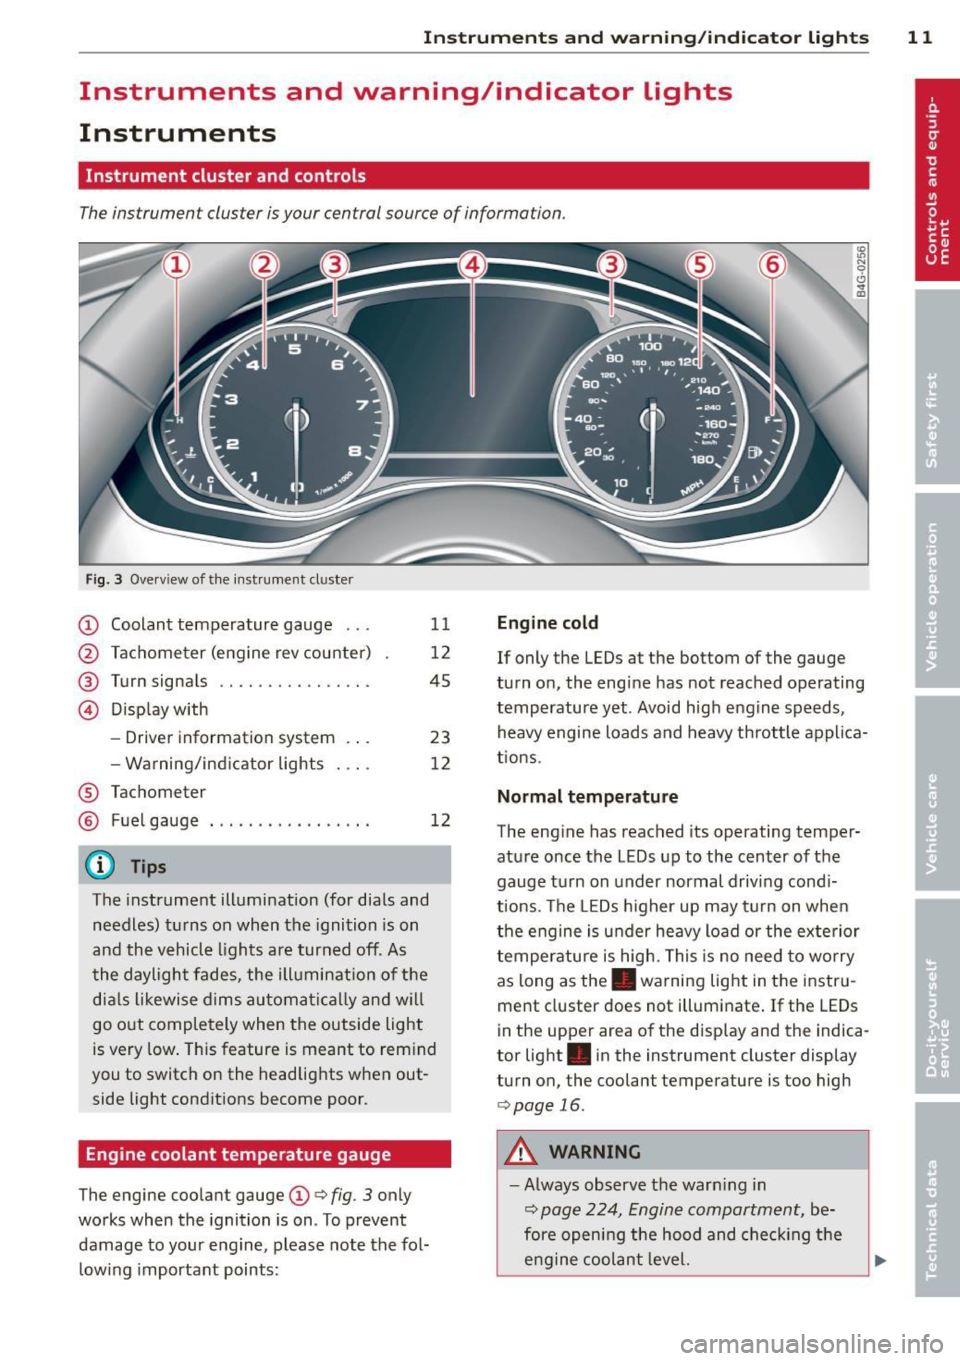
Fig. 3 Overv iew of the instrument cluster
CD Coolant temperature gauge .. .
@ Tachometer (eng ine rev counter)
@ Turn signals ............... .
11
12
45
@ Display with
®
®
-Driver information system .. .
- Wa rning/ind icator lights
Tachometer Fuel gauge
@ Tips
23
12
12
The instrument illumination (for dials and
needles) turns on when the ignition is on
and the vehicle lights are turned off. As
the daylight fades, the illumination of the
dials likewise dims automatically and wil l
go out completely when the outside light
is very low. This feature is meant to rem ind
you to switch on the headlights when out
side light conditions become poor.
Engine coolant temperature gauge
The engine coolant gauge CD¢ fig. 3 only
works when the ignition is on . To prevent
damage to your eng ine, please note the fol
l owing important points:
Engine cold
If only the LEDs at the bottom of the gauge
turn on, the eng ine has not reached operating
temperature yet . Avoid high engine speeds,
heavy engine loads and heavy throttle applica
tions.
Normal temperature
The engine has reached its operating temper
ature once the LEDs up to the center of the
gauge turn on under normal driving cond i
t ions. The LEDs higher up may turn on when
the engine is under heavy load or the exterior
temperature is high. This is no need to worry
as long as the. warning light in the instru
ment cluster does not illuminate. If the LEDs
in the upper area of the disp lay and the indica
tor light . in the instrument cluster display
turn on, the coolant temperature is too high
¢page 16.
A WARNING
-Always observe the warn ing in
¢ page 224, Engine compartment, be
fore opening the hood and checking the
engine coolant level.
Page 14 of 310
12 Instrum ent s and w arn ing /indic ato r light s
-Never open the engine hood if you see or
hear steam, or if you see engine coolant
dripping from the engine compartment.
You could burn yourself . Let the engine
cool off first until you can no longer see
o r hear steam or coo lant escaping.
@ Note
- Mounting additional lights or accessories
i n front of the a ir inlets reduces the cool
i ng effect of the rad iator . At h igh outside
temperatures or high eng ine load, the
engine could overheat.
- The front spo iler has been designed to
proper ly distribute the cooling air when
t h e ve hicle is moving.
If the spoiler is
dam aged, th is co uld red uce the cooling
effect and the engine co uld then over
heat . Ask your authorized Audi dea ler for
assistance .
Tachometer (engine rev counter)
The tachometer indicates the engine RPM
(revolutions per minutes).
If engine RP M drops be low 1,500, yo u should
downshift to the next lower gear. The red a rea
at the end of the sca le indicates maximum
perm iss ib le engine RPM after the break-in pe
riod. Before reaching this area, move these
lector lever to position D/S (Drive) or ease
your foot off the accelerator pedal.
(D Note
The tachometer needle should on ly br iefly
be in the red zone: you could damage your
engine! The beginn ing of the red zone var
ies depending on the engine .
@ For the sake of the environment
Upshifting early saves fuel and reduces en
gine noise.
Fuel gauge
The fuel gauge only works when the ignition is
on .
If the fuel level d rops below 2 . 6 ga llons (10 liters), the bottom LED turns red and the
indicator light
Em turns on
¢ page 22. The
bottom LED blinks red when the fuel level is
very low.
T he possible range based on the current fuel
level is shown in tab@<=>
fig. 4.
(D Note
Never run the tank completely dry. An ir
r egular supply of f uel can cause engine
misfiring and fuel could enter the ex haust
system . The catalytic converter could then
overheat and be damaged.
Warning/indicator lights
Description
The ind icator lights in the instrument cluster
blink or turn on. They indicate funct ions or
malfunc tions <=>,& .
Messages may appear with some indicato r
lights. A warning signal will sound at the
same t ime. The indicator lights and messages
in the center of the displays may be rep laced
by other d isplays . To show them again, select
the tab for ind icator lights and messages us
i ng the multifunction steering wheel
Q page 23. If t here are several malfunc
t ions, you can display them one at a time us
ing the thumbwheel.
Some indicato rs lights in the d isplay can tu rn
o n in severa l co lors.
A WARNING
- F ailure to heed w arning l igh ts and other
important vehicle in forma tion may res ult
in ser io us personal inj ury or vehicle dam
age .
- Whenever stalled or stopped for repair, move the vehicle a safe d istance off the
road, stop the engine, and turn on the
emergency flasher<=>
page 44.
-The engine compartment of any motor
veh icle is a potentially hazardous area.
Before you chec k anything in the engine
Page 17 of 310
Instruments and warning/indicator lights 15
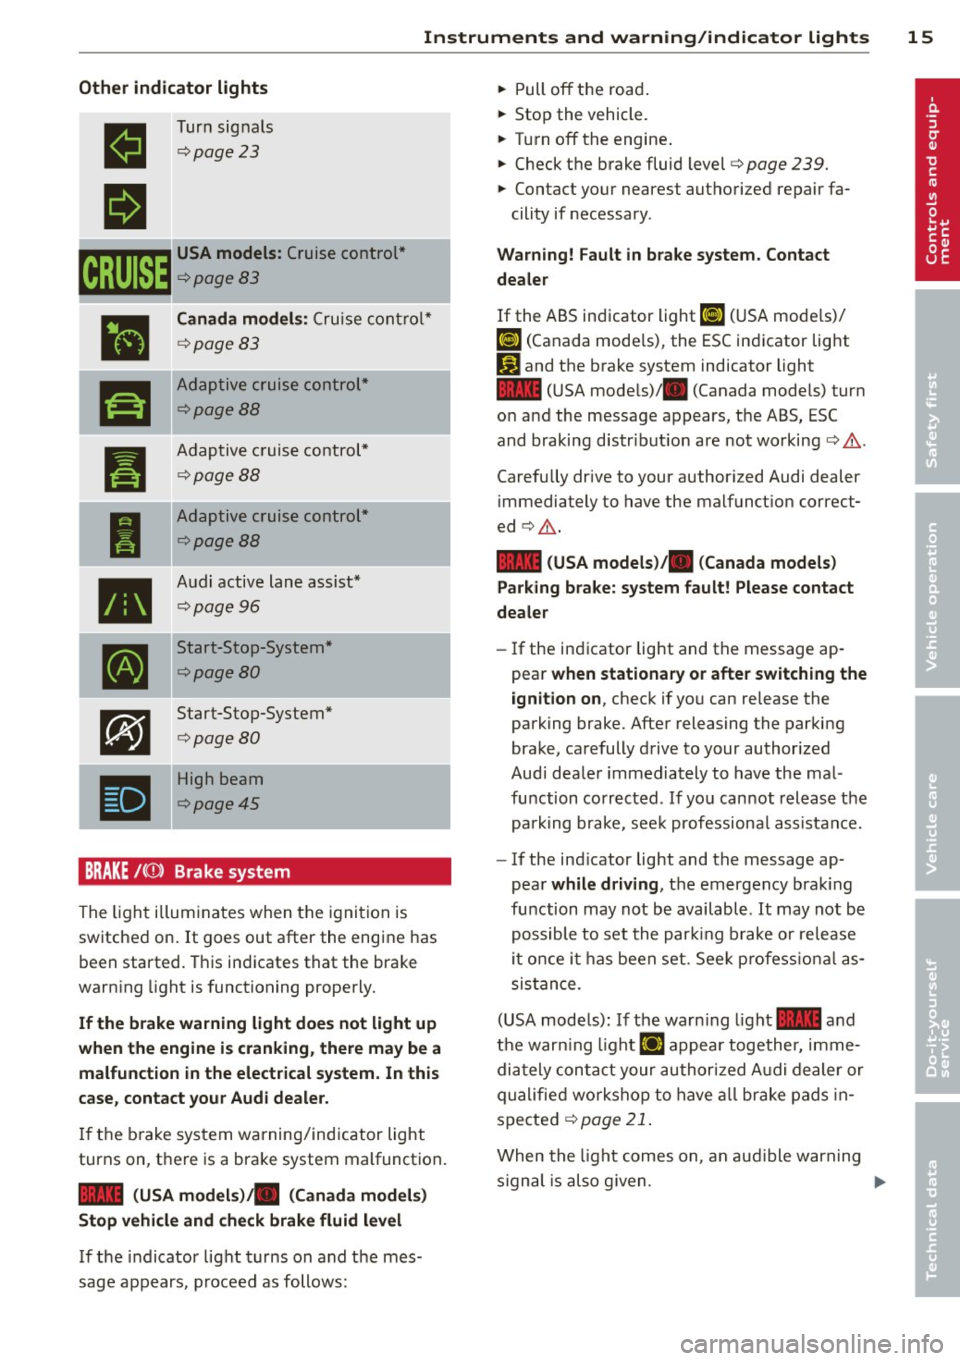
Other indicator lights
II
II
Turn signals
¢page23
r.r;TJm USA models: Cruise control*
~¢page83
•
ra
Canada models: Cruise control*
¢page83
Adaptive cruise control*
¢page BB
_,. .... _
Pl
I
--
•
[I]
Adaptive c ruise control*
¢page BB
Adaptive cruise control*
¢page BB
Audi active lane assist*
¢page 96
Start-Stop-System*
¢page BO
Start-Stop-System*
¢page BO
High beam
¢poge45
BRAKE /((f) ) Brake system
The light i lluminates when the ignition is
switched on.
It goes out after the engine has
been started. This indicates that the brake
warning light is functioning properly.
If the brake warning light does not light up
when the engine is cranking , there may be a
malfunction in the electrical system. In this
case, contact your Audi dealer.
If the brake system warning/indicator light
turns on, there is a brake system malfunction .
1111 (USA models)ta (Canada models)
Stop vehicle and check brake fluid level
If the indicator light turns on and the mes
sage appears, proceed as follows: ""
Pull off the road .
... Stop the vehicle.
... Turn off the engine .
"" Check the brake fluid level¢
page 239.
"" Contact your nearest authorized repair fa-
cility if necessary .
Warning! Fault in brake system. Contact
dealer
If the ABS indicator light Ii] (USA mode ls)/
¢0)
1111 (USA mode ls)/ . (Canada models) turn
on and the message appears, the ABS, ESC
and braking distr ibut ion are not working¢.&, .
Carefully drive to your authorized Audi dealer
immediately to have the malfunct ion correct
ed ¢.&, .
1111 (USA models )/. (Canada models)
Parking brake: system fault! Please contact
dealer
- If the indicator light and the message ap
pear when stationary or after switching the
ignition on ,
check if you can release the
parking brake. After releasing the parking
brake, carefully drive to your authorized
Audi dealer immediately to have the mal
function corrected . If you cannot release the
park ing brake , see k professiona l assistance.
- If the ind icator light and the message ap
pear
while driving , the emergency braking
function may not be available . It may not be
possible to set the parking brake or release
it once it has been set . Seek profess ional as
sis tan ce.
(USA models): If the warn ing light
1111 and
the warn ing light
IJ appear together, imme
diately contact your authorized Audi dealer or
qualified workshop to have all brake pads in
spected ¢
page 21.
When the light comes on , an aud ible warn ing
s ignal is also g iven . ...,
Page 25 of 310
Instrument s and warning /indicator lights 23
However, you can continue to turn the lights
on and off using the light switch . You can still
control all funct ions that are independent of
the rain sensor through the windshield wiper
lever.
Contact your authorized Audi dealer as soon
as possible to have the prob lem corrected .
I--i Sport differential
Applies to vehicles: with spo rt differe ntial
(II Sport differential: system fault
There is a malfunction with the sport differen
tial.
Drive to your authorized Aud i dealer immedi
ately to have the mal function corrected .
(II Sport differential : overheating
The transmission temperature has increased
sign ificantly due to the sporty dr iving manner .
Drive in a less sporty manner until the tem
perature returns to the norma l range and the
indicator light switches of.
& WARNING
Contact your authorized Aud i dealer or a
qualified workshop if the sport differential
is faulty or ma lfunctioning. The repair
must be performed by trained personnel
using the correct oil in order to ensure
safety .
¢i Q Turn signals
-
The indicator light blinks when you use either
turn signal .
Whenever you use the left. or the right a
turn signal, the indicator light blinks. When
you use the emergency flashers, both indica
tor lights f lash.
If one of the turn s ignal light bulbs burn out,
the turn signal will blink twice as fast as nor
mal. Carefully drive to your authorized Audi
de aler immediately to have the malfunction
correc ted. The indicator light does not indi
cate a malfunction if a turn signal on the trail- er or on the vehicle
fails in trailer towing
mode.
a) Tips
For more information on the turn signals,
refer to
¢ page 45.
CRUISE t •(-') Crui se cont rol
The warning/indicator light IB;(l)~i~ (USA mod
els)/lil (Canada models) illuminates when
the cruise control is activated¢ page
83.
Driver information
display
Overv iew
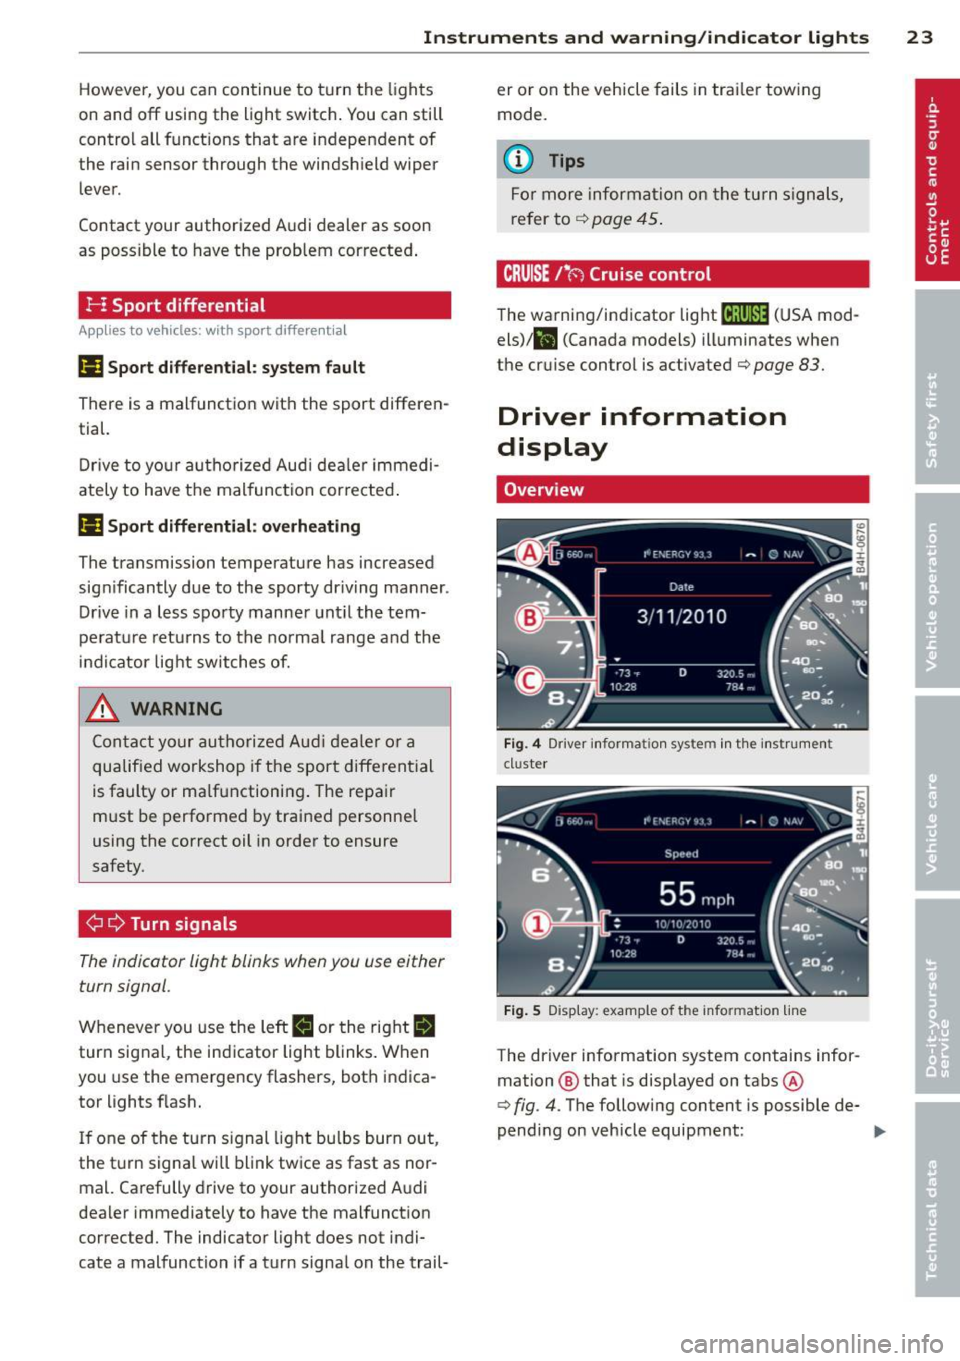
Fig. 4 Drive r informat io n sys te m in th e in strument
cl uster
Fig. 5 Disp lay: example of t he info rmatio n line
The driver information system contains infor
mation @that is displayed on tabs @
¢
fig. 4 . The following content is possible de-
pending on vehicle equipment: ..,.
Page 36 of 310
34 Openin g and clo sing
for another vehicle or a transponder is
located on the key ring.
- For Declaration of Compliance to United States FCC and Industry Canada regula
tions
~ page 292.
Power locking system
General description
The power locking system locks or unlocks all
doors and the rear lid simultaneously.
You can lock and unlock the vehicle centrally.
You have the following choices:
- Remote master key~
page 35,
-Door handles with convenience key*
~ page 36,
-Lock cy linder at the dr iver's door
¢ page 37, or
- Power lock ing switch inside
¢ page 37.
Select ive unlocking
When you lock the vehicle, the power locking
system w ill lock the doors and the rear lid .
When unlocking, you can set in the MMI
whether only the driver 's door o r the entire
vehicle should be unlocked ¢
page 35.
Automatic locking
The automat ic locking feature locks all the ve
h icle doors and the rear l id when you drive
faster tha n 9 mph (15 km/h).
The car is unlocked again, when the opening
function in the power locking system sw itch
or at one of the door levers is actuated . The
Auto Lock function can be turned on and off in
the MMI
¢ page 35.
Anti-theft alarm warning sy stem
If the anti -theft alarm warning system de
tects a break- in into the vehicle, acoust ic and
visua l warning signals are triggered.
The anti-theft warning system is activated au
tomatically when you lock the vehicle . It is de
activated when unlocking using the remote key, with the mechanical key, and when you
sw itch the ignition on. T
he alarm also turns off when the a larm cycle
has expired .
Turn signals
When you unlock the veh icle, the turn s ignals
flash twice. When you lock the vehicle the
turn s ignals flash once. If they do not flash,
one of the doors, the rear lid or the hood is
not locked.
Unint entionally locking your self out
In the follow ing cases there safeguards to
prevent yo u lock ing yo ur remo te master key i n
the vehicle :
- The vehicle does not lock w ith the central
loc king switch ¢
page 3 7 if the drive r's
door is open.
- On veh icles with co nvenience key*, if the
most recently used master key is in the lug
gage compartment, the rear lid is a utomat i
cally un locked again after it is closed.
Do not lock your veh icle w ith the
remot e ma s
t e r ke y or co nv eni enc e ke y*
until all doors
and the rear lid are closed . In this way you
avoid lock ing you rsel f out accidentally .
Power side door clo ser *
The veh icle doors are equipped with a power
s ide door closer. When closing a door, you on
ly h ave to let it fall light ly into the latch. The
door will then automatically close by itself
¢ & .
A WARNING
-When you lock yo ur vehicle from o utside,
nobody -especially children -shou ld re
main inside the vehicle. Remember,
when you lock the vehicle from the out side the windows cannot be opened from
the inside.
- When you leave the veh icle, always take
the ignition key w ith you . Th is w ill pre
vent passenge rs (children, for example)
from accidenta lly being locked in the ve
h icle should they accidentally press the
power locking sw itch in the doors.
~
Page 46 of 310
44 Clear vision
& WARNING
-Automatic headlights are only intended
to assist the driver . They do not relieve
the driver of his responsibility to check
the headlights and to turn them on man
ually according to the current light and
visibility conditions. For example, fog
cannot be detected by the light sensors.
So always switch on the headlights
io
under these weather conditions and
when driving in the dark.
- Crashes can happen when you cannot see
the road ahead and when you cannot be
seen by other motorists. Always turn on
theheadlightssothatyoucanseeahead and so that others can see your car from
the back .
- Please observe legal regulations when
using the lighting systems described .
(D Note
The rear fog lights should only be turned
on in accordance with traffic regulation, as
the lights are bright for following traffic.
{D) Tips
- The light sensor* for automatic head
light range control* is located in the rear
view mirror mount . You should therefore
not apply any stickers to the windshield
in this area in order to prevent malfunc
tions or failures .
- In the event of a light sensor malfunc
tion, the driver is notified in the instru
ment cluster display ~
page 22 .
-You will hear a warning tone if you open
the driver door when the exterior lights
are switched on.
- In cool or damp weather, the inside of
the headlights, turn signals and tail lights can fog over due to the tempera
ture difference between the inside and
outside. They will clear shortly after
switching them on. This does not affect
the service life of the lighting.
Emergency flasher
The emergency flasher makes other motorists
aware that you or your vehicle are in an emer
gency situation .
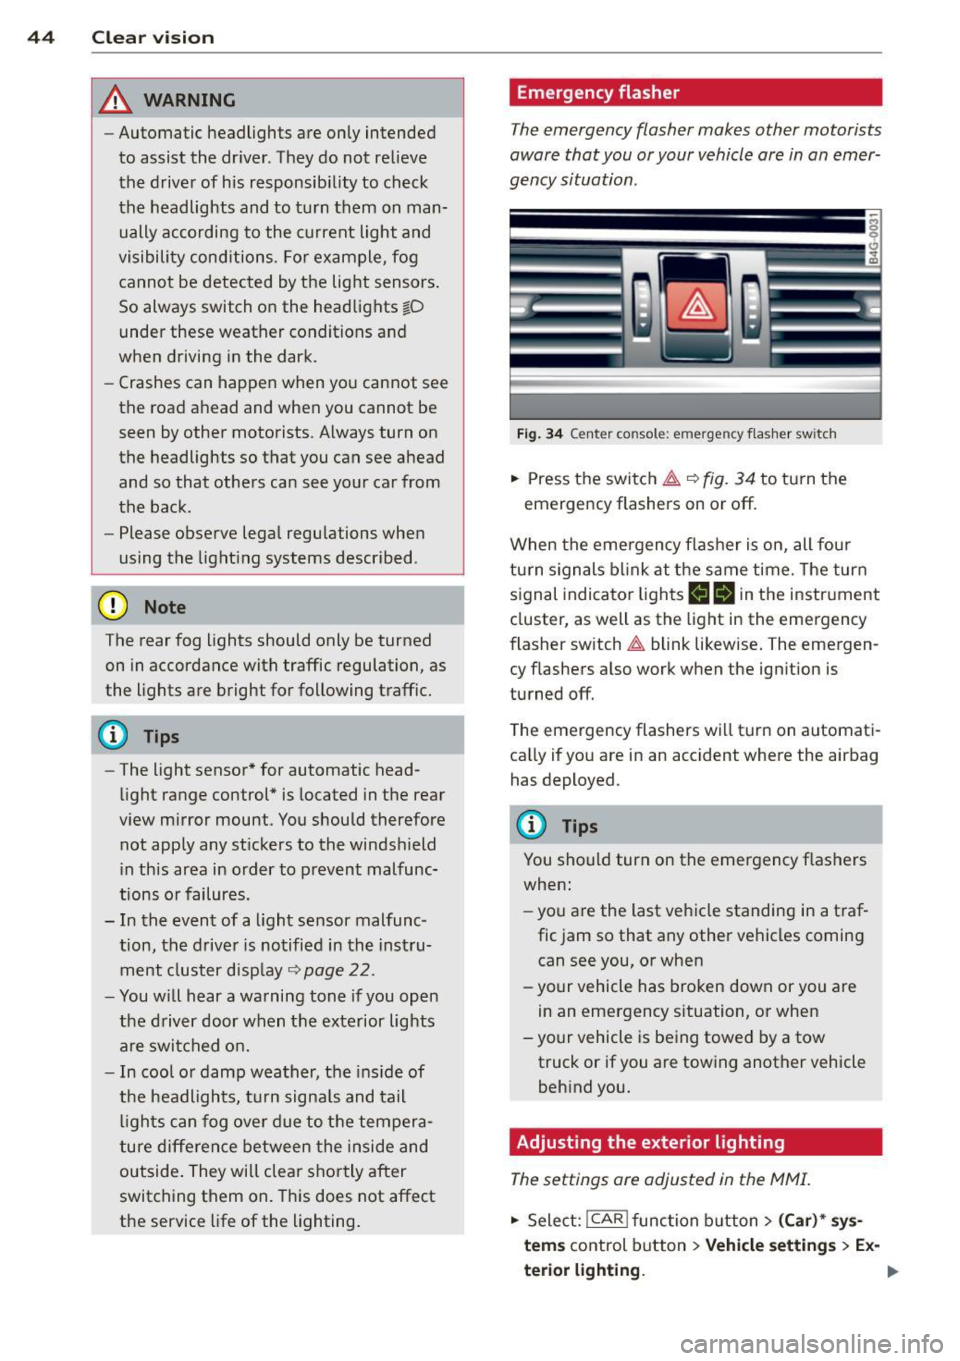
Fig. 34 Ce nte r co nso le: em erg en cy flash er sw itc h
.. Press the switch I:;,,. ~fig. 34 to turn the
emergency flashers on or off.
When the emergency flasher is on, all four
turn signals blink at the same time. The turn
signal indicator lights
B Nin the instrument
cluster, as well as the light in the emergency
flasher switch
I:;,,. blink likewise. The emergen
cy flashers also work when the ignition is
turned off.
The emergency flashers will turn on automati
cally if you are in an accident where the airbag
has deployed.
@ Tips
You should turn on the emergency flashers
when:
- you are the last vehicle standing in a traf
fic jam so that any other vehicles coming
can see you, or when
- your vehicle has broken down or you are
in an emergency situation, or when
-your vehicle is being towed by a tow
truck or if you are towing another vehicle
behind you.
Adjusting the exterior lighting
The settings ore adjusted in the MMI.
.. Select: !CAR ! function button> (Car)* sys
tems
control button > Vehicle settings > Ex-
terior lighting. ..,.
Page 47 of 310
Automatic headlights
You can adjust the following settings in the
Automatic headlights menu:
Headlights activation time -You can adjust if
the headlights switch on
Early, Med . or Late
according to the sensitivity of the ligh t sensor.
Audi adaptive light* -You can switch adaptive
light
On and Off.
Daytime running lights
USA models:
You can switch the dayt ime run
n ing lights
on and off .
Canada models :
The function cannot be
turned off . It is activated automatically each
time the ignition is switched on. This menu
item is shown "greyed out" .
Coming home, Leaving home
The coming home function illuminates the
area outside the vehicle when you switch the
ignition off and open the driver's door. To turn
the function on, select
Lights when leaving
car > On .
The leaving home function illuminates the
area outside the vehicle when you un lock the
vehicle. To turn the funct ion on, select
Lights
when unlocking car > On .
The coming home and leaving home functions
only operate when it is dark and the light
switch is in the
AUTO position. Clear
vision 45
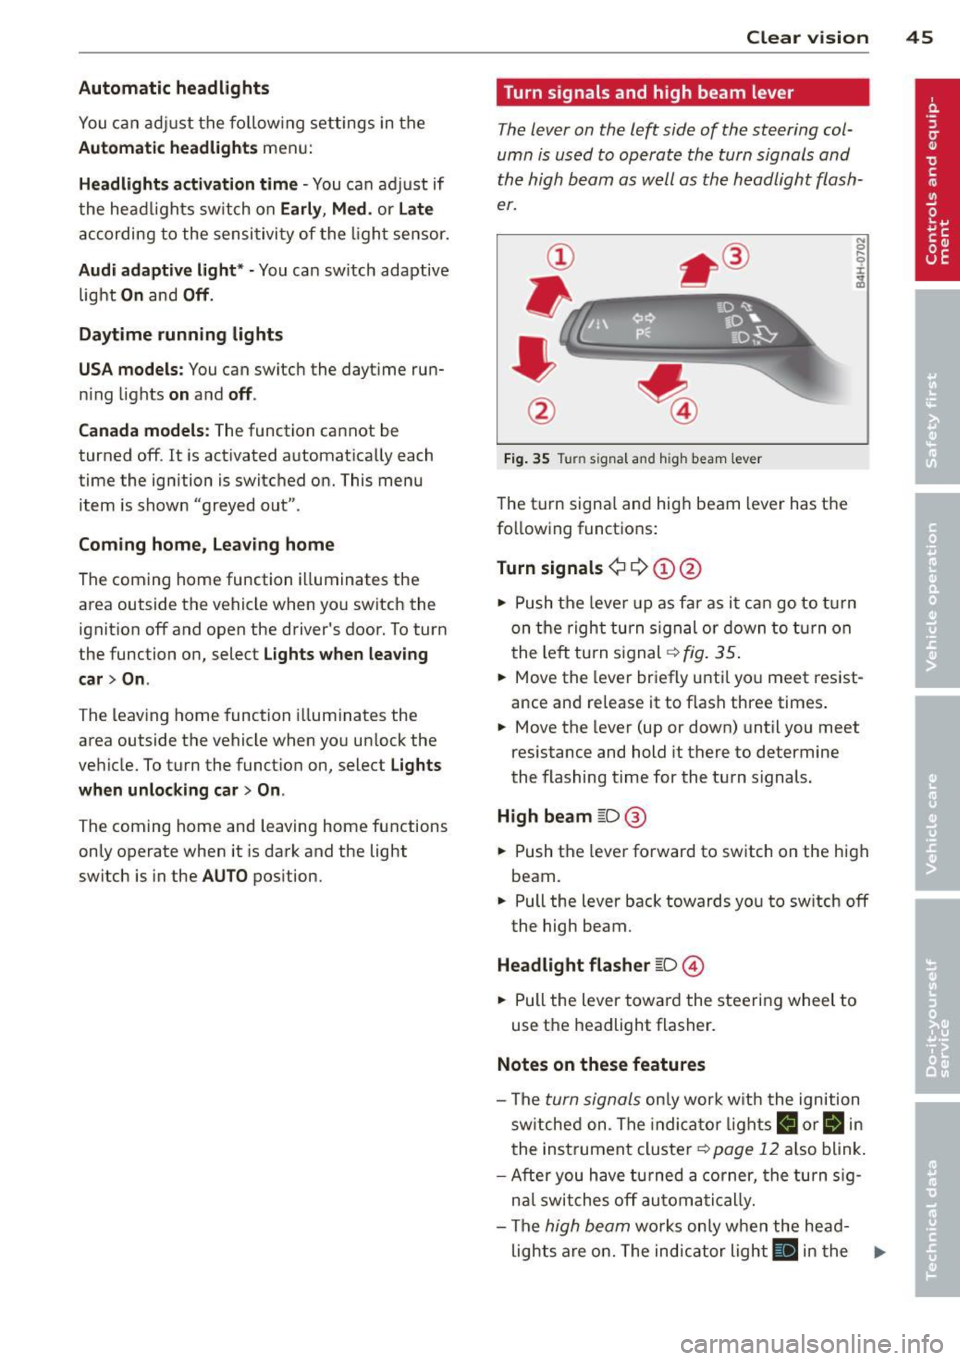
Turn signals and high beam lever
The lever on the left side of the steering col
umn is used to operate the turn signals and
the high beam as well as
the headlight flash
er.
Fig. 35 Tu rn signal and high beam lever
The turn signal and high beam lever has the
following functions:
Turn signals ¢ 9 ©@
.. 0 ....
~
.,. Push the leve r up as far as it can go to turn
on the right turn signa l or down to turn on
the left tu rn s ignal ¢
fig. 35.
... Move the lever briefly until you meet resist
ance and re lease it to flash three times.
.,. Move the lever (up or down) until you meet
resistance and hold it there to determine
the flashing time for the turn signals.
High beam ~D @
... Push the lever forward to switch on the high
beam .
.,. Pull the lever back towards you to sw itch
off
the high beam.
Headlight flasher ~D ©
... Pull the lever toward the steering wheel to
use the headlight flasher.
Notes on these features
-The turn signals on ly work w ith the ignition
sw itched on. The indicator l ights
B or Bin
the instrument cluster¢ page 12 also blink.
-After you have turned a corner, the turn sig-
n al switches
off automatically.
- The
high beam works only when the head-
lights are on. The indicator light
El in the .,.
Page 98 of 310
96 Audi active lane assist
Activating and deactivating
A ppl ies to vehicles: with active lan e assis t
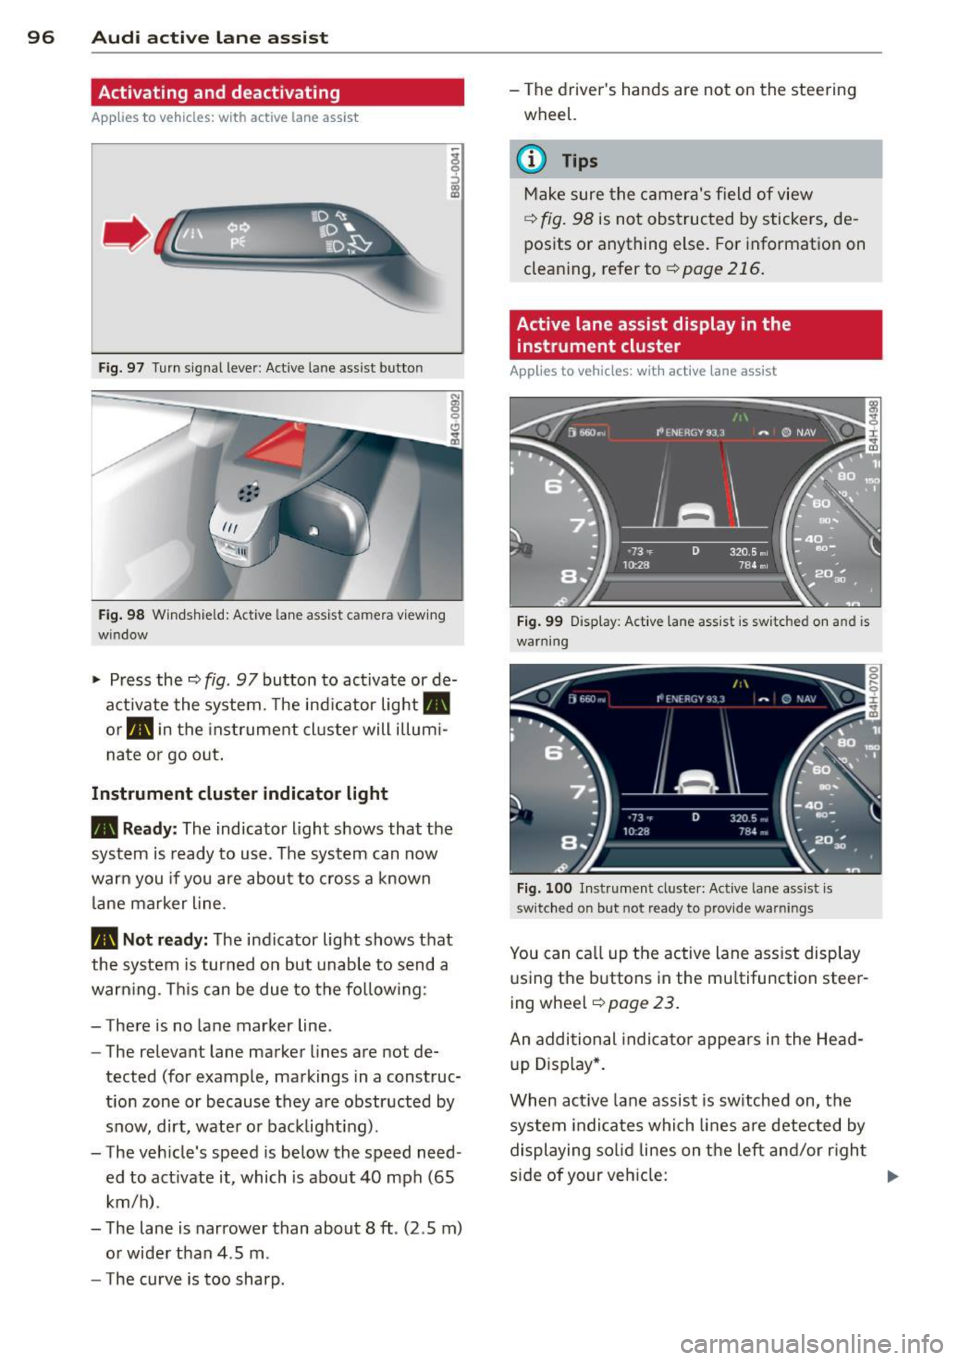
Fig. 97 Turn signal leve r: Active lane ass ist butto n
Fig. 98 Windshie ld: Active lane assist ca mera viewing
wi ndow
-
I
~ Press the c::> fig. 97 button to activate or de
activate the system. The indicator light.
or . in the instrument cluster will illumi
nate or go out.
Instrument cluster indicator light
• Ready:
The indicator light shows that the
system is ready to use . The system can now
warn you if you are about to cross a known
lane marker line .
• Not ready: The indicator light shows that
the system is turned on but unable to send a
warning . This can be due to the following:
- There is no lane marker line .
- The relevant lane marker lines are not de·
tected (for example, markings in a construc
tion zone or because they are obstructed by
snow, dirt, water or backlight ing).
- The vehicle 's speed is below the speed need
ed to activate it, which is about 40 mph (65
km/h) .
- The lane is narrower than about 8 ft . (2 .5 m)
or wider than 4 .5 m .
- The curve is too sharp. - The driver's hands are not on the steering
wheel.
(D Tips
Make sure the camera's field of view
c::> fig. 98 is not obstructed by stickers, de
posits or anything else. For information on
cleaning, refer to
c::> page 216.
Active lane assist display in the
instrument cluster
Applies to vehicles: wit h act ive lane assist
Fig. 99 Display : Active lane assist is switc hed on a nd is
warning
Fig. 100 Instrument cl uster: Active lane assist is
switch ed on but not re ad y to provid e wa rnin gs
You can call up the active lane assist display
using the buttons in the multifunction steer
ing wheel
c::> page 23.
An additional indicator appears in the Head
up Display*.
When active lane assist is switched on, the
system indicates which lines are detected by
displaying solid lines on the left and/or right
side of your vehicle: .,..
Page 100 of 310
98 Audi side assist
Audi side assist
Lane Change Assistant
Description
App lies to vehicles: wit h side ass ist
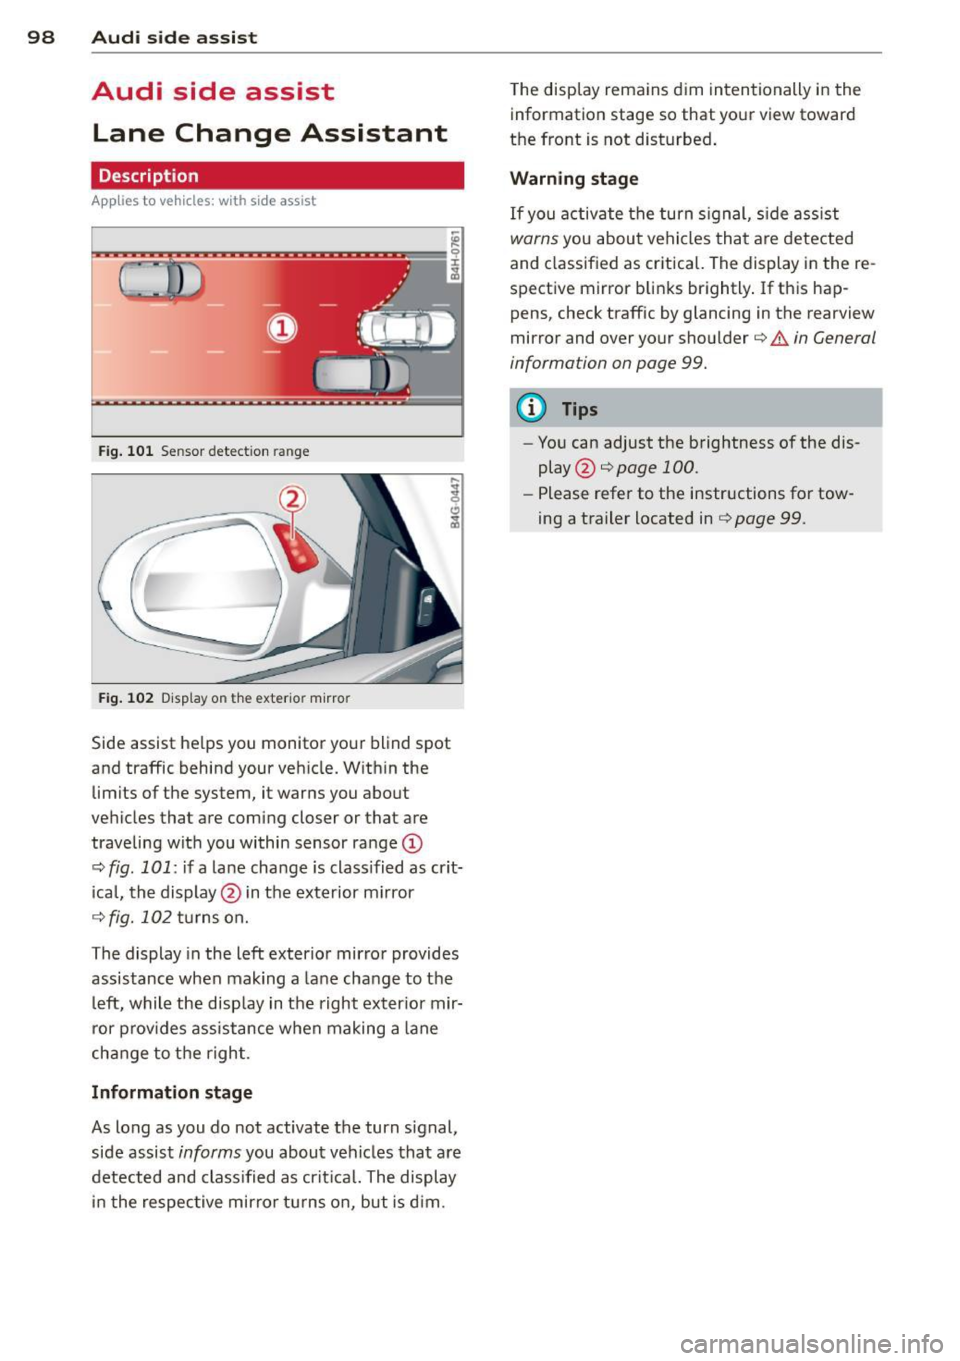
Fig . 101 Sensor detectio n ran ge
Fig. 102 Display on the exterio r mirro r
Side assist helps you monitor your blind spot
and traffic behind your vehicle. Within the
limits of the system, it warns you about
vehicles that are coming closer or that are
traveling with you within sensor range
(D
c:> fig . 101: if a lane change is class ified as crit
ical, the display @ in the exterior mirror
¢fig. 102 turns on.
The display in the left exterior mirror provides
assistance when mak ing a lane change to the
left, while the display in the right exterior mir·
ror provides assistance when making a lane
change to the right.
Information stage
As long as you do not activate the turn signal,
side assist
informs you about vehicles that are
detected and class ified as critical. The display
in the respective mirror turns on, but is dim. The
display remains dim intentionally in the
information stage so that your view toward
the front is not disturbed.
Warning stage
If you activate the turn signal, side assist
warns you about vehicles that are detected
and class ified as critical. The display in the re
spective mirror blinks brightly. If this hap
pens, check traffic by glancing in the rearview
mirror and over your shoulder c:>
.&. in General
information on page 99.
(D Tips
- You can adjust the brightness of the dis
play @c:>
page 100.
-Please refer to the instructions for tow·
ing a trailer located in
¢ page 99.
Page 119 of 310
Parking system plus
Description
Applies to vehicles: with parking system plus
Audi parking system plus provides audio and
visual signals when parking.
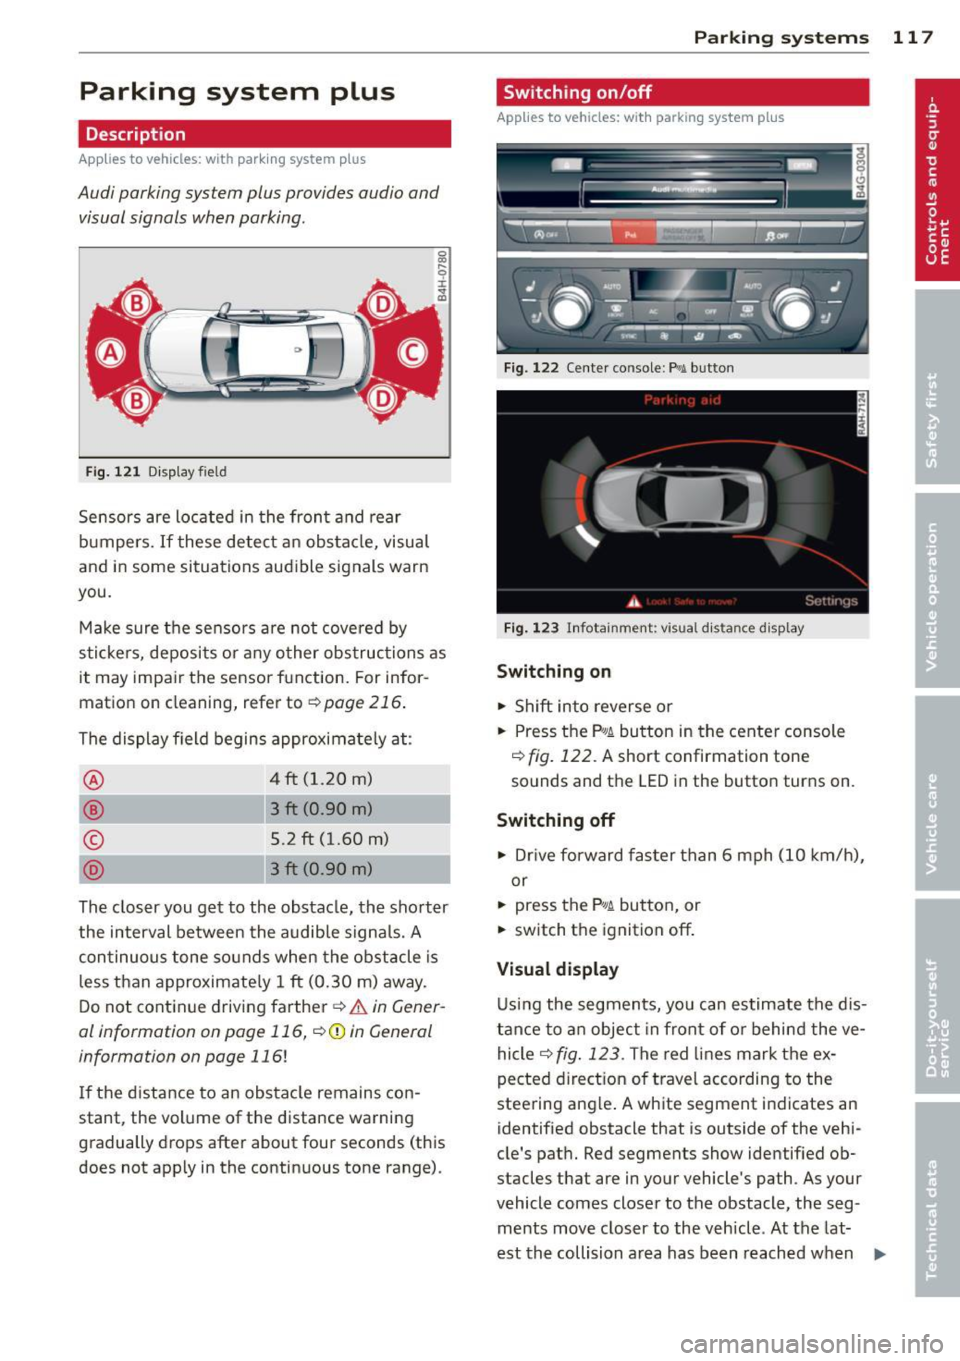
Fi g. 1 21 Dis p lay f ie ld
Sensors are located in the front and rear
bumpers.
If these detect an obs tacle, visual
and in some situations aud ible signals warn
you.
M ake sure t he sensors are not cove red by
s t icke rs, deposits or any o ther obs truc tions as
it may impair the sensor function. For infor
mation on cleaning, refer to
c::> page 216 .
The display field begins approximately at:
® 4 ft (1.20 m)
® 3 ft (0.90 m)
© 5.2 ft (1.60 m)
D 3 ft (0.90 m)
The clos er you get to the obstacle, the sho rter
the interval between the audible signa ls. A
con tinuous tone sounds when the obstacle is
l ess than approximate ly 1 ft (0.30 m) away .
Do not continue driving farther¢
& in Gener
al information on page 116,
¢ CD i n General
information on page
116 !
If the d istance to an obstacle remains con
stant, the volume of the d istance warning
gradually drops after about four seconds (this
does not apply in the continuous tone range).
P arking systems 11 7
Switching on/off
Applies to vehicles: with parking system plus
F ig. 122 Ce nter co nso le :
Pv! button
F ig . 1 23 Infota in m ent : v is u al d is ta n ce d isplay
Switching on
.,. Shift into reverse or
.,. Press the
P,,1~ bu tton in the center console
c::> fig. 122 . A short confirmation tone
sounds and the LED in the button turns on .
Switching off
.,. Drive fo rward fas ter than 6 mph (10 k m/h),
or
.,. press the P"1~ butto n, or
.,. switch the ignition
off .
Visual d isplay
U sing the segments, yo u can estimate the dis
tan ce to an object in front of o r behind the ve
hicle ¢
fig. 123 . The red lines mark the ex
pected di rect ion of travel according to the
steering ang le . A wh ite segment indicates an
identified obstacle that is outside of the vehi
cle's pat h. Red segments show identified ob
stacles that are in your vehicle's path . As your
vehicle comes close r to the obstacle, the seg
ments move closer to the vehicle . At the lat-
est th e collision area has been reached when ..,.