sensor AUDI A7 2015 Owners Manual
[x] Cancel search | Manufacturer: AUDI, Model Year: 2015, Model line: A7, Model: AUDI A7 2015Pages: 316, PDF Size: 78.09 MB
Page 16 of 316
14 Instrum ent s and w arn ing /indic ato r light s
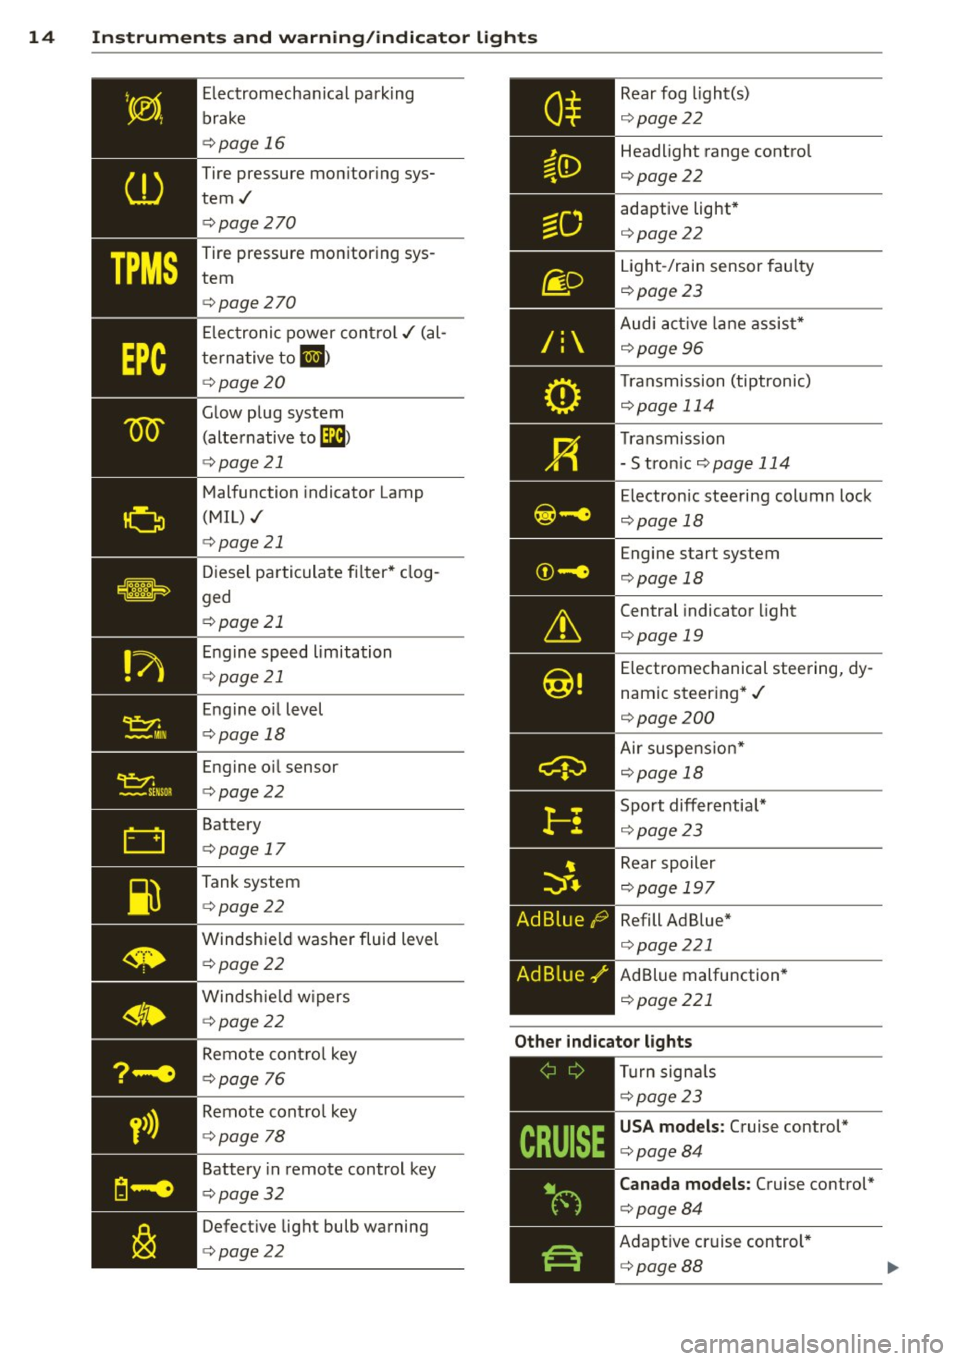
Electromechanical parking
brake
c::>page 16
Tire pressure monitor ing sys
tem../
c::> page270
Tire pressure monitoring sys
tem
c::> page270
Electronic power control../ (al
te rna tive to
II)
c::> page20
Glow plug system
(alternative to
Gi)
c::> page 21
Malfunction indicator Lamp
(MIL)../
Diesel particulate fi lter* clog
ged
c::> page 21
Engine speed limitation
c::>page 21
Engine oil level
c::> page 18
Engine o il sensor
c::> page 22
Battery
c::>page 17
Tank system
c::>page22
Windshie ld washer fluid level
c::>page22
Windshie ld w ipers
c::> page22
AdBlue ./'
Rear fog light(s)
c::> page 22
Headlight range control
c::>page22
adaptive light*
c::>page 22
Light-/rain sensor fau lty
c::>page 23
Audi act ive lane assist*
c::>page 96
T ransmission (tiptronic)
c::>page 114
Transmission
- S tron ic
c::>page 114
Electronic steering column lock
c::>page 18
Engine start system
c::>page 18
Central indicator light
c::>page 19
Electromechanical steering, dy
namic steering*../
c::>page 200
Air suspens ion*
c::>page 18
Sport differentia l*
c::> page 23
Rear spoiler
c::>page 197
Refill Ad Blue*
c::>page 221
AdBlue malfunction*
c::>page 221
Remote cont ro l key
c::>page 76
Other indicato r lights
,---=--~-----
Remote cont ro l key
c::> page 78
Battery in remote control key
c::> page32
Defect ive light bulb warning
c::>page 22
Tu rn signa ls
c::> page23
USA mod els : Cruise control*
c::>page 84
Can ada models : Cruise control*
c::> page 84
Adaptive cruise control*
c::> page 88
Page 24 of 316
22 Instruments and warning/indicator lights
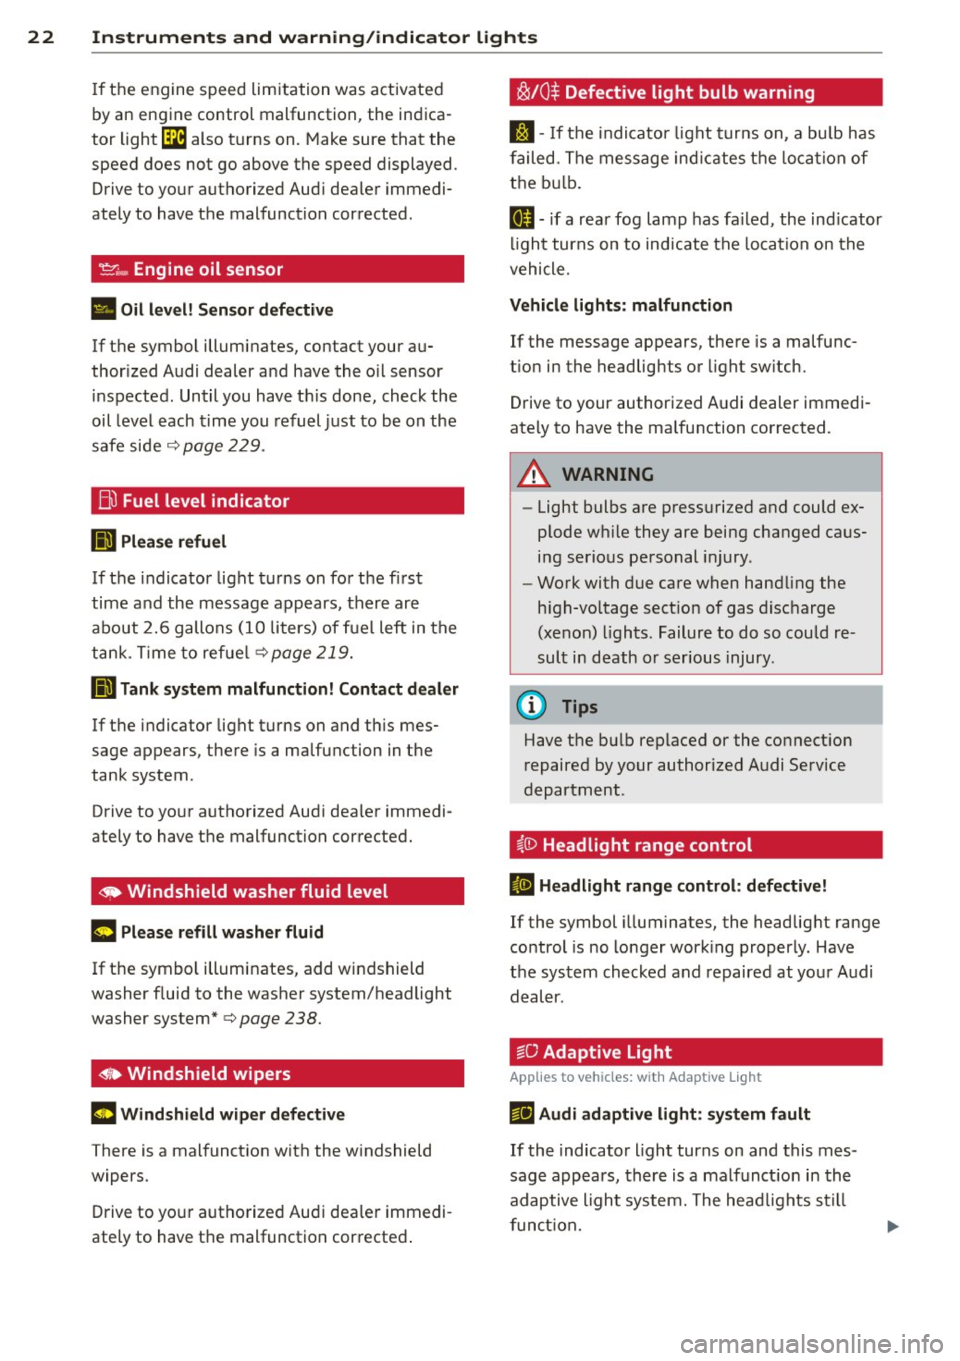
If the engine speed limitation was activated
by an engine control malfunction , the indica
tor light ~ also t urns on. Make sure that the
speed does not go above the speed displayed .
Drive to your authori zed Aud i dealer immedi
ately to have t he malfunction corrected .
If the symbol illuminates, contact your au
thor ized Audi dealer a nd have the o il sensor
i n spected . Until you have t his done , ch eck the
oil level each time you refuel just to be on the
safe side
c::> page 2 29 .
Bil Fuel level indicator
ID'J Plea se refuel
If the indicator light turns on fo r the fi rs t
time and the message app ears, ther e ar e
about 2.6 gallons (10 liters) of f ue l left in the
t an k. T ime to refue l
c::>page 219.
Ill Tank system malfunction! Contact dealer
If the i ndicator light tu rns on and t his mes
sage appears, t here is a ma lfunction in the
tank system .
Drive to yo ur autho rized Aud i dea ler immedi
ately to have t he malfunction corrected.
~ Windshield washer fluid level
~ Please refill washer fluid
If the symbo l illuminates, add windshield
washer f luid to the washer system/headlight
washer system*
c::> page 238.
~• Windshield wipers
m Windshield wiper defective
There is a malfunct io n with the w indshield
wipers.
D rive to yo ur autho rize d Au di dea ler immedi
ate ly to have t he malfunction cor rected .
~/0$ Defective light bulb warning
S:j -If t he in dicato r light tu rn s on, a bu lb h as
f ailed. The message in dicates t he loca tio n of
t h e b ulb .
II-if a rea r fog lamp has fa iled , the ind icator
li gh t tur ns on to ind icate the loca tion on the
vehicle.
Vehicle lights : malfunction
If the message appears, there is a malfu nc
t ion in the headlights o r light sw itch.
Drive to your authorized A udi dealer immedi
ate ly to have the ma lfunction corrected.
.&_ WARNING
- Light bulbs a re pr ess urized and could ex
p lode w hile they are being changed ca us
i n g s erio us pe rsonal injury .
- Wo rk with due care when han dling the
h igh-vo ltage sect io n o f gas disc harge
(xe non) ligh ts. Failur e to do so could re
s ult in death or ser ious injury .
(D Tips
Have t he b ulb replaced or the co nnect ion
r epaired by y our auth orized A udi Se rvice
d epartment .
~{i) Headlight range control
II Headlight range control : defective!
If the symbol illuminates, the headlig ht range
control is no lo nger wor king properly . Have
t h e sys tem checked and repaired at yo ur Audi
d eal er.
:sO Adaptive Light
App lies to veh icles : w ith Adapt ive lig ht
r!J Audi adaptive light: sy stem fault
If the indicato r light turns on and this m es
sage appears, there is a malf unct io n in th e
adaptive ligh t syste m. The head lig ht s s till
funct ion.
Page 25 of 316
M N <( (.J
'SI: ,...., \!) 1.1'1 ,...., 1.1'1 ,....,
Instruments and warning/indicator lights 23
Go to an authorized dea lership to have the
headlights or the contro l unit for the Adaptive
Light repaired.
fi.D Light/rain sensor
El Automatic headl ights/automatic wipers:
system fault
If the indicator light t urns on and this mes
sage appears, the light/rain sensor is not
functioning correctly .
F or safety reasons the low beams are turned
on permanent ly with the switch in
AUTO.
However, you can continue to turn the lights
on and off using the light switch. You can still
control all funct ions that are independent of
the rain sensor through the windsh ield wiper
lever .
Contact your author iz ed Audi dealer as soon
as possible to have the problem corrected.
I-: Sport differential
App lies to vehicles: with sport different ia l
IIJ Sport differential: system fault
There is a malfunct ion with the sport differen
tial.
Drive to your authorized Audi dea ler immedi
ately to have the malfunction corrected.
IIJ Sport differential : overheating
The transmission temperature has increased
sig nificantly due to the sporty dr iv ing manner .
Dri ve i n a less sporty manner until the tem
perature returns to the normal range and the
indicator light switches of .
A WARNING
Contact your authorized Audi dealer or a
qualif ied workshop if the sport differential
is faulty or ma lfunctioning. The repa ir
must be performed by trained personnel
using the correct oil in order to ensure
safety .
-
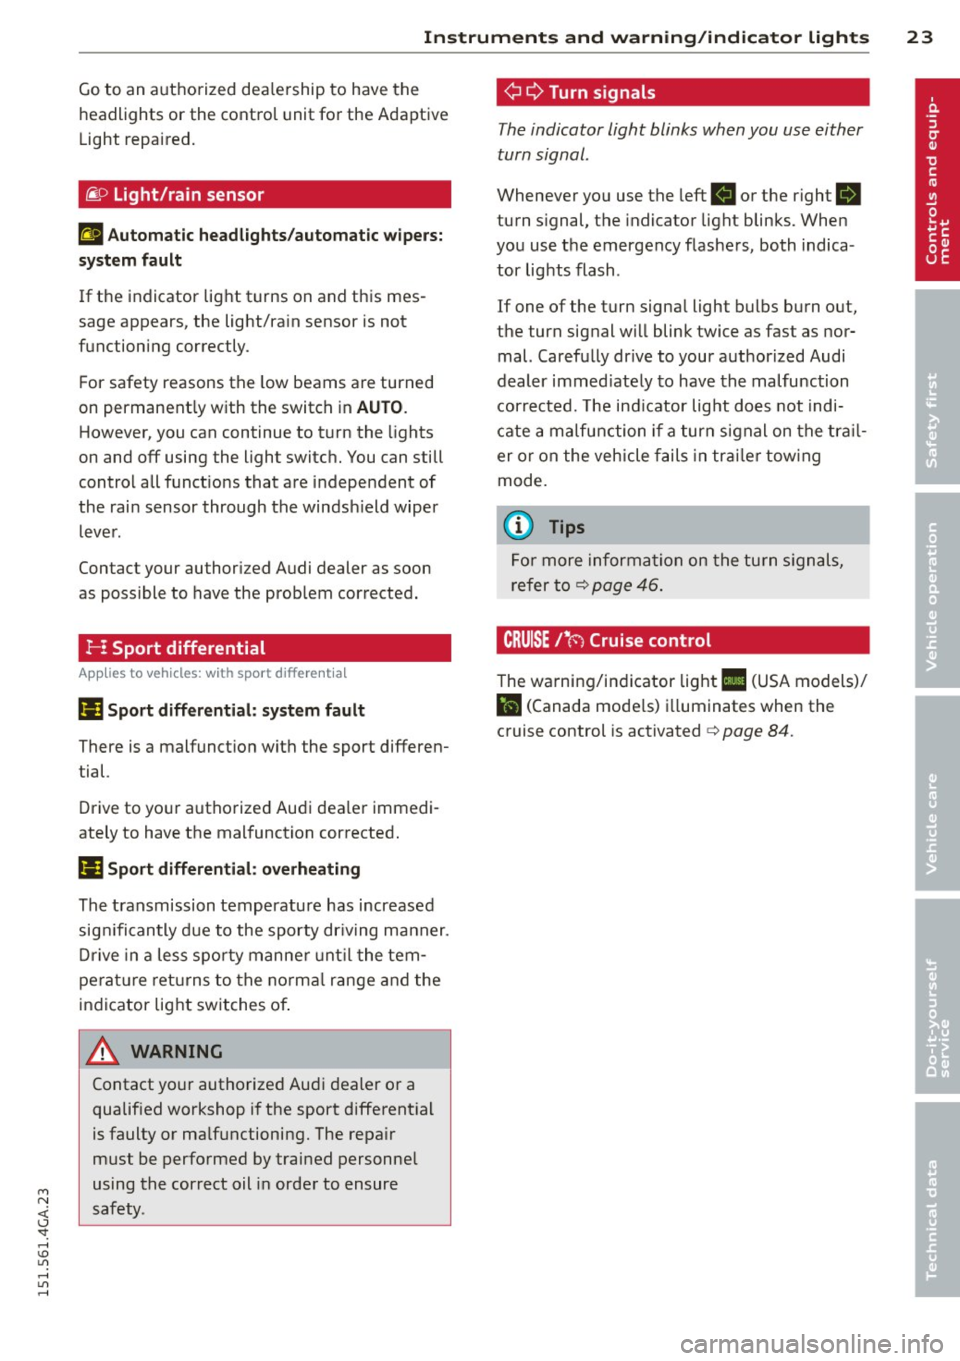
¢ Q Turn signals
The indicator light blinks when you use either
turn signal .
Whenever you use the left . or the right 1B
turn s ignal, the indicator light blinks. When
you use the emergency flashers, both indica
tor lights flash .
If one of the turn signa l light bulbs burn out,
the turn signal will blink twice as fast as nor
mal. Carefully dr ive to your authorized Audi
dealer immed iately to have the malfunction
corrected. The ind icator light does not indi
cate a malfunction if a turn signal on the trail
er or on the vehicle fails in trailer towing
mode.
(D Tips
For more information on the turn signals,
refer to
q page 46.
CRUISE/' (-) Cruise control
The warning/indicator light Ill (USA models)/
l'I (Canada mode ls) illuminates when the
cruise control is activated
q page 84.
Page 36 of 316
34 Openin g and clo sing
- Do not leave children inside the veh icle
unsupervised. In an emergency it would
be impossible to open the doors from
the outside without the key.
- Applies to vehicles with power side door
closer*:
- When closing a doo r, make sure noth
i ng can interfere w ith the door. This
could cause ser ious personal injury .
- You c an stop the door from closing at
any time by pulling on the inside or
outside door handle.
(DJ Tips
- In the event of a c rash with airbag de
ployment al l locked doors will be auto
matically un locked to g ive access to t he
vehicle occupants from t he outside.
- If the power lock ing system should ma l
function, you can lock the driver's door
u sing the mechanical key ¢
page 3 7.
- If the power loc king system should fail,
you can st ill open the fue l tank flap in an
emergency ¢
page 221.
-You are well advised no t to keep valua
bles inside an unattended vehicle, visib le
or not. Even a properly locked vehicle
cannot provide the security of a safe.
- If the LED in the upper edge of the driv
er's door panel comes on for abo ut
30
seconds afte r the vehicle is locked, the re
i s a malfunction in the power locking or
the anti-theft warning system . Have the
malfunction corrected by an author ized
Audi dealersh ip or qua lified repai r fac ili
ty.
Setting power locking
The driver can determine the functions for
power locking in the MMI.
.. Select : I CARI funct io n button> (Car )* sy s
tem s
control button > V ehicle settings >
( Central lo ck ing) *.
Lo ck when dr iving -
If you se lec t On , the vehi
cle locks automatically when d riving. All of
the doors and rear lid lock .
Central locking
Unlock door s -
You can dec ide if All doors or
o nly the
Driv er shou ld unlock . The rear lid al
so unlocks when
All is selected . If you select
Driver in a vehicle with a convenience key*,
only the door whose hand le you pu ll will un
lock.
If you se lect
Driver , all the doors and rear lid
will unlock if you press them button on the re
mote control master key twice .
Lo ck exterior trunk handle -If you select On ,
the rear lid handle is locked . In this case the
rear lid can be opened with the b utton
c:s on
the master key or with the
c:s button in the
driver' s door . In veh icles with a convenience
key* , you can still open the rear lid using the
handle if an authorized master key is near the
proxim ity sensor .
Fold mirrors * -If yo u select On , the exterior
rearview mirrors fold in automatically when
you press the
{f) button on the remote control
master key or touch the sensor* in the handle.
Tone when lock ing -When you select On, a
confirmat io n tone sounds when you lock the
vehicle .
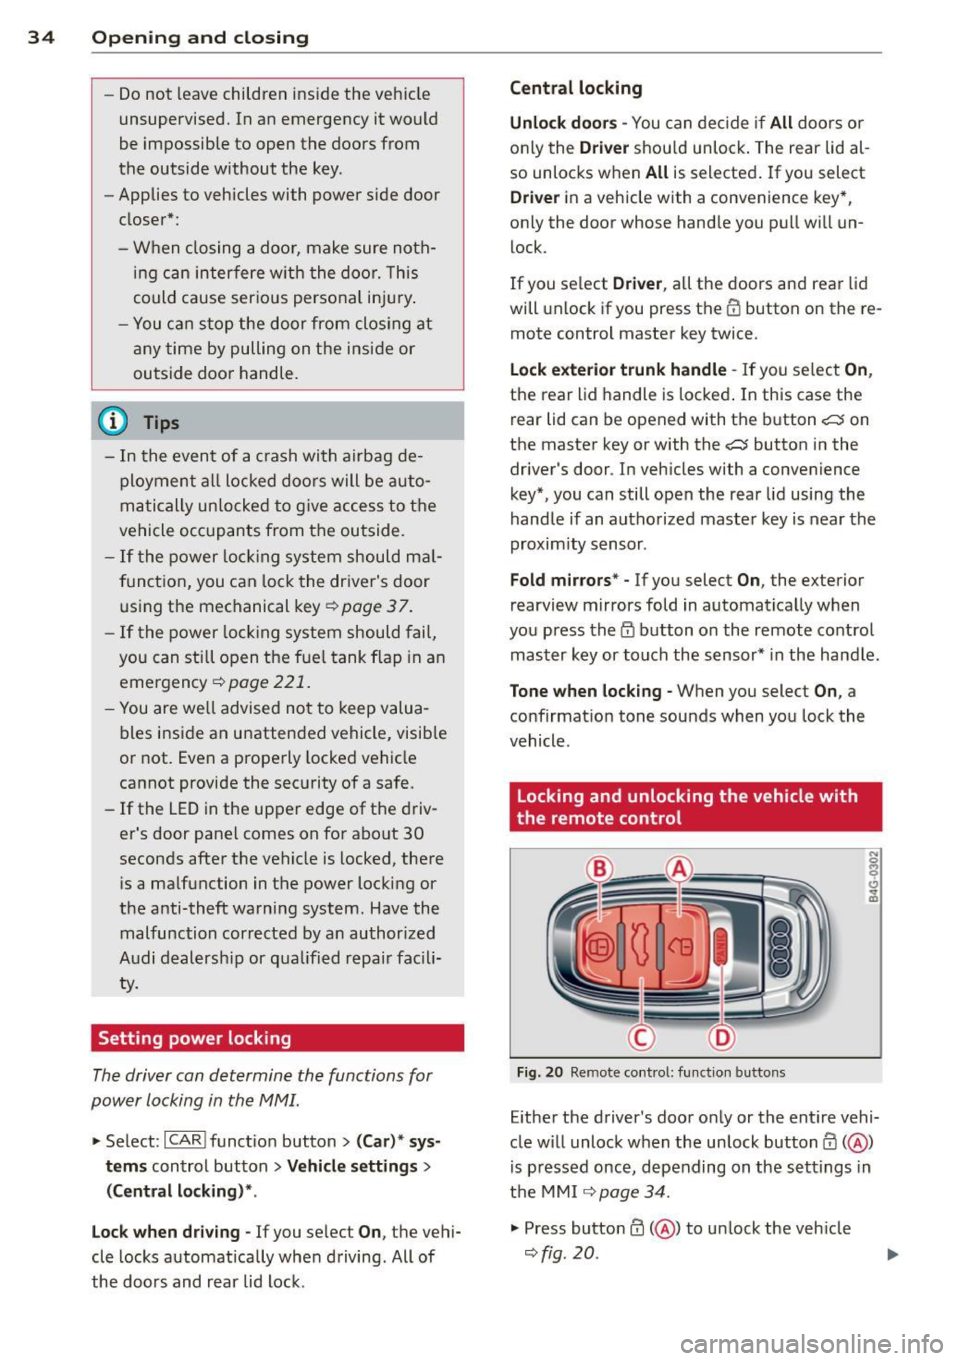
Locking and unlocking the vehicle with
, the remote control
Fi g. 20 Re mote co ntro l: fu nct io n buttons
N 0 q
Cl
~
E ither the driver's door only or the entire vehi
cle w ill unlock when the unlock button
0 ( @ )
is p ressed once, depending on the settings in
the MMI
¢ page 34 .
.. Press butto n 0 (@ ) to un lock the veh icle
¢fig. 20 .
Page 38 of 316
36 Opening and clo sing
@ Tips
If your vehicle has been standing for an ex
tended period, please note the following:
- The proximity sensors are deactivated af-
ter a few days to save power. You then
have to pull on the door handle once to
unlock the vehicle and a second time to
open the vehicle.
- To prevent the battery from being dis
charged and to preserve your vehicle's
ability to start for as long as possible,
the ene rgy management system gradu
ally switches off unnecessary conven i ence functions.
It i s possible that you
will not be able to unlock your vehicle us
i ng these conven ience f unctions .
- For Declaration of Compliance to United
States FCC and Industry Canada regula
tions
¢ page 297.
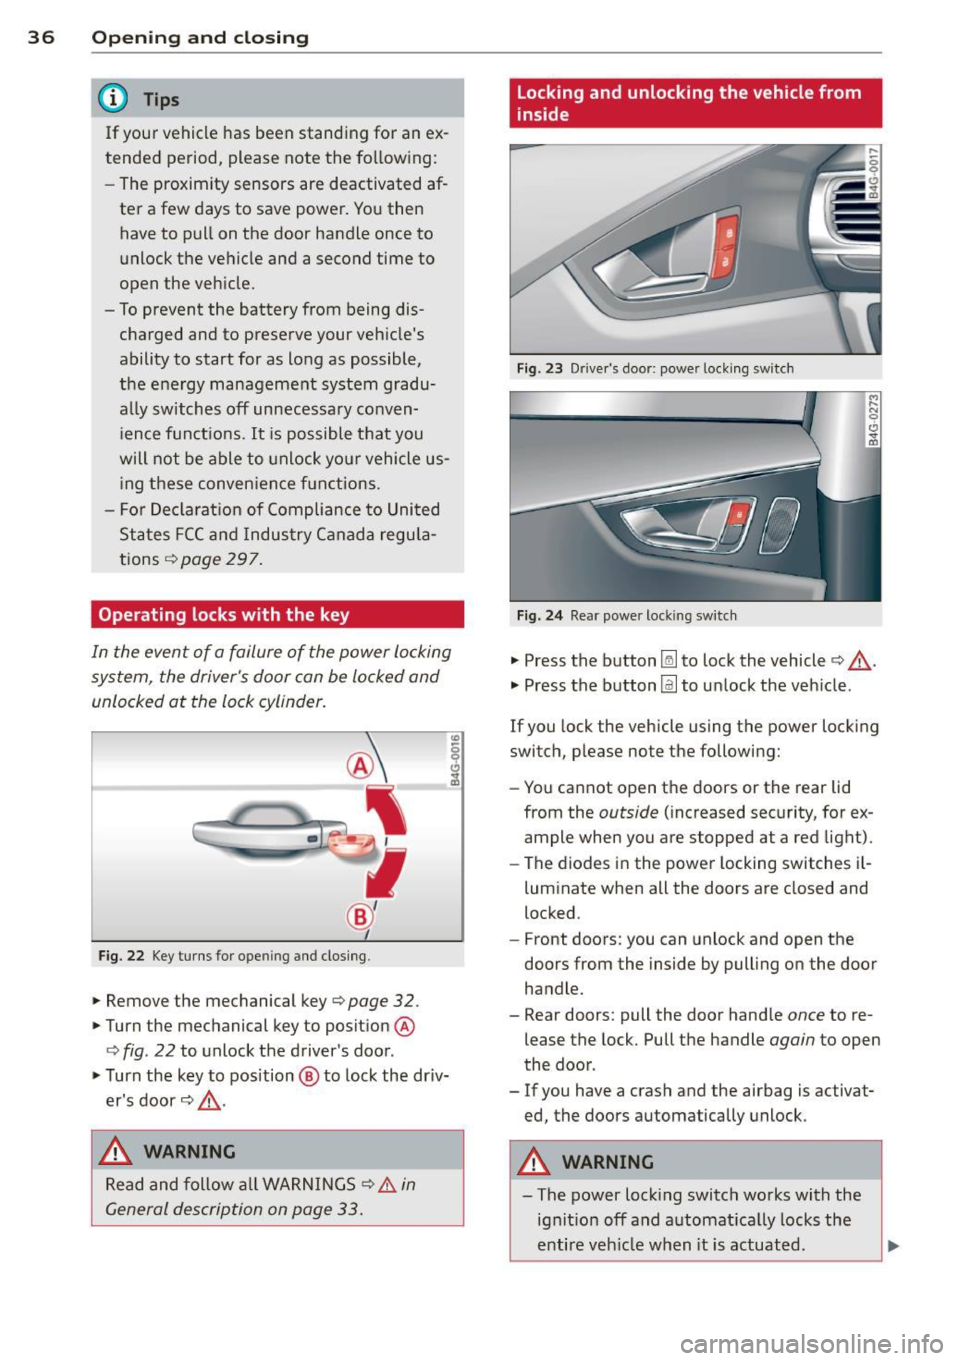
Operating locks with the key
In the event of a failure of the power locking
system, the driver 's door can be locked and
unlocked at the lock cylinder.
Fig. 22 Key turns for ope ning and closing .
.. Remove the mechanical key¢ page 32 .
.. Turn the mechanical key to position @
¢
fig . 22 to unlock the driver's door .
.. Turn the key to position @ to lock the driv
er's door ¢.&, .
_& WARNING
Read and follow all WARNINGS¢ & in
General description on page 33.
Locking and unlocking the vehicle from
inside
Fig. 23 Drive r's door; power locking sw itch
Fig. 24 Rear powe r lock ing switch
.. Press the button~ to lock the vehicle¢.&, .
.. Press the button@] to unlock the veh icle .
If you lock the vehicle using the power locking
switch, please note the following:
- You cannot open the doors or the rear lid
from the
outside (increased security, for ex
ample when you are stopped at a red light).
- The diodes in the power locking switches i l-
luminate when all the doors are closed and
locked .
- Front doors: you can unlock and open the
doors from the inside by pulling on the door
handle .
- Rear doors: pull the door handle
once to re
lease the lock. Pull the handle
again to open
the door .
- If you have a crash and the airbag is activat
ed, the doors automatically unlock.
A WARNING
-==
-The power lock ing switch works with the
ignition off and automatica lly locks the
entire veh icle when it is actuated .
Page 41 of 316

M N <( I.J "". rl I.O
"' ....
"' rl
-The following applies to vehicles equip
ped with the Convenience key* feature: if
the remote control key is left in the lug
gage compartment, luggage compart
ment will automatically unlock itself af
ter you lock the vehicle . This prevents
you from un intent ionally locking your
key in the luggage compartment .
- When the vehicle is locked, the rear lid
can be unlocked separately by pressing
the button
las! on the master key. When
the rea r lid is closed aga in, it locks auto
matically.
Luggage compartment with movement
activated opening
Applies to vehicles: with conve nience key and sensor-con·
trolled luggage compartment lid
Fig. 28 Rear of ve hicle: foot move ment
Requirements : You must be carrying your ve
h icle key with you . You must be standing at
the center beh ind the luggage compartment
lid. The distance to the rea r of the vehicle
should be approxima tely 8 inches (20 cm).
The ignition must be switched off . Make sure
you have firm footing .
.. Swing your foot for th and back below the
bumper ¢
fig. 28. Do not to uch the bumper.
Once the system recognizes the movement,
the luggage compartment lid will open.
The luggage compartment lid will on ly open if
you make the movement as described . This
prevents the luggage compa rtment lid from
opening due to similar movements s uch as
when you walk between the rear of the vehicle
and your garage door.
Op enin g an d clos ing 39
Gen eral information
In some sit uatio ns, the f unction is limited or
temporarily unavai lable . This may happen if:
- the luggage compartment lid was just
closed.
- you park close to a hedge and the bra nches
move back and forth unde r the veh icle for a
long per iod of t ime .
- you clean your veh icle, for examp le with a
pressure washer or in a car wash .
- there is heavy rain .
- the bumper is very dirty, for example after
driving on salted roads .
- there is interference to the radio signal from
the vehicle key, such as from cell phones or
remote cont ro ls .
Rear lid emergency release
The rear lid con be released in on emergency
from the inside .
Fig . 29 Rea r lid inter ior
.. Remove the mechan ica l key ¢ page 32.
.. Remove the cover with the mechanical key
from the rear lid ¢
fig. 29 .
.. Press the leve r in the direction of the arrow
until the rear lid re leases.
Page 47 of 316

M N <( I.J "". rl I.O
"' rl
"' rl
visibility conditions. For example, fog cannot be detected by the light sensors.
So always switch on the headlights 1§.D under these weather conditions and
when driving in the dark.
- Crashes can happen when you cannot see
the road ahead and when you cannot be
seen by other motorists . Always turn on
the headlights so that you can see ahead
and so that others can see your car from
the back.
- Please observe legal regulations when
using the light ing systems descr ibed .
(D Note
The rear fog lights should only be turned
on in accordance with traffic regulation, as
the lights are bright for following traffic.
@ Tips
- The light sensor* for automatic head light range control* is located in the rear
view mirror mount. You should therefore not apply any stickers to the windshield
in this area in order to prevent malfunc
tions or failures.
- In the event of a light sensor malfunc
tion, the driver is notified in the instru
ment cluster display ¢
page 23 .
-You will hear a warning tone if you open
the driver door when the exterior lights
are switched on .
- In cool or damp weather, the inside of
the headlights, turn signals and tail
lights can fog over due to the tempera
ture difference between the inside and
outside. They will clear shortly after
switching them on. This does not affect
the service life of the lighting .
Clear vision 45
Emergency flasher
The emergency flasher makes other motorists
aware that you or your vehicle are in an emer
gency situation .
Fig. 37 Ce nt er co nsol e: em erge ncy flash er sw itc h
.,. Press the switch &..¢ fig. 37 to turn the
emergency flashers on or off.
When the emergency flasher is on, all four
turn signals blink at the same time . The turn
signal indicator lights
B DI in the instru
ment cluster, as well as the light in the emer
gency flasher switch &.. blink likewise. The
emergency flashers also work when the igni
tion is turned off.
The emergency flashers will turn on automati
cally if you are in an accident where the airbag has deployed.
@ Tips
You should turn on the emergency flashers
when:
- you a re the last vehicle standing in a traf
fic jam so that any other vehicles coming
can see you, or when
- your vehicle has broken down or you are
in an emergency situation, or when
- your vehicle is being towed by a tow
truck or if you are towing another vehicle
behind you.
Adjusting the exterior lighting
The settings are adjusted in the MMI.
.,. Select: !CAR ! function button> (Car)* sys
tem s
control button > Vehicle settings > Ex-
terior lighting. ..,.
Page 48 of 316

46 Clear vision
Automatic headlights
You can adjust the following settings in the
Automatic headlights menu:
Headlights a ctivation time -You can adjust if
the head lights switch on Early, Med. or Late
according to the sensitivity of the light sensor.
Audi adaptive light* -You can sw itch adaptive
light On and Off.
Daytime running lights
USA models : You can switc h the dayt ime run
ning lights on and off.
Canada models: The function cannot be
turned off . It is activated automatica lly each
time the ign ition is switched on. This menu
item is shown "greyed out".
Coming home, Leaving home
The coming home function illuminates the
area outside the vehicle when yo u switch the
ignition off and open the driver's door. To turn
the function on, select Lights when leaving
car> On .
The leaving home function illuminates the
area outside the vehicle when you un lock the
vehicle. To turn the funct ion on, select Lights
when unlocking car > On .
The coming home and leaving home functions
only operate when it is dark and the light
switch is in the AUTO position. Turn signals and high beam lever
The lever on the left side of the steering col
umn is used to operate the turn signals and
the high beam as well as the headlight flash
er.
Fig. 38 Turn signal and high beam lever
The turn signa l and hig h beam lever has the
following functions:
Turn signals ¢
9 (D@
.. Push the lever up as far as it can go to turn
on the right turn signal or down to turn on
t he left turn signal ¢
fig. 38.
N 0 ... 'i' :r
~
.. Move the lever briefly until you meet res ist
ance and re lease it to flash three times.
.. Move the lever (up or down) until you meet
resistance and hold it there to determine
the flashing time for the turn signals.
High beam
[D @
.. Push the lever forward to switch on the high
beam.
.. Pull the lever back towards you to switch off
the high beam.
Headlight flasher
[D ©
.. Pull the lever toward the steering whee l to
use the headlight flasher.
Notes on these features
- The
turn signals only work w ith the ignition
switched on. The indicato r lights
B or B
in th e instrument cluster ¢ page 12 also
blink.
- After you have turned a corner, the turn sig
na l switches off automatically.
- The
high beam works only when the head-
lights are on. The indicator light
El in the ..,.
Page 50 of 316

48 Clear vis ion
automatically and will go o ut comp letely
when the outside light is very low. This
feature is meant to remind you to switch on the headlights when outs ide light con
ditions become poor.
Vision
Sun visors
( )
Fig. 42 Sun viso r
The sun visors for the dr iver and passenge r
can be released from the ir brackets and
turned toward the doors
9 fig. 42@.
The mirror light switches on whe n the cover
over the vanity mirror @opens .
Sun shade
Applies to vehicles: with s un shade
The sun shade is located on the luggage com
partment shelf.
Fi g. 4 3 Sun s hade in lowered position
When the sun shade is in the lowe red posi
tion, it is secured in the retaine r@ .
~ To ra ise ® the su n shade, remove it from
the reta iner .
A WARNING
-Do not use t he sun shade to secure cargo.
The luggage compartme nt cover is not a
surface for storing objects. Objects p laced
on th e cove r could enda nger all vehi cle oc
cup ants dur ing s udden braki ng maneuvers
or i n a crash.
Wiper and washer
system
Switching the windshield wipers on
Fig. 44 W indshield wiper leve r
Move the windshie ld wiper lever to the corre
sponding position:
@ -Windshield wipers off
(D-Rain sensor mode . The windsh ie ld wipers
swi tch on once the veh icle speed exceeds ap
proximate ly 2 mph ( 4 km/h) and it is ra ining.
T he higher t he rain sensor sensit ivity is set
(switch @to the right), the earlier the wind
shield wipers react to moisture on the w ind
shield. You can deactivate rain sensor mode in
the MMI, which will then activate interm ittent
mode. Select:
I CAR ! funct ion button > (Car )*
systems
cont ro l butto n > Driver as sist > Rain
sensor > Off .
In inte rm ittent mode, yo u can
adjust the interval time using the sw itch @.
@ -Slow w iping
® -Fast wiping
@ -Single wipe. If you ho ld the lever in this
position longer, the wipe rs switch from s low
wiping to fast w iping.
® -Clean the w indshie ld. The wipe rs wipe
one time after severa l seconds of driving to
Page 51 of 316

M N <( (.J
'SI: ,...., \!) 1.1'1 ,...., 1.1'1 ,....,
remove water droplets . You can switch this
function off by moving the lever to position ®
within 10 seconds after the afterw ipe. The af
terw ipe funct ion is react ivated the next time
you switch the ignit ion on .
C lea ning the headlights *. The headlight wash
er system * operates on ly when the headlights
are on. If you move the lever to pos ition ®,
the headlights and the night vision assistant
camera* are washed in intervals .
.&_ WARNING
-The ra in sensor is only des igned to assist
and support the drive r.
It remains entire
ly the dr iver's respons ibility to monitor
o utside wea ther conditions and to man
ually activate the wipers as soon as rain
or drizzle reduces visibility through the
w indshield.
- The w indshie ld m ust not be treated with
water -repe llent materials. They can in
c rease glare under poor visibi lity condi
tions such as wetness, darkness, or when
the sun is low on the horizon. I n addi
tion, they can cause the windshield wip
ers to chatte r.
- Properly functioning windshie ld w iper
blades are required for a clear view and
safe dr iv ing ¢
page 49, Replacing
windshield wiper blades .
(D Note
-In the case of frost, check whether the
windsh ield wiper b lades a re frozen to
t h e windshie ld. Switching on the wind
s h ield wipers can damage the wiper
blades!
- Prior to using a car wash, the win dsh ield
wipe r system must be switched off (lever
i n position @). This helps to prevent un
i ntent ional sw itch ing on and damage to
the windshie ld w iper sys tem .
- Do no t use the wipe rs to cle ar a frosted
window. Using the wipers as a conven
i ent ice sc raper will destroy t he wiper
b lades .
Clear vis ion 49
(D Tips
- The windshie ld wipers are switched off
when the ign it ion is off. Activate the
w indshield wipers after the ignition is
switched back on by moving the w ind
shield wiper lever to any position .
- Worn or d irty windshield wiper blades
result in streaking. This ca n affect the
rai n sensor function. Check your wind
shield wiper blades regularly.
- The washer fluid nozz les of the wind
shield washe r system a re heated at low
tempe ratu res whe n the ignition is on.
- When stopping temporarily, e .g. at a
t raffic light, the set spe ed of the wind
shield wipers is automatically reduced by
one speed.
Cleaning windshield wiper blades
Clean the w indsh ie ld w iper blades when t hey
begin to leave st reaks. Use a soft clo th and
glass cleaner to clean the wi ndshield wipe r
blades.
.,. Place t he windsh ie ld w iper arms in the serv
ice pos ition . Re fer to ¢
page 50 .
.,. Lift the wiper arm away from the front win
dow.
.&_ WARNING
Dirty windsh ield wiper b lades can impair
your view. This can lead to accidents .
Replacing windshield wiper blades
Fig. 45 Removing windshie ld wiper blades