fuel pressure AUDI A7 2015 Owners Manual
[x] Cancel search | Manufacturer: AUDI, Model Year: 2015, Model line: A7, Model: AUDI A7 2015Pages: 316, PDF Size: 78.09 MB
Page 5 of 316
M N <( (.J
'SI: ,...., \!) ..,.,
,...., ..,., ,....,
Safet y fir st . . . . . . . . . . . . . . . . . . . . 128
Driving Safely . . . . . . . . . . . . . . . . . 128
General notes . . . . . . . . . . . . . . . . . . . . 128
Proper occupant seating posit ions . . . 129
Driver and passenger side footwell . . . 133
Pedal area . . . . . . . . . . . . . . . . . . . . . . . 133
Stowing luggage . . . . . . . . . . . . . . . . . 134
R eport ing Safety Defects . . . . . . . . . . . 136
Safety belts . . . . . . . . . . . . . . . . . . . 138
General notes . . . . . . . . . . . . . . . . . . . . 138
Why safety bel ts? . . . . . . . . . . . . . . . . 139
Safety belts . . . . . . . . . . . . . . . . . . . . . 14 1
Safety belt p re tens ioners . . . . . . . . . . 145
Airbag system . . . . . . . . . . . . . . . . . 147
I mpor tant th ings to know . . . . . . . . . . 1 47
Fr ont airbags . . . . . . . . . . . . . . . . . . . . 151
M onitoring the Advanced Airbag
System . . . . . . . . . . . . . . . . . . . . . . . . . 159
Knee airbags . . . . . . . . . . . . . . . . . . . . . 164
Side airbags . . . . . . . . . . . . . . . . . . . . . 166
Side curta in a irbags ........ . .... . .
Ch ild Safety ............... .. . .
Important things to know .. .. .. .. . .
C hi ld safety seats ............ .... .
Install ing a chi ld safety seat .. .. ... .
L A TC H L ower ancho rages and tethe rs
fo r ch ild ren . ............. .... .. . .
Addit io nal Informa tion
Audi pre sense .......... .. .. . .
Pr even ta ti ve passe nger p rotec tion
Vehicle operation ....... .. .. . .
Intelligent technology .. .. .. . .
N ot ice about da ta re corded by the
E vent Data Recorder and vehi cle
control mod ules ... .... ... .. .. .. . .
Elect ronic Stabilization Control (ESC) .
Rear spoiler ............. .... .. . .
Braking .. .. ................. .. . .
Elect romechan ical power assist, 169
173
173
179
184
187
19 1
192
19 2
194
194
194
195
197
198
dynam ic steering . . . . . . . . . . . . . . . . . 200
D riving w ith your quattro . . . . . . . . . . 200
E ne rgy management . . . . . . . . . . . . . . 20 1
Table of contents 3
Driving and environment . . . . .
203
T he first 1,000 miles (1 ,500 km) and
afterwa rds . . . . . . . . . . . . . . . . . . . . . . 203
Avoid damaging the vehicle . . . . . . . . . 204 Driving through water on roads . . . . . 204
Catalytic co nverter . . . . . . . . . . . . . . . . 204
D iesel pa rticulate filter . . . . . . . . . . . . 205
S hu tting down vehi cle . . . . . . . . . . . . . 205
Operate your vehicle e conomically and
min imi ze poll ution . . . . . . . . . . . . . . . . 205
Trailer towing . . . . . . . . . . . . . . . . . 208
Dr iving wit h a trailer . . . . . . . . . . . . . . 208
T ra ile r tow ing t ips . . . . . . . . . . . . . . . . 210
Vehicle care . . . . . . . . . . . . . . . . . . . 2 12
Vehicle care and cleaning . . . . . 212
Genera l informa tion . . . . . . . . . . . . . . 212
Car was hes . . . . . . . . . . . . . . . . . . . . . . 212
Cleaning and care information . . . . . . 213
Fuel supply and filling your
fueltank ... .. .... . ... ...... ... .
217
Gasoline .. .. .. .. .. .. .. . . .. .. .. .. 217
Diesel fuel . . . . . . . . . . . . . . . . . . . . . . 218
Fuel tank.. .. .. .. .. .. ........... . 219
Se lective cata lytic reduction . . . . . . . . 221
Checking and filling . . . . . . . . . . . 225
Engine hood . . . . . . . . . . . . . . . . . . . . . 225
En gine compartment . . . . . . . . . . . . . . 227
E ngine o il . . . . . . . . . . . . . . . . . . . . . . . 227
En gine cooling system . . . . . . . . . . . . . 231
Br ake fluid . . . . . . . . . . . . . . . . . . . . . . 234
Battery . . . . . . . . . . . . . . . . . . . . . . . . . 235
Windshie ld/headlight * washer
co ntainer . . . . . . . . . . . . . . . . . . . . . . . 238
Tires and wheels . . . . . . . . . . . . . . 24 0
T ires . . . . . . . . . . . . . . . . . . . . . . . . . . . 240
Tire pressure mo nitoring system 2 70
Do-it-yourself service . . . . . . . . . 273
What do I do now? . . . . . . . . . . . . 273
Emergency warn ing triangle . . . . . . . . 273
Vehicle tool kit . . . . . . . . . . . . . . . . . . . 273
Changi ng a wheel. . . . . . . . . . . . . . . . . 275
•
•
Page 19 of 316
M N <( (.J
'SI: ,...., \!) 1.1"1 ,...., 1.1"1 ,....,
Instruments and warning/indicator lights 17
-The engine compartment of any vehicle
is a dangerous area. Before you perform
any work in the engine compartment,
turn of the eng ine and allow it to cool.
Follow the warning stickers
c::;, page 225.
(D Note
Do not continue driving if the. symbo l
illuminates. There is a malfunct ion in the
eng ine cooling system -you could damage
your eng ine.
0 Battery
This warning/indicator light detects a mal
function in the generator or in the vehicle's
electrical system.
The. warning/ind icator light illuminates
when you switch on the ignit ion and must go
out after the engine has started.
• Alternator fault: Battery is not being
charged
If the indicator light turns on and the mes
sage appears, there is a malfunction in the
generator or vehicle e lectr ica l system .
Dr ive to your au thorized Audi dealer or quali
fied workshop immediately . Because the vehi
cle battery is discharging, turn
off all unnec
essary electrical equipment such as the radio.
Seek professional ass istance if the battery
charge level is too low .
(•) Low battery: battery will be charged
while driving
If the indicator light turns on and the mes
sage appears , there may be limited starting
abi lity .
If this message turns off after a litt le wh ile,
the battery charged enough wh ile driving.
If the message does not turn off, have your
authorized Audi dealer or qua lified workshop
correct the mal func tion.
~ Safet y belts
This warning/indicator light reminds you to
put on your safety belt.
The . warning/ indicator light illum inates
when the ignition is switched on to remind
the driver and any front passenger to put on
the safety belt. Add it ionally, an acoustic warn
ing (gong) wi ll also sound.
For more Information
c::;, page 138, i Safety
belt warning light .
~ Engine oil pressure malfunction
The red engine oil pressure warning symbol
requires immediate service or repair . Driving
with a low-oil-pressure indication is likely to
inflict severe damage to the engine.
• Switch off engine and check oil level
If the indicator light turns on and the mes
sage appears, the oi l pressure is too low.
.,. Pull
off the road.
.,. Stop the vehicle.
.,. Turn
off the engine .
.,. Check the engine oil level c> page 229 .
.,. If the eng ine o il level is too low, add eng ine
oil
c::;, page 229. Make sure that the oil pres
sure warning symbol. appears no longer
in the display before you start dr iv ing again .
.,. If the eng ine o il level is correct and the indi
cator light still turns on, turn the engine
off
and do not continue driving. Seek professio
na l assistance .
(D Tips
- The engine oil pressure symbol. is
not an indicator for a low engine oil lev
el. Do not rely on it. Instead, check the
oil level in your engine at regular inter
vals, preferably each time you refuel ,
and always before going on a long trip.
- The yellow oil level warning indication
II requires oil refill or workshop serv
ice without delay. Do not wait until the
red oil pressure warning. starts to
flash before you respond to the low oil
Page 231 of 316
M N <( I.J "". rl I.O
"' rl
"' rl
@ Tips
-The oil pressure warning display. i s
not an indicator of the oil level. Do not
rely on it. Instead , check the oil level in
your engine at regular intervals, pref
erably each time you refuel , and always
before going on a long trip .
-If you have the impression your engine
consumes excessive amounts of oil, we r ecommend that you consult your Audi
dealer to have the cause of your concern
properly diagnosed. Keep in mind that
the accurate measurement of oil con
sumption requires great care and may
take some time. Your Audi dealer has in
structions about how to measure oil con
sumption accurately.
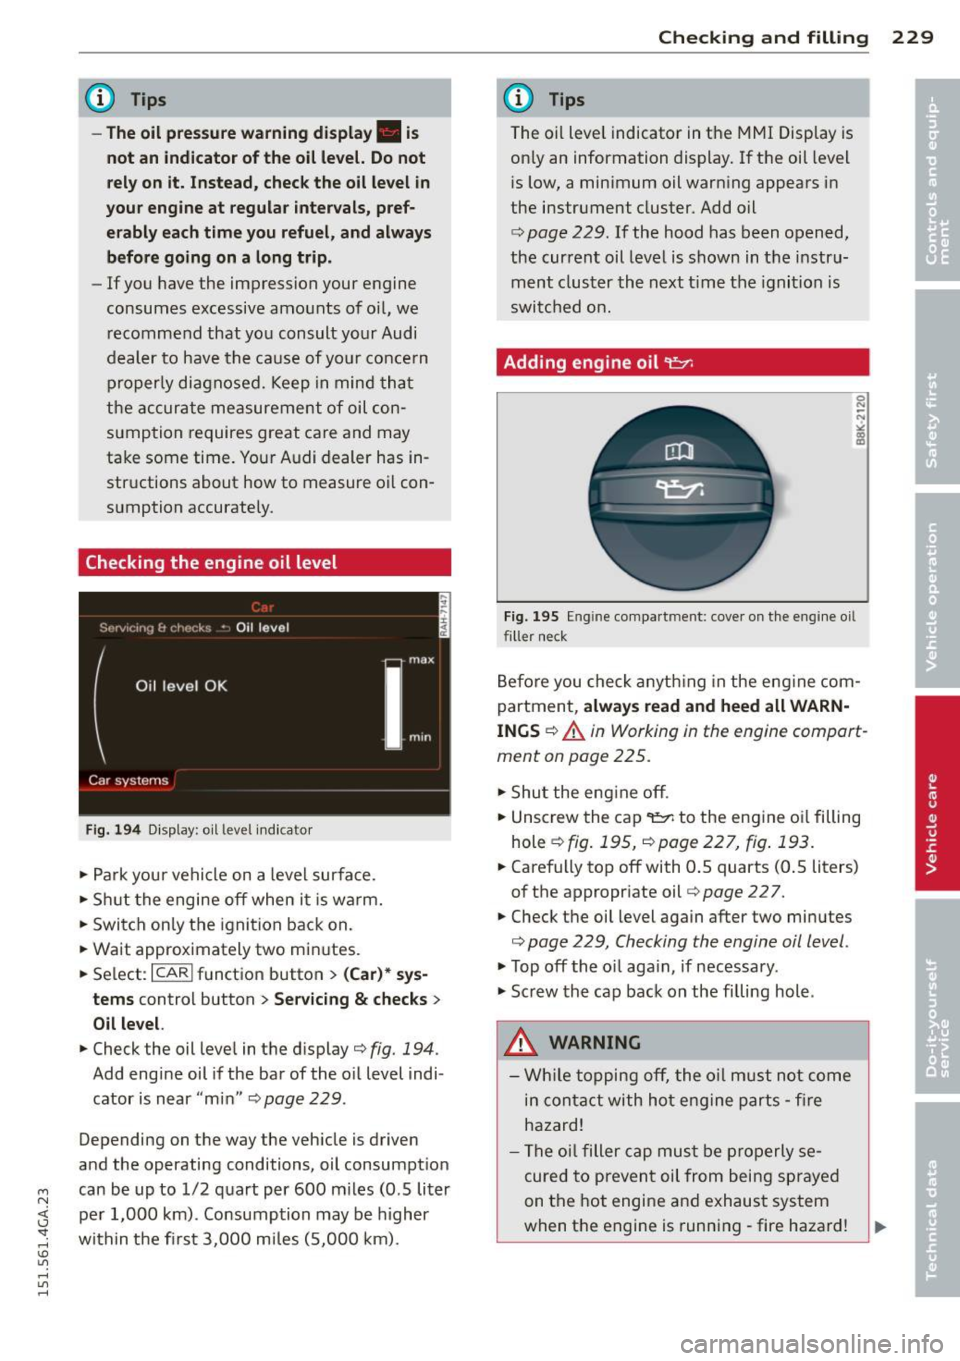
Checking the engin e oil lev el
Fig . 194 D isp lay : o il lev el indicato r
"' Park your vehicle on a level surface .
"' Sh ut the engine off when it is warm.
.. Switch only the ignition back on.
.. Wait approximately two min utes .
.. Select:
ICARI funct ion button> ( Car)* sys
tems
contro l button > Se rvicing & checks >
Oil level.
.. Check the oil level in the display¢ fig. 194 .
Add engine oil if the bar of the oil level indi
cator is near "min" ¢
page 229 .
Depending on the way the vehicle is driven
and the operating conditions, oil consumpt ion
can be up to 1/2 quart per 600 m iles (0 .5 liter
per 1,000 km) . Consumption may be higher
within the first 3,000 miles (5,000 km).
Checking and filling 229
@ Tips
The oil level indicator in the MMI Display is
on ly an information display. If the oil level
i s low, a minimum oil warn ing appears in
the instrument cluster. Add oil
c» page 229. If the hood has been opened,
the current oil level is shown in the instru
ment cluster the next time the ignition is
switched on.
Adding engine oil '1:::1:
Fig . 195 En gin e compart ment: cove r on the eng ine oil
filler neck
Before you check anything in the eng ine com
partment ,
always read and heed all WARN·
INGS
¢ A in Working in the engine compart
ment on page 225 .
.. Shu t the engine off .
"'U nscrew the cap
¢ fig. 195, ¢page 227 , fig. 193 .
.. Carefully top off with 0 .5 quarts (0 .5 liters)
of the appropr iate oil
¢ page 227.
.. Check the oil level again after two minutes
¢ page 229, Checking the engine oil level .
"'Top off the o il aga in, if necessary .
.. Screw the cap back on the fi lling hole .
_&. WARNING
-While topping off, the oil must not come
in contact with hot engine parts -fire
hazard!
- The oil filler cap must be prop erly se
cured to prevent oil from being sprayed
on the hot engine and exhaust system
when the engine is running -fire hazard! .,.
Page 245 of 316
M N <( (.J
'SI: ,...., \!) 1.1'1 ,...., 1.1'1 ,....,
Bead
means the part of the tire that
is made of steel wires, wrapped
or reinforced by ply cords and
that is shaped to fit the rim .
Bead separation
means a breakdown of the bond
between components in the
bead.
Cord
means the strands forming the
plies in the tire.
Cold tire inflation pressure
means the tire pressure recom
mended by the vehicle manu
facturer for a tire of a designat
ed size that has not been driven
for more than a couple of miles (kilometers) at low speeds in
the three hour period before
the tire pressure is measured or
adjusted.
Curb weight
means the weight of a motor
vehicle with standard equip
ment including the maximum
capacity of fuel, oil, and cool
ant, air conditioning and addi
tional weight of optional equip
ment.
Tires and wheels 243
Extra load tire
means a tire design to operate
at higher loads and at higher inflation pressures than the
corresponding standard tire .
Extra load tires may be identi
fied as "XL", "xl", "EXTRA
LOAD", or "RF" on the sidewall.
Gross Axle Weight Rating ("GAWR")
means the load-carrying capaci
ty of a single axle system,
measured at the tire-ground in
terfaces.
Gross Vehicle Weight Rating ("GVWR")
means the maximum total
loaded weight of the vehicle .
Groove
means the space between two
adjacent tread ribs.
Load rating (code)
means the maximum load that
a tire is rated to carry for a giv
en inflation pressure. You may
not find this information on all
tires because it is not required by law.
•
•
'
Page 257 of 316
M N <( (.J
'SI: ,...., \!) 1.1'1 ,...., 1.1'1 ,....,
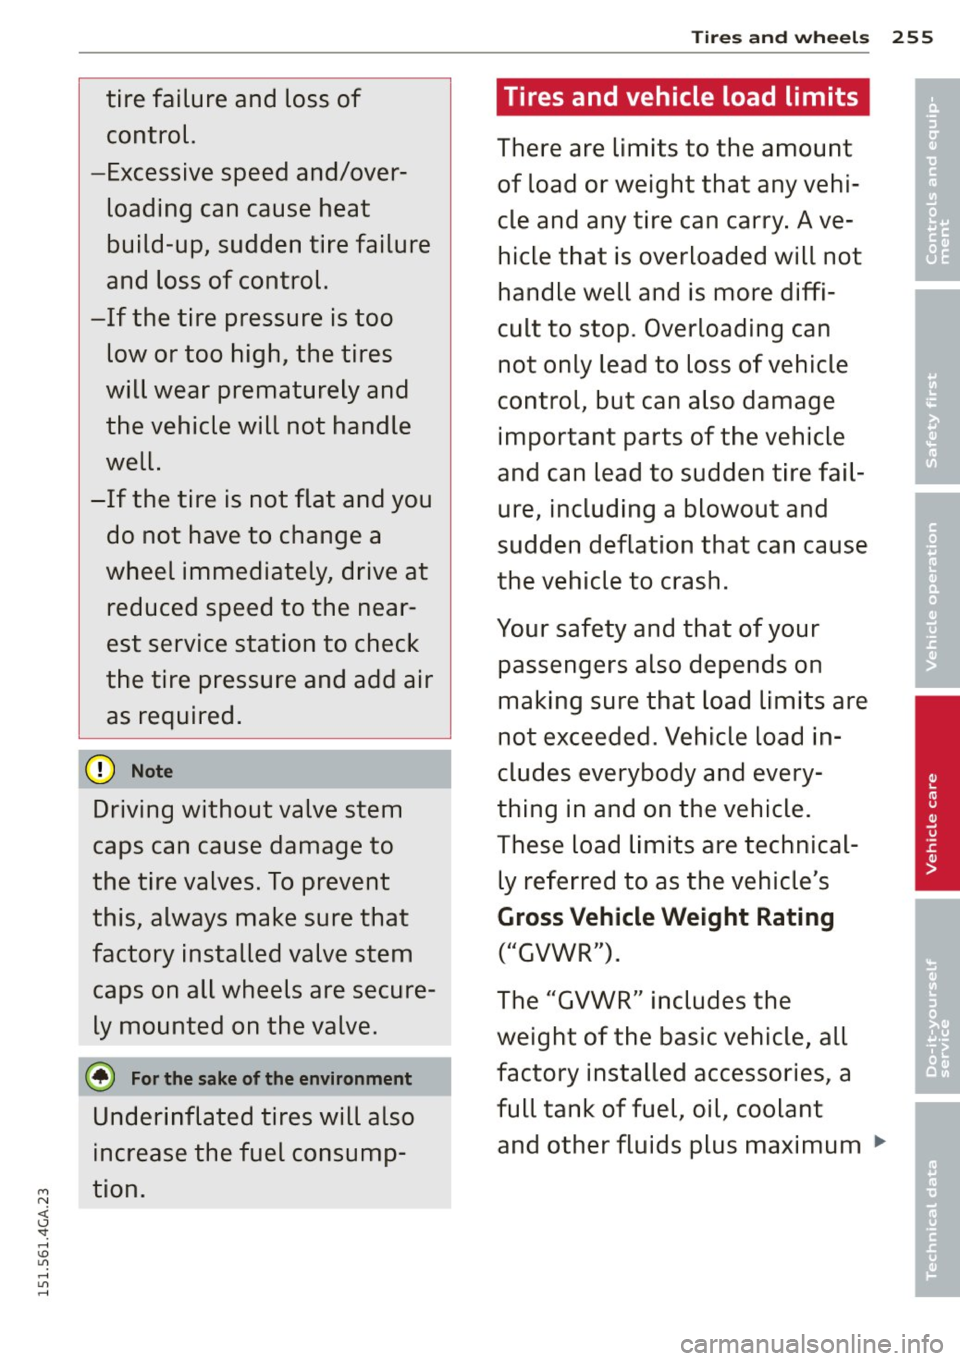
tire failure and loss of
control.
-Excessive speed and/over loading can cause heat
build -up, sudden tire failure
and loss of control.
-If the tire pressure is too low or too high, the tires
will wear prematurely and
the vehicle will not handle
well.
-If the tire is not flat and you do not have to change a
wheel immediately, drive at
reduced speed to the near
est service station to check
the tire pressure and add air as required.
(D Note
Driving without valve stem
caps can cause damage to
the tire valves. To prevent
this, always make sure that
factory installed valve stem caps on all wheels are secure
ly mounted on the valve.
@ For the sake of the environment
Underinflated tires will also
increase the fuel consump
tion.
Tires and wheels 255
Tires and vehicle load limits
'
There are limits to the amount of load or weight that any vehi
cle and any tire can carry. Ave
hicle that is overloaded will not
handle well and is more diffi
cult to stop. Overloading can
not only lead to loss of vehicle
control, but can also damage important parts of the vehicle
and can lead to sudden tire fail
ure, including a blowout and
sudden deflation that can cause
the vehicle to crash.
Your safety and that of your passengers also depends on
making sure that load limits are
not exceeded. Vehicle load in
cludes everybody and every
thing in and on the vehicle .
These load limits are technical ly referred to as the vehicle's
Gross Vehicle Weight Rating
("GVWR").
The "GVWR" includes the
weight of the basic vehicle, all
factory installed accessories, a
full tank of fuel, oil, coolant and other fluids plus maximum ""
•
•
'
Page 272 of 316

2 70 T ire s and wheel s
through or over such obstacles can damage
your tires. Impact with a curb may also
cause damage to your tires.
- After any impact, immediately inspect your
tires or have them inspected by the nearest
authorized Audi dealer. Rep lace a damaged
t ire as soon as possible.
- Inspect your t ires every 2,000 miles (3,000
km) for damage and wear . Damage is not al
ways easy to see. Damage can lead to loss of air and underinflation, wh ich could eventu
ally cause t ire failu re. If you bel ieve that a
t ire may have been damaged, replace the
t ire as soon as possible.
- These tires may wear more quickly than oth
ers.
- Please also remember that, while these t ires
deliver respons ive handling, they may ride
less comfortably and make mo re no ise than
othe r cho ices .
Reduced performance in winter /co ld
season condition s
All tires are des igned for certain pu rposes.
The low aspect ratio, ultra high pe rformance
tires orig inally installed on your veh icle are in
tended for maximum dry and wet road per
formance and handling. They are not suitable for cold, snowy or icy weather conditions. If
you dr ive under those circumstances, you
should equip your vehicle with all-season or
winter tires, which offer better traction under
those cond it ions. We suggest you use the rec
ommended snow or a ll-season tires specified
for your vehi cle, or their equ ivalent.
Refer to¢
page 267 for more deta iled infor
mat ion regarding winter tires.
Tire pressure
monitoring system
U) General notes
Each t ire, includ ing the spare (if provided),
should be checked monthly when cold and in
flated to the inflation pressure recommended by the vehicle manufacture r on the vehicle
p lacard or tire inflation pressure label. (If your vehicle has tires of a diffe
rent size than the
size indicated on the vehicle placard or tire in
flat ion pressure labe l, you shou ld determ ine
the proper t ire inflation pressure for those
t ires).
As an added safety feature, your ve hicle has
been equipped with a tire pressure monitoring
system (TPMS) that illum inates a low tire
pressure telltale when one or more of your
t ires is significantly under-inflated. According
ly, when the low tire pressure telltale illumi
nates, you shou ld stop and check you r tires as
soon as possib le, and inflate them to the
proper p ressu re. Driving on a sig nifican tly u n
der- inflated t ire causes the tire to overheat
and can lead to tire fai lure . Under-inflation al
so reduces fuel efficiency and tire tread life,
and may affect the vehicle 's hand ling and
stopp ing ability.
Please note that the TPMS is not a substitute
for proper tire maintenance, and it is the driv er's respons ibility to maintain correct tire
pressure, even if under-inflation has not
reached the level to trigger illumination of the
TPMS low tire pressure telltale .
Your vehicle has also been equipped with a
TPMS malfunction indicator to ind icate when
the system is not operating properly. The
TPMS ma lfunction indicator is combined w ith
the low tire pressure telltale . When the sys
tem detects a malfunction, the telltale will
flash fo r approxima te ly one m inute and then
rema in continuously illum ina ted. This se
quence will continue upon subsequent vehicle
start-ups as long as the malfunction exists.
When the malfunction indica to r is illum inat
ed, the system m ay not be ab le to detect or
signal low tire pressure as intended . TPMS
malfunctions may occur for a var iety of rea
sons, incl uding the insta llation of replace
ment or alternate tires or wheels on the vehi
cle that prevent the TPMS from functioning
properly. Always check the TPMS malfunction
telltale after replacing one or more tires or
whee ls on you r vehicle to ensu re that the re
placement o r alternate ti res and wheels a llow
the TPM S to cont inue to func tion p roperly.
Page 284 of 316
282 Fuses and bulbs
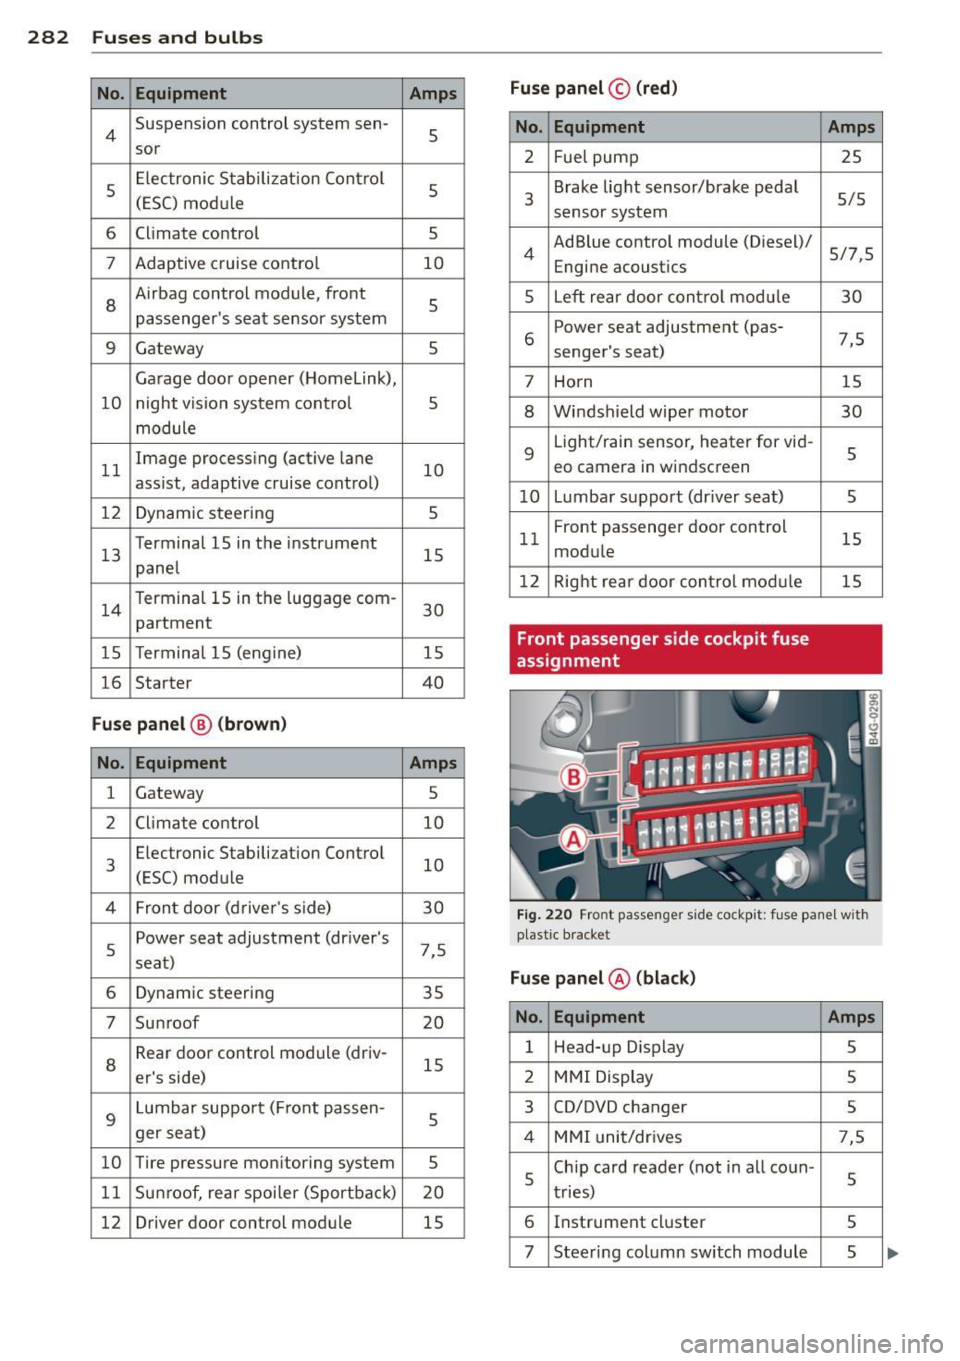
No . Equipment Amps
4 Suspension control system sen-
5
sor
5 Electron
ic Stabilization Control
5
(ESC) mod ule
6 Climate
control
5
7 Adaptive cruise control 10
8
Airbag control module, front
5
passenger's seat sensor system
9 Gateway 5
Garage door opener (Homelink),
10 night vision system contro l 5
module
11 Image processing (active
lane
10
ass ist, adaptive cruise control)
12 Dynamic steering 5
13 Terminal 15
in the instrument
15
panel
14 T
ermina l 15 in the luggage com-
partment 30
15 T
erminal 15 (engine)
15
16 Starter 40
Fuse panel @ (brown)
No . Equipment Amps
1 Gateway
5
2 Climate control 10
E lec tronic Stabilization Contro l
10
3
(ESC) module
4 Front door (driver's
side)
30
5 Power seat adjustment (driver's
7,5
seat)
6 Dynamic steering
35
7 Su nroof 20
Rear door control module (driv- 15
8
er's side)
9 Lumbar support (Front passen-
5
ger seat)
10 Tire pressure monitoring system
5
11 Su
nroof, rear spoiler (Sportbac k)
20
12 Driver door
control module
15
Fuse panel© (red)
No . Equipment
2 Fuel pump
3 Brake light sensor/brake pedal
sensor system
4 AdBlue control module (Diesel)/
Engine acoustics
5 Left rear door contro l modu le
6 Power
seat adjustment (pas-
senger's seat)
7 Horn
8 Windshield wiper motor
9
Light/rain sensor, heater for vid-
eo camera in windscreen
10 Lumbar support (dr iver seat)
11 Front
passenger door control
module
12 Right rear door control mod ule
Front passenger side cockpit fuse
assignment Amps
25
5/5
5/7,5 30
7,5 15
30
5
5
15
15
Fig. 220 Front passenger side cockpit: fu se pane l w ith
plastic bracket
Fuse panel @ (black)
No. Equipment Amps
1 Head-up Display
5
2 MMI Display 5
3 CD/DVD changer
5
4 MMI unit/dr ives 7,5
5 Chip card reader (not
in all coun-
5
tries)
6 Instrument cluster
5
7 Steering column switch module 5
Page 312 of 316
310 Index
Trip odometer ..... ..... ... .. .. .... .. 27
What does it mean whe n DEF appears in
the trip odometer d isp lay? ... .. .... . . 27
T runk
refer to L uggage compa rtment . . . . . . . . 64
Trunk pass -through ......... ... .. .. .. 68
Turn signa ls . .... . ...... ... .. .. .... .. 46
Warn ing/ indicator lights ... .. .. .... .. 23
u
ULSD No. 2 (Diese l fuel) ... .. .. .. .. .. . 218
Unfasten ing safety belts .. .. .. .. .. .. . 143
Unid irect iona l tires ......... .. .. .... . 241
Unifo rm tire q uality g rading
Unlock ing 266
P owe r locking sw itch ....... ... .. .... 36
Remote cont rol . . . . . . . . . . . . . . . . . . . . 34
Using the key . ........... .. .. .... .. 36
V
Valet park ing . ................ ... ... . 41
Vanity mirrors .. ........... ........ .. 48
Vehicle care/cleaning .. .. ..... ... .. .. .... . 212
Vehicle control mod ules . .. .. .. .. .. .. . 194
Vehicle e lectrica l system .... .. .. .. .. .. 17
Vehicle ident ificat ion labe l ... .. .. .. .. . 29 1
Vehicle Identification Number (VIN) ... . 291
Vehicle jack . . . . . . . . . . . . . . . . . . . 273, 277
Vehicle literature . . . . . . . . . . . . . . . . . . . . . S
Vehicle shutt-down ......... .. .. .... . 20S
Vehi cle transport ..... ... .. .. .. .... . 289
Vent ilation .. ..... ........... ... .. .. 69
Viny l
C leaning . ....................... . 215
w
War ning/indicato r lights . ... .. .... .. . . 1 2
A irbag system ........... .. .. .... .. 19
Anti-lock braking system (ABS) .. .. .... 19
Brake system . ........... .. .. .... .. 15
C ruise control . . . . . . . . . . . . . . . . . . . . . . 23
Elect romechan ical park ing brake .. .... 16
E lect ronic power control . . . . . . . . . . . . . 20
E lec troni c Stabilization Co ntrol ( ESC) ... 19 Generator
. . . . . . . . . . . . . . . . . . . . . . . . . 17
G low p lug system . .... ..... ... .. .. . 21
Instrument cluster . .. .. ..... ... .. .. . 11
Malfunction Ind icator Lamp (MIL) .... . 21
Safety be lt . . . . . . . . . . . . . . . . . . . . . . . . 17
Turn signals ..... ................ .. 23
Warning/Indicator lights
Airbag system . . . . . . . . . . . . . . . 159, 160
PASSENGER AIR BAG OFF ....... .. .. 160
Warran ty cove rages ............. .. .. 294
Washer reservo ir .. .......... ...... . 238
Wea r indicato r .... .. ... ..... ... .. .. 258
Weights .. .. .. .. . .............. .. .. 291
Wha t happens if you wear your safety belt
too loose? ...... .. .......... ...... . 142
What happens to unbe lted occupants? . . 139
What impa irs d riving safety? ...... .. .. 129
What shou ld I do after changing a
whee l? ..... .. .. .. ... .......... .... 254
What shou ld I do after replacing whee ls? 254
Whee l bo lts
T orque .... .... .. ............. .... 269
Wheels .... .... .. ............. .... 240
Checking t ire pressure ..... ...... ... 252
Cleaning ...... .. ..... ....... ... .. 213
Co ld tire inflation pressur e ......... . 247
Genera l notes .. .. ... .......... .. .. 240
G lossary of tire and loading term inolo-
gy ....... .. .. . .................. 242
New t ires and whee ls . .. ..... ... .. .. 260
T ires and vehicle load limits .. ... .. .. 255
When must a safety be lt be replaced? .. 141
When must the a irbag system be inspect-
ed? ........ .. ... . .. .... ...... ... .. 159
When should I adjust the ti re pressures? 254
When should I c hec k th e tire p ressu res? . 254
Where are lower anchorages located? . .. 188
Where can I find the t ire press ures for my
ca r? .. ... .. .. .. .. .. ... .. ..... ... .. 252
Why safety belts? . . . . . . . . . . . . . . 138, 139
Windows Cleaning/removing ice .......... .... 214
defrosting (automatic climate control) . 73
defrosting (cl imate control) . . . . . . . . . . 71