belt AUDI A7 2015 Owners Manual
[x] Cancel search | Manufacturer: AUDI, Model Year: 2015, Model line: A7, Model: AUDI A7 2015Pages: 316, PDF Size: 78.09 MB
Page 5 of 316
M N <( (.J
'SI: ,...., \!) ..,.,
,...., ..,., ,....,
Safet y fir st . . . . . . . . . . . . . . . . . . . . 128
Driving Safely . . . . . . . . . . . . . . . . . 128
General notes . . . . . . . . . . . . . . . . . . . . 128
Proper occupant seating posit ions . . . 129
Driver and passenger side footwell . . . 133
Pedal area . . . . . . . . . . . . . . . . . . . . . . . 133
Stowing luggage . . . . . . . . . . . . . . . . . 134
R eport ing Safety Defects . . . . . . . . . . . 136
Safety belts . . . . . . . . . . . . . . . . . . . 138
General notes . . . . . . . . . . . . . . . . . . . . 138
Why safety bel ts? . . . . . . . . . . . . . . . . 139
Safety belts . . . . . . . . . . . . . . . . . . . . . 14 1
Safety belt p re tens ioners . . . . . . . . . . 145
Airbag system . . . . . . . . . . . . . . . . . 147
I mpor tant th ings to know . . . . . . . . . . 1 47
Fr ont airbags . . . . . . . . . . . . . . . . . . . . 151
M onitoring the Advanced Airbag
System . . . . . . . . . . . . . . . . . . . . . . . . . 159
Knee airbags . . . . . . . . . . . . . . . . . . . . . 164
Side airbags . . . . . . . . . . . . . . . . . . . . . 166
Side curta in a irbags ........ . .... . .
Ch ild Safety ............... .. . .
Important things to know .. .. .. .. . .
C hi ld safety seats ............ .... .
Install ing a chi ld safety seat .. .. ... .
L A TC H L ower ancho rages and tethe rs
fo r ch ild ren . ............. .... .. . .
Addit io nal Informa tion
Audi pre sense .......... .. .. . .
Pr even ta ti ve passe nger p rotec tion
Vehicle operation ....... .. .. . .
Intelligent technology .. .. .. . .
N ot ice about da ta re corded by the
E vent Data Recorder and vehi cle
control mod ules ... .... ... .. .. .. . .
Elect ronic Stabilization Control (ESC) .
Rear spoiler ............. .... .. . .
Braking .. .. ................. .. . .
Elect romechan ical power assist, 169
173
173
179
184
187
19 1
192
19 2
194
194
194
195
197
198
dynam ic steering . . . . . . . . . . . . . . . . . 200
D riving w ith your quattro . . . . . . . . . . 200
E ne rgy management . . . . . . . . . . . . . . 20 1
Table of contents 3
Driving and environment . . . . .
203
T he first 1,000 miles (1 ,500 km) and
afterwa rds . . . . . . . . . . . . . . . . . . . . . . 203
Avoid damaging the vehicle . . . . . . . . . 204 Driving through water on roads . . . . . 204
Catalytic co nverter . . . . . . . . . . . . . . . . 204
D iesel pa rticulate filter . . . . . . . . . . . . 205
S hu tting down vehi cle . . . . . . . . . . . . . 205
Operate your vehicle e conomically and
min imi ze poll ution . . . . . . . . . . . . . . . . 205
Trailer towing . . . . . . . . . . . . . . . . . 208
Dr iving wit h a trailer . . . . . . . . . . . . . . 208
T ra ile r tow ing t ips . . . . . . . . . . . . . . . . 210
Vehicle care . . . . . . . . . . . . . . . . . . . 2 12
Vehicle care and cleaning . . . . . 212
Genera l informa tion . . . . . . . . . . . . . . 212
Car was hes . . . . . . . . . . . . . . . . . . . . . . 212
Cleaning and care information . . . . . . 213
Fuel supply and filling your
fueltank ... .. .... . ... ...... ... .
217
Gasoline .. .. .. .. .. .. .. . . .. .. .. .. 217
Diesel fuel . . . . . . . . . . . . . . . . . . . . . . 218
Fuel tank.. .. .. .. .. .. ........... . 219
Se lective cata lytic reduction . . . . . . . . 221
Checking and filling . . . . . . . . . . . 225
Engine hood . . . . . . . . . . . . . . . . . . . . . 225
En gine compartment . . . . . . . . . . . . . . 227
E ngine o il . . . . . . . . . . . . . . . . . . . . . . . 227
En gine cooling system . . . . . . . . . . . . . 231
Br ake fluid . . . . . . . . . . . . . . . . . . . . . . 234
Battery . . . . . . . . . . . . . . . . . . . . . . . . . 235
Windshie ld/headlight * washer
co ntainer . . . . . . . . . . . . . . . . . . . . . . . 238
Tires and wheels . . . . . . . . . . . . . . 24 0
T ires . . . . . . . . . . . . . . . . . . . . . . . . . . . 240
Tire pressure mo nitoring system 2 70
Do-it-yourself service . . . . . . . . . 273
What do I do now? . . . . . . . . . . . . 273
Emergency warn ing triangle . . . . . . . . 273
Vehicle tool kit . . . . . . . . . . . . . . . . . . . 273
Changi ng a wheel. . . . . . . . . . . . . . . . . 275
•
•
Page 19 of 316
M N <( (.J
'SI: ,...., \!) 1.1"1 ,...., 1.1"1 ,....,
Instruments and warning/indicator lights 17
-The engine compartment of any vehicle
is a dangerous area. Before you perform
any work in the engine compartment,
turn of the eng ine and allow it to cool.
Follow the warning stickers
c::;, page 225.
(D Note
Do not continue driving if the. symbo l
illuminates. There is a malfunct ion in the
eng ine cooling system -you could damage
your eng ine.
0 Battery
This warning/indicator light detects a mal
function in the generator or in the vehicle's
electrical system.
The. warning/ind icator light illuminates
when you switch on the ignit ion and must go
out after the engine has started.
• Alternator fault: Battery is not being
charged
If the indicator light turns on and the mes
sage appears, there is a malfunction in the
generator or vehicle e lectr ica l system .
Dr ive to your au thorized Audi dealer or quali
fied workshop immediately . Because the vehi
cle battery is discharging, turn
off all unnec
essary electrical equipment such as the radio.
Seek professional ass istance if the battery
charge level is too low .
(•) Low battery: battery will be charged
while driving
If the indicator light turns on and the mes
sage appears , there may be limited starting
abi lity .
If this message turns off after a litt le wh ile,
the battery charged enough wh ile driving.
If the message does not turn off, have your
authorized Audi dealer or qua lified workshop
correct the mal func tion.
~ Safet y belts
This warning/indicator light reminds you to
put on your safety belt.
The . warning/ indicator light illum inates
when the ignition is switched on to remind
the driver and any front passenger to put on
the safety belt. Add it ionally, an acoustic warn
ing (gong) wi ll also sound.
For more Information
c::;, page 138, i Safety
belt warning light .
~ Engine oil pressure malfunction
The red engine oil pressure warning symbol
requires immediate service or repair . Driving
with a low-oil-pressure indication is likely to
inflict severe damage to the engine.
• Switch off engine and check oil level
If the indicator light turns on and the mes
sage appears, the oi l pressure is too low.
.,. Pull
off the road.
.,. Stop the vehicle.
.,. Turn
off the engine .
.,. Check the engine oil level c> page 229 .
.,. If the eng ine o il level is too low, add eng ine
oil
c::;, page 229. Make sure that the oil pres
sure warning symbol. appears no longer
in the display before you start dr iv ing again .
.,. If the eng ine o il level is correct and the indi
cator light still turns on, turn the engine
off
and do not continue driving. Seek professio
na l assistance .
(D Tips
- The engine oil pressure symbol. is
not an indicator for a low engine oil lev
el. Do not rely on it. Instead, check the
oil level in your engine at regular inter
vals, preferably each time you refuel ,
and always before going on a long trip.
- The yellow oil level warning indication
II requires oil refill or workshop serv
ice without delay. Do not wait until the
red oil pressure warning. starts to
flash before you respond to the low oil
Page 55 of 316
M N <( (.J
'SI: ,...., \!) 1.1'1 ,...., 1.1'1 ,....,
Seats and storage
General recommen
dations
Why is your seat adjustment so important?
The safety belts and the airbag system can
only provide maximum protection if the front
seats are correctly adjusted.
There are various ways of adjusting the front
seats to provide safe and comfortable support
for the driver and the front passenger. Adjust
your seat properly so that :
- you can easily and quick ly reach all the
switches and controls in the instrument
panel
- your body is properly supported thus reduc ing physical stress and fatigue
- the safety belts and airbag system can offe r
maximum protection ¢
page 147.
In the following sections, you will see exactly
how you can best adjust your seats .
There are special regulations and instructions
for installing a child seat on the front pas
senger's seat. Always fo llow the information
regarding chi ld safety provided in
¢ page 173, Child Safety .
A WARNING
Incorrect seating position of the driver and
all other passengers can result in serious
personal injury.
- Always keep your feet on the f loor when
the vehicle is in motion -never put your
feet on top of the instrument panel, out
of the window or on top of the seat cush
ion. Th is applies especially to the passen
gers . If your seating position is incorrect,
you increase the r isk of injury in the case
of sudden braking or an acc ident. If the
airbag inflates and the seating position
is incorrect, this could result in persona l
injury or even death.
- It is important for both the driver and
front passenger to keep a distance of a t
Seat s an d sto rage 53
least 10 inches (25 cm) between them
selves and the steering wheel and/or in
strument panel. If you're s itting any
closer than th is, the airbag system can
not protect you properly. In addition, the
front seats and head restraints must be
adjusted to your body height so that they
can give you maximum protect ion.
- Always try to keep as much distance as
possible between yourself and the s teer
ing wheel o r instrument pane l.
- Do not adjust the driver's or front pas
senger's seat whi le the vehicle is moving.
Your sea t may move unexpected ly, caus
ing sudden loss of vehicle cont rol and
personal injury . If you adjust yo ur seat
while the veh icle is moving, yo u are out
of posit ion.
Driver's seat
The correct seat position is important for safe
and relaxed driving.
We recommend that you adjus t the dr iver's
seat in the fo llowing manner:
.,. Adjust the seat in fore and aft direction so
that you can easily push the peda ls to the
floor wh ile keeping your knees s lightly bent
i:::> A in Why is your seat adjustment so im
portant? on page 53.
.,. Adjust the backrest so that when you sit
w ith your back against the backrest, you can
still grasp the top of the steering wheel.
.,. For adjustable head restra ints: adjust the
head restra int so the upper edge is as even
as poss ible with the top of your head . If that
is not poss ible, try to adjust the head re
straint so that it is as close to this position
as possible ¢
page 56. Move the head re
straint so that it is as close to the back of
the head as possib le .
A WARNING
-Never place any objects in the dr iver's foot-
well. An object could get into the pedal
area and interfere with pedal funct ion . In
~
Page 56 of 316
54 Seat s and storage
case of sudden braking or an accident, you
would not be ab le to brake or acce lerate.
Front passenger's seat
Always move the front passenger seat into
the rearmost position.
To avo id contact with the airbag wh ile i t is de
p loying, do not sit a ny closer to the inst ru
ment panel than necessary and always wear
the three-point safety belt provided adjusted
correctly. We recommend that you adjust the
passenger's seat in the following manner:
"' Bring the backrest up to an (almost) upright
position . Do not ride with the seat reclined.
"' For adjustable head restraints: adjust the
head restraint so the upper edge is as
even
as possible w ith the top of your head . If that
is not possible, try to adjust the head re
stra int so that it is as close to th is position
as possible ¢
page 56. Move t he head re
stra int so that it is as close to the back of
the head as possible.
"' Place your feet on the floor in front of the
passenger's seat .
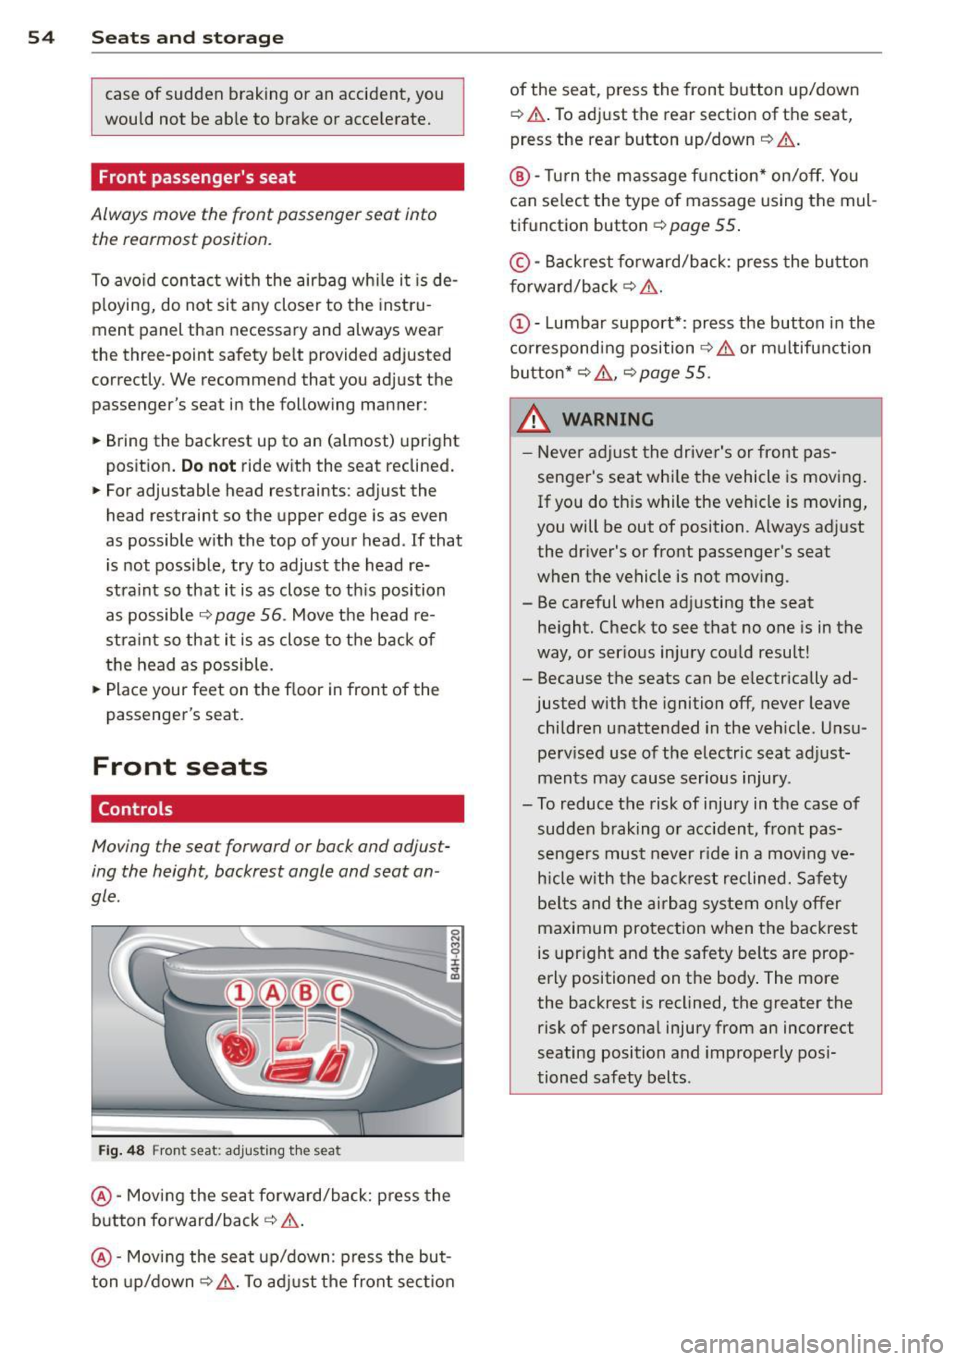
Front seats
Controls
Moving the seat forward or bock and adjust
ing the height, backrest angle and seat an
gle.
F ig. 4 8 Front seat: adjusting t he seat
@ -Moving the seat forward/back: press the
button fo rward/back
c:> .&. .
@ -Mov ing the seat up/down: press the but
ton up/down~ _&.. To ad just the fron t sec tion of the seat, press the front button up/down
¢
.&. .To adjust the rear sectio n of the seat
,
press the rear button up/down ¢ &..
®-Turn the massage function * on/off. You
can select the type of massage using the mul
tif unction button ¢
page 55 .
© -Backrest fo rward/back: p ress the bu tton
f orward/back
c:> &. .
c:> &. or multifunction
button*
c:> &. , c:> page 55 .
_& WARNING -
-Never adjust the driver's or front pas -
senger's seat whi le the vehicle is moving .
If you do th is while the veh icle is moving,
you will be out of position. A lways adjust
the driver's or front passenger's seat
when the ve hicle is not mov ing.
- Be careful when adj usting the seat
he ight. Check to see that no one is in t he
way, or ser ious injury cou ld result!
- Because the seats can be e lectrically ad
justed with the ignition off,
never leave
children unattended in the veh icle. Unsu
pe rv ised use of the electric seat adjust
ments may cause serious injury .
- To reduce the risk of injury in the case of sudden b raking or accident, front pas
sengers mus t never r ide in a moving
ve
h icle with the ba ck res t reclined. Safety
be lts and the airbag system o nly offer
maxim um protection when the backrest
is upr ight and the safety belts are prop
erly positioned on the body . The more
the backrest is reclined, the greater the risk of persona l injury from an incorrect
seating position and improperly pos i
tioned safety belts.
Page 57 of 316
M N <( I.J "". rl I.O
"' rl
"' rl
Multifunction button
Applies to vehicles: with memory function
You con adjust the massage function, Lumbar
support, side bolsters and seating surface us
ing the multifunction button .
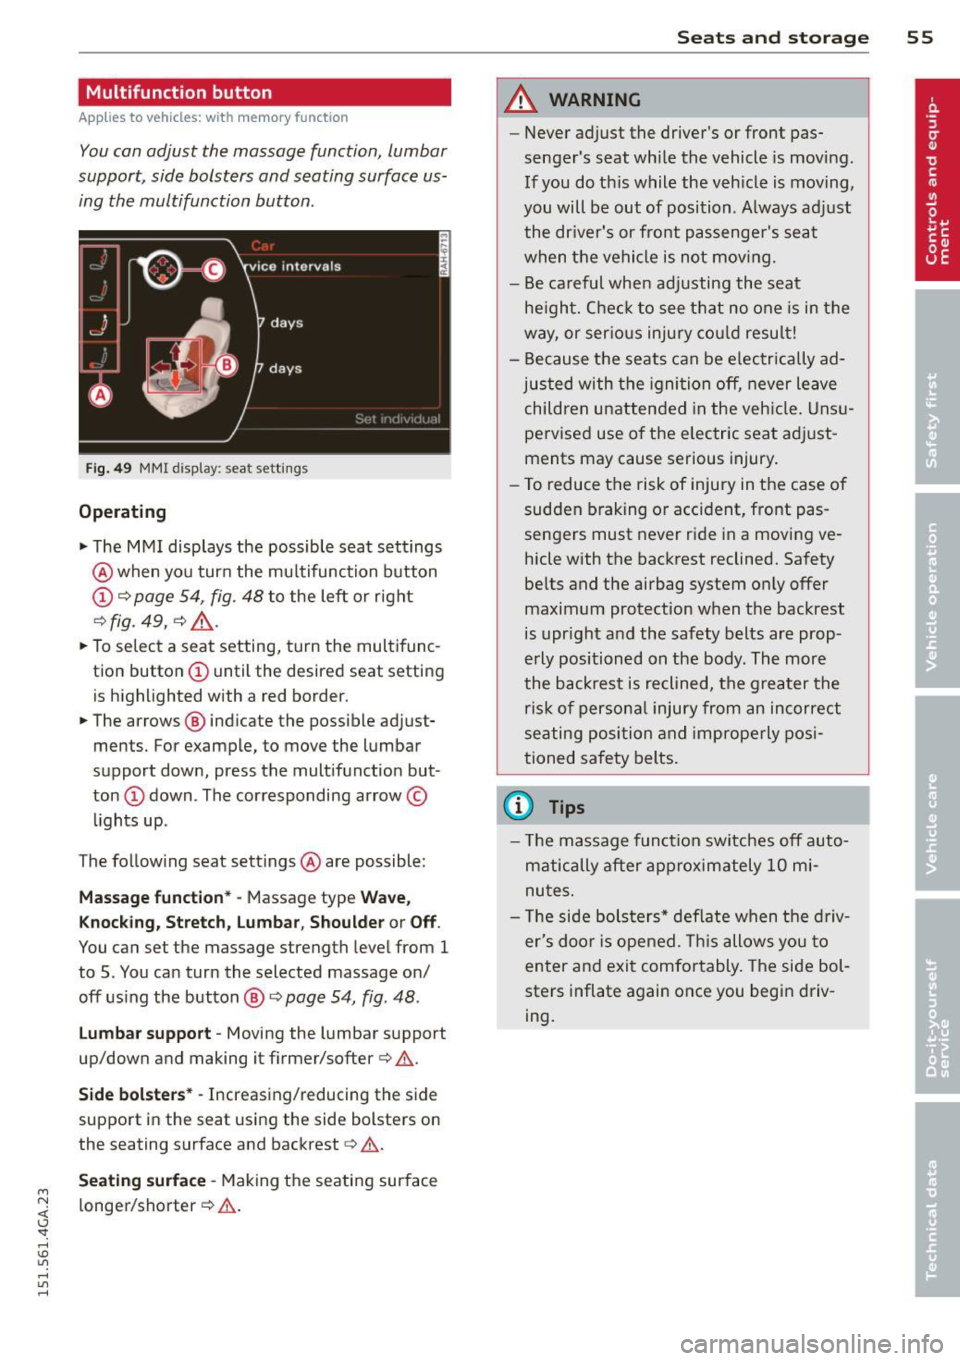
Fig. 49 MMI display: seat sett ings
Operating
.. The MMI displays the possible seat settings
@ when you turn the mu ltifunction button
(D c:> page 54, fig. 48 to the left or right
~ fig . 49 , c:> ,& .
.. To select a seat setting, turn the multifunc
tion button
(D until the desired seat setting
is highlighted with a red border.
• The arrows @ indicate the possible adjust
ments. For example, to move the lumbar
support down, press the multifunction but
ton
(D down . The corresponding arrow ©
lights up .
T he follow ing seat settings @ are possible:
Massag e fun ct ion * -Massage type Wave,
Kn ock ing, S tretch, Lumb ar, Sho ulde r or Off.
You can set the massage strength level from 1
to 5. You can turn the selected massage on/
off us ing the button @~
page 54, fig . 48 .
Lu mba r support -Moving the lumbar support
up/down and making it firmer/softer
c:> .&. .
Side bol sters* -Increasing/reducing the side
support in the seat using the side bolsters on
the seating surface and backrest
c:> A.
Se ati ng surfac e -Making the seating surface
l onger/shorter
c:> .&. .
Sea ts a nd s to rage 55
A WARNING
-Never adjust the driver's or front pas
senger's seat while the vehicle is moving.
If you do th is while the veh icle is moving,
you will be out of position . A lways adjust
the dr iver's or front passenger's seat
when the vehicle is not moving.
- Be careful when adjusting the seat
he ight. Check to see that no one is in the
way, or ser ious injury cou ld resu lt!
- Because the seats can be electrically ad
justed with the igni tion off, never leave
children unattended in the veh icle. Unsu
pervised use o f the electric seat adjust
ments may cause serious injury.
- To reduce the risk of injury in the case of
sudden braking or accident, front pas
sengers must never ride in a moving ve
hicle with the backrest reclined. Safety
belts and the airbag system only offer
maximum protection when the backrest
is upr ight and the safety belts are prop
erly positioned on the body . The more
the backrest is reclined, the greater the
ris k of persona l inju ry from an incorrect
seating position and improperly posi
tioned safety belts.
(D Tips
- T he massage funct ion switches off auto
matically after approximately 10 mi
nutes.
- T he side bolsters* deflate when the driv
er's doo r is opened. This allows you to
enter and exit comfortably. The side bol
sters inflate again once you begin driv
ing.
Page 58 of 316
56 Seats and storage
Armrest
Th ere is a storage compartment under the
armrest.
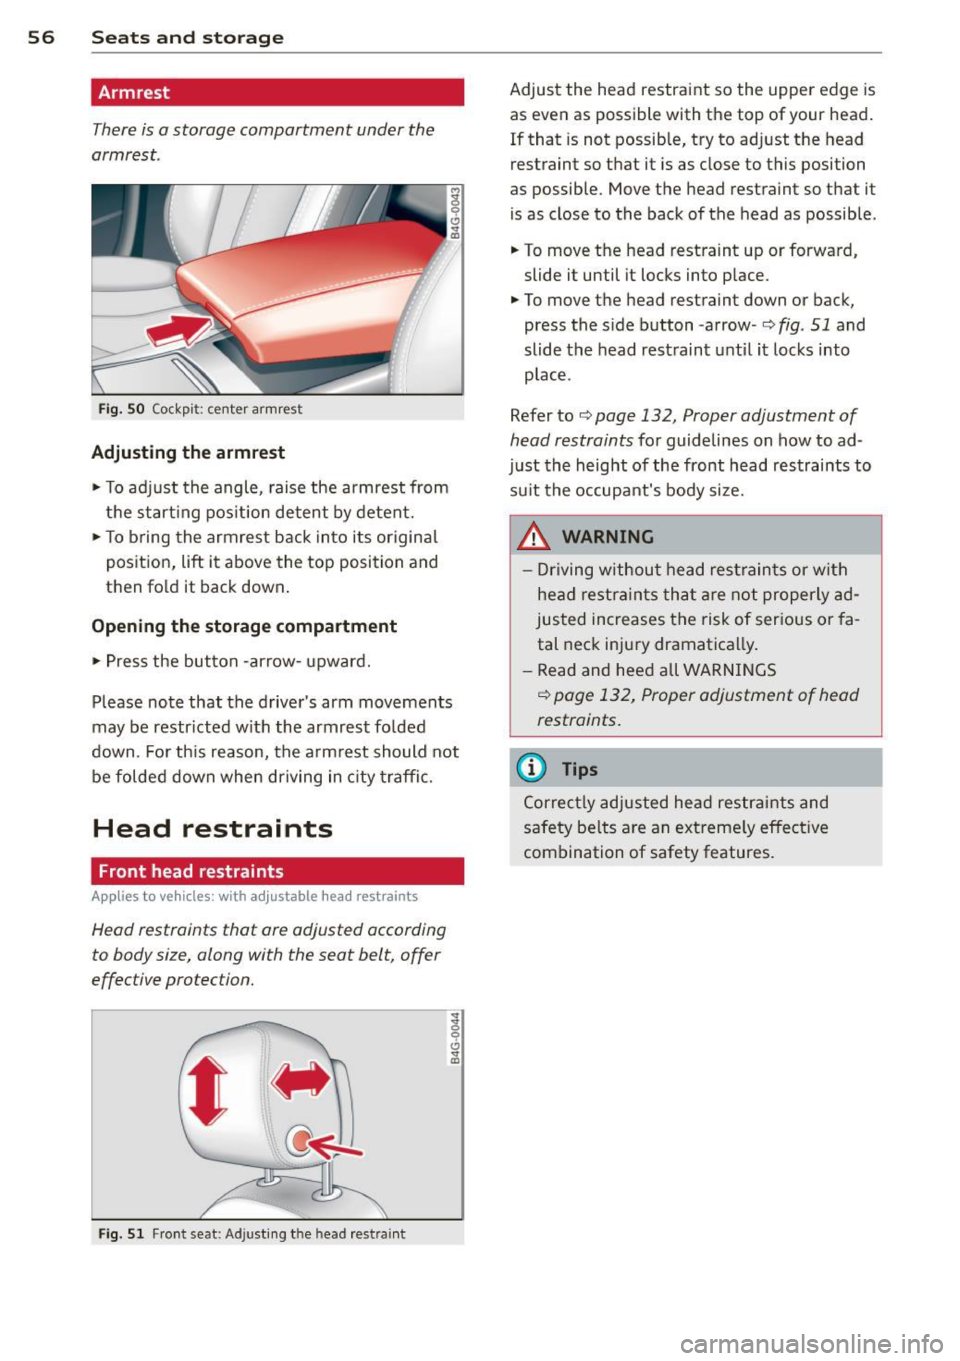
F ig. SO Cockp it : center arm rest
Adjusting th e armrest
• To ad just the angle, raise the armrest from
the start ing pos ition detent by detent.
• To bring the armrest back into its original
position, lift it above the top position and
then fold it back down .
Opening th e storage compartment
• Press the button -arrow-upward.
Please note that the driver's arm movements
may be restr icted w ith the armrest fo lded
down. Fo r th is reason, the armrest should not
be folded down when driving in city traffic.
Head restraints
Front head restraints
App lies to vehicles: with adjustable head restrain ts
Head restraints that are adjusted according
to body size, along with the seat belt, offer
effective protection.
F ig . 51 Fr ont seat: Adjusting t he head res tra int
Adjust the head restraint so the upper edge is
as even as possible with the top of your head.
If that is not possible, try to adjust the head
restraint so that it is as close to this position
as possible. Move the head restraint so th at it
is as close to the back of the head as possib le .
• To move the head restraint up or forward,
slide it until it locks into place.
• To move the head restraint down or back,
press the side button -arrow -
c::> fig. 51 and
slide the head restraint unt il it loc ks into
p lace.
Refer to
c::> page 132, Proper adjustment of
head restraints
fo r guidelines on how to ad
just the height of the front head restraints to
su it the occupant's body size.
_& WARNING
- Dr iving w ithou t hea d rest rain ts or with
hea d restra ints tha t ar e no t properly ad
justed increases t he risk of ser ious or fa
tal neck injury dramatica lly.
- Read and heed all WARN INGS
c::> page 132, Proper adjustment of head
restraints.
(D Tips
Cor rec tly adjusted hea d restr aints and
s a fety be lt s are an extreme ly effe ctive
com bination of safety features.
-
Page 67 of 316

M N <( I.J "". rl I.O
"' rl
"' rl
Removing the cover in the rear lid
• Remove the knobs CD c::> fig. 65 from the ball
mounts.
• Pull the cover @out of the retainers@ in
the direct ion of the arrow .
Installing the cover in the rear lid
• Slide the cover upward into the retainers @.
• Press the knobs
CD onto the ball mounts.
Removing the cover behind th e rear bench
seat
• Pull the cover ¢ fig. 66 back.
• Pull the cover upward to release.
Installing the cover behind the rear bench
seat
• Insert the left and right sides of the cover
into the mounts on the side trim .
• Slide the cover forward until it locks into
place .
A WARNING
-To prevent accidents, never install the
luggage compartment cover unsecured.
- The luggage compartment cover is not a
surface for storing objects. Objects
placed on the cover could endanger all
vehicle occupants during sudden braking
maneuvers or in a crash.
(D Note
Objects located on the rear shelf that rub
aga inst the rear window could damage the
heating wires for the rear window defog
ger.
Seats and storage 65
Enlarging cargo capacity of the vehicle
, interior
The seat backs can be folded forward to en
large the cargo capacity.
Fig. 67 Release handle on th e seatback
Folding the seatback forward
• When you pull the release lever @<=:> fig. 67
in the direction of the arrow, the safety knob
® pops out far enough for the red marking
on knob to be visib le.
.,. Fold the seatback forward.
Raising the seatback
.,. Raise the seatback until it is secure ly latch
ed¢ &,.. When you can no longer see the
red mark on the safety knob@, the seat is
latched.
_& WARNING
-
- The backrest must always be securely
latched so that the safety belt of the cen
ter seating position can work properly to he lp protect the occupant.
- The backrest must be securely latched in
position so that no items contained in
the luggage compartment can s lide for
ward upon sudden braking.
- Always check whether the latch is fully
engaged by pulling the seatback for
ward .
- N ever a llow safety belts to become dam
aged by being caught in door or seat
hardware .
- Torn or frayed safety belts can tear and
damaged be lt hardware can break in a
crash. Inspect the belts periodical ly.
Page 68 of 316

66 Seats and st o rage
Belts showing damage to webbing, bind
ings, buckles, or retractors must be re
placed.
(D Note
- If you move the front seat back when the
rear seat backrest is fo lded forward, you
could damage the head restraints on the
rear seat.
- Slide the belt guide on the outside safety
belt all the way up before folding the
backrest back forward. Make sure the
seat belt is not p inched or damaged
when the rear seat backrest if folded
back. Other objects shou ld be removed
from the rear seat bench to protect the
seatbac k from d amage.
Tie -downs and cargo net
The cargo net" prevents small objects from
sliding.
Fig . 68 Locat ion of the tie-downs in the luggage com
partment
Fig. 69 Luggage compartme nt: ca rgo net*
... To secure objects with the luggage compa rt
ment net*, fold the tie-down bracket up
ward
c:::> fig. 68.
... Insert the hooks on the luggage compart
ment net* into the tie-downs
c:::> fig . 69.
... Read and heed all WARNINGS
c:::> page 134,
Stowing luggage.
In a collision, the laws of physics mean that
even smaller items that are loose in the vehi
cle wi ll turn into heavy missi les that can cause
serious injury. Items in the vehicle pick up ki
netic energy which varies with the veh icle and
the weight of the item . Vehicle speed is the
most sign ificant factor .
For example, in a frontal collision at a speed
of 30 mph (48 km/h), the forces acti ng on a
10-lb (5 kg) object are about
20 times the
normal we ight of the item . This means that
the weight of the item would sudden ly be the
equivalent of abo ut 200 lbs (90 kg). One can
easily imagine the injuries that an item of that
weight flying freely through the passenge r
compartment ca n cause in a collision at a
speed considered relatively low.
A WARNING
-
Weak, damaged or improper straps used
to secure items to tie-downs can fail dur
ing hard braking or in a collision and cause
serious personal injury.
- Always use suitable retaining straps and
properly secure items to the tie-downs in
the l uggage compartment to help pre
vent items from shift ing or fly ing for
ward.
- Never attach a chi ld seat tether strap to
a tie-down.
- For strength-related reasons, the mou nt
ing hooks can only be used to secure ob
jects weigh ing up to 10 lb. (5 kg). Heavi
er objects will not be adequ ately sec ured
- there is a risk of injury.
Page 70 of 316

68 Seats and storage
@ Tips
You can a lso open the pass-through from
the luggage compartment. Push the re
lease button down and p ush the cover for
ward.
Securing the ski sack
App lies to vehicles: with sk i sack
The ski sock must be secured in the luggage
compar tmen t.
Fig. 73 Lu ggage compartme nt: Sec uri ng th e bag
Fig. 7 4 Securin g th e o bjects in t he s ki s ack
Securing the ski sack in the luggage
compartment
.. The ski sack has two be lts with hooks o n the
unders ide
r::;, fig. 73@. Hang the hooks to
t h e rear fastening eye lets in the luggage
compartment .
Securing the objects in the ski sack
.. The re is also a securi ng strap r::;, fig . 74 @ in
the sack . Pu ll the strap taut using the free
end of the s trap.
& WARNING
- Th e ski sac k is intended only fo r the
t ransportation of skis and ot her ligh t ob- jects
. To reduce the risk of serio us per
sonal injury, never transport heavy or
pointed objects in the sk i sack.
- When braking rapid ly or during an acci
dent, the load could be d isplaced and
cause injury to occupa nts .
- Sharp edges on the load must be covered
for protection. A lways fasten the belt
tightly around the sack and its contents
r::;, fig. 74.
(D Tips
- Never stow the ski sack away when it is
st ill wet or damp (for example, snow
me lting from skis) . Allow it to dry com
pletely before stow ing it away .
- Pos ition skis in the sk i sack with the
pointed ends facing the front and ski
poles with the pointed ends facing the
rear.
Page 82 of 316

80 On the road
& WARNING
-When you leave your vehi cle -even if on
ly brief ly -always take the ignition key
with yo u. This applies par ticu larly when
children remain in the veh icle. Otherw ise
the ch ildren could start the engine, re
lease the parking brake or operate elec
trical equipment (e.g. power windows) .
There is the risk of an accident.
- When the vehicle is locked, no one -par
t icularly not children should remain in
the vehicle. Loc ked doors make it more
difficult for emergency wor kers to get in
to the vehicle - putt ing lives at risk.
Starting from rest
The starting assist function ensures that the
parking brake is released automatically upon starting.
Stopping and applying parking brake
" Pull the switch ID to apply the park ing
brake.
St arting and automa tically relea sing the
parking brake
.. When you start to drive as usua l, the park
ing brake is automatically released and you r
vehicle begins to move.
When stopp ing at a traff ic signa l or stopp ing
in city traffic, the parking brake can be ap
plied . The veh icle does not have to be held
with the footbrake. The par king brake elimi
nates the tendency to c reep with a drive range
engaged. As soon as you dr ive
off as usua l,
the park ing brake is released automatically
and the vehicle starts to move.
Starting on slopes
When sta rt ing on in cl ines, the starting ass ist
p revents the veh icle from uninten tionally ro ll
ing bac k. The braking force o f the parking
brake is not released un til sufficient dr iving
force has been b uilt up at the whee ls.
(D Tips
For safety reasons, the parking bra ke is re
l eased automatically only when the driv
er's safety belt is engaged in the buckle.
Starting off with a trailer
To prevent rolling back unintentionally on an
incline, do the following:
.. Keep the sw itch(®) pulled and depress the
accelerator. The pa rking bra ke stays applied
and prevents the vehicle from roll ing back
ward.
" You can release the switch© once you are
sure that you are developing enough for
wa rd momentum at the wheels as you de
press the acce lerator.
Depend ing on the we ight of the rig (vehicle
and trailer) and the severity of the incline, you
may roll backwards as you start. You can p re
vent rolling backwa rds by holdi ng the par king
brake switch (®) pulled o ut and ac celera ting -
j u st as you wou ld w hen s tarti ng on a hill wi th
a conventiona l hand brake.
Emergency braking
In the event that the conven tional brake sys
tem fails or locks.
"I n an emergency, pull the switch(®) and
cont inue to pull it to slow your ve hicl e down
w ith the par king b rake.
" As soon as you re lease the swi tch (®) or ac -
celerate, the braking process stops.
If you p ull the swi tc h (®) a nd hold it above a
speed of about 5 mph (8 km/h), the emergen
cy braking f unction is initiated. The ve hicle is
braked at all four whee ls by activating the hy
draulic brake system. The brake performance
is similar to making an emergency stop¢&..
In order not to activate the emergency brak-
ing by mistake, an audib le warning tone (buz
zer) sounds when the switch(®) is pulled. As ..,.