acc AUDI A7 2018 Owners Manual
[x] Cancel search | Manufacturer: AUDI, Model Year: 2018, Model line: A7, Model: AUDI A7 2018Pages: 274, PDF Size: 42.77 MB
Page 222 of 274
Wheels
be five 150 lbs. pas seng ers in
your vehicle, th e am ount of
a vail abl e cargo and lug gage
lo ad ca pac ity is 650 lb s.
(1400-750 (5
X 150) = 650
lb s.)
5. Determine the combined weight of lu ggage and c argo
bein g loaded on the vehi cle .
Th at w eight ma y not safel y
ex
ceed the a vail able car go and
luggage lo ad capac ity calc ul at
ed in St ep 4 .
6. If your vehicle will b e towing a
tr aile r, lo ad from your tr aile r
w ill b e tran sferr ed to your
v e
hi cle. C onsul t this manual t o
determin e how this re du ces
th e av ailab le cargo and lug
g age load capa cit y of your v ehi
cl e.
..,.Che ck th e tire sidewall
(c:::> pa ge 206, fig . 187) to det er
mine the de signated load rating
for a sp e cific tire.
Wheel bolts and rims
Wheel bolts
Wheel bolts must be clean and loosen/t ighten
easi ly .
Rims
Rims with a bolted rim ring* or w it h bolted whee l
covers " consist of mu ltip le pieces . These compo
nents were bolted together using specia l bolts
220
and a spec ia l proced ure. Yo u must not repair or
disassemb le them
i::> &. .
A WARNING
Wheel bo lts that are tightened or repaired in
correct ly can become loose and resu lt in loss
of vehicle contro l, wh ich increases the risk of
an accident . For the correct tighten ing spec ifi
cation,
see ¢ page 23 7, After changing a
whe el.
- Always keep the wheel bolts and the
threads in the wheel hub clean and free of
grease .
- Only use wheel bolts tha t fit the rim.
- Always have damaged rims repaired by an
author ized Audi dealer or authorized A udi
Serv ice Facility . Neve r repa ir o r disassemb le
rims you rself, because this increases the risk
of an a cciden t.
Winter tires
Win ter tires significant ly imp rove the veh icle's
handling when dr iv ing in winter conditions. Be
ca use of their construction (width, compound,
tread patte rn), s ummer ti res provide less trac
tion on ice and snow.
.,. Use winter tires on a ll four wheels .
.,. Only use winter tires that are app roved for yo ur
vehicle .
.,. Please note that the maximum permitted
speed may be lowe r with winter
tires¢ &. in
General information on page
205 . An author
ized Aud i dealer or authorized Aud i Serv ice Fa
cility can inform yo u about t he maximum per
m itted speed for your tires .
.,. Check the tire p ressure afte r insta lling wheels
¢ page 215 .
The effectiveness of wi nter tires is reduced g reat
l y when t he tread is wo rn down to a depth of
0.157 i n (4 mm). The cha ra cte ris tics of winte r
t ir es a lso decrease g rea tly as the t ire ages , re
gard less o f th e remaining t read.
Page 223 of 274
a co .... N
" N .... 0 00 \.J '
Reinstall summer tires at the appropriate
time, because they provide better handling
when roads are free of snow and ice. Summer
tires cause less road noise, tire wear and fuel
consumption.
(D Tips
You can also use all season tires instead of
winter tires. Please note that in some coun
tries where winter tires are required, only
winter tires with the
& symbol may be per
mitted .
Snow chains
Snow chains not only improve the driving in win
ter road conditions, but also the braking .
.,. Only install snow chains on the front wheels.
This applies also to vehicles with all wheel
drive*.
.,. Check and correct the seating of the snow
chains after driving a few feet, if necessary. Fol
low the instructions from the manufacturer .
.,. Note the maximum speed of 30 mph (SO km/
h). Note the local regulations.
Use of snow chains is only permitted with certain
rim/tire combinations due to technical reasons.
Check with an authorized Audi dealer or author i zed Audi Service Facility to see if you may use
snow chains.
You must remove the snow chains on roads with
out snow. Otherwise, you could impair driving
ability and damage the tires.
A WARNING
Using incorrect snow chains or installing snow
chains incorrectly can result in loss of vehicle
control, which increases the risk of an acci
dent.
@ Note
- Snow chains can damage the rims/wheel
covers* if the chains come into direct con
tact with them . Remove the wheel covers*
first . Use coated snow chains.
Wheels
- Using snow chains that add more than 0.4
inch (10.5 mm) of height can severely dam
age the wheel housings and other vehicle
components.
- Do not install and use snow chains if there is
a malfunction in the air suspension*, be
cause the vehicle height will be very low. If
you drive with snow chains anyway, the
wheel housings and other vehicle compo
nents can be severely damaged .
(D Tips
When using snow chains, it may be useful to
switch on sport mode
c> page 121.
Low-profile tires
Applies to: vehicles with low-profile tires
Compared to other tire/rim combinations, low
profile tires offer a wider tread surface and a
larger rim diameter with shorter tire sidewalls.
This results in an agile driving style. However, it
may reduce the level of comfort and increase
road noise when driving on roads in poor condi
tion.
Low-profile tires can become damaged more
quickly than standard tires when driving over
large bumps, potholes, manhole covers and
curbs. Therefore, it is particularly important to
maintain the correct tire pressure
c>page 215.
To reduce the risk of damage to the tires and
rims, drive very carefully on poor roads.
Check your wheels regularly every 2,000 mi
(3,000 km) for damage. For example, check for
bulges/cracks on the tires or deformations/
cracks on the rims.
After a heavy impact or damage, have the tires
and rims inspected or replaced immediately by
an authorized Audi dealer or authorized Audi
Service Facility.
Low-profile tires can wear out faster than stand
ard tires.
Uniform tire quality grading
-Tread wear
221
Page 224 of 274
Wheels
- Traction AA A B C
- T emperature ABC
Quality grades can be found where appl icable on
the tire side wall between tread shoulder and
maximum section width
~ page 206, fig. 187.
For example: Tread wear 200, Traction AA, Tem
perature
A .
All passenger car tires must conform to Federal
Safety Requirements in addition to these grades.
Tread wear
The tread wear grade is a comparative rating
based on the wear rate of the tire when tested
under contro lled conditions on a specified gov
ernment test course.
F or examp le, a tire graded
150 would wear one
and one half (1 1/2) times as well on the govern
ment course as a tire graded
100.
The relative performance of tires depends upon
the actua l conditions of their use, however, and
may depart significantly from the norm due to
variations in driving habits, service practices and
d ifferences in road characteristics and climate.
Traction
The traction grades, from highest to lowest, are
AA, A, Band
C. T hose grades represent the tire's
abi lity to stop on wet pavement as measured un
der controlled conditions on specified govern ment test surfaces of asphalt and concrete. A tire
marked C may have poor traction performance
~ .&..
Temperature
The temperature grades are A (the highest), B,
and C, representing the tire's resistance to the
generation of heat and its ability to d iss ipate
heat when tested under controlled conditions on
a specified indoor laboratory test wheel.
Sustained high temperature can cause the mate rial of the tire to degenerate and reduce tire life,
and excess ive temperature can lead to sudden
tire
fa ilure ~.&. .
The grade C corresponds to a level of perform
ance which a ll passenger car tires must meet un-
222
der the Federal Motor Vehicle Safety Standard
No.
109. Grades Band A represent higher levels
of performance on the laboratory test wheel than
the minimum required by law.
A WARNING -
The tract ion grade assigned to this t ire is
based on straight-ahead braking traction
tests, and does not include acceleration, cor
nering, hydroplaning or peak traction charac
teristics .
A WARNING
The temperature grade for this tire is estab
lished for a tire tha t is properly inflated and
not overloaded. Excessive speed, underinfla
tion, or excessive loading, either separately or
in combination, can cause heat buildup and
possible tire failure.
A WARNING
-
-
Temperature grades apply to tires that are
proper ly inflated and not over or underinflat
ed.
Tire pressure monitoring system
ill General notes
Each tire, including the spare (if prov ided),
shou ld be checked monthly when cold and inflat
ed to the inflation pressure recommended by the
vehicle manufacturer on the vehicle placard or
tire inflation pressure label. (If your veh icle has
t ir es of a diffe rent size t han the size ind icated on
the vehicl e placard or tire infl ation press ure la
bel, you sho uld determine the proper tire infla
tion pressure for those tires).
As an added safety featu re, you r vehicle has been
equipped with a tire pressure monitoring system
(TPMS) that illuminates a low tire pressure tell
ta le when one or more of your tires is significant
l y under-inflated. According ly, w hen the low tire
pressure telltale illuminates, you should stop and
check your t ires as soon as possible, and inflate
them to the proper pressure. Dr iving on a
.,..
Page 226 of 274
![AUDI A7 2018 Owners Manual Wheels
Indicator lights
It]-loss of pressure in at least one tire¢,&. .
Check the tires and replace or repair if necessary.
Check/correct the pressures of all four tires and
st](/img/6/57599/w960_57599-225.png "AUDI A7 2018 Owners Manual Wheels
Indicator lights
It]-loss of pressure in at least one tire¢,&. .
Check the tires and replace or repair if necessary.
Check/correct the pressures of all four tires and
st")
Wheels
Indicator lights
It]-loss of pressure in at least one tire¢,&. .
Check the tires and replace or repair if necessary.
Check/correct the pressures of all four tires and
store the pressure again in the Infotainment sys
tem
¢ page 224.
[m]) (Tire Pressure Monitoring System) Tire
pressure: System malfunction!.
If[m]J appears
after switching the ignition on or while driving
and the
RI] indicator light in the instrument clus
ter blinks for approximately one minute and then
stays on, there is system malfunction. Try to
store the correct tire
pressures¢ page 224 . If
the indicator light does turn off or turns on again
after a short period of time, drive to an author
ized Audi dealer or authorized Audi Service Facili
ty immediately to have the malfunction correct
ed.
A WARNING
- If the tire pressure indicator appears in the
display, reduce your speed immediately and
avoid any hard steering or braking maneu
vers. Stop as soon as possible and check the
tires and their pressure .
- The driver is responsible for maintaining the
correct tire pressure. You must check the
tire pressure regularly.
- Under certain conditions (such as a sporty
driving style, winter conditions or unpaved
roads), the tire pressure monitoring system
indicator may be delayed.
(D Tips
- The tire pressure monitoring system can al
so stop working when there is an ESC mal
function.
- Using snow chains may result in a system
malfunction.
- The tire pressure monitoring system in your
Audi was calibrated with "Audi Original
Tires"
¢ page 212. Using these tires is rec
ommended .
224
Storing tire pressures
Applies to: vehicles with Tire P ressure Monitoring System in
dicator
If the tire pressure changes or a tire is replaced,
it must be confirmed in the Infotainment sys
tem.
.,. Make sure before storing that the tire pressures
of all four tires meet the specified values and
are adapted to the load
¢page 215.
.,. Switch the ignition on .
.,. Select: the I CARI function button > (Car)* Sys
tems
control button > Service & control > Tire
pressure monitor> Store tire pressure > Yes,
store now.
(D Tips
Do not store the tire pressures if snow chains
are installed.
Tire pressure monitoring
system
ill General notes
Each tire, including the spare (if provided),
should be checked monthly when cold and inflat
ed to the inflation pressure recommended by the
vehicle manufacturer on the vehicle placard or
tire inflation pressure label. (If your vehicle has
tires of a different size than the size indicated on
the vehicle placard or tire inflation pressure la
bel, you should determine the proper tire infla
tion pressure for those tires).
As an added safety feature, your vehicle has been
equipped with a tire pressure monitoring system
(TPMS) that illuminates a low tire pressure tell
tale when one or more of your tires is significant
ly under-inflated. Accordingly, when the low tire
pressure telltale illuminates, you should stop and
check your tires as soon as possible, and inflate
them to the proper pressure. Driving on a signifi
cantly under-inflated tire causes the tire to over
heat and can lead to tire failure. Under-inflation
also reduces fuel efficiency and tire tread life,
and may affect the vehicle's handling and stop-
ping ability.
.,.
Page 227 of 274

a co .... N
" N .... 0 00 \,;J '
proper tire maintenance, and it is the driver's re
sponsibility to maintain correct tire pressure,
even if under-inflation has not reached the level
to trigger illumination of the TPMS low tire pres
sure telltale .
Your vehicle has also been equipped with a TPMS malfunction indicator to indicate when the sys
tem is not operating properly. The TPMS mal
function indicator is combined with the low tire pressure telltale. When the system detects a
malfunction, the telltale will flash for approxi
mately one minute and then remain continuously
illuminated. This sequence will continue upon
subsequent vehicle start-ups as long as the mal
function exists.
When the malfunction indicator is illuminated,
the system may not be able to detect or signal
low tire pressure as intended. TPMS malfunctions
may occur for a variety of reasons, including the
installation of replacement or alternate tires or
wheels on the vehicle that prevent the TPMS
from functioning properly . Always check the
TPMS malfunction telltale after replacing one or
more tires or wheels on your vehicle to ensure
that the replacement or alternate tires and
wheels allow the TPMS to continue to function
properly.
Description
Applies to: vehicles with tire pressure monitor ing system
The tire pressure monitoring system monitors
the pressure in the four tires when driving.
T he system uses sensors that measure the tem
perature and pressure in the tires . The data is
sent from these sensors to the control module by radio frequency.
T he Tire Pressure Monitoring System shows the
current pressures and temperatures of the tires
in the Infotainment system
¢page 226. It also
compares the current tire pressures with the
stored tire pressures and gives a warning in the
driver information system if the tire pressure is
different from what is
stored ¢ page 226 .
Wheels
The system does not detect if the stored tire
pressures match the recommended tire pres
sures. You must store the tire pressures again
¢ page 226:
- every time the tire pressures change, for exam
ple when the load in the vehicle changes,
- after replacing a tire, or
- if wheels with new wheel sensors are used.
_& WARNING
- The tire pressure monitoring system assists
the driver in monitoring tire pressures. The
driver is responsible for having the tires in
flated to the correct pressure.
- Do not change the tire pressure when the
temperature of the tire is extremely high.
This could result in serious damage to the
tire and even cause the tire to burst, in
creasing the risk of an accident.
- A tire with low pressure flexes more. This heats the tire up too much. This could cause
the tread to separate and even cause the
tire to burst, increasing the risk of an acci
dent.
- The tire pressure monitoring system does not warn about damage or defects in the
tire construction that could cause the tire to
burst, for example. Inspect your tires regu
larly.
(D Tips
- If tires are replaced, the sensors/valves do
not need to be removed or replaced . Just re
placed the valve stem and, if necessary, the
valve and the wheel electronics. If you have questions, see an authorized Audi dealer or
authorized Audi Service Facility.
- An incorrect display or a malfunction in the
tire pressure monitoring system can occur
after using the tire mobility kit. Have the
sensors replaced by an authorized Audi
dealer or authori zed Audi Service Facility.
- For an explanation on conformity with the
FCC regulations in the United States and the
Industry Canada regulations, see
¢ page 258.
225
Page 230 of 274

Care and cleaning
Care and cleaning
General information
Regular, proper care helps to maintain your vehi
cle's value. It can also be a requirement when
submitting warranty claims for corrosion damage
and paint defects on the body.
The necessary care products can be obtained
from an authorized Audi dea ler or authorized
Audi Service Facility. Read and follow the instruc
tions for use on the packaging.
A WARNING
-Using cleaning and care products incorrectly
can be dangerous to your health.
- Always store clean ing and care products out
of reach of children to reduce the r isk of poi
sonin g.
@ For the sake of the environment
- Preferab ly purchase environmenta lly-friend
l y cleaning products.
- Do not dispose of leftover cleaning and care
products with household trash.
Car washes
The longer that deposits remain on the vehicle,
the more the surface may be damaged. High
temperatures such as those caused by sunlight increase the damaging effect .
Before washing, rinse
off heavy deposits with
p lenty of water.
Stubborn deposits such as bird droppings or tree
sap are best removed with plenty of water and a
microfiber cloth.
A lso, wash the underside of yo ur vehicle once
road sa lt stops being used for the season.
Pressure washers
When washing your veh icle w ith a pressure wash
er, always follow the operating instructions pro
vided with the press ure washer. This is espec ially
impor tant in r egard to the pressure and spraying
distance. Do not aim the spray directly at the
sea ls on the side windows, doors, lids or the sun-
228
roof* or at tires, rubber hoses, insulating materi
a l, sensors* or camera lenses* . Keep a distance of
at least 16 in (40 cm) .
Do not remove snow and ice with a pressure
washe r.
Never use cone nozzles o r high pressu re nozzles.
The water temperature must not be above 140 °F
(60 °().
Automatic car washes
Spray off the vehicle before washing .
Make sur e that the windows and roof* are closed
and the windshie ld wipers are
off. Follow instruc
tions from the car wash operator, especially if
there are accessories attached to your vehicle .
If possible, use car washes that do not have
brushes.
Applies to : RS models: only use car washes where
the vehicl e remai ns stationary and the washing
equipment moves around the vehicl e when wash
ing and drying. Car washes that move the vehicle
through the car wash using a chain are not rec
ommended.
Washing by hand
Clean the vehicl e starting from the top and work
ing down using a soft sponge or cleaning brush.
Use solvent -free cleaning products.
Washing vehicles with matte finish paint by
hand
To avoid damaging the paint when washing, first
remove dust and large particles from your vehi
cle. Insects, grease spots and fingerprints are
best removed with a special cleaner for matte
finish paint.
Apply t he product using a microfiber cloth. To
avoid damaging the paint surface, do not use too
much pressure.
Rinse t he ve hicle thoroughly with water. Then
clean using a neutra l shampoo and a so ft micro
fiber clot h.
R inse the vehicl e thoroughly again and let it air
dry. Remove any water residue using a chamois.
..,..
Page 231 of 274

a co .... N
" N .... 0 00 \.J '
-Only wash the vehicle when the ignition is
off and follow the instructions from the ca r
was h operator to reduce the risk of acci
dents.
-T o red uce the risk of cuts, protect yourself
from sha rp metal components when wash
ing the underbody or the inside of t he wheel
hous ings .
-After wash ing the vehicle, the brak ing effect
may be delayed due to mo isture on the
brake rotors or ice in the w inter . This in
c reases the risk of an acc ide nt. The bra kes
mus t be d rie d first w ith a few careful brake
app lic at ions.
@ Note
-If yo u wash t he veh icle in an automatic car
wash, yo u m ust retract the rear spoi ler if
necessa ry, and fold the exte rior m irrors i n
to re du ce the risk of damage. Powe r fo ldi ng
ex ter io r m irr ors* m ust only be fo lde d in a nd
o ut u sing t he power folding fu nction .
-
Care and cleaning
-To re duce the risk of pa int damage, do not
was h the vehicle in direct su nlight .
-To re duce the risk of d amage to the s urface,
do not use insect removing sponges, kitche n
sponges or s imilar items .
-Mat te finish painted veh icle components :
-To reduce the risk of damage to t he sur-
face, do not use po lish ing agents o r hard
wax.
-Neve r use protective wax. It can destroy
the matte finish effect .
-Do not place any st ickers or magnetic
s igns on vehicle parts painted w ith matte
finish paint . The paint cou ld be damaged
when the stickers or magne ts are re
m oved.
@ For the sake of the environment
Only wash the veh icle in facili ties s pec ia lly de
s igned for tha t pur pose . This will reduce the
r isk of di rty wate r cont ami nated with o il from
ente rin g t he sewe r sys tem.
Cleaning and care information
When cleani ng and ca ring for in dividua l vehicle
componen ts, re fer to the follow ing tables. The
i nf ormation contained there is s imp ly recom
mendations. Fo r qu est ions or for components t
h at are not liste d, co n su lt an au tho riz e d Au di
dealer or au thor ized A udi Se rvice Fa cility. Also
f o llow the information fo und
in ¢ .&. .
Exterior cleaning
Component Situation Solution
Windshield wiper
Deposits Soft cloth with g
lass cleaner, ¢ page 46
blades
Headlights/
Deposi ts So
ft spo nge wi th a m ild soap sol utiona )
Tail lights
Sensors /
Deposits Sensors: soft cloth wit h solvent-free cleaning solut io n
camera lenses Camera le nses: soft cloth w ith a lcoho l- free cleaning so lu -
tion
Snow/ice H
and br ush/solvent-free de -icing spray
Wheels Road salt Water
Bra ke dust Acid-f
ree s pecial clea ning so lution
E xhaust tail pipes Road salt Water, clean ing so lution su itab le for s tainless stee l, if nee-
ess ary
229
Page 235 of 274
a co ,...,
N
" N ,...,
0 00 <.,;) '
General information
.. Par k the vehicle as far as poss ible from moving
traff ic in the event of a breakdown. In the event
of a flat tire, park the vehicle on a leve l surface .
It you are on a steep hill, be especially careful.
.. Set the parking brake .
.. Switch the emergency flashe rs on .
.. Set up the warn ing triangle C) page 233 .
.. Have the passengers exit the veh icle . They
sho uld move to a safe place, for example be
hind a guard rail.
_& WARNING
Follow the s teps given above. This is for your
protection and the for the safety of other d riv
ers .
Equipment
Warning triangle
App lies to: ve hicles with warning triangle
D
Fig. 193 Luggage compa rtment U d : wa rnin g tr iang le
The warning triangle placed in the vehicle at the
factory is located in the luggage compartment.
.. Turn the twist lock C) fig . 193 and pull the cover
downward to open the cover.
.. Remove the warning triangle from its holder.
The luggage compartment lid is only designed to
hold the warning triangle offered by the Audi
Genu ine Accessories program.
Em ergen cy as sis tanc e
Vehicle tool kit
Fig. 194 Lu ggage compartment: vehicle tool kit, tire mob i
lity kit and comp resso r
The vehicle tool kit, vehicle ja ck*, tire mobility
ki t* and compressor are stored in the luggage
compartment under the ca rgo floor cover .
.. Lift the cargo floor by the p lastic handle .
.. Turn the handle cou nter- clockwise and remove
the cover or the spare tire *.
A WARNING
Improper use of the vehicle jack can cause se
rious pe rsonal injuries.
-Never use the screw driver hex head to
tighten wheel bolts, since the bolts cannot
attain the necessary tightening torque if yo u
use the hex head, potentially causing an ac
cident.
-The factory-supplied jack is intended only
for your vehicle model. Under no circum stances shou ld it be used to lift heavy
veh icles o r othe r loads; you risk injuri ng
yourse lf .
-Never start the engine when the vehicle is
raised, which could cause an accident.
-Support the vehicle securely with appropri
ate stands if wo rk is to be performed under
neath the vehicle; otherwi se, there is a po
t ential risk fo r injury .
-Never use the jack supplied with your Aud i
on another vehicle, particularly on a heavier
o n e. Th e jack is o nly sui tab le for u se on the
veh icle i t came wi th.
(D Tips
The vehicle jack* in your vehicle is mainte
nance-free.
233
Page 237 of 274
Repairing tires
Applies to: vehicles with tire mobility kit
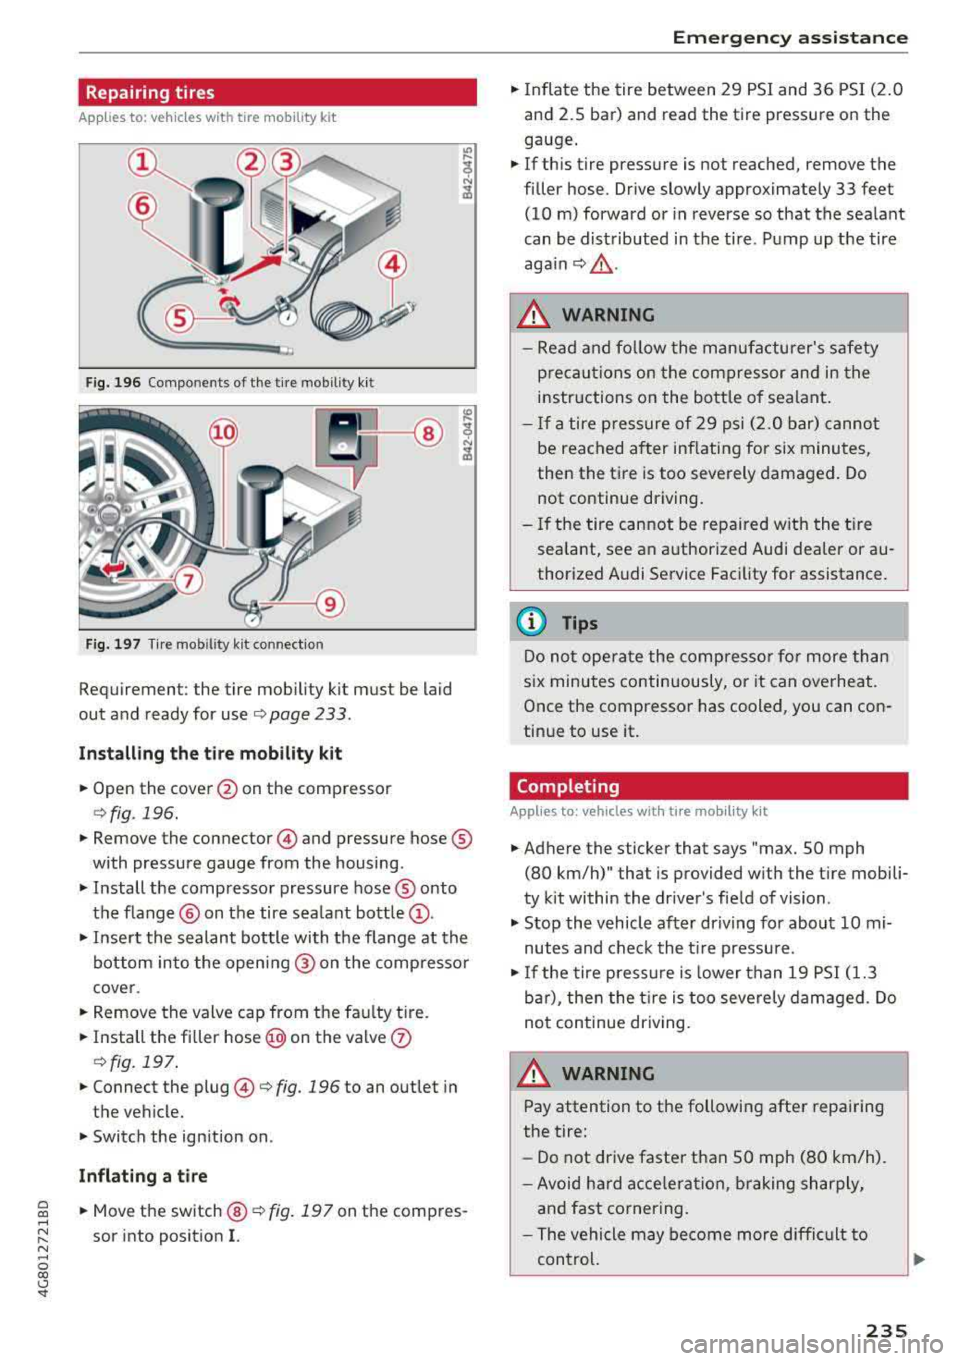
Fig. 196 Compo nents of the tire mo bility k it
Fig. 197 T ir e mo bility k it con nec tion
Requiremen t: the tire mob ili ty ki t mus t be laid
out and ready for
use ¢ page 233 .
Install ing th e tir e mob ility k it
.,. Open the cover @on the compressor
¢fig . 196 .
.,. Remove the connecto r@) and pressure hose ®
with pressure gauge from the housing .
.,. Install the compressor pressure hose® onto
the f lange @ on the tire sea lant
bottle @.
.,. Insert the sealant bottle with the f lange at the
bottom into the opening @ on the compresso r
cover.
.,. Remove the valve cap from the fau lty t ire.
.,. Install the fi ller hose @on the valve 0
¢fig . 197 .
.,. Connect the plug @¢ fig. 196 to an outlet in
the vehicle.
.,. Switch the ignition on .
Inflating a tire
~ .,. Mov e th e sw itch @¢ fig. 197 on the com pres-,...,
~ sor into position I. N ,...,
0 00 <..:l '
.,. Inflate the tire between 29 PSI and 36 PSI (2 .0
and 2.5 bar) and read the tire pressure on the
gauge .
.,. If th is tire pressure is not reached , remove the
filler hose . Drive slowly approximately 33 feet
(10 m) forward or in reverse so that the sealant
can be distributed in the tire . Pump up the tire
aga in ¢ £ .
_&. WARNING
-Read and fo llow the manufacturer's safety
p recautions on the compressor and in the
instr uctions o n the bottle o f sealant .
- If a tire pressure of 29 psi (2.0 bar) canno t
be reached after inflating for six minutes,
then the tire is too severely damaged. Do
not continue driving.
- If the tire cannot be repaired w ith the t ire
sealant, see an authorized Audi dealer or au
thorized A udi Service Facility for assistance.
(D Tips
Do not operate the compresso r fo r more than
six minutes continuously, or it can overheat .
Once the compressor has cooled, you can con
tinue to use it.
Completing
Applies to: vehicles with tire mob ility kit
.,. Adhere the sticker that says "max. SO mph
(80 km/h)" that is provided with the t ire mobili
ty kit within the driver 's fie ld of vision .
.,. Stop the vehicle after dr iving for about 10 mi
nutes and check the t ire pressure .
.,. If the tire press ure is lower than 19 PSI ( 1.3
ba r) , then the t ire is too seve rely damaged . Do
no t continue dr iv ing .
A WARNING
Pay attention to the following after repairing
the tire:
- Do not drive faster than SO mph (80 km/h) .
- Avoid hard acce lera tion, braking sharply,
and fast cornering .
- The vehicle may become more difficult to
control.
235
Page 239 of 274
a co ,...,
N
" N ,...,
0 00 <..:l '
s u sp .: jack mode > Off .
The vehicle jack mode* swi tches off automatical
l y at speeds above 6 mph ( 10 km/h).
_& WARNING
Always read and follow all WARNINGS and in
formation
c:> ,1,. in Raising the vehicle on
page 239
and c:> page 241.
After changing a wheel
A wheel change is not complete without the do
ing the following.
.,. Always store the vehicle tool kit, the jack* and
the replaced tire in the luggage compartment
c:> page 134.
... Check the tire p re ssu re on the spare wheel im
mediately after mounting it.
... As soon as possible, have the tighten ing tor
que s
on all wheel bolts checked with a torque
wrench. The correct tightening torque is 90 ft
lbs (120 Nm).
.,. Have the flat tire replaced as soon as possib le.
@ Tips
- If you notice t hat the wheel bolts are cor
roded and diffic ult to turn wh ile changing a
tire, they should be rep laced before yo u
chec k the tightening torque.
- Drive at reduced speed until you have the
tightening torques chec ked.
- After changing a wheel, the tire pressure in
all four tires must be checked/corrected and
the tire pressure mon itor ing indicator must
be stored in the MM I
c:> page 224,
c:> page 226 .
Emergen cy as sis tanc e
Decorative wheel covers
Applies to: vehicles with decorative wheel covers
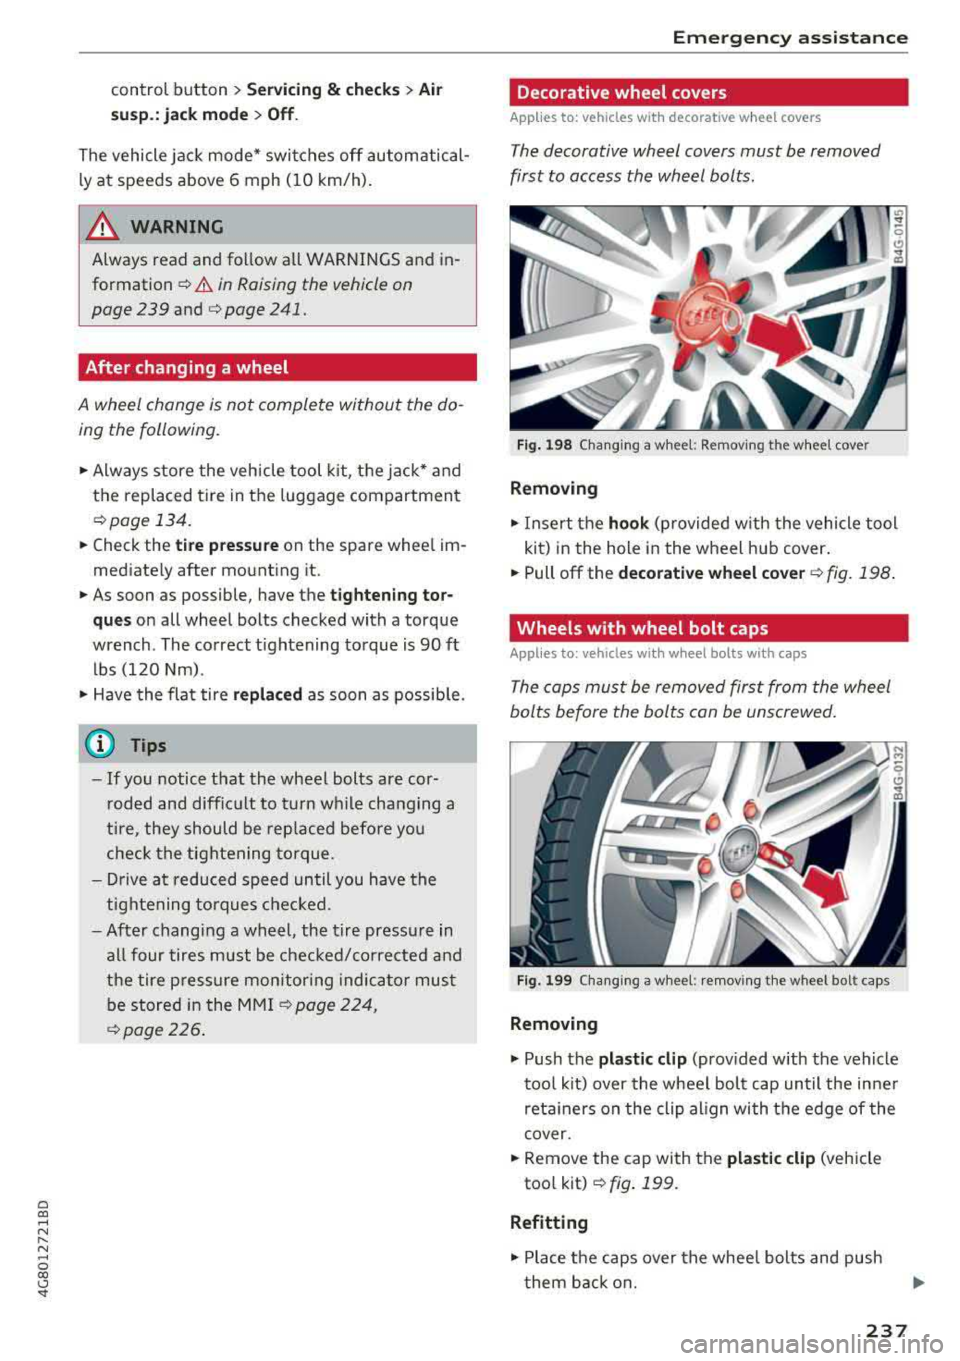
The decorative wheel covers must be removed
first to access the wheel bolts.
F ig. 1 98 Changing a wheel: Removing the whee l cover
Removing
... Insert the hoo k (provided w ith the vehicle tool
kit) in the hole in the wheel hub cover.
... Pull off the decorati ve w heel co ve r c:> fig. 198 .
Wheels with wheel bolt caps
Applies to: vehicles with wheel bolts with caps
The caps must be removed first from the wheel
bolts before the bolts can be unscrewed.
Fi g. 199 Cha ng ing a whee l: remov ing the wheel bolt caps
Removing
.,. Push the pla st ic clip (prov ided with the vehicle
too l kit) over the wheel bolt cap until the inner
reta iners on the clip al ign with the edge of the
cover.
... Remove the cap with the pla stic clip (vehicle
too l kit)
c:>fig. 199.
Refitting
.,. Place the caps over the whee l bolts and push
them back on.
2 37