acc AUDI A7 2018 Owners Manual
[x] Cancel search | Manufacturer: AUDI, Model Year: 2018, Model line: A7, Model: AUDI A7 2018Pages: 274, PDF Size: 42.77 MB
Page 243 of 274

a co ,...,
N
" N ,...,
0 00 <.,;) '
Tires with unidirectional tread design must be
mounted with their tread pattern pointed in the
right direction .
Using a spare tire with a tread pattern
intended for use in a specific direction
When using a spare t ire with a tread pattern in
tended fo r use in a specific direction, please note
the following:
- The direction of rotat ion is marked by an arrow
on the side of the tire .
- If the spare tire has to be installed in the incor
rect direction, use the spare tire only tempora
rily s ince the tire will not be able to achieve its
opt imum performance character istics with re
gard to aquaplaning, noise and wear.
- We recommend that you pay particular atten
t ion to this fact during wet weather and that
you adjust your speed to match road condi
tions.
- Replace the flat tire with a new one and have it
installed on your vehicle as soon as possible to
restore the handling advantages of a unidirec
tiona l tire .
Notes on wheel changing
Please read the information ~ page 212, New
tires or wheels
if you are going to use a spare tire
which is different from the tires on your vehicle.
After you change a tire:
- Check the tire pressure on the spare tire im
mediately after installation.
- Have the wheel bolt tightening torque
checked with a torque wrench as soon as pos
sible by your authorized Audi dealer or a
qualified service station.
- With steel and alloy wheel rims, the wheel
bolts are correctly tightened at a torque of 90
ft lbs (120 Nm).
- If you notice that the wheel bolts are corroded
and difficult to turn while changing a tire ,
they should be replaced before you check the
tightening torque.
Emergency assistance
- Replace the flat tire with a new one and have
it installed on your vehicle as soon as possi
ble. Remount the wheel cover.
Until then , drive with extra care and at reduced
speeds.
A WARNING
- If you are going to equip your vehicle with
tires or rims which differ from those which
were factory installed, then be sure to read the information
r=> page 212, New tires or
wheels.
- Always make sure the damaged wheel or
even a flat tire and the jack and tool kit are
properly secured in the luggage compart
ment and are not loose in the passenger
compa rtment.
- In an accident or sudden maneuver they
could fly forward, injuring anyone in the ve
h icl e.
- Always store damaged wheel, jack and tools
securely in the luggage compartment. Oth
erwise, in an accident or sudden maneuver
they could fly forward, causing injury to pas
sengers in the vehicle .
Spare tire
Space-saving spare tire
App lies to : vehicles wit h spare tire
Fig. 206 Luggage compartment: space-sav ing spare tire
The spare tire is intended for short-term use on-
-
ly. Have the damaged tire checked and, if neces
sary, replaced by an authorized Audi dealer or au
thorized Audi Serv ice Facility as soon as possible .
..,.
241
Page 244 of 274
Emerg enc y assis tance
There are some restrictions on the use of the
spare tire. The spare tire has been designed spe
cifically for your type of vehicle. Do not replace it
with the spare tire from another type of vehicle.
S pac e-s av ing sp are tir e*
The tire pressure must be 61 PSI (4.2 bar).
Remov ing th e spar e tire
.,. Fold the cargo floor up to the rear bench seat .
.,. Turn the handwheel counter-clockw ise and re-
move it .
.,. Remove the spare t ire.
Snow chains
Using snow chains on the spare tire is not perm it
ted due to technical reasons .
If you have to drive with snow chains and a front
tire fa ils, mount the spare t ire in place of a rear
tire . Install the snow cha ins on the rear tire that
you removed, and install that in place of the
front tire that failed.
A WARNING
-
- After installing a spa re t ire, the tire p res
s u re must be checked as quickly as poss ible.
- Do not drive faster than SO mph (80 km/h)
with a spare tire. Driv ing faster than that in
creases the risk of an a ccident.
- Avoid full-throttle accelerat ion, heavy b rak
ing, and fast cornering, because this in
creases the risk of an accident.
- Never dr ive using more than one spa re t ire,
because th is increases the r isk of an acci
dent.
- Norma l tires o r winter tires m ust not be
mounted on the spare tire rim .
- Only use the co llapsible spare tire in emer
gencies and dr ive very carefu lly, especially if
it is more than 6 years o ld .
242
Page 250 of 274
Emergency situations
@ Tips
The discharged battery must be properly con
nected to the vehicle's electrical system .
When jump starting or charging the battery,
never connect the negative ground cable to
the battery negative post because the battery
manager system must be able to detect the
battery's state of charge. Always connect the
negat ive g round cable to the negative ground
post of the battery manager control unit.
Use of jumper cables
Make sure to connect the jumper cable clamps in
exactly the order described below!
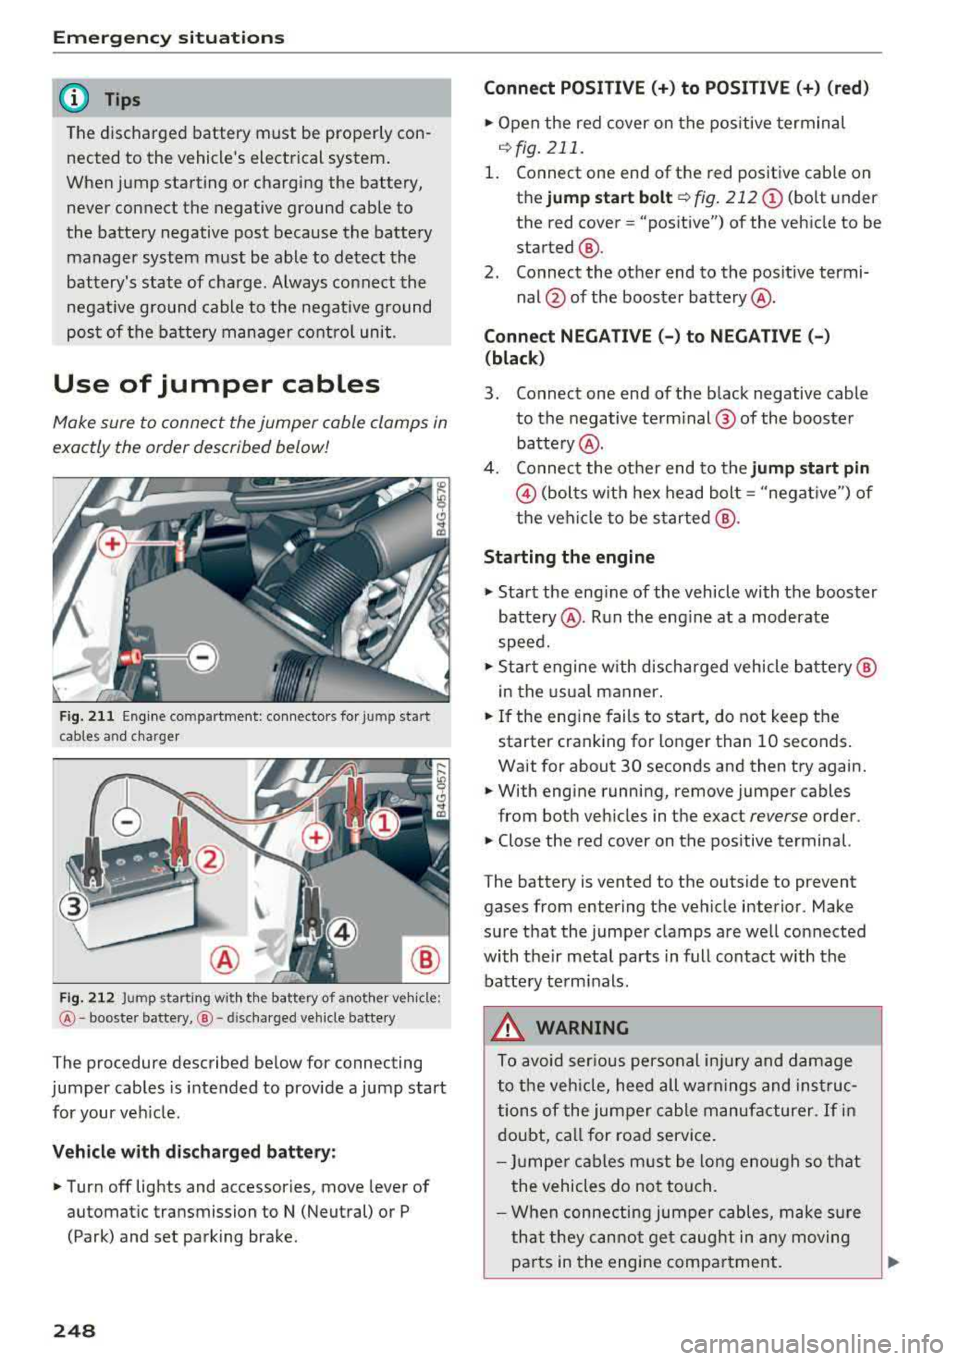
Fig . 211 Engine compartmen t: connecto rs for jump start
cables and charger
@
F ig . 212 Jump starting w it h the battery of anot her vehicle :
@-booster battery, @- discha rged vehicle battery
The procedure described below for connecting
jumper cables is intended to provide a jump start
for your veh icle.
Vehicle with discharged battery:
• Turn off lights and accessories, move lever of
automatic transmission to N (Neutral) or P (Park) and set park ing brake.
248 Connect POSITIVE(+) to POSITIVE(+)
(red)
• Open the red cover on the positive terminal
.:!.>fig. 211.
1. Connect one end of the red positive cable on
the
jump start bolt ~ fig. 212@ (bolt under
the red cover= "positive") of the vehicle to be
started @.
2. Connect the other end to the positive termi-
nal @of the booster battery @.
Connect NEGATIVE(-) to NEGATIVE(-)
(black)
3. Connect one end of the black negative cable
to the negative terminal @ of the booster
battery @.
4. Connec t the other end to the
jump start pin
@ (bolts with hex head bolt= "negative") of
the vehicle to be started @.
Starting the engine
• Start the eng ine of the vehicle with the booster
battery @. Run the eng ine at a moderate
speed.
• Sta rt engine w ith discharged vehicle battery@
in the usual manner.
• If the engine fails to start, do not keep the
starter cranking for longer than 10 seconds.
Wait for about 30 seconds and then try again.
• With engine running, remove jumper cables
from both veh icles in the exact
reverse order.
• Close the red cover on the pos itive terminal.
The battery is vented to the outside to prevent
gases from entering the vehicle interior . Make
sure that the jumper clamps are well connected
with their metal parts in full contact w ith the
battery terminals.
A WARNING
To avoid serious personal injury and damage
to the vehicle, heed all warnings and instruc
tions of the jumper cable manufacturer. If in
doubt, call for road service .
- Jumper cables must be long enough so that
the vehicles do not touch.
- When connecting jumper cables, make sur e
that they cannot get caug ht in any moving
pa rts in the engine compartment.
.,.
Page 252 of 274
Emergency situations
& WARNING
If the towing loop is not tightened until it
stops when installing, the threads may be
pulled out when towing the vehicle and that
could cause an accident.
Rear towing loop
0 0
F
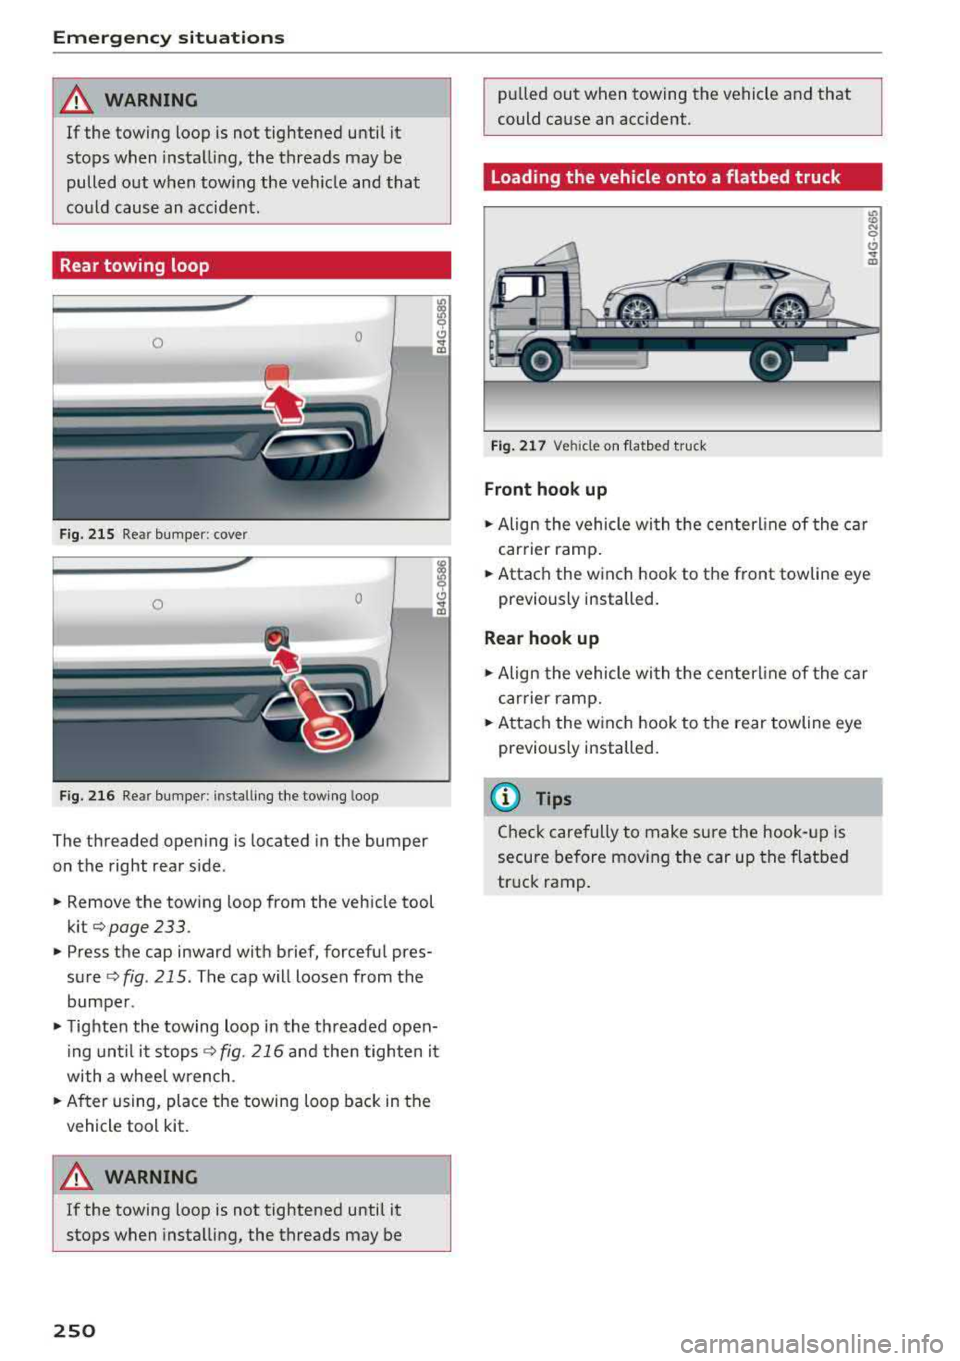
ig. 215 Rear bumper : cover
0 0
F
ig. 216 Rear bumper : installi ng the towing loop
The threaded opening is located in the bumper
on the right rear side .
.. Remove the towing loop from the vehicle tool
kit
o page 233 .
.. Press the cap inward with brief, forceful pres
sure
o fig . 215 . The cap will loosen from the
bumper .
.. Tighten the towing loop in the threaded open
ing until it stops
<=?fig. 216 and then tighten it
with a whee l wrench .
.. After using, place the towing loop back in the
vehicle tool kit.
A WARNING
If the towing loop is not tightened until it
stops when installing, the threads may be
250
-
pulled out when towing the vehicle and that
could cause an accident .
Loading the vehicle onto a flatbed truck
Fig. 217 Vehicle on f latbed truck
Front hook up
l8 N 0
CJ .., m
.. Align the vehicle with the centerline of the car
carrier ramp .
.. Attach the winch hook to the front towline eye
previously installed.
Rear hook up
.. Align the vehicle wi th the centerl ine of the car
carrier ramp .
.. Attach the winch hook to the rear towline eye
previously installed.
@ Tips
Check carefully to make sure the hook-up is
secure before moving the car up the flatbed
truck ramp .
Page 258 of 274
Consum er Info rmation
scope of maintenance and repairs which can be
carried out by vehicle owners.
Al so , sa fet y and
en vironment al
concerns place very strict limits
on the nature of repairs and ad justments to en
g ine and transmission parts wh ich an owner can
perform .
Maintenance, adjustments and repairs usually re
qu ire special tools, testing devices and other
equ ipment available to specially trained work
shop personnel i n order to assure proper per
formance, reliab ility and safety of the veh icle and
its many systems .
Improper maintenance, adjustments and repairs
can impair the operation and reliab ility of your
veh icle and eve n void your vehicle warranty .
Therefo re, proof of servicing in accordance w ith
the ma intenance sc hedule may be a condition fo r
up hold ing a possible wa rra nty claim made wi thin
the warranty pe riod.
Above all , operational safety can be adversely af
fected, c reating unnecessa ry risks fo r you and
your p assengers.
If in doubt about any servicing, have it done by
your author ized Audi dealer or any other properly
eq uipped and qualified workshop . We strongly
urge yo u to g ive your author ized Audi dealer the
opportu nity to pe rform a ll scheduled ma inte
nance and necessary repairs. Your dealer has the
facilities, origina l parts and train ed sp ecialists to
keep your veh icle running properly.
Performing limited maint enance yourself
The fo llow ing pages describe a limited number of
procedures w hich can be performed on your ve hi
cle with ordinary tools, should the need arise and
trained personne l be unavai lable . Before pe r
forming any of these procedures, always thor
ough ly read a ll of the app licab le text and carefu l
ly follow the instructions g iven . A lways rigorously
observe the
WARNING S provided .
Before you check anything in the engine com
partment , alw ays read a nd heed all WARNINGS
c> .&. and c> .&. in Working in the engine compart
ment on page 193 .
256
A WARNING
- Ser ious personal in jury may occur as a result
of imp roperly performed maintenance, ad
justments or repairs .
- Always be extreme ly careful when work ing
on the vehicle . Always follow commonly ac
cepted safety practices and general com mon sense. Never r is k personal in jury.
- Do not attempt any of the maintenance,
checks or repairs described on the following pages if you are not fu lly fam il iar with these
or other proce dures with respect to t he ve
hicle, or are uncertain how to proceed.
- Do not do any work wi thout the prope r tools
an d equi pmen t. H ave the necessary wo rk
done by your authorized Au di dealer or an
other properly equipped and qualified work
shop.
- The engine compartment of any motor vehi
cle is a potentially hazardous area . Never
reach into the area around or touch the radi
ator fan. It is temperature controlled and
can switch on suddenly - even when the en
gine is off . The radiato r fan switches on au
tomatically when the coolan t reaches a cer
tain tempe rature and w ill cont inue to run
until the coolant temperature d rops.
- Always sw itch off the ignition before anyone
gets under the vehicle.
- Always support your vehicle with safety
stands if it is necessary to work underneath
the vehicle. The jack supp lied with the veh i
cle is no t adequate fo r th is pu rpose a nd
could collapse causing serious personal in
jury .
- If you must wor k unde rneath the vehicle
w ith the wheels on the g round, always make
sure the vehicle is on level ground, that the
wheels a re always sec urely blocked and that
the engine cannot be started.
- Always make sure the transmission se lector
lever (automatic t ransm iss ion) is in P (Park
position) and the pa rk b rake is applied .
Ill>
Page 259 of 274

a co .... N
" N .... 0 00 \.J '
-Changing the engine settings wi ll adversely
affect emission leve ls. Th is is detrimental to
the env ironment and increases fuel con
sumption.
- A lways observe environmenta l regu lations
when disposing of old engine o il, used brake
flu id, d irty engine coolant, spent batteries
or worn out tires.
- Undeployed airbag modules and pretension
ers might be classified as Perchlorate Mate
rial -spec ial handl ing may apply, see
www .dtsc.ca .gov/hazardouswaste/perch lo
r ate. When the vehicle or pa rts of t he re
stra int system includi ng a irbag mod ules
s af ety be lts with pretens ioners a re scrap
ped, a ll applicab le laws and regulations
must be observed. Your a uthorized Audi
dealer is fam iliar with these requirements
and we recommend that you have your dea l
er perform this service for you.
Accessories and
technical changes
Additional accessories and parts
replacement
Always consult on authorized Audi dealer before
purchasing accessories.
Audi ve hicles that are constructed with advanced
materials like Steel/Aluminum (Hybrid construc
tion), Aluminum (Aud i Space Frame), and/or Alu
minum/Carbon Fiber (Ultra Advanced Light
We ight Materials) are as unique as the ir dr ivers .
Therefo re, the ava ilability of certain parts needed
for repa ir , restorat ion, or reconstruction w ill be
rest ricted , or pa rts will be unava ilable, if the ve
hicl e is not repa ired at an a uthorized Aud i co lli
sion repair facility . This includes but is not limi t
ed to structura l parts which require specia lized
training and equipment to restore their crash
worthiness back to the original NHTSA and IIHS performance.
Your vehicle incorporates the latest safety design
features ensuring a high standard of active and passive safety.
Con sum er In form ation
This safety could be compromised by non -ap
proved changes to the vehicle. For t his reason, if
parts have to be rep laced, p lease observe the fol
lowing points when install ing additional accesso
ries:
Approved Audi accessories and genuine Audi parts are avai lab le from authorized Aud i dea lers.
T hese dea le rs a lso have t he necessa ry fa cilit ies,
tools and trained specialists to install the pa rts
and accessories proper ly .
A WARNING
--
Using the wrong spare parts or using non -ap
p roved accessories can cause damage to the
vehicle and serious personal injury.
- Use on ly accessories expressly approved by
Aud i and genuine Audi spare parts
- These parts and accessor ies have been spe
cially designed to be used on your vehicle.
- Do not use license p late brac kets in the
front area that are d ifferent from the one
installed at the factory, or add additional
li
cense plate brackets.
- Never install accessor ies such as telephone
cradles or beverage holders on airbag covers
or w ith in the airbag deployment zones . Do
ing so will increase the risk of injury if a ir
bags a re tr iggered in an accident!
- Before you check anyth ing in the eng ine
compa rtment, always read and heed all
WARN INGS
~page 193.
@ Note
- If items other than genu ine Audi spare
parts, add-on equipment and accessory
items are used or if repa ir work is not per
form ed according to specified methods, th is
c an result in seve re damage to you r vehi
cle's eng ine and body (s uch as cor rosion)
and adve rsely affec t your ve hicle's warranty.
- If emergency repa irs m ust be pe rformed
elsew here, have the vehicle ex am ined by an
authorized A udi dealer as soon as possib le .
- Th e manufac ture r ca nnot be he ld liable fo r
damage wh ic h occur s d ue to fail ure to com
ply with these stipulations.
257
Page 260 of 274

Consum er Info rmation
Technical Modifications
Our guidelines must be complied with when tech
nical modifications are made .
Always consult an authorized Audi dealer before
starting work on any modificat ions.
This will he lp ensure that vehicle function, per
formance and safety are not impaired
c> &. .
Attempting to work on e lectronic components
and the software used with them can cause mal
functions. Because of the way electronic compo
nents are interconnected with each other, such
malfunct ions can also have an adverse affect on
other systems that are not directly involved. This
means that you risk both a substantial reduction
in the operational safety of your veh icle and an
i n creased wea r of ve hicle parts
c> ,&. .
Author ized Audi dealers w ill perform this work in
a profess io nal and competent manner or, in spe
cial cases, refer you to a p rofessional company
that spec ializes in such modificat ions.
.&_ WARNING
Improper repa irs and modificat ions can
c hange the way veh icle systems work and
c ause damage to the veh icle and ser ious per
sonal injury.
(UJ) Note
I f emergency rep air s mus t be pe rformed else
where, have the vehicle ex am ined by an a u
thorized A udi dealer as soon as possib le .
Declaration of
compliance for telecom munications equipment
and electronic systems
The manufacturer is not liable fo r rad io m alfu nc
tions that are caused by unauthori zed changes to
the equipment.
Equipment
The fo llow ing equipment comp lies w it h F CC sec
tion 15 and RSS -Gen:
258
- Audi adaptive cru ise control *
- Aud i side assist*
- Remote cont rol key
- Garage door opener (Homel ink)*
- Cell phone package*
- T ire pressure monitoring system*
FCC Part 15.19
This device complies with part 15 of the FCC
Rules . Operation is subject to the fo llowing two
conditions: ( 1) This device may not cause harmful
i nterference, and (2) this device must accept any
i nterference rece ived, includ ing interference that
may cause undesired operation.
FCC Part 15.21
Changes or modifications not express ly approved
by the party responsible for compliance cou ld
vo id the user's authority to operate the eq uip
ment .
RSS-Gen
This device complies with Ind ustry Canada's li
cense-exempt RSSs . Operation is subject to the
fo llowing two conditions:
(1) This dev ice may no t cau se inte rference; and
(2) This dev ice must accept any interference, i n
clud ing inte rfe rence that may cause undes ired
ope ration of the dev ice.
CNR-Gen
Le present appare il est conforme aux CNR d'In
dustrie Canada appl icables aux appare ils radio
exempts de licence . L'explo itation est autor isee
aux deux conditions su ivantes :
1) l'appareil ne doit pas produire de brouillage;
2) l'appareil doit accepter tout brouillage
radioe
lectr ique s ubi, meme si le bro uillage est suscept i
ble d'en compromettre le fonct ionnement.
Page 261 of 274

Numbers and
Symbols
4-zone deluxe automatic climate control 58
Air vents . . . . . . . . . . . . . . . . . . . . . . . . . . . . 62
Key recognition . . . . . . . . . . . . . . . . . . . . . . 58
Operation . . . . . . . . . . . . . . . . . . . . . . . . . . . 60
Residual heat . . . . . . . . . . . . . . . . . . . . . . . . 62
Synchronizing . . . . . . . . . . . . . . . . . . . . . . . . 62
A
A/C (4-zone de luxe automatic climate
control) . . . . . . . . . . . . . . . . . . . . . . . . . . . . . . 61
A/C (deluxe automatic climate control) 59
ABS
refer to Anti-lock braking system . . . . . . . 120
Accessories . . . . . . . . . . . . . . . . . . . . . . . 52, 257
Active lane assist . . . . . . . . . . . . . . . . . . . . . . 96
Adjusting the vibration warning . . . . . . . . . 98
Cleaning the camera area . . . . . . . . . . . . . 229
Indicator light . . . . . . . . . . . . . . . . . . . . . . . 97
Messages . . . . . . . . . . . . . . . . . . . . . . . . . . . 97
Switching on/off . . . . . . . . . . . . . . . . . . . . . 97
Adaptive air suspension . . . . . . . . . . . . . . . . 105
Adaptive cruise control . . . . . . . . . . . . . . . . . . 87
Braking guard . . . . . . . . . . . . . . . . . . . . . . . . 92
Cleaning the sensor . . . . . . . . . . . . . . . . . . 229
Messages . . . . . . . . . . . . . . . . . . . . . . . . . . . 94
Request for driver intervention . . . . . . . . . . 92
Stop -and-go traffic . . . . . . . . . . . . . . . . . . . 90
Adaptive dampers . . . . . . . . . . . . . . . . . . . . . 105
Indicator light . . . . . . . . . . . . . . . . . . . . . . . 18
Adjusting air distribution (4-zone deluxe auto
matic climate control) . . . . . . . . . . . . . . . . . . 61
Adjusting air distribution (deluxe automatic
climate control) . . . . . . . . . . . . . . . . . . . . . . . 59
Adjusting the temperature (4-zone deluxe au
tomatic climate control) . . . . . . . . . . . . . . . . 61
Adjusting the tempera ture (deluxe automatic
climate control) . . . . . . . . . . . . . . . . . . . . . . . 59
Advanced key
refer to Convenience key . . . . . . . . . . . . . . . 68
Airbag . . . . . . . . . . . . . . . . . . . . . . . . . . . . . . 146
~ Airbag system . . . . . . . . . . . . . . . . . . . . . . . . 166 ....
~ Advanced Airbag System . . . . . . . . . . . . . . lS0 N
8 Advanced Airbag System components . . . 153 00 \.J '
Care . . . . . . . . . . . . . . . . . . . . . . . . . . . . . . 161
Children . . . . . . . . . . . . . . . . . . . . . . . . . . . 172
Child restraints . . . . . . . . . . . . . . . . . . . . . 172
Components (front airbags) . . . . . . . . . . . 153
Danger of fitting a child seat on the front
passenger seat . . . . . . . . . . . . . . . . . . . . . . 14 7
Disposal . . . . . . . . . . . . . . . . . . . . . . . . . . . 161
Front airbags .. .. .. ............. 150, lSl
How do the front a irbags work? . . . . . . . . 1S6
How many airbags does my vehicle have? 153
How the Advanced Airbag System compo-
nents work together . . . . . . . . . . . . . . . . . 1 SS
Impo rtant information . . . . . . . . . . . . . . . 146
Important safety instructions on the knee
airbag system . . . . . . . . . . . . . . . . . . . . . . . 164
Knee airbags. . . . . . . . . . . . . . . . . . . . . . . . 162
Monitoring . . . . . . . . . . . . . . . . . . . . . . . . . 158
PASSENGER AIR BAG OFF light . . . . . . . . . 158
Repairs . . . . . . . . . . . . . . . . . . . . . . . . . . . . 161
Safety instructions . . . . . . . . . . . . . . . . . . . 160
Side airbags . . . . . . . . . . . . . . . . . . . . . . . . 164
Side curtain airbags . . . . . . . . . . . . . . . . . . 167
Warning/Indicator lights . . . . . . . . . . . . . 158
When must the system be inspected? 158
Air pressure Tires . . . . . . . . . . . . . . . . . . . . . . . . . . . . . . 21S
Air pressure (tire pressure monitoring
system) . . . . . . . . . . . . . . . . . . . . . . . . . . . . . 224
Air suspension . . . . . . . . . . . . . . . . . . . . . . . 105
Alarm system
refer to Anti-theft alarm system . . . . . . . . . 32
Alignment pin (tire changing) . . . . . . . . . . . 233
All-weather lights . . . . . . . . . . . . . . . . . . . . . . 39
All season tires . . . . . . . . . . . . . . . . . . . . . . . 220
All wheel drive . . . . . . . . . . . . . . . . . . . . . . . 124
Alternator
refer to Alternator (indicator light) . . . . . . 14
Alternator (indicator light) . . . . . . . . . . . . . . 14
Ambient lighting . . . . . . . . . . . . . . . . . . . . . . 42
Anti-freeze Windshield washer system . . . . . . . . . . . . 203
Anti-lock braking system . . . . . . . . . . . . . . . 120
Indicator light . . . . . . . . . . . . . . . . . . . . . . . 16
Anti-Slip Regulation . . . . . . . . . . . . . . . . . . . 120
Indicator light . . . . . . . . . . . . . . . . . . . . . . . 16
Anti-theft alarm system . . . . . . . . . . . . . . . . . 32
Ashtray . . . . . . . . . . . . . . . . . . . . . . . . . . . . . . Sl
259