turn signal AUDI A7 2018 User Guide
[x] Cancel search | Manufacturer: AUDI, Model Year: 2018, Model line: A7, Model: AUDI A7 2018Pages: 274, PDF Size: 42.77 MB
Page 114 of 274
Parking systems
the orange orientation lines for assistance
¢ A in General information on page 110, ¢@
in General information on page 111 . @ repre
sents the rear bumper. At the very latest, stop
the vehicle when the red orientation
line ©
borders an object .
Parallel parking
Applies to: veh icles w ith rearview camera
This view may be used when parallel parking
along the side of
a street.
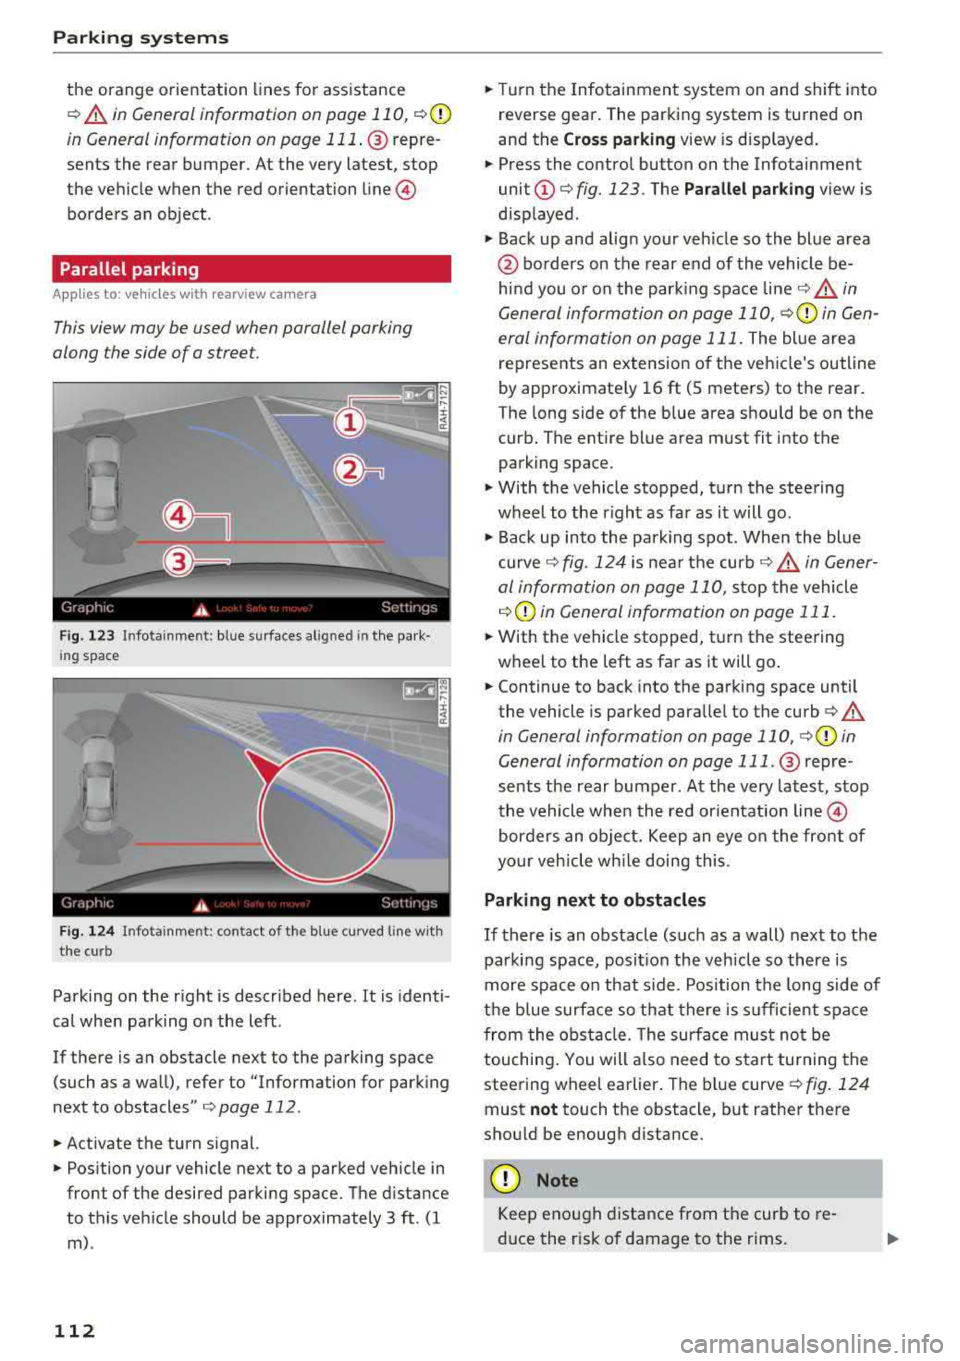
F ig. 123 Infotainment : blue surfaces aligned in the park·
i ng space
F ig . 124 In fo tainme nt: contact of the blue curved line w ith
the curb
Parking on the right is described here. It is identi
cal when park ing on the left .
If there is an obstacle next to the parking space (such as a wall), refer to "Information for parking
next to obstacles"
¢ page 112 .
.. Activate the turn signal.
.. Position your vehicle next to a parked vehicle in
front of the desired parking space. The distance
to this vehicle should be approximately 3 ft . (1
m) .
112
.. Turn the Infotainment system on and shift into
reverse gear. The parking system is turned on
and the
Cross parking view is displayed .
.. Press the control button on the Infotainment
unit
(D ¢ fig. 123. The Parallel parking view is
displayed .
.,. Back up and align your veh icle so the blue area
@ borders on the rear end of the vehicle be
hind you o r on the parking space
line¢,&. in
General information on page 110,
¢Q) in Gen
eral information on page 111.
The blue area
represents an extension of the vehicle's outline
by approximate ly 16 ft (5 meters) to the rear.
The long side of the blue area should be on the
curb. The ent ire blue area must fit into the
parking space .
.,. With the vehicle stopped, turn the steering
wheel to the right as far as it will go .
.,. Back up into the parking spot . When the blue
curve¢ fig. 124 is near the curb ¢ A in Gener
al information on page 110,
stop the vehicle
¢ (i) in General information on page 111 .
.. With the vehicle stopped, turn the steering
wheel to the left as far as it will go .
.. Continue to back into the parking space until
the vehicle is parked parallel to the
curb ¢ A
in General information on page 110, ¢Q) in
General information on page 111 .
@ repre
sents the rear bumper. At the very latest, stop
the vehicle when the red orientation
line ©
borders an object. Keep an eye on the front of
your veh icle wh ile doing this .
Parking next to obstacles
If there is an obstacle (such as a wall) next to the
parking space, posit ion the vehicle so there is
more space on that side. Position the long side of
the blue surface so that there is sufficient space
from the obstacle. The surface must not be
touching . You will a lso need to sta rt turning the
steering wheel earlier . The blue
curve ¢ fig. 124
must not touch the obstacle, but rather there
shou ld be enough distance .
(D Note
Keep enough distance from the curb to re
d uce the risk of damage to the rims.
Page 118 of 274
Parking systems
You can choose between three different views in
this mode.
~ To cross park, parallel park or position the veh i
cle in front of a trai ler*, press the control but
ton ® on the control panel repeatedly until the
symbol for the desired mode is selected .
Perpendicular parking
Applies to: ve hicles w ith peripheral cameras
This view may be used when parking in a garage
or in a parking space .
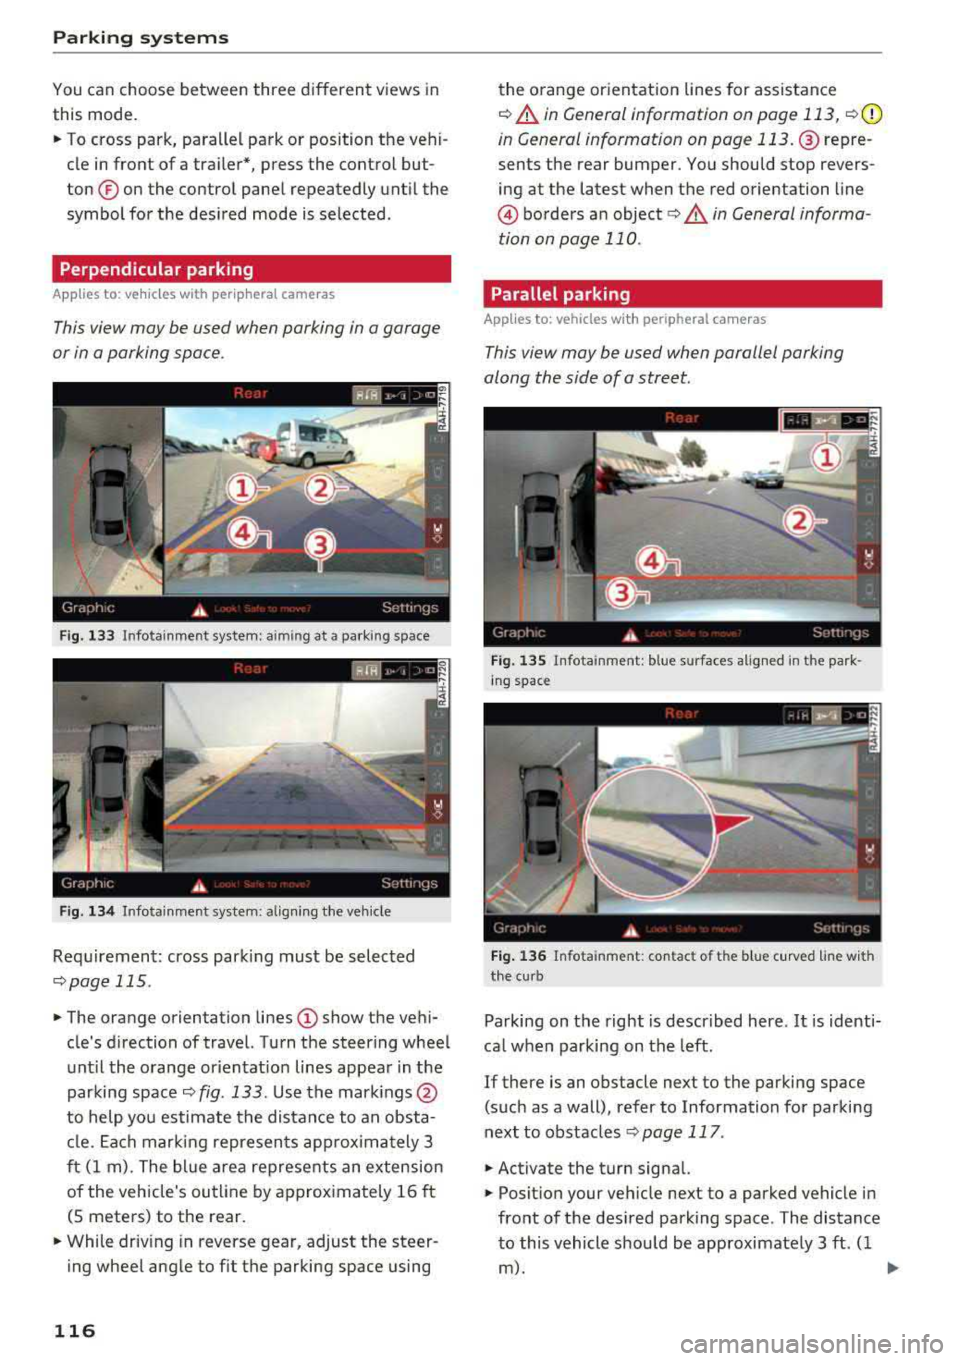
Fig. 133 In fotainme nt system : aimin g at a park ing space
Fig. 134 Infota inme nt system : aligning the veh icle
Requirement: cross park ing must be selected
qpage 115 .
~ The orange orientation lines (D show the vehi
cle's direction of travel. Turn the steering wheel
until the orange or ientat ion lines appear in the
parking space
q fig . 133 . Use the mark ings @
to help you estimate the distance to an obsta
cle. Each marking represents approximately 3
ft (1 m) . The blue area represents an extension
of the vehicle's outline by approx imately 16 ft
(5 meters) to the rear.
~ While driv ing in reverse gear, adjust the steer
ing wheel angle to fit the parking space using
116
the orange orientation lines for assistance
q A in General information on page 113, q(D
in General information on page 113. @repre
sents the rear bumper. You should stop revers
ing at the latest when the red orientation line
© borders an object<=>.&. in General informa
tion on page
110 .
Parallel parking
Applies to: vehicles with peripheral cameras
This view may be used when parallel parking
along the side of a street.
Fig. 135 Infota inment: blue s urfaces alig ned in the park ·
ing space
Fig. 136 Infota inm ent: con tac t o f th e blue cur ved line wi th
the cu rb
Parking on the right is described here. It is identi
cal when parking on the left.
If there is an obstacle next to the parking space (such as a wall), refer to Information for parking
next to obstacles
q page 117 .
~ Activate the turn signal.
~ Position your vehicle next to a parked vehicle in
front of the desired parking space . The distance
to this vehicle should be approximately 3 ft . (1
m). .,.
Page 152 of 274
Airbag system
-An improperly installed child restraint can
interfere with the airbag as it deploys and
seriously injure or even kill the child
-even
with an Advanced Airbag System .
-Always carefully follow the manufacture r's
instructions provided with the child seat or
carrier .
-Always make sure that there is nothing on
the front passenger seat that will cause the
capacit ive passenger detection system in
the seat to signal to the Airbag System that
the seat is occupied by a person when it is
not, or to signa l that it is occupied by some
one who is heav ier than the person actually
sitting on the seat. The presence of addi
tional objects could cause the passenger
front airbag to be turned on when it should be off, or could cause the airbag to work in a
way that is different from the way it would
have worked without the object on the seat .
Front airbags
Description of front airbags
The airbag system can provide supplemental
protection to properly restrained front seat occu
pants.
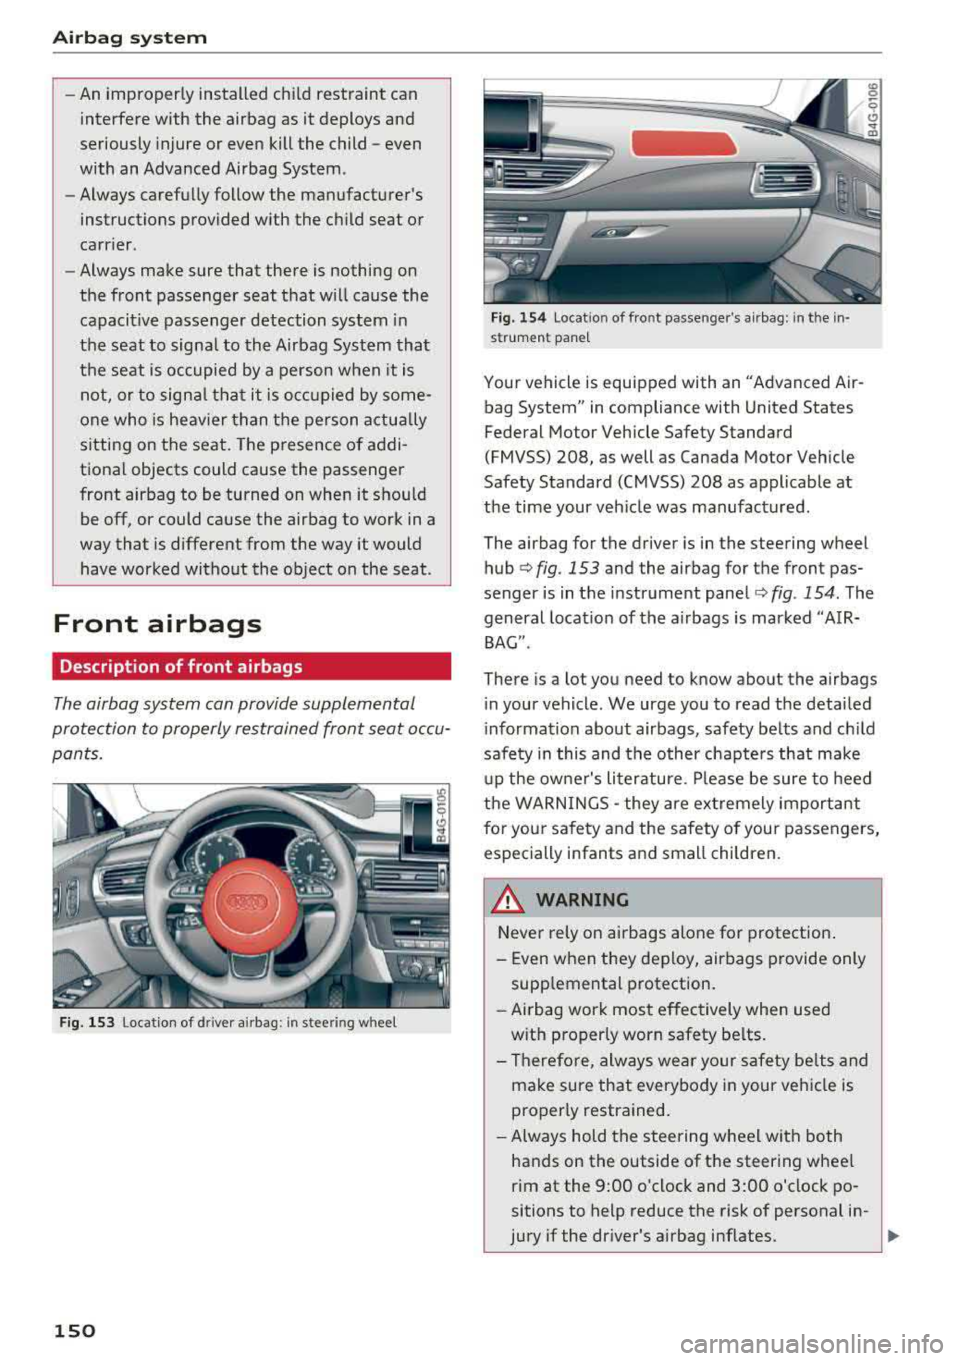
Fig. 153 L ocation of d river airbag : in stee ring w heel
150
Fig. 154 Locat io n of fro nt passenge r's airbag : in th e in ·
s trumen t pan el
Your vehicle is equipped with an "Advanced Air
bag System" in compliance with United States
Federal Motor Vehicle Safety Standard
(FMVSS) 208, as well as Canada Motor Vehicle
Safety Standard (CMVSS) 208 as applicable at
the time your vehicle was manufactured .
The airbag for the driver is in the steering wheel
hub
q fig. 153 and the airbag for the front pas
senger is in the instrument panel
q fig. 154 . The
general location of the airbags is marked
"AIR·
BAG".
There is a lot you need to know about the airbags
in your vehicle . We urge you to read the detailed
information about airbags, safety belts and child
safety in this and the other chapters that make
up the owner's literature. Please be sure to heed
the WARNINGS
-they are extremely important
for your safety and the safety of your passengers,
especially infants and small children.
A WARNING
-Never rely on airbags alone for protection.
-Even when they deploy, airbags provide only
supplemental protection.
- Airbag work most effectively when used
with properly worn safety belts.
- Therefore, always wear your safety belts and
make sure that everybody in your veh icle is
properly restrained.
- Always hold the steering wheel with both
hands on the outside of the steering wheel
rim at the 9:00 o'clock and 3:00 o'clock po·
sitions to help reduce the risk of personal in-
jury
if the dr iver's airbag inflates. ~
Page 155 of 274
a co .... N
" N .... 0 00 \,;J '
t ing s ideways or out of pos ition in any way,
your risk of injury is much higher.
- You will also receive serious injur ies and
cou ld even be killed if you are up aga inst the
airbag or too close to it when it inflates -
even with an Advanced
Airbag¢ page 146 .
A WARNING
A ch ild in a rearward-facing ch ild seat instal
led on the front passenger seat w ill be ser i
ously in jured and can be k illed if the front air
bag inflates - even with an Advanced A irbag
System.
- Alt hough the Advanced A irbag System in
yo ur vehicle is des igned to t urn off t he front
airbag when a re arwa rd-faci ng ch ild re
straint has been insta lled on the front pas
senger seat, nobody can abso lutely guaran
tee that deployment is impossible in a ll con
ceivable s ituations that may happen during
the useful life of your vehicle.
- The inflating a irbag w ill hit the child seat or
infant carrier w ith great force and will
smash the c hild seat and child against the
backrest, ce nter armrest, door, or roof .
- Always install rearward-fac ing ch ild re
straints on the rear seat.
- If you must install a rearward fac ing c hild
seat on the front passenger seat because of
exceptiona l circumstances and the
PA SSEN
GER AIR BAG OFF
light does not come o n
and stay on, immediately insta ll the rear
facing child seat in a re ar seat ing pos ition
and have the a irbag sys tem inspected by
yo ur Audi dealer .
A WARNING
If , in except ional circumstances, you mus t in
sta ll a forward-facing chi ld restraint on the
front passenger's seat:
- Always make sure the forward -facing seat
has been designed and certified by its man
ufact urer for use on a front seat with a pas
senger front and s ide a irbag.
Airbag syste m
- Never p ut the fo rward-facing child restraint
up aga inst or very near the instr ument pan
el.
-Always move the front passenger seat to
the highest posit ion in the up and down ad
justment range and move it back to the rearmost posit ion in the seat's fore and aft
ad justment range, as far away from the a ir
bag as poss ible, before installing the for
ward-fac ing ch ild rest raint.
- Always make sure that the safety be lt upper
a nchorage is behind the c hild rest raint and
not next to o r in front of the ch ild res trai nt
so th at the s afety be lt will be p roper ly posi
tioned.
- Always make su re th at there is not hing o n
the front passenger seat that will cause the
capacitive passenger detection system in
the seat to signal to the Airbag System that
the seat is occup ied by a person when it is
not, or to signal that it is occupied by some
one w ho is heavier than the person actually
sitt ing on the seat. The presence of add i
tional objects cou ld cause the passe nger
front a irbag to be t urned on when it should
be off, o r cou ld cause t he air bag to work in a
way th at is d ifferen t from the way it wo uld
have worked withou t the object on the seat .
- Mak e sure that t he
PASSENGER AIR BAG
OFF
li ght comes on and stays on all the time
whenever t he ignition is switched on .
Advanced Airbag System components
The front passenger seat in your ve hicle has a lot
of very important parts of t he Advanced Airbag
System in it. These parts include the capacitive passenger detection system, wir ing, brackets,
and more . The control unit monitors the system
on the fro nt passenger seat when the ignition is
switched on and turns the airbag indicator l igh t
o n when a malfunction in the one of the system
components is
detec ted ¢ page 158. Because
the fron t passenger sea t contains impo rtan t
parts of the Advanced Ai rbag System, you m ust
take care to prevent it from being damaged .
Damage to the seat may prevent the Advanced
..,_
153
Page 159 of 274

a co .... N
" N .... 0 00 \,;J '
A child in a rearward-facing child seat instal
led on the front passenger seat will be seri
ously injured and can be killed if the front air
bag inflates - even with an Advanced Airbag
System.
- The inflating airbag will hit the child seat or
infant carrier with great force and will
smash the child seat and child against the
backrest, center armrest, door or roof.
- Always install rear-facing child seats on the
rear seat.
- If you must install a rearward facing child
seat on the front passenger seat because of
exceptional circumstances and the
PASSEN
GER AIR BAG OFF
light does not come on
and stay on, immediately install the rear
facing child seat in a rear seating position and have the airbag system inspected by
your Audi dealer.
A WARNING
Objects between you and the airbag will in
crease the risk of injury in a crash by interfer
ing with the way the airbag unfolds or by be
ing pushed into you as the airbag inflates .
- Never hold things in your hands or on your
lap when the vehicle is in use .
- Never transport items on or in the area of
the front passenger seat. Objects could
move into the area of the front airbags dur
ing braking or other sudden maneuvers and
become dangerous projectiles that can
cause serious personal injury if the airbags
inflate.
- Never place or attach accessories or other
objects (such as cup holders, telephone
brackets, large, heavy or bulky objects) on
the doors, over or near the area marked
"AIRBAG" on the steering wheel, instru
ment panel, seat backrests or between
those areas and yourself. These objects could cause injury in a crash, especially
when the airbags inflate .
- Never recline the front passenger 's seat to
transport objects. Items can also move into
the area of the side airbag or the front air-
-
Airbag system
bag during braking or in a sudden maneu
ver. Objects near the airbags can become projectiles and cause injury, particularly
when the seat is reclined .
- Never place or transport objects on the
front passenger seat. Objects on the front passenger seat could cause the capacitive
sensor in the seat to signal to airbag system
that the seat is occupied by a person when it
in fact is not, or that the person on the seat
is heavier than he or she actually is. The
change in electric capacitance because of
such objects can cause the passenger front
airbag to be turned on when it should be
off, or can cause the airbag to work in a way
that is different from the way it would have
worked without objects on the seat.
- Always make sure that there is nothing on the front passenger seat that will cause the
capacitive passenger detection system in
the seat to signal to the Airbag System that
the seat is occupied by a person when it is not , or to signal that it is occupied by some
one who is heavier than the person actually
sitting on the seat. The presence of an ob
ject could cause the passenger front airbag to be turned on when it should be off, or
could cause the airbag to work in a way that is different from the way it would have
worked without the object on the seat.
A WARNING ...__ -
The fine dust created when airbags deploy can
cause breathing problems for people with a history of asthma or other breathing condi
tions .
- To reduce the risk of breathing problems,
those with asthma or other respiratory con
ditions should get fresh air right away by
getting out of the vehicle or opening win
dows or doors.
- If you are in a collision in which airbags de
ploy, wash your hands and face with mild
soap and water before eating.
- Be careful not to get the dust into your eyes,
or into any cuts or scratches.
- If the residue should get into your eyes,
flush them with water.
157
Page 160 of 274

Airbag system
Monitoring the
Advanced Airbag System
:~ (USA models) /!f (Canada models)
Airbag monitoring indicator light
Two separate indicators monitor the function of
the Advanced Airbag System : the airbag moni
toring indicator light and the
PASSENGER AIR
BAG OFF
ligh t.
The Advanced Airbag System as well as the side
airbags and side curtain airbags with eject ion
mitigation features (including the e lectroni c con
trol unit, sensors and system wiring) are all
monitored continuously to make sure that they
are funct ion ing prope rly whenever the ignition is
on . Every time you turn on the ignition, the air
bag system indicator light
II (USA models) 1fll
(Canada models) will come on for a few seconds
(function check).
The system must be inspected when the
indicator light
II (USA models) tfll
(Canada models):
-does not come on w hen the ignition is switched
on,
-does not go out a few seconds after you have
switched on the ign ition, or
-comes on wh ile driving .
If an airbag system ma lf u nction is detected, the
ind icator light wi ll come on to serve as a constant
reminder to have the system inspected immedi
ately.
If a malfunction occurs that turns the front air
bag on the passenger side off, the
PASSENGER
AIR BAG OFF
light will come on and stay on
whenever the igni tion is on .
A WARNING
An airbag system that is not funct ioning prop
erly cannot provide supplemental protection
in a frontal crash .
-If the airbag indicato r light ¢page 16
comes when the vehicle is being used, have
the system inspected immediate ly by your
authorized Audi dealer . It is possible that
158
the airbag will inflate when it is not sup
posed to, or will not inflate when it should.
PASSENGER AIR BAG OFF light
Fig. 156 Sect io n fro m t he inst rume nt panel: PASSENGER
AIR BAG O FF lig ht
The PASSENGER AIR BAG OFF light is located in
the center of the instrument panel ¢
fig. 156.
The PASSENGER AIR BAG OFF light will come on
and stay on to tell you when the front Advanced
Airbag on the passenger side has been turned off
by the electronic contro l unit . If the bulb for the
PASSENGER AIR BAG OFF light burns out, the
airbag indicator light
II (USA models) a (Can
ada models) will come on to signal a malfunction
i n the Advanced A irbag System. Although the
burned-out bulb will not change the way the
front passenger's frontal airbag works, it wi ll no
l onger be poss ible to use the
PASSENGER AIR
BAG OFF
lig ht to make sure that the a irbag on/
off status is correct for the occupant on the front
passenger seat . Have the airbag system inspect
ed immediately by your author ized Audi dealer .
The PASSENGER AIR BAG OFF light will blink
for about 5 seconds when:
-the ignition is switched on and
- the capacit ive passenger detection system,
which switches the front seat passenger's fron
tal Advanced Airbag on and off, detects a
change in the status of the front passenger
seat.
As soon as the
PASSENGER AIR BAG OFF light
stops blinking, always make sure that the airbag
status (on or off) as shown by the
PASSENGER
AIR BAG OFF
light is proper for the age, size and
electrical capacitance of the person occupying
.,..
Page 175 of 274
a co .... N
" N .... 0 00 \,;J '
one of the rear seating positions . If in exception
a l circumstances you must use it on the front
passenger seat, carefully read all of the informa
tion on chi ld safety and Advanced Airbags and
heed all of the applicable WARNINGS . Make cer
tain that the child and ch ild restraint are correct
l y recogn ized by the capacitive passenger detec
tion system in the front passenge r seat, that the
front passenger airbag is turned off, and t hat the
airbag status is always cor rectly signaled by the
PASSENGER AIR BAG OFF light.
M any types and models of ch ild rest rai nts have
been available ove r th e yea rs , new mode ls are in
trod uced regular ly incorporat ing new and im
proved designs and older mode ls are taken out o f
production . Chi ld restraints are not standardized .
Ch ild restraints of the same type typica lly have
d ifferent weights and s izes and different "foot
prints", the size and shape of the bottom of the
child restraint that sits on the seat, when they
are installed on a vehicle seat . T hese differences
make it virtually impossible to certify compliance
w ith the requirements fo r advanced airbags with
e ach and eve ry c hild rest raint t hat has ever been
sold in the past o r will be sold over t he course o f
the useful life of your vehicle.
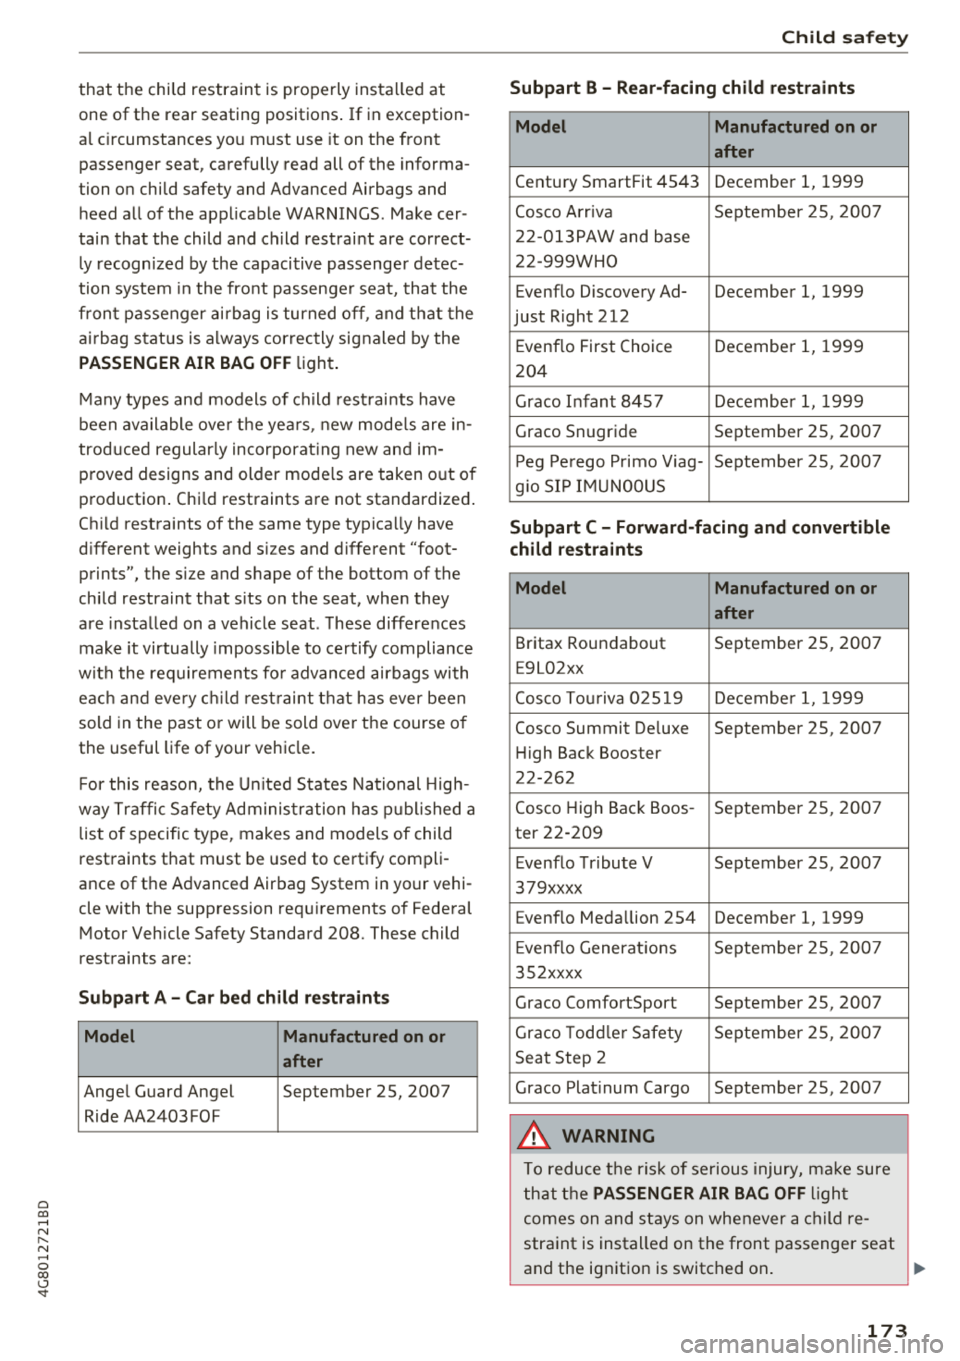
F or this reason, the U nited States National High
way Tr affic Safety Adminis tration has p ublished a
lis t of specific type, makes and models of child
restraints that must be used to certify compli
ance of th e Advanced Airbag System in your vehi
cle with the suppression requirements of Federal
Motor Vehicle Safety Standard 208. These child
restraints are:
Subpart A -Car bed child re straint s
Model Manufactured on or
after
Ange l Guard Angel September 25, 2007
Ride AA2403FOF
Ch ild saf ety
Subpart B -Rear-facing child restraints
Model Manufactured on or
after
Century SmartFit 4543 December 1, 1999
Cosco Arr iva September 25, 2007
22-013PAW and base
22 -999WHO
Evenflo Discovery
Ad-December 1, 1999
just Right 212
E venflo First Choice December 1, 1999
204
Graco Infant 8457 December 1, 1999
Graco Snug ride September 25, 2007
P eg Pe rego P rimo Viag- September 25, 2007
g io SI P IM UNOOUS
Subpart C -Forward -facing and convertible
child restraints
Model Manufactured on or
after
Britax Roundabout September 25, 2007
E9L02xx
Cosco Tou riva 025 19 Decembe r 1, 1999
Cosco Summit De luxe September 25, 2007
H igh Back Booster
22-262
Cosco High Back Boos -September 25, 2007
ter 22 -209
E venflo Tr ibute V September 25, 2007
379xxxx
Evenflo Medallion 254 December 1, 1999
E venflo Generat io ns September 25, 200 7
352xxxx
Graco ComfortSport September 25, 2007
Graco Todd le r Safety September 25, 200 7
Seat Step 2
Graco Platinum Cargo September 25, 2007
A WARNING
To reduce the r isk of serious injury, ma ke sure
that the
PASSENGER AIR BAG OFF l ight
comes on and stays on whenever a chil d re
straint is installed on the front passenger seat
and the ignition is switched on .
173
Page 229 of 274

a co .... N
" N .... 0 00 \.J '
tem measures the current tire pressures and stores them as the new specified pressures.
~ If the changed tire pressures are not displayed
in the Infotainment system, drive the vehicle
for approximately 10 minutes so that the sen
sor signal from the wheels is received again.
During this adaptation phase, --.·· is displayed
for the pressure and temperature and the tire
pressure monitoring system is only partially
available. It only provides a warning if one or
more tir e pressures is below the minimum per
mitted specified pressure. If this is the case, the
IE indicator light appears with a message.
& WARNING
Read and follow the important information
and notes
¢p age 225.
Malfunctions
Applies to: vehicles with tire pressure monitoring syste m
-
If the Tire Pressure Monitoring System is not
avai lable, the
mm indicator light appears in the
driver information system. The
IE indicator light
also blinks for approximately one minutes each
time the ignition is switched on . The tire pressure
monitoring system cannot be selected in the In
fotainment system. The fol lowing are examples
of situat ions that could cause a malfunction:
-If the message appears at the end of the adap
tation phase, the system cannot detect the
wheels installed on the vehicle. This may resu lt
from one or more wheels being installed with
out wheel sensors or with incompatible wheel
sensors.
-A wheel sensor or another component has
failed.
-Using snow cha ins can affect the function of
the system because of the shield ing effect of
the chains .
-The tire pressure monitoring system is not
available due to a malfunction.
-T ransmitters with the same frequency, such as
headphones or remote-control led dev ices, may
cause a temporary system malfunction due to
the strong electromagnetic field.
Wheels
T he m;i indicator light turns off once the Tire
Pressure Monitoring System is available again. If
you cannot correct the ma lfunction and the
m;i
indicator light stays on, drive immediately to an
authorized Audi dealer or authorized Audi Service
Facility to have the malfunction repaired.
227