tow AUDI A7 2018 Owner's Guide
[x] Cancel search | Manufacturer: AUDI, Model Year: 2018, Model line: A7, Model: AUDI A7 2018Pages: 274, PDF Size: 42.77 MB
Page 177 of 274
a co .... N
" N .... 0 00 \,;J '
jure each other in an accident .
- Never install rear-facing child safety seats
or infant carriers on the front passenger
seat. A child will be seriously injured and can be killed when the passenger airbag in
flates - even with an Advanced Airbag Sys
tem .
- The inflating airbag will hit the child safety
seat or infant carrier with great force and
will smash the child safety seat and child against the backrest, center armrest, door
or roof.
- Always install rear-facing child safety seats
or infant carriers on the rear seat.
- Make sure there is enough space in front of
the child in the child seat. If necessary, ad
just the angle and position of the seat in
front of the child seat.
- Forward-facing child safety seats installed
on the front passenger's seat can interfere
with the airbag when it inflates and cause
serious injury to the child. Always install for
ward-facing child safety seats on the rear
seat.
- If exceptional circumstances require the use
of a forward-facing child restraint on the
front passenger's seat, the child's safety
and well-being require that the following
special precautions be taken:
- Make sure the forward-facing seat has
been designed and certified by its manu
facturer for use on a front seat with a pas
senger front and side airbag.
- Always carefully follow the manufacturer's
instructions provided with the child safety
seat or carrier.
- Always move the front passenger seat to the highest position in the up and down
adjustment range and move it back to the rearmost position in the seat's fore and
aft adjustment range, as far away from
the airbag as possible, before installing
the forward-facing child restraint .
- Always make sure that the safety belt up
per anchorage is behind the child restraint
and not next to or in front of the child re-
Child safety
straint so that the safety belt will be prop
erly positioned.
- Always make sure that nothing prevents
the front passenger's seat from being moved to the rearmost position in its fore
and aft adjustment range.
- Always make sure that the backrest is in the upright position.
- Never place or use any electrical device
(such as a laptop, CD player, electronic
games device, power inverter or seat heat
er for child seats) on the front passenger
seat if the device is connected to the 12-
volt socket or the cigarette lighter socket.
- If a seat heater has been retrofitted or
otherwise added to the front passenger seat, never install any child restraint sys
tem on this seat.
- Make sure that there are no wet objects
(such as a wet towel) and no water or oth
er liquids on the front passenger seat
cushion.
- Never place objects on the seat (such as a
laptop, CD player, electronic games de
vice, power inverter or seat heater for child seats). These may influence the elec
trical capacitance measured by the capaci
tive passenger detection system and can
also fly around in an accident and cause
serious personal injury.
- Always buckle the child safety seat firmly in
place even if a child is not sitting in it. A
loose child safety seat can fly around during
a sudden stop or in a collision .
- Always read and heed all WARNINGS when
ever using a child restrained in a vehicle is
being used<=;>
page 138, Safety belts,
~page 146, Airbag system and
~ page 170, Child safety.
_&. WARNING
To reduce the risk of serious injury, make sure
that the
PASSENGER AIR BAG OFF light
comes on and stays on whenever a child re
straint is installed on the front passenger seat
and the ignition is switched on.
~
175
Page 179 of 274
a co .... N
" N .... 0 00 \,;J '
cras h
¢fig . 164.
The a irbag on the passenger s ide makes the front
seat a potentia lly dange rous p lace for a ch ild to
ride. The front seat is not the safest place for a
chi ld in a forward-facing chi ld seat . It is a very
dangerous place for an infant or a larger child in
a rearward-facing seat.
A WARNING
Not using a ch ild safety seat, using the wrong
child safety seat or improperly installing a
child restra int increases the r isk of serious
personal in ju ry and death in a crash.
- Never install rear -facing chi ld safety seats
o r infant carriers on the front passenger
seat - even with an Advanced Airbag System.
A ch ild will be ser iously injured and can be
kille d when the infla ting air bag hits the
child safety seat o r infant carr ier with great
force and smashes the child safety seat and child against the backrest, center armrest,
doo r or r oof
c> page 147, Child restraints on
the front seat -some important things to
know .
-Always install rear-facing child safety seats
o r infant carriers on the rear seat.
- Never install a rear-facing child restra int in
the forward-facing direct ion. Such restraints
are designed for the spec ial needs of infants
and very small children and cannot protect
them properly if the seat is forward-facing .
- If you must install a rearward fac ing ch ild
safety seat on the front passenger seat be
cause of exceptiona l circumstances and the
PASSENGER AIR BAG OFF light does not
c ome on and stay on, imme diate ly install
the rear-fac ing ch ild safety sea t in a rear
seating pos it ion and have the airbag system
inspected by you r A udi dealer.
- Never place o r use any elec trical device
(s uch as a la ptop, CD player, electronic
games dev ice, power inverte r o r seat heater
f or child seats) on the front passenger seat
if the device is connected to the 12-volt
socket or the cigarette lighter socket.
Ch ild saf ety
- If a seat heater has been ret rofitted or oth
erwise added to the front passenger seat, never install any child restra int system on
this seat .
- Make sure that there are no wet objects
(such as a wet towel) and no water or other
liquids on the fron t passenger seat cush ion .
- Never p lace objects on the seat (such as a
laptop, CD p layer, electronic games device,
power inverter o r seat heater fo r ch ild
seats) . These may influence the elect rical
capacitance measu red by the capacitive pas
senger de te ct io n s ystem and can al so fly
aro und in an accident an d cause serious per
sonal injury .
- Always read and hee d all WARNING S when
ever using a child restrained in a vehicle is
be ing
u sed ¢ page 138, Safety belts,
¢ poge 146, Airbag system and
c> page 170, Important information.
177
Page 181 of 274
a co .... N
" N .... 0 00 \,;J '
move the rear seat head restraint if it is dif
ficult to install the child seat with the head restraint in place
c> page 49 . Install the
head restraint again immediately once the
child seat is removed. Driving without head
restraints or with head restraints that are
not properly adjusted increases the risk of
serious or fatal neck injury dramatically.
- Always read and heed all WARNINGS when
ever using a child restrained in a vehicle is
being used
c> page 138, Safety belts,
c> page 146, Airbag system and
c> page 170, Important information.
A WARNING
If exceptional circumstances require the use
of a forward-facing child restraint on the
front passenger's seat, the child's safety and
well-being require that the following special
precautions be taken:
- Make sure the forward-facing seat has been
designed and certified by its manufacturer
for use on a front seat with a passenger
front and side airbag .
- Always follow the manufacturer's instruc tions provided with the child safety seat or
infant carrier.
- Always move the front passenger seat to
the highest position in the up and down ad
justment range and move it back to the
rearmost position in the seat's fore and aft
adjustment range, as far away from the air
bag as possible, before installing the for
ward-facing child restraint.
- Always make sure that the safety belt upper
anchorage is behind the child restraint and
not next to or in front of the child restraint
so that the safety belt will be properly posi
tioned.
- Always make sure that nothing prevents the
front passenger's seat from being moved to
the rearmost position in its fore and aft ad
justment range.
- Always make sure the backrest is in an up
right position.
Child safety
-Never place or use any electrical device
(such as a laptop, CD player, electronic
games device, power inverter or seat heater
for child seats) on the front passenger seat
if the device is connected to the 12-volt
socket or the cigarette lighter socket.
- If a seat heater has been retrofitted or oth erwise added to the front passenger seat, never install any child restraint system on
this seat.
- Make sure that there are no wet objects
(such as a wet towel) and no water or other
liquids on the front passenger seat cushion.
- Never place objects on the seat (such as a
laptop, CD player, electronic games device,
power inverter or seat heater for child
seats). These may influence the electrical
capacitance measured by the capacitive pas
senger detection system and can also fly
around in an accident and cause serious per
sonal injury.
- Make sure that the
PASSENGER AIR BAG
OFF
light comes on and stays on all the time
whenever the ignition is switched on.
- If the
PASSENGER AIR BAG OFF light does
not come on and stay on, immediately in
stall the forward-facing child seat at a seat ing position on the rear seat and have the
airbag system inspected by your authorized
Audi dealer .
- Take the child restraint off the front passen
ger seat and install it properly at one of the
rear seat positions if the
PASSENGER AIR
BAG OFF
light does not stay on whenever
the ignition is switched on.
179
Page 186 of 274
Child sa fety
- Always make sure the seat backrest to which
t h e chi ld restraint is installed is in an up
rig ht p osition and s ecurely latched into
plac e and can not f old forward. O therwise,
t he se atback with t he ch ild safe ty seat at
tached to it could fly forward in the event of
an accident or other emergency situation.
- Always read and heed all WARNINGS when
ever using a child restrained in a veh icle is
being used
¢ page 170. Specia l preca utions
apply when installing a child safety seat on
the front passenger
seat¢ page 147, Child
restraints on the front seat -some impor
tant things to know.
Deactivating the convertible locking
retractor
The convertible locking retractor for child re
straints will be deactivated automatically when
the belt is wound all the way back into the re
tractor .
~ Press the red button on the safety belt b uckle.
Th@ belt tongue w ill pop out of the buckle.
~ Gu ide the safety belt a ll the way back into its
stowed position .
Always let the safety belt retract complete ly into
its stowed position . The safety belt can now be
used as an ordinary safety belt without the con
vert ible lock ing retractor for child restra ints .
If the convert ible lock ing retractor should be ac
tivated inadve rtently, the safety belt must be un
fastened and gu ided completely back into its
stowed position to deact ivate this feature.
If the
convertib le lock ing retractor is not deact ivated,
the safety belt w ill gradually become tighte r and
uncomfo rtable to wea r.
A WARNING
-
Improperly installe d child safety seats in
crease the risk of serio us pe rsonal injury and
death in a collision .
- Never unfasten the safe ty belt to deactiva te
the convert ible locking retractor for child re
straints while the vehicle is moving . You
184 wou
ld not be rest rained and could be seri
ously in jured in an acc ident.
- Always read and heed all WARNINGS when
ever us ing a child restrained in a vehicle is
be ing
used¢ page 170. Special p recautions
apply when installing a child safety seat on
the front passenge r
seat¢ page 147, Child
restraints on the front seat -some impor
tant things to know.
LATCH system (lower
anchorages and tethers
for children)
Child Restraint System anchors and how
are they related to child safety
To p rovide a simp ler and mo re practicab le way to
attach the ch ild restraint on the vehicle seat,
Federal regulations require spec ia l lower ancho
rages in vehicles and devices on new ch ild re
straints to attach to the vehicle anchorages .
In the United States, the combination of the
tethe r ancho rages and the lower anchorages is
now generally called t he LATCH system for
" Lower Anchorages and Tethers for Children" . In
Canada, the terms
" top tet her" wi th "lower u ni
versa l anchorages" (o r "lowe r universa l anchor
age bars") a re used to des cribe the system .
In other co untries the term
"ISOFIX" is used to
desc ribe the lower anchorages .
Fo rward-facing chi ld restraints manufactured af
ter September
1, 1999, are required by U.S . fed
era l regulations to comply with new child head
movement performance req uir ements . These
new performance requ irements make a tether
necessary on most new ch ild sea ts.
Installing a ch ild restraint that requires a top
tether wi thout one can se riously impair the per
fo rmance of the c hild rest raint and its ab ility to
pro tect the ch ild in a co ll ision. I nstalling a ch ild
r es trai nt th at r equi res a top te ther wi tho ut the
top tether may be a vio lation o f st ate law.
Child restra int manufactu rers offe r LATCH lowe r
ancho rages on t heir child seats w ith hook-on or
...
Page 220 of 274
Wheels
A WARNING
Please note the important safe
ty precautions regarding tire
pressure
¢ page 215 and load
limits¢ page 218.
Tires and vehicle load limits
There are limits to the amount of
load or weight that any vehicle
and any tire can carry. A vehicle
that is overloaded will not handle
well and is more difficult to stop. Overloading can not only lead to loss of vehicle control, but can al
so damage important parts of the
vehicle and can lead to sudden
tire failure, including a blowout
and sudden deflat ion that can
cause the vehicle to crash .
Your safety and that of your pas
sengers also depends on making
sure that load limits are not ex
ceeded . Vehicle load inc ludes ev
erybody and everything in and on
the vehicle. These load limits are
technically referred to as the vehi
cle's
Gross Vehicle Weight Rat
ing
("GVWR") .
T he "GVWR" inc ludes the weight
of the basic vehicle, all factory in
stalled accessories, a full tank of
fuel, oil, coolant and other fluids
2 18
plus maximum load . The maxi
mum load includes the number of
passengers that the vehicle is in
tended to carry ("seating capaci
ty") with an assumed weight of
150 lbs . (68 kg) for each passen
ger at a designated seating posi
tion and the total weight of any luggage in the veh icle. If you tow
a trailer, the weight of the trailer
hitch and the tongue weight of
the loaded trailer must be includ ed as part of the vehic le load.
The
Gross Axle Weight Rating
("GAWR") is the maximum load
that can be applied at each of the
vehicle's two axles .
The fact that there is an upper limit to your vehicle's Gross Vehi
cle Weight Rating means that the
total weight of whatever is being
carried in the vehic le (inc luding
the weight of a trailer h itch and
the tongue weight of the loaded
trailer) is limited . The more pas
sengers in the vehicle or passen
gers who are heavier than the
standard weights assumed mean
that less weight can be carried as luggage .
The Gross Veh icle We igh t Ra ting
and the Gross Axle Weight Rat ing
.,.
Page 222 of 274
Wheels
be five 150 lbs. pas seng ers in
your vehicle, th e am ount of
a vail abl e cargo and lug gage
lo ad ca pac ity is 650 lb s.
(1400-750 (5
X 150) = 650
lb s.)
5. Determine the combined weight of lu ggage and c argo
bein g loaded on the vehi cle .
Th at w eight ma y not safel y
ex
ceed the a vail able car go and
luggage lo ad capac ity calc ul at
ed in St ep 4 .
6. If your vehicle will b e towing a
tr aile r, lo ad from your tr aile r
w ill b e tran sferr ed to your
v e
hi cle. C onsul t this manual t o
determin e how this re du ces
th e av ailab le cargo and lug
g age load capa cit y of your v ehi
cl e.
..,.Che ck th e tire sidewall
(c:::> pa ge 206, fig . 187) to det er
mine the de signated load rating
for a sp e cific tire.
Wheel bolts and rims
Wheel bolts
Wheel bolts must be clean and loosen/t ighten
easi ly .
Rims
Rims with a bolted rim ring* or w it h bolted whee l
covers " consist of mu ltip le pieces . These compo
nents were bolted together using specia l bolts
220
and a spec ia l proced ure. Yo u must not repair or
disassemb le them
i::> &. .
A WARNING
Wheel bo lts that are tightened or repaired in
correct ly can become loose and resu lt in loss
of vehicle contro l, wh ich increases the risk of
an accident . For the correct tighten ing spec ifi
cation,
see ¢ page 23 7, After changing a
whe el.
- Always keep the wheel bolts and the
threads in the wheel hub clean and free of
grease .
- Only use wheel bolts tha t fit the rim.
- Always have damaged rims repaired by an
author ized Audi dealer or authorized A udi
Serv ice Facility . Neve r repa ir o r disassemb le
rims you rself, because this increases the risk
of an a cciden t.
Winter tires
Win ter tires significant ly imp rove the veh icle's
handling when dr iv ing in winter conditions. Be
ca use of their construction (width, compound,
tread patte rn), s ummer ti res provide less trac
tion on ice and snow.
.,. Use winter tires on a ll four wheels .
.,. Only use winter tires that are app roved for yo ur
vehicle .
.,. Please note that the maximum permitted
speed may be lowe r with winter
tires¢ &. in
General information on page
205 . An author
ized Aud i dealer or authorized Aud i Serv ice Fa
cility can inform yo u about t he maximum per
m itted speed for your tires .
.,. Check the tire p ressure afte r insta lling wheels
¢ page 215 .
The effectiveness of wi nter tires is reduced g reat
l y when t he tread is wo rn down to a depth of
0.157 i n (4 mm). The cha ra cte ris tics of winte r
t ir es a lso decrease g rea tly as the t ire ages , re
gard less o f th e remaining t read.
Page 238 of 274
Emergency assistance
-If the tire is too severely damaged, see an
authorized Aud i dealer or authorized Aud i
Service Facility for assistance.
@ For the sake of the environment
You can give the used tire sealant bottle to an
authorized Audi dealer or authorized Audi
Serv ice Facility for disposal.
(D Tips
Remember to obtain a new bottle of sealant
from an authorized Audi dealer or authorized
Audi Serv ice Facility after repairing a tire.
Replacing wheels
Before changing a wheel
Observe the following precautions for your own
and your passenger's safety when changing a
wheel.
.,. After you exper ience a tire fa ilure, pull the car
well away from moving traff ic and try to reach
level ground
before you stop ¢.&, .
.,. All passengers sho uld leave the car and move
to a safe location (for instance, be hind t he
guardrail) ¢.&, .
.. Engage the parking brake to prevent your vehi
cle from rolling
unintentionally ¢.&, .
.. Move selector lever to position P ¢ A-
.. If you are towing a trailer, unhitch the trailer
from your veh icle .
.,. Take the jack and the spare tire* out of the lug
gage compartment
ca> page 233 .
.8, WARNING
You or your passengers could be inju red w hile
chan gin g a wheel if you do not follow these
safety precautions:
- If you have a flat ti re, move a safe d ista nee
off th e road. Turn off the engine, turn the
emergency flashers on and use other warn
ing devices to alert other motorists .
- Make sur e that passengers wait in a safe
place away from the vehicle and we ll away
from the road and traffic.
236
- To help prevent the vehicle from moving
suddenly and possibly s lipping off the jack,
always fully set the parking brake and block
the front and back of the wheel diagonally
opposite the wheel being changed. When
one front wheel is lifted off the ground,
p lacing the Automat ic Transmission in P
(Pa rk) w ill
not prevent the vehicle from
mov ing.
- Before you change a wheel, be sure the
ground is level and firm. If necessary, use a
sturdy board under the jack.
- Always store the vehicle tool kit, the jack
and the replaced tire in the lu ggage com
pa rtment
¢page 134 .
(D Tips
Before changing the wheel, you must activate
the jacking mode, so that the automatic con
trols for the Adaptive Air Suspension* do not
make it more difficult to lift the vehicle with
the jack
ca> page 238 .
Changing a wheel
When you change a wheel, follow the sequence
described below step-by-step and in exactly that
order .
1. Act ivate the vehicle jack mode* ca> page 238 .
2. Remove the decorative wheel cover* or the
wheel bolt caps*. For more details see also
¢ page 23 7, Decorative wheel covers or
¢ page 237, Wheels with wheel bolt caps.
3. Loosen the wheel bolts ¢ page 238.
4. Locate the proper mounting point for the
jack and alig n the jack below that po int
¢ page 238 .
5. Raise the car with the jack ca> page 238.
6. Remove the wheel with the flat tire and then
install
the spare ca> page 240.
7. T ighten all whee l bolts lightly.
8 .
Lower the vehicle with the jack.
9. Use the wheel bolt wrench and
firmly tighten
all wheel
bolts ¢ page 238.
10. Replace the decorat ive wheel cover* or the
wheel bolt caps*.
11. Deact ivate the vehicle jack mode* in the
MM I:
ICARI function button > (Ca r)* systems .,.
Page 249 of 274

a co .... N
" N .... 0 00 \.J '
General
This chapter is intended for trained emergency
crews and working personnel who have the nec
essary tools and equipment to perform these
operations.
Starting by pushing or
towing
~ Note
Vehicles with an automatic transmission can
not be started by pushing or towing.
Starting with jumper
cables
If necessary, the engine can be started by con
necting it to the battery of another vehicle .
If the engine should fail to start because of a dis
charged or weak battery, the battery can be con
nected to the battery of
another vehicle, using a
pair of jumper cables to start the engine.
Jumper cables
Use only jumper cables of sufficiently large cross
section
to carry the starter current safely. Refer
to the manufacturer's specifications.
Use only jumper cables with
insulated terminal
clamps which are distinctly marked :
plus(+) cable in most cases colored red
minus(-) cable
in most cases colored black.
A WARNING -
Batteries contain electricity, acid, and gas.
Any of these can cause very serious or fatal in
jury. Follow the instructions below for safe
handling of your vehicle's battery .
-Always shield your eyes and avoid leaning
over the battery whenever possible.
-A dead battery can freeze at temperatures
around 32 °F (0 °C) . If the vehicle battery is
frozen, you must thaw it before connecting
the jump start cables. If you do not, this in-
Emergency situations
creases the risk of an explosion and chemi
cal burns. After jump starting the vehicle,
drive to an authorized Audi dealer or author ized Audi Service Facility immediately to
have the vehicle battery checked.
- Do not allow battery acid to contact eyes or
skin . Flush any contacted area with water
immediately.
- Improper use of a booster battery to start a
vehicle may cause an explosion .
- Vehicle batteries generate explosive gases .
Keep sparks, flame and lighted cigarettes
away from batteries.
- Do not try to jump start any vehicle with a
low acid level in the battery .
- The voltage of the booster battery must also
have a 12-volt rating . The capacity (Ah) of
the booster battery should not be lower
than that of the discharged battery. Use of
batteries of different voltage or substantial
ly different "Ah " rating may cause an explo
sion and personal injury.
- Never charge a frozen battery. Gas trapped
in the ice may cause an explosion.
- Never charge or use a battery that has been
frozen. The battery case may have be weak
ened.
- Use of batteries of different voltage or sub
stantially different capacity (Ah) rating may
cause an explosion and injury. The capacity
(Ah) of the booster battery should not be
lower than that of the discharged battery.
- Before you check anything in the engine
compartment, always read and heed all
WARNINGS
c>page 193.
@ Note
- Applying a higher voltage booster battery
will cause expensive damage to sensitive
electronic components, such as control
units, relays, radio, etc.
- There must be no electrical contact between
the vehicles as otherwise current could al
ready start to flow as soon as the positive
( + ) terminals are connected.
247
Page 251 of 274
-Be fore yo u chec k any thing in the engine
compartment, a lways read and heed a ll
WARNINGS
c:::> page 193 .
(D Note
Impro per hook-u p of jum per cables c an r uin
the gene rato r.
-Always connect P OSITIVE( +) to POS ITIV E
( + ), and NEG ATIVE( -) to NEGATI VE( -)
g round post of t he battery manage r contro l
unit.
- Check that a ll sc rew p lugs on t he battery
ce lls are screwed in f irmly . If not, t ighten
plugs p rior to connecting clamp on negative
b attery termi nal.
- Please note t hat the procedure fo r con nect
i ng a jumper cab le as desc ribed above ap
pli es specifica lly to the case of yo ur vehicle
b eing jump starte d. W hen you are giv ing a
ju mp s ta rt to ano ther vehicle , d o
no t con
ne ct t he negative( -) cable to the neg ative
(-) t ermin al on the disch arged b attery @
c:::> fig . 212 . In stead , securely connec t the
n egative ( -) cable to either a solid metal
com ponent that is firm ly bolted to the e n
gine block or to the engine bloc k itsel f. If
the battery that is be ing charged does not
vent to the outs ide, escap ing battery gas
could ignite and ex plode!
Towing with a tow truck
General hints
Your Audi requires special handling for towing .
The follow ing informa tion is to be used by com
mercia l tow tr uck operators who know how to op
e rate the ir equip men t sa fely.
- Never tow your Audi. Towing will cause dam
age to the engine and transmission .
- Never wrap the safety chains or winch cables
around the brake line s.
- To prevent unnecessary damage, your Audi
must be transported with a flatbed tru ck .
a co -To load the vehicle on to the flatbed , use the ,...,
~ towing loop found in the vehicle tools and at-N ,...,
0 00 <.,;) '
tach to the front or rear anchorage
c:::> pag e 249 and c:::>page 250 .
A WARNING
-
A veh icle bei ng towed is not safe for passen-
gers . N ever allow anyone to ride in a vehicle
being towed, for any reason.
Front towing loop
Fig. 213 Front bu mpe r: co ve r
Fig. 214 Front bu mper: i nst all ing the tow ing loop
T he t hreaded o pen ing for th e towing loop is lo
cated be hind a cover on the r ight side of the front
bumper .
.,. Remove the towing loo p from the vehi cle too l
k it
c:::> page 2 3 3 .
.,. Press the cap inward with brief, force ful p res
su re
c:::> fig. 213 . The cap will loosen from the
bumper.
.,. T ighten the towing loop in the threaded open
ing until it sto ps
c:::> fig . 214 and then tighten it
w ith a wheel w re nch .
.,. After usi ng, p lace the tow ing loop back i n the
veh icle tool kit.
..,.
249
Page 252 of 274
Emergency situations
& WARNING
If the towing loop is not tightened until it
stops when installing, the threads may be
pulled out when towing the vehicle and that
could cause an accident.
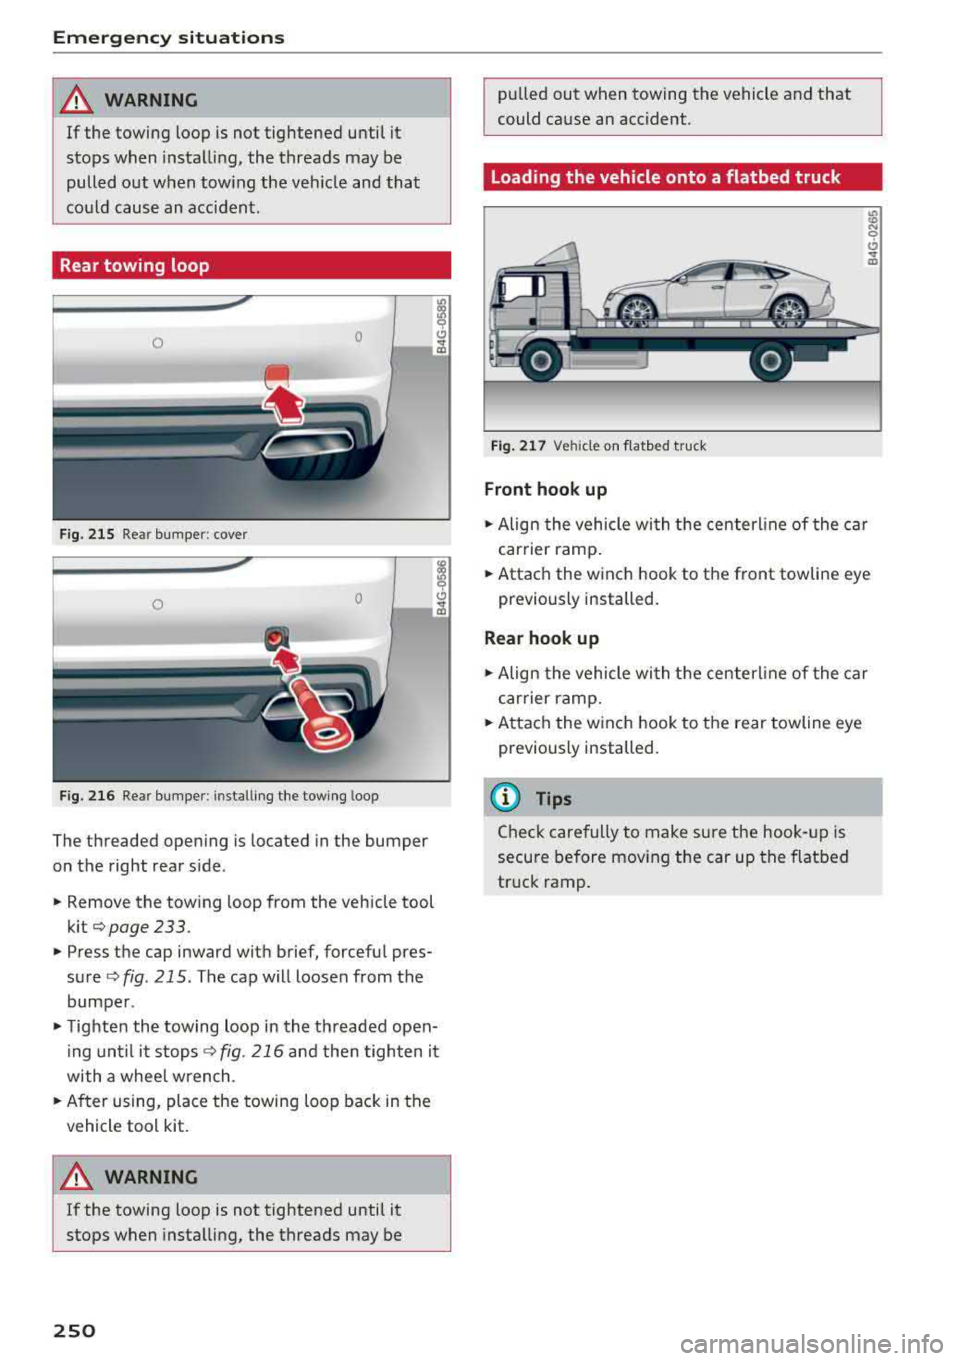
Rear towing loop
0 0
F
ig. 215 Rear bumper : cover
0 0
F
ig. 216 Rear bumper : installi ng the towing loop
The threaded opening is located in the bumper
on the right rear side .
.. Remove the towing loop from the vehicle tool
kit
o page 233 .
.. Press the cap inward with brief, forceful pres
sure
o fig . 215 . The cap will loosen from the
bumper .
.. Tighten the towing loop in the threaded open
ing until it stops
<=?fig. 216 and then tighten it
with a whee l wrench .
.. After using, place the towing loop back in the
vehicle tool kit.
A WARNING
If the towing loop is not tightened until it
stops when installing, the threads may be
250
-
pulled out when towing the vehicle and that
could cause an accident .
Loading the vehicle onto a flatbed truck
Fig. 217 Vehicle on f latbed truck
Front hook up
l8 N 0
CJ .., m
.. Align the vehicle with the centerline of the car
carrier ramp .
.. Attach the winch hook to the front towline eye
previously installed.
Rear hook up
.. Align the vehicle wi th the centerl ine of the car
carrier ramp .
.. Attach the winch hook to the rear towline eye
previously installed.
@ Tips
Check carefully to make sure the hook-up is
secure before moving the car up the flatbed
truck ramp .