belt AUDI A8 2013 User Guide
[x] Cancel search | Manufacturer: AUDI, Model Year: 2013, Model line: A8, Model: AUDI A8 2013Pages: 318, PDF Size: 79.34 MB
Page 72 of 318

70 Seats and storage
Pass-through with ski
sack
Preparing the pass-through
Appl ies to vehicles: with pass-through and ski sack
Long objects such as skis con be transported
in the ski sock.
Fig. 70 Rear benc h seat: removing t he protective cover
Fig . 71 Rear center armres t: attaching the protective
cover
.. Fold the rear center arm rest and the cover
located beh ind it down .
.,. Press the butto n to remove the p rotective
c ove r¢
fig . 70.
.. To p rotect the front area of the center arm
r est, position the cover as illustrated
,::;, fig. 71 and press the suct io n cups down so
they adhere.
.. Remove the ski sack and unfold it.
Loading and securing the ski sack
Applies to vehicles: with pass -through and ski sack
--~ --
--· ---
Fig. 72 Luggage compartmen t: pass -th roug h in th e
back rest
F ig. 73 Rear bench seat: secu ring the sk i sack
Loading
.,. Fold the pass-through cover in the luggage
compa rtment down ¢
fig. 72.
.,. Slide the pointed end of the s kis into the sk i
sack first¢ &. The front par t of the bind
ings must be direc tly under the securing
strap on the ski sack@¢
fig. 73.
Securing
.,. Insert the securing strap@ on the ski sack
into the center safety belt latch © ¢
fig. 73 .
.,. Tigh ten t he secur ing strap @.
Securing (vehicles with full-length center
console )
In the pass-th rough, two securi ng straps are
i n the hooks lo cated in the lugg age compa rt·
ment .
.,. Hook the hooks into the front tie-downs in
the luggage compartment .
.,. Tigh ten the secur ing str ap @ in the rear .
Page 73 of 318
A WARNING
-The ski sack is intended only for the
transportation of skis and other light ob
jects. To reduce the risk of serious per
sonal injury, never transport heavy or pointed objects in the ski sack.
- When brak ing rapidly or during an acci
dent, the load could be displaced and
cause injury to occupants.
- Sharp edges on the load must be covered
for protect ion. Always fasten the belt
t ightly around the sack and its contents
~fig. 73.
-For safety reasons, do not transport
more than two pairs of skis in the ski
sack.
- You must secure the ski sack with the strap after loading.
- Make sure all objects that you are trans
porting in the pass-th rough a re secured.
Otherwise they cou ld slide around during
s u dden braking maneuvers and cause in
jury.
(D Tips
- Never stow the sk i sack away when it is
still wet or damp ( for example, snow
melting from skis). Allow it to dry com
plete ly before stowing it away.
- Position skis in the ski sack w ith the
pointed ends facing the front and ski
po les w ith the pointed ends facing the
rear.
S ea ts a nd s to rage 71
Roof rack
Description and mounting locations
Additional cargo can be carried with a roof
luggage rack.
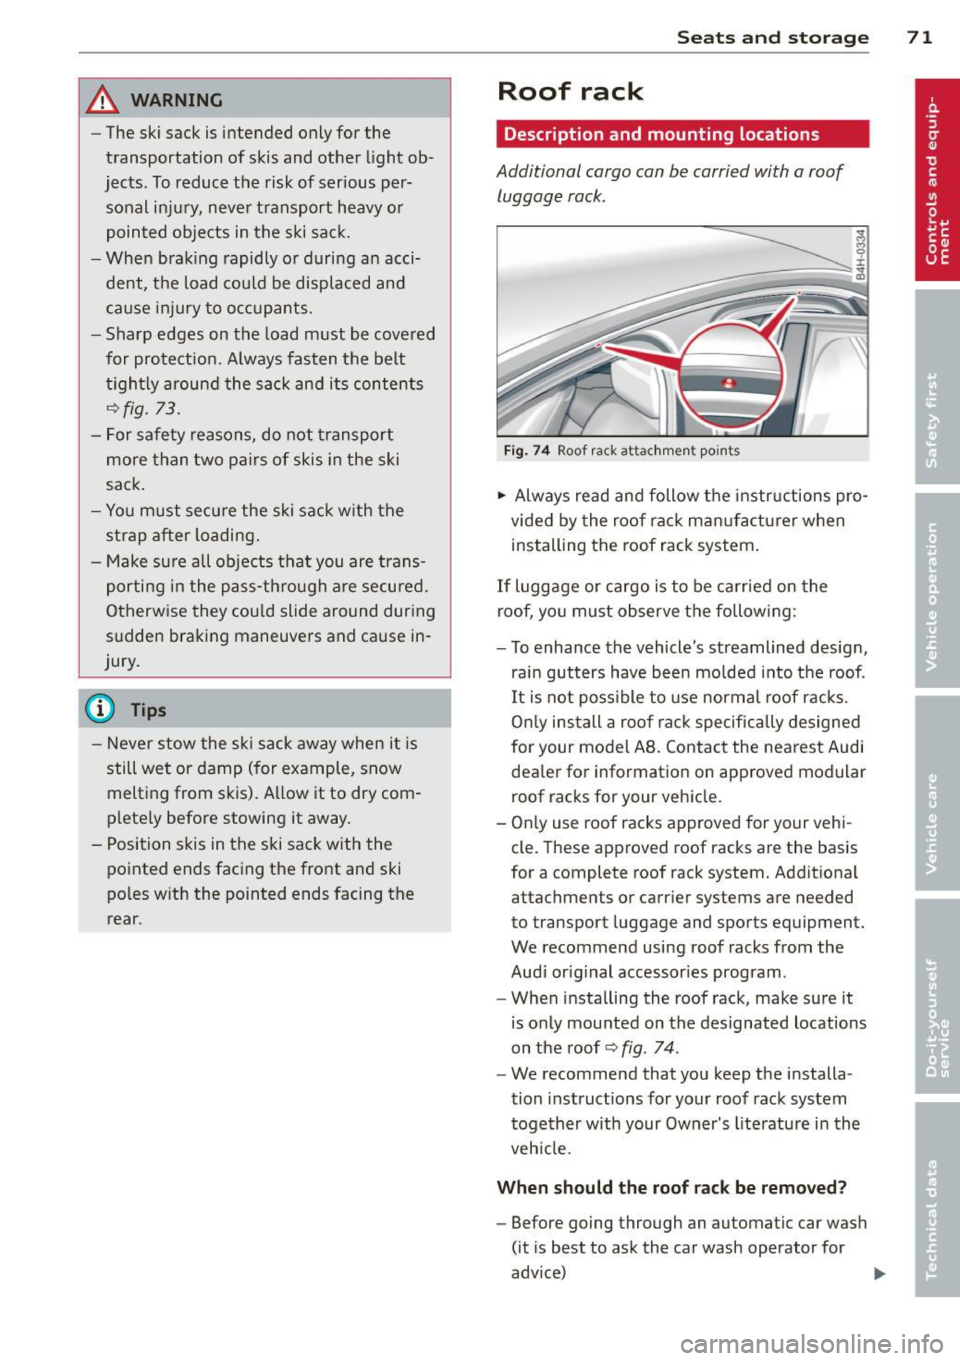
Fi g. 74 Roof r ack attac hmen t po ints
.,. Always read and follow the instructions pro
vided by the roof rack man ufacturer when
installing the roof rack system .
If luggage or cargo is to be carr ied on the
roof, you must observe the following:
- To enhance the vehicle's streamlined design,
rai n gutters have been molded into the roof.
It is not poss ible to use normal roof racks.
On ly install a roof rack specifically designed
for your model AB. Contact the nearest Audi
dea ler for information on approved modular
roof racks for your vehicle.
- On ly use roof racks approved for your vehi
cle. These approved roof racks are the basis
for a complete roof rack system. Additional
attachments or carrier systems are needed
to transport luggage and sports equipment.
We recommend using roof racks from the
Audi orig inal accessories program.
- When installing the roof rack, make sure it
is only mou nted on the designated locations
on the roof ~
fig. 74 .
-We recommend that you keep the installa
tion instructions for your roof rack system
together w ith your Owner's literature in the
vehicle.
When sh ould the roof rack be remo ved?
-Before going through an automatic car wash
(it is best to ask the car wash operator for
adv ice)
..
Page 85 of 318

the stored position as soon as you switch on
the ignition.
Starting and stopping
the engine
Starting the engine
This button switches on the ignition and
starts the engine.
Fig. 85 Center console: S TART ENGINE S TOP b utton
Switching the ignition on/off
• To switch the ignition on/off, press the
I START ENGINE STOPI button. Do not press
the brake pedal while doing this.
Starting the engine
• Press the brake pedal QA .
• Press the !START ENGINE STOPI button
Q fig . 85. The engine will start.
If the engine does not start immediately, the
starting process is automatically stopped af
ter a short time. Repeat starting procedure.
Start-Stop-System*:
When you stop and the Start -Stop -System*
turns off the engine, the ignition still remains
switched on.
- If you press the !S TART ENGINE STOPI but
ton now, the ignition will be switched off.
The engine will not start
¢page 89.
- Make sure that the ignit ion is switched off
before exiting the vehicle.
Switching the ignition/engine off
automatically*
The follow ing applies to vehicles with Start
Stop-System*: to prevent the battery from
On the road 83
draining, the ignition and the engine will
switch off automatically under the following
cond itions:
- The vehicle has already been driven.
- The driver's door is opened.
- The driver's seat belt is removed .
- The brake pedal is not pressed down.
- The vehicle is stationary.
In this case, the activated low beam will be re
placed by the side marker lights. The side
marker lights will switch off after a certain pe
riod of time or when you lock the vehicle .
A WARNING
-Never allow the engine to run in conf ined
spaces -danger of asphyx iation.
- Never turn off the engine until the vehi
cle has come to a complete stop.
- The brake booster and power steering
only work when the engine is running. If
the engine is off, you have to use more
force when steering or braking. Because
you cannot steer and brake as you usual
ly would, this could lead to crashes and
serio us injuries.
(D Note
- Avo id h igh engine rpm, full throttle and
heavy engine loads until the engine has
reached operating temperature - other
w ise you risk engine damage.
- The engine cannot be started by pushing
or towing the vehicle.
@ Tips
-After a co ld engine is started, there may
be a brief period of inc reased noise be
cause oil pressure must first build up in
the hydraulic valve adjusters. This is nor
ma l and not a cause for concern.
-If you leave the vehicle with the ignition
switched on, the ignition w ill switch off
after a certain period of time. Please
note that electrical equipment such as
exterior lights will sw itch off as well
when that happens.
Page 89 of 318

When stopping at a traffic signal or stopp ing
i n city traffic, the parking brake can be ap
p lied . The vehicle does not have to be held
with the footbrake. The park ing brake elimi
nates the tendency to creep with a drive range
engaged. As soon as you dr ive off as usual,
the park ing brake is released automatically
and the vehicle starts to move .
Starting on slopes
When starting on inclines, the start ing ass ist
prevents the vehicle from unintentionally roll
i ng back. The braking force of the parking
brake is not released until sufficient dr iv ing
force has been bu ilt up at the whee ls.
O') Tips
For safety reasons, the park ing brake is re
leased automatically only when the dr iv
er's safety belt is engaged in the buck le.
Starting off with a trailer
To prevent rolling back unintentionally on an
incline, do the following:
.. Keep the switch(®) pulled and depress the
acce lerator. The park ing brake stays applied
and prevents the vehicle from rolling back
ward .
.. You can release t he sw itch C®l once you are
s u re that yo u are develop ing eno ugh f or
wa rd momentum at the wheels as you de
press the accelerator.
D epending on the weight of the r ig (veh icle
and trai le r) and the severi ty of the in cli ne, you
may roll backwards as you sta rt. Yo u can pre
ve nt roll ing backwards by holding the parking
brake switch C®) p ulled out and acce lerating -
just as you would when starting on a hill with
a conventional hand brake.
On th e ro ad 87
Emergency braking
In the event that the conventional brake sys
tem fails or locks .
.. In an emergency, pull the sw itch(®) and
cont inue to pull it to s low your ve hicle down
w ith the park ing brake.
.. As soon as you release the switch C®> or ac-
celerate, the b ra ki ng process stops.
If you pu ll the switch C®> and hold it above a
speed of about 5 mph (8 km/h), the emergen
cy brak ing f unction is initia ted . T he ve hicle is
braked at all fou r whee ls by activating the hy
d raulic brake sys tem. The brake pe rform ance
is simila r to making an emergency stop~ .&..
In order not to act ivate the emergency brak
ing by mis take, an audib le wa rn ing tone (buz
z er) so unds whe n the switch(®) is pulled . As
soon as the sw itch<®> is re leased, or the accel
erator peda l is depressed, emergency braking
stops.
_& WARNING
Emergency braking should only be used in
an emergency, when the normal foot bra ke
has fa iled or the brake pedal is obstructed.
Using the parking brake to pe rform emer
gency b rak ing will slow your vehicle down
as if you had made a full bra ke application .
T he laws of physics cannot be su spended
even wi th ESC and i ts asso ciated compo
nents (ABS, ASR , ED L) . In corners and
when road or weather con ditions are bad,
a full brake application can ca use the vehi
cle to sk id or the rear end to break away -
risking an accident.
Start-Stop-System
Description
Applies to veh icles: w ith Start -Stop-System
The Sta rt -Stop -Sys tem can help incre ase fuel
e conomy and redu ce CO2 emissions.
In the Start-S top-mode, the engine shuts off
a utomat ically when the veh icle is stopped,
s u ch a s at a t raff ic lig ht. The igni tion rem ains
lill-
Page 111 of 318
Audi drive select Driving settings
Introduction
Aud i drive select makes it possible to experi
ence different types of vehicle settings in one
veh icle. The driver can select th ree
Comfort,
Auto
and Dynamic modes in the MMI to
switch between a sporty and a comfortable
driving mode.
You can also adjust the setting according to
your preferences in the
individual mode. For
examp le, you can combine settings such as a
sporty engine tuning with comfortab le steer
ing.
A WARNING
Improper use of the Audi drive select can
cause collisions, other acc idents and seri
ous personal injury .
Description
The vehicle setup in each mode depends on
the vehicle's features. The engine, transm is
sion, steering, reve rsible safety belt tension
ers and adaptive air suspension are always in
volved.
Engine and transmission
Depending on the mode, the engine and the
tra nsmission respond quicker or in a more bal
anced manne r to acce lerator pedal move
ments. In the sporty dynamic mode, the
transmission shifts at higher RPMs .
Air suspension
The adaptive air suspension/adaptive air sus
pension sport*
( Air suspension in the MMI) is
an electronically con trolled air suspension and
damping sys tem. They are adjusted depend
ing on the selected driving mode, the drive r's
steering, braking and acceleration input and
the road s urface, vehicle speed and load. A
sporty setting is generally used in vehicles
with adaptive air suspension sport*.
Audi drive select 109
The vehicle clearance varies depending on the
selected mode and the speed .
T he hig hway setting is activated automatically
when you drive above 75 mph (120 km/h) for
more than 30 seconds in the
auto or dynamic
mode. The ground clearance is increased auto
matically if the speed drops below 44 mph
(70 km/h) for more than 120 seconds.
Steering
The steering adapts in terms of steering effort
and steering ratios . Indirect stee ring that
moves easily, like the steering in comfort
mode, is best suited to long drives on a high
way . In contrast, dynamic mode provides
sporty, direct steer ing .
The following applies to vehicles with dynamic steering* : the steering ratio changes based on
vehicle speed in order to ma inta in optimum
steering effort for the driver at all times. This
sets the steering to be less sens itive at higher
speeds in order to provide improved vehicle
control. At reduced speeds, however, steer ing
is mo re direct in order to keep the steering ef
fort as minimal as possible when the driver is
maneuvering the vehicle. At low and average
speeds, dynamic steering additiona lly pro
vides more responsive steering performance.
Sport differential*
As a component of the all whee l dr ive system
(quattro ®)
<:!) page 203, the Sport differen
tia l* distributes the driving power to the rear
axle depending on the situation . The distribu
tion of power varies depending on the select
ed mode, from balanced (comfort) to agile
(dynamic). The goal is a high level of agility
and ability to accelerate on curves . The vehicle
is very responsive to steering.
Curve light*
The curve light adapts to driving on curves.
The pivoting act ion and the lighting are also
adapted to the mode.
Adaptive cruise control*
The behavior when accelerating can be adjust
ed from comfortab le to sporty, depending on .,..
Page 113 of 318
Audi drive select 111
Adjusting the Individual mode
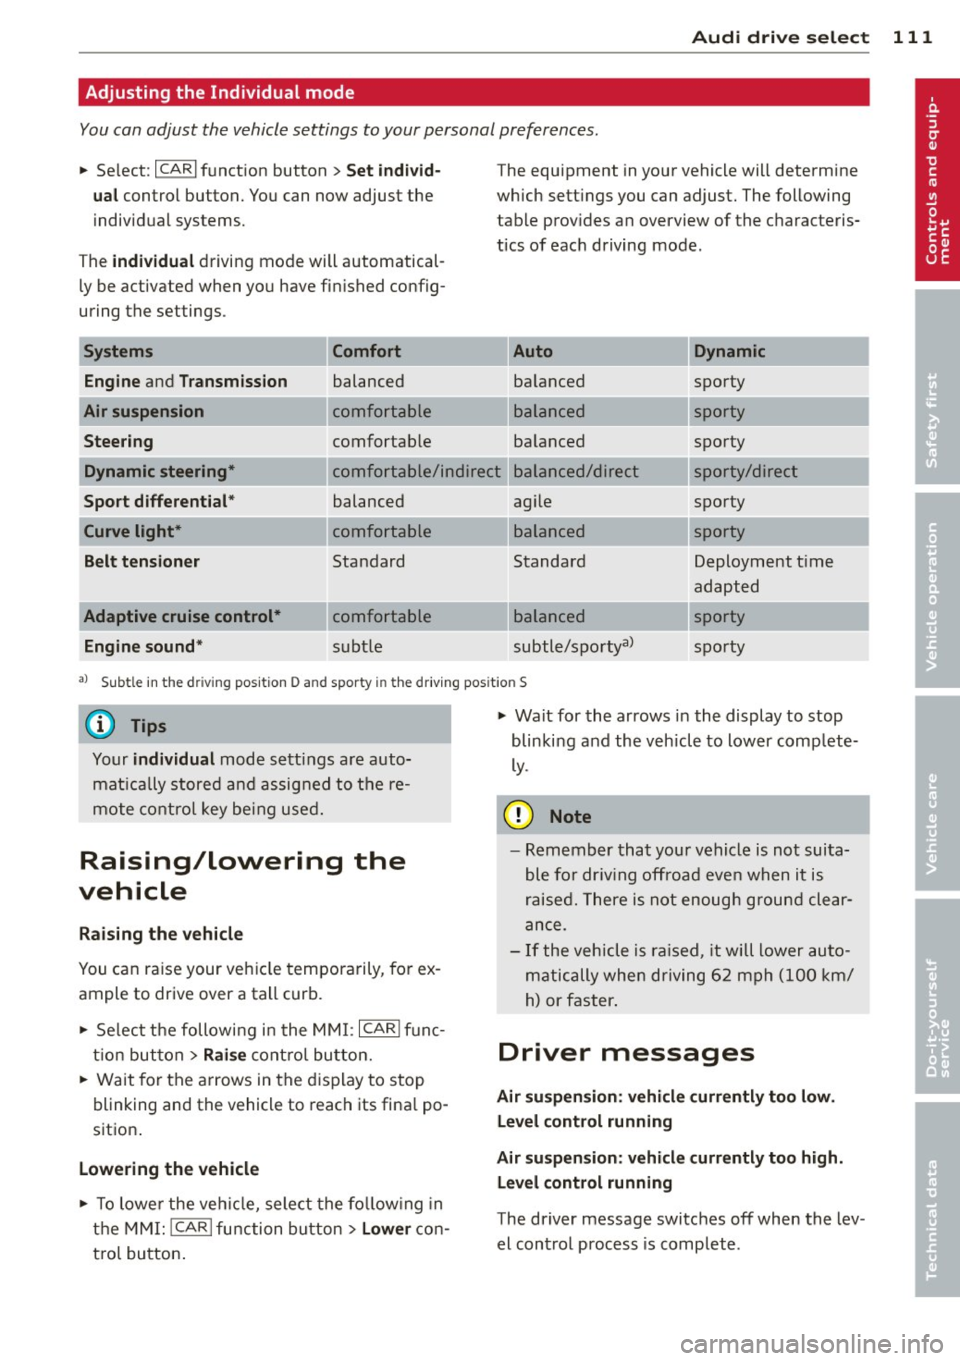
You can adjust the vehicle settings to your personal preferences.
"Se lect: ICARlf unction button> Set individ·
ual
control button. You can now adjust the
individual systems.
The
individual driving mode will automatical
ly be activated when you have finished config
uring the settings .
Systems Comfort
Engine
and Transmission balanced
Air suspension comfortable
Steering comfortable The equipment
in your vehicle will determine
which settings you can adjust. The following
table provides an overview of the characteris
tics of each driving mode.
Dynamic
balanced sporty
---~-
sporty
balanced
Dynamic steering* comfortable/ind ire ct balanced/direct sporty
sporty/direct
sporty
Sport
differential *
Curve light*
Belt tensioner
Adaptive cruise control* Engine sound* balanced
comfortable
Standard
comfortable
subtle agile
---~· balanced
Standard
---~· balanced
subtle/sportyal
sporty
Deployment t ime
adapted
sporty
sporty
al Subt le in the d riving position D and sporty i n the driving pos itio n S
© Tips
Your individual mode settings are auto
matically stored and assigned to the re
mote control key being used.
Raising/lowering the
vehicle
Raising the vehicle
You can raise your veh icle temporarily, for ex
ample to drive over a tall curb.
" Select the following in the MMI: ICARI func
tion button >
Raise control button.
" Wait for the arrows in the display to stop
blinking and the vehicle to reach its final po
sition .
Lowering the vehicle
" To lowe r the vehicle, select the following in
the MMI: ICARlfunction button>
Lower con
t rol button. "
Wait for the arrows in the display to stop
blinking and the vehicle to lower comp lete
ly.
(D Note
- Remember that your vehicle is not suita
ble for driv in g offroad eve n when it is
raised. There is not enough ground clear
ance.
- If the vehicle is raised, it will lower auto
matically when driving 62 mph (100 km/
h) or faster.
Driver messages
Air suspension: vehicle currently too low.
Level control running
Air suspension: vehicle currently too high.
Level control running
The driver message switches off when the lev
el control process is complete .
Page 136 of 318
134 Driving Safel y
Driving Safely
General notes
Safe driving habits
Please remember -safety first!
This chapter contains important information,
tips, instructions and warnings that you need
to read and observe for your own safety, the
safety of your passengers and others . We have
summarized here what you need to know
about safety belts, a irbags, ch ild restra ints as
well as child safety. Your safety is for us
priori
ty number 1.
Always observe the info rmat ion
and warn ings in th is sect ion -fo r yo ur own
safety as well as that of your passengers .
The information in this se ction app lies to all
model ve rsions of your veh icle . Some of the
feat ures desc ribed in this sec tions may be
standard equipment on some models, or may
be optional equipment on others . If you are
not sure, ask your authorized Aud i dealer.
A WARNING
- Always make sure that you follow the in
struct ions and heed the WARNINGS in
this Manual. It is in your interest and in
the inte rest of you r passengers.
- Always keep the complete Owner's Liter
ature in your Audi when you lend or sell
yo ur vehicle so that this important info r
mation will always be ava ilable to the
dr iver and passengers.
- Always keep the Owner's literature handy
so that you can find i t eas ily if you have
ques tions.
Safety equipment
The safety features are part of the occupant
restraint system and work together to help
redu ce the risk of injury in a wide variety of
accident situations.
Your safety and the safety of your passenge rs
should not be left to chance. Advances in
technology have made a varie ty o f fea tures
avai la bl e to he lp re duce the risk of inj ury in an accident
. The following is a list of just a few of
the safety features in your Audi:
- sophis tic ated s afety be lts for d rive r and a ll
passenger sea ting pos it ions,
- s afety belt prete nsio ners ,
- safety belt force lim ite rs fo r the front seats,
- safety belt he ight ad justment systems for
the front seats ,
- front airbags,
- knee airbags for the front seats
- side airbags in the front seats a nd outer rear
seats,
- side c urtai n airbags ,
- specia l LATCH anchorages for child re-
straints,
- he ad restr aints for each sea ting pos ition,
- ad justab le s teer ing colum n.
These ind iv idual safety features, can work to
ge ther as a system to help protect you and
you r passengers in a wide range of accidents .
T hese features canno t wo rk as a system if
they are not always cor re ct ly adjusted and co r
rect ly used.
Safety is ev erybody' s responsibility!
Important things to do before driving
Safety is everybody 's job! Vehicle and occu
pant safety always depends on the informed and careful driver .
For your safety and the safety of your passen
gers,
befor e driv ing always:
.. Make s ure that all lig hts and signa ls are op
erating correctly.
.. Make sure that the tire pressure is correct .
.. Mak e sur e that all windows are clean and
afford good v is ibility to the outside .
.. Se cu re a ll luggage a nd o ther items carefu lly
<:!) page 69, ¢page 74.
.. Ma ke s ure that noth ing can interfere wi th
the peda ls .
.. Adjust front seat, head restraint and mir
rors correctly for your height.
.. Instruct passengers to adjust the head re-
straints according to the ir height . .,..
Page 137 of 318
.. Make sure to use the right child restraint
correct ly to protect children
Q page 176,
Child Safety.
.. Sit properly in your seat and make sure that
your passengers do the same
¢ page S7,
General recommendations .
.. Faste n your safety belt and wear it properly.
Also instruct your passengers to fasten their
safety belts properly ¢
page 144 .
What impairs driving safety?
Safe driving is directly related to the condi
tion of the vehicle, the driver as well as the
driver 's ability to concentrate on the road
without being distracted.
The driver is respons ible for the safety of the
veh icle and all of its occupants.
If your ability
to drive is impai red, safety r isks for everybody
in the vehicle increase and you also become a
hazard to everyone else on the road ¢ _&. .
Therefore:
.. Do not let yourself be dist racted by passen
gers or by using a cellular telephone.
.. NEVER drive when your driving ability is im
paired (by medications, alcohol, drugs, etc.).
.. Observe all traffic laws, rules of the road
and speed limits and plain common sense .
.. ALWAYS adjust your speed to road, traffic
and weather conditions .
.,. Take frequent breaks on long trips . Do not
drive for more than two hours at a stretch.
.. Do NOT drive when you are tired, under
pressure or when you are stressed.
A WARNING
Impaired driving safety increases the risk
of serious personal injury and death when
ever a vehicle is being used.
Driving Safely 135
Proper occupant
seating positions
Proper seating position for the driver
The proper driver seating position is impor
tant for safe, relaxed driving .
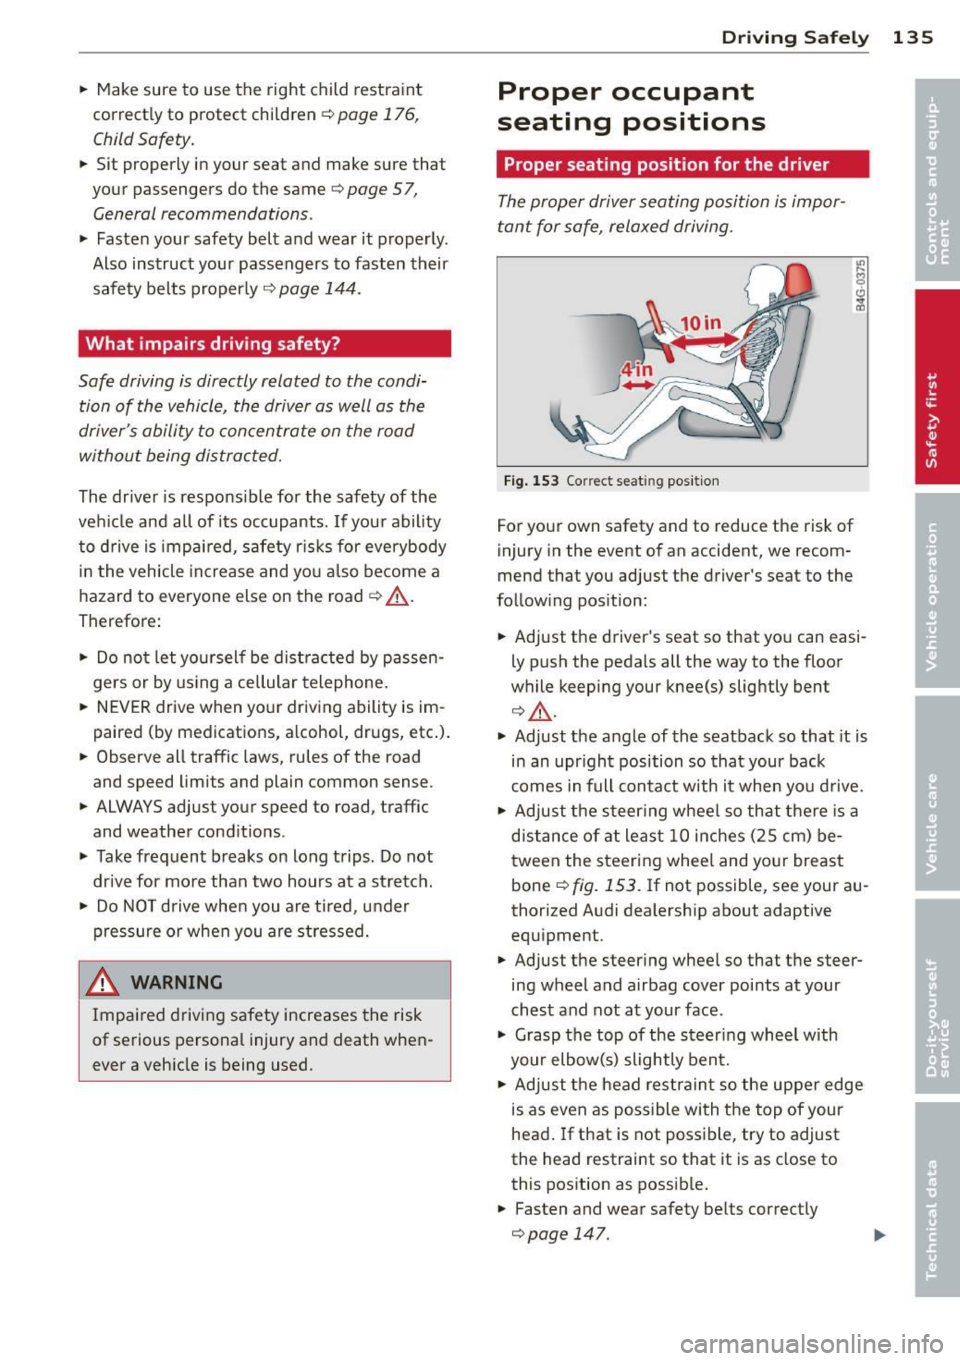
Fig. 153 Correct seat ing pos it ion
For your own safety and to reduce the risk of
injury in the event of an accident, we recom
mend that you adjust the driver's seat to the
follow ing pos ition:
.. Adjust the driver's seat so that you can easi
ly push the pedals all the way to the floor
wh ile keeping your knee(s) slightly bent
¢ _&. .
.. Adjust the angle of the seatback so that it is
in an upr ight position so that your back
comes in full contact w ith it when you drive.
.. Adjust the steering wheel so that there is a
distance of at least 10 inches (25 cm) be
tween the steering wheel and yo ur breast
bone
Q fig. 153. If not possible, see your au
thorized Audi dealership about adaptive
equipment .
.. Adjust the steer ing wheel so that the steer
ing wheel and airbag cover points at your
chest and not at your face.
.,. Grasp the top of the steering whee l with
your elbow(s) slightly bent.
.. Adjust the head restraint so the upper edge
is as even as possible with the top of your
head. If that is not poss ible, try to adjust
the head restraint so that it is as close to
this position as possible .
.. Fasten and wear safety belts correctly
¢page 147.
Page 138 of 318
136 Driving Safely
• Always keep both feet in the footwell so
that you are in control of the vehicle at all
times.
For detailed information on how to adjust the
driver's seat, see
¢ page 58.
A WARNING
Drivers who are unbelted, out of position
or too close to the airbag can be seriously
injured by an airbag as it unfolds. To help
reduce the risk of serious personal injury:
- Always adjust the driver's seat and the
steering wheel so that there are at least
10 inches (25 cm) between your breast
bone and the steering wheel.
- Always adjust the driver's seat and the
steering wheel so that there are at least
4 inches (10 cm) between the knees and
the lower part of the instrument panel.
- Always hold the steering wheel on the
outside of the steering wheel rim with
your hands at the 9 o'clock and 3 o'clock positions to help reduce the risk of per
sonal injury if the driver's airbag inflates.
- Never hold the steering wheel at the
12 o'clock position or with your hands at
other positions inside the steering wheel
rim or on the steering wheel hub. Hold
ing the steering wheel the wrong way
can cause serious injuries to the hands,
arms and head if the driver's airbag in
flates.
- Pointing the steering wheel toward your
face decreases the ability of the supple
mental driver's airbag to protect you in a
collision.
- Always sit in an upright position and nev
er lean against or place any part of your
body too close to the area where the air
bags are located.
- Before driving, always adjust the front
seats and head restraints properly and
make sure that all passengers are prop
erly restrained.
- Never adjust the seats while the vehicle
is moving. Your seat may move unexpect- edly and you could lose control of the ve
hicle .
- Never drive with the backrest reclined or
tilted far back! The farther the backrests
are tilted back, the greater the risk of in
jury due to incorrect positioning of the safety belt and improper seating posi
tion .
- Children must always ride in child seats
¢
page 176. Special precautions apply
when installing a child seat on the front passenger seat¢
page 152.
Proper seating position for the front
passenger
The proper front passenger seating position
is important for safe, relaxed driving .
For your own safety and to reduce the risk of
injury in the event of an accident, we recom
mend that you adjust the seat for the front
passenger to the following position :
• Adjust the angle of the seatback so that it is
in an upright position and your back comes in full contact with it whenever the vehicle is
moving.
• Adjust the head restraint so the upper edge
is as even as possible with the top of your
head. If that is not possibl e, try to adjust
the head restraint so that it is as close to
this position as possible¢
page 138.
• Keep both feet flat on the floor in front of
the front passenger seat .
• Fasten and wear safety belts correctly
¢page 147.
For detailed information on how to adjust the
front passenger's seat, see ¢
page 5 7.
A WARNING
-
Front seat passengers who are unbelted,
out of position or too close to the airbag
can be seriously injured or killed by the air
bag as it unfolds. To help reduce the risk of
serious personal injury:
Page 139 of 318
-Passengers must always sit in an upright
position and never lean against or place
any part of their body too close to the
area where the airbags are located.
- Passengers who are unbelted, out of po
sition or too close to the airbag can be
seriously injured by an airbag as it un
folds with great force in the blink of an
eye.
- Always make sure that there are at least
10 inches (25 cm) between the front
passenger's breastbone and the instru
ment panel.
- Always make sure that there are at least
4 inches (10 cm) between the front pas
senger's knees and the lower part of the
instrument panel.
- Each passenger must always sit on a seat
of their own and properly fasten and
wear the safety belt belonging to that
seat.
- Before driving, always adjust the front
passenger seat and head restraint prop
er ly.
- Always keep your feet on the floor in
front of the seat. Never rest them on the
seat, instrument panel, out of the win
dow, etc. The airbag system and safety
belt will not be able to protect you prop
erly and can even increase the risk of in
jury in a crash .
- Never drive with the backrest reclined or
tilted far back! The farther the backrests
are tilted back, the greater the risk of in
jury due to incorrect positioning of the
safety belt and improper seating posi
tion.
- Children must always ride in child seats
¢
page 176. Special precautions apply
when installing a child seat on the front
passenger seat ¢
page 152.
Driving Safely 137
Proper seating positions for passengers
in rear seats
Rear seat passengers must sit upright with
both feet on the floor consistent with their
physical size and be properly restrained
whenever the vehicle is in use.
To reduce the risk of injury caused by an incor
rect seating position in the event of a sudden
braking maneuver or an accident, your pas
sengers on the rear bench seat must always
observe the following:
.,. Adjust the head restraint so the upper edge
is as even as possible with the top of your
head. If that is not possible, try to adjust
the head restraint so that it is as close to
this position as possible¢
page 138 .
.,. Keep both feet flat in the footwell in front
of the rear seat.
.,. Fasten and wear safety belts properly
¢page 147.
.,. Make sure that children are always properly
restrained in a child restraint that is appro
priate for their size and age~
page 176.
,& WARNING
..-
Passengers who are improperly seated on
the rear seat can be seriously injured in a
crash.
- Each passenger must always sit on a seat
of their own and properly fasten and
wear the safety belt belonging to that seat.
- Safety belts only offer maximum protec
tion when the safety belts are properly
positioned on the body and securely
latched . By not sitting upright, a rear
seat passenger increases the risk of per
sonal injury from improperly positioned
safety belts!
- Always adjust the head restraint properly
so that it can give maximum protection.
•
•