lock AUDI A8 2013 Owner's Manual
[x] Cancel search | Manufacturer: AUDI, Model Year: 2013, Model line: A8, Model: AUDI A8 2013Pages: 318, PDF Size: 79.34 MB
Page 42 of 318
40 Opening and clo sing
Child safety lock
Mechanical child safety lock in the rear
doors
The child safety lock prevents the rear doors
from being opened from the inside.
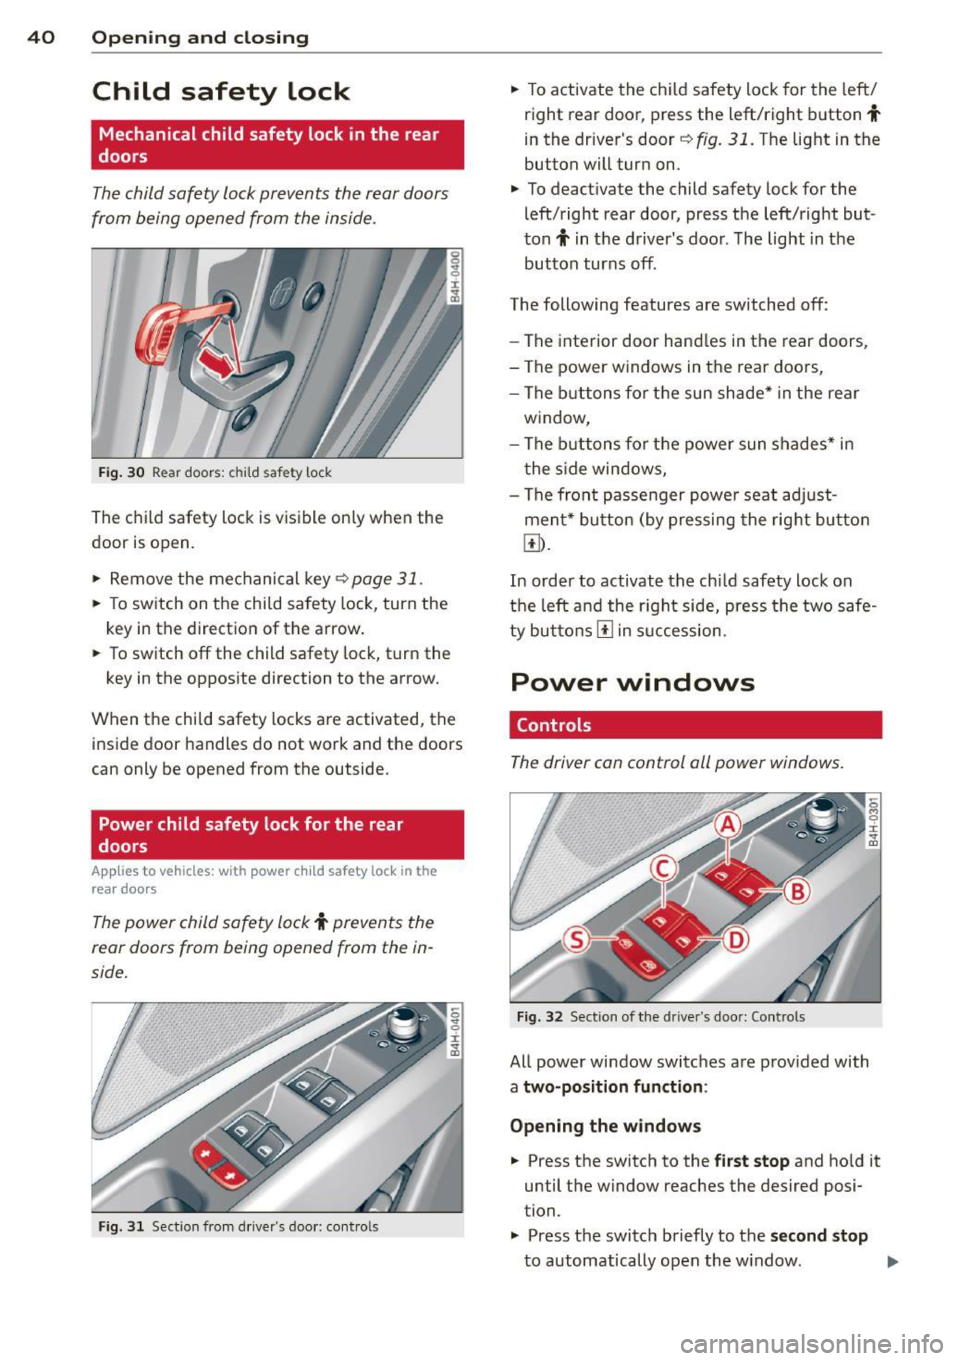
F ig . 3 0 Rear doors: child safety loci<
The child safety lock is vis ible on ly when the
door is open .
.. Remove the me chanical key
¢page 31.
.. To sw itch on the child safety lock, turn the
key in the direct ion of the arrow .
.. To sw itch
off the child safety lock, turn the
key in the oppos ite direction to the arrow.
W hen the chi ld safety locks a re activated, the
inside door handles do not work and the doors
can only be opened from the outside.
Power child safety lock for the rear
doors
Applies to vehicles: with power child safety loci< in the
rear doo rs
The power child safety lock t prevents the
rear doors from being opened from the in
side.
F ig . 3 1 Sec tion from drive r's doo r: co ntro ls
.. To activate the ch ild safety lock for the le ft /
r ight rear doo r, press the left/right b utton
t
in the dr iver's door~ fig. 31. The light in the
button will turn on .
.. To deact ivate the child safety lock for the
left/ right rear door, press the left/rig ht but
ton
t in th e d river's doo r. T he light in t he
button turns
off .
The following features are switched off:
-The interior door hand les in the rear doors,
- The power windows in t he rear doo rs,
- The bu ttons fo r th e sun shade * in the re ar
w indow,
- The buttons fo r th e p ower sun shades* i n
t he s ide win dows,
- The fro nt passenger powe r seat adjust
ment * butt on (by pressing the rig ht butto n
@.
In order to activate the ch ild safety lock on
t h e le ft and the righ t side, press the two safe
ty bu ttons
I!] in suc cession.
Power windows
Controls
The driver can control all power windows.
Fig. 3 2 Sect ion of the dr iver 's door: Co ntrols
All powe r window switc hes are prov ided with
a two-position function :
Opening the windows
.. Press t he switch to the first stop and ho ld it
until the wind ow reaches the desired posi
tion.
.. Press t he switch briefly to the
second stop
to automatically open the w indow. IJI,
Page 43 of 318

Closing the windows
• Pull the switch to the first stop and hold it
until the window reaches the desired posi
tion.
• Pull the switch briefly to the
second stop to
automatically close the window.
Power window switches
@ Driver's door
@ Passenger's door
© Left rear door
@ Right rear door
® Safety button (or two safety buttons in
vehicles with power child safety locks
¢ poge40)
Child safety lock
When the safety button®¢ fig. 32 is press
ed, the LED in the button lights up. The fol
lowing features are switched off:
- The power windows in the rear doors,
- The buttons for the power sun shades* in
the side windows,
- The buttons for the power sun shade * in the
rear window,
- Front passenger power seat adj ustment*
button.
_& WARNING
- When you leave your vehicle - even if on
ly briefly- always take the ignition key
with you. This applies particularly when
children remain in the veh icle. Otherw ise
the ch ildren could start the engine or op
erate electrical equ ipment (e.g. power
w indows). The powe r windows are func
tional until the driver's door or passeng
er's door has been opened.
- Be careful when closing the windows.
Check to see that no one is in the way, or
serious injury could result!
- When locking the vehicle from outside,
the vehicle must be unoccupied sinc e the
windows can no Longer be opened in an
emergency.
Opening and closing
@ Tips
-The driver can Lower or raise the power
sun shades* in the side windows by using
switches © and @.
- After the ignition has been switched off,
the windows can still be opened or
closed for about 10 min utes. The power
windows are not switched off until the dr iver's door or passenger's door has
been ope ned.
What to do after a malfunct ion
The one-touch open and close function must
be reactivated if the battery hos been discon
nected .
• Pull and hold the power window switch un
til the w indow is fully closed.
• Release the sw itch and then pull it again for
at least one second.
Valet parking
The valet parking feature protects the lug
gage comportment from unauthorized
ac
cess .
Fig. 33 Valet parking bu tton
With "valet parking" activated, the luggage
compartment lid cannot be opened.
• Remove the mechanical key¢
page 31.
• Open the glove compartment and activate
¢
fig. 33 the "valet parking" feature by
pressing the
! VALE TI button . The indicator
light in the sw itch illuminates .
.,.. Close the glove compartment and lock it
w ith the mechanical key .
liJJ,,
41
Page 44 of 318
42 Opening and clo sing
• Leave the master key with the service per
sonnel for parking and keep the mechanical
key with you.
When the "valet pa rking" feature is activated:
- the unlocking button for the luggage com
partment lid~ in the driver's doo r is inac
t ive
- the button~ on the master key is inact ive
- the opening handle in the luggage compart-
ment lid is inactive.
The vehicle can be driven and locked and un locked with the master key . Access to the lug
gage compartment is blocked .
When the va let parking function is switched
on, the message
V alet pa rk ing act iv ated ap
pears in the instrument cluster disp lay when
you switch the ign it ion on .
Sliding/tilting sunroof
Operation
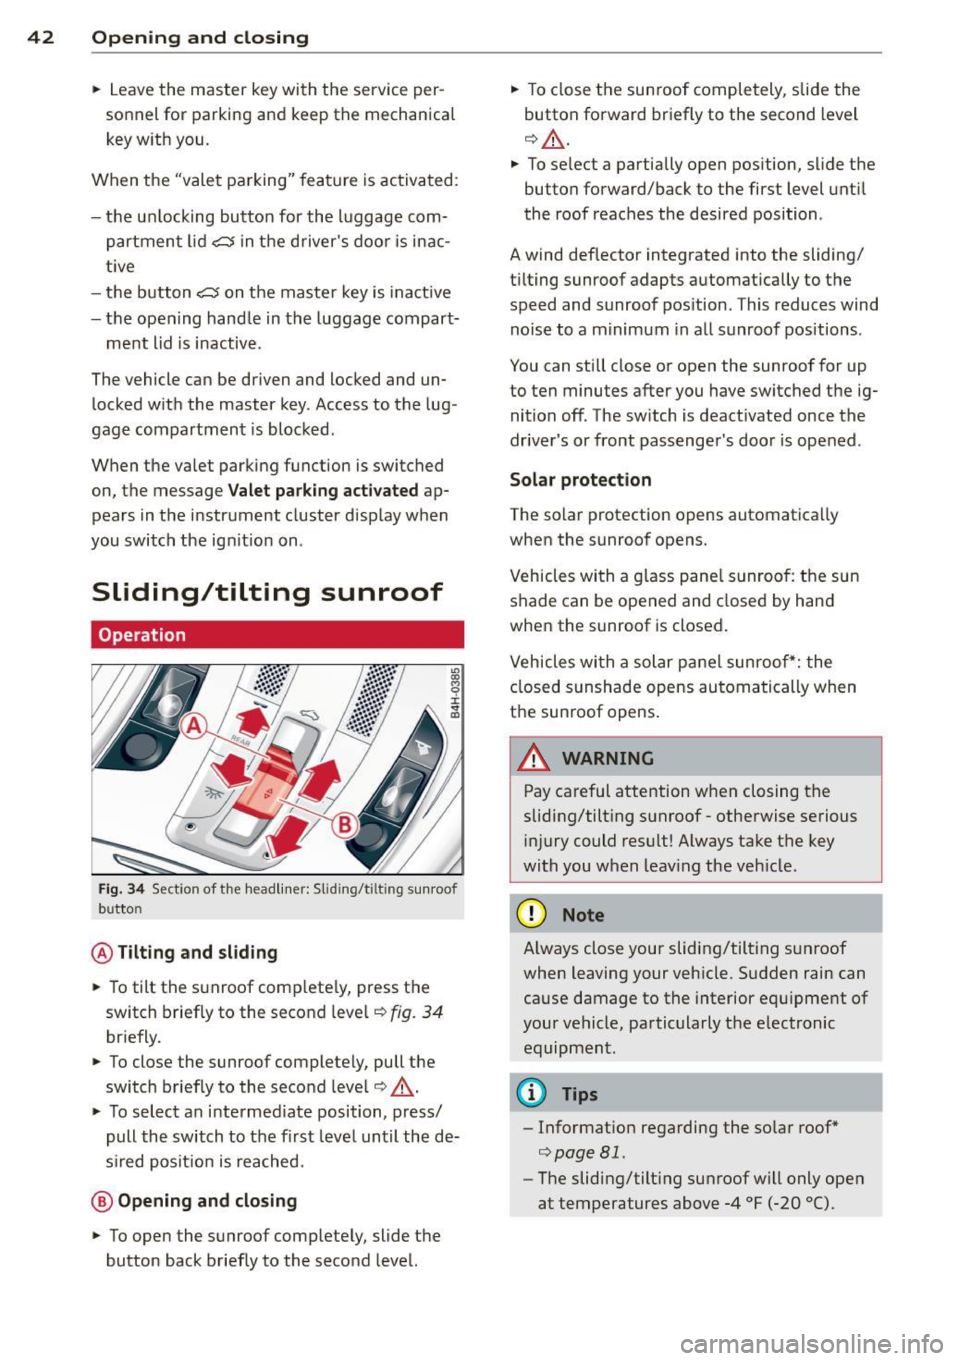
Fig . 3 4 Sect io n of the he adli ner: S lidin g/tiltin g sunroof
b utto n
@ Tilting and sliding
• To tilt the sunroof comp lete ly, press the
switch briefly to the second leve l
9 fig. 34
briefly.
• To close the sunroof completely, pull the
switch briefly to the second leve l
9 .&,.
• To select a n in termed iate position, press/
pull the switch to the fi rst level until the de
s ired posit ion is reached.
@ Opening and closing
• To open the sunroof completely, slide the
button back briefly to the second level. •
To close the sun roof completely, slide the
button forward briefly to the second level
Q .&, .
• To se lect a partially open pos ition, slide the
bu tton forward/back to the first level unt il
the roof reaches the desired position .
A wind deflector integrated into the sliding/
t il ting sunroof adapts automatically to the
speed and sunroof pos ition . This reduces wind
noise to a m inimum in all sunroof positions .
You can sti ll close or open the sunroof for up
to ten minutes after you have switched the ig nition
off . The sw itch is deact ivated once the
driver's or front passenger 's doo r is opened .
Solar prot ection
The solar protection opens automatica lly
when the sunroof opens.
Vehicles with a g lass pane l s u nroo f: the sun
shade can be opened and closed by hand
when the sunroof is closed.
Vehicles wi th a solar pa nel sunroof*: the
cl osed s unshade opens au tomatically when
t h e sunroof opens.
A WARNING
Pay careful attention when closing the
sliding/tilt ing sunroof -otherwise serious
i njury could result ! Always take t he key
with you w hen leav ing the veh icle .
(D Note
Always close your sliding/tilt ing sunroof
when leaving your veh icle. S udden rain can
cause damage to the interior equ ipment of
your vehicle, particularly the e lectronic
equipmen t.
@ Tips
- Informat ion regarding the so lar roof*
¢ page 81 .
-The sliding/tilt ing sunroof w ill only open
at temperatures above -4 °F
(-20 °() .
Page 49 of 318
Adjusting the exterior lighting
The settings are adjusted in the MMI.
~ Select: ICARI f u nct ion button> Car systems
control button > Vehicle sett ings > E xterior
lighting .
Automatic headlights
You can a djust the fo llow ing settings in the
Automatic headl ights men u:
Headlight s activation time -You can adjus t if
the hea dlights sw itch on
Early , Med . or Late
according to the sensitivity of the light se nsor .
Audi adaptive light* -You can sw itch adaptive
l ig ht
On a n d Off .
Automatic high beams*
You can switch th e high beam assist on and
off .
Daytime running lights
USA models :
You can sw itch the dayt ime ru n
n ing lights
on and off .
Canada models:
The function ca nnot be
turned off. It is activated a utomat ica lly each
time the ignition is switched on. This menu item is shown "greyed out" .
Coming home, Leaving home
The coming home function illuminates the
a rea outside the vehicle when yo u switch the
i gnit ion off and open the driver's door. To turn
the function o n, select
Lights when leaving
car > On .
The leav ing home function illuminates the
area outside the vehicle when yo u un lock the
ve hicle. To t urn the funct ion on, select
Lights
when unlocking car > On .
The coming home and leaving home functions
only operate when it is dark and the light
switch is in the
AUTO pos ition.
Clear vision 4 7
Turn signal and high beam lever
The lever on the left side of the steering col
umn is used to operate the turn signals and
the high beam as w ell as th e headlight flash
er.
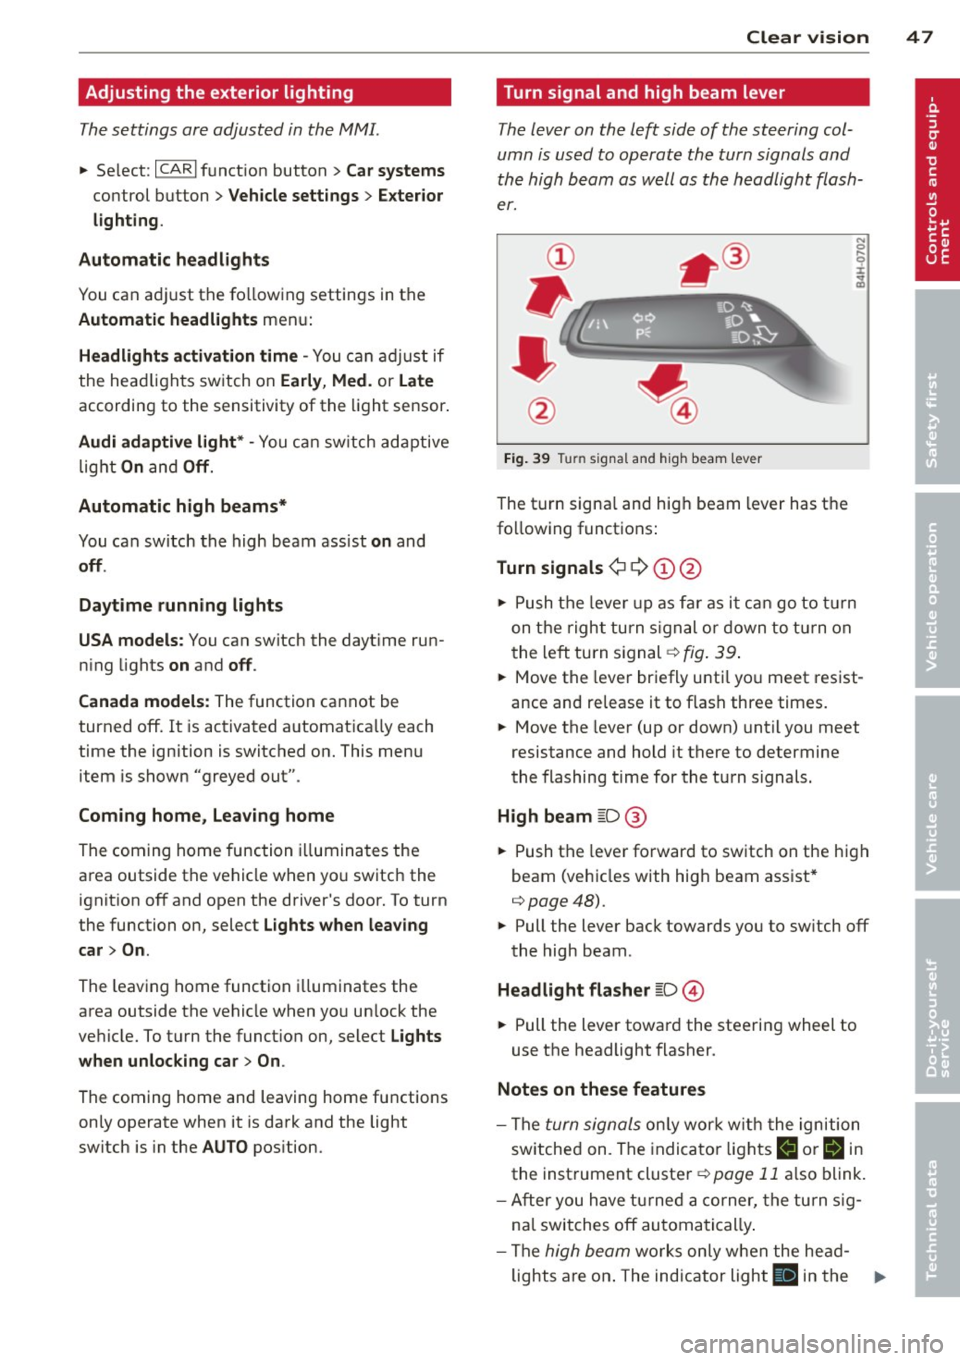
Fig. 39 T urn signal and high beam lever
The t urn signa l and hig h beam lever has t he
fo llow ing funct ions :
Turn signals ¢ Q ©@
N 0 ,._
± .. a,
~ Push t he leve r up as fa r as i t can go t o tur n
on t he righ t turn s igna l or d own to t urn on
t he le ft turn s ignal
¢ fig . 39 .
~ Move the leve r br iefly u ntil yo u meet res ist
ance and re lease it to f lash three times.
~ Move the lever (up or down) until you meet
resistance and hold it there to determine
the flashing t ime for the tu rn signals.
High beam ~D @
~ Push t he leve r forward to sw itch on the high
beam (veh icles with hig h beam ass ist*
¢ poge4 8).
~ Pull the lever back towards you to sw itch off
the high beam .
Headlight flasher ~D ©
~ Pull the lever towar d the steering wheel to
use the headlight flasher.
Notes on these features
- The turn signals on ly wor k w it h t he igniti on
sw itche d on . T he indica to r li ghts
II or B in
the inst rument cluster¢ page 11 also blink .
- Aft er you h ave tu rned a cor ner, the tu rn s ig -
na l swi tches off au toma tica lly .
- The
high beam wo rk s onl y w hen the he ad-
lights a re on . The indic ator ligh t
ii in the .,.
Page 50 of 318

48 Clear vis ion
instrument cluster illuminates when the
high beams are on.
- T he
headlight flash er works only as long as
yo u hold the lever -even if there are no
li ghts turned on . The indicator light
El in
the instrument cluster i llum inates when you
use the headlight flasher.
A WARNING
Do not use the hig h beam or headlight
flasher if you know that these could blind
oncoming traffic.
High beam assist
App lies to vehicles: with high beam assist
The high beam assist au tomatically swi tches
the high beams on or off, depending on the
surroundings and traffic conditions .
Fig. 40 Turn sig na l an d high beam leve r: T urnin g on
an d off the high be am assist
Act ivating h igh beam a ssis t
8
9 :r ... (0
Requirement: The light sw itch must be in the
AUTO position, the low beam headlights must
be on and the high beam assis t must be
switched on in the Infotainment <=>
page 47.
.. Press the leve r into position @ in order to
act ivate the high beam assist . The indicator
li ght
ml turns on in the instrument cluster
display and the h igh beams switch on or off
automat ically. The indicato r light
El turns
on if the high beams were switched on .
Switching the high beams on /off
manually
Requi rement : Hig h beam ass ist is activated .
If the high beams d id not switch on/off a uto
matically when expected, you may instead
switch them on/off manually:
.. To swi tch the hig h beams o n manually ,
press the lever into position
(D . The indica
to r li ght
II turns on. To switch the high
beams off again, pull the lever into pos ition
@ .
.. To switch the hig h beams off man ually after
they have turned on automat ica lly, pull the
lever i nto pos it io n @ .
Oper ating the headlight flasher
.. To operate the flashers while the h igh beam
assist is act ive, pu ll the lever into position
@ . The high beam assist will remain act ive.
Messages in the in strument clu ster
di splay
Headlight assist: System fault
D rive to your authori zed A udi dealer immedi
ately to have the ma lfunction corrected. Yo u
can still switch the high beams on or off man
ually.
Headlight assi st: Unavailable. No camera
view
T he came ra v iew is b locked, for examp le by a
sticker or deb ris .
T he sensor is loca ted between the inter io r
r earview mirror a nd the w indshield. There
f ore , do no t place any s tickers in this a rea o n
t h e windshie ld .
Service setting
The re is a different sens it iv ity sett ing for serv
ic ing . Thi s sett ing can be activat ed by pressing
and holding the b utton on the in ter io r r ear
view m irror for mo re th an 18 seconds. The
LE D next to the button blinks three times.
If
yo u have accidentally se lected this service
funct ion, the orig inal sensitivity will be a uto
matically restored the next t ime yo u sw itch
t h e ignit ion on. ..,.
Page 51 of 318

_& WARNING
High beam assist is only i ntended to assist
the driver . The driver is sti ll responsible for
cont ro lling the h eadlights and switching
the high beams on and off manually de pen ding on traffic, ligh ting and visibili ty
condi tions. Failure to interve ne manually
may lead to r isk o f accident . It m ay be nec
essary to operate the high beams man ual
ly in the following sit uat ions, e .g .:
- For adverse wea ther conditions such as
fog, heavy rain, blowing snow or s praying
water .
- On roads where oncoming traffic may be partia lly obsc ured s uch as exp ressways .
-If there are in dividuals on the road wi th
no light ing or poor lightin g, such as cy
cli sts .
- In tight c urves and on steep slopes .
- In po orly lit areas.
- With stro ng re flecto rs su ch a s signs.
-If the area of t he wind shie ld nea r th e
sensor is fogg ed over, d irty, icy or cov
ered w it h a st icker.
(D} Tips
- The high beam ass ist is active above a
speed of approx . 25 mph (40 km/h).
- If afte r activation, you r speed falls below
approx . 15 mph (24 km/h), the hig h
beams w ill automa tica lly be switched
off .
Interior lights
Front and rear interior lighting
Fig. 41 Headl iner: Front in te ri or l ights
Clear vi sion 49
Fig . 4 2 Rea r headliner: Read ing l ig ht
Press the appropriate button r::;, fig . 41:
El-Inte rior light ing on/off
~ -Door contact swi tch. The interio r ligh ting
turns o n automatically when yo u unl ock the
v e hicle, open a door or sw itch the ignition
off .
The inter ior light ing turns off s evera l seconds
after you close the doors, when you lock the
vehicle or when you switch the ignition on .
When a doo r is open, the l ight turns off after
a few minutes.
~ -Read ing lights on/off
@[I -Switching the rear read ing lights on/off
from the cockpit.
I REAR MODE i* -Sw itch ing the rea r reading
li gh ts on/off from the cockpit: press the
I REAR MODE i bu tton and then the appropriate
button ~ in the cockpit.
Ambience lighting
App lies to vehicles : wit h ambience lig hting
You can select a color profile and br ightness
for t he ambie nce lighting in various areas of
the veh icle, called zones .
Turning ambience lighting on
.. Select in the MMI: ICAR lfunction button>
Car systems control button > Vehicle set
t ings > Interior light ing > On .
Adjusting /turning off the brightne ss
.. Select in the MMI: ICAR lfunction button>
Car systems control b utton > Vehicle set
tings
> Inte rior lighting > Brightness .
Page 55 of 318
rain sensor funct ion . Check your
windshield wiper b lades regularly.
- The washer fluid nozzles of the wind
sh ield washer system are heated at low
temperatures when the ig nitio n is on .
- When stopping temporarily, e .g. at a
traffic light , the set speed of the wind
sh ield wipers is automatically red uced by
one speed.
Replacing windshield wiper blades
Wip er blad es in good condition h elp keep the
windshield clear.
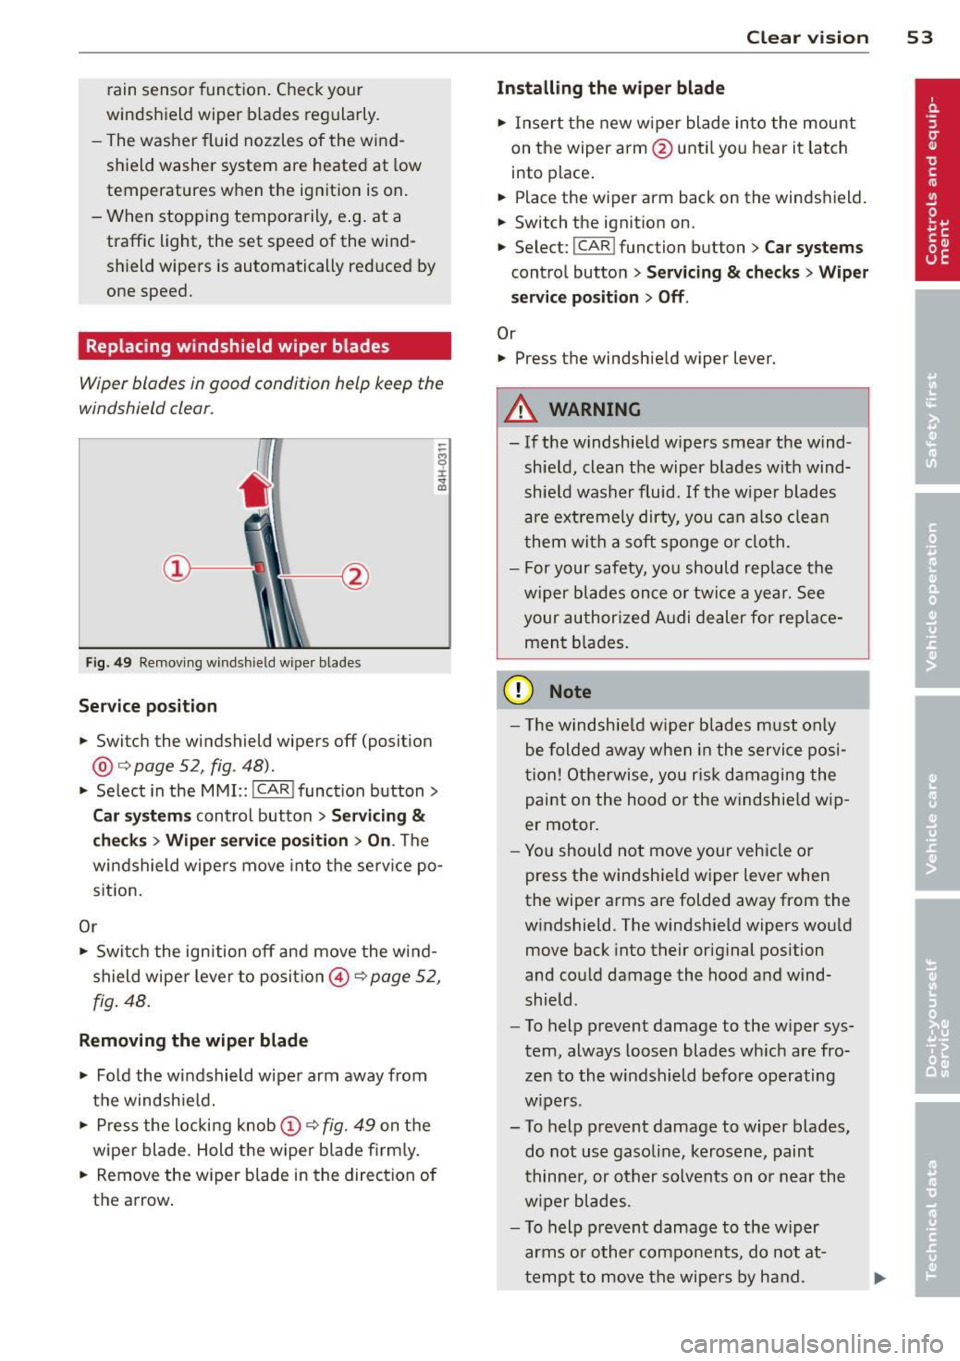
Fi g. 49 Rem ov ing wi nds hield w iper bla des
Service pos ition
.. Switc h the windshield wipers off (posit ion
@ ¢
page 52, fig . 48).
.. Se lect in the M MI:: !CAR ! function button>
Car s ystem s control button > Servicing &
che ck s > Wip er servic e po sition > On . The
wi ndshield wipe rs move into the serv ice po
s ition.
Or
.,. Swi tch the ignition off and move the wind
shield wipe r lever to posit io n © ¢
page 52 ,
fig . 48.
R emoving the wiper blade
.. Fold the w indshield wipe r arm away from
t h e windshie ld.
.,. Press the locking knob(!)
¢fig. 49 on t he
wiper blade . Hold the wiper blade fi rm ly.
.. Remove the w iper blade in the direction of
the arrow .
Clear vision 5 3
Installing the wiper blade
.. Insert the new w iper blade into the mount
on the wiper arm @unti l you hear it latch
i nto place .
.. Place the wiper arm back on the windshield.
.. Switch the ignit ion on.
.. Select:
I CAR ! function button > Car systems
control button > Servicing & checks > Wiper
serv ice position > Off .
Or
.. Press the windshie ld wiper lever.
.&_ WARNING
- If the windshie ld w ipers smear the w ind
shie ld , clean the wiper b lades with wind
shie ld washer fluid. If the w iper blades
are ex tremely dirty, you can a lso clea n
them with a so ft sponge o r clo th.
- For your safety, you should rep lace the
wiper blades once o r twi ce a year. See
your author ized Audi dealer for replace
ment b lades.
(D Note
- T he windsh ie ld w iper blades m ust only
be folded aw ay whe n in the service pos i
tion! Otherwise, yo u ris k damaging the
paint on the hood or the windshie ld wip
er motor.
- Yo u should not move your vehicle or
press the windshield wiper lever when
the wipe r arms are folded away from the
w indshield. The windsh ield wipers wou ld
move back into their or iginal position
and could damage the hood and wind
shield .
- To help prevent damage to the w iper sys
tem , always loosen blades wh ich are fro
zen to the windshield before operating
w ipers .
- To help p revent damage to wiper blades,
do not use gasoline, kerosen e, paint
thinne r, or other solvents on or near the
w iper blades .
- T o help prevent damage to the w iper
arms or other components, do not at-
t empt to move the wipe rs by hand. .,._
Page 56 of 318
54 Clear vis ion
@ Tips
- Commercial hot waxes applied by auto
matic car washes affect the cleanability
of the windshield .
- You can also use the service position, for
example, if you want to protect the
winds hield from icing by using a cover .
- You cannot activate the service position
when the hood is open.
Mirrors
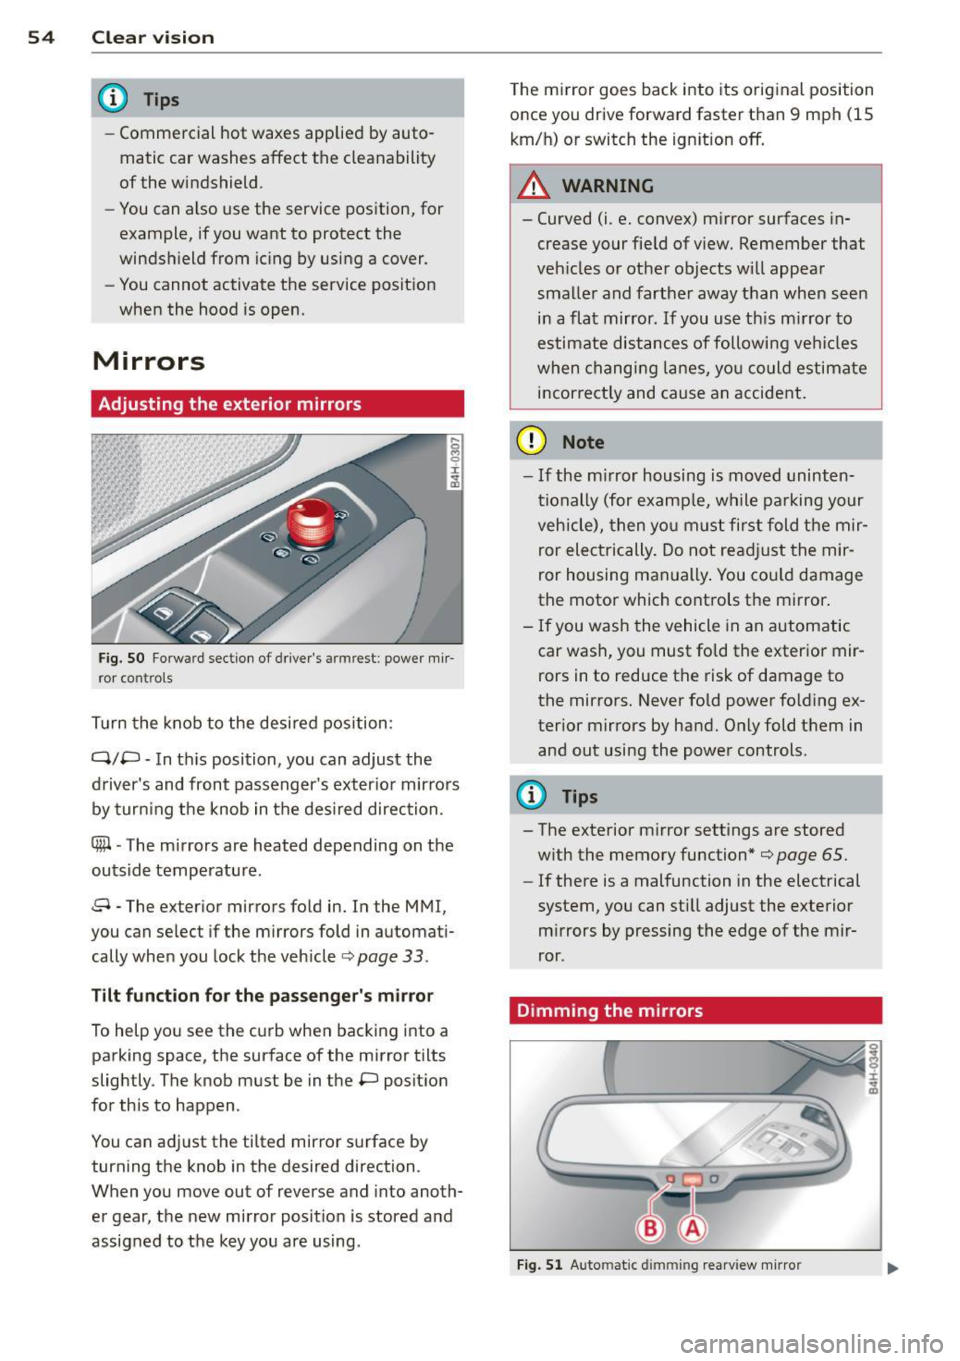
Adjusting the exterior mirrors
... g C)
I
~
Fig. S O Fo rw ar d s ecti on of driver's armr est: powe r m ir
r or con tro ls
T urn the knob to the desired position :
Q/P -In th is position, you can adjust the
driver's and front passenger's exter io r mirrors
by turn ing the knob in t he des ired direction .
®-The m irrors are heated depending on the
outside temperature .
8 -The exte rior m irrors fo ld in. In the MMI,
you c an se lec t if the m irror s fold in automat i
cally when you lock the vehicle ¢ page
33 .
Tilt funct ion for th e pa ssenger' s mi rro r
To help yo u see the c urb when bac king into a
parking space, the su rface of the mirror tilts
slightly . The knob must be in the P posit ion
for this to happen .
You can ad just the tilted mirror s urface by
turning the knob in the desired direction .
When you move out of reverse and into anoth
er gear, the new mirror posit ion is stored and
assigned to the key you are using . T
he mi rror goes back into its orig inal position
once you drive forward faster than 9 mph (15
km/h) or switch the ign ition off .
A WARNING
--
-Curved (i .e. conve x) mirror surfaces in
crease your fie ld of view. Remember that
veh icles o r ot he r objects will appea r
smalle r and farther away than when seen
in a flat mirror . If you use th is m irror to
estimate distances of following ve hicles
when chang ing lanes, yo u co uld estimate
i n correct ly and cause an accide nt.
(D Note
- If the m irror housing is moved uninten
ti onally (for examp le, w hile parking your
veh icle), then yo u must first fold the mir
ror electrically. Do not re adjust the mir
ror housing man ually . You co uld damage
the motor which controls the mirror .
-If you wash the vehicle in an automatic
car was h, you must fo ld the exter ior mir
rors in to reduce the risk of damage to
the mirro rs. Never fold power folding ex
terior mirrors by hand. O nly fold t hem in
and out using the power controls.
{I) Tips
- The exterior m irror settings are stored
w ith the memory function*
¢ page 65 .
-If there is a malfunction in the electrical
system, you can sti ll adjust the exterior
m irrors by pressing the edge of the mir
ror .
Dimming the mirrors
Fig. 5 1 Auto matic dimming rearview mirro r
Page 63 of 318
©-Switching front passenger seat adjust
ment on/off: this function must be activated
in the MMI
r=> page 63, r:=> &. To switch front
passenger seat adjustment on, pre ss the but
ton . You can now adjust the front passenger
seats using the buttons @ and @. If you do
not press the buttons @ or@ , front passen
ger seat adjustment sw itches
off automatical
ly after approximately ten seconds.
A WARNING
- The power adjustment for the individual
seats also works with the ignition . For
this reason, children should never be left
unattended in the vehicle -they could be
injured!
- Exercise caution when adjusting the
seats. Unsupervised or careless seat ad
justment can pinch fingers or hands
causing injuries.
- Vehicles with a pass through in the cen
ter console have seat ing for four. The
long center console between the two
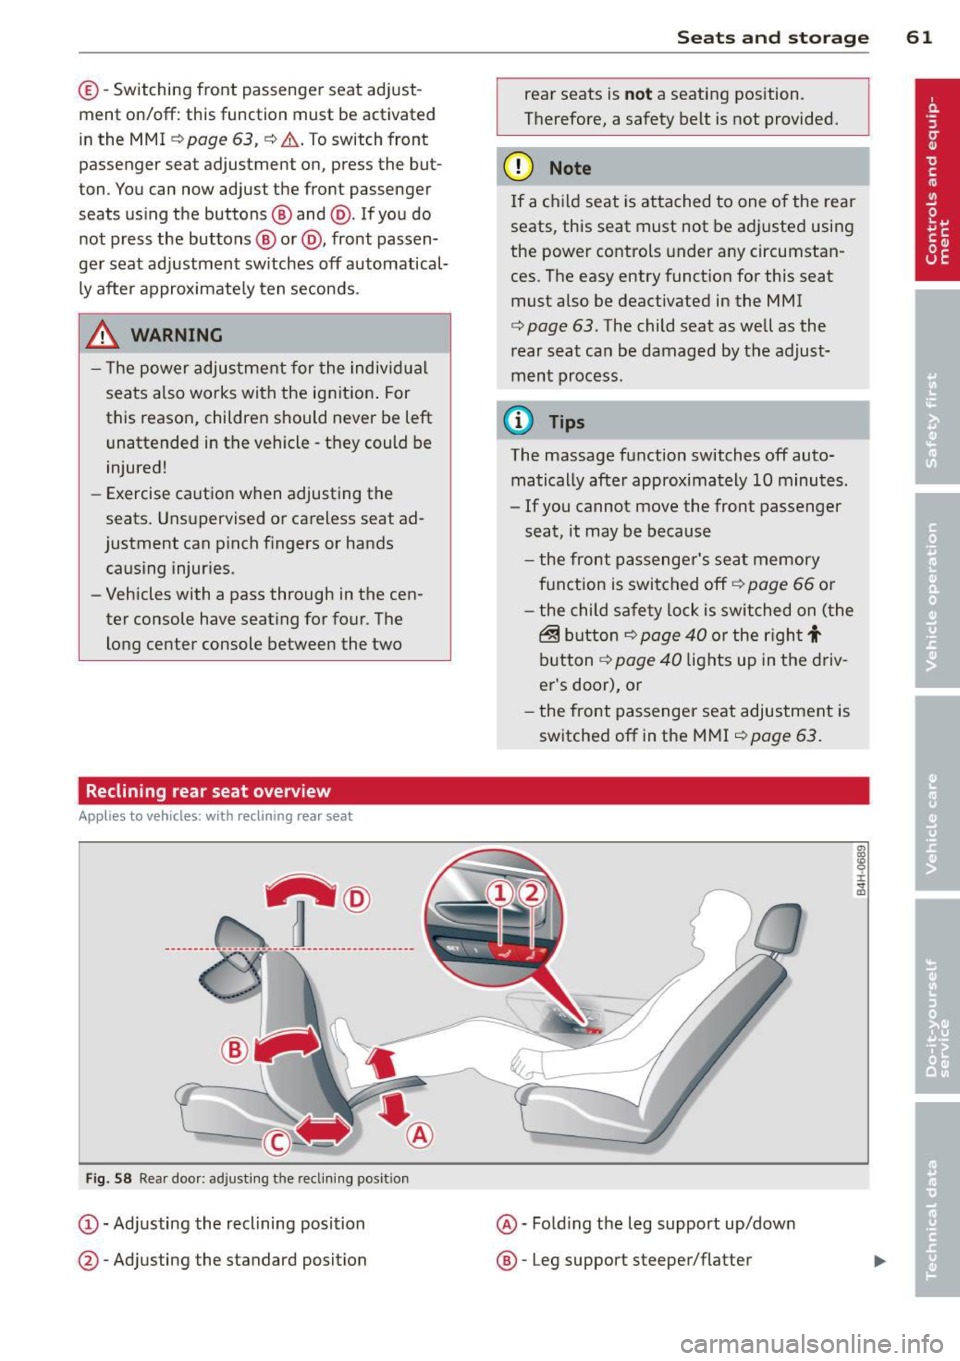
Reclining rear seat overview
Applies to vehicles: with reclining rear seat
----------------- ~@ -------
F ig. 58 Rear door: a djusting t he reclining posit ion
@ -Adjusting the reclining position
@ -Adjusting the standard position
Seats and storage 61
rear seats is not a seating position.
Therefore, a safety belt is not provided .
.
(D Note
If a child seat is attached to one of the rear
seats, this seat must not be adjusted using
the power controls under any circumstan
ces . The easy entry funct ion for this seat
must also be deactivated in the MMI
r:=> page 63. The child seat as well as the
rear seat can be damaged by the adjust
ment process.
@ Tips
The massage function switches off auto matically after approximately 10 minutes .
- If you cannot move the front passenger
seat , it may be because
- the front passenger's seat memory
function is switched off
r::!> page 66 or
- the child safety lock is switched on (the
~ button r::!> page 40 or the rig ht t
button r::!> page 40 lights up in the driv
er's door), or
- the front passenger seat adjustment is
switched
off in the MMI r::!> page 63.
@-Fold ing the leg support up/down
@ -Leg suppo rt steeper/flat ter
I ± ...
"'
Page 65 of 318
@ Tips
If you cannot move the seat into the re
clining position, it may be because
- the front passenger's seat memory func
tion is switched off¢
page 66 or
- the child safety lock is switched on (the
@ button
¢ page 40 or the right t but
ton ¢
page 40 lights up in the driver's
door), or
- the front passenger seat adjustment is
switched off in the MMI
¢ page 63.
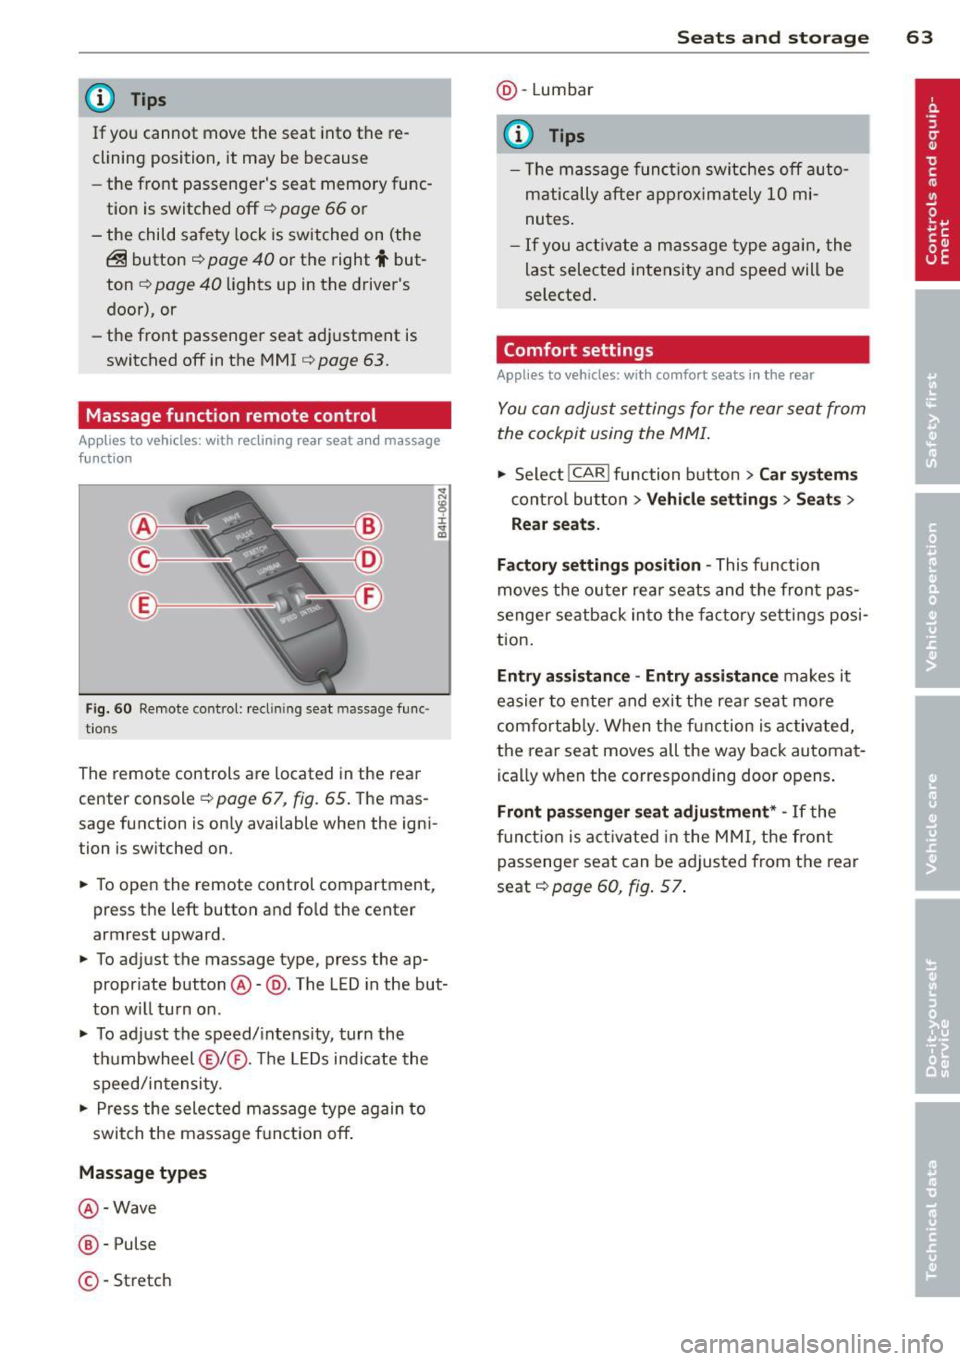
Massage function remote control
Applies to vehicles: with reclining rear seat and massage
fu nct ion
F ig. 60 Remote control: reclin ing seat massage func
t ions
The remote controls are located in the rear
center console ¢
page 67, fig. 65. The mas
sage function is only available when the igni
tion is switched on.
.,. To open the remote control compartment,
press the left button and fo ld the center
armrest upward .
.,. To adjust the massage type, press the ap
propriate button @-@ . The LED in the but
ton w ill turn on .
.,. To adjust the speed/intensity, turn the
thumbwheel @I® . Th e LED s indicate the
speed/intensity .
.,. Press the selected massage type again to
switch the massage funct ion off .
Massage types
@-Wave
@-Pulse
©-Stretch
Seats and storage 63
@-Lumbar
(D Tips
- Th e massage function switches off auto
matically after approximately 10 mi
nutes .
-If you activate a massage type again, the
last selected intensity and speed will be
selected.
Comfort setting s
Applies to vehicles: wit h co mfort seats in the rear
You can adjust settings for the rear seat from
the cockpit using the MMI.
.,. Select I CAR I function button > Car systems
control button > Vehicle settings > Seats >
Rear seats.
Factory settings position -
This function
moves the outer rear seats and the front pas
senger seatback into the factory settings posi
tion.
Entry as sistance -Entry assistance makes it
easier to enter and exit the rea r seat more
comfortab ly. When the function is activated,
the rear seat moves all the way back automat
ically when the corresponding door opens .
Front passenger seat adjustment * -If the
function is activated in the MMI, the front
passenger seat can be adjusted from the rear
seat ¢
page 60, fig. 5 7.