warning light AUDI A8 2014 Workshop Manual
[x] Cancel search | Manufacturer: AUDI, Model Year: 2014, Model line: A8, Model: AUDI A8 2014Pages: 314, PDF Size: 78.47 MB
Page 94 of 314
92 On the road
• Pull the lever to position CD ¢ fig . 91 to
switch the system on.
• Drive at the speed you wish to set .
• Press button @to set that speed.
The stored spee d and the ind icator light
[ij;(i)~i~ (US mode ls) ,ii (Canadian mode ls) ap
pear in the instrument cluster d isplay
¢ fig. 92. The display may vary, depending on
the type of d isplay in your vehicle .
The speed is kept constant via an engine o ut
p ut adjustment or act ive brake intervention .
A WARNING
-Always pay attention to traffic even when
the cruise control is switched on . You are
always responsible for your speed and
the distance between your vehicle and other vehicles.
- For safety reasons, the cruise control
should not be used in the city, in stop
and-go t raff ic, on twist ing roads and
when ro ad conditions are poor (such as
ice , fog, grave l, heavy rain and hydro
planing) -risk of accident.
- T urn off the cruise control tempor aril y
when entering turn lanes, highway exit lanes or in construction zones.
- Please note tha t inadvertent ly "rest ing"
yo ur foot on the accelerator peda l causes
the cruise control not to brake. This is
because the cr uise control is overridden
by t he driver 's acce lerat ion.
- If a brake system malfunction such as
overheat ing occurs when the cru ise con
tro l system is sw itched on, the braking
function in the system may be switched
off . The other cruise control functions re
ma in active as long as t he indicator light
[ij;rn~i~ (US models) Iii.I (Canad ian mod
els) is on.
(D Tips
The b rake lights illuminate as soon as the
brakes decelerate automat ica lly.
Changing speed
• To increase/decrease the speed in inc re
men ts, tap the lever in the
0 10 direction
¢ page 91, fig. 91 .
• To increase/decrease the speed quick ly, hold
the lever in the
0 10 direction until the de
sired speed is displayed.
You can also press the accelerator pedal down
to increase yo ur speed, e.g . if you want to
pass someone . The speed you saved earlier
will res ume as soon as you release the acce ler
ator pedal.
If, however, you exceed your saved speed by
6 mph (10 km/h) for longer than 5 minutes,
the cr uise control w ill turn off temporari ly.
The green symbol
[ij;(l)~i~ (US mode ls) ,ii in
the d isplay is replaced with a white symbol.
T he saved speed remains the same .
Presetting your speed
You can preset your desired speed while the
vehicle is not moving.
• Switch on the ign ition.
• Pull lever into position
CD ¢ page 91,
fig . 91 .
• Press the lever in t he 0 o r 0 direction to
increase or decrease your speed .
• Release t he lever to save that speed .
Th is function makes it possib le, for examp le,
to save the speed you want before dr iv ing on
the highway. Once on the h ighway, act ivate
the cr uise con trol by pulling the leve r toward
CD -
Switching the system off
Temporary deactivation
• Press the brake pe dal , or
• Press the lever into posi tion @(not cl icked
into p lace)
¢ page 91, fig. 91, or
• Drive for longer t han S m in utes at more
than 5 mph (10 km/h) above the stored
speed.
Page 99 of 314
Audi adaptive cruise control and braking guard 97
.. You must also press the b rake pedal when
the vehicle is stopped.
Switching adaptive cruise control off
.. Push the lever away from you into position
@ until it clicks into place. The message
ACC off appears.
@ Indicator lights
fl -Adaptive cruise control is switched on. No
vehicles are detected up ahead . The stored
speed is ma intained.
I -A moving vehicle is detected up ahead .
The adaptive cruise control system regulates
the speed and distance to the moving vehicle
ahead and acce lerates/brakes automatica lly.
f¥i -Adaptive cruise control is switched on. A
mov ing vehicle up ahead was detected . Your
veh icle remains stopped .
I· When automatic braking is not able to
keep enough distance to a previously detected
mov ing vehicle up ahead, you must take con
trol and brake
c:::> page 99, Prompt for driver
intervention.
© Display
If adaptive cruise control is not shown in the
d isplay, you can call it up with the multifunc
tion steering wheel buttons¢
page 24 .
Based on the symbols in the display, you can
determine if the system is maintaining a dis
tance to the vehicle ahead and what that dis
tance is.
No vehicle -No vehicle ahead was detected.
White vehicle -A vehicle ahead was detected.
Red vehicle -Prompt for the driver to take ac
tion
c:::> page 99.
Both
arrows o n the scale © indicate the dis
tance to the vehicle ahead . No arrow appears
when the vehicle is on an open road and there
is no object ahead.
If an object is detected
ahead, the arrow moves on the scale.
The green zone on the scale shows the stored
distance. For information on changing the stored distance, refer to
c:::> page 98
. If the
distance selected is too close or may soon be
come too close, the arrows move into the red
z one on the sca le .
A WARNING
Improper use of the adaptive cruise con
trol can cause collisions, other accidents
and serious personal injuries.
- Pressing the
!SET ! button when driv ing at
speeds below 20 mph (30 km/h), w ill au
tomatically accelerate the vehicle to 20
mph (30 km/h), which is the minimum
speed that can be set.
@ Tips
-If you switch the ignit ion or the adaptive
cruise control off, the set speed is erased
from the system memory.
- You cannot switch the Electronic Stabili
zation Control (ESC) to the SPORT mode
when adaptive cruise control is switched
on.
Changing the speed
App lies to veh icles: w it h A ud i ada ptive c ruise co ntrol
0
f
• 0
Fig. 99 Selector lever: changing the speed
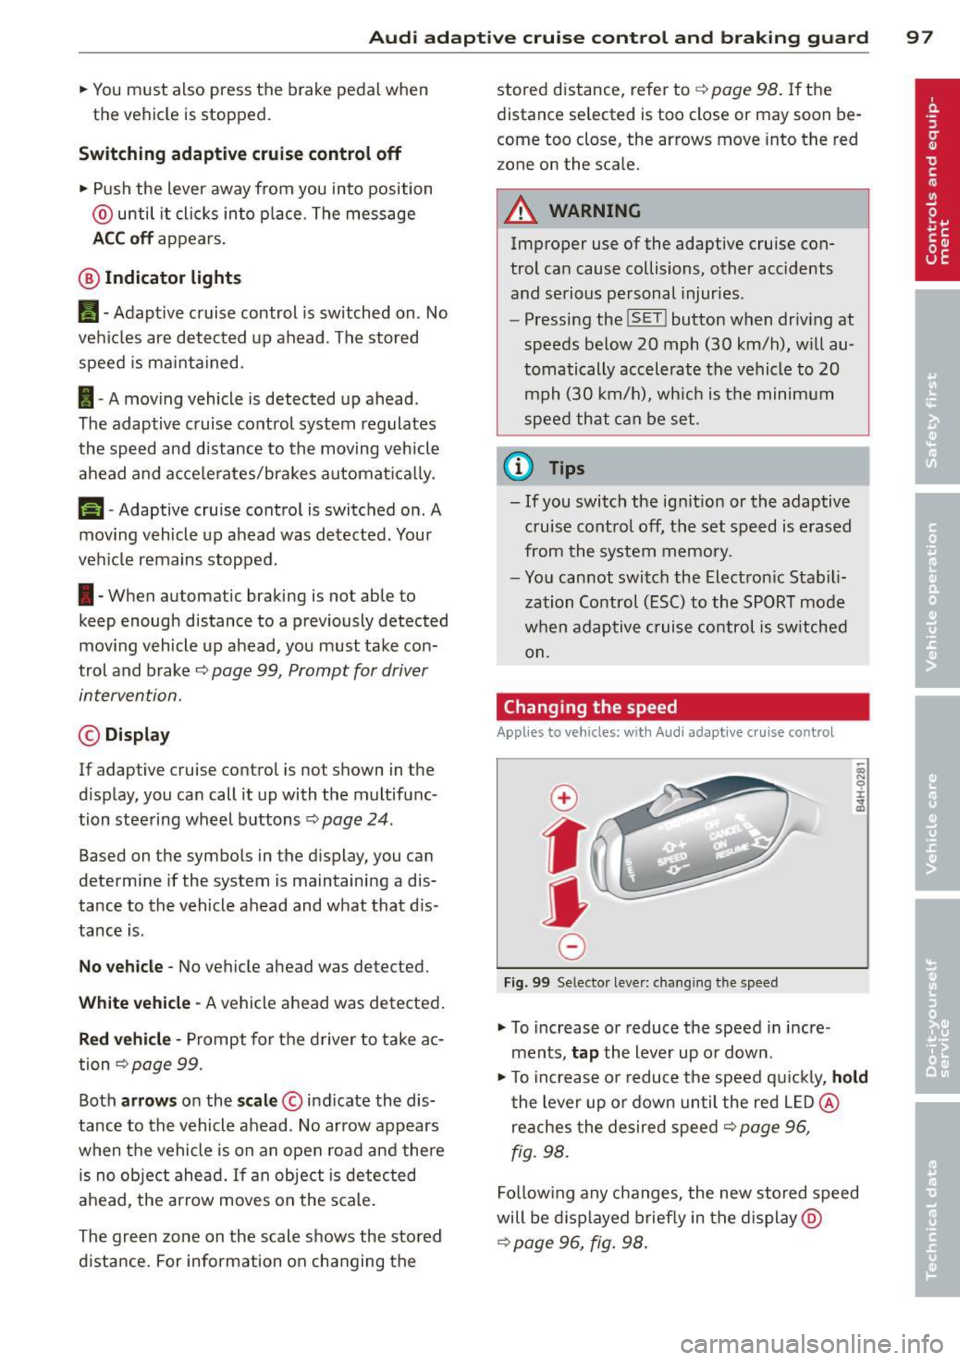
.. To increase or reduce the speed in incre
ments,
tap the lever up or down.
.,. To increase or reduce the speed q uickly,
hold
the lever up or down until the red LED @
reaches the desired speed
c:::> page 96,
fig. 98.
Follow ing any changes, the new stored speed
will be displayed briefly in the display @
c:::> page 96, fig. 98.
Page 101 of 314
Audi adaptive cruise control and braking guard 99
then maintains the stored distance. If the ve
hicle ahead accelerates, adaptive cr uise con
trol will also accelerate up to the stored
speed.
The higher the speed, the greater the distance
in yards (meters) ¢.&. . The
Distance 3 setting
is recommended .
The distances prov ided are spec ified values.
Depending on the driving situation and the
how the vehicle ahead is driving, the actual
d istance may be more or less than these tar
get distances.
The various symbols for the time increments
appear briefly in the information line @
¢ page 96, fig. 98 when you change the set
tings.
~ -~ --- Distance 1: This setting corre
sponds to a distance of 92 feet/28 meters
when traveling at 62 mph (100 km/h), or a
time interva l of
l second.
~ -- ~-- Distance 2: This setting corre
sponds to a distance of 118 feet/36 meters
when traveling at 62 mph (100 km/h), or a
time interva l of 1.3 seconds .
~--- ~-Distance 3: This setting corre
sponds to a distance of 164 feet/SO meters
when traveling at 62 mph (100 km/h), or a
time interva l of 1.8 seconds .
~---- ~ Distance 4: This setting corre
sponds to a distance of 210 feet/64 meters
when traveling at 62 mph (100 km/h), or a
time interva l of 2.3 seconds .
A WARNING
Following other vehicles too closely in
creases the risk of collisions and serious
personal injury.
- Setting short distances to the traffic
ahead reduces the time and distance
available to br ing your vehicle to a safe
stop and makes it even more necessary
to pay close attention to traffic.
- Always obey applicable traffic laws, use
good judgment, and select a safe follow- ing distance
for the traffic, road and
weather conditions.
@ Tips
- Distance 3 is set automatically each time
you switch the ignition on.
- Your standard settings are automatically
stored and assigned to the remote con
tro l key being used.
Selecting the driving mode
Applies to vehicles: with Aud i adapt ive c ruise contro l
.,. Select the desired driving mode in drive se
lect¢
page 110.
(0 Tips
Your settings are automat ica lly stored and
assigned to the remote control key being
used.
Prompt for driver intervention
Applies to vehicles: with Audi adapt ive cru ise contro l
Fig. 102 Instrument cluster: request fo r drive r in ter
vent ion
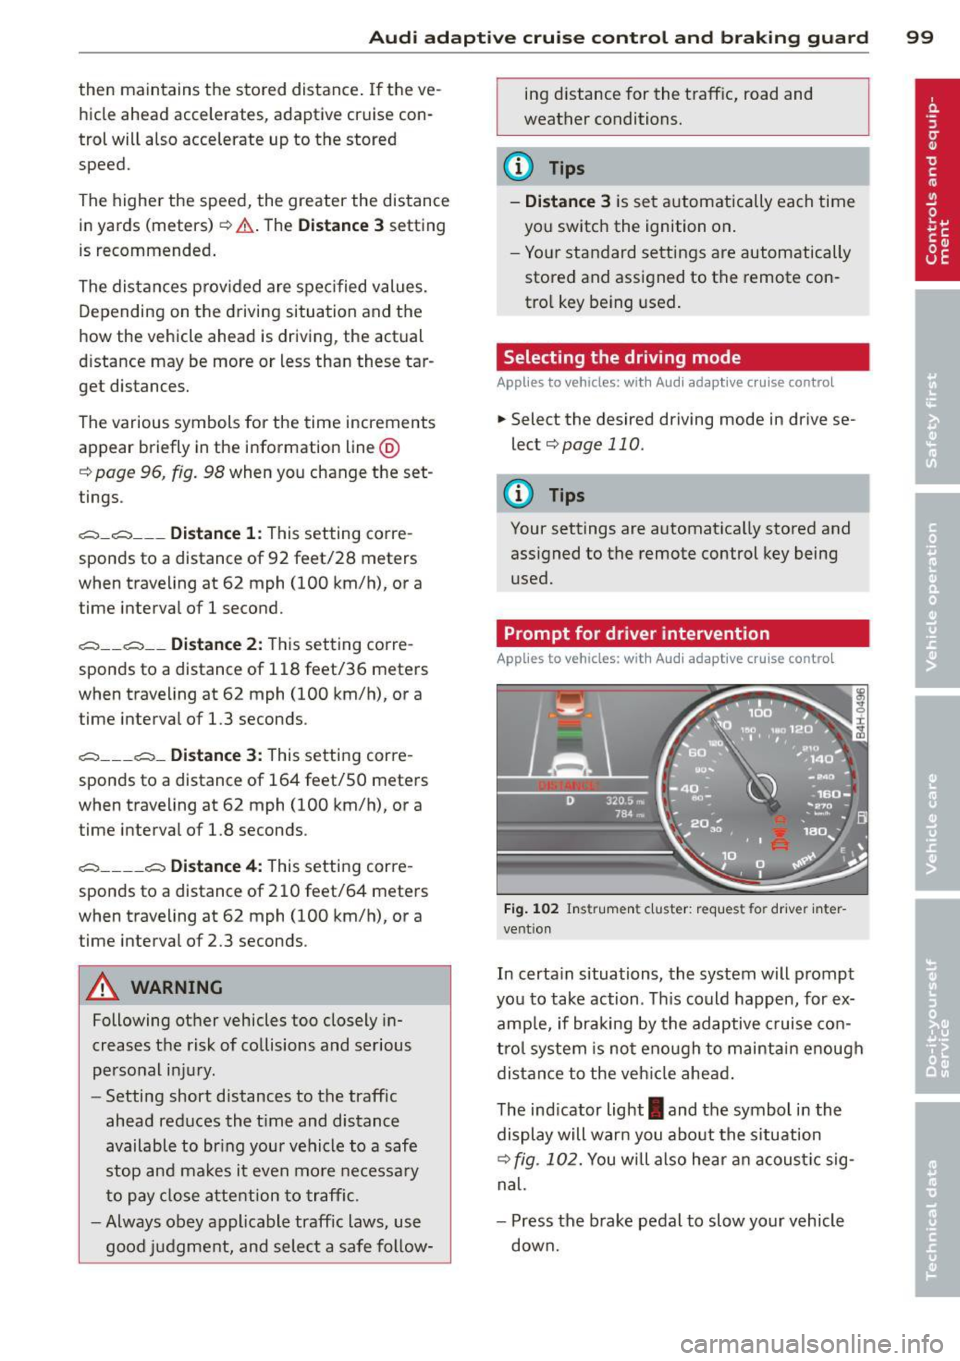
In certa in situations, the system will prompt
you to take action . Th is could happen, for ex
amp le, if braking by the adaptive cruise con
trol system is not enough to maintain enough
distance to the vehicle ahead.
The indicator light
I and the symbol in the
display will warn you about the situation
¢ fig. 102. You will also hea r an acoustic sig
nal.
- Press the brake pedal to slow your vehicle
down.
Page 105 of 314
Audi lane assist Lane assist
De script ion
App lies to vehicles: with la ne ass ist
Lane assist helps you keep your vehicle in your
lane.
Lane assist detects lane marker lines within
the limits of the system using a camera in the
windshield. If you are approaching a detected
lane marker line and it appears likely that you
will leave the lane, the system will warn you
with a light vibration . Lane assist is operable
when the line marking the lane is detected on
at least one s ide of the vehicle.
The system will not warn you before crossing
a lane marker line if you have activated the
turn signal. In th is case, it assumes that you
are changing lanes intent ionally.
The system is designed for driv ing on free
ways and expanded highways and thus works only at speeds of 40 mph (65 km/h) o r more .
_& WARNING
-Lane assist will not keep your veh icle in
your lane. The system only warns the
driver w hen the veh icle is leaving the
lane. The driver is always responsible for
keeping the vehicle in the lane.
- The camera is not able to detect all lane
boundary lines and in some cases might
also detect lane structures or objects as
boundary lines. This can lead to incorrect
warnings or warnings that fail to go off
at all.
- The camera's visibility can be impaired by
vehicles ahead of you, for instance, or by
rain, snow, heavy spray or light shin ing
in to the camera lens. This can ca use lane
assist to fa il to detec t boundary li nes.
-
Audi lane a ssis t 10 3
Act ivating and deactivating
App lies to vehicles: wit h lane assist
Fig. 104 Turn s igna l lever: Lane assist button
Fig . 105 Windsh ield: Lane assist ca mera view ing win
dow
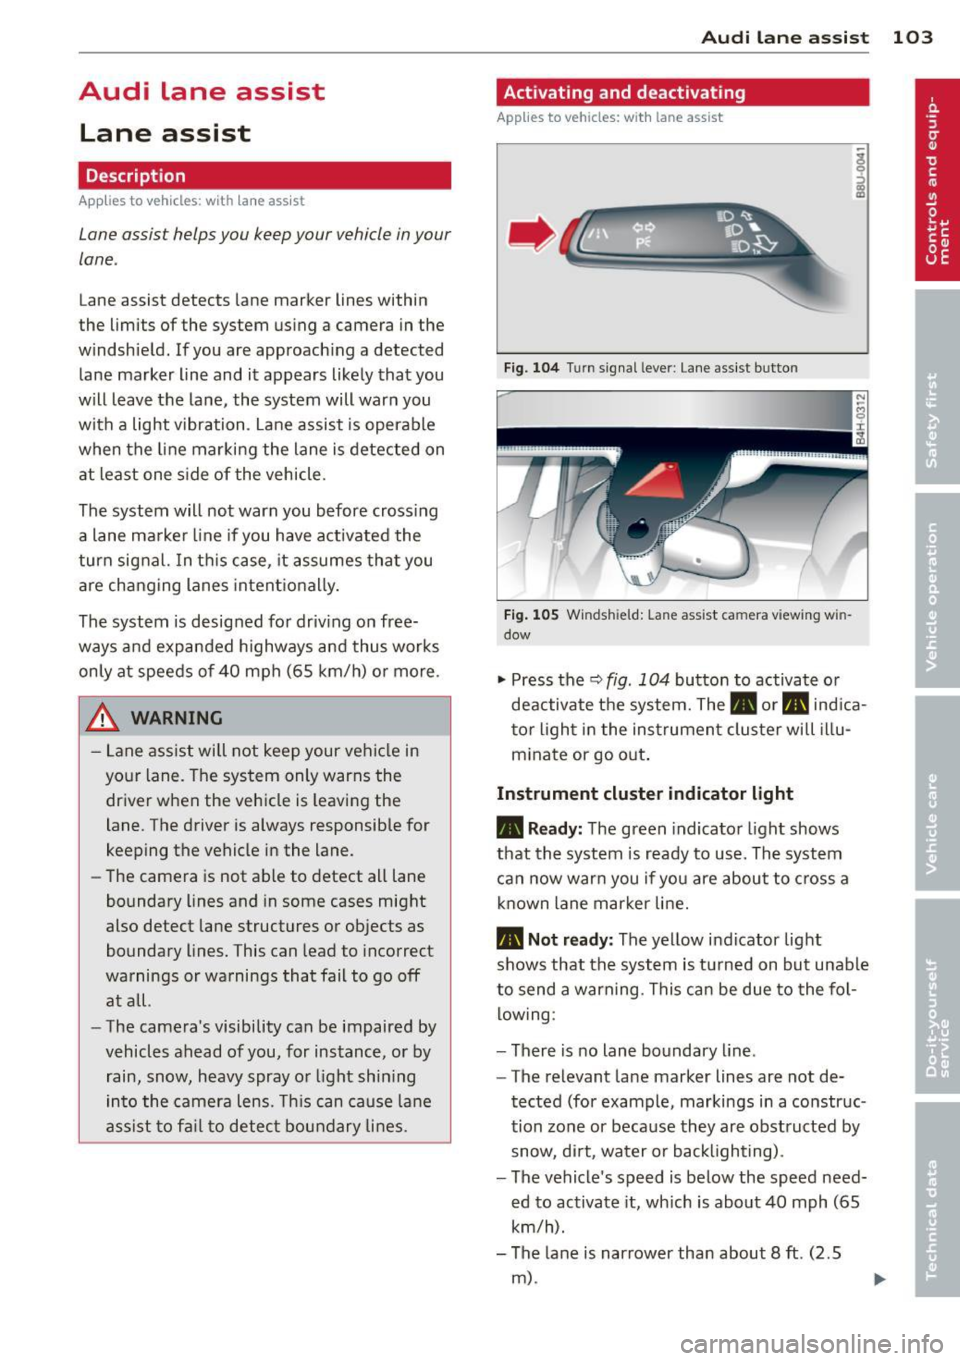
"' Press the Q fig . 104 button to activate or
deactivate the system. The. or. indica
tor l ight in the instrument cluster will il lu
m inate or go out .
Instrument cluster ind icator light
• Read y:
The green indicator light shows
that the system is ready to use. The system
can now war n you if you are about to c ross a
known lane marker line.
• Not ready : The yellow indicator light
shows that the system is t urned on but unable
to send a warning. This can be due to the fol low ing:
- There is no lane boundary line .
- The relevant lane marker lines are not de-
tected (for example, markings in a construc
tion zone or because they are obstructed by
snow, di rt, water or backlighting) .
- The vehicle's speed is below the speed need ed to activate it, wh ich is about 40 mph (65
km/h).
- The lane is narrower than about 8 ft. (2.5
m) .
Page 107 of 314

Setting the warning point and steering
wheel vibration
Appl ies to vehicles: with lane assist
You can adjust individual settings in the MMI.
.. Select : I CARI funct ion button > Car systems
control button > Driver assist> Audi lane
assist .
Setting the warning point Early :
With this setting, a warning is provided
before a wheel touches the detected lane
boundary line. The warning depends on the
angle in which the ve hicle is approaching the
line. The distance at which the warning is giv
e n increases as the angle becomes sharper. If
you dr ive toward a boundary line at a very
sha rp angle, the warning will come just before
a w heel touches the line.
Medium : With this sett ing, the warning point
i s adapted to the cou rse of the road, the lane
width and the speed . You wi ll st ill be warned
if you cross slightly over a dotted line when
driving on curves.
Late: This setting has the same properties as
medium. You will only be warned once a
wheel crosses a detected line.
Setting the steering wheel vibration
The steering wheel v ibration can be set to
Low , Medium or Strong . Selecting each of the
set tings will cause the steering wheel to vi
brate so you can ch eck the strength of the vi
bration in that setting.
@ Tips
Your settings are automatically stored and
assigned to the remote contro l key be ing
used.
Audi lane assist 105
Page 112 of 314
110 Audi drive select
Audi drive select
Driving settings
Introduction
Aud i d rive select mak es it possible to expe ri
ence diffe ren t types of vehi cle se ttin gs i n o ne
ve hicl e. The dr ive r can se lect th ree
Comfort ,
Auto
and Dynamic modes in the M MI to
switch between a sporty and a comforta ble
driving mo de.
You c an a lso a djust the setti ng according to
your p re ferences in the
individual mo de. For
examp le, you ca n combine settings such as a
sporty en gine t uning with comfortab le steer
ing.
A WARNING
Improper use of the A udi drive select can
cause collisions, ot her acc idents and se ri
ous pe rsonal injury.
Description
The vehicle setup in each mode depends on
the veh icl e's featu res. The engine, t ransm is
sion, stee ring, reve rsible sa fe ty belt tension
e rs a nd adap tive air su spension are alw ays in
volved.
Engine and transmission
Depending on the mode, the e ng ine and the
tra nsmission respond quic ker or i n a more bal
an ced manne r to acce le rator pedal move
men ts. In the sporty dyn ami c mode, the
tra nsmission sh ifts at highe r RP Ms.
Air suspension
The adaptive air suspens ion/adaptive air sus
pe nsion spor t*
(Air suspension in the MM I) is
an elec tronic ally con trolled air suspensio n and
da mpi ng sys tem. They are adjus ted depend
ing on the se lected driving mode, the drive r's
steering, braking and acceleration input and
the road s urface, ve hicle speed and load. A
sporty setting is generally used i n ve hicles
with adaptive air suspension sport*. T
he vehicle clea rance varies depending on the
se lected mo de an d the speed .
T he highw ay setting is activate d automatically
whe n you dr ive above 7 5 mph (120 km/ h) for
more than
3 0 seconds in the auto or dynamic
mode. The gro und clea rance is increased a uto
matically if the speed drops below
44 mph
(70 km/h) for more than 120 seconds.
Steering
T he s teering adap ts i n t erms of s teer ing effor t
and stee ring ratios . Indirect stee ring that
moves easily, like the steer ing in comfo rt
mode, is best suited to long drives on a high
way. In contrast, dynamic mode provides
sporty, direct steer ing .
The following app lies to vehi cles with dynamic
stee ring* : the steer ing rat io changes based on
vehicle speed in order to ma inta in optimum
steering effort for the drive r at all times. This
sets the stee ring to be less sens itive at h igher
s p eeds in order to provide improved vehicl e
control. At r educed speeds, howeve r, steer ing
is mo re dir ect i n order to keep the stee ring ef
f o rt as minima l as po ssible when the drive r is
mane uveri ng the veh icle. At low and average
speeds, dynamic steering ad dit iona lly pro
vides more responsive steering pe rformance .
Sport differential*
As a compone nt o f the all whee l dr ive system
(quat tro)
r:!> page 204, the Spor t differen tia l*
dis tributes t he d riving power to the rear ax le
depen ding on the sit uat io n. The distrib ution
of power var ies depending on the se lected
mode, from ba lanced (comfort) to agile (dy
nam ic). The goal is a high level of agility and
ability to accelerate on curves . The vehicle is
very res pons ive to stee ring .
Curve light*
The curve light adapts to driving on curves.
The pivoting act ion and the lighting are also
adapted to the mode.
Adaptive cruise control*
T he be hav ior when ac celera ting can be adjust
ed from comforta ble to sporty, de pending on ..,.
Page 115 of 314

Night vision assistant
Description
Appl ies to vehicles: with night v isio n ass istant
Fig. 114 Display: night v ision assistan t
"Night vis ion assistant with pedestrian detec
tion" uses an infrared camera to mon itor the
area in front of your vehicle at night . Within
the limits of the system, it can display objects
up to about 1000 feet (300 mete rs) away. The
h eat image of a pedestrian detected by the
camera is shown in the instrument cluster dis
p lay
¢ fig. 114. Warm areas appear lighter
and cold areas appear darker.
Pedestrian detection
Applies to vehicles: with night v isio n ass istant
Fig. 115 D isplay: yellow pedestrian marking
Fig. 116 Display: symbol when in frared image is not
v is ibl e
Night vision assistant 113
Night vision assistant can detect pedestrians
that are between about 50 and 300 feet (15
and 90 meters) in front of the vehicle, under
ideal conditions . If a pedestrian is detected
when it is dark outside and the vehicle head
light s are switched on, the pedestrian is high
lighted in yellow
~ fig. 115, ¢page 114,
General information .
If another display such
as navigat ion replaces the image from the
night vis ion assistant , the symbo l~,, appears
in a tab
¢fig. 116.
(D Tips
If the night v is ion assistant image does
not appear when the system is switched
on, you can access it with the buttons on
the mu ltifunction steering wheel
¢ page 25.
Pedestrian warning
Applies to vehicles: wit h night vision assistan t
Fig.117 D isp lay: pedestr ian wa rning
Fig. 118 Disp lay : pedestrian warnin g wit h anot her dis
play
If a pedestr ian is detected in an area in front
of the vehicle that the system considers criti
cal, the pedestrian is highlighted in red
¢fig . 117 and a warning tone sounds. This
area is based on the vehicle speed and
Page 116 of 314

114 Night visi on assis tant
steering angle. The pedestrian warning
prompts you to pay even closer attention to
the area in front of the vehicle and to watch
out for pedestrians.
I f another display such as the tr ip computer
replaces the image from the night vision as
sistant , the ind icator light turns red when
there is a pedestrian warning .
¢fig. 118 .
@ Tips
The pedestrian marking and warning tone
can be adjusted in the MMI r::!)poge
115.
General information
Applies to vehicles: with night vision assistant
Fig. 119 Front of the vehi cle: n ig ht v ision ass istant
camera
The following s ituations may affect the func
tion of the night vision assistant system:
- poor vis ibility such as snow, ra in , fog or
heavy road sp ray
- dirty lens on the night vision ass istant cam -
era
M ake sure the night v ision assistant camera
¢ fig. 119 is not cove red by stickers, deposits
or any other obstruc tions because that can
p revent the camera from working p roperly.
F or information on cleaning the lens, refer to
r::!) page
216.
Pedestrian de tect ion depends on the differ
ence in temperat ure between the person and
the background. Pedestrians may not be de
tected if the temperature difference is too
smal l. The pedestrian highlighting feature is
deactivated at temperatures above 77 °F (25
0 () and when it is light outside.
A WARNING
--
Night vision ass istant has l imits and can
not always detect pedestrians . Always pay
close attention to traffic and the area
a round your vehicle even when night vision
assis tant is sw itched on.
- Night vision assistant can only warn
about people located within the v isual
range of the infrared camera. The vis ual
ra nge corresponds to the image in the in
strument cluster display.
- Night vision assistant may not detec t
peop le and highlight them if
- they are not in an upright posit ion, for
example if they are sitt ing, crouching
o r lying down and/or
- if the outline in the disp lay is incom
plete or interrupted, for example be
cause the perso n is part ial ly hidden by
a parked vehicle.
@ Tips
- Pedestrian detection and the pedestrian
warm ing are limited to objects that are
detected as pedest rians. The system
does not detect an imals. Even though
the shape and warmth radiated by each objec t detected is eval uated, the system
does have limitat io ns and it can g ive in
correct warnings .
- For technical reasons, the image pauses
in split second in tervals.
Switching on and off
Applies to vehicles: with night vision assistant
Fig. 120 Area aro und the light switc h: ni ght v is ion as -
s ista nt button
Ill>
Page 117 of 314

.. Swi tch the ign ition on and turn the lig ht
sw itch to the
AUTO pos ition or io .
.. To sw itch night vision ass istant on , press the
~ ,, button
i:> fig . 120. The image from the
night vision camera appea rs in the instru
me nt cluster d isp lay .
.. Press t he button ~,, aga in to swi tc h ni ght vi
s ion assistant off .
Settings in the MMI
Applies to vehicles: with night vision assistant
F ig. 121 D isp lay: examp le of pedestr ia n detec tion and
warni ng tone sw itc hed off
.. Se lect: ICARI f unct ion but ton> Car systems
co ntrol button > Dr iver assist > Night vision
a ssist.
Highlight pedestrians -
You can switch pedes
tr ian detection
on and off . If yo u sw itch pe
destrian detect ion off, the p edestr ian war ning
tone also switches off . The symbols
II and ~
appe ar in the upper righ t area o f the ins tru
men t clus ter display ~
fig. 121.
Warning tone -You can switch the to ne fo r
t he pedestrian warning
on and off . Whe n the
warn ing tone is swi tched off, a ye llow sym bol
fo r the de activa ted w arning tone with a line
throug h it appears in the upper right of the in
strument cluster display ~
fig. 121 .
Contrast -When the nigh t vis ion assis tan t is
switche d on and the ima ge is visible in t he in
strument cluster disp lay, yo u can adjust the
contrast in the image from
Min to Max.
Driver messages
Applies to vehicles: with night vision assistant
Night vision assistant : system malfunction! Night
vision assistant 115
The system cannot work properly and is
sw itched off. See your authorized Audi dealer
for ass istance .
Night vision a ssistant: not available
The system cannot detect p roperly under cur
rent cond itions and is swit ched off tempora ri
ly.
Night vision assistant: only available in dark
ness and with lights switched on
N ight vision assistant only works when it is
dark outside and the head lights are on .
Night vision assistant: pedestrian detection
not available
T he system has deactivated the pedestrian de
tection funct ion .
Page 120 of 314
118 Automatic Transm iss ion
& WARNING
-Never e ngag e R or P w hile driving. It
could cause a crash .
-
-Power is sti ll t ransmitted to the whee ls
when the engine is r unning at idle . To
prevent the vehicle from "creeping", you
must keep your foot on the brake in all
selector lever positions except P and N
when the eng ine is running. Do not inad
vertent ly press the accelerator pedal
when the veh icle is stationary . Otherwise
the vehicle will s tart to move immediate
ly. This cou ld h appen even if the parking
brake is activa ted .
- Be fore opening the hood, select the P se
le ctor lever position and set the par king
brake. This red uces the risk of a crash. Al
ways read and follow the applicable
wa rnings
<=)page 231.
-Never get out of the driver's seat when
the engine is running.
- If you mus t get out of the vehicle, move
the se lector lever securely into the P po
sit ion an d apply the park ing brake .
(D Tips
-If you u nin ten tio nally shift into the N se
l ector lever posi tion while dr iv ing, ta ke
your foot off the acce lerator pedal and
wait for the e ngine to slow down until it
i s idling before you shift into Dor S.
Driving tips
The gears shi~ automatically .
Starting from a stop
"" Press and ho ld the brake pedal.
"" Sta rt the eng ine
c:> page 8 4.
"" Press the but ton on the se lector lever and
select the D, S or R selecto r leve r pos it ion
c:> page 116 .
""Wait a moment until the transmission
shifts. You w ill not ice a slight movement
when the gear engages .
"" Re lease the brake pedal and press the accel
erator pedal¢ ,& .
Stopping temporarily
""Press the brake pedal to s top the ve hicle, for
examp le a t a traffic light . Do not press the
accelerato r peda l when doing this.
"" To prevent the vehicle from ro lling when yo u
start dr iving, set the parking brake when
stopping on large incl ines
c:> ,& .
"" The parking brake will release automat ica lly
and the vehicle will start mov ing once you
press the acce lerator pedal.
Parking
If the se lector lever is not in the P position
whe n you open the driver's door, the ve hicle
could roll. The message
Transmission: Car
may roll! Shift to park!
appears .
"" Press and hold the brake pedal¢ ,& .
"" Set the park ing brake.
"" To engage the P se lector lever position,
press the button on the selector leve r and
shift into the P posit ion
c:> page 116 .
Under certa in conditions suc h as dr iv ing in the
mountains or when towing a trailer, it may be
helpful to switch to manual mode tempo rari ly
to shift
manually to adapt to the driving con
di tions
c:> page 119.
On slopes, activate the parki ng bra ke first and
then move the selecto r leve r to the P position .
T his prevents too much st ress from be ing
pla ced o n the locking mec hanism.
& WARNING
R ead an d fol low all WAR NING S ¢.&. in Se
lecting a selector lever position on
page 118.
- The vehicle can also roll when the engine
is stopped.
- Do not press t he acceler ator pe dal when
chan ging the se lector leve r posi tion
while the veh icle is stationary and t he
engine is running . This cou ld result in a
crash.
- Never engage R o r P while driving .
It
could cause a crash.
- Power is still transmitted to the wheels
when the engine is runn ing at idle. To
IJJ,,