start stop button AUDI A8 2016 Owners Manual
[x] Cancel search | Manufacturer: AUDI, Model Year: 2016, Model line: A8, Model: AUDI A8 2016Pages: 302, PDF Size: 75.68 MB
Page 11 of 302
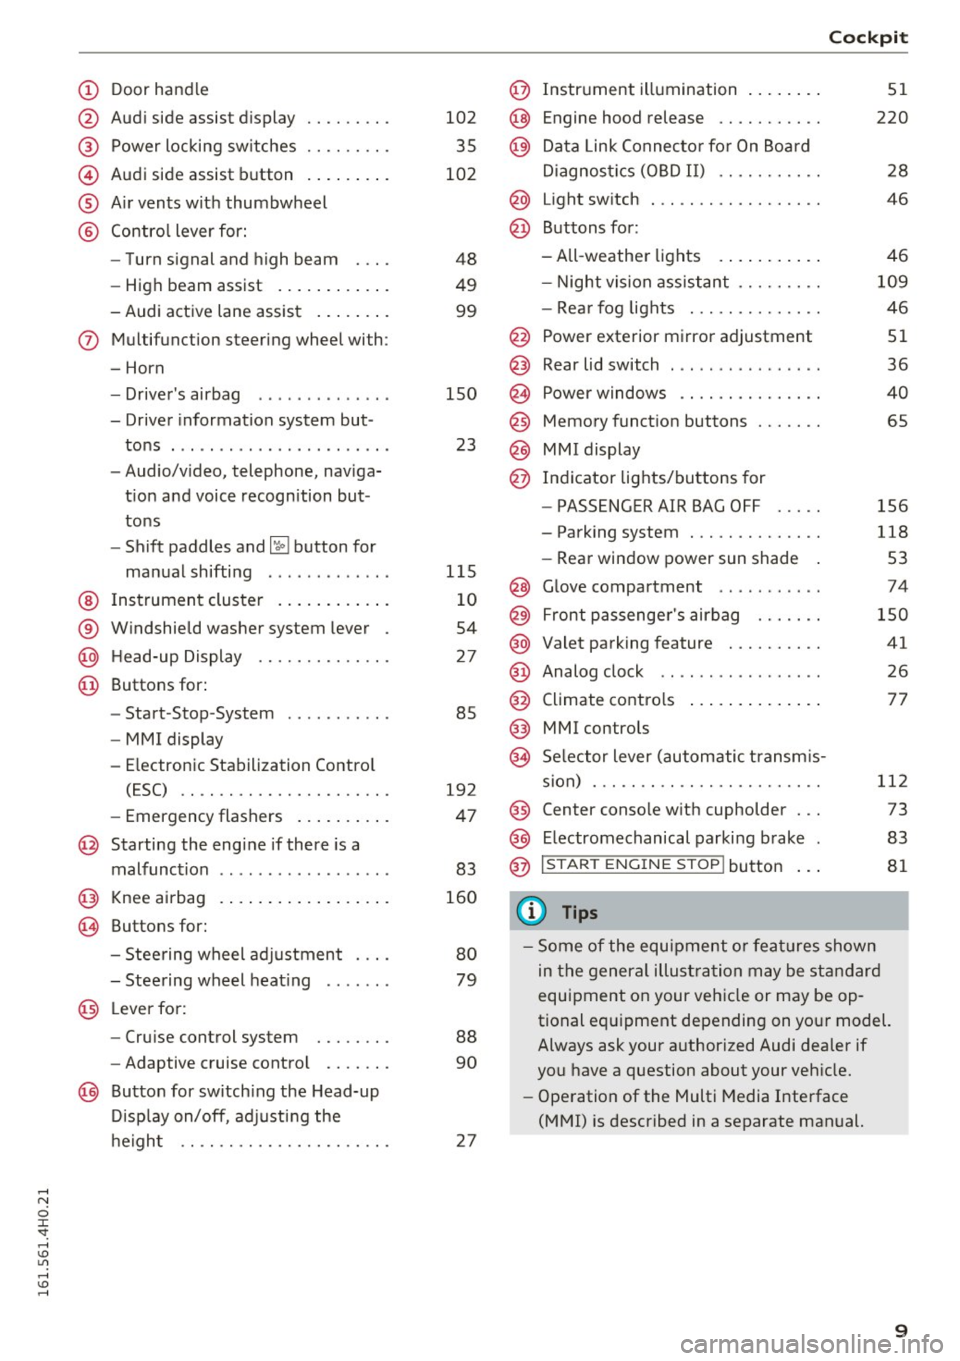
(!) Door handle
@
®
©
®
®
Audi side assist display
Power locking sw itches
Audi side assist button ........ .
A ir vents with thumbwheel
Contro l lever for:
- Turn signal and high beam
- High beam assist .......... . .
- Audi active lane assist ....... .
(J) Multifunction steering wheel with:
- Horn
- Driver's airbag .... ..... ... . .
- Driver information system but-
tons . ......... ....... ..... .
- Audio/video, telephone, naviga
tion and voice recognition but
tons
- Shift paddles and~ button for
manual shifting ... ..... ... . .
@ Instrument cluster .......... . .
® Windshield washer system lever
@ Head-up Display ........... .. .
@ Buttons for:
- Start -Stop -System . ..... ... . .
- MMI display
- Electronic Stabilization Control
(ESC) .. .. ............. .. .. .
- Emergency flashers ........ . .
@ Starting the engine if there is a
malfunction ..... ....... ..... .
@ Knee airbag ................ . .
~ Buttons for:
- Steering wheel adjustment ... .
- Steering wheel heating .. .... .
@ Lever for:
- Cruise control system ..... .. .
- Adaptive cruise control .... .. .
@ Button for switching the Head-up
Display on/off, adjusting the
height .. .. ............... .. .
102
35
102
48
49
99
150
23
115 10
54
27
85
192
47
83
160
80
79
88
90
27
Cockpit
@ Instrument illumination ....... .
@ Engine hood release .......... .
@) Data Link Connector for On Board
Diagnostics (OBD II) .......... .
@ Light switch . .. .............. .
@ Buttons for :
-All-weather lights .......... .
- Night vision assistant ........ .
- Rear fog lights ............. .
@ Power exterior mirror adjustment
Rear lid switch ... ...... ...... .
Power windows .............. .
Memory function buttons ...... .
MMI display
Indicator lights/buttons for
- PASSENGER AIR BAG OFF
- Parking system ............. .
- Rear window power sun shade
@ Glove compartment .... ...... .
@ Front passenger's airbag ...... .
@ Valet parking feature ......... .
@ Analog clock .. .. ............ .
@ Climate contro ls ............. .
@) MMI controls
<.§ Selector lever (automatic transmis-
sion) . .. .. .. .. .............. .
@ Center console with cupholder .. .
@ E lectromechanical parking brake
@ IS TAR T ENGINE ST OP !button
{I) Tips
51
220
28
46
46
109
46
51
36
40
65
156
118
53
74
150
41 26
77
112 73
83
81
- Some of the equipment or features shown
in the general illustration may be standard
equipment on your vehicle or may be op
tional equipment depending on your model.
Always ask your authorized Audi dealer if
you have a question about your vehicle.
- Operation of the Multi Media Interface
(MMI) is described in a separate manual.
9
Page 17 of 302
or qualified repair facility and have the
brake system inspected.
- Always keep in mind that after several brake
applications, you will need greater pressure
on the brake pedal to stop your vehicle. Do
not rely on strained brakes to respond with
maximum stopping power in critical situa
tions. You must allow for increased braking
distances . The extra distance used up by
fading brakes could lead to an accident.
PARK/( ®) Electromechanical parking brake
The warning/indicator light monitors the elec
tromechanical parking brake.
If the indicator light- (USA models)/ .
(Canada models) turns on, the parking brake was
set .
- (USA models) ,. (Canada models) Cau
tion: Vehicle parked too steep
If the indicator light blinks and the message ap
pears, there is not enough braking power to keep
the vehicle from rolling. The brakes have over heated. The vehicle could roll away even on a
small incline .
Press brake pedal to release parking brake
To release the parking brake, press the brake
pedal and press the button~ or start driving
with starting assist at the same time
c:> page84.
Please release parking brake
To release the parking brake manually, press the
brake pedal and press the button ~ at the same
time. The parking brake only releases automati
cally if the driver's safety belt is fastened.
mJ Parking brake!
If the Iii indicator light turns on and this mes
sage appears, there is a parking brake malfunc
tion . Drive to your authorized Audi dealer or
qualified workshop immediately to have the mal-
;:;:: function corrected.
0 J:
'SI: ,....,
-L Cooling system
• Switch off engine and check coolant level!
The coolant level is too low .
Do not continue driving and switch the engine
off. Check the coolant level
c:> page 22 7.
- If the coolant level is too low, add coolant
c:> page 228. Only continue driving once the in
dicator light turns off.
• Coolant temperature too high! Let engine
run with vehicle stationary
Let the engine run at idle for a few minutes to
cool off, until the indicator light turns off.
- If the indicator light does not turn off, do not
continue driving the vehicle . See an authorized
Audi dealer or authorized Audi Service Facility
for assistance .
A WARNING
- Never open the hood if you can see or hear
steam or coolant escaping from the engine
compartment. This increases the risk of
burns. Wait until you no longer see or hear
steam or coolant escaping.
- The engine compartment in any vehicle can
be a dangerous area. Stop the engine and
allow it to cool before working in the engine
compartment. Always follow the informa
tion found inc:>
page 220.
(0 Note
Do not continue driving if the . indicator
light turns on - this increases the risk of en
gine damage.
C:I Battery
This warning/indicator light detects a malfunc
tion in the generator or in the vehicle's electrical
system .
The. warning/indicator light illuminates when
you switch on the ignition and must go out after
the engine has started .
• Alternator fault: Battery is not being charg-
ed
~
15
Page 37 of 302
@ Tips
If your vehicle has been standing for an ex
tended period, please note the follow ing:
- The proximity sensors are deactivated after
a few days to save power . You then have to
pull on the door handle once to unlock the
vehicle and a second time to open the vehi
cle.
- To prevent the battery from draining and to
preserve your vehicle's ability to start for as
long as poss ible, the energy management
system gradually switches off unnecessary
convenience funct ions. It is possible that
you wi ll not be able to unlock your veh icle
us ing these convenience functions .
- Fo r De claration of Comp liance to Un ited
States FCC and Industry Canada regulations
c>page284.
Operating locks with the key
In the event of a failure of the power locking sys tem , the driver's door can be locked and un
locked at the lock cylinder.
F ig. 23 Key turns for opening and closing.
• Remove the mechan ical key c> page 31.
• Turn the key to the left to unlock the dr iver's
door .
• Turn the key to the right to lock the driver 's
door c>
,&.
& WARNING
Read and follow all WARN INGS c> .&. in Gener
al description on page 32 .
Openin g an d clos ing
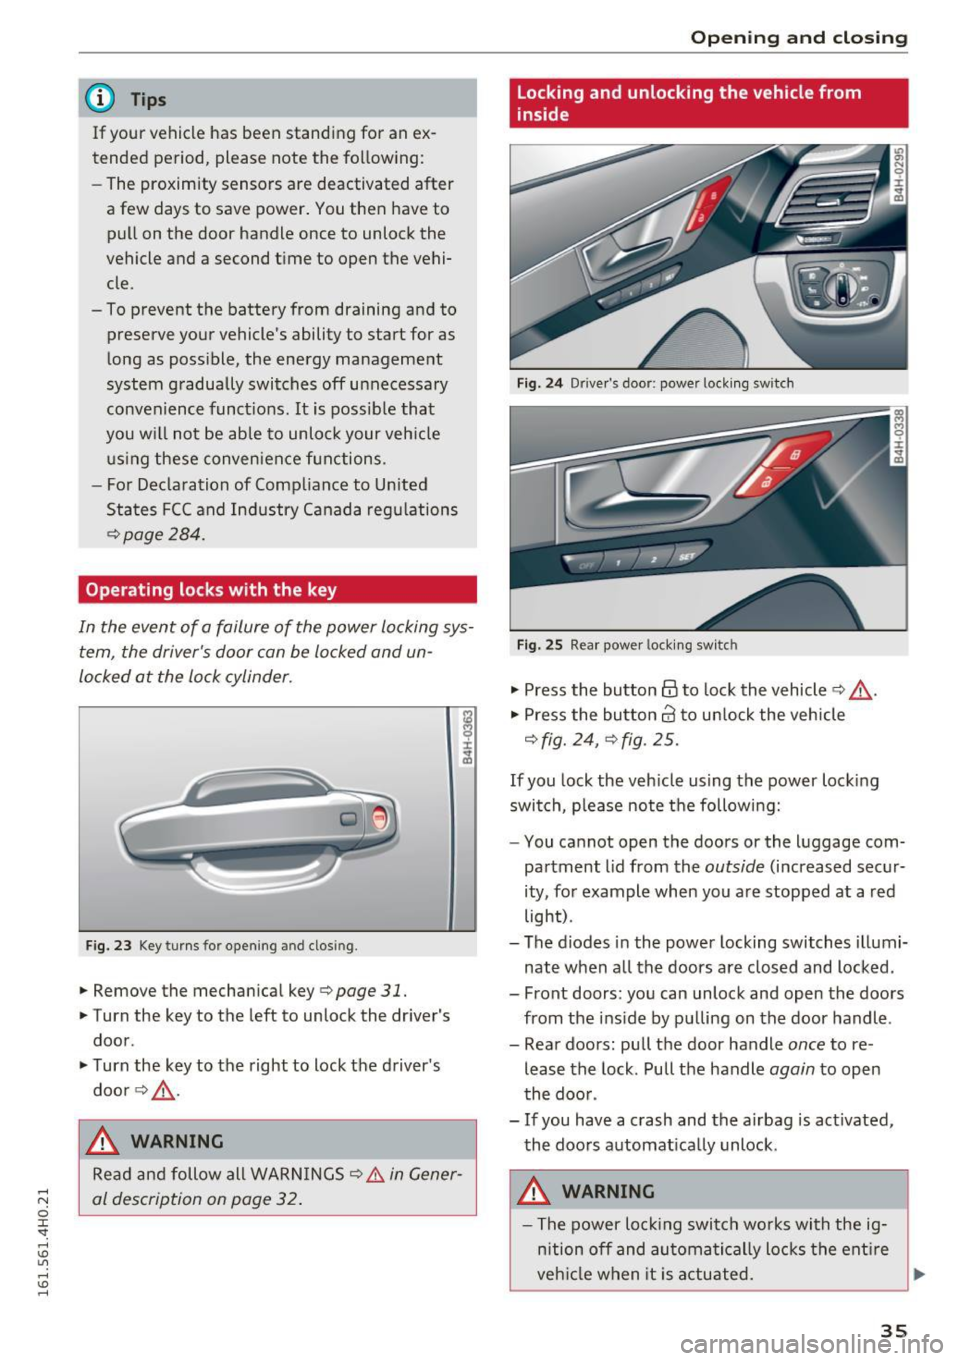
Locking and unlocking the vehicle from
inside
Fig. 2 4 Driver's door; power lock ing switch
Fig. 25 Rear power lock ing switc h
"' Press the button @to lock the vehicle c> &,,.
"' Press the bu tton crl to un lock the vehicle
c> fig. 24, c> fig . 25.
If you lock the veh icle using the power lock ing
switch, please note the following:
- You cannot open the doors or the luggage com
partment lid from the
outside (increased secur
ity, for example when you a re stopped at a red
light) .
- The diodes in the power locking switches illumi
nate when a ll the doors are closed and locked.
- Front doors: you can unlock and open the doors from the ins ide by pu lling on the door handle .
- Rear doors : pu ll the door handle
once to re
lease the lock . Pull the handle
again to open
the doo r.
- If you have a crash and the airbag is act ivated,
the doors automat ically unlock.
& WARNING
- The power lock ing switch wo rks with the ig
n ition off and au toma tically lo cks the ent ire
veh icle when it is a ctuated.
~
3 5
Page 83 of 302
Starting and stopping
the engine
Starting the engine
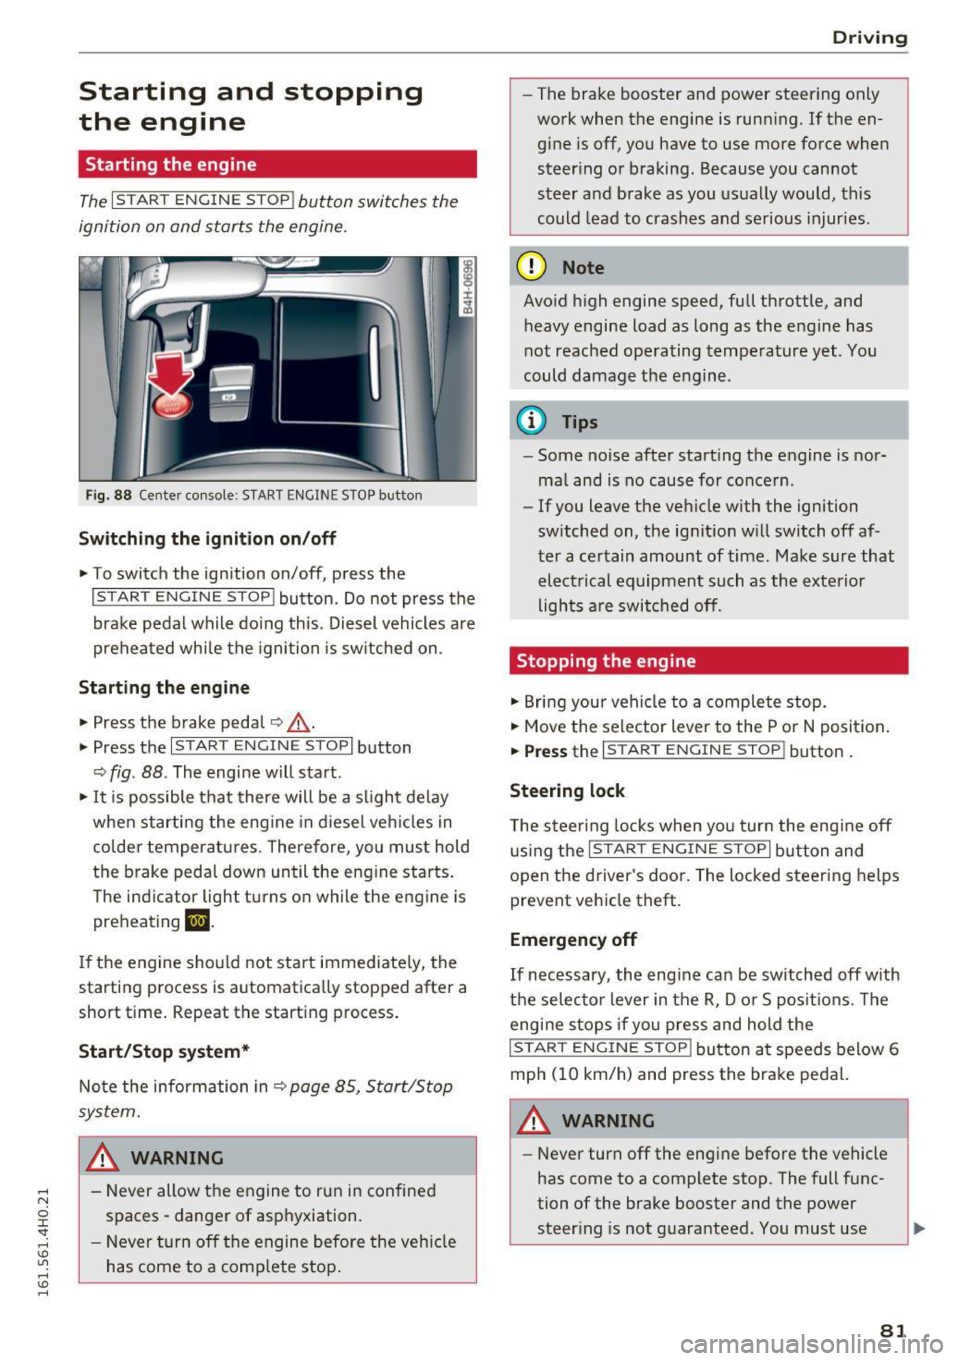
The I S TAR T ENGIN E ST OP ! button switches the
ignition on and starts the engine.
Fig. 88 Cente r co nsole: S TART ENG IN E STOP b utton
Switching the ignition on /off
.,. To switch the ign ition on/off, press the
I START E NGIN E STOP ! button. Do not press the
brake pedal while do ing th is . Diesel vehicles a re
preheated while the ignition is sw itched on .
Starting the engine
~ Press the brake peda l c:> _&.
.,. Press the I START E NG IN E ST OPI button
c:> fig . 88 . The engi ne w ill s tart.
.,. It is possible that there will be a slight delay
when starting the eng ine in d iesel veh icles in
colder temperatures . There fore, you mus t hold
t h e brake pedal down un til the eng ine starts .
The ind icator light turns o n while the engine is
preh eating
m.
If the engine sho uld not start immed iate ly, the
starting process is automatica lly stopped after a
short time. Repeat the start ing process .
Start/Stop system*
Note the infor mation in c:> page 85, Start/Stop
system.
_& WARNING
- Never allow the engine to run in confine d
spaces - danger of asphyxiation.
- Never t urn off the engine before the ve hicle
has come to a comp lete stop .
Drivi ng
-The brake booster and power steer ing only
work when the engine is runn ing . If the en
g ine is off, yo u have to use more force when
steer ing o r braking . Because you cannot
steer a nd b rake as you usu ally would, this
could lead to crashes and serious injuries .
(D Note
Avoid h igh engine speed, full th rottle, and
heavy engine load as long as the eng ine has
not reached ope rating temperature yet . You
could damage the e ng ine .
© Tips
-Some noise after start ing the engine is nor
ma l and is no cause for co nce rn .
- If you leave the ve hicle w ith the ignition
switched on, the ig nit ion w ill switch off af
t er a ce rtain amount of time. Ma ke sure that
el ec trical equipment such as the exte rior
ligh ts a re swi tched off .
Stopping the engine
.,. Bring you r vehi cle to a complete stop.
.,. Move the selector lever to the P o r N posit ion .
.,. Press the I ST AR T EN GINE ST OP ! button.
Steering lock
The steer ing locks when yo u tur n the eng ine off
u sing the
I S TART ENG INE S TOPI bu tton and
o pen t he d river 's doo r. T he locked steering help s
prevent vehicle theft.
Emergency off
If necessary , the eng ine ca n be switched off w ith
t h e selec tor lever in the R, Do r S posit io ns. Th e
engine s tops if you press and hold the
!S TAR T EN GINE ST OP ! button a t speed s below 6
mph ( 10 km/h) and press the bra ke peda l.
_& WARNING
-Never turn off the engine be fore the vehicle
has come to a complete stop . The full func
tion of the brake booster and the power
steer ing is not guara nteed. You must use ..,.
81
Page 85 of 302
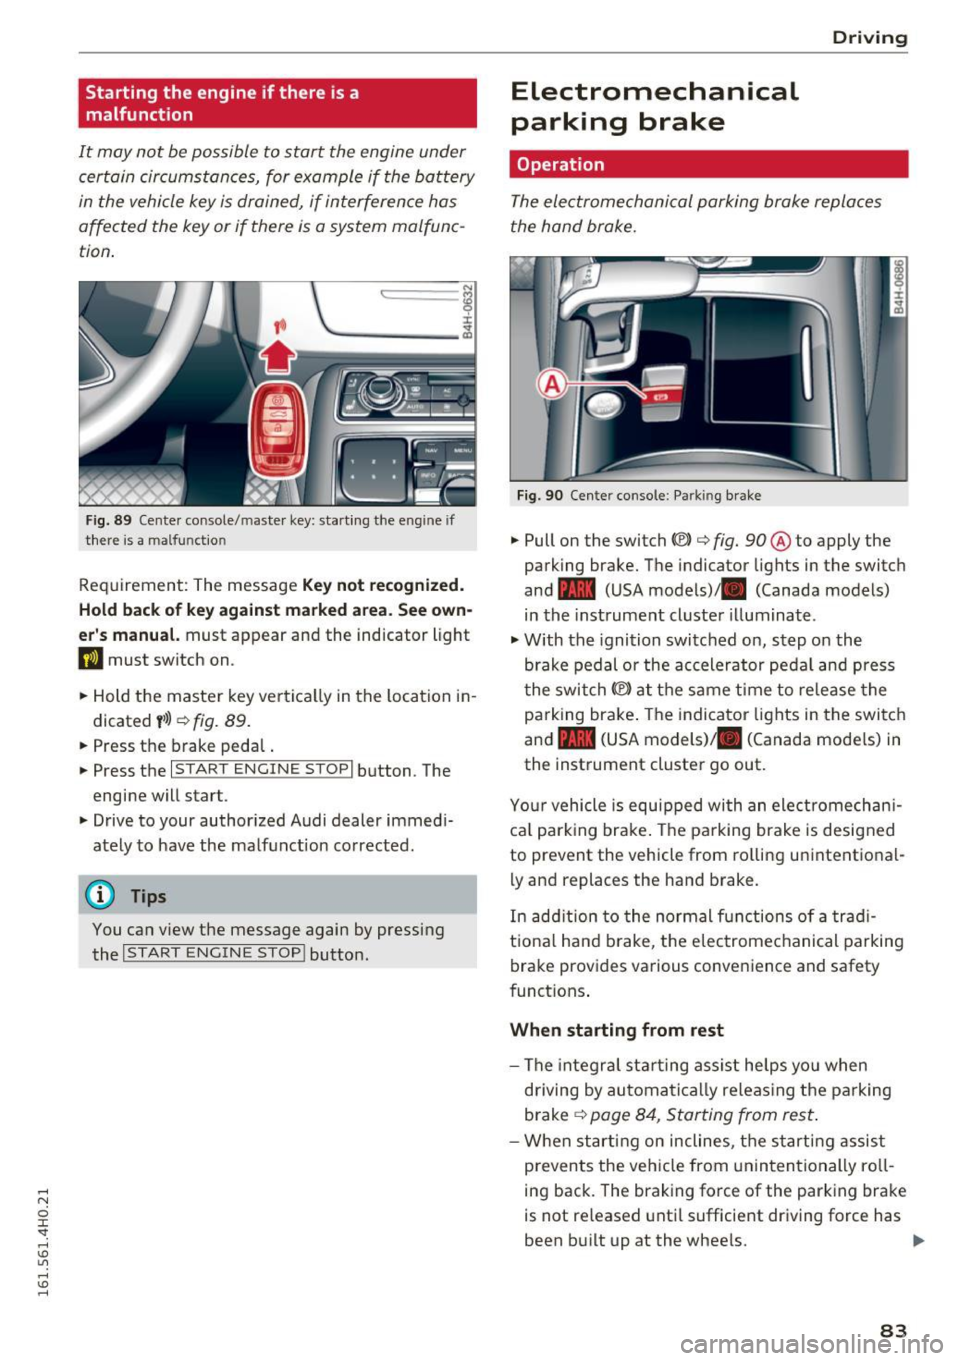
Starting the engine if there is a
malfunction
It may n ot be possible to start the engine under
certain circumstances, for example if the battery
in the vehicle key is drained, if interference hos
affected the key or if there is a system malfunc
tion .
i:;
~ ___ ____ !
F ig . 89 Cen te r co nsole/ maste r key: start ing the e ng in e if
ther e is a malfu nct io n
Req uirement: The message Key not re cognized.
Hold back of key against marked area. See own
er' s manual.
must appear and the indicator light
DJ must switch on .
.. Hold the master key ve rtica lly in the location i n
d icated
y >l) ¢ fig. 89 .
.. Press the brake peda l.
.. Press the
I STAR T ENGINE STOP I button . The
engine will star t.
.. Drive to your author ized Audi dealer immed i
ately to have the malf unct ion corrected .
(D Tips
You can view the message again by pressing
the
I START ENGINE STOP ! button.
Electromechanical
parking brake
Operation D
rivi ng
The electromechanical parking broke replaces
t he hand broke.
Fig . 9 0 Cen te r conso le : Parkin g brake
.. Pull on the switch «vl c:> fig. 90 ® to apply the
parking brake. The indicator lights in the switch
and - (USA models)/ . (Canada models)
in the instrument cluster illuminate .
.,. With the ignition switched on, step o n the
brake pedal or the accelerator ped al and press
t he swi tch(® at the same time to re lease the
pa rking bra ke . The indicator lights in the swi tc h
and - (USA models)/ . (Canada mode ls) in
the instrument cluster go out .
Yo ur vehicle is equ ipped wi th an ele ct romechan i
ca l park ing brake . The parking brake is designed
to prevent the vehicle from ro lling unintentional
ly and replac es the hand brake.
In add ition to the normal functions of a trad i
t io na l h and brake, t he e lectrome chanical pa rking
brake provides va rious conveni ence and safety
funct ions .
When starting from rest
-The integra l st art ing assis t he lps yo u when
driving by automa tic a lly releas ing the pa rking
brake
¢ page 8 4, Star ting from res t.
-W hen start ing on incline s, t he s tarting assist
prevents the vehicle from unin ten tionally ro ll
ing back . The braking force of the parking bra ke
is not re leased unti l sufficient driv ing force has
been b uilt up at the wheels. .,.
83
Page 87 of 302
.... N
0 J:
'SI: ....
To prevent rolling back unintentionally on an in
cline, do the following:
11-Keep the sw itch<®) pulled and depress the ac
celerator. The parking brake stays applied and
prevents the vehicle from rolling backward .
11-You can release the switch© once you are su re
that you a re deve loping enough forwa rd mo
mentum at the whee ls as you depress the ac
celerator .
Depending on the weight of the rig (vehicle and
trailer) and the seve rity of the incline, you may
roll backwards as you start. You can prevent roll
ing backwards by holding the parking brake
switch C®> pulled out and accelerating -just as
you would when starting on a hill with a conven
tional hand brake.
Emergency braking
In the event that the conventional brake system
fails or locks.
11-In an emergency, pull the sw itch<®) and contin
ue to pull it to s low your vehicle down with the
parking brake.
11-As soon as you release the switch © or acceler-
ate, the brak ing process stops.
If you pull the switch<®> and hold it above a
speed of about 5 mph (8 km/h), the emergency
braking function is in itiated. The vehicle is braked
at all four wheels by activating the hydrau lic
brake system . The brake performance is sim ilar
to making an emergency stop¢,& .
In order not to activate the emergency brak ing by
mistake, an audib le warning tone (bu zzer)
sounds when the sw itch(®) is pu lled . As soon as
the switch(®) is released, or the accelerator pedal
i s depressed, emergency braking stops .
A WARNING
Emergency braking should only be used in an
emergency, when the normal foot brake has
fai led or the brake pedal is obstructed. Using
t he parking brake to perform emergency
braking will slow your vehicle down as if you
D riving
had made a full brake applicat ion . The laws of
physics cannot be suspended even with ESC
and its associated components (ABS, ASR,
EDL). In corners and when road or weather
conditions are bad, a full brake application
can cause the vehicle to skid or the rear end to
b reak away -risking an acc ident.
Start/Stop system
Description
Applies to: vehicles with Start-Stop-System
The Start-Stop -System can help increase fuel
economy and reduce CO2 emissions.
In the Start-Stop-mode, the engine shuts off au
tomatica lly when the vehicle is stopped, such as
at a traffic light . The ign ition remains switched
on during this stop phase. The eng ine will be au
tomat ically restarted when needed.
The last Start-Stop-System setting (on/off using
the b utton
10 -I) will be restored when the igni
t ion is turned on. The LED in the
10 ~1 button turns
on when the Start-Stop-System is switched off
manually .
Basic requirements for the Start-Stop mode
-The driver's door is closed.
- The driver' seat belt is latched .
- The hood is closed.
- The vehicle must have bee n driven faster than
2.5 mph (4 km/h) since the last stop.
- A trailer is not hitched to the vehicle .
A WARNING
-
-Never let the vehicle roll with the engine
switched off. You could lose contro l over the
veh icle. Th is can lead to a collision and seri
ous injuries .
- The brake booster and the steering support
do not work while the engine is switched
off . More force is required to stop and to
steer the vehicle.
- To reduce the risk of injur ies, ma ke sure that
the Sta rt-Stop-System is turned off when
working in the engine compartment
¢page 87.
85
Page 89 of 302
-The windshield is being defrosted~ page 79.
-The brake pedal is pressed sever al t imes in a
row .
- T he battery charge level becomes too low .
- High power cons umption .
Switching the ignition off automa tic ally
To prevent the battery from dra ining, the ignition
will sw itch off
auto mati call y when all of the fol
lowing cond itions have been met:
- The vehicle has already been driven.
- The eng ine has been turned
off by the Start-
Stop -System*.
- The driver's door is opened .
- The driver's seat bel t is removed.
- The brake pedal is not p ressed down.
- The veh icle is stationary.
In this case, the activated low beam will be re
p laced by the s ide marker lights. The side marker
lights will switch
off after appro ximately 30 mi
nutes or when you lock the veh icle.
If the Start-Stop System has
not turned off the
engine or if you have sw itched the Start-Stop sys
tem
off manually , the ignition will not be auto
mat ica lly switched
off and the engine w ill contin
ue to run~& .
& WARNING
Never allow the engine to r un in confi ned
spaces - da nger o f as phyxia tio n.
(D Tips
-
If you shift in to the D, Nor S posit ions after
shifti ng into reve rse, the veh icle must be driv
en faster th an 6 mph (10 km/h) in order for
t he eng ine to swi tc h
off aga in.
D rivi ng
Switching the Start-Stop-System on/off
manually
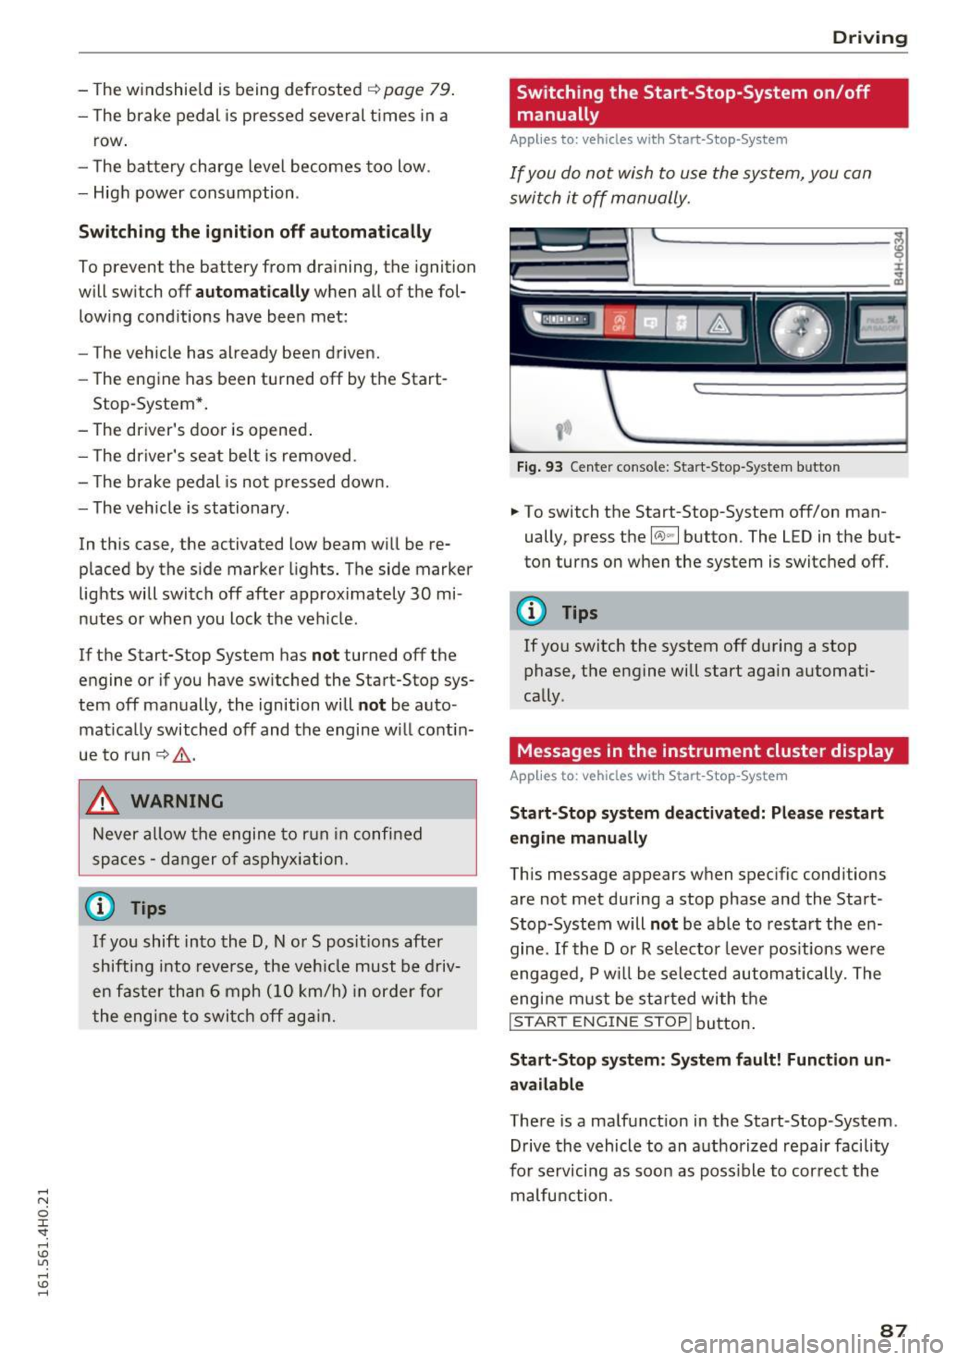
Applies to: vehicles with Start-Stop-System
If you do not wish to use th e system, you can
switch it off manually.
Fi g. 93 Center console: Start-Stop -System button
.. To switch the Start-Stop-System off/on man
ually, press the
l(A) ~ I button. The LED in the but
ton turns on when the system is switc hed
off.
(D Tips
If you sw itch the system off during a stop
phase, the engine will start aga in automati
cally .
Messages in the instrument cluster display
Applies to: vehicles with Start-Stop -System
Start-Stop system deactiv ated: Plea se restart
engin e manually
This message appears when spec ific conditions
are not met during a stop phase and the Start
Stop-System will
not be able to resta rt the en
gine.
If the Dor R selector leve r pos itions we re
engaged, P w ill be sele cted automatically. The
engi ne m ust be st arted wi th t he
I START ENGINE STOP! button .
Start-Stop s yst em : S y stem fault! Function un
available
There is a malfunction in the Start-Stop-System.
Drive the vehicle to an a uthorized repair facility
for serv icing as soo n as poss ible to cor rec t the
malfunction .
87
Page 109 of 302
Engine sound *
The sou nd of the engine is adapted to the select
ed mode and ranges from subt le to sporty.
(D Note
- Make sure there is enough cle arance above
and below t he vehicle when parking. The
height of the vehicle can change once it is
parked due to temperature f luctuations,
changes to the load conditions and changes
to the driving modes, which can affect clear
ance.
- When transporting the vehicle on a car car
rier, tra in, ship or by other means, only t ie
the vehicle down at the running surface of
the tires, which is the outer circumference.
Securing the vehicle at the axle compo
nents, suspe ns ion struts or towing eyes is
not permitted be cause the press ure in the
air suspension struts can change dur ing
transport . The vehicle may not be secured
sufficiently if this happens .
-If yo u are going to tow a tra ile r, you m ust
activate the trailer operation mode
<:!;>page 202.
(D Tips
- In some models, the maximum vehicle
speed can only be reached in the
auto and
dynamic modes.
- Se lecting the
d ynami c mode resu lts i n spor
ty shifting characteristics. The S gear posi
tion engages a utomatically.
- In vehicles that have dynamic steering*, op
erating noise is heard when starting or stop ping the engine. This does not indicate a
problem.
Audi driv e se lect
- In vehicles w ith sport differential*, the dy
namic mode is deactivated when towing a
trailer .
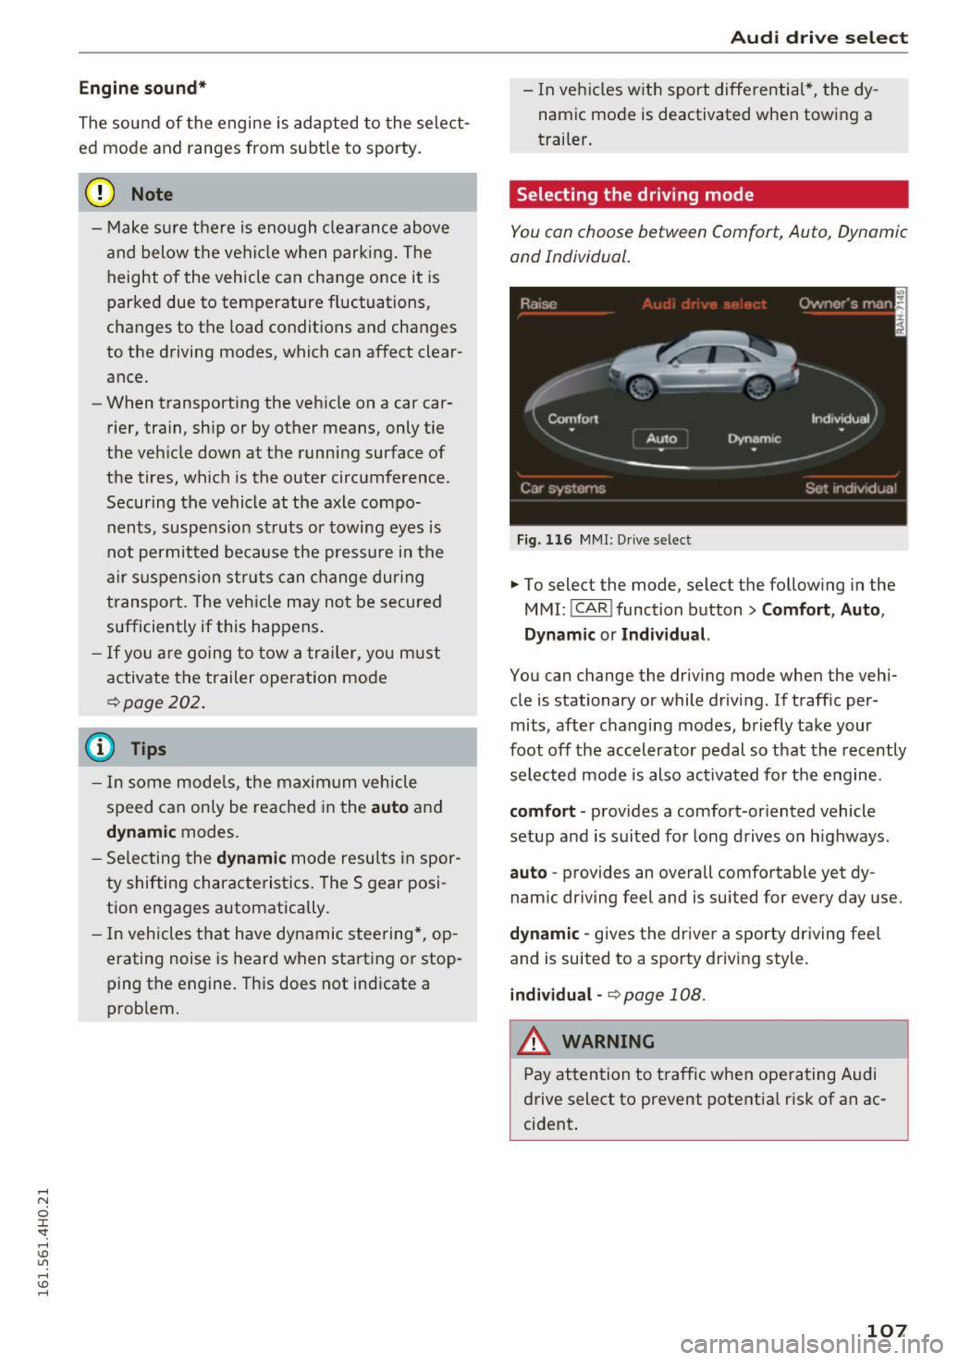
Selecting the driving mode
You con choose between Comfort, Auto , Dynamic
and Individual .
Fig. 116 MMI: Dr ive select
.,. To select the mode , select the follow ing in the
MMI: ICAR !function button>
Comfort , Auto ,
Dynamic or Indi vidual.
You can change the driv ing mode when the vehi
cle is stationary or while driving . If traff ic per
mits, afte r changing modes, briefly take your
foot off the accelerator pedal so that the recently
selected mode is also activated for the engine.
comfort -provides a comfort-oriented vehicle
setup and is suited for long drives on h ighways.
auto -provides an overall comfortable yet dy
nam ic dr iving feel and is suited for every day use.
dynamic -gives the driver a sporty driving fee l
and is suited to a sporty driving style.
individual-<:!;>page 108.
_& WARNING ~
Pay attention to t raffic when operating Audi
drive select to prevent potentia l risk of an ac
cident .
107
Page 116 of 302
Automatic transmissio n
-Power is sti ll transmitted to the w heels
w hen the eng ine is r unning at idle. To pre
vent the veh icle from "creeping", you must
keep your foot on the brake in all selector
lever positions except P and N when the en
gine is runn ing . Do not inadvertently press
t h e accelerator pedal when the vehicle is
s tationa ry. Otherwise the vehicle will start
to move immediately. This cou ld happen
even if the parking brake is activated.
- Before opening the hood, se lect the P sele c
tor leve r pos ition and se t the park ing bra ke .
This reduces the risk of a crash . Always read
and follow the applicab le warnings
<=> page 220.
- Never get out of the driver's seat when the
engine is running.
- If you must get out of the vehicle, move the
selector lever securely into the P position
and apply the parking brake.
(D Tips
- If you un intent ionally shift in to the N selec
tor lever position whi le driving, ta ke your
foot off the accelerator pedal and wait for
the engine to slow down unt il it is idling be
fore yo u shift into D or S.
Driving tips
Th e gears shi~ automatically .
Starting from a stop
.. Press and hold the brake pedal.
.. Start the engine<=>
page 81 .
.. Press the button on the selector lever and se
l ect the D, 5 or R selector lever position
<=> page 112.
.. Wait a moment unti l the transmission shifts.
You w ill not ice a slight moveme nt when the
gear engages .
"' Release the b rake pedal and press the acce lera
tor pedal <=>,&. .
Stopping temporarily
.. Press the b rake pedal to stop the vehicle, for
example at a traff ic light. Do not press the ac
celerator pedal when do ing th is.
114
.. To preven t the vehicle from ro lling when yo u
start driving, set t he parking brake when stop
ping on large inclines¢,&. .
.. The parking brake will release a utomat ica lly
and the vehicle will start moving once you press
the acce lerato r pedal.
Parking
If the se lector lever is not in the P position whe n
yo u open the drive r's door, the vehicle cou ld roll.
The message
Transmission: Car may roll! Shift
to park!
appears.
.. Press an d hold the b rake peda l
c::> ,&..
.. Set the park ing brake.
.. To engage the P selector lever position, press
the button on the selector lever and shift into
the P position
c::> page 112 .
Under certain conditions such as driving in the
mountains or when towing a trailer, it may be
helpful to switch to manua l mode temporar ily to
shift
manually to adapt to the driving conditions
c::> page 115.
On slopes, act ivate the park ing brake first and
then move the selector lever to the P position .
This prevents too muc h stress from be ing placed
on the locking mechanism .
A WARNING
Read and fo llow all WAR NING S c::> .&. in Se
le ct ing a selec tor lever posi tion on p age 113.
- The vehicle can also ro ll when the eng ine is
s t o pped .
- Do no t press the acce le ra t o r pedal when
chang ing t he selec to r lever posit io n while
t he vehicle is s tat ionary and the engine i s
r u nning. This co uld result in a crash.
- Never e ngage R or P while driving.
It co uld
cause a crash.
- P owe r is still transmitted to the wheels
when t he e ngine is runni ng at idle . To pre
vent the vehicle from "creeping", yo u m ust
keep your foot on the brake in a ll selector
lever positions except P and N when the en
gi ne is running. Do not inadvertent ly press
the acce le rator peda l when the veh icle is
stat ionary. Otherwise t he vehicle will start
-
Page 124 of 302
Parking systems
Parallel parking
Applies to: vehicles with parking system p lus with rear view
camera
This view may be used when parallel parking
along the side of a street.
Fig. 136 Infotainment: blue surface aligned in the pa rking
space
F ig . 1 37 Infotainment: contact of the blue curved line with
the curb
Parking on the right is described here. It is identi
cal when parking on the left.
If there is an obstacle next to the parking space
(such as a wall), refer to information for "Parking
next to obstacles"¢
page 122.
.,. Activate the turn signal.
.,. Position your vehicle next to a parked vehicle in
front of the desired parking space. The d istance
to this vehicle should be approximately 3 ft
(1 m) .
.,. Turn the Infota inment on and shift into reverse
gear. The parking system is turned on and the
cross parking indicator is displayed .
.,. Press the con trol button on the Infotainment
un it (!)
c::> fig. 136. The parallel parking indica
tor is displayed.
.,. Back up and align your vehicle so the blue area
@ borders on the rear end of the vehicle be-
122
hind you or on the parking space line c::> .&. in
General information on page 120,
c:,(D in Gen
eral information on page 120.
The blue area
represents an extension of the veh icle's outline
by approximate ly 16 ft (5 m) to the rear. The
long side of the blue area should be on the
curb . The ent ire blue area must fit into the
parking space .
.,. With the vehicle stopped, turn the stee ring
wheel to the right as far as it will go .
.,. Back into the parking space unt il the blue curve
c::> fig. 137 touches the curb c:> .&. in General in
formation on page 120,
c:, (D in General infor
mation on page 120.
Stop the vehicle .
.,. With the vehicle stopped, turn the steering
wheel to the left as far as it will go.
.,. Continue to back into the parking space until
the vehicle is parked parallel to the curb
c:> .&.
in General information on page 120, c::>(D in
General information on page 120.@
marks
t he rear bumper . Stop the vehicle, at the latest,
when the red orientation line@ borders an ob
ject . Keep an eye on the front of your vehicle
while doing this.
Parking next to obstacles
If there is an obstacle (such as a wall) next to the
parking space, posit ion the vehicle so there is
more space on that side. Position the long side of
the blue surface so that there is sufficient space
from the obstacle. The surface must not be
touching. You will a lso need to start turning the
steering wheel much earlier. The blue curve
c::> fig. 13 7 must not touch the obstacle and
sho uld have suff ic ient room .
@ Tips
The left or right orientation lines and surfaces
will be disp layed, depending on the turn s ig
nal being used .
Peripheral cameras
Introduction
Applies to : vehicles with top v iew camera system
In addition to the functions from the sensors
c:, page 119, Sensors, c:, page 121, Visual display,
this parking system contains peripheral cameras . ..,_