clock AUDI A8 2016 User Guide
[x] Cancel search | Manufacturer: AUDI, Model Year: 2016, Model line: A8, Model: AUDI A8 2016Pages: 302, PDF Size: 75.68 MB
Page 258 of 302
Emergency assistance
Emergency assistance
Trunk escape handle
In case of an emergency, the rear lid can be
opened from the inside using the trunk escape
handle.
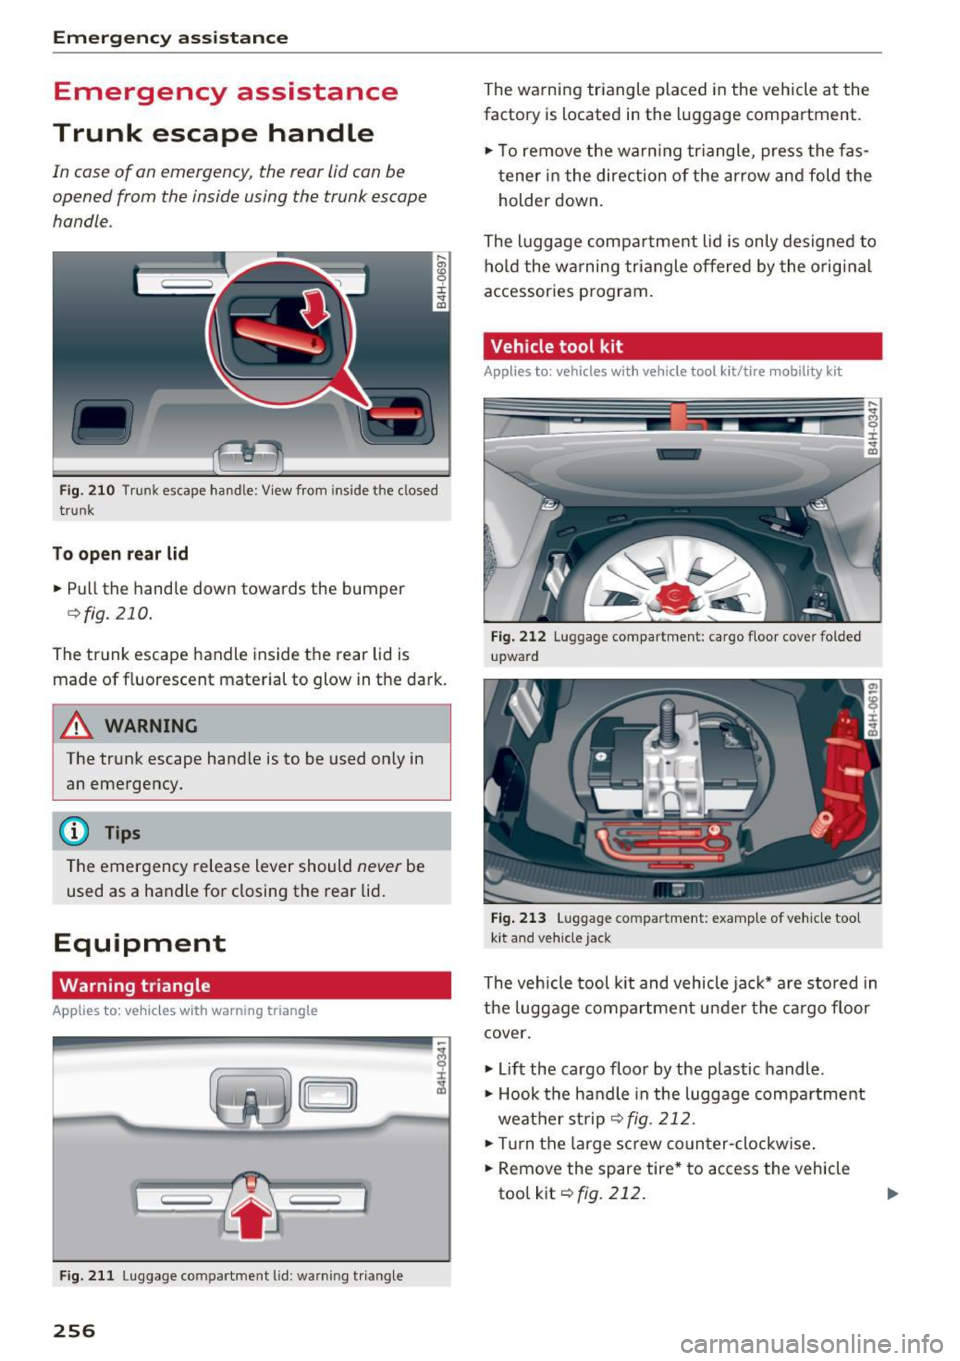
Fig. 210 T runk escape handle: View from inside the closed
tru nk
To open rear lid
.. Pull the handle down towards the bumper
¢ fig. 210.
The trunk escape handle inside the rear lid is
made of fluor escent material to glow in the dark.
A WARNING
The trunk escape handle is to be used only in
an emergency.
@ Tips
The emergency release lever should never be
used as a handle for closing the rear lid.
Equipment
Warning triangle
Applies to: vehicles with warn ing triangle
r ---->
Fig . 211 Luggage compartment lid : warning triangle
256
The warning triangle placed in the vehicle at the
factory is located in the luggage compartment.
.. To remove the warn ing triangle, press the fas-
tener in the direction of the arrow and fold the
holder down.
The luggage compartment lid is only designed to
hold the warning triangle offered by the original
accessories program.
Vehicle tool kit
Applies to: vehicles with vehicle tool kit/tire mobility kit
Fig. 212 Luggage compartment: cargo floor cover folded
upward
Fig. 213 L uggage compartment: examp le of vehicle tool
ki t and vehicle jack
The vehicle tool kit and vehicle jack* are stored in
the luggage compartment under the cargo floor cover .
.. Lift the cargo floor by the plastic handle .
.. Hook the handle in the luggage compartment
weather strip
¢ fig. 212 .
.. Tu rn the large screw counter -clockw ise .
.. Remove the spare tire * to access the vehicle
tool kit¢
fig. 212.
Page 259 of 302
Depending on the equipment, the vehicle tool kit
may be located under the spare tire under an ad
d itional cover or in the too l box. The position of
the vehicle jack* may vary.
A WARNING
Improper use of the vehicle jack can cause se
r ious personal injuries.
- Never use the screw driver hex head to
t ighten wheel bolts, since the bolts cannot
attain the necessary tighten ing torque if you
use the hex head, potentia lly causing an ac
c ident.
- The factory-supplied jack is intended on ly
for your vehicle model. Under no circum
stances should it be used to lift heavy
vehicles or other loads; yo u risk injuring
yo urself.
- Never start the engine whe n the vehicle is
raise d, which could ca use a n accident.
- Support the veh icle secure ly with appropr i
a te stands if wor k is to be perfo rmed u nder
neath the veh icle; otherwise, the re is a po
tential risk for in jury.
- Never use the jack s upplied with your Audi
on another vehicle, particularly o n a heav ier
one. The jack is only suitab le for use on the
vehicle it came wit h.
@ Tips
The vehicle j ack* in your vehicle is mainte
nance -free.
Em ergen cy a ssis tanc e
Space-saving spare tire (compact spare
tire)
Applies to: vehicles with space-saving spare tire
The spare tire/wheel is located in the luggage
compartment under the cargo floor cover . It is
intended for short-term use only.
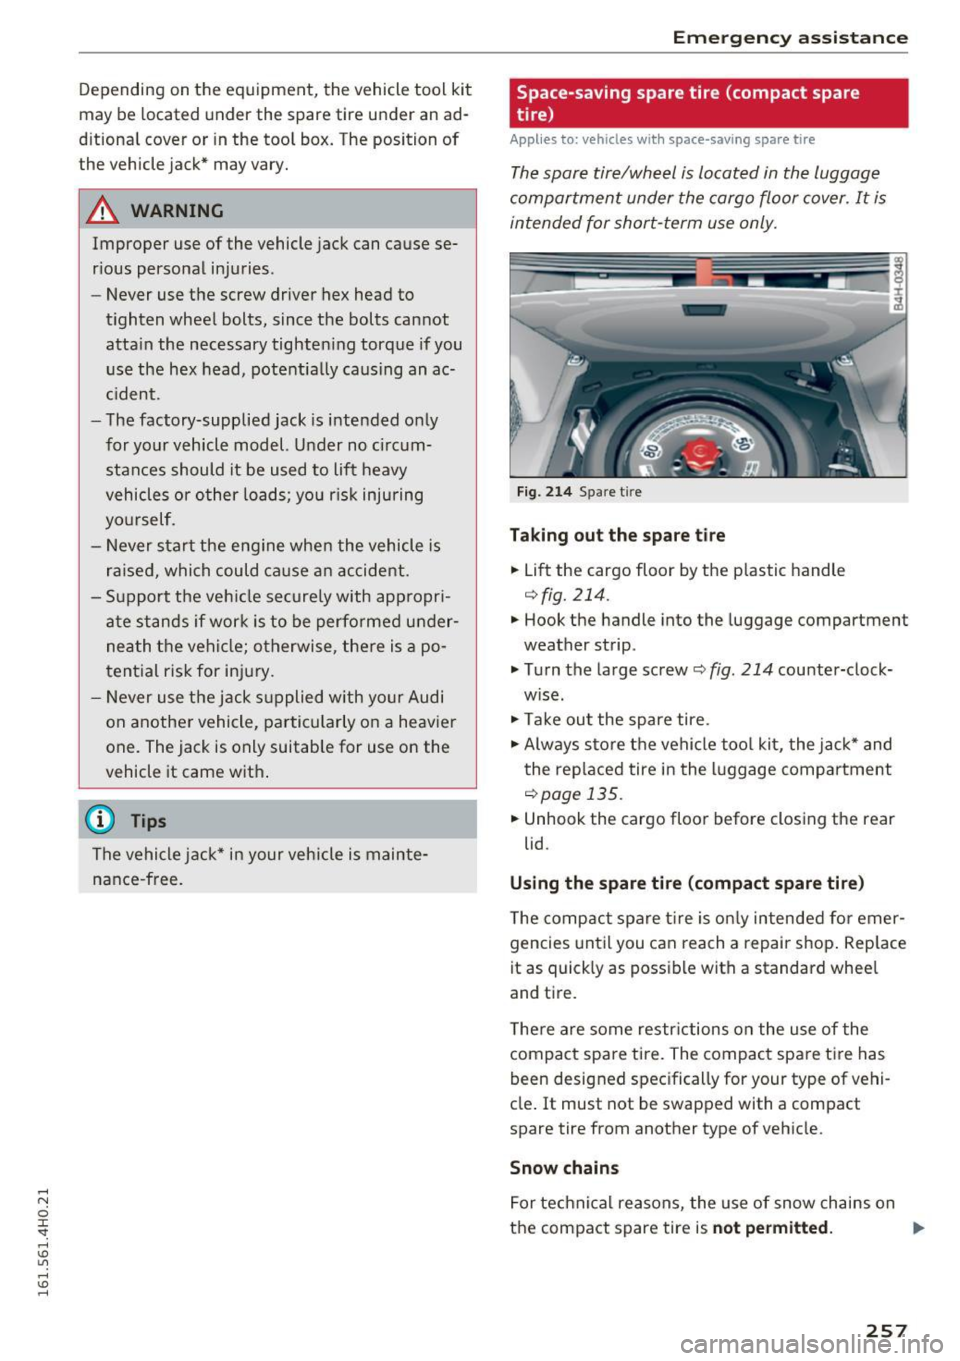
Fig . 21 4 Spare tire
Ta king out the spare tir e
... Lift the cargo floor by the p lastic handle
q fig. 214.
.,. Hook the handle into the luggage compartment
weather strip.
.,. Turn the large screw
r:=;, fig . 214 cou nter-clock
w ise.
.,. Take ou t the spare tire.
.,. Always s to re the vehicle too l kit, the jac k* and
the rep laced tire i n the luggage compartment
r:::;, page 135.
.,. Unhook the cargo floor before closing the rear
lid.
Using the spare tire (compact spare tire )
The compact spare tire is on ly intended for emer
gencies until you can reach a repair shop . Rep lace
it as quick ly as poss ible with a standard wheel
and tire.
T here are some restr ictions on the use of the
compact spare tire. The compact spa re tire has
been designed specifically for your type of vehi
cle . It must not be swapped with a compact
spare tire from another type of vehicle.
Snow chains
For technical reasons, the use of snow chains on
the compact spare tire is
not permitted. .,..
257
Page 260 of 302
Emerg ency assis ta nce
If you do have to drive with snow chains and a
front tire fails, mount the spare wheel with tire
instead of a rear tire . Install the snow chains on
the rear tire and use it to replace the defective
front tire.
A WARNING
- Never use the spare tire if it is damaged or if
it is worn down to the tread wear indicators.
- If the spare tire is more than 6 years old,
use it only in an emergency and with ex
treme caution and ca refu l dr iving .
- The spare tire is intended only for tempora
ry and short-term use . It should be replaced
as soon as possible with the normal wheel
and t ire.
- After mounti ng the compact spare t ire, the
tire pressure must be checked as soon as possible. The tire pressure of the compac t
spare tire must be 4.2 bar; otherwise, you risk having an accident.
- Do not drive faster than SO mph (80 km/h).
Yo u risk hav ing an accident.
- Avoid full-throttle accelerat ion, heavy brak
ing, and fast cornering. You risk having an
acc ident .
- Never dr ive using more than one spare
wheel and tire. You risk having an acciden t.
- Normal summer or winter tires must not be
mounted on the compact spare wheel rim.
- For technical reasons, the use of tire chains
on the spare tire is not pe rm itted. If it is
necessary to drive with tire chains, the spare
wheel m ust be mounted on the front ax le in
the event of a flat in a rear tire. The new ly
available front wheel must then be insta lled
in place of the rear wheel with the flat t ire.
Installing the tire chain before mounting
the wheel and t ire is recommended.
- Loose items in the passenger compartment
can cause ser ious personal injury during
hard braking or in an accident. Never store
the inflatable spare t ire or jack and too ls in
the passenger compartment.
258
Spare wheel
Applies to: vehicles with spare whee l
The spore wheel is stored in the wheel well un
derneath the floor panel in the luggage
com
portment.
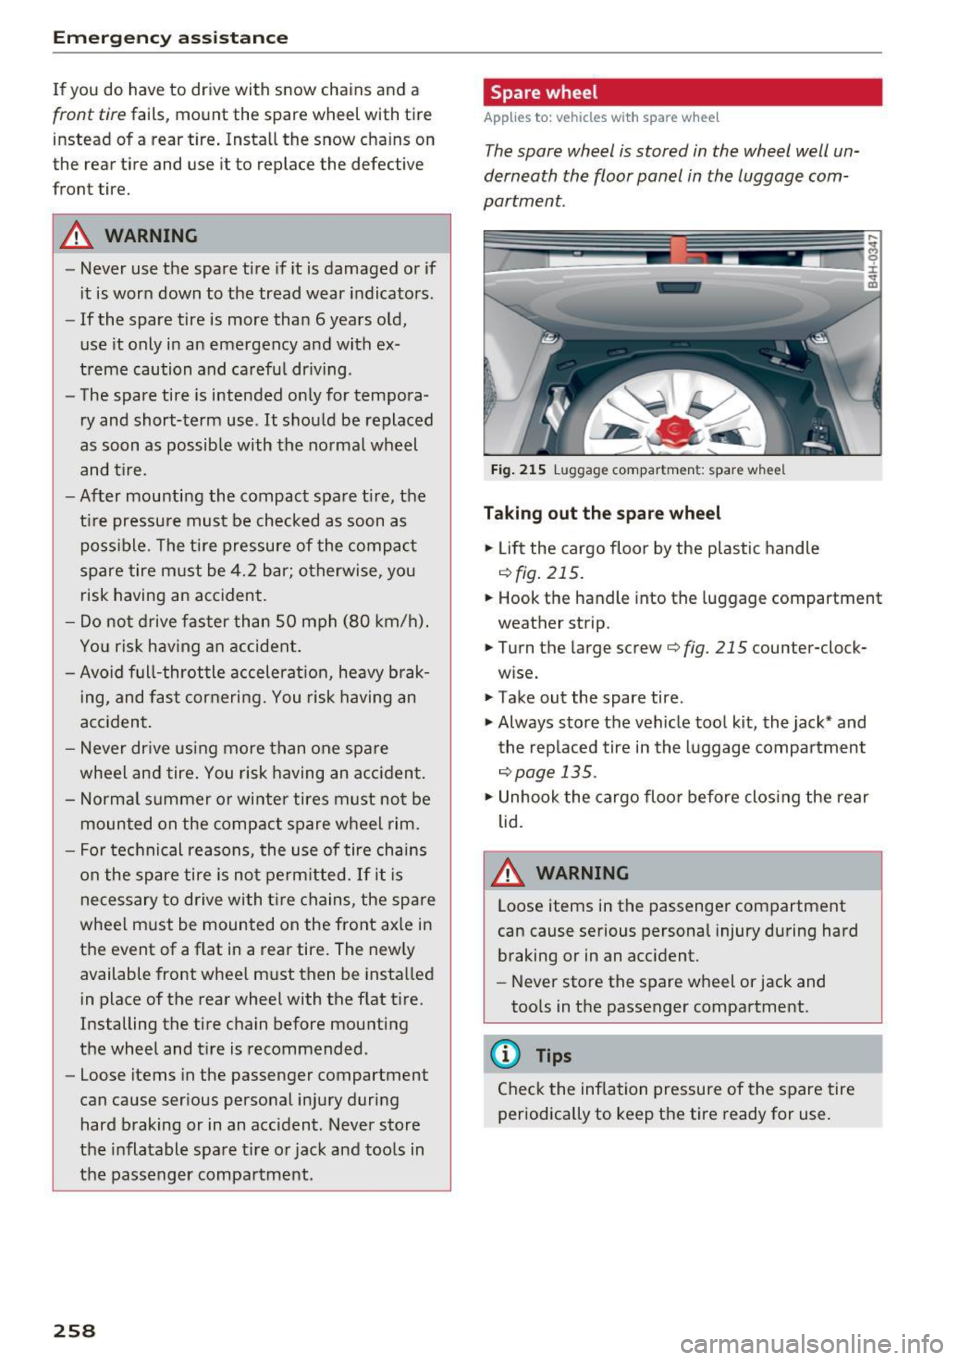
Fig . 215 Luggage compartmen t: spare whee l
Taking out th e spar e wh eel
.. Lift the cargo floor by the plastic handle
¢ fig. 215.
.. Hook the handle into the luggage compartment
weather strip.
.. Turn the large screw
¢fig. 215 counter-clock
wise .
.,. Take out the spare tire.
.,. Always store the vehicle tool kit , the jack* and
the rep laced tire in the luggage compartment
¢page 135.
.. Unhook the cargo floo r before clos ing the rear
lid.
A WARNING
Loose items in the passenger compartment
can cause serious personal injury during hard braking or in an acc ident.
- Never store the spare wheel or jack and
too ls in the passenger compartment .
(D Tips
Check the inflation pressure of the spare tire
periodically to keep the tire ready for use.
-
Page 266 of 302
Emergency assistance
After you have loosened all wheel bolts and raised the vehicle off the ground, remove and re
place the wheel as follows:
Removing the wheel
.,. Use the hexagonal socket in the screwdriver
handle
to completely remove the topmost
wheel bolt and set it aside on a
clean surface
.::!> fig. 223.
.,. Screw the threaded end of the alignment pin
from the tool kit hand-tight into the empty bolt
hole¢
fig. 224 1> .
.,. Then remove the other wheel bolts as described
above.
.,. Take off the wheel leaving the alignment pin in
the bolt hole ¢0 .
Putting on the spare wheel
.,. Lift the spare wheel and carefully slide it over
the alignment pin to guide it in place ¢0 .
.,. Use the hexagonal socket in the screwdriver
handle to screw in and tighten all wheel bolts
slightly .
.,. Remove the alignment pin and insert and tight
en the remaining wheel bolt slightly like the
rest.
.,. Turn the jack handle counter-clockwise to lower
the vehicle until the jack is fully released.
.,. Use the wheel bolt wrench to tighten all wheel
bolts firmly ¢
page 260 . Tighten them cross
wise,
from one bolt to the (approximately) op
posite one, to keep the wheel centered.
0 Note
When removing or installing the wheel, the
rim could hit the brake rotor/ceramic brake
rotor* and damage the rotor . Work carefully
and have a second person help you.
Never use the hexagonal socket in the handle
of the screwdriver to loosen or tighten the
wheel bolts.
1
> A pp lies to vehicles with cer amic brake rotors*: Use a sec
o n d alignment p in* (sto re d in th e s pare w hee l well mold
in g) fo r the lower hole , fol low ing the descrip tion for the
fir st a lig nme nt pin .
264
-Pull the reversible blade from the screwdriv
er before you use the hexagonal socket in
the handle to turn the wheel bolts.
- When mounting tires with
unidirectional
tread design
make sure the tread pattern is
pointed the right way¢
page 264.
-The wheel bolts should be clean and easy to
turn. Check for dirt and corrosion on the
mating surfaces of both the wheel and the
hub. Remove all dirt from these surfaces be
fore remounting the wheel.
Tires with unidirectional tread design
Tires with unidirectional tread design mus t be
mounted with their tread pattern pointed in the
right direction .
Using a spare tire with a tread pattern
intended for use in a specific direction
When using a spare tire with a tread pattern in
tended for use in a specific direction, please note
the following:
- The direction of rotation is marked by an arrow
on the side of the tire.
- If the spare tire has to be installed in the incor
rect direction, use the spare tire only tempora
rily since the tire will not be able to achieve its
optimum performance characteristics with re
gard to aquaplaning, noise and wear.
- We recommend that you pay particular atten
tion to this fact during wet weather and that
you adjust your speed to match road condi tions.
- Replace the flat tire with a new one and have it
installed on your vehicle as soon as possible to
restore the handling advantages of a unidirec
tional tire.
Notes on wheel changing
Please read the information¢ page 243 if you
are going to use a spare tire which is different
from the tires on your vehicle.
Page 271 of 302
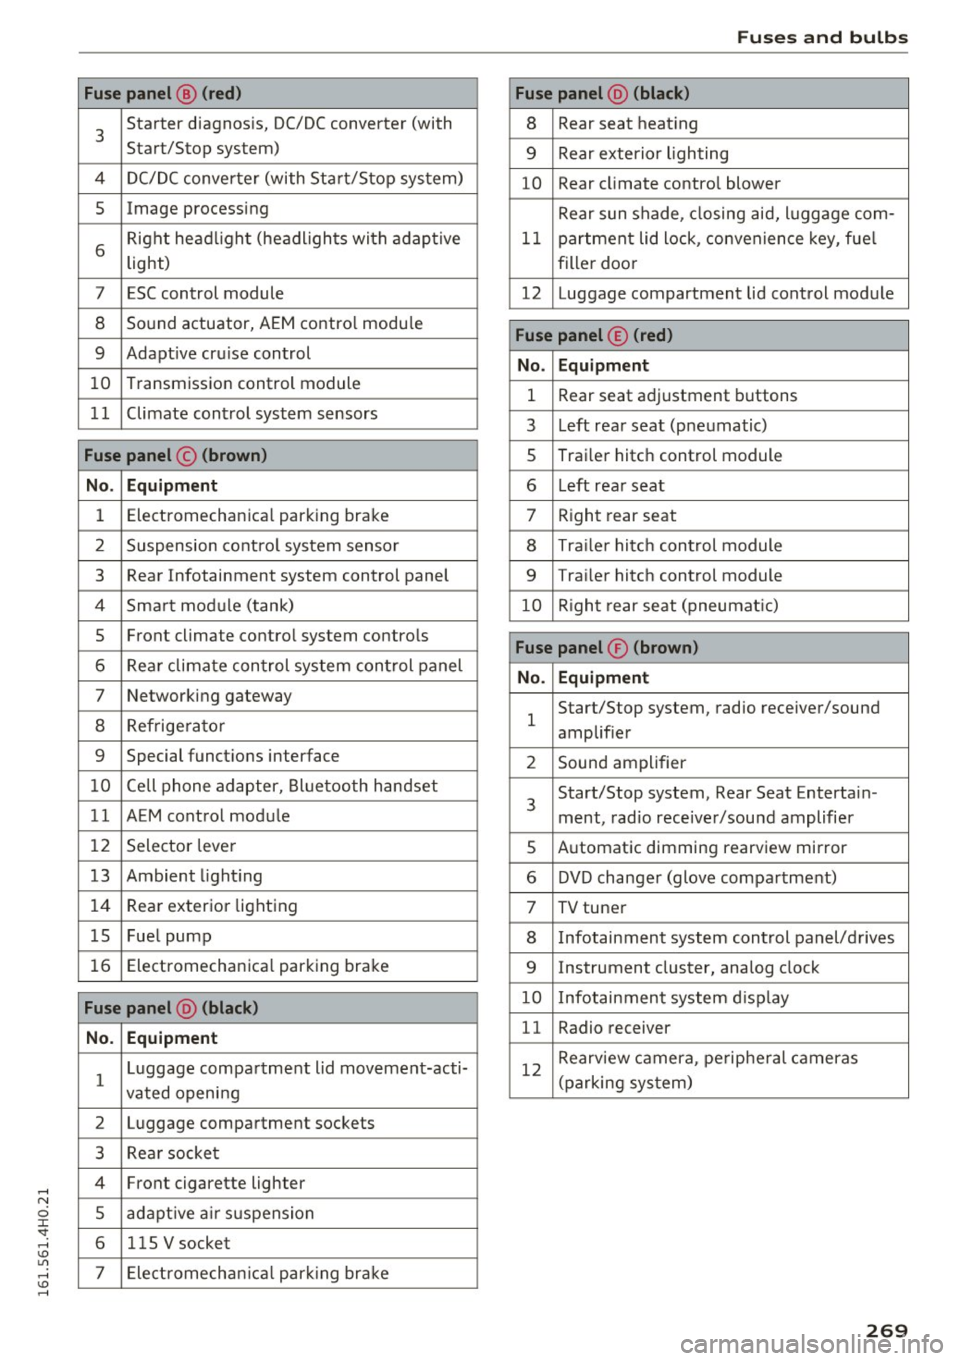
Fuses an d bulb s
Fuse p anel @ (red ) Fuse panel@ (black )
3 Starter diagnosis, DC/DC converter (with
Start/Stop system) 8 Rear
seat heating
9 Rear exterio r lighting
4 DC/DC converter (with Start/Stop system)
10 Rear
climate contro l blower
5 Image processing
Rear sun shade, closing aid, luggage com-
6 Right headl
ight (headlights with adaptive
light) 11 partment lid
lock, convenience key, fue l
filler doo r
7 ESC control module 12 Luggage compartment lid control module
8 Sound actuator, AEM control modu le
9 Adapt ive cru ise control
10 Transmission
control module
Fuse panel © (red )
No . Equ ipm en t
1 Rear seat adjustment buttons
1 1 Climate control system sensors
3 Left rear
seat (pneumatic)
Fuse panel © (br own ) 5 Trai
ler hitch control module
No. Equipm ent 6 L
eft rear seat
1 Electromechanical parking
brake
7 Right rear seat
2 Suspension control system sensor
8 Traile r hitc h control module
3 Rear Infotainment system control
panel
9 Trailer hitch control module
4 Smart module (tank) 10 Right rear seat (pneumatic)
5 Front climate contro
l system controls
6 Rear climate control system control panel
7 Networking gateway
8 Refrige rator
Fuse panel ® (brown )
No. Equipm en t
1 Start/Stop
system, radio receiver/sound
amplifier
9 Special functions interface
2 Sound amplifier
10 Cell phone adapter, Bluetooth handset
11 AEM control module 3 Start/Stop
system, Rear Seat Entertain-
ment, radio receiver/sou nd amplifier
12 Selector lever
5 Automatic dimming
rearview mirror
13 Ambient lighting 6 DVD changer (glove compa rtment)
14 Rear
exterior lighting
7 TV tuner
15 Fuel pump
8 Infotainment system control panel/drives
16 Electromechanica l parking brake
9 Instrument cluster, analog clock
Fuse panel @ (bl ack ) 10 Infotainment system d isp lay
N o. Equi pm en t 11 Radio receiver
1 Luggage compartment lid movement-acti-
vated openi ng 12
Rearview camera, pe
ripheral cameras
(parking system)
2 Luggage compartment sockets
3 Rear socket
4 Front cigarette lighter
5 adapt ive a ir suspension
6 115 V
socket
7 Electromechan ica l park ing brake
269
Page 289 of 302

Child safety . . . . . . . . . . . . . . . . . . . . . . . . . . 168
Guidance fixtures for lower anchorages . . 182
Important safety instructions for using child
safety seats . . . . . . . . . . . . . . . . . . . . . . . .
171
Tether anchors . . . . . . . . . . . . . . . . . . . . . . 184
Tether straps . . . . . . . . . . . . . . . . . . . . . . . 184
Child safety lock
Rear doors (mechanical) . . . . . . . . . . . . . . .
39
Rear doors (power) . . . . . . . . . . . . . . . . . . . 40
Ch ild safety seat
Unused safety belts on the rear seat
173
Child safety seats
Booster seats . . . . . . . . . . . . . . . . . . . . . . .
176
Convertible child seats . . . . . . . . . . . . . . . 174
H ow do I properly install a child safety seat
. h" l ? 171 in my ve 1c e . ................. ..... .
Infant seats . ................. ..... .
173
Installing a child restraint using the LATCH
system . . . . . . . . . . . . . . . . . . . . . . . . . . . .
183
LATCH system . . . . . . . . . . . . . . . . . . . . . . 183
Lower anchorages . . . . . . . . . . . . . . . . . . . 181
Mounting and releasing the anchorage
hook . . . . . . . . . . . . . . . . . . . . . . . . . . . . . .
183
Safety instructions . . . . . . . . . . . . . . . . . . . 171
Child seats .. .. .. ........... .. .. ..... 173
Securing . . . . . . . . . . . . . . . . . . . . . . . . . . . 177
C leaning . . . . . . . . . . . . . . . . . . . . . . . . . . . . 206
Climate control system . . . . . . . . . . . . . . . . . 76
Supplementary heater . . . . . . . . . . . . . . . . . 79
Clock . . . . . . . . . . . . . . . . . . . . . . . . . . . . . . . . 26
C losing
Panorama glass roof . . . . . . . . . . . . . . . . . .
43
Sunroof. . . . . . . . . . . . . . . . . . . . . . . . . . . . . 42
Sun shade (panoramic sunroof) . . . . . . . . . 44
Windows .. .. .. ............. .. .. .. .. 40
Coming home . . . . . . . . . . . . . . . . . . . . . . . . .
48
Compact spare tire . . . . . . . . . . . . . . . . . . . . 257
Compartments . . . . . . . . . . . . . . . . . . . . . . . . 73
Compass in the mirror . . . . . . . . . . . . . . . . . . 56
Compliance . . . . . . . . . . . . . . . . . . . . . . . . . . 284
Consumer information . . . . . . . . . . . . . . . . . 281
Consumer Informat ion . . . . . . . . . . . . . . . . . 136
Consumption (fuel) . . . . . . . . . . . . . . . . . . . . 24
;:;:: Contacting NHTSA . . . . . . . . . . . . . . . . . . . . 136
0
~ Controls
~ Cleaning . . . . . . . . . . . . . . . . . . . . . . . . . . . 208 Lil ,...., v:, ,....,
Index
Convenience key . . . . . . . . . . . . . . . . . . . . . . . 34
Starting the engine (START ENGINE ST OP
button) . . . . . . . . . . . . . . . . . . . . . . . . . . . . .
81
Stopping the engine (START ENGINE STOP
button) . . . . . . . . . . . . . . . . . . . . . . . . . . . . .
81
Switching the ignition on . . . . . . . . . . . . . . 81
Unlocking and locking vehicle . . . . . . . . . . . 34
Convertible child safety seats . . . . . . . . . . . 17 4
Convertib le locking retractor
Activating . . . . . . . . . . . . . . . . . . . . . . . . . .
179
Deactivating . . . . . . . . . . . . . . . . . . . . . . . . 180
Using to secure a child safety seat . . . . . . 179
Coolant
refer to Eng ine coolant
Cooler 227
Cleaning . . . . . . . . . . . . . . . . . . . . . . . . . . . 209
Operation . . . . . . . . . . . . . . . . . . . . . . . . . . . 7 4
Cooling mode (automatic climate control)
77
Cooling system Indicator light . . . . . . . . . . . . . . . . . . . . . . .
15
Cruise control
Changing speed . . . . . . . . . . . . . . . . . . . . . .
89
Presetting your speed . . . . . . . . . . . . . . . . . 89
Switching off . . . . . . . . . . . . . . . . . . . . . . . . 89
Switching on . . . . . . . . . . . . . . . . . . . . . . . . . 88
(upholder . . . . . . . . . . . . . . . . . . . . . . . . . . . . 73
Current consumption . . . . . . . . . . . . . . . . . . . 24
Curve light . . . . . . . . . . . . . . . . . . . . . . . . . . . 106
Cylinder management
refer to Cylinder on demand system . . . . . . 24
Cylinder on demand system . . . . . . . . . . . . . . 24
D
Data recorder . . . . . . . . . . . . . . . . . . . . . . . . 189
Date display . . . . . . . . . . . . . . . . . . . . . . . . . . 26
Daytime running lights . . . . . . . . . . . . . . . . . 46
Declaration of compliance
Adaptive cruise control . . . . . . . . . . . . . . .
284
Audi side assist . . . . . . . . . . . . . . . . . . . . . 284
Cell phone package . . . . . . . . . . . . . . . . . . 284
Convenience key . . . . . . . . . . . . . . . . . . . . . 284
Electronic immobilizer. . . . . . . . . . . . . . . . 284
Homelink universal remote control . . . . . 284
Remote control key . . . . . . . . . . . . . . . . . . 284
Decorative parts/trim
Cleaning . . . . . . . . . . . . . . . . . . . . . . . . . . .
208
287
Page 295 of 302
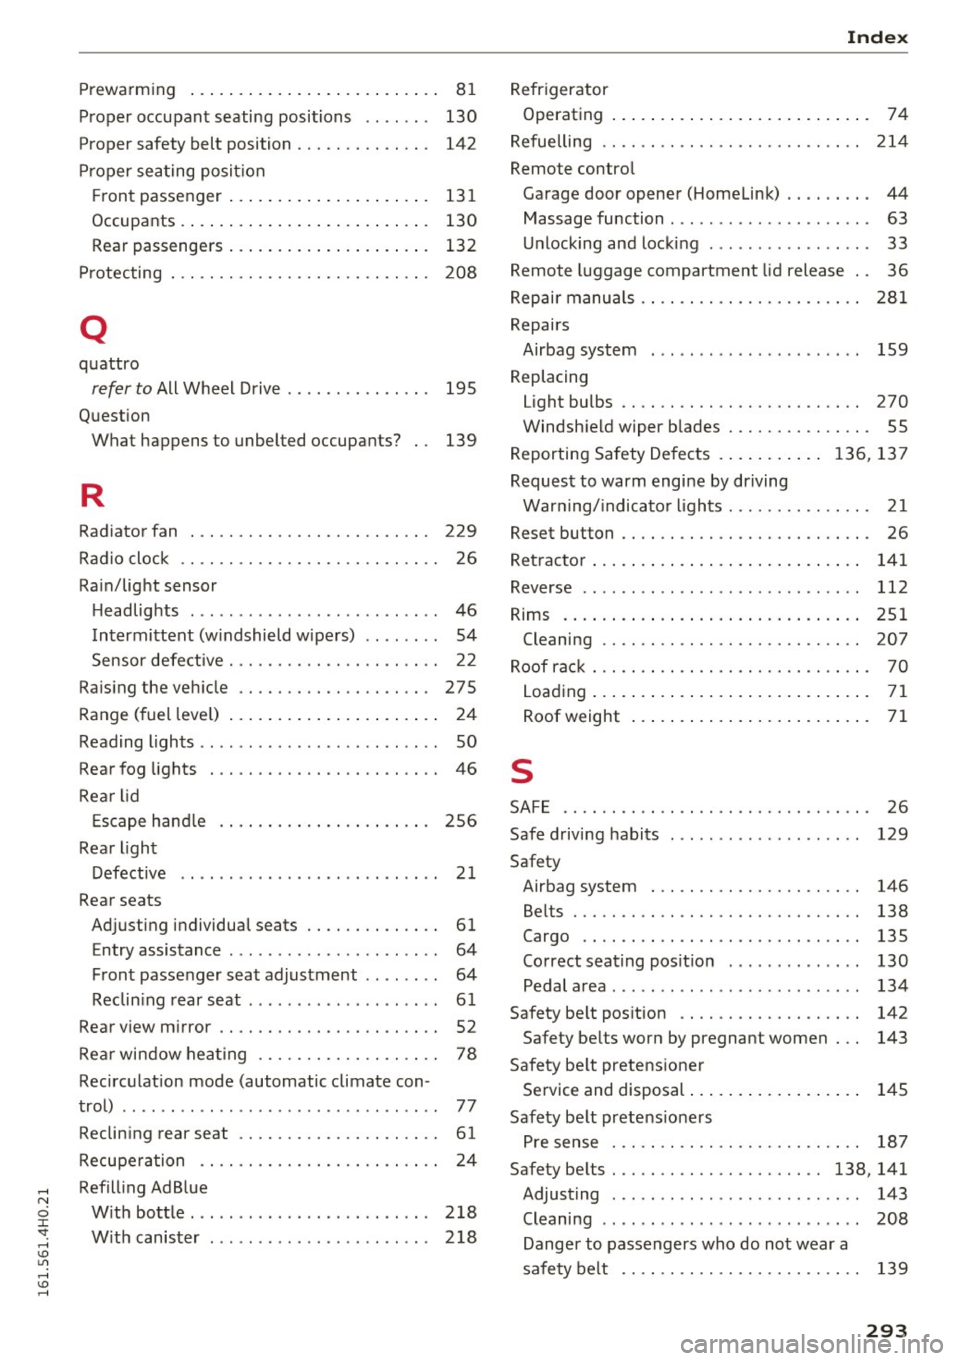
Prewarming . . . . . . . . . . . . . . . . . . . . . . . . . . 81
Proper occupant seating positions . . . . . . . 130
Proper safety belt position . . . . . . . . . . . . . . 142
Proper seating position
Fr ont passenger . . . . . . . . . . . . . . . . . . . . . 131
Occupants . . . . . . . . . . . . . . . . . . . . . . . . . . 130
Rear passengers . . . . . . . . . . . . . . . . . . . . . 132
Protecting 208
Q
quattro
refer to All Wheel Drive . . . . . . . . . . . . . . . 195
Question What happens to unbelted occupants? 139
R
Radiator fan . . . . . . . . . . . . . . . . . . . . . . . . . 229
Radio clock . . . . . . . . . . . . . . . . . . . . . . . . . . . 26
Rain/light sensor Headlights . . . . . . . . . . . . . . . . . . . . . . . . . . 46
Intermittent (windshield wipers) . . . . . . . . 54
Sensor defective . . . . . . . . . . . . . . . . . . . . . . 22
Raising the vehicle . . . . . . . . . . . . . . . . . . . . 275
Range (fuel level) . . . . . . . . . . . . . . . . . . . . . . 24
Reading lights . . . . . . . . . . . . . . . . . . . . . . . . . 50
Rearfoglights . .. ............. .. .. .. .. 46
Rear lid Escape hand le . . . . . . . . . . . . . . . . . . . . . . 256
Rear light Defective . . . . . . . . . . . . . . . . . . . . . . . . . . . 21
Rear seats Adjusting individual seats . . . . . . . . . . . . . . 61
Entry assistance . . . . . . . . . . . . . . . . . . . . . . 64
Front passenger seat adjustment . . . . . . . . 64
Reclining rear seat . . . . . . . . . . . . . . . . . . . . 61
Rear view mirror . . . . . . . . . . . . . . . . . . . . . . . 52
Rear window heating . . . . . . . . . . . . . . . . . . . 78
Recirculation mode (automatic climate con-
trol) . . . . . . . . . . . . . . . . . . . . . . . . . . . . . . . . . 77
Reclining rear seat . . . . . . . . . . . . . . . . . . . . . 61
Recuperation . . . . . . . . . . . . . . . . . . . . . . . . . 24
Refilling AdBlue With bottle. .. ................ .... .. 218
With canister . . . . . . . . . . . . . . . . . . . . . . . 218
Index
Refrigerator
Operating . . . . . . . . . . . . . . . . . . . . . . . . . . . 74
Refuelling . . . . . . . . . . . . . . . . . . . . . . . . . . . 214
Remote control Garage door opener (Homelink) . . . . . . . . . 44
Massage function . . . . . . . . . . . . . . . . . . . . . 63
Unlocking and locking . . . . . . . . . . . . . . . . . 33
Remote luggage compartment lid release . . 36
Repair manuals . . . . . . . . . . . . . . . . . . . . . . . 281
Repairs Airbag system . . . . . . . . . . . . . . . . . . . . . . 159
R eplacing
Light bulbs . . . . . . . . . . . . . . . . . . . . . . . . . 270
Windshield wiper blades . . . . . . . . . . . . . . . 55
Reporting Safety Defects ........... 136, 137
Request to warm engine by driving Warn ing/ indicator lights . . . . . . . . . . . . . . . 21
Reset button . . . . . . . . . . . . . . . . . . . . . . . . . . 26
Retractor . . . . . . . . . . . . . . . . . . . . . . . . . . . . 141
Reverse . . . . . . . . . . . . . . . . . . . . . . . . . . . . . 112
Rims . . . . . . . . . . . . . . . . . . . . . . . . . . . . . . . 251
Cleaning . . . . . . . . . . . . . . . . . . . . . . . . . . . 207
Roof rack . . . . . . . . . . . . . . . . . . . . . . . . . . . . . 70
Loading........... ................. . 71
Roof weight . . . . . . . . . . . . . . . . . . . . . . . . . 71
s
SAFE . . . . . . . . . . . . . . . . . . . . . . . . . . . . . . . . 26
Safe driving habits . . . . . . . . . . . . . . . . . . . . 129
Safety Airbag system . . . . . . . . . . . . . . . . . . . . . . 146
Belts . . . . . . . . . . . . . . . . . . . . . . . . . . . . . . 138
Cargo . . . . . . . . . . . . . . . . . . . . . . . . . . . . . 135
Correct seating posit ion . . . . . . . . . . . . . . 130
Pedal area . . . . . . . . . . . . . . . . . . . . . . . . . . 134
Safety belt position . . . . . . . . . . . . . . . . . . . 142
Safety belts worn by pregnant women . . . 143
Safety belt pretensioner
Service and disposal . . . . . . . . . . . . . . . . . . 145
Safety belt pretensioners Pre sense . . . . . . . . . . . . . . . . . . . . . . . . . . 187
Safety belts . . . . . . . . . . . . . . . . . . . . . . 138, 141
Adjusting . . . . . . . . . . . . . . . . . . . . . . . . . . 143
Cleaning . . . . . . . . . . . . . . . . . . . . . . . . . . . 208
Danger to passengers who do not wear a
safety belt . . . . . . . . . . . . . . . . . . . . . . . . . 139
293