window AUDI A8 2016 User Guide
[x] Cancel search | Manufacturer: AUDI, Model Year: 2016, Model line: A8, Model: AUDI A8 2016Pages: 302, PDF Size: 75.68 MB
Page 76 of 302
Seats and storage
Additional storage
There are a variety of storage compartments and
fasteners in various places in the vehicle.
- Storage compartments in the doors
- Net in the front passenger footwell
- Eyeglasses compartment in the headliner (near the rearview mirror)
- Storage compartments under the center armr
ests
- Compartments* on the back of the front seat
backrests
- Garment hooks over the rear doors
- Compartment in the center console with pass-
through)* (rear)
- Compartment behind the rear center armrest
(in vehicles without the pass-through* or cool
er*)
- Cell phone holder* in the right rear door
- Bag hooks in the luggage compartment
_& WARNING
-When driving, do not leave any hard objects
on the rear window shelf or allow your pet
to sit on the shelf. They could become a haz ard for vehicle occupants in the event of
sudden braking or a crash.
- Always remove objects from the instrument
panel. Any items not stored could slide
around inside the vehicle while driving or
when accelerating or when applying the
brakes or when driving around a corner.
- When you are driving make sure that any
thing you may have placed in the center con
sole or other storage locations cannot fall
out into the footwells. In case of sudden
braking you would not be able to brake or
accelerate.
- Any articles of clothing that you have hung
up must not interfere with the driver's view.
The coat hooks are designed only for light
weight clothing. Never hang any clothing
with hard, pointed or heavy objects in the
pockets on the coat hooks. During sudden
braking or in an accident -especially if the
airbag is deployed -these objects could in
jure any passengers inside the vehicle.
74
- To reduce the risk of personal injury in an
accident or sudden stop, always keep the
glove compartment closed while driving.
- Read and follow all WARNINGS
¢ page 164, Important safety instructions
on the side airbag system.
- Hang clothes in such a way that they do not
impair the driver's vision.
- The coat hooks must only be used for light
weight clothing. Do not leave any heavy or
sharp edged objects in the pockets which
may interfere with the side curtain airbag
deployment and can cause personal injury in
a crash.
- Do not use coat hangers for hanging cloth
ing on the coat hooks as this can interfere
with proper deployment of the side curtain
airbags in an accident.
- Do not hang heavy objects on the coat
hooks, as they could cause personal injury in
a sudden stop.
(D Note
Objects located on the rear shelf that rub
against the rear window could damage the
heating wires for the rear window defogger .
(D Tips
-A vent slot is located between the shelf and
the rear window. Do not block the vent with
any items you may place on the rear window
shelf .
'
-Do not place bulky items on the rear window
shelf as they could restrict or block the driv
er's vision in the rear view mirror.
Refrigerator
Introduction
Applies to: vehicles wit h cooler
Please clean the cooler before using it for the
first time ¢
table on page 208 .
You can only switch on the cooler if
- the temperature in the luggage compartment
is below 131 °F (5 5 °C). The cooler switches off
automatically if the temperature in the luggage .,._
Page 78 of 302
Warm and cold
Warm and cold
Climate control system
Description
The climate control system warms, cools and
adds humidity to the air in the veh icle inter ior. It
is the most effective when the windows and sun
roof* are closed . If the temperature inside the
parked vehicle becomes very warm, opening the
window briefly will speed up the cooling process.
I n all heating mode functions except
defrost, the
b lower only switches to a higher speed once the
engine coolant has reached a certain tempera
ture .
Condensat ion from the cooling system can drip
and form a puddle of water under the veh icle.
This is normal and does not mean there is a leak.
P ollutant filt er
The po llutant filte r removes pollutants such as
dust and pollen from the a ir.
The air pollutants filter must be changed at the intervals specif ied in your Warranty
& Mainte
nance booklet, so that the a ir cond it ione r can
properly work.
If you drive your vehicle in an area with high air pollut ion, the filter may need to be changed
more frequently than specified i n your Aud i Wa r
ranty
& Maintenance booklet. If in doubt, ask
your author ized Audi Service Advisor for advice.
Key cod ed setting s
The climate control settings are automatically
stored and assigned to the remote contro l key
that is in use .
.8, WARNING
Reduced visib ility is dangerous and can ca use
accidents.
- For safe dr iv ing it is very impo rtan t that a ll
windows be free of ice, snow and condensa
t ion .
76
- Complete ly familiarize yourself with the
proper use and function of the heating and
ventilation system and espec ially how to de
fog and defrost the wi ndows .
- Never use the windshield wiper/washer sys
tem in freezing weather until you have
warmed the windshield first, using the heat ing and vent ilation system. The washer solu
tion may freeze on the windshield and re
duce visibi lity.
(D Note
- If you suspect that the air conditioner has
been damaged, sw itch the system off to
avoid further damage and have it inspected
by a q ualified dealership.
- Repa irs to the Aud i air cond itioner requ ire
special techn ica l know ledge and spec ial
tools. Contact an a uthorized Audi dealer fo r
assistance.
@ For the sake of the environment
By reduc ing the amo unt of fuel you use, you
also red uce the amount of pollutants emitted
into the a ir.
(D Tips
- Keep t he a ir intake slots (in front of the
windshield) free from ice, snow and debr is
in orde r to maintain the prope r funct ion of
the climate control system .
- The energy management sys tem may sw itch
the seat heating* o r rea r window defroster
off temporarily. These systems are available
again as soon as the energy balance has
been restored.
- Air escapes through vents under the rear
window. When placing items of clothing on
the luggage compartment cover, ensure
that the openings are not covered.
Page 79 of 302
Warm and cold
Operation
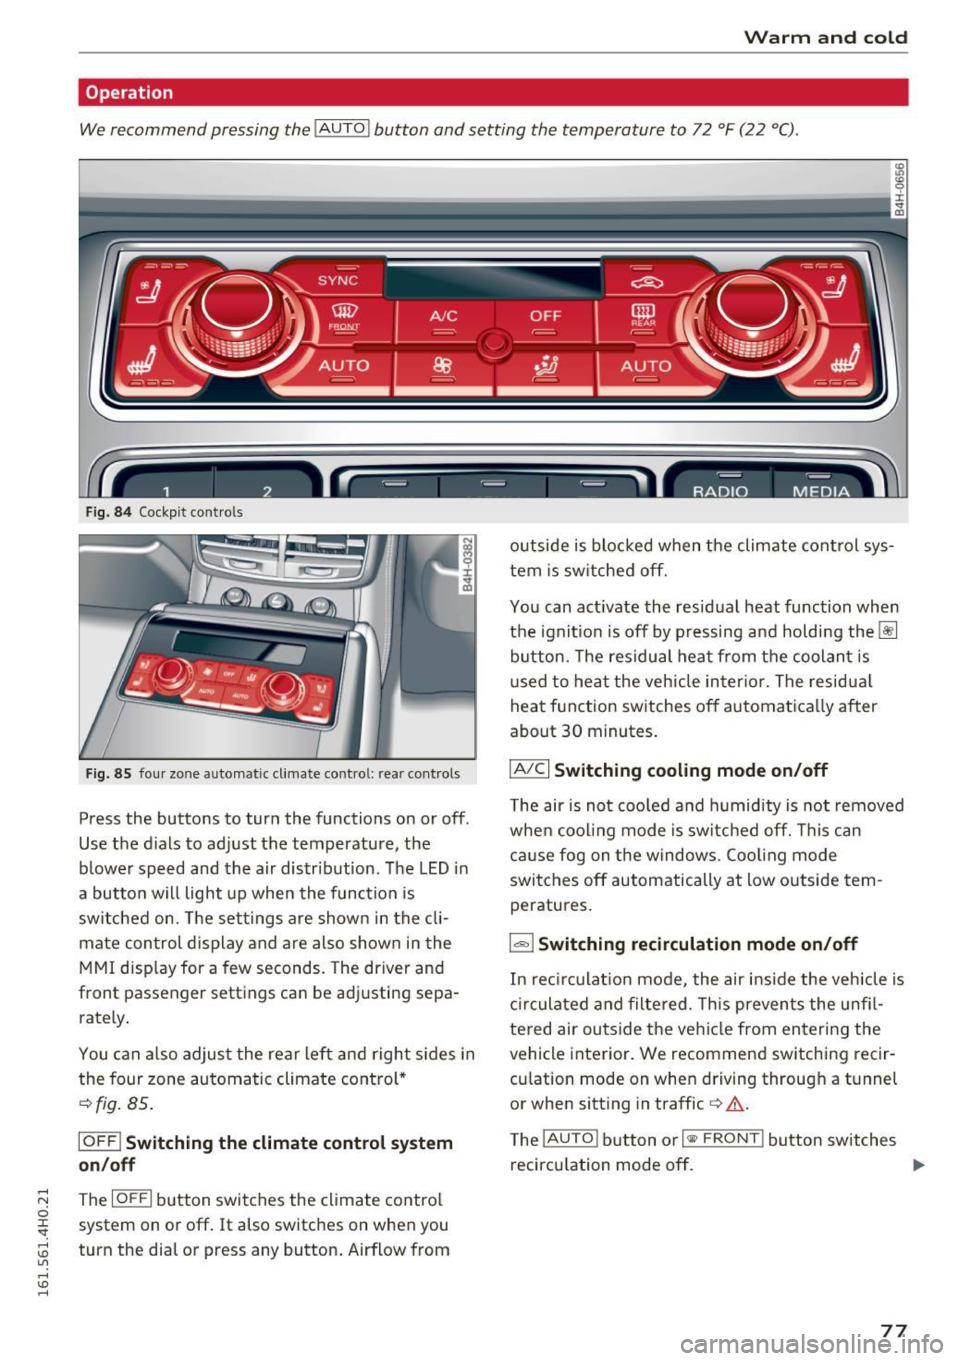
We recommend pressing the
! AUTO ! button and setting the temperature to 72 °F (22 °C).
Fig. 84 Cockpit con trols
Fig. 85 four zone automatic climate control: rear controls
Press the buttons to turn the functions on or off .
Use the dials to adjust the temperature, the
b lower speed and the air distr ibut ion. The LED in
a butto n will light up when the function is
switched on. The settings a re shown in the cli
mate con trol display and are also shown in the
MMI disp lay for a few seconds. The driver and
front passenger settings can be adj usting sepa
rately .
You can also adjus t the rear left and right sides in
the four zone automatic climate control*
¢fig. 85 .
IOFF I Switching the climate control system
on/off
~ The IOFFI button switches the climate control 0
~ system on or off. It also switches on when you
~ turn the dial or press any button. Airflow from U"I ,...., \!) ,....,
outside is blocked when the climate control sys
tem is switched off.
You can act ivate the residual heat function when
the ignit io n i s off by pressing and holding the~
button. The residual heat from the coolant is
u sed to heat the veh icle inter ior. The residua l
heat function switches off automatica lly after
about 30 minutes .
IA/Cl Switching cooling mode on/off
The air is not cooled and humidity is not removed
when cooling mode is switched off. This can
cause fog on the windows. Coo ling mode
switches off automatically at low outside tem
peratures.
1 .,.,,1 Switching recirculation mode on/off
In rec irculat ion mode, the air inside the vehicle is
circulated and filtered. This prevents the unfi l
tered air outside the vehicle from entering the
vehicle interior. We recommend switching recir
cu lation mode on when driving through a tunnel
or when sitting in traffic
c> &.
The !AUTO I button or I
recircu lation mode off. ..,.
77
Page 80 of 302
Warm and cold
IAUTO ! Switching auto matic mode on
Automatic mode ma intains a constant tempera
ture inside the vehicle. Air temperature, airflow
and air distribution are cont rolled automatically.
Adjusting th e tempe rature
Tempe ratures between 60 °F (+16 °C) and 84 °F
(+28 °C) can be set. Outside of this range,
l o or hi
will appear in the climate control system disp lay.
At both of these settings, the climate control sys
tem runs continuously at maximum cooling or
heating power . There is no temperature regula
tion .
~ Adjust ing th e airflo w
You can adjust the airf low manually to suit your
needs . To have the airflow regulated automati
cally, press the
IAU TO I button.
~ Adjusting the air distribution
You can manually se lect the vents where the a ir
will flow. To have the a ir dist ribution reg ulated
automatically, press the
IAU TO I button.
[ti /~ * Adjusting Seat h eating /v entil ation *
Pressing the button switches the seat heating/
venti lation on at the h ighest setting (level 3) . The
L EDs indicate the temperature level. To reduce
the tempera ture, press the button aga in. To
switch the seat heating/ventilation off, press the
button repeated ly until the LED turns off.
Afte r 10 minutes, the seat heating/ventilation
automatically switches from level 3 to level 2 .
In vehicles without the four zone automat ic cl i
mate control*, buttons in the rear center console
control the seat hea ting for both outer rear
seats*.
I @ FRONT I Switch th e defroster on /off
The windsh ield and s ide windows are defrosted
or cleared of condensation as qu ickly as possible .
The max imum amo unt of air flows ma inly from
the vents below the w indshield. Recircu lation
mode switches off. The temperature shou ld be
set to approximate ly 72 ° F (22 °C).
The
IAU TOI button switches the defroster off.
78
lliil REAR I Switch ing rear window he ater on /
off
The rear window heater only operates when the
engine is running . It switches off automatically
after 10 to 20 minutes, depending on the outside
temperature.
To prevent the rear window heater from switch
i ng off automatica lly, press and hold the
ICiJ REARI
button for more than 2 seconds. This rema ins
stored until the ignition is sw itched off.
I SYNC ! Synchroni zation *
When synchronization is switched on, the set
tings for the driver's side are applied to the front
passenger's side (except for seat heating/venti la
tion*). The rear seat is also synchroni zed in
vehicles with the 4-zone deluxe automatic cli mate control system*. Synchron izat ion sw itches
off if the sett ings a re adjusted on the front pas
senger's s ide or in the rear*.
You can synchronize the sett ings in a row by
pressing and holding a knob . For example, to ap
ply the settings for the front passenger's side to
the d river's s ide, press and hold the knob o n the
front passenger 's side.
Air vents
You can open or close the center and rear vents in
the cockpit and the vents in the rear center con
so le and doo r pillars us ing the ridged thumb
whee ls. The levers adj ust the direction of the air
flow from the vents.
_&. WARNING
- Do not use the rec irculat ion mode for ex
tended periods of time . The windows could
fog up since no fresh air can enter the vehi cle. If the windows fog up, press the air re
circulation button again immed iate ly to
sw itch off the a ir recircu lation function or
select defrost.
- Individuals w ith reduced sensit iv ity to pa in
or temperature could develop burns when
using the seat heating funct ion. To reduce
the risk of injury, these individuals should not use seat heating.
-
Page 86 of 302
Driving
E m erg ency b ra ke function
An emergency b rake ensures that the veh icle can
be slowed down even if the
normal brakes fai l
¢ page 85, Emergency broking.
.&_ WARNING
-
Do not press the accelerator pedal inadver
tently if the vehicle is stationary but the en
gine is runn ing and a gear is selected. Other
w ise the vehicle will start to move immediate
ly and could result in a crash.
(D Tips
- If the parking brake is app lied with the igni
tion switched off, the indicator lights in the
switch and -(USA models)/ . (Cana-
da models) in the instrument cluster will go
out after a ce rtain per iod of t ime.
- Occasional noises when the parking brake is applied and released are normal and are not
a cause for conce rn.
- When the vehicle is parked, the park ing
brake goes thro ugh a self-test cycle at regu
l a r i ntervals. Any associa ted noises a re nor
mal.
Parking
" Press the brake ped al to stop the vehicle.
" Pull the switch
«el} to set the parking brake .
" Se lect the P selector lever position
c:> poge 112.
"Turn the eng ine off c> &_ .
"When on incl ines or declines, turn the steering
wheel so that your vehicle will roll into the c urb
if it beg ins to move .
.&_ WARNING
-When you leave your vehi cle -even if on ly
br iefly -always ta ke the ignition key with
yo u. This applies par ticularly when children
remain in the vehicle . Otherwise the chil
dren could start the engine, release the
parking b rake o r operate elect rical eq uip
ment (e.g . power windows). There is the r isk
of an accident.
84
-
- When the veh icle is locked, no one -pa rtic u
larly not chi ldren should rema in in the vehi
cle. Locked doors make it more d ifficult for
emergency workers to get into the vehicle -
putting lives at risk .
Starting from rest
The starting assist function ensures that the
parking broke is released automatically upon starting.
Stopping and applying park ing brake
" Pull the switch
C®l to apply the parking brake .
Starting and automatically releasing the
park ing bra ke
" When you sta rt to drive as usua l, the par king
brake is automatically released and your vehicle
beg ins to move.
When stopping at a traffic signa l or stopping in
city traffic, the parking brake can be applied. The
vehicle does not have to be held with the foot
brake . The parking brake eliminates the tendency
to creep w ith a dr ive range engaged. As soon as
you drive off as usual, the parking brake is re
leased a utomat ically and the vehicle starts to
move .
Starting on slopes
When starting on incl ines, the sta rting assist pre
vents the vehicle from un intent iona lly rolling
back. The braking force of t he parking brake is
not released u nti l sufficient dr iv ing force has
been built up at t he wheels .
(D Tips
Fo r safety reasons, the park ing brake is re
l eased automatically only when the driver's
safety be lt is e ngaged in the b uck le.
Page 102 of 302
Audi active lane assist
Activating and deactivating
Applies to: vehicles with active lane assist
Fig. 107 Turn sign al lever : Active lane assist button
Fig. 108 Windshiel d: Active lane assist came ra viewing
window
• Press the r=;, fig. 10 7 button to activate or deac
tivate the system. The indicator light. or
Pit
in the instrument cluster will illuminate or go
out.
Instrument cluster indicator light
• Ready:
The ind icator light shows that the sys
tem is ready to use. The system can now warn
you if you are about to cross a known lane marker
line.
Pit Not ready: The ind icator light shows that the
system is turned on but unable to send a warn
ing . This can be due to the following :
- There is no lane marker line.
- The relevant lane marker lines are not detected
(for example , mark ings in a construct ion zone
o r because they are obstructed by snow, dirt,
water or backlighting).
- T he vehicle's speed is below the speed needed
to activate it , which is about 40 mph (65 km/
h).
- The lane is narrower than about 8 ft. (2.5 m) or
wide r than 15 ft (4.5 m).
100
- The curve is too sharp.
- The driver's hands are not on the steering
wheel.
{i) Tips
Make sure the camera's field of view
r=;, fig. 108 is not obstructed by stickers, de
posits or anything else. For information on
cleaning, refer to¢
page 206.
Active lane assist display in the instrument
cluster
Appl ies to : vehicles with active lane assist
Fig. 109 Disp lay : Activ e lane ass ist is switc hed on a nd is
warn ing
Fig. 110 Instrument cl uste r: Active lane as sis t is sw itched
on but hot ready to provide warnings
You can call up the active lane assist display us
i ng the buttons in the multifu nction steering
wheel
r=;, page 23.
When active lane assist is switched on, the sys
tem indicates which lines are detected by display
i ng solid lines on the left and/or right side of
your vehicle:
Page 106 of 302
Audi side assist
-Improper reliance on the side assist system
can cause collisions and serious personal in
jury:
- Never rely only on side assist when chang
ing lanes.
- Always check rear view mirrors to make
sure that it is safe to change lanes.
- Side assist cannot detect all vehicles under
all conditions- danger of accident!
- Please note that side assist indicates there
are approaching vehicles, or vehicles in your blind spot, only after your vehicle has
reached a driving speed of at least 19 mph
(30 km/h).
- In certain situations, the system may not
function or its function may be limited. For
example:
- if vehicles are approaching or being left
behind very quickly . The display may not
turn on in time .
- in poor weather conditions such as heavy
rain, snow or heavy mist .
- on very wide lanes, in tight curves or if
there is a rise in the road surface . Vehicles
in the adjacent lane may not be detected
because they are outside of the sensor
range.
(D Note
The sensors can be displaced by impacts or damage to the bumper, wheel housing and
underbody . This can affect the system . Have
your authorized Audi dealer or authorized
Audi Service Facility check their function.
(D Tips
-If the window glass in the driver's door or
front passenger's door has been tinted, the
display in the exterior mirror may be misin
terpreted.
- For Declaration of Compliance to United
States FCC and Industry Canada regulations
c::> page 284.
104 Activating and deactivating
App
lies to : vehicles with side assist
Fig. 115 D riv er's doo r: Side ass ist butto n
.,.. Press the button c::> &. in General information
on page 103
to switch the system on/off . The
LED in the button turns on when side assist is
switched on .
Adjusting the display brightness
Applies to: vehicles wit h side assist
The brightness setting can be adjusted via the
MMI.
.,.. Select: I CAR I function button > Car systems
control button > Driver assist> Audi side as
sist .
The display brightness adjusts automatically to
the brightness of the surroundings, both in the
information and in the warning stage . In very
dark or very bright surroundings, the display is
already set to the minimum or maximum level by
the automatic adjustment. In such cases, you may notice no change when adjusting the bright
ness, or the change may only be noticeable once
the surroundings change.
Adjust the brightness to a level where the display
in the information stage will not disrupt your
view forward. If you change the brightness, the
display in the exterior mirror will briefly show the
brightness level in the information stage. The
brightness of the warning stage is linked to the
brightness in the information stage and is adjust
ed along with the information stage adjustment . .,,.
Page 131 of 302
Driving safety
Basics
Safe driving habits
Please remember -safety first!
This chapter contains important information,
tips, instructions and warnings that you need to
read and observe for your own safety, the safety
of your passengers and others . We have summar
ized here what you need to know about safety
belts, airbags, child restraints as well as child
safety. Your safety is for us
priority number 1. Al
ways observe the information and warnings in
this section - for your own safety as well as that
of your passengers.
The information in this section applies to all
model versions of your vehicle. Some of the fea
tures descr ibed in this sections may be standard
equipment on some models, or may be optional
equipment on others. If you are not sure, ask
your authorized Audi dealer.
A WARNING
- Always make sure that you follow the in
structions and heed the WARNINGS in this
Manual. It is in your interest and in the in
terest of your passengers .
-
-Always keep the complete Owner's Litera
ture in your Audi when you lend or sell your
vehicle so that this important information
will always be available to the driver and
passengers.
- Always keep the Owner's literature handy so
that you can find it easily if you have ques
tions.
Safety equipment
The safety features are part of the occupant re
straint system and work together to help reduce the risk of injury in a wide variety of accident sit
uations.
Your safety and the safety of your passengers
should not be left to chance. Advances in tech
nology have made a var iety of features available
to help reduce the risk of injury in an accident.
Driving safety
The following is a list of just a few of the safety
features in your Audi:
- sophisticated safety belts for driver and all pas-
senger seat ing pos itions,
- safety belt pretensioners,
- safety belt force limiters for the front seats,
- safety belt height adjustment systems for the
front seats,
- front airbags,
- knee airbags for the front seats
- side airbags in the front seats and outer rear
seats,
- side curtain airbags,
- special LATCH anchorages for child restraints,
- head restraints for each seating position,
- adjustable steering column.
These individual safety features, can work to gether as a system to help protect you and your
passengers in a w ide range of accidents . These
features cannot work as a system if they are not
always correctly adjusted and correctly used.
Safety is everybody's responsibility!
Important things to do before driving
Safety is everybody 's job! Vehicle and occupant
safety always depends on the informed and care
ful driver .
For your safety and the safety of your passen
gers,
before driving always:
.,. Make sure that all lights and signals are operat
ing correctly .
.,. Make sure that the tire pressure is correct.
.,. Make sure that all windows are clean and afford
good visibility to the outside .
.,. Secure all luggage and other items carefully
c:c.> page 68, c:c.> page 73 .
.,. Make sure that nothing can interfere with the
pedals.
.,. Adjust front seat, head restraint and mirrors
correctly for your height.
.,. Instruct passengers to adjust the head re
straints according to their height.
.,. Make sure to use the right child restraint cor
rectly to protect children
¢ page 168, Child
safety. ..,.
129
Page 134 of 302
Driving safety
-Always make sure that there are at least
10 inches (25 cm) between the front pas
senger 's breastbone and the instrument
panel.
- Always make sure that there are at least
4 inches (10 cm) between the front passen
ger's knees and the lower part of the instru
ment panel.
- Each passenger must always sit on a seat of
their own and properly fasten and wear the
safety belt belonging to that seat .
- Before driving, always adjust the front pas
senger seat and head restraint properly .
- Always keep your feet on the floor in front
of the seat. Never rest them on the seat, in
strument panel, out of the window, etc . The
airbag system and safety be lt will not be
able to protect you properly and can even in
crease the risk of injury in a crash.
- Never dr ive with the backrest reclined or
ti lted far back! The farther the backrests are
ti lted back, the greater the risk of injury due
to incorrect positioning of the safety belt
and improper seating position.
- Children must always ride in child seats
¢
page 168. Special precautions apply
when installing a child seat on the front passenger seat ¢
page 146.
Proper seating positions for passengers in
rear seats
Rear seat passengers must si t upright with both
feet on the floor consi sten t with their physical
size and be properly restrained whenever the ve
hicle is in use .
To reduce the risk of injury caused by an incorrect
seating position in the event of a sudden braking
maneuver or an accident, your passengers on the
rear bench seat must always observe the follow
ing:
.,. For adjustable head restraints: Adjust the head
restraint so the upper edge is as even as possi
ble with the top of your head . If that is not pos
s ib le, try to adjust the head restraint so that it
is as close to this position as possible
~page 132.
132
.,. Keep both feet flat in the footwell in front of
the rear seat.
.,. Fasten and wear safety belts properly
q page 141.
.,. Make sure tha t children are always properly re
strained in a child restraint that is appropriate
for their size and age
q page 168 .
A WARNING
Passengers who are imprope rly seated on the
rear seat can be seriously injured in a crash.
- Each passenger must always sit on a seat of
their own and properly fasten and wear the
safety belt belonging to that seat.
- Safety belts only offer maximum protection
when the safety be lts are properly posi
tioned on the body and secure ly latched . By
not sitting upright, a rear seat passenger in
creases the risk of personal injury from im
properly positioned safety belts!
-Always ad just the head restraint properly so
that it can give maximum protection.
Proper adjustment of head restraints
Correctly adjusted head restraints are an impor
tant part of your vehicle's occupant restraint sys
tem and can help to reduce the risk of injuries in
accident situations .
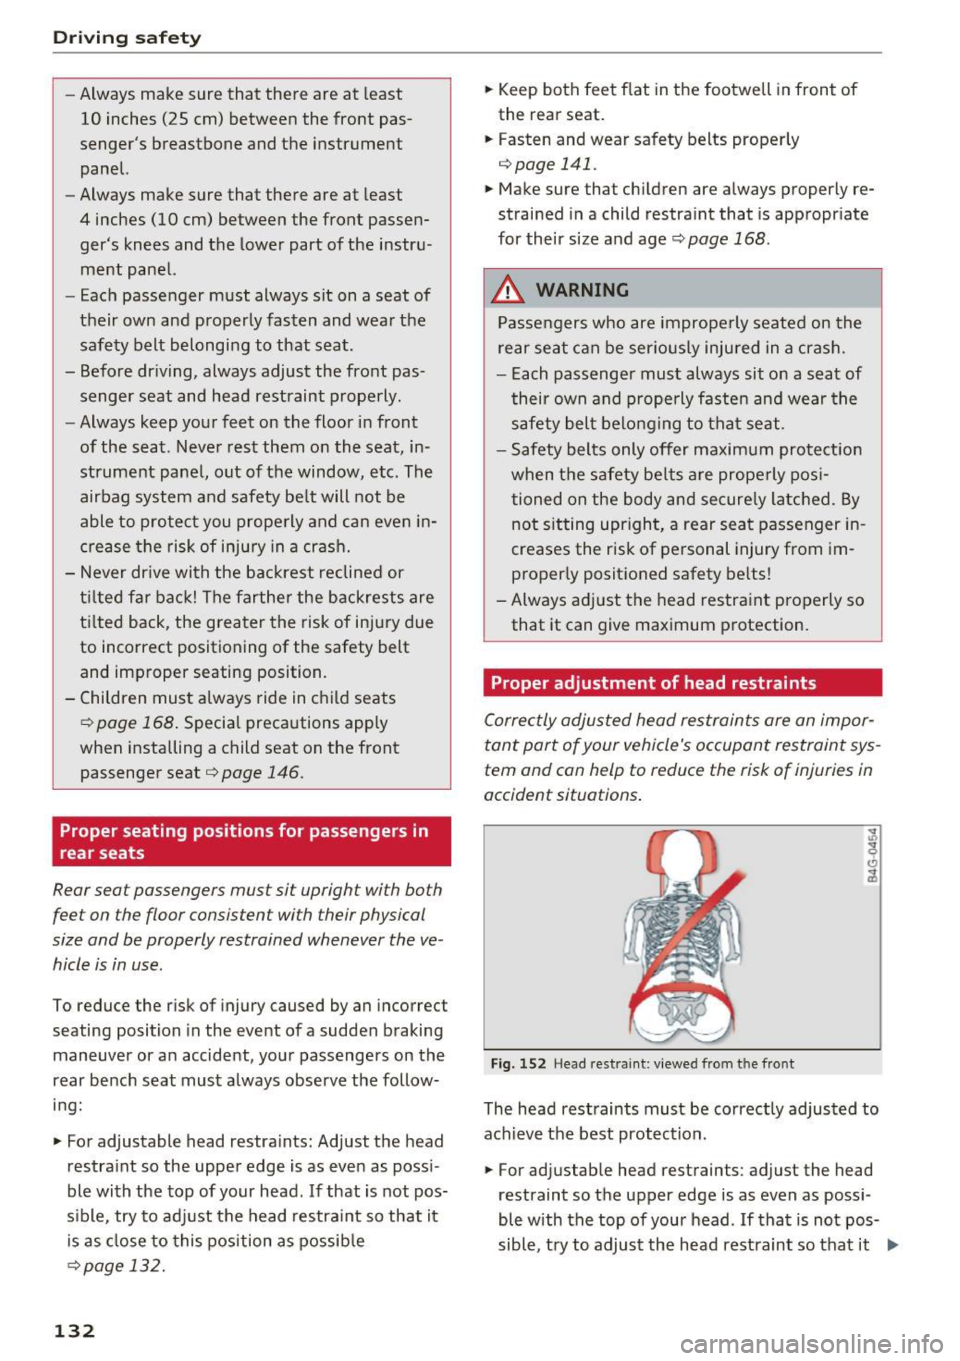
Fig. 152 Head rest raint : viewed from the front
The head restraints must be correctly adjusted to
achieve the best protection .
.,. For adjustable head restraints: adjust the head
restraint so the upper edge is as even as possi-
ble with the top of your head . If that is not pos
sible, try to adjust the head restraint so that it .,._
Page 135 of 302
is as close to this position as possible.
¢fig. 152.
Adjusting head restraints ¢page 64.
Crash -active head restraints
In the event of a rear -end collision, it is possible
that the crash-active head restraints on the driv
er's seat and front passenger's seat
1> are trig
gered. On head restraints that have been trig
gered, the padding protrudes forwards by several
centimeters. Drive the vehicle to your authorized
Audi dealer without delay and have the function
of the active head restraints restored.
_& WARNING
Driving without head restraints or with head
restraints that are not properly adjusted in
creases the risk of serious or fatal neck injury
dramatically. To help reduce the r isk of injury:
- Always drive with the head restraints in
place and properly adjusted .
- Every person in the vehicle must have a
properly adjusted head restraint.
- Always make sure each person in the vehicle
properly adjusts their head restraint. Adjust
the head restraint so the upper edge is as
even as possible with the top of your head.
If that is not possib le, try to adjust the head
restra int so that it is as close to this position
as possible.
- Never attempt to adjust head restraint
wh ile driving. If you have dr iven off and
must adjust the driver head rest for any rea
son, first stop the vehicle safely before at
tempting to adjust the head restra int.
- Children must always be properly restrained
in a child restraint that is appropriate for
their age and size¢
page 168.
-
l) Ve hicles w ith recl inin g rear seat: This functio n is not avai l
able fo r th e fro nt passenger's seat .
Driving safety
Examples of improper seating positions
The occupant restraint system can only reduce
the risk of injury if vehicle occupants are properly
seated.
Improper seating positions can cause serious in
jury or death . Safety belts can only work when
they are properly positioned on the body . Im
proper seat ing positions reduce the effectiveness
of safety belts and will even increase the risk of
injury and death by moving the safety belt to cr it
ical areas of the body. Improper seating positions
also increase the risk of serious injury and death
when an airbag deploys and strikes an occupant
who is not in the proper seating position. A driver
is responsible for the safety of all vehicle occu
pants and especially for children . Therefore:
.,. Never allow anyone to assume an incorrect
seating position when the vehicle is being used
¢ .,& .
The following bulletins list only some sample po
sitions that will increase the risk of serious injury
and death . Our hope is that these examples will
make you more aware of seating positions that
are dangerous .
Therefore, whenever the vehicle is moving:
-never stand up in the vehicle
- never stand on the seats
- never kneel on the seats
- never ride with the seatback recl ined
- never lie down on the rear seat
- never lean up against the instrument panel
- never sit on the edge of the seat
- never sit sideways
- never lean out the window
- never put your feet out the window
- never put your feet on the instrument panel
- never rest your feet on the seat cushion or back
of the seat
- never ride in the footwell
- never ride in the cargo area
133