fog light AUDI A8 2018 Owners Manual
[x] Cancel search | Manufacturer: AUDI, Model Year: 2018, Model line: A8, Model: AUDI A8 2018Pages: 356, PDF Size: 54.71 MB
Page 10 of 356
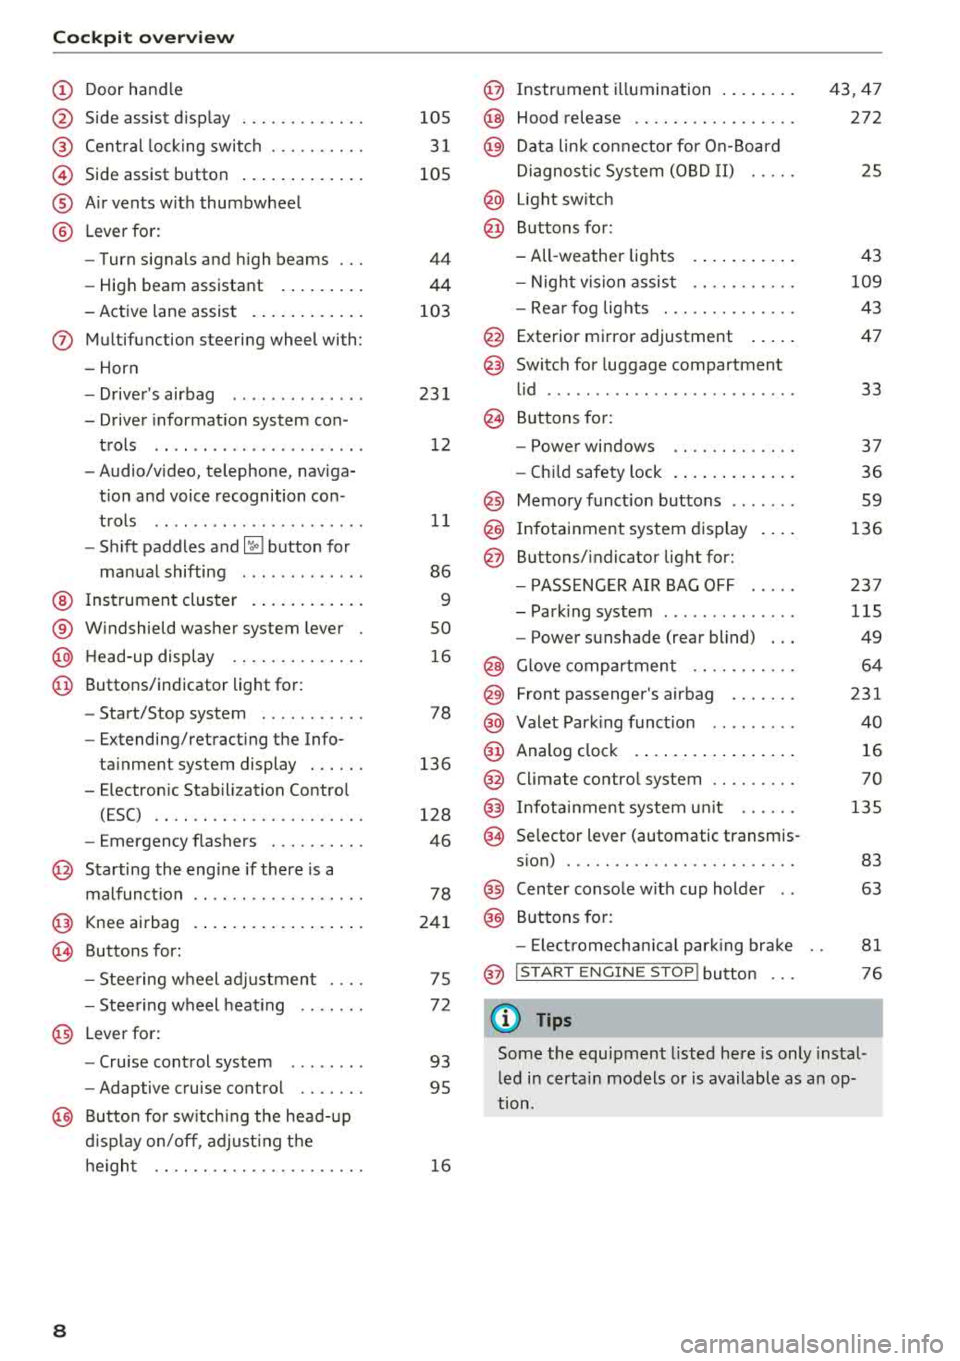
Cockpit overv ie w
CD
@
®
©
®
®
Door hand le
S ide assist d isp lay
Cent ral lock ing switch ....... .. .
Side assist button .. ..... ... .. .
A ir vents w ith thumbwheel
L ever fo r:
- Turn signals and h igh beams
- High beam assistant ... ... .. .
- Active lane assist . ..... ... .. .
(J) Multifunction steering wheel with :
- Horn
- Drive r's airbag ............. .
- Drive r informat io n system con -
trols .. .. .. ............... .
- Audio/v ideo, telephone, naviga
t ion and voice recognition con -
t rols .. .. .. ............... .
- Shift paddles
and ~ button for
manual shifting ............ .
@ Ins trumen t cluster . ..... ... .. .
® W indshield washer system lever
@ H ead-up display ........... .. .
@ Buttons/ indicator light for :
- Start/Stop system .......... .
- Extending/retract ing t he Info-
ta inment system display . .. .. .
- E lectron ic Stabili zation Contro l
(ESC) .. .. .. ............. .. .
- Emergency flashers ....... .. .
@ Starting the eng ine if there is a
malfunct ion
@ Knee airbag
~ Buttons for :
- Stee ring wheel adjustmen t ... .
- Stee ring wheel heat ing
@ Lever for:
- Cru ise control system ....... .
- Adaptive cruise control .... .. .
@ Butto n for sw itch ing the head- up
d isp lay on/off , adjust ing t he
h e igh t .. .. .. ............. .. .
8
105
3 1
105
44
44
103
23 1
1 2
11
86
9
so
1 6
78
136
128
46
78
24 1
75
7 2
93
95
1 6
@ Instr ument i llumination .. ..... .
@ Hood release .. .. .. .......... .
@ Data lin k co nne ctor fo r On-Board
Di agnos tic Sys tem (OB D II) .....
@ Light sw itch
@ Buttons for:
- All -weather lights
- Night v is ion assis t .......... .
- Rea r fog lights . .. .......... .
@ Exterior mi rror adjustment .... .
@ Switch for luggage compartment
l id ........ ... .. .. .......... .
@ B uttons for:
- Powe r windows .. .......... .
- Ch ild safety lock . .... .. ..... .
@ Memory funct io n buttons ...... .
@) Infotainment system d isplay
@ B uttons/indicator light for:
- PA SSE NG ER AIR BAG OFF .... .
- Park ing system ... .......... .
- Power sunshade (rear blind) .. .
@ Glove comp artment .......... .
@) Front passenger's airbag ...... .
@ Valet Park ing funct ion ........ .
@ Analog cloc k .... .. ... .. ..... .
@ Climate contro l system ........ .
@ Infota inment system u nit ..... .
@ Se lector lever (automatic transmis -
s ion) ... .. .. .. .. .. .......... .
@ Center conso le w ith cup holder ..
@ Buttons for:
- Electromechan ica l park ing bra ke
@ I START EN GINE STO P! button
(D Tips
43,47
272
25
43
109
43
47
33
37
36 59
136
23 7
115
49
64
231
40
16
70
135
83 63
81
76
Some the equipment l isted here is only instal
l ed i n certa in models or is available as a n op
tion.
Page 20 of 356
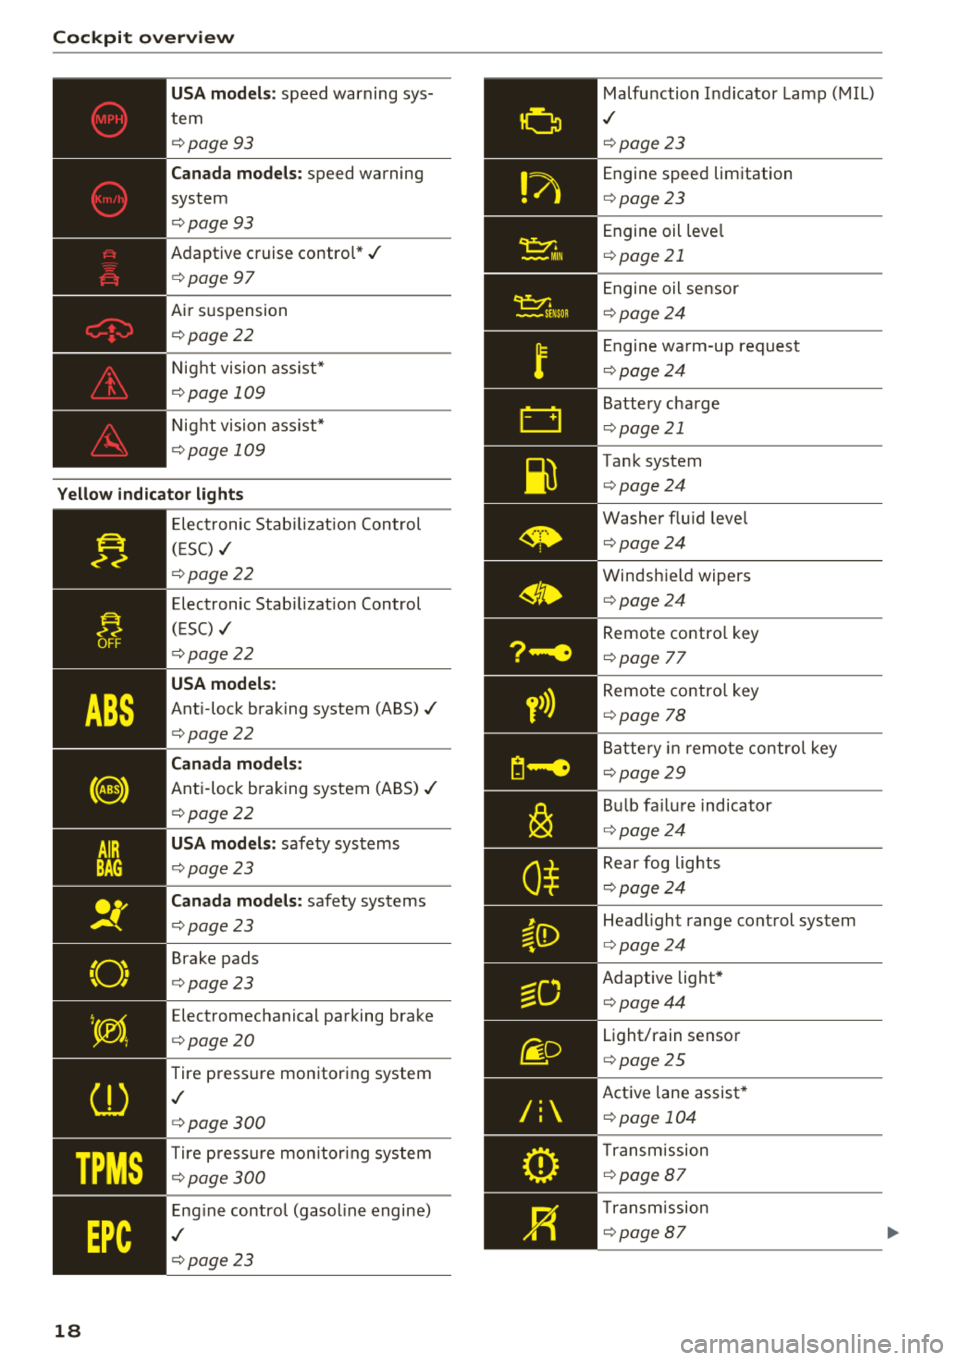
Cockpit overv ie w
USA mod els : speed warning sys
tem
¢ page 93
Ca nad a models: speed warning
system
¢ page93
Adaptive cruise contro l*./
¢ page 97
Air s uspension
¢ page22
Night vision ass ist*
¢ page 109
Night vision ass ist*
¢ page 109
Yello w indic ator light s
18
-------------Elect ronic Stab ilizat ion Control
( E SC)
./
¢ page 22
Electronic Stabilizat ion Control
(ESC)
./
¢ page22
USA models:
Ant i-lock braking system (ABS)./
¢page22
Canada mod els:
Anti -loc k braking system (ABS) ./
¢ page22
USA mod els: safety systems
¢ page23
Ca nad a models: safety systems
¢ page23
Brake pads
¢ page23
Electromechanical parking brake
¢ page20
Tire pressure monitoring system
.I
¢page300
Tire p ress ure mon itor ing system
¢ page 300
Eng ine control (gasol ine engine)
.I
¢ page23
Malfunction Indicator Lamp (MIL)
.I
¢page23
Engine speed limitation
¢ page23
Engine oil leve l
¢page 21
Engine oil sensor
¢page24
Engine wa rm-up request
¢ page24
Battery charge
¢page 21
Tank system
¢page24
Washer flu id leve l
¢page24
Windshield wipers
¢page24
Remote contro l key
¢ page 77
Remote contro l key
¢ page 78
Battery in remote contro l key
¢page29
Bu lb fa ilu re indicator
¢ page24
Rear fog lights
¢page24
Headlight range control system
¢page24
Adaptive light*
¢page44
Light/rain sensor
¢page 25
Active lane assist *
¢page 104
Transm ission
¢ page 87
Transm ission
¢page 87
Page 26 of 356
Cockpit overv ie w
lig ht also turns on. Make sure t hat the speed
does not go above the speed displayed. Drive to
an author ized Audi dealer or authorized A udi
Serv ice Facility immediately to have the malfunc
tion corrected .
--... Engine oil sensor
• Oil l evel! Sen sor d efe ctiv e
The sensor to check the engine oil leve l has
fa iled. Drive to an authori zed Aud i dea ler or au
thor ized Audi Service Facility immed iate ly to have
the ma lfunction corrected .
f Engine warm-up request
0 Plea se warm up engine
Fue l has entered the eng ine oil, either from low
outside temperatures or frequent short drives .
Dr ive unt il the engine is warm so that the fuel in
the eng ine oi l will evaporate . Avo id h igh eng ine
speeds, fu ll acce le rating and heavy eng ine loads
when doing this.
jjl Tank system
Ill Plea se refuel
If t he i nd icator lig ht t urns on fo r the fi rst time
a nd the mess age appears, there a re abo ut 4 ga l
lons (15 lite rs) of fue l le ft in the tank.
D Fuel tank s ystem malfunction! Plea se con
tact dealer
There is a malfunction in the fue l tank system .
Drive to an a uthorized Audi dea ler or a uth orized
Aud i Serv ice Facility immediately to have the
malfunct ion corrected.
(D Tips
For more information on fueling, see
¢page 269 .
~ Washer fluid level
C Please refill washer flu id
24
Fill the washer fluid for the windshie ld washer
system and the head light washer system when
t h e ignit ion is switched
off ¢ page 281 .
• Windshield wipers
m Windshield wiper defective
There is a ma lfunction with the winds hield wip
ers .
D rive to an au thor ized A udi dealer or au tho riz ed
Audi Se rvice Facility immediate ly to have the
malfunction corrected.
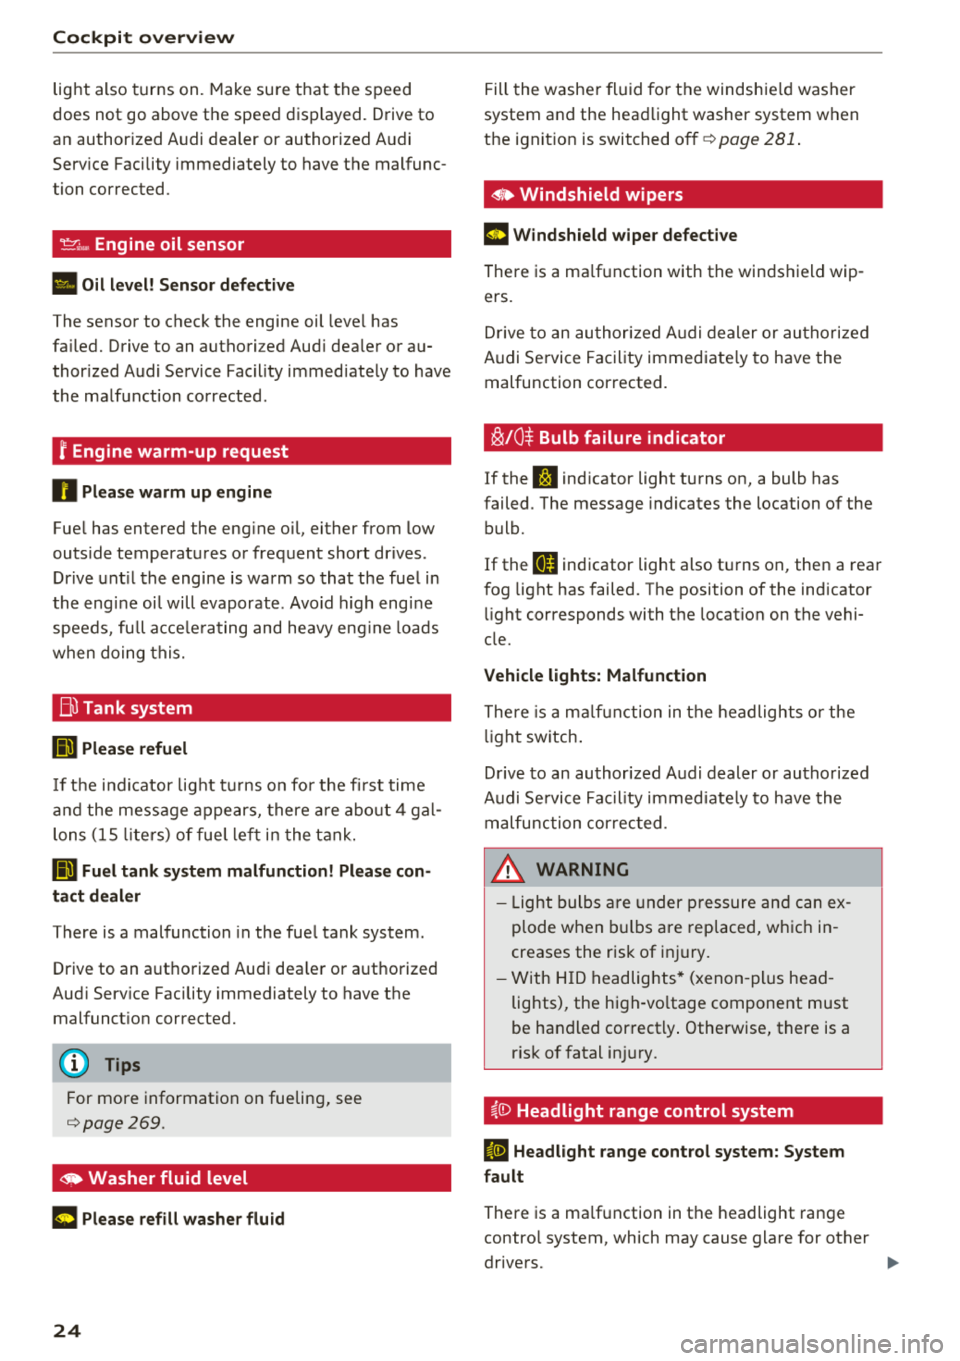
~ /0~ Bulb failure indicator
If the S:$ ind icator light turns on, a bulb has
failed . The message indicates the location of the
bulb.
If the
II indicator light also t urns on, then a rear
fog light has failed. The position of the indicator
li ght corresponds with the location on the vehi
cle.
Vehicle light s: Malfunction
There is a m alfu nction in the headlights o r the
li gh t sw itch .
D rive to an author ized Audi dealer or autho rized
Audi Se rvice Fac il ity immed iate ly to have the
malfunction cor rec ted .
_& WARNING
-Light bulbs are under pressure and can ex
p lode when b ulbs a re rep laced, w hic h in
creases the ris k of in jury.
- With H ID headlig hts* (xenon -plus head
lights), the high-vo ltage component must
be handled correct ly . Otherwise, there is a
risk o f fatal in jury.
§.0 Headlight range control system
El He adlight range cont rol system: System
fault
There is a ma lfunction in the headlight range
contro l system, which may cause glare for other
drivers.
-
Page 45 of 356
lL t:0 .-,
"' ......
"' .-, 0 0 :c "
Exterior Lighting
Switching the headlights on and off
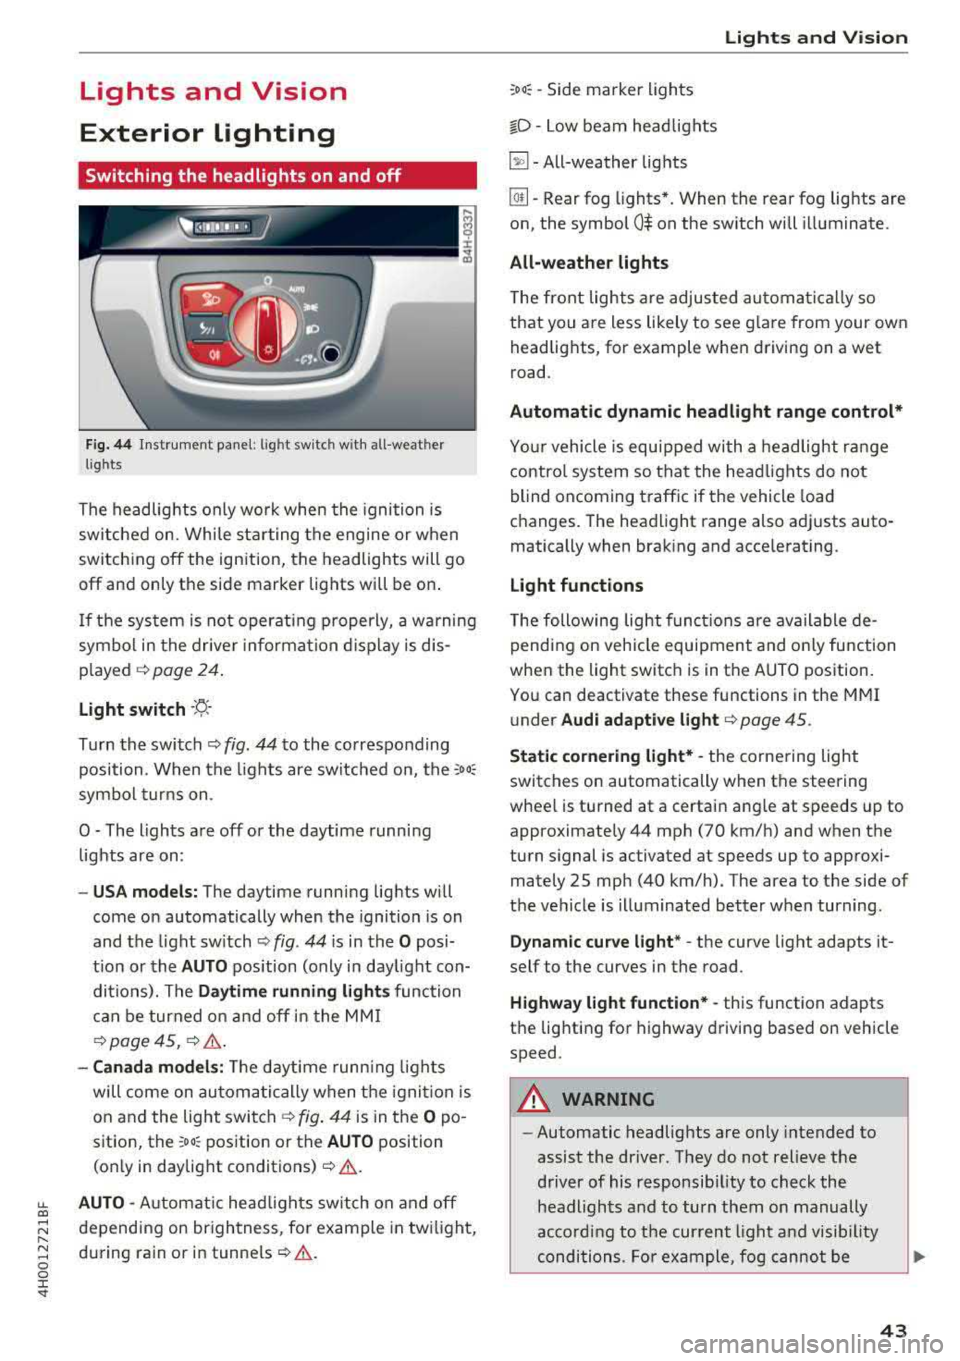
F ig . 44 Instrument panel: l ig ht switc h w ith all -weather
l ig hts
The headlights only wo rk when the ignition is
switched on. While sta rting the engine or when
switch ing off the ign ition, the headlights will go
off and only the side marker lig hts will be on .
I f the sys tem is not operating p roperly, a w arning
symbol in the dr ive r informa tion d isplay is dis
p layed .::>
page 24.
Light switch --r;_-
T u rn the switch .::> fig. 44 to the co rresponding
position . When the lights are switched on, the
:o o:
sym bol turn s on .
0 - The lights a re off or the daytime runni ng
lights are on :
-USA models: The daytime running lig hts will
come on automatically when the ignition is on
and the light sw itch .::>
fig. 44 is in the O posi
t ion or the
AUTO position (only i n day light con
di tions). The
Daytime running lights function
c an be turned o n and off i n the MM I
¢ page 45, i=> &..
-Canada model s: The dayt ime runn ing lights
will come on au toma tic ally when the igni tion is
on and the light swi tch .::>
fig. 44 is in the O po
s ition, the
:oo: pos ition or the AUTO position
(o nly in daylig ht
conditions) .::>&. .
AUTO -Automat ic head lig hts sw itch on and off
depend ing on br ightness, for example in tw ilight,
d uring rain or in
tunne ls ¢ &. .
Lights and V ision
:oo: -Side marker ligh ts
io -Low beam head lights
~ -All-weather lig hts
lw -Rear fog lights*. When the rear fog lights are
on, the symbol
0$ on the sw itch will i lluminate.
All-weather lights
The front lights are adjus ted au toma tica lly so
that you are less likely to see g lare from your ow n
head lig hts, for example when driving on a wet
road.
Automatic dynamic headlight range control*
Yo ur vehicle is equ ipped with a headlight r ange
contro l system so tha t the head lig hts do not
blind oncoming t raffic if the vehicle load
changes . T he hea dlight range also adj usts auto
matically when brak ing and acce lerating .
Light functions
The following light funct io ns are available de
pending on veh icle equipment and o nly fu nction
whe n the light switc h is in t he AUTO position.
You can deactivate these functions in the MMI
under
Audi adaptive light ¢ page 45.
Static cornering light* -the corne ring light
switches on automatically when the steering
wheel is turned at a certai n angle at s peeds up to
approximately 44 mph (70 km/h) and when the
turn s ignal is activated at speeds up to approxi
mately 25 mp h (40 km/h) . The area to t he side of
t h e ve hicle is illuminated better w hen turning.
Dynamic curve light * -the curve light adapts it
self to the curves in the road .
Highway l ight function* -this function adapts
t h e lig hting for highway driving based on vehicle
speed .
A WARNING ~ --Automatic headlights are only intended to
assist the driver. They do no t relieve the
driver of his responsib ility to check the
headligh ts and to turn them on manually
ac co rding to t he cur rent light a nd vis ib ili ty
conditions . Fo r example, fog cannot be
43
Page 46 of 356
Lights a nd Vis ion
detected by the light sensors. So a lways
switch on the headlights
§.D under these
weather conditions and when driving in the
dark .
- Crashes can happen when you cannot see
the road ahead and when you cannot be
seen by other motorists . Always turn on the
headlights so that you can see ahead and so
that others can see your
car from the back.
- The rear fog lights should only be turned on in accordance with traffic regulat ion, as the
lights are bright for following traffic.
- Please observe legal regulations when using
the light ing systems described .
@ Tips
-The light sensor* for automatic dynam ic
headlight range control* is located in the
rear view mirror mount . You should there
fore not apply any st ickers to the w indshield
i n this area in order to prevent malfunctions
or fail ures .
- In the event of a ligh t sensor malfunct ion,
the driver is not ified in the instrument clus
ter
d isplay~ page 25.
- You w ill hear a wa rning tone if you open the
driver door when the exter ior lights are
switched on .
- In cool or damp weather, the inside of the
headlights, turn s ignals and tail lights can
fog over due to the temperature difference between the inside and outside . They will
clear short ly after switching them on . This
does not affect the service life of the light
i ng .
44
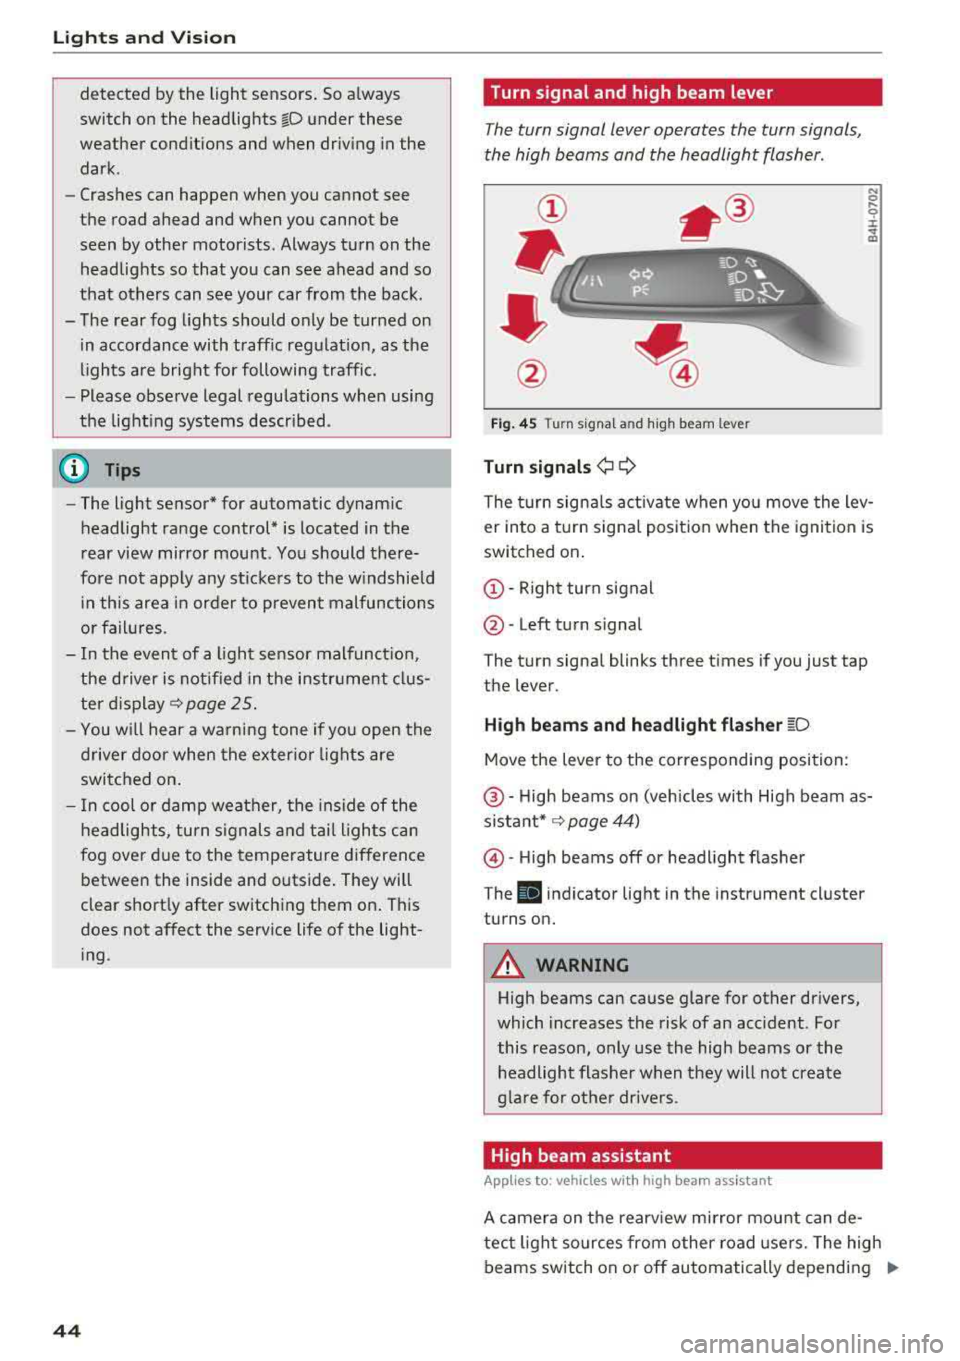
Turn signal and high beam lever
The turn signal lever operates the turn signals,
the high beams and the headlight flasher .
Fig. 45 T urn signa l an d high beam leve r
Turn signa ls¢ Q
N 0 .... 0 :i:
"' m
The t urn signa ls act ivate when you move the lev
er into a turn signa l position when the ignit ion is
switched on.
(D -Right turn signal
@ -Left turn signal
The turn signa l blinks three times if you just tap
the lever.
H igh be ams and h eadlight fla sh er ~D
Move the lever to the corresponding position:
@ -High beams on (vehicles with High beam as
sistant* ~ page 44)
@-High beams off or headl ight flasher
T he
El indicator light in the instrument cluster
turns on.
A WARNING
High beams can cause glare for other drivers,
which increases the risk of an accident . For
this reason, only use the high beams or the
headlight flasher when they will not create
g la re for othe r drive rs .
High beam assistant
App lies to: vehicles with high beam ass istant
A camera on the rearv iew mirror mount can de-
tect light sources from other road use rs. The high
beams switch on or off automatically depending
IJI>
Page 47 of 356
u. co .... N
" N .... 0 0 :c '
coming vehicles, the vehicle speed and other en
vironmenta l and traffic conditions.
Activating high beam assistant
Requirement: the light switch must be set to the
AUTO position and the high beam assistant must
be switched on in the Infotainment system
~ page 45 .
.,. To activate the high beam assistant , tap the
l ever forward @. T he
II ind icator light ap
pears in the instrument cluster display and the
high beam headlights are switched on/off auto
matically. The
ii indicator light also turns on if
the high beams are switched on.
Switching the high beams on/off manually
If the high beams did not switch on/off automat
ica lly as expected, you may switch them on or off
manually instead:
.,. To switch the high beams on manually, tap the
lever forward @. T he
ii indicator light turns
on .
.,. To switch the hig h beams off manua lly, pull the
lever
back @. The high beam assistant is deac
t ivated.
Operating the headlight flasher
.,. T o operate the headlight flasher when the high
beam assistant is activated and high beams are
switched off, pull the lever
back @. The high
beam assistant rema ins active.
Messages in the instrument cluster display
Headlight assist: System fault
Drive to an authorized Aud i dea ler or authorized
Audi Service Fac ility immediately to have the
malfunction corrected. You can still switch the
high beams on or off manually.
Headlight assist: Unavailable No camera view
The camera view is blocked, for example by a
sticker or debris .
The sensor is located between the interior rear
view mirror and the windshield. Do not place any
stickers in this area on the windshield.
Lights and Vision
A WARNING
--
High beam assistant is only intended to assist
the driver. The driver is still respons ible for
controlling the headlights and switching
them manually depend ing on light and visibil
it y conditions. It may be necessary to operate
them manually in situations such as:
- I n adverse weather conditions such as fog,
heavy rain, blowing snow or spraying water.
- On roads where oncom ing traffic may be
pa rtiall y obscured, such as expressways.
- When there are road users that do not have
sufficient lighting, such as b icyclers or
vehicles with dirty tail lamps.
- I n tight curves and on steep hills.
- In poorly lit areas.
- With strong reflectors, such as signs.
- If the area of the w indshield near the sensor
is fogged over, dirty, icy or covered with a
sticker .
Adjusting the exterior lighting
The functions are adjusted in the Infotainment
system.
.,. Select: I CAR ! function button > Car systems
control button > Vehicle settings > Exterior
lighting .
Automatic headlights
You can adjust the following sett ings in the Au
tomatic headlights
menu:
Headlights activation time -you can adjust if the
headlights switch on
Early, Medium or Late ac
cording to the sensitivity of the light sensor.
Auto-dimming high beams* -you can switch the
high beam assistant*
On and Off .
Daytime running lights*
USA models :
the daytime running lights can be
switched on/off. Select
On or Off.
Canada models:
this function cannot be switched
off. They activate automatically each time the ig -
nition is switched on .
IIJ>-
45
Page 72 of 356
Warm and cold
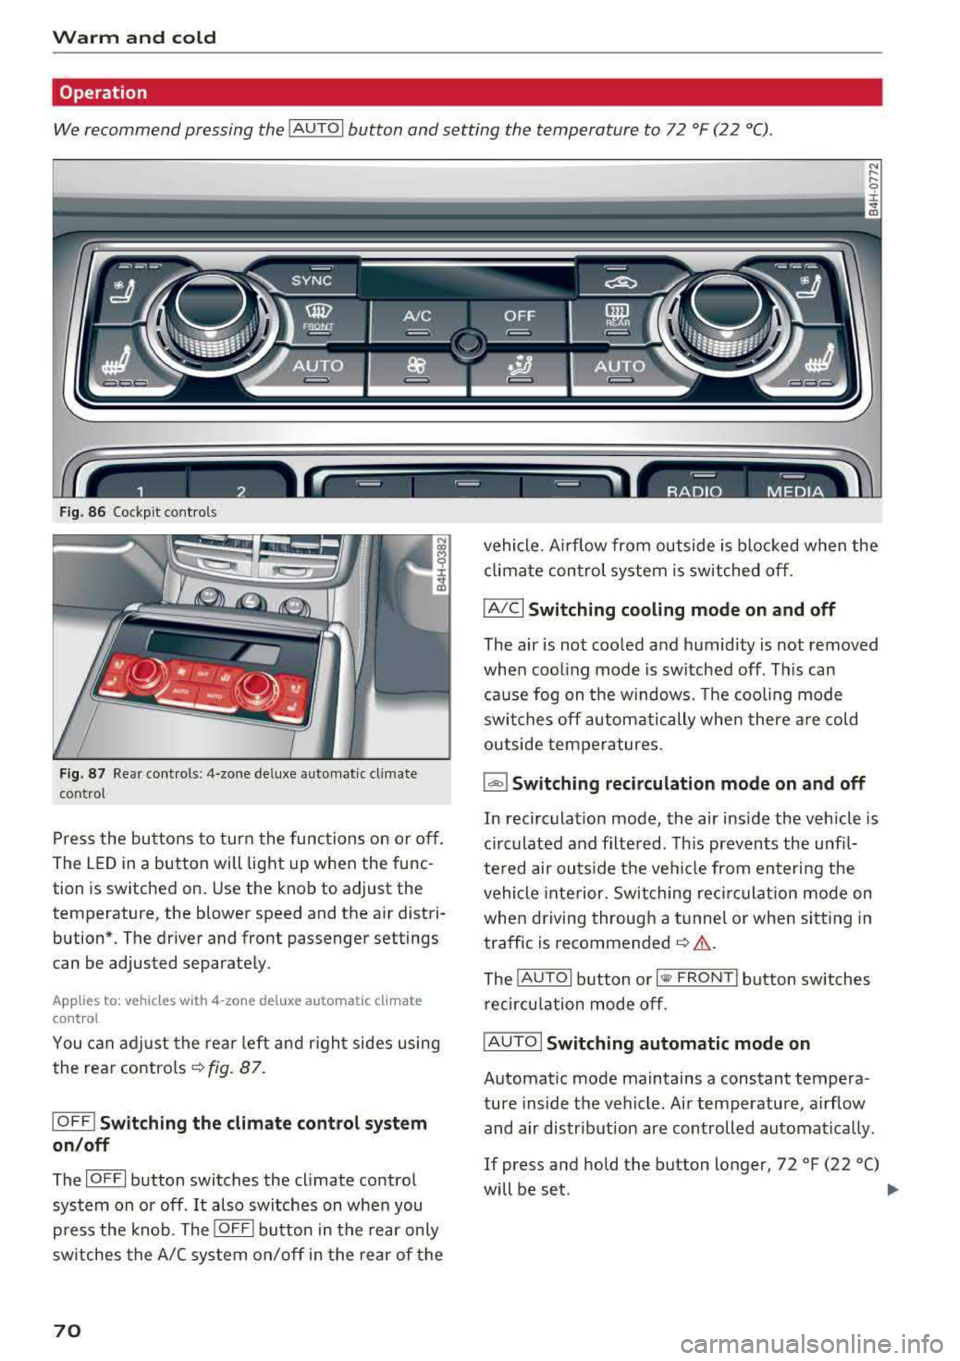
Operation
We recommend pressing the !AUTOI button and setting the temperature to 72 °F (22 °C) .
Fig . 8 6 Cockp it con trols
F ig . 87 Re ar contro ls: 4 -zone de lu xe auto matic cl imate
con tro l
Press the bu ttons to tur n the func tions on or off .
The LED in a button will light up when the func
tion is sw itched on. Use the knob to adjust the
temperature, the blower speed and the a ir distri
bution*. The driver and front passenger settings
can be adjusted separate ly.
Applies to: vehicles w ith 4-zone del uxe automatic climate
cont rol
You can adj ust the rea r left and r igh t sides using
the rea r contro ls
~ fig . 87.
IO FF ! Switching the climate control system
on /off
The IO FFI button switches the cl imate contro l
system on or off .
It also switches on whe n you
p ress the knob . The
!OFF I butto n in the rear only
sw itches the A/C system on/off in the rear of the
70
vehicle . A irflow from outside is blocked w hen the
cl imate control system is switched off.
IAIC I Switching cooling mode on and off
The air is not coo led and h umid ity is not removed
whe n coo ling mode is sw itched off . Th is can
ca use fog on the windows. The coo ling mode
swi tches off autom atically whe n there a re cold
outside temperatures.
l'-"" I Switching recirculation mode on and off
In recirculat ion mode , the air inside the vehicle is
c ir culated and filte red . Th is prevents the unfi l
te red air outs ide t he ve hicle from en teri ng the
vehicle inte rior. Switching reci rc u lat ion mode on
whe n driving throug h a t unnel or whe n sitting in
traffic is recommended
~ & .
The !AU TO I button o r I@ F RO NT I button switches
recircu lation mode off .
IAUTO I Switching automatic mode on
Automat ic mode maintains a constant tempera
ture inside the vehicle. Air temperature , a irflow
and air distrib ution are controlled automatica lly .
If press and hold the button longer, 72 °F (22 °C)
will be set .
.,,.
Page 74 of 356
Warm and cold
(D Note
To avoid damage to the heating elements in
the seats, do not kneel on the seats or place
heavy loads on a small area of the seat.
Basic settings
The climate control system basic settings ore ac
cessed in the Infotainment system.
,.. Select: the ICARI function button > Car systems
control button > AC.
Rear seat settings*
When this function is selected, all settings for
the rear can be adjusted through the climate con
trol system in the cockpit. The climate control
system settings cannot be adjusted in the rear
seat at the same time. This function switches off
after a certain period of time or when one of the
dials in the cockpit is pressed.
Auto recirculation*
The sensit ivity level of the automatic recircula
tion mode can be set at various levels from
Off to
Sensitive. When recirculation mode 1~ 1 is switch
ed on, the air recirculation is controlled automat
ically. If the windows fog up, press the
I ® FRONT I
button.
Footwell temperature
You can adjust the footwell temperature so that
it is cooler or warmer .
Solar roof*
Parking ventilation is controlled automatically in
the
Auto setting.
When the ignition is switched off, solar-powered
parking ventilation may switch on, as long as
- there is sufficient sunlight,
- the outside temperature is not too low,
- the sunroof is closed or tilted and
-Auto (Infotainment system) is set
72
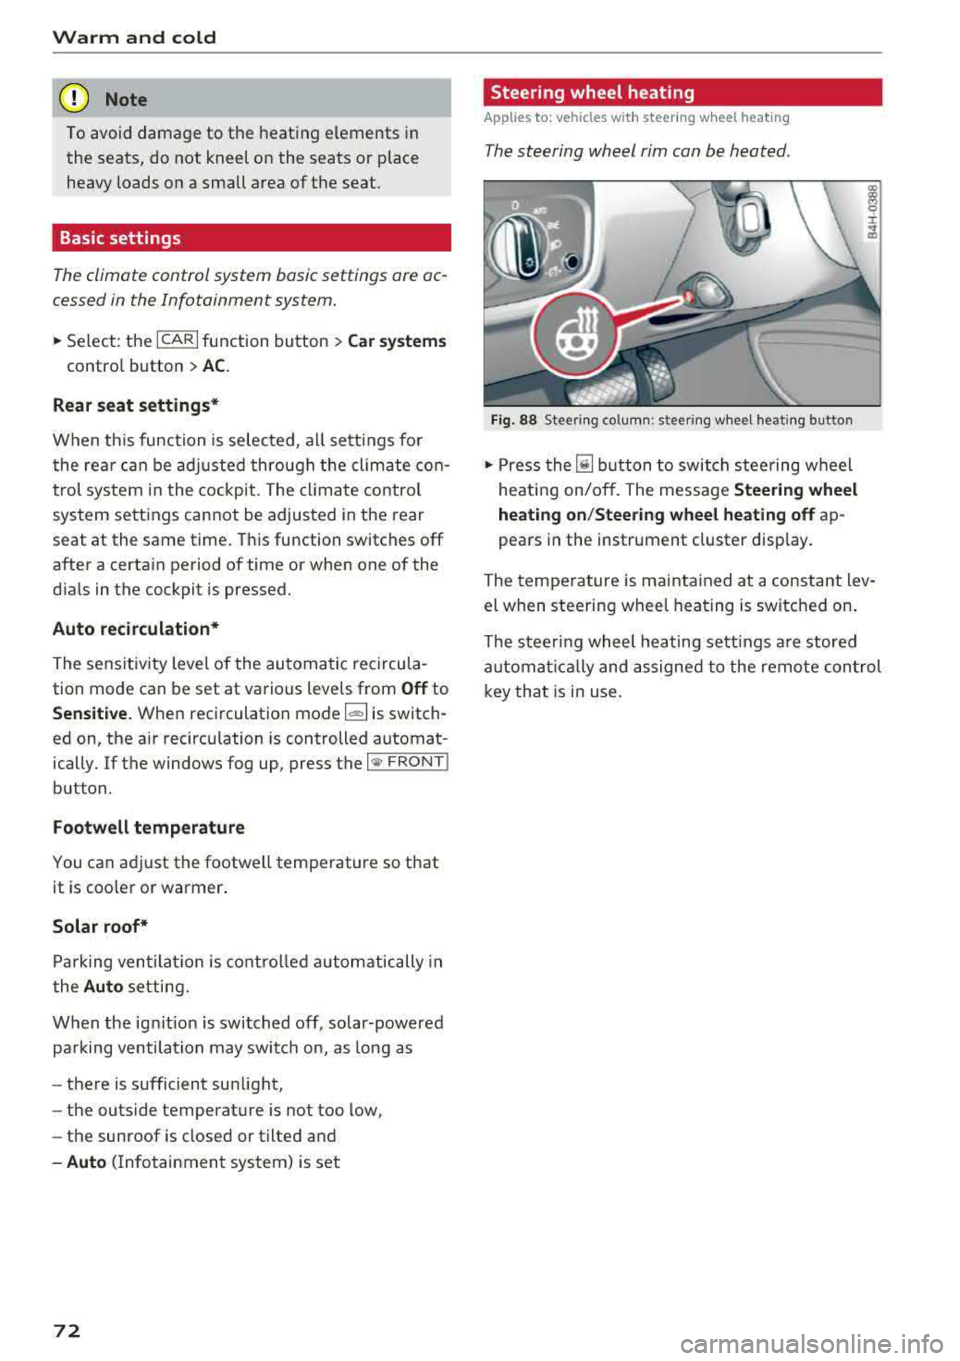
Steering wheel heating
Applies to: vehicles with steering wheel heating
The steering wheel rim can be heated .
Fig. 88 Steering column: steering wheel heating button
,.. Press the [il button to switch steering wheel
heating on/off. The message
Steering wheel
heating on/Steering wheel heating off
ap
pears in the instrument cluster display.
The temperature is maintained at a constant lev
el when steering wheel heating is switched on.
The steering wheel heating settings are stored
automat ical ly and assigned to the remote control
key that is in use.
Page 77 of 356
lL t:0 ....
"" ......
"" .... 0 0 :c '
The engine drives the generator, wh ich generates
electricity; the fue l consumption also increases
with the demand for electricity. Therefore, switch
e lectrical equipment off when you no longer
need it. Examples of equipment that use a lot of
energy are air blowers at a high setting, the rear
window defogger and seat heating*.
CD Note
Do not leave engine idling unattended after
starting. If warning lights should come on to
ind icate improper operation, they would go
unheeded. Extended idling also produces
heat, wh ich could result in overheat ing or
other damage to the vehicle or other p roper-
ty.
CD Note
-Have your vehicle maintained properly and
i n accordance with the service recommenda
tions in your Warranty
& Ma intenance book
l et. Lack of proper maintenance as well as
i mproper use of the vehicle will impair the
function of the emission control system and
could lead to damage.
-Do not alter or remove any component of
the Emission Control System unless ap proved by the manufacturer.
-Do not alter or remove any device, such as
heat shie lds, switches, ignition wires,
valves, which are designed to protect your
vehicle's Emission Control System and other
important vehicle components .
@ Tips
The consumption estimates as published by
ENVIRONMENTAL PROTECTION AGENCY
(EPA) and Transport Canada may not corre
spond to your actual consumption on the
road, which will vary depending upon vehicle
load and speed, road and weather conditions
trip length, etc.
'
D rivi ng
Steering
Adjusting the steering wheel position
The steering column can be power adjusted up
and down and forward and back.
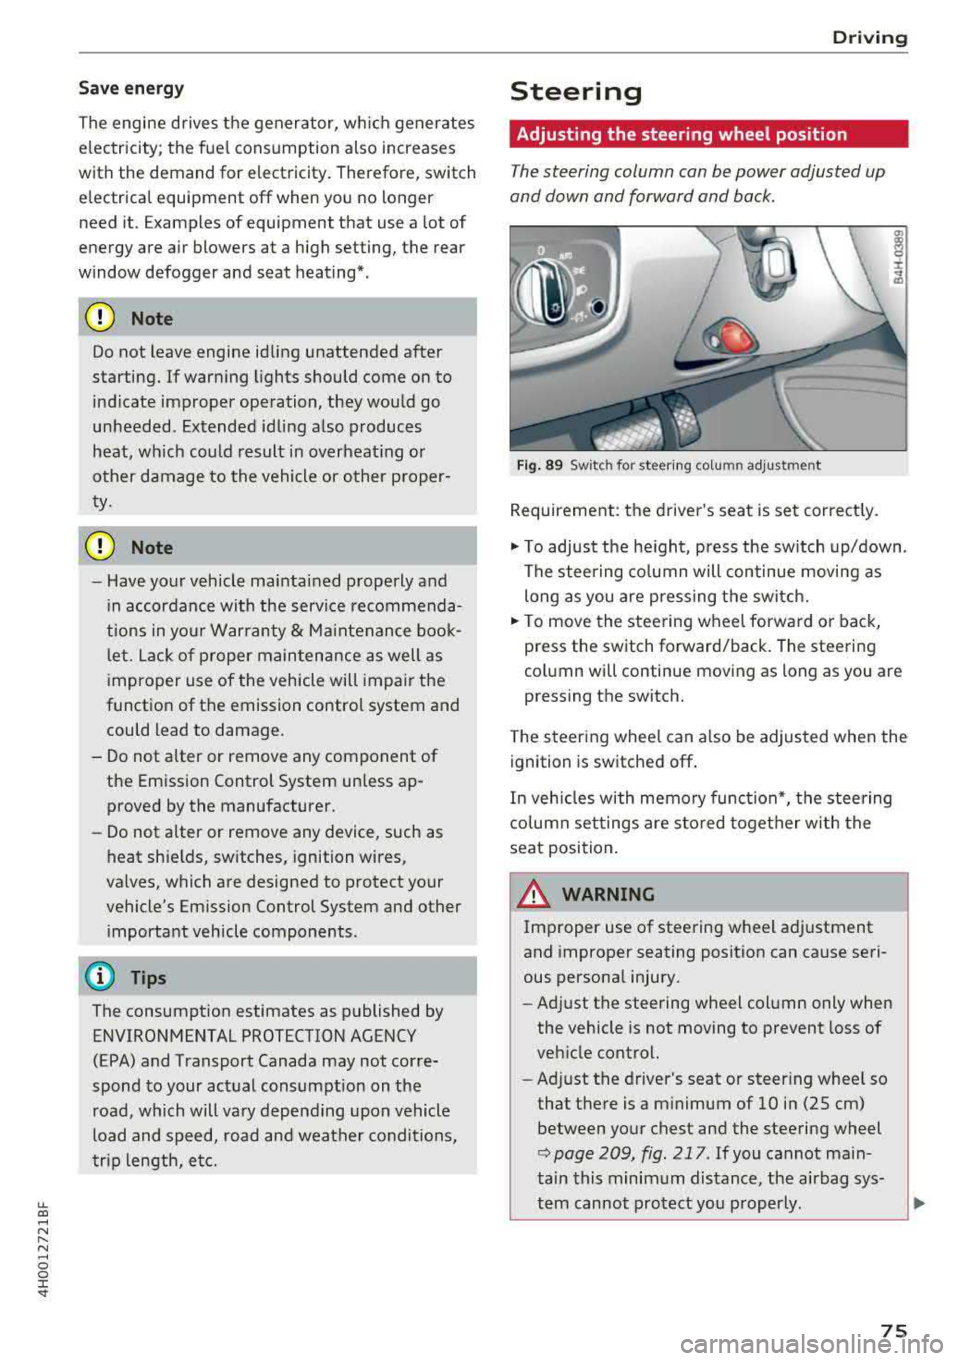
F ig . 89 Sw itc h for steering colu mn adjustment
Requirement: the driver's seat is set correct ly.
"' To adjust the he ight, press the sw itch up/down .
The steering co lumn will continue movi ng as
long as you are pressing the switch.
"' To move the steering wheel forwa rd or back,
press the switch forward/back. The steering
column will continue moving as long as you are
pressing the switch.
T he steering wheel can a lso be adjusted when the
ignition is switched off .
In veh icles with memory function*, the steering
co lumn settings are s to red toget her w ith the
seat position.
A WARNING
Improper use of steering wheel adjustment
and improper seating position can cause seri
ous personal injury.
- Adjust the steering wheel column only when
the vehicle is not moving to prevent loss of
veh icle control.
- Ad just the driver's seat or steer ing whee l so
that the re is a m inimum of 10 in (25 cm)
between your chest and the steering wheel
r::;, page 209, fig . 217 . If you cannot main
tain this minimum distance, the airbag sys-
tem cannot protect you p roperly.
~
75
Page 95 of 356
lL t:0 ....
"' ......
"' .... 0 0 :c '
The speed warning system helps you to stay un
der a specified maximum speed.
The speed warning system warns you if you are
exceeding the maximum speed that you have set.
A warning tone will sound as soon as your speed
exceeds the stored value slightly.
The. (USA models)/ . (Canada models) indi
cator light and a message appear in the instru
ment cluster display at the same time. The
•
• indicator light and the message turn off if the
speed falls back below the stored maximum
speed.
Setting a threshold is recommended if you would like to be reminded when you reach a certain
maximum speed. Situations where you may want
to do so include driving in a country with a gener
al speed limit or if there is a specified maximum
speed for winter tires.
Setting the warning threshold
The warning threshold is set in the Infotainment
system.
.. Select: I CARI function button > Car systems
contro l button > Driver assistance > Speed
warning.
(D Tips
Regardless of the speed warning system, you
should always monitor your speed using the
speedometer and make sure you are following
the legal speed limit.
Assistance systems
Cruise control system
Switching on
The cruise control system makes it possible to
drive at a constant speed starting at 20 mph (30
km/h).
0
f
®t
0
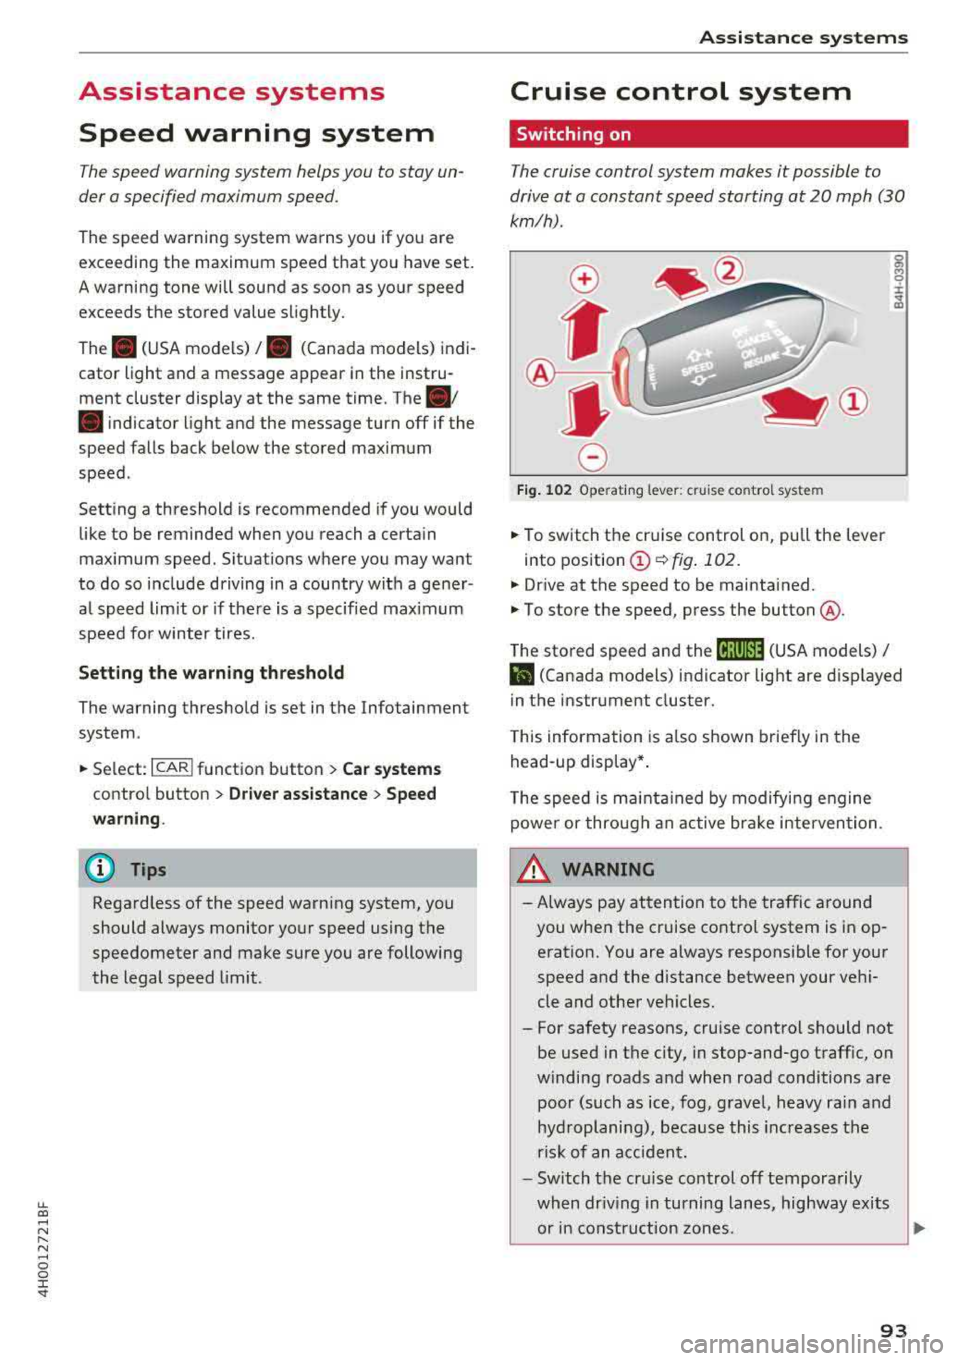
Fig. 102 Operating lever: cruise control system
g M 0 :i: ;A
.. To switch the cruise control on, pull the lever
into position
(D ¢ fig. 102.
.. Drive at the speed to be maintained.
.. To store the speed, press the button @.
The stored speed and the
(ij;ji)M~ (USA models) /
l'I (Canada models) indicator light are displayed
in the instrument cluster.
This information is also shown briefly in the
head-up display* .
The speed is maintained by modifying engine
power or through an active brake intervention.
_.&. WARNING
-
-Always pay attention to the traffic around
you when the cruise control system is in op
eration. You are always responsible for your
speed and the distance between your vehi
cle and other vehicles.
-For safety reasons, cruise control should not
be used in the city, in stop-and-go traffic, on
winding roads and when road conditions are poor (such as ice, fog, gravel, heavy rain and
hydroplaning), because this increases the
risk of an accident.
-Switch the cruise control off temporarily
when driving in turning lanes, highway exits or in construction zones.
~
93