heating AUDI A8 2018 Owners Manual
[x] Cancel search | Manufacturer: AUDI, Model Year: 2018, Model line: A8, Model: AUDI A8 2018Pages: 356, PDF Size: 54.71 MB
Page 12 of 356
Cockpit overv iew
CD Note
- Auxiliary headlights and other accessories in
front of the cooling-air intake impair the
cooling effect of the coolant. This increases
the r isk of the engine overheat ing during
high outside temperatures and heavy en-
gine load.
- The front spoiler also helps to distr ibute
cooling air correctly wh ile driving. If the
spoiler is damaged, the cooling effect will
be impaired and the risk of the engine over
heating will inc rease. See an a uthorized
A ud i dealer or authorized Audi Service Fa
cility for assistance .
Tachometer
The tachometer displays the engine speed in rev
olutions per minute
(RPM).
You should shift to the next lowest gea r when
the speed is below 1,500 RP M. The beginn ing of
the red zone in the tachometer ind icates the
maximum permissible engine speed fo r all gears
once the engine has been broken in and when it is
warmed up to operating temperature . Before
reaching this zone, you should shift into the next
highest gear, select the D selector lever position,
or remove your foot from the accelerator pedal.
~ Note
The needle in the tachometer @ c:> page 9,
fig. 3 may only be in the red area of the gauge
for a short time or there is a risk of engine damage. The locat ion where the red zone be
gi ns varies depending on the engine.
@ For the sake of the environment
Upshifting early helps you to save fuel and re
duces operating noise.
Fuel level
The display @ only works when the ignition is
sw itched on. If the fuel level drops below 4 gal
(15
L), a red L ED will light up and the Ill indica
tor light will turn on
c:> page 24. The red LED
will blink when the fuel level is very low.
10
The fuel tank capacity of your ve hicle is listed in
the
Techn ical Data section c:> page 334.
CD Note
Neve r drive until the tank is comp letely emp
ty. The irregu lar supply of fuel th at results
from that can cause engine misfires . Uncom
busted fuel w ill then enter the exhaust sys
tem. This can cause overheating and damage
to the catalyt ic converter.
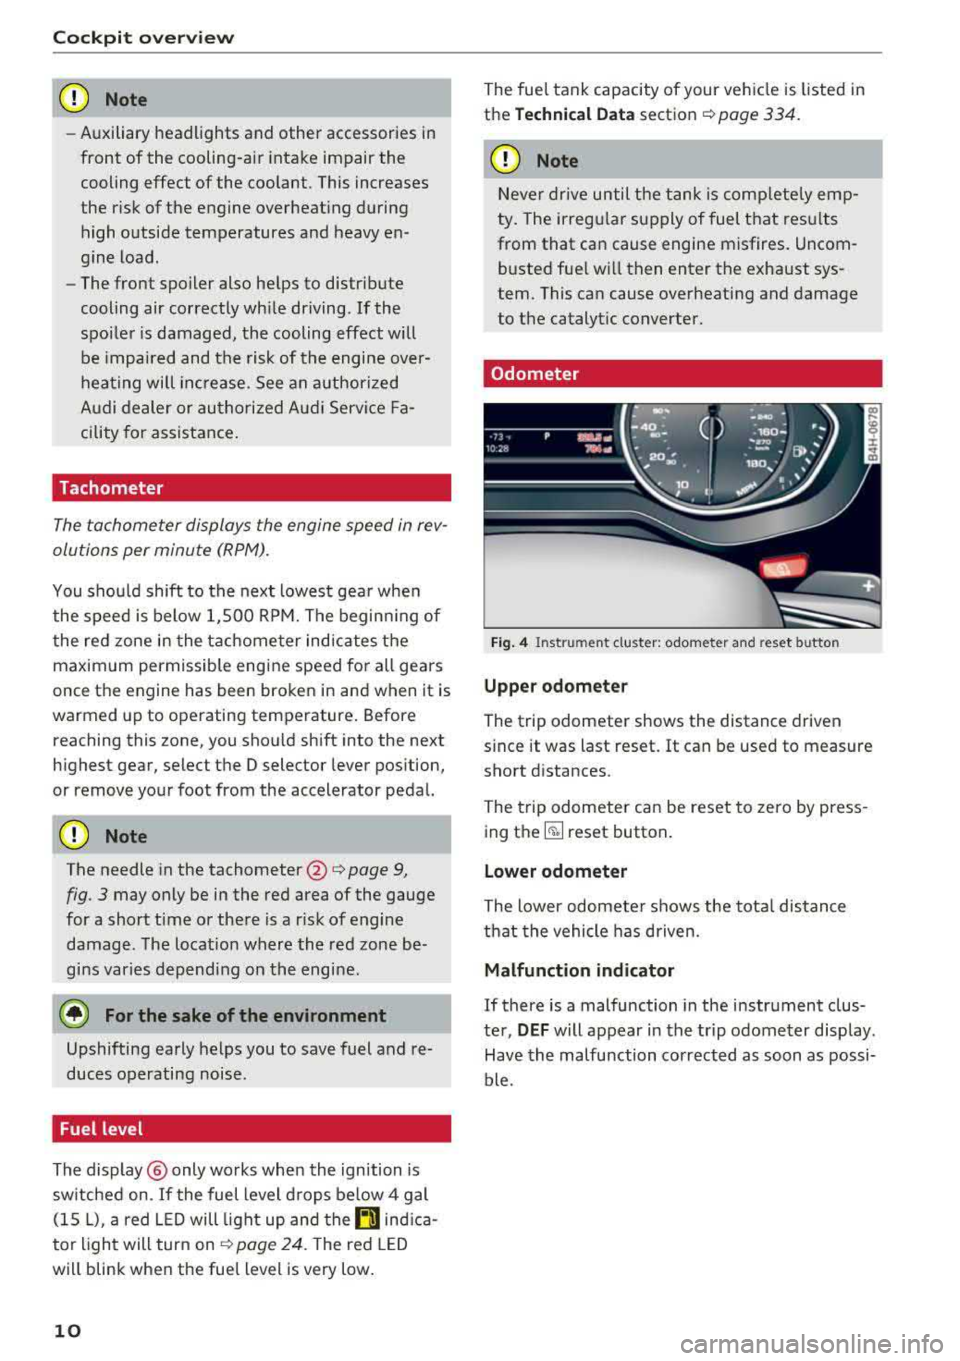
Odometer
Fig. 4 Instru ment cluster: odometer and reset button
Upper odometer
The trip odometer shows the distance driven
s ince it was last reset.
It can be used to measure
short distances.
The trip odometer can be reset to zero by press
ing
the ~ reset button.
Lower odometer
The lower odomete r shows the total distance
that the vehicle has driven.
Malfunction indicator
If there is a malfunction in the instrument clus
ter,
DEF will appear in the trip odometer display.
Have the malfunction corrected as soon as possi
ble.
Page 30 of 356
Opening and clo sin g
@ Tips
- Do not leave valuables unattended in t he ve
hicle . A locked vehicle is not a safe!
- The LED in the driver 's door rail blinks when
you lock the vehicle . If the LED lights up for
approximately 30 seconds after locking,
there is a ma lfunction in the central locking
system. Have the problem corrected by an
authorized Audi dealer or authorized Audi
Service Fac ility.
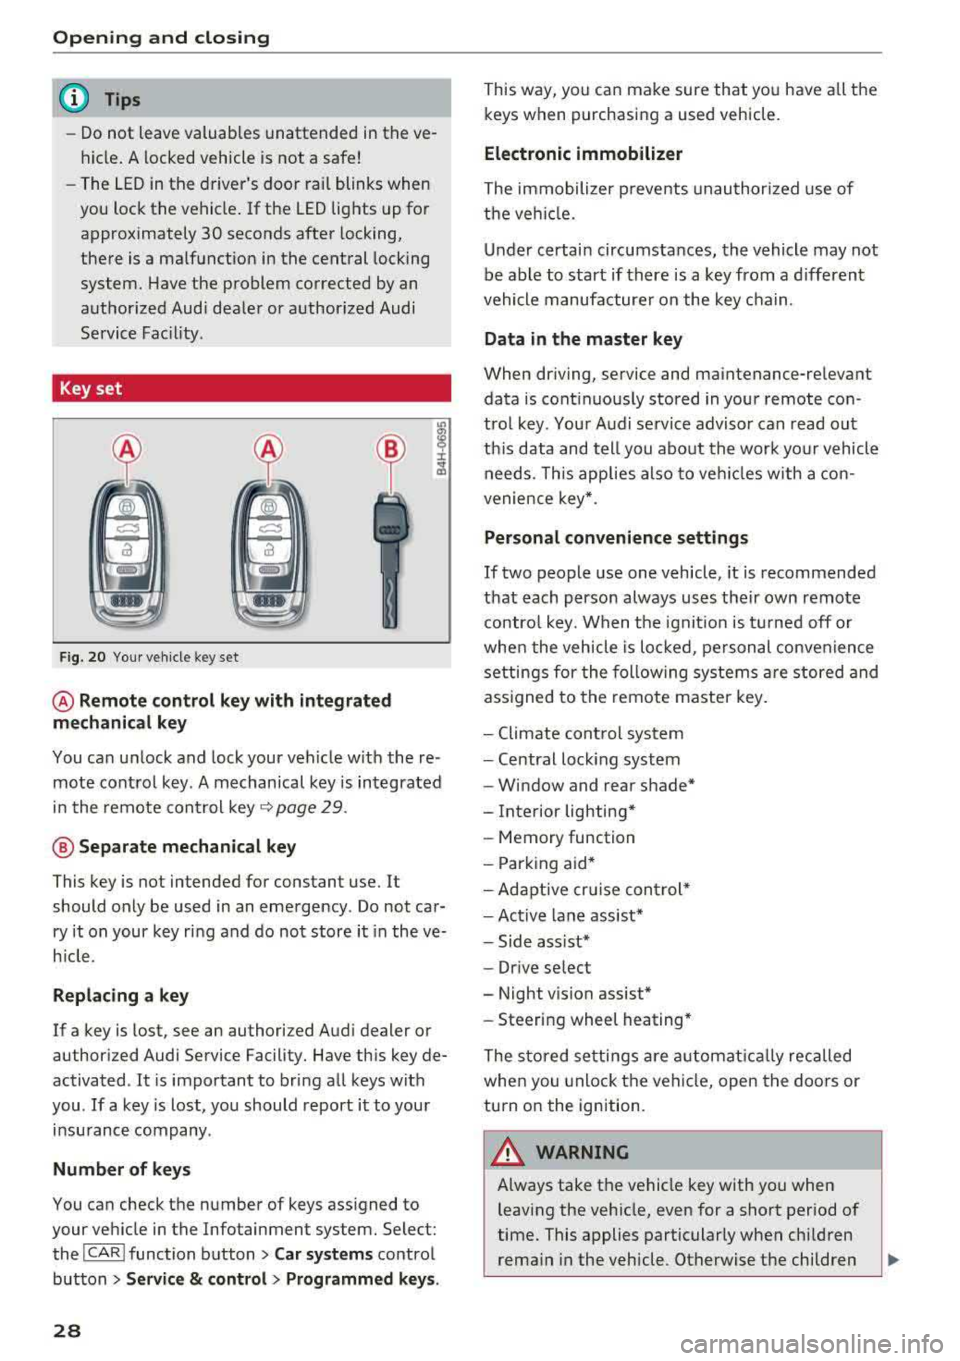
Key set
F ig. 20 You r veh icle key set
@ Remote control ke y with integr ated
mechanica l key
You can unlock and lock your vehicle w ith the re
mote control key . A mechanical key is integrated
in the remote control key
Q page 29 .
@ Separate mechanical ke y
This key is not intended for constant use. It
should only be used in an emergency . Do not car
ry it on your key ring and do not store it in the ve
h icle.
Rep lacing a ke y
If a key is lost, see an authorized Audi dealer or
authorized Audi Service Facility. Have this key de
activated . It is important to bring all keys with
you .
If a key is lost, you should report it to your
insurance company .
Number of keys
You can check the number of keys ass igned to
your veh icle in the Infotainment system. Select:
the
I CAR I function button > Car sy st e m s control
button
> Ser vice & cont rol > Pr ogrammed ke ys.
28
This way, you can make sure that you have all the
keys when purchasing a used vehicle.
Electronic immobilizer
The immobilizer p revents unauthorized use of
the ve hicle.
Under certain circumstances, the vehicle may not
be able to start if there is a key from a d ifferent
vehicle manufacturer on the key chain .
Data in the master ke y
When driving, service and maintenance-relevant
data is cont inuous ly stored in your remote con
trol key . Your A udi se rvice advisor can read out
th is data and tell you abo ut the work yo ur vehicle
needs . T his applies also to veh icles w ith a con
venience key *.
Personal convenience sett ings
If two people use one vehicle, it is recommended
that each person always uses their own remote contro l key. When the ignit io n is tu rned off or
whe n the vehicle is lo cked, pe rsonal convenience
settings for the following systems a re stored and
ass igned to the remote master key .
- Climate cont rol system
- Central lock ing system
- Window and rear shade*
- Interior lighting*
- Memory function
- Park ing aid*
- Adaptive cr uise control *
- Ac tive lane assist*
- Side ass ist*
- Dr ive select
- Night vision assist*
- Steeri ng wheel heating*
The stored settings are automat ica lly recalled
when you unlock the vehi cle, open the doors or
turn on the ignition.
A WARNING
A lways take the vehicle key with you when
leaving the vehicle, even for a short period of
time. This applies particularly when child ren
rema in in the vehicle . Otherwise the children
-
Page 63 of 356
lL t:0 ....
"' ......
"' .... 0 0 :c '
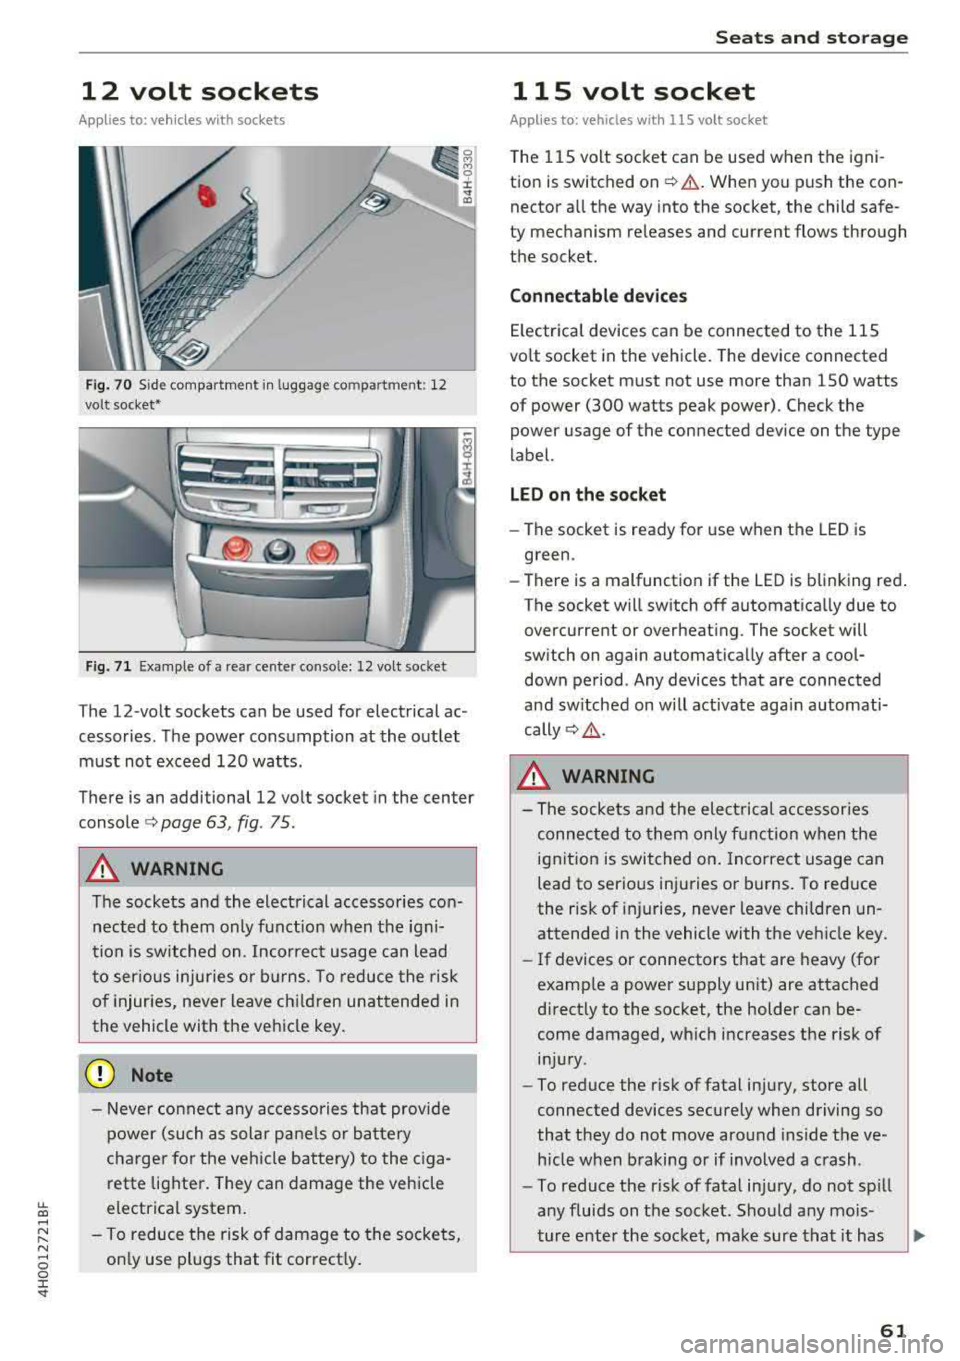
Applies to: veh icles with sockets
Fig . 70 Side compartment in luggag e compartment: 12
volt socket•
Fig. 71 Example of a rear center console: 12 volt socket
The 12-volt sockets can be used for electrical ac
cessories. The power consumption at the outlet
must not exceed 120 watts.
There is an additional 12 volt socket in the center
console
¢page 63, fig . 75.
_&, WARNING
The sockets and the electrical accessories con
nected to them only funct ion when the igni
tion is switched on. Incorrect usage can lead
to ser ious injuries or burns. To reduce the risk
of injuries, never leave children unattended i n
the vehicle with the vehicle key.
(D Note
- Never connect any accessories that provide
power (such as solar panels or battery
charger for the vehicle battery) to the ciga
rette lighter. They can damage the vehicle
electrical system .
- To reduce the risk of damage to the sockets,
on ly use plugs that fit correct ly .
Seats and storage
115 volt socket
Applies to: vehicles with 115 volt socket
T he 115 volt socket can be used when the igni
tion is switched on
¢ .&. . When you push the con
nector all the way into the socket, the child safe
ty mechanism re leases and current flows through
the socket.
Connectable devices
Electrica l devices can be connected to the 115
volt socket in the vehicle. The device connected
to the socket must not use more than 150 watts
of power (300 watts peak power). Check the
power usage of the connected device on the type
label.
LED on the socket
-The socket is ready for use when the LED is
green.
- There is a malfunction if the LED is blinking red.
The socket will switch off automatically due to
overcurrent or overheating. The socket will
switch on again automatically after a cool
down period. Any devices that are connected
and sw itched on w ill act ivate aga in automati
cally¢ .&.
_&, WARNING
- The sockets and the electrical accessories
connec ted to them only f unction when the
ignit ion is switched on. Incorrect usage can
lead to serious injuries o r burns. To reduce
the risk of injuries, never leave children un
attended in the vehicle with the vehicle key.
- If devices or connectors that are heavy (for
example a power supply unit) are attached
d ire ctly to the socket, the holder can be
come damaged, wh ich increases the risk of
injury.
-To reduce the risk of fatal injury, store all
connected devices securely when driving so
that they do not
move around inside the ve
h icle when braking or if involved a crash.
- To reduce the risk of fatal injury, do not spill
any fluids on the socket. Should any mo is-
ture enter the socket, make sure that it has
~
61
Page 64 of 356
Seats and stor age
dried out complete ly before using the
socket again .
-Devices connected to the vehicle behave dif
ferent ly than when they are connected to a
regu lar power supply. Therefore, connected
devices can become hot dur ing operation,
wh ich can increase the risk of injury .
-There is a risk of injury when using adapters
and extension cords, because the child safe
ty on t he socket is switched off and the
socket is powered w ith current .
-To reduce the risk of fatal injury, do not in
sert any conductive objects, such as knitting
need les, into the contacts on the socket.
-T o reduce the risk of injury, switch off any
connected electr ical devices if the socket
has switched off d ue to overheating.
(D Note
- Also read the operating manuals for the
connected dev ices .
- Do not connect any lamps that contain neon
tubes . Due to technical reasons, this can
cause malf unct ions in the lamp .
- Do not connect any 230 volt dev ices to the
115 volt socket . The device can be dam
aged . Check the permitted voltage of the
device accord ing to the type label.
- With some power supply units, such as for
l aptops, switching them on disables the
in
teg rated ove rcur rent shutdown . In this
case, disconnec t the power s upply un it from
the electrical equipment and reconnect
af
ter approximately 10 seconds .
(D Tips
-Devices that are not shie lded or devices ne ar
the rear w indow antenna can ca use mal
functions in the radio, TV area or in the vehi
cle electrical system .
- T he functions on some devices may be limit
ed d ue to the low power output (wattage).
62
Full-Length center
console
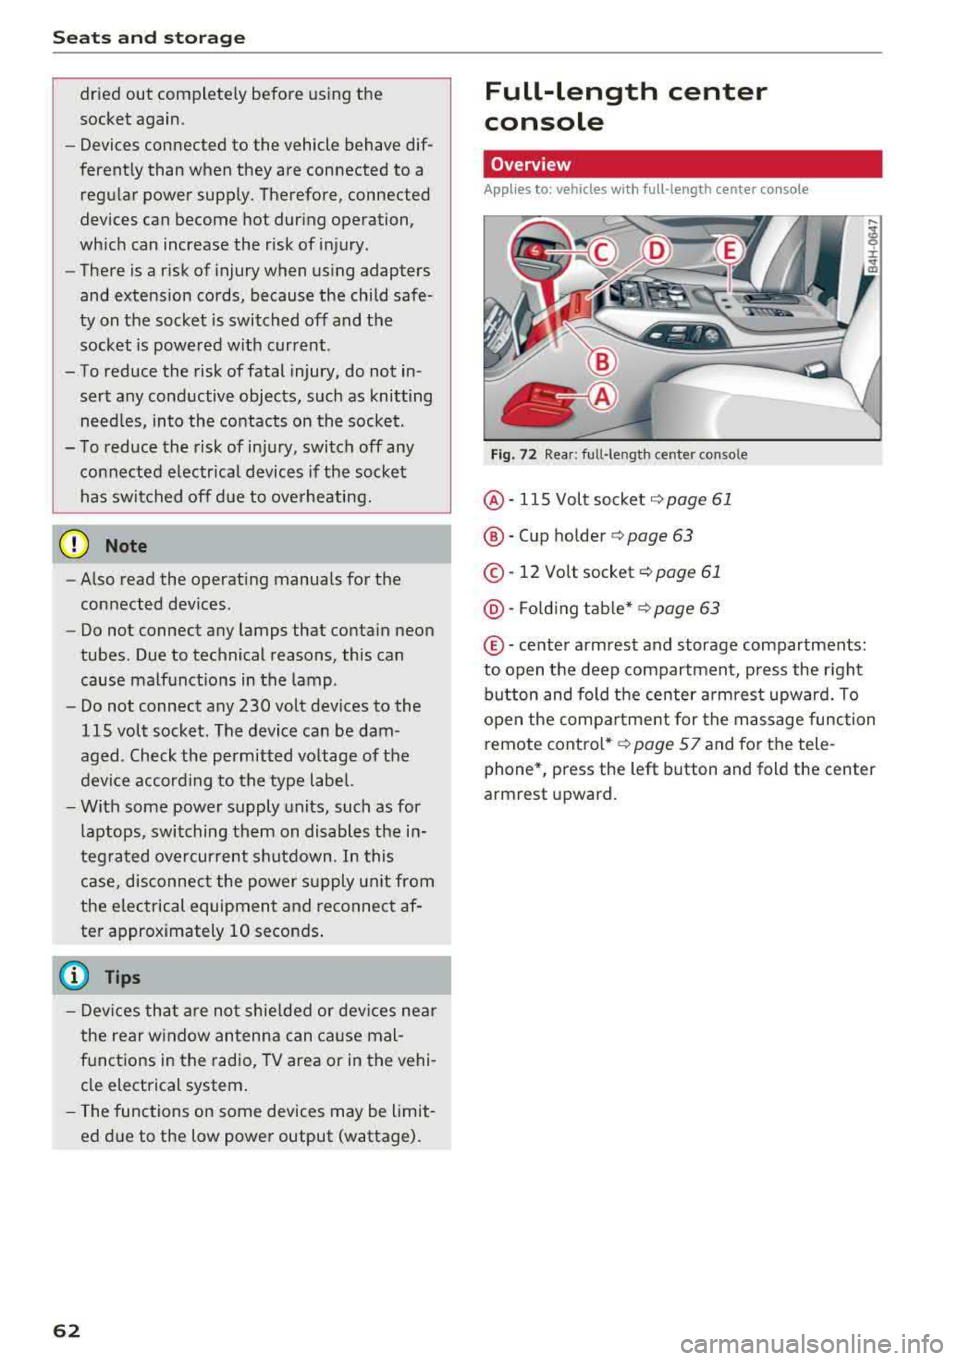
Overview
Applies to: vehicles with full-length center co nsole
F ig. 72 Rea r: ful l-leng th center console
@ -115 Volt socket c:;, page 61
®-Cup ho lder c:;, page 63
© -12 Volt socket c:;, page 61
@ -Fo ld ing t able* c:;, page 63
© -ce nter armrest and storage compartments:
to open the deep compartment, press the right b utton and fold the center a rmrest upward. To
open the compa rtment for the massage function
remote cont rol*
c:;, page S 7 and for the tele
phone*, press the left button and fold the center
armrest upward.
Page 66 of 356
Seats and storage
(D Note
Beverage containers in the cup holders should
always have a lid. If not, beverages could spill
and cause damage to vehicle equipment, such
electronics or seat covers.
Cooled glove compartment
The cooled glove compartment only functions
when the A/C system is switched on.
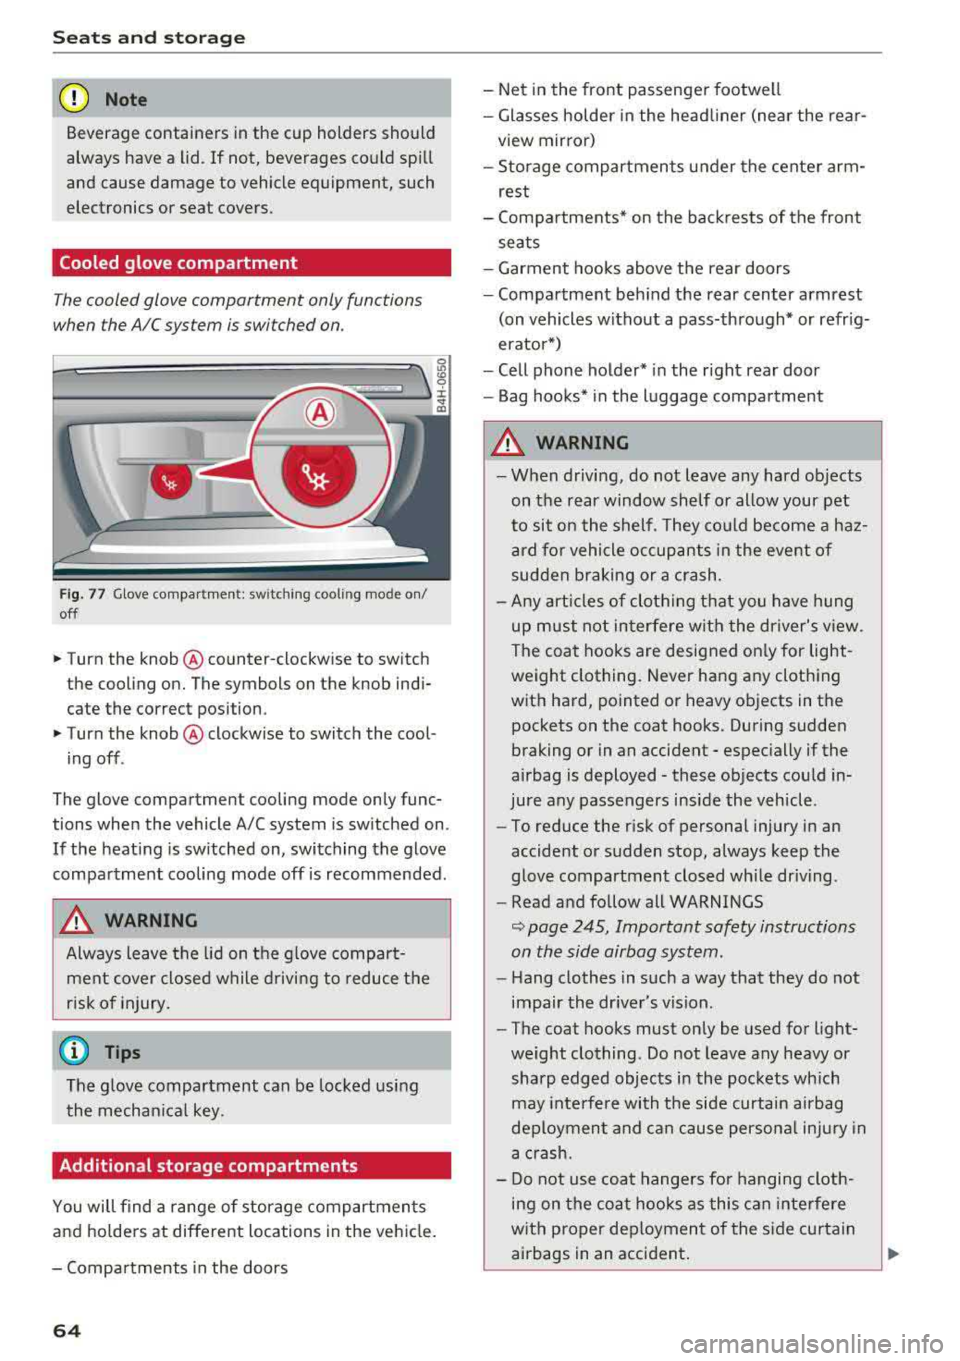
Fig. 77 Glove compar tment: switching cooling mode on/
off
.. Turn the knob @counter-clockwise to switch
the cooling on. The symbols on the knob indi
cate the correct position.
.. Turn the knob @clockwise to switch the cool-
ing off .
The glove compartment cooling mode only func
tions when the vehicle A/C system is switched on.
If the heating is switched on, switching the glove
compartment cooling mode off is recommended.
A WARNING
-
Always leave the lid on the glove compart
ment cover closed while driving to reduce the
risk of injury.
(D Tips
The glove compartment can be locked using
the mechanical key.
Additional storage compartments
You will find a range of storage compartments
and hold ers at different locations in the vehicle.
- Compartments in the doors
64
- Net in the front passenger footwell
- Glasses holder in the headliner (near the rear-
view mirror)
- Storage compartments under the center arm
rest
- Compartments* on the backrests of the front
seats
- Garment hooks above the rear doors
- Compartment behind the rear center armrest
(on vehicles without a pass-through* or refrig
erator*)
- Cell phone holder* in the right rear door
- Bag hooks* in the luggage compartment
A WARNING
-When driving, do not leave any hard objects
on the rear window shelf or allow your pet
to sit on the shelf. They could become a haz
ard for vehicle occupants in the event of
sudden braking or a crash.
- Any articles of clothing that you have hung
up must not interfere with the driver's view .
The coat hooks are designed only for light
weight clothing. Never hang any clothing
with hard, pointed or heavy objects in the
pockets on the coat hooks. During sudden
braking or in an accident
-especially if the
airbag is deployed
-these objects could in
jure any passengers inside the vehicle .
- To reduce the risk of personal injury in an
accident or sudden stop, always keep the
glove compartment closed while driving.
- Read and follow all WARNINGS
~ page 245, Important safety instructions
on the side airbag system.
- Hang clothes in such a way that they do not
impair the driver's vision.
- The coat hooks must only be used for light
weight clothing. Do not leave any heavy or
sharp edged objects in the pockets which
may interfere with the side curtain airbag
deployment and can cause personal injury in
a crash.
- Do not use coat hangers for hanging cloth
ing on the coat hooks as this can interfere
with proper deployment of the side curtain
airbags in an accident.
Page 71 of 356
u. co .... N
" N .... 0 0 :c '
climate control
Description
The climate control system warms, cools and re
moves humidity from the air in the vehicle interi
or. It is the most effective when the windows and
sunroof* are closed. If there is a build-up of heat inside the vehicle, ventilation can help to speed
up the cooling process .
In all heating mode functions, except for defrost,
the blower only switches to a higher speed once
the engine coolant has reached a sufficient tem
perature .
Pollut ant filt er
The po llutant filter removes pollutants such as
dust and pollen from the air.
Ke y r eco gnition
The climate control settings are a utomatically
stored and assigned to the remote control key
that is in use .
A WARNING
Poor visibility can lead to accidents.
- For safer driving, keep all windows free of
ice, snow and fog .
- Become familiar as quickly as possible with
the correct use and function of the climate contro l system, especially with the defrost
ing and defogging function.
- When the temperature is below freezing,
only use the windshield washer system after
Warm and c old
the windshield has been warmed by the cli
mate control system. The washer fluid could
freeze on the windshield and impair visibili
ty .
@ Note
-If you suspect that the climate contro l sys
tem is damaged, switch the system off to
prevent further damage and have it checked
by an authorized Audi dealer or authorized
Aud i Serv ice Facility.
- Repa irs to the Aud i climate control system
require special technical knowledge and
special tools . See an authorized Aud i dealer
or authorized Audi Serv ice Fac ility .
@ For the s ake of the environment
Reducing the amount of fuel used also re
duces the amount of pollutants that enter the
a ir .
(D Tips
- To prevent interference with the heat ing
and cooling output and to prevent the win
dows from fogging over, the a ir intake in
fro nt of t he w indshie ld must be free of ice,
snow or leaves.
- Condensat ion from the coo ling system can
dr ip and form a pudd le of water under the
veh icle . T h is is no rma l and does not mean
there is a leak .
- Th e energy management system may tem
porarily switch off certain functions, suc h as
the seat heating* or rear window defogger .
T hese systems are avai lable again as soon
as the energy supply has been restored.
69
Page 73 of 356
Adjusting the temperature
Temperatures between 60 °F ( +16 ° C) and 84 °F
(+28 °C) can be set . Outside of this range,
LO or
HI will appear in the climate contro l system dis
p lay . At both of these settings, the climate con
trol system runs continuously at maximum cool
ing or heating power. There is no temperature
regulation.
~ Adjusting the amount of air
You can adjust the airf low manually to suit your
ne eds . The blower should always run at a low set
ting to prevent the windows from fogging and to
ensure a continuous exchange of air ins ide the
vehicle. To have the airflow regulated automat i
cally, press the
IAUTO I button.
~ Adjusting the air distribution
You can manually se lect the vents where the air
will flow. To have the a ir distribution regu lated
automatically, press the
IAUTO I button.
Ill/ lil* Adjusting seat heating/ventilation*
Pressing the button switches the seat heating/
venti lation on at the highest setting (level 3). The
LEDs indicate the temperature level. To reduce
the temperature, press the button aga in. To
sw itch the seat heating/ventilation off, press the
button repeatedly until the LED turns off.
After 10 minutes, the seat heating/ventilation
automatically switches from level 3 to level 2.
l
or cleared of condensation as quickly as possible.
The maximum amount of air flows main ly from
the vents below the windshield. Recirculation
mode switches off. The temperature shou ld be
set to approximately 72 °F (22 °().
The
IAUTOI button switches the defroster off .
IQil REAR I Switching the rear window defogger
on and off
The rear window defogger only operates when
~ the engine is running. It switches off automati-....
~ cally after 10 to 20 minutes, depending on the N
~ outside temperature. 0 :c '
To prevent the rear window defogger from
switching off automatica lly, press and hold the
loo REAR I button for more than three seconds .
This is stored until the ignition is switched off.
I SYNC! Synchronization*
When synchron ization is switched on, the set
tings for the driver's side are applied to the front
pass enge r's side (except for seat heating/venti la
tion*). The rear is also synchronized in vehicles
with the 4-zone deluxe automatic climate control
system*. Synchronization switches off if the set
t ings are adjusted on the front passenger's side
or in the rear*.
You can synchronize the sett ings in a row by
pressing and holding a knob. For example, to ap
ply the sett ings for the front passenger's side to
the driver's side, press and hold the knob on the
front passenger 's side.
Vents
You can open or close the center and rear vents in
the cockpit and the vents in the rear center con
sole and door pillars using the ridged thumb
wheels. The levers adjust the direction of the air
flow from the vents.
Residual heat
You can act ivate the residual heat function when
the ignition is switched off by pressing and hold
ing the
lj) button. The residual heat from the
coolant is used to heat the vehicle interior . T he
r esidua l heat function switches off automatically
after about 30 minutes .
_&. WARNING
-You should not use the recirculation mode
for an extended period of time since no
fresh air is drawn in. With the air-condition
ing switched off, the windows can fog up,
which increases the risk of an acc ident.
- Individuals with reduced sensitivity to pain
or temperature could develop burns when
using the seat heating function. To reduce
the r isk of injury, these individua ls should
not use seat heating .
71
Page 74 of 356
Warm and cold
(D Note
To avoid damage to the heating elements in
the seats, do not kneel on the seats or place
heavy loads on a small area of the seat.
Basic settings
The climate control system basic settings ore ac
cessed in the Infotainment system.
,.. Select: the ICARI function button > Car systems
control button > AC.
Rear seat settings*
When this function is selected, all settings for
the rear can be adjusted through the climate con
trol system in the cockpit. The climate control
system settings cannot be adjusted in the rear
seat at the same time. This function switches off
after a certain period of time or when one of the
dials in the cockpit is pressed.
Auto recirculation*
The sensit ivity level of the automatic recircula
tion mode can be set at various levels from
Off to
Sensitive. When recirculation mode 1~ 1 is switch
ed on, the air recirculation is controlled automat
ically. If the windows fog up, press the
I ® FRONT I
button.
Footwell temperature
You can adjust the footwell temperature so that
it is cooler or warmer .
Solar roof*
Parking ventilation is controlled automatically in
the
Auto setting.
When the ignition is switched off, solar-powered
parking ventilation may switch on, as long as
- there is sufficient sunlight,
- the outside temperature is not too low,
- the sunroof is closed or tilted and
-Auto (Infotainment system) is set
72
Steering wheel heating
Applies to: vehicles with steering wheel heating
The steering wheel rim can be heated .
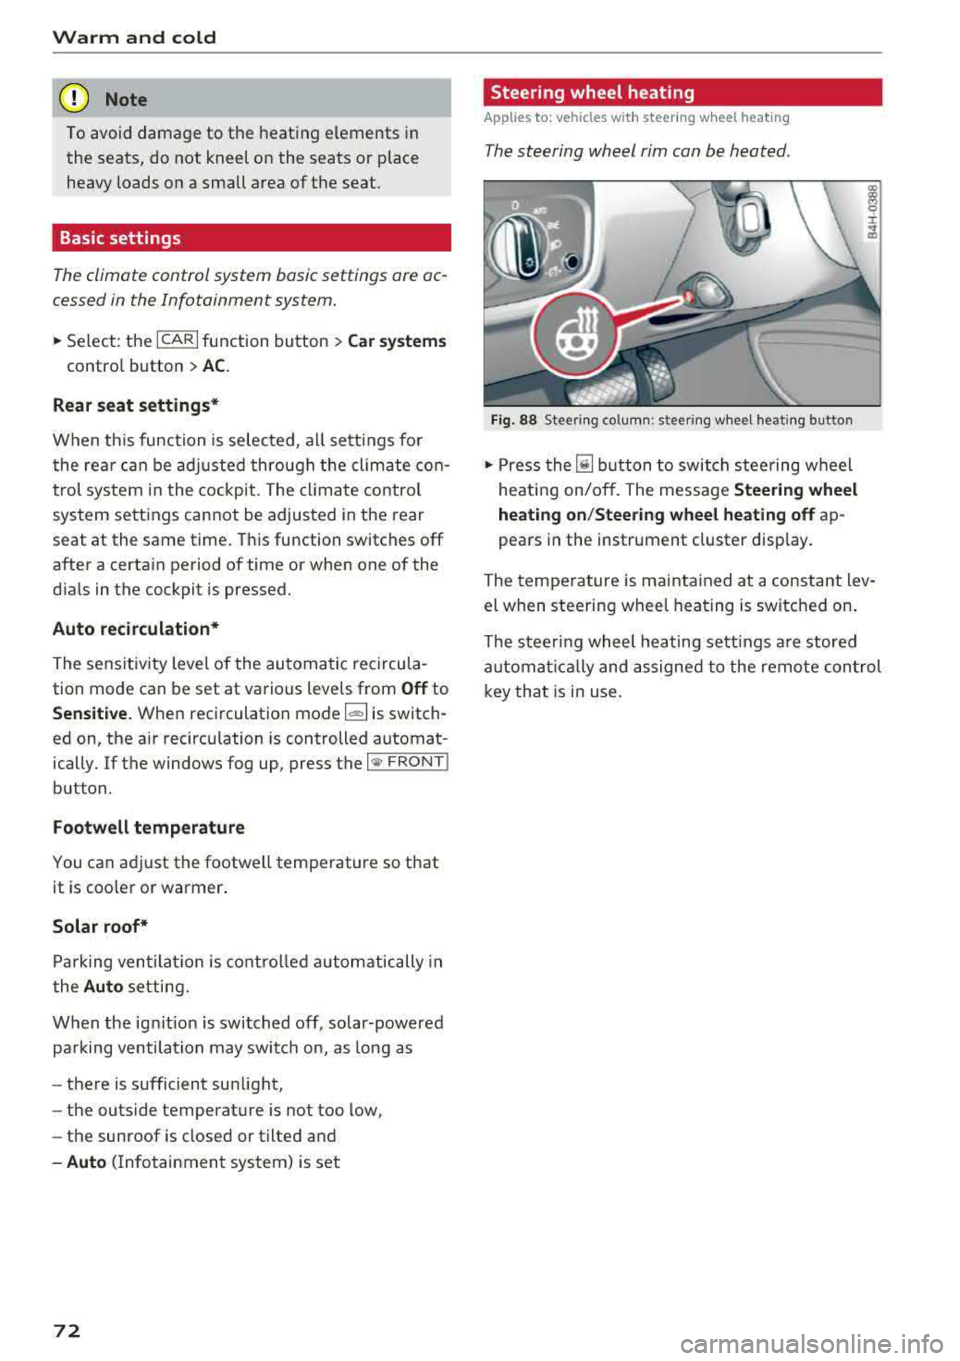
Fig. 88 Steering column: steering wheel heating button
,.. Press the [il button to switch steering wheel
heating on/off. The message
Steering wheel
heating on/Steering wheel heating off
ap
pears in the instrument cluster display.
The temperature is maintained at a constant lev
el when steering wheel heating is switched on.
The steering wheel heating settings are stored
automat ical ly and assigned to the remote control
key that is in use.
Page 77 of 356
lL t:0 ....
"" ......
"" .... 0 0 :c '
The engine drives the generator, wh ich generates
electricity; the fue l consumption also increases
with the demand for electricity. Therefore, switch
e lectrical equipment off when you no longer
need it. Examples of equipment that use a lot of
energy are air blowers at a high setting, the rear
window defogger and seat heating*.
CD Note
Do not leave engine idling unattended after
starting. If warning lights should come on to
ind icate improper operation, they would go
unheeded. Extended idling also produces
heat, wh ich could result in overheat ing or
other damage to the vehicle or other p roper-
ty.
CD Note
-Have your vehicle maintained properly and
i n accordance with the service recommenda
tions in your Warranty
& Ma intenance book
l et. Lack of proper maintenance as well as
i mproper use of the vehicle will impair the
function of the emission control system and
could lead to damage.
-Do not alter or remove any component of
the Emission Control System unless ap proved by the manufacturer.
-Do not alter or remove any device, such as
heat shie lds, switches, ignition wires,
valves, which are designed to protect your
vehicle's Emission Control System and other
important vehicle components .
@ Tips
The consumption estimates as published by
ENVIRONMENTAL PROTECTION AGENCY
(EPA) and Transport Canada may not corre
spond to your actual consumption on the
road, which will vary depending upon vehicle
load and speed, road and weather conditions
trip length, etc.
'
D rivi ng
Steering
Adjusting the steering wheel position
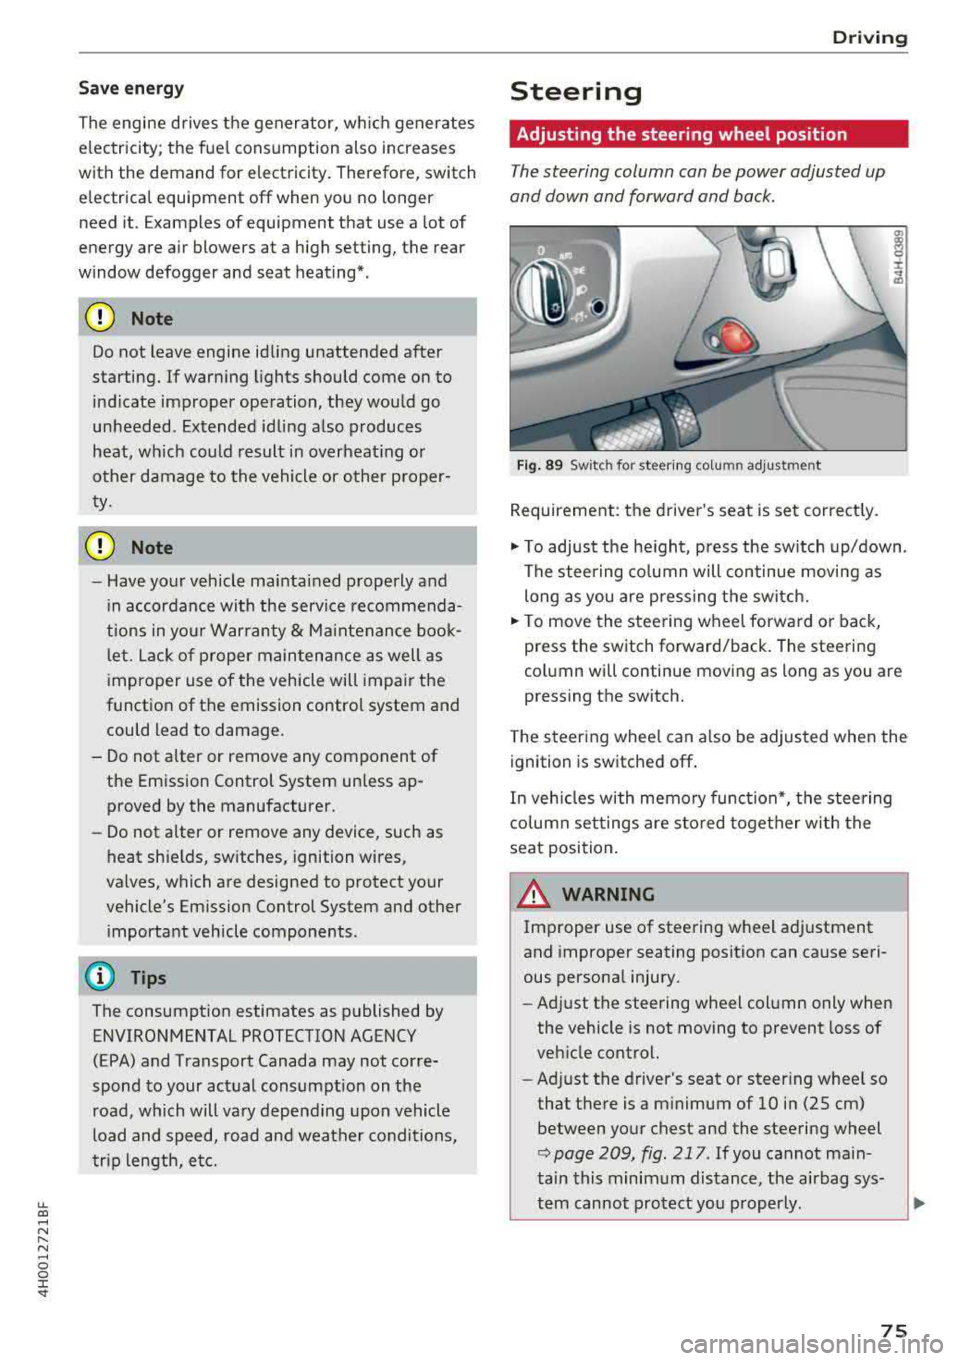
The steering column can be power adjusted up
and down and forward and back.
F ig . 89 Sw itc h for steering colu mn adjustment
Requirement: the driver's seat is set correct ly.
"' To adjust the he ight, press the sw itch up/down .
The steering co lumn will continue movi ng as
long as you are pressing the switch.
"' To move the steering wheel forwa rd or back,
press the switch forward/back. The steering
column will continue moving as long as you are
pressing the switch.
T he steering wheel can a lso be adjusted when the
ignition is switched off .
In veh icles with memory function*, the steering
co lumn settings are s to red toget her w ith the
seat position.
A WARNING
Improper use of steering wheel adjustment
and improper seating position can cause seri
ous personal injury.
- Adjust the steering wheel column only when
the vehicle is not moving to prevent loss of
veh icle control.
- Ad just the driver's seat or steer ing whee l so
that the re is a m inimum of 10 in (25 cm)
between your chest and the steering wheel
r::;, page 209, fig . 217 . If you cannot main
tain this minimum distance, the airbag sys-
tem cannot protect you p roperly.
~
75
Page 96 of 356
Assistance systems
-Please note that unconsciously "resting"
your foot on the accelerator pedal prevents
the cruise control from braking. This is be
cause pressing the accelerator pedal over
rides the cruise control system.
- If a brake system malfunction such as over
heating occurs when the cruise control sys
tem is switched on, the braking function in
the system may be switched off. The rest of
the cruise control system funct ions remain
active as long as the
@;\IM~ (USA models) /
l'I (Canada models) indicator light is on.
(D Tips
The brake lights turn on when the brakes are
applied automatically.
Changing the speed
.,. To incr ease or decrease the speed in incre
ments, tap the lever toward
010 ¢ page 93,
fig . 102.
.. To increase or decrease the speed quickly, hold
the lever in the
0 10 direction until the de
s ir ed speed is displayed.
You can a lso press the accelerator pedal down to
increase your speed, for example if you want to
pass someone. The speed you set earlier w ill re
sume as soo n as you release the accelerator ped
al.
However, if you exceed your saved speed by 5
mph (10 km/h) for longer than 6 minutes, the
cru ise control system turns off temporarily.
The
green@;\1)~1~ (USA mode ls) !l'I (Canada mod
els) indicator light in the speedometer turns off
and the stored speed is maintained.
Preselecting a speed
You can pre-select your desired speed when the
vehicle is stationary.
.. Switch the ignition on .
.. Pull the lever into position (D i::> page 93,
fig. 102 .
.. To increase or decrease the speed, push the lev
er toward
0 10 .
94
.. To store the speed displayed, release the lever.
This function makes it possible , fo r example, to
save the speed you want before driving on the
highway. Once on the highway , activate the
cruise contro l by pulling the lever toward
(D.
Switching off
Deactivating temporarily
.. Press the brake pedal, or
.. Press the lever into position @(not clicked into
place)
¢ page 93, fig. 102, or
.. Dr ive for longer than 5 minutes faster than 5
mph (10 km/h) above the stored speed.
Switching off completely
.. Press the lever into position@(clicked into
place), or
.. Switch the ignition off .
The speed you stored will be maintained if the
cruise contro l has been switched off temporarily .
T o resume the stored speed, release the brake
pedal and pull the lever into position
(D.
Switching the ignition off will erase the stored
speed.
A WARNING
You sho uld only resume the stored speed if it
is not too high for existing traffic conditions.
Otherwise you can increase the risk of an acc i
dent.