warning light AUDI A8 2020 User Guide
[x] Cancel search | Manufacturer: AUDI, Model Year: 2020, Model line: A8, Model: AUDI A8 2020Pages: 360, PDF Size: 95.38 MB
Page 39 of 360
4N0012721BD
Head-up display
Head-up display
Description
Applies to: vehicles with head-up display
The head-up display projects certain warnings or
selected information from the assist systems on
the windshield. The display appears within the
driver's field of vision.
Switching on and off
The Y button is located in the function bar on
the lower display > page 21.
> To switch the head-up display on or off, press
and hold the Y button.
Settings in the Infotainment system
> Applies to: MMI: Select on the home screen:
SETTINGS > Display & brightness > Head-up
display, or
> Press the Y button.
Possible settings:
— Picture rotation
— Brightness
— Display height: You can adjust the height of the
display. Sit in the correct seating position
=> page 72 and adjust the head-up display.
— Display contents: You can set which informa-
tion should be displayed. The display of certain
information and some of the red indicator
lights cannot be hidden.
@) Note
To reduce the risk of scratches on the glass
covering the head-up display, do not place any
objects in the projection opening.
@ Tips
— Sunglasses with polarization filters and un-
favorable lighting conditions can impair visi-
bility of the display.
— An optimal display depends on the seat po-
sition and the height adjustment of the
head-up display.
—A special windshield is needed for the head-
up display function.
— For information on cleaning, see > table In-
terior cleaning on page 311.
— Certain settings are stored automatically in
the active personal profile.
37
Page 40 of 360
Voice recognition system
Voice recognition system
General information
Applies to: vehicles with voice recognition system
You can operate many functions in the vehicle
easily using voice commands.
Using the voice recognition system optimally
> Speak clearly and distinctly at a normal volume.
Speak louder when driving faster.
> Emphasize the words in the commands evenly
and do not leave long pauses.
> Close the doors, the windows, and the sunroof*
to reduce background noise. Make sure that
passengers are not speaking when you are giv-
ing a voice command.
> Do not direct the vents toward the hands-free
microphone, which is in the roof headliner near
the front interior lights.
> Only the driver should speak to the system, be-
cause the handsfree microphone is aimed to-
ward this seating position.
ZA\ WARNING
— Direct your full attention to driving. As the
driver, you have complete responsibility for
safety in traffic. Only use the functions in
such a way that you always maintain com-
plete control over your vehicle in all traffic
situations.
— Do not use the voice recognition system in
emergencies because your voice may change
in stressful situations. The system may take
longer to dial the number or may not be
able to dial it at all. Dial the emergency
number manually.
G) Tips
There are no voice guidance* prompts when a
dialog is active.
38
Operating
Applies to: vehicles with voice recognition system
See
Dat)
Where is a
Connect
Diala
coy
Es
ea
cog
Fig. 29 Upper display: voice recognition system
Switching the voice recognition system on or
off
Requirement: the ignition and the MMI must be
switched on. A system language supported by
the voice recognition system must be set. There
must be no phone calls in progress and the park-
ing aid must not be active.
> To switch the voice recognition system on,
briefly press the «€ button on the multifunction
steering wheel, or depending on the context,
press w¢ in the upper display.
> To switch the voice recognition system off,
press and hold the « button on the multifunc-
tion steering wheel, or say or press Cancel (a).
Using the voice recognition system
In the voice recognition system menu, possible
commands or help settings are displayed for the
current dialog @).
> Say the desired command after the signal tone.
> To receive additional help for the current dia-
log, say or press Help (2).
> To pause voice recognition, say or press Pause
@. To reactivate voice recognition, press (@)
again or briefly press the «€ button on the mul-
tifunction steering wheel.
> Applies to: MMI: Select on the home screen:
SETTINGS > General > Speech dialog system >
Allow commands during voice output. If the
function is switched on, you can simply say a
new command during a prompt.
Activating the online recognizer
Applies to: vehicles with online recognizer
You can activate the online recognizer for addi-
tional functions and to improve the results of >
Page 45 of 360
4N0012721BD
Opening and closing
Opening and closing
Central locking
(ee emul ela)
Z\ WARNING
— If you leave the vehicle, switch the ignition
off and take the key with you. This applies
particularly when children remain in the ve-
hicle. Otherwise, children could start the ve-
hicle or operate electrical equipment (such
as power windows), which increases the risk
of an accident.
— Applies to: vehicles with anti-theft alarm
system: No one, especially children, should
stay in the vehicle when it is locked from the
outside, because the windows can no longer
be opened from the inside > page 46, Anti-
theft alarm system. Locked doors make it
more difficult for emergency workers to en-
ter the vehicle, which puts lives at risk.
All doors and the luggage compartment lid can
be centrally unlocked and locked at once. You can
select in the MMI if the entire vehicle or only the
driver's door should unlock when unlocking the
vehicle > page 44. The turn signals flash twice
when you unlock the vehicle and flash once when
you lock the vehicle. If they do not flash when
locking, check if all doors and lids are closed.
Depending on the vehicle equipment, you may
have different options for centrally unlocking and
locking your vehicle.
— Vehicle key > page 48
— Sensors in the door handles > page 48
— Lock cylinder on the driver's door > page 46
— Central locking switch inside > page 45
Vehicle key
The term “vehicle key” refers to the remote con-
trol key or convenience key*. The convenience
key* is a remote control key with special func-
tions > page 48 and > page 111.
Power closing*
When closing a door or the luggage compart-
ment lid, you only have to let it fall lightly into
the latch. It then closes automatically > A.
Automatic locking
If you unlock the vehicle but then do not open
any of the doors, the luggage compartment, or
the hood within a short period time, the vehicle
locks again automatically. This feature prevents
the vehicle from being accidentally left unlocked
for a long period of time.
Automatic locking (Auto Lock)
The Auto Lock function locks all doors and the
luggage compartment lid once the speed has ex-
ceeded approximately 9 mph (15 km/h). The ve-
hicle will unlock again if the unlock function in
the central locking switch is pressed, the “P” gear
is engaged, or the ignition is switched off.
You can open the doors individually from the in-
side by pulling the door handle one time. To open
the rear doors individually, you must pull the
door handle twice.
In the event of a crash with airbag deployment,
the doors will also automatically unlock to allow
access to the vehicle.
Unintentionally locking yourself out
Only lock your vehicle when all of the doors and
the luggage compartment lid are closed and
there is no key in the vehicle. This reduces the
risk of locking yourself out accidentally.
The
following features help to reduce the risk of
locking your vehicle key in the vehicle:
— If the driver's door is open, the vehicle cannot
be locked by pressing the & button on the re-
mote control key or by touching the locking
sensor* on a door.
— If the vehicle key that was used most recently is
inside the luggage compartment, the luggage
compartment lid will automatically open again
after it closes > ©.
— If the vehicle key that was last used is detected
inside the vehicle, then the vehicle cannot be
locked from the outside > ©.
43
Page 47 of 360
4N0012721BD
Opening and closing
Fold mirrors
You can select if the exterior mirrors automatical-
ly fold in when locking.
Tone
when locking)
You can select if an audio signal sounds when
locking the vehicle.
Open with convenience key
Applies to: vehicles with convenience key
You can deactivate the feature for unlocking us-
ing the sensor. The function for locking via the
sensor will still be enabled > page 48.
G@) Tips
The settings are automatically stored and as-
signed to the active personal profile.
Central locking switch
B8V-0681
Fig. 32 Driver's door: central locking switch
> To lock or unlock the vehicle, press the or 8
button > /\.
When locking the vehicle with the central locking
switch,
the following applies:
— The doors and the luggage compartment lid
cannot be opened from the outside for security
reasons, for example, to reduce the risk of un-
authorized entry while stopped at a light.
—The LED in the central locking switch turns on
when all doors are closed and locked.
— You can open the doors individually from the in-
side by pulling the door handle one time. To
open the rear doors individually, you must pull
the door handle twice.
)_ This function is not available in all countries.
— In the event of a crash with airbag deployment,
the doors unlock automatically to allow access
to the vehicle.
Z\ WARNING
— Follow the safety precautions > page 43.
— The central locking button works when the
ignition is switched off.
— The central locking switch is inoperative
when the vehicle is locked from the outside.
Messages
EB Driver's door: malfunction! Shift to P before
leaving vehicle. See owner's manual
There is a malfunction in the driver's door. Secure
the vehicle before exiting by selecting the “P” se-
lector lever position. Drive immediately to an au-
thorized Audi dealer or authorized Audi Service
Facility to have the malfunction repaired.
|-3} Central locking: malfunction! See owner's
manual
There is a central locking malfunction. If the
doors cannot lock, you can emergency lock the
doors > page 46. Drive to an authorized Audi
dealer or authorized Audi Service Facility immedi-
ately to have the malfunction corrected.
B Door lock: opening while driving is only pos-
sible with the emergency release. See owner's
manual
It is not possible to power unlock the doors at
speeds above approximately 9 mph (15 km/h). If
you must open doors at higher speeds in cases of
emergency, you can manually unlock the door by
forcefully pulling the door handle beyond its no-
ticeable resistance two times. Then press the
door handle back into its original position, if nec-
essary.
45
Page 48 of 360
Opening and closing
Mechanically unlocking and locking the
(efoto ey
If the central locking fails, you must unlock or
lock the doors separately.
[RAz-0026|
5 a S 3
Fig. 34 Door: mechanically locking
Unlocking or locking the driver's door with
the mechanical key
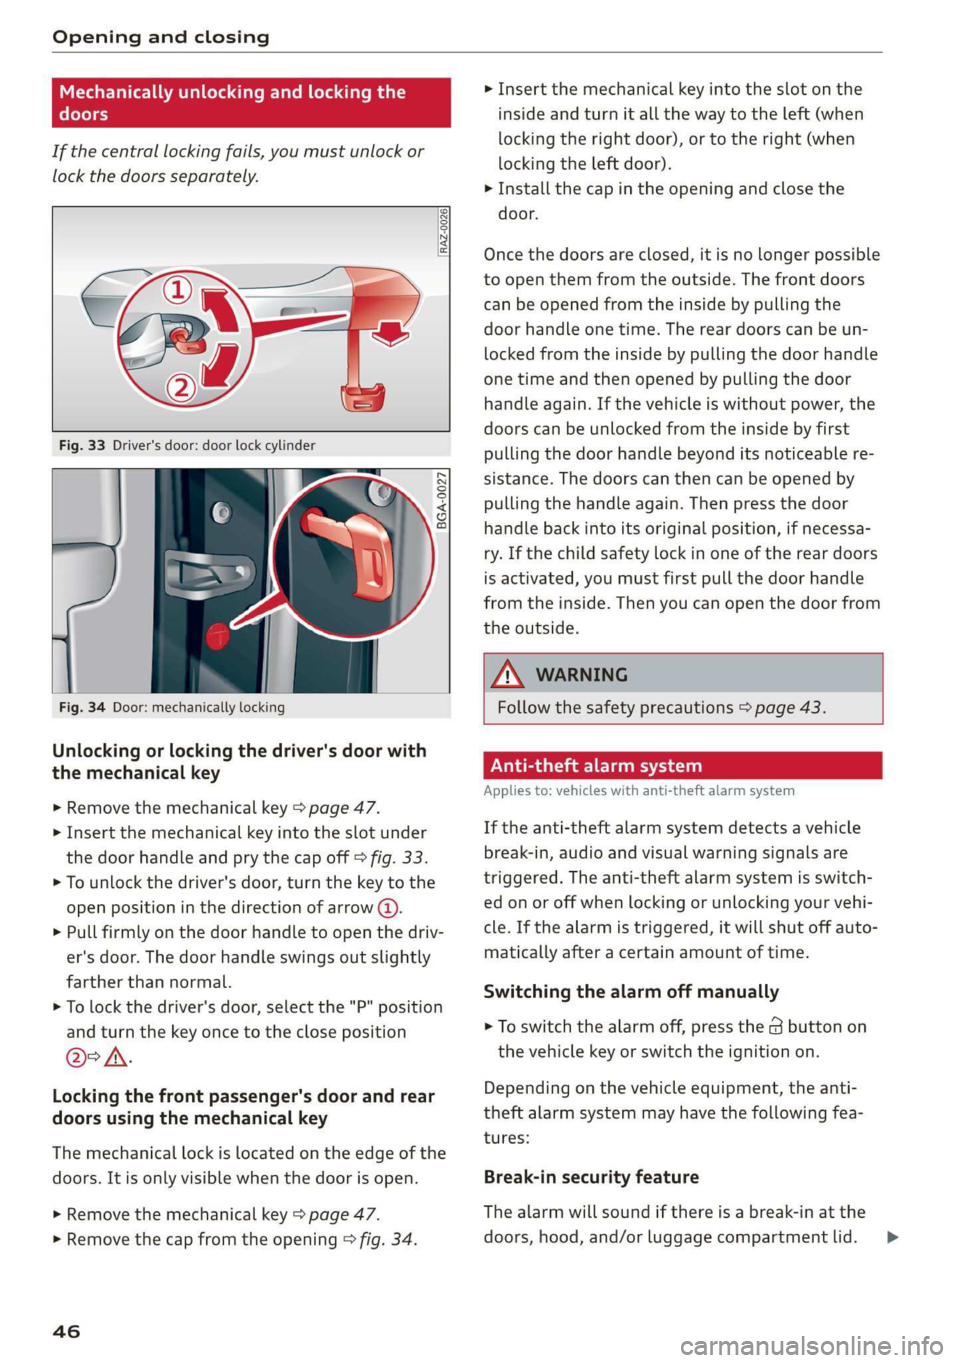
> Remove the mechanical key > page 47.
> Insert the mechanical key into the slot under
the door handle and pry the cap off > fig. 33.
> To unlock the driver's door, turn the key to the
open position in the direction of arrow @).
> Pull firmly on the door handle to open the driv-
er's door. The door handle swings out slightly
farther than normal.
> To lock the driver's door, select the "P" position
and turn the key once to the close position
@°A.
Locking the front passenger's door and rear
doors using the mechanical key
The mechanical lock is located on the edge of the
doors. It is only visible when the door is open.
> Remove the mechanical key > page 47.
> Remove the cap from the opening > fig. 34.
46
> Insert the mechanical key into the slot on the
inside and turn it all the way to the left (when
locking the right door), or to the right (when
locking the left door).
> Install the cap in the opening and close the
door.
Once the doors are closed, it is no longer possible
to open them from the outside. The front doors
can be opened from the inside by pulling the
door handle one time. The rear doors can be un-
locked from the inside by pulling the door handle
one time and then opened by pulling the door
handle again. If the vehicle is without power, the
doors can be unlocked from the inside by first
pulling the door handle beyond its noticeable re-
sistance. The doors can then can be opened by
pulling the handle again. Then press the door
handle back into its original position, if necessa-
ry. If the child safety lock in one of the rear doors
is activated, you must first pull the door handle
from the inside. Then you can open the door from
the outside.
ZX WARNING
Follow the safety precautions > page 43.
rae Le)
Applies to: vehicles with anti-theft alarm system
If the anti-theft alarm system detects a vehicle
break-in, audio and visual warning signals are
triggered. The anti-theft alarm system is switch-
ed on or off when locking or unlocking your vehi-
cle. If the alarm is triggered, it will shut off auto-
matically after a certain amount of time.
Switching the alarm off manually
> To switch the alarm off, press the G button on
the vehicle key or switch the ignition on.
Depending on the vehicle equipment, the anti-
theft alarm system may have the following fea-
tures:
Break-in security feature
The alarm will sound if there is a break-in at the
doors, hood, and/or luggage compartment lid. >
Page 50 of 360
![AUDI A8 2020 User Guide Opening and closing
—To turn the alarm off, press the red [PANIC] but-
ton again.
Lost key/replacing a key
If a vehicle key is lost, contact an authorized Audi
dealer or authorized AUDI A8 2020 User Guide Opening and closing
—To turn the alarm off, press the red [PANIC] but-
ton again.
Lost key/replacing a key
If a vehicle key is lost, contact an authorized Audi
dealer or authorized](/img/6/57606/w960_57606-49.png)
Opening and closing
—To turn the alarm off, press the red [PANIC] but-
ton again.
Lost key/replacing a key
If a vehicle key is lost, contact an authorized Audi
dealer or authorized Audi Service Facility. Have
this vehicle key deactivated. It is important to
bring all keys with you.
If a key is lost, you should report it to your insur-
ance company.
Electronic immobilizer
The immobilizer prevents unauthorized use of
the vehicle.
In some cases, it may not be possible to start the
vehicle if there is a vehicle key from a different
vehicle manufacturer on the key chain.
Data in the vehicle key
When driving, service and maintenance-relevant
data is continuously stored in your vehicle key. An
authorized Audi dealer or authorized Audi Service
Facility can read out this data and tell you about
the work your vehicle needs.
ZA WARNING
Follow the safety precautions > page 43.
@) Note
Protect the key against high temperatures
and direct sunlight.
@ For the sake of the environment
XX Do not dispose of vehicle keys in household
trash. They contain materials that can be re-
cycled. Contact an authorized Audi dealer or
authorized Audi Service Facility for more in-
formation.
@) Tips
— The vehicle key function can be temporarily
disrupted by interference from transmitters
near the vehicle working in the same fre-
quency range (such as a mobile device or ra-
dio equipment). Always check if your vehicle
is locked.
48
— Applies to: MMI: You can display the num-
ber of vehicle keys programmed to the vehi-
cle: Select on the home screen: VEHICLE >
Settings & Service > Vehicle info.
— Applies to: Audi tablet: You can display the
number of vehicle keys programmed to the
vehicle: Select on the home screen: VEHI-
CLE > Settings.
— For an explanation on conformity with the
FCC regulations in the United States and the
Industry Canada regulations, see
=> page 339.
Unlocking and locking the vehicle
[RAZ-0025]
Fig. 36 Door handle: sensor for locking
You can unlock and lock your vehicle using either
the buttons on the vehicle key or the sensors* in
the door handles, or you can unlock your vehicle
using the sensors in the luggage compartment
lid handle. The settings in the MMI specify which
doors will unlock > page 44.
The symbol for the luggage compartment lid may
differ depending on the vehicle key. The <¥ or 4S
symbol may be on the button.
Unlocking or locking using the vehicle key
buttons
> To unlock the vehicle, press the @ button
=> page 47, fig. 35.
> To lock the vehicle, press the & button once.
> To open the luggage compartment lid, press
and hold the
or press the 4S button twice > A\ in General
information on page 50.
Page 53 of 360

4N0012721BD
Opening and closing
» Applies to: vehicles without convenience keys:
Unlock the vehicle using the B / <3 / As button
on the vehicle key and press the handle in the
luggage compartment lid. Or
> Applies to: vehicles with convenience key: Press
the handle in the luggage compartment lid.
The vehicle key cannot be more than approxi-
mately 4 feet (1.5 m) away from the luggage
compartment.
Closing the luggage compartment lid
> Applies to: vehicles without automatic luggage
compartment lid: Use the inside grip to pull the
luggage compartment lid down and allow it to
close using a gentle push. Or
> Applies to: vehicles with automatic luggage
compartment lid: See > page 51.
Z\ WARNING
Follow the safety precautions > page 50.
Automatic luggage compartment lid
Applies to: vehicles with automatic luggage compartment lid
RAZ-0082|
Fig. 39 Luggage compartment lid: @ closing button*, @)
lock button* (vehicles with convenience key*)
Opening the luggage compartment lid
> When the ignition is switched off, press and
hold the < button > page 47, fig. 35 on the
vehicle key for at least one second or press the
3 button twice. Or
> Engage the "P" selector lever position and pull
the <3 button* in the driver's door. Or
> Applies to: vehicles with convenience key: Press
the handle in the luggage compartment lid.
The vehicle key cannot be more than approxi-
mately 4 feet (1.5 m) away from the luggage
compartment.
Closing the luggage compartment lid
> Press the < button in the luggage compart-
ment lid. Or
> Press the handle in the luggage compartment
lid. Or
> Press the luggage compartment lid downward
slightly. Or
> When the ignition is switched on, pull the <>
switch in the driver's door > page 50, fig. 38
until the luggage compartment lid is closed. Or
> Applies to: vehicles with convenience key: With
the ignition switched off, press and hold the
<3 / As button on the vehicle key until the lug-
gage compartment lid is closed. Make sure
there is enough distance (maximum of approxi-
mately 9 feet (3 m)) between you and the lug-
gage compartment lid. Or
> Applies to: vehicles with convenience key: With
the ignition switched off, press the <4 / fi* but-
ton in the luggage compartment lid. The vehi-
cle key must not be more than approximately
4 feet (1.5 m) away from the luggage compart-
ment and it must not be inside the vehicle. If
you press the f}* button, then the vehicle will
lock.
The automatic opening or closing will stop if:
— You press the < button or press the handle in
the luggage compartment lid again Or
— If something blocks the luggage compartment
lid or makes it difficult for the lid to move.
If you press the < button or press the handle in
the luggage compartment lid again, the luggage
compartment lid will open again.
Z\ WARNING
Follow the safety precautions > page 50.
@® Tips
The luggage compartment lid can be operat-
ed manually if the vehicle battery is low. It is
necessary to use more force when doing this.
Move the lid slowly to reduce the amount of
force needed.
51
Page 59 of 360
4N0012721BD
Opening and closing
> Lock the glove compartment with the mechani-
cal key.
> Give your vehicle key to the service personnel
who are parking your vehicle and keep the me-
chanical key.
The following buttons are deactivated when the
valet parking function is switched on:
— <3 button in the driver's door
— <3 or 4s button on the vehicle key
— Handle in the luggage compartment lid
If the valet parking function is switched on, a
message will appear every time the ignition is
switched on.
@ Tips
Please note that the luggage compartment
can still be accessed from the vehicle interior
in vehicles with fixed rear seat backrests or
ones that cannot be locked, even when the
valet parking function is switched on.
Garage door opener
Applies to: vehicles with garage door opener
2 + S >
<
go EI
ent systems
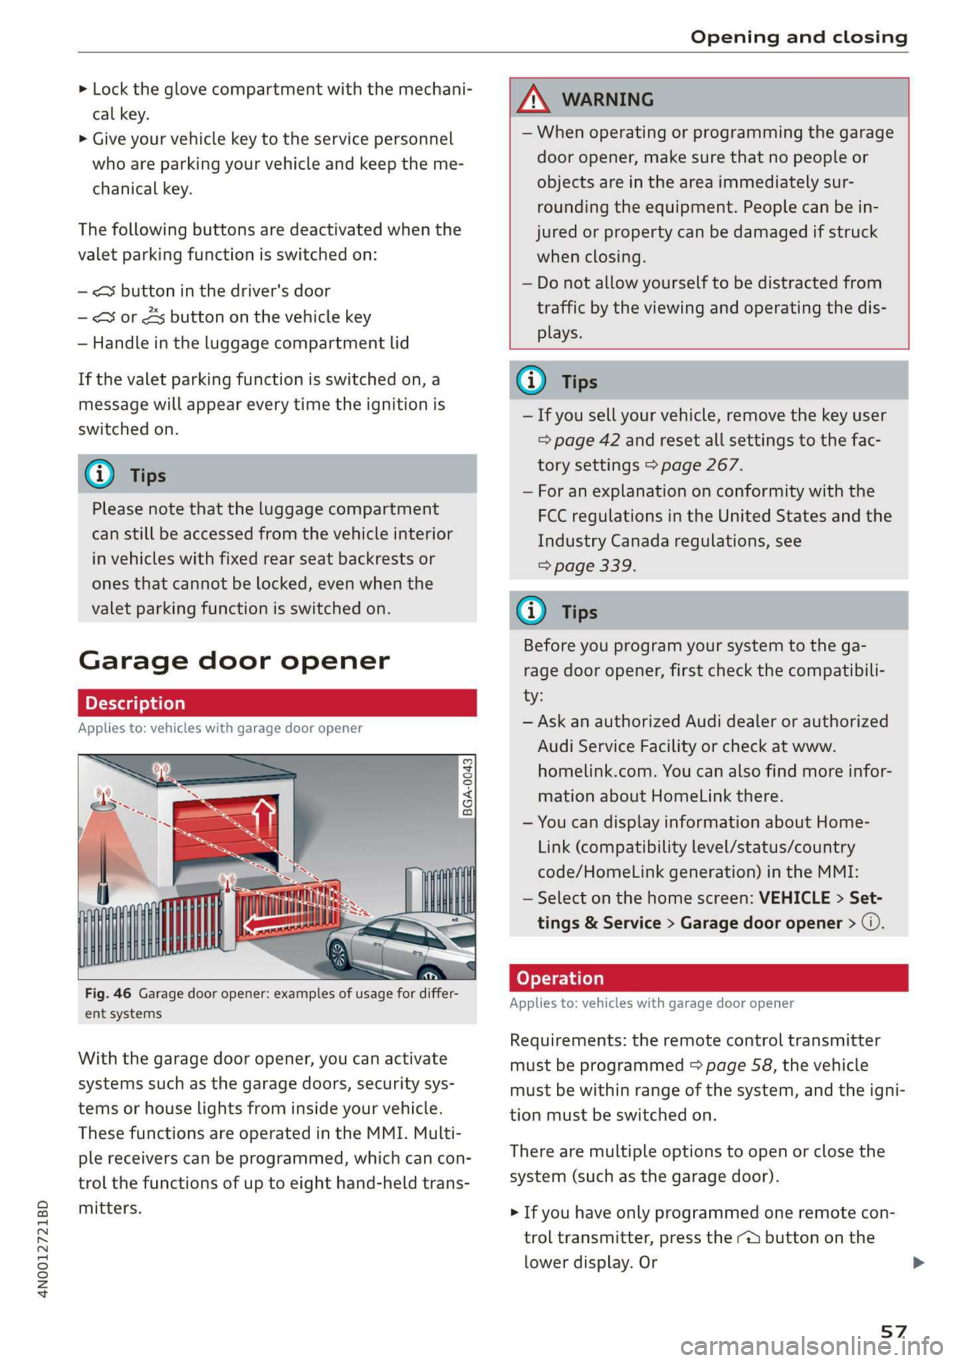
With the garage door opener, you can activate
systems such as the garage doors, security sys-
tems or house lights from inside your vehicle.
These functions are operated in the MMI. Multi-
ple receivers can be programmed, which can con-
trol the functions of up to eight hand-held trans-
mitters.
ZX WARNING
— When operating or programming the garage
door opener, make sure that no people or
objects are in the area immediately sur-
rounding the equipment. People can be in-
jured or property can be damaged if struck
when closing.
— Do not allow yourself to be distracted from
traffic by the viewing and operating the dis-
plays.
G) Tips
— If you sell your vehicle, remove the key user
= page 42 and reset all settings to the fac-
tory settings > page 267.
— For an explanation on conformity with the
FCC regulations in the United States and the
Industry Canada regulations, see
> page 339.
G) Tips
Before you program your system to the ga-
rage door opener, first check the compatibili-
ty:
— Ask an authorized Audi dealer or authorized
Audi Service Facility or check at www.
homelink.com. You can also find more infor-
mation about HomeLink there.
— You can display information about Home-
Link (compatibility level/status/country
code/HomeLink generation) in the MMI:
— Select on the home screen: VEHICLE > Set-
tings & Service > Garage door opener > @.
Applies to: vehicles with garage door opener
Requirements: the remote control transmitter
must be programmed > page 58, the vehicle
must be within range of the system, and the igni-
tion must be switched on.
There are multiple options to open or close the
system (such as the garage door).
> If you have only programmed one remote con-
trol transmitter, press the ra button on the
lower
display. Or
57
Page 62 of 360
Lights and Vision
Lights and Vision
Exterior lighting
Sitar MeL Lats eal
Fig. 47 Instrument panel: light button module
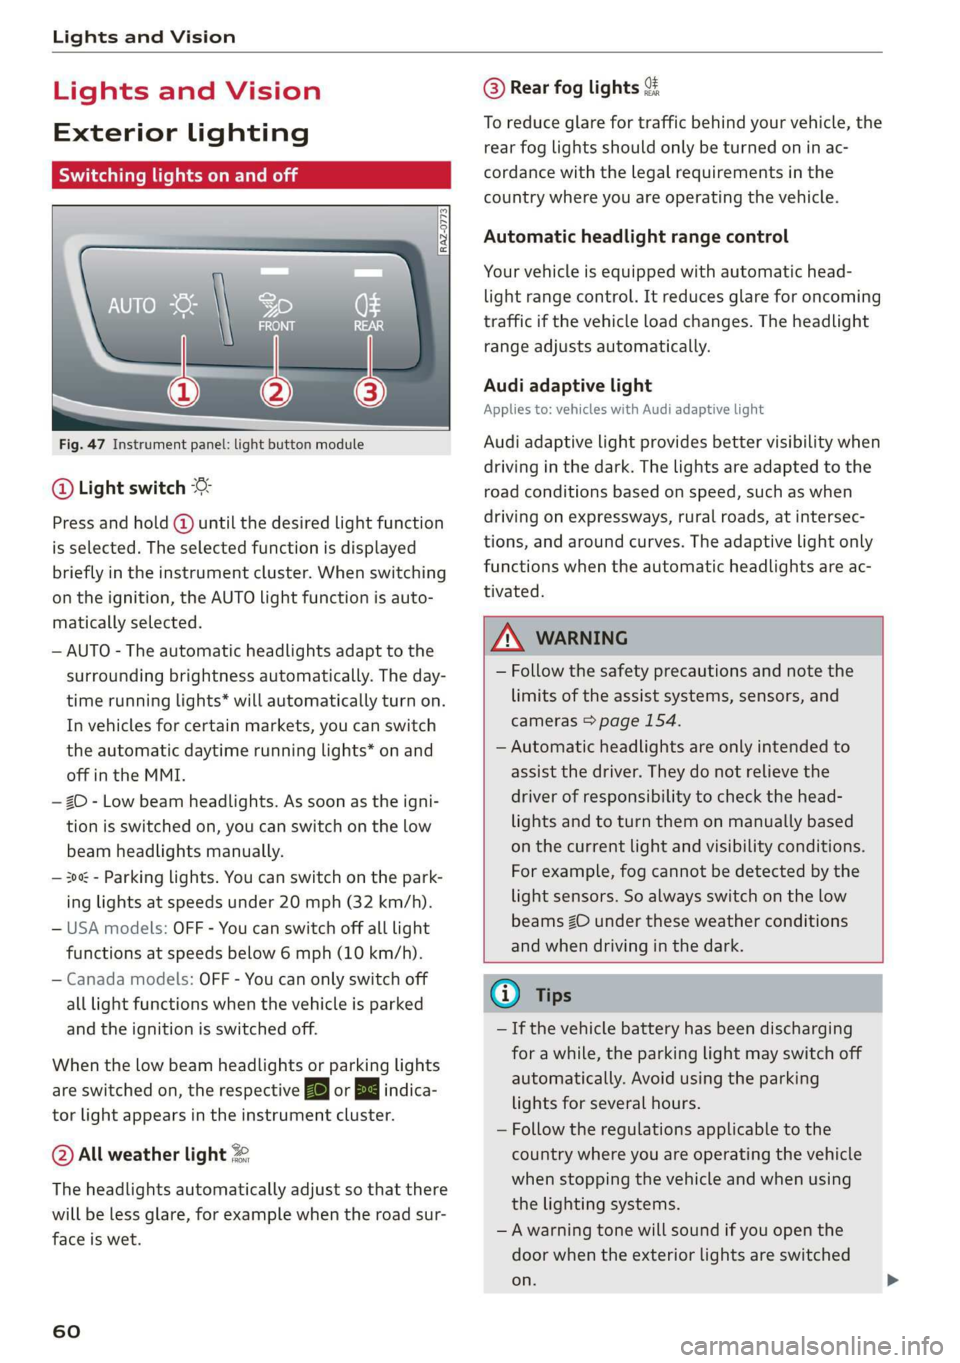
@ Light switch &
Press and hold @ until the desired light function
is selected. The selected function is displayed
briefly in the instrument cluster. When switching
on the ignition, the AUTO light function is auto-
matically selected.
— AUTO - The automatic headlights adapt to the
surrounding brightness automatically. The day-
time running lights* will automatically turn on.
In vehicles for certain markets, you can switch
the automatic daytime running lights* on and
off in the MMI.
— 20 - Low beam headlights. As soon as the igni-
tion is switched on, you can switch on the low
beam headlights manually.
— 30a - Parking lights. You can switch on the park-
ing lights at speeds under 20 mph (32 km/h).
— USA models: OFF - You can switch off all light
functions at speeds below 6 mph (10 km/h).
— Canada models: OFF - You can only switch off
all light functions when the vehicle is parked
and the ignition is switched off.
When the low beam headlights or parking lights
are switched on, the respective Ba or Ea indica-
tor light appears in the instrument cluster.
@ All weather light 2
The headlights automatically adjust so that there
will be less glare, for example when the road sur-
face is wet.
60
@ Rear fog lights %
To reduce glare for traffic behind your vehicle, the
rear fog lights should only be turned on in ac-
cordance with the legal requirements in the
country where you are operating the vehicle.
Automatic headlight range control
Your vehicle is equipped with automatic head-
light range control. It reduces glare for oncoming
traffic if the vehicle load changes. The headlight
range adjusts automatically.
Audi adaptive light
Applies to: vehicles with Audi adaptive light
Audi adaptive light provides better visibility when
driving in the dark. The lights are adapted to the
road conditions based on speed, such as when
driving on expressways, rural roads, at intersec-
tions, and around curves. The adaptive light only
functions when the automatic headlights are ac-
tivated.
ZA WARNING
— Follow the safety precautions and note the
limits of the assist systems, sensors, and
cameras > page 154.
— Automatic headlights are only intended to
assist the driver. They do not relieve the
driver of responsibility to check the head-
lights and to turn them on manually based
on the current light and visibility conditions.
For example, fog cannot be detected by the
light sensors. So always switch on the low
beams ZO under these weather conditions
and when driving in the dark.
@ Tips
— If the vehicle battery has been discharging
for a while, the parking light may switch off
automatically. Avoid using the parking
lights for several hours.
— Follow the regulations applicable to the
country where you are operating the vehicle
when stopping the vehicle and when using
the lighting systems.
—Awarning tone will sound if you open the
door when the exterior lights are switched
on.
Page 63 of 360
4N0012721BD
Lights and Vision
— Only the front headlights turn on when the
daytime running lights are switched on*. In
vehicles in certain markets, the tail lights
will also turn on.
—In cool or damp weather, the inside of the
headlights, turn signals, and tail lights can
fog
over due to the temperature difference
between the inside and outside. They will
clear shortly after switching them on. This
does not affect the service life of the light-
ing.
— When the parking lights are switched on
and the ignition is switched off, the 00-} sym-
bol appears in the light switch module.
Turn signal and high beam lever
©
%
/
@
Fig. 48 Operating lever: switching on the turn signal and
high beams
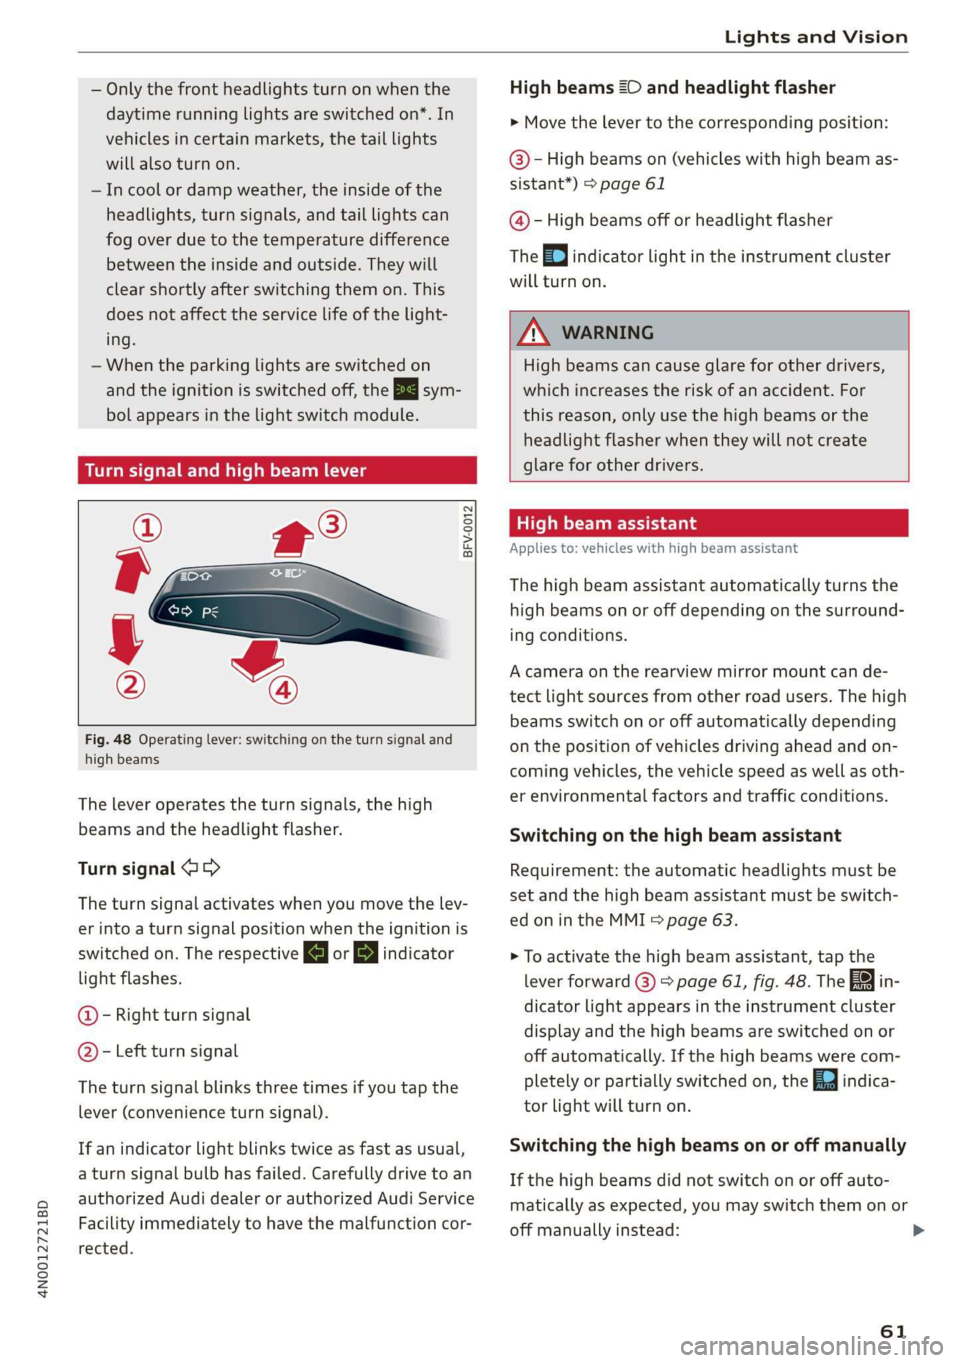
The lever operates the turn signals, the high
beams and the headlight flasher.
Turn signal @ >
The turn signal activates when you move the lev-
er into a turn signal position when the ignition is
switched on. The respective a or B indicator
light flashes.
@ - Right turn signal
@ - Left turn signal
The turn signal blinks three times if you tap the
lever (convenience turn signal).
If an indicator light blinks twice as fast as usual,
a turn signal bulb has failed. Carefully drive to an
authorized Audi dealer or authorized Audi Service
Facility immediately to have the malfunction cor-
rected.
High beams 20 and headlight flasher
> Move the Lever to the corresponding position:
@- High beams on (vehicles with high beam as-
sistant*) > page 61
@ - High beams off or headlight flasher
The =o] indicator light in the instrument cluster
will turn on.
Z\ WARNING
High beams can cause glare for other drivers,
which increases the risk of an accident. For
this reason, only use the high beams or the
headlight flasher when they will not create
glare for other drivers.
High beam assistant
Applies to: vehicles with high beam assistant
The high beam assistant automatically turns the
high beams on or off depending on the surround-
ing conditions.
A camera on the rearview mirror mount can de-
tect light sources from other road users. The high
beams switch on or off automatically depending
on the position of vehicles driving ahead and on-
coming vehicles, the vehicle speed as well as oth-
er environmental factors and traffic conditions.
Switching on the high beam assistant
Requirement: the automatic headlights must be
set and the high beam assistant must be switch-
ed on in the MMI = page 63.
> To activate the high beam assistant, tap the
lever forward @) > page 61, fig. 48. The fa in-
dicator light appears in the instrument cluster
display and the high beams are switched on or
off automatically. If the high beams were com-
pletely or partially switched on, the Ea indica-
tor light will turn on.
Switching the high beams on or off manually
If the high beams did not switch on or off auto-
matically as expected, you may switch them on or
off manually instead:
61