engine AUDI A8 2020 Owner's Guide
[x] Cancel search | Manufacturer: AUDI, Model Year: 2020, Model line: A8, Model: AUDI A8 2020Pages: 360, PDF Size: 95.38 MB
Page 132 of 360
Driving dynamic
With Road ahead: level correction, you can ad-
just how much the vehicle will compensate for
bumps in the road. For this purpose, there is a
camera behind the windshield that detects the
road conditions and activates the active suspen-
sion when bumps are predicted. A colored cone in
the display indicates when this function is acti-
vated. This function may only have limited availa-
bility under certain conditions, for example,
when it is dark > page 155.
Applies to: vehicles with elevated entry
With the Elevated entry function, you can select
if the vehicle should be raised when a door is
opened in order to enter and exit the vehicle
more comfortably. The vehicle will lower again
slowly in the following situations:
— When starting from a stop
— When locking the vehicle
— When changing the Audi drive select* mode
— Approximately 10 seconds after all doors have
been closed
— After a certain period of time when the engine
is stopped and a door is open, in order to main-
tain the battery charge level.
This function may not be available under certain
conditions, for example if the ground is not level
or when the battery charge level is low. The func-
tion may also be deactivated temporarily after
the
vehicle is serviced using diagnostic equip-
ment, and it will only be available again once the
vehicle is driven a certain distance.
©) Note
When the elevated entry function is activated,
make sure there is sufficient space above and
below the vehicle. This particularly applies to
space under open doors and above roof struc-
tures. If you are unsure about the amount of
space, deactivate the elevated entry function
before exiting the vehicle to reduce the risk of
damage.
@ Tips
— If an open door touches the ground or be-
comes stuck, use the Raise > page 129
130
function in the MMI to raise the vehicle us-
ing the air suspension.
— When the curve tilting function is switched
on, the vehicle passengers will experience
less turning force when driving around
curves. This may influence the perception of
speed. Always adjust the speed to the driv-
ing situation.
Ground clearance
The vehicle height and clearance can be influ-
enced by the following factors:
— Change in temperature
— Change in load
— Change to the Audi drive select* mode
— Lifting and lowering via the air suspension*
— Automatic lifting and lowering using the Ele-
vated entry* function
ZA\ WARNING
To reduce the risk of injury, make sure no one
gets pinched when the vehicle level is chang-
ing, for example when cleaning the under-
body or the wheel housings.
C) Note
Always make sure there is enough clearance
above and below the vehicle. This is especially
important for entrances with height restric-
tions, for example, before driving into under-
ground garages. You could also scrape the
ground when driving over the edges of curbs
or on steep ramps, which could damage your
vehicle.
Messages
B Air suspension: malfunction! You may con-
tinue driving slowly at max. XX mph (km/h)
There is a malfunction. Driving stability may be
limited. Drive to an authorized Audi dealer or au-
thorized Audi Service Facility immediately. Do not
drive faster than the speed given in the message.
B Air suspension: malfunction! Safely stop ve-
hicle. Steering and ground clearance limited >
Page 134 of 360

Driving dynamic
& Steering: malfunction! Please stop vehicle.
Pay attention to distance at side
The rear axle steering may have failed. More
space on the road may be needed at the side of
the vehicle. Slow down immediately, and stop
your vehicle as soon as possible in a safe location
with enough space at the sides of the vehicle. Do
not continue driving. See an authorized Audi
dealer or authorized Audi Service Facility for as-
sistance.
BS Steering: malfunction! Please stop vehicle
There is a malfunction in the electronic steering
lock. You cannot turn the ignition on. Do not tow
your vehicle because it cannot be steered. See an
authorized Audi dealer or authorized Audi Service
Facility for assistance.
a Steering: malfunction! You can continue
driving
There is a malfunction. Steering may be more dif-
ficult or more sensitive. Adapt your driving style.
Have the steering system checked immediately
by an authorized Audi dealer or authorized Audi
Service Facility. Please note that the red indicator
light may turn on after restarting the engine. Do
not continue driving if it does.
a Steering: malfunction! Adapt driving style.
Larger turning radius
The rear axle steering may have failed. The vehi-
cle will have a larger turning radius, and the sta-
bility when driving around curves will be compa-
rable to a vehicle without rear axle steering. Drive
carefully to an authorized Audi dealer or author-
ized Audi Service Facility to have the malfunction
corrected.
BS Steering lock: malfunction! Please contact
Service
There is a malfunction in the electronic steering
lock. Drive immediately to an authorized Audi
dealer or authorized Audi Service Facility to have
the malfunction repaired.
Dynamic steering: correcting steering wheel
position
132
The steering is reinitializing. The steering wheel
will move easily after starting the vehicle. Reiniti-
alization might be necessary if the steering wheel
was moved while the engine was switched off.
The display turns off if the initialization was suc-
cessful.
Z\ WARNING
Do not tow your vehicle if there is a malfunc-
tion in the electronic steering lock because
this increases the risk of an accident.
@ Tips
— If there is a malfunction, the steering wheel
may be crooked when driving straight.
—Ifthe a or a indicator light only stays on
for a short time, you may continue driving.
ALL wheel drive (quattro)
Applies to: vehicles with all wheel drive
The all-wheel drive system distributes the driving
power variably to the front and rear axle to im-
prove the driving characteristics. It works togeth-
er with selective wheel torque control, which can
activate when driving through curves
> page 134.
The all-wheel drive system is designed for high
engine power. Your vehicle is exceptionally pow-
erful and has excellent driving characteristics
both under normal driving conditions and on
snow and ice. Always read and follow safety pre-
cautions > A\.
Z\ WARNING
— Even in vehicles with all wheel drive, you
should adapt your driving style to the cur-
rent road and traffic conditions to reduce
the risk of an accident.
— The braking ability of your vehicle is limited
to the traction of the wheels. In this way, it
is not different from a two wheel drive vehi-
cle. Do not drive too fast because this in-
creases the risk of an accident.
— Note that on wet streets, the front wheels
can “hydroplane” if driving at speeds that >
Page 135 of 360
4N0012721BD
Driving dynamic
are too high. Unlike front wheel drive
vehicles, the engine RPM does not increase
suddenly when the vehicle begins hydro-
planing. Adapt your speed to the road condi-
tions to reduce the risk of an accident.
Sy Telamelaielcls
Applies to: vehicles with sport differential
The sport differential distributes the drive power
to the rear axle based on the situation. The goal
is a high level of agility and ability to accelerate
on curves. The vehicle is very responsive to steer-
ing. The settings depend on the selected Audi
drive select* mode.
Messages
Hi Sport differential: malfunction! Please con-
tact Service
Drive immediately to an authorized Audi dealer
or authorized Audi Service Facility to have the
malfunction repaired.
it} Sport differential: temperature too high.
Please adapt driving style
The transmission temperature has increased sig-
nificantly due to the sporty driving manner. Drive
in a less sporty manner until the temperature re-
turns to the normal range and the indicator light
switches of.
Z\ WARNING
Contact an authorized Audi dealer or author-
ized Audi Service Facility if the sport differen-
tial is faulty or malfunctioning. The repair
must be performed by trained personnel us-
ing the correct oil in order to ensure safety.
Electronic Stabilization
Control
Electronic Stabilization Control (ESC) supports
driver safety. It reduces the risk of slipping and
improves driving stability. ESC detects critical sit-
uations, such as if the vehicle is oversteering or
understeering, or if the wheels are spinning. The
brakes are applied or the engine torque is re-
duced in order to stabilize the vehicle.
If the [i indicator light blinks while driving, the
ESC is actively regulating.
If the B&B indicator light turns on, the system has
switched the ESC off. In this case, you can switch
the ignition off and then on to switch the ESC on
again. The indicator light turns off when the sys-
tem is fully functional.
If the B indicator light turns on, ESC was limit-
ed or switched off manually > page 134.
The following systems are integrated in the ESC:
Anti-lock braking system (ABS)
ABS prevents the wheels from locking when brak-
ing. The vehicle can still be steered even during
hard braking. Apply steady pressure to the brake
pedal. Do not pump the pedal.
A pulsing in the brake pedal indicates that the
system is acting to stabilize the vehicle.
Brake assist
The brake assist system can decrease braking dis-
tance. It increases braking power when the driver
presses the brake pedal quickly in emergency sit-
uations. You must press and hold the brake pedal
until the dangerous situation is over. Depending
on the activated driver assistance systems, the
brake assist system may react with increased sen-
sitivity.
Anti-Slip Regulation (ASR)
ASR reduces drive power when the wheels begin
spinning and adapts the power to the road condi-
tions. This will increase the driving stability.
Electronic Differential Lock (EDL)
The EDL applies the brakes to wheels that are
slipping and transfers the drive power to the oth-
er wheels. This function is not available at higher
speeds.
In extreme cases, EDL automatically switches off
to keep the brake on the braked wheel from over-
heating. The vehicle is still functioning correctly. >
133
Page 136 of 360
Driving dynamic
EDL will switch on again automatically when con-
ditions have returned to normal.
Power steering
The ESC can also support vehicle stability
through steering.
Selective wheel torque control
Selective wheel torque control is used when driv-
ing on curves. Braking is targeted toward the
wheels on the inside of the curve as needed. This
allows more precise driving in curves.
Automatic post-collision braking system
The automatic post-collision braking system can
help to reduce the risk of sliding and of addition-
al collisions after an accident. If the airbag con-
trol module detects a collision, the vehicle is
braked by the ESC.
The vehicle does not brake automatically if one of
the following occurs:
— The driver presses the accelerator pedal, or
— The braking force generated by the pressed
brake pedal is greater than the braking force
that
would be initiated by the system
— The ESC, the brake system, or the vehicle elec-
trical system is not functioning
Z\ WARNING
— The ESC and its integrated systems cannot
overcome the limits imposed by natural
physical laws. This is especially important on
slippery or wet roads. If the systems begin
acting to stabilize your vehicle, you should
immediately alter your speed to match the
road and traffic conditions. Do not let the in-
creased safety provided tempt you into tak-
ing risks. This could increase your risk of a
collision.
— Please note the risk of a collision increases
when driving fast, especially through curves
and on slippery or wet roads, and when driv-
ing too close to objects ahead. There is still
a risk of accidents because the ESC and its
integrated systems cannot always prevent
collisions.
134
— Accelerate carefully when driving on
smooth, slippery surfaces such as ice and
snow. The drive wheels can spin even when
these control systems are installed and this
can affect driving stability and increase the
risk of a collision.
@) Tips
— The ABS and ASR only function correctly
when all four wheels have a similar wear
condition. Different tire sizes can lead to a
reduction in engine power.
— You may hear noises when the systems de-
scribed are working.
The So button for controlling the ESC is located
in the center console, in front of the selector lev-
er.
The ESC is automatically switched on when the
ignition is switched on. It may make sense in
some situations to limit the ESC so that the
wheels can spin:
— Rocking the vehicle to free it when it is stuck
— Driving in deep snow, on unpaved ground, or
with snow chains
Limiting ESC (sport mode)
—To limit the ESC, press the oF button briefly.
The B indicator light turns on.
— To completely reactivate the ESC stabilization
function, press the button again. The indicator
light turns off.
Switching off ESC
— To switch off the ESC, press and hold the Sor
button for more than three seconds. The B
and Ea indicator lights turn on.
— To completely reactivate the ESC stabilization
function, press the button again. The indicator
lights turn off.
Z\ WARNING
- When the ESC is switched off or limited,
there will be no vehicle stabilization or it will
be limited. The driving wheels could spin >
Page 153 of 360
4N0012721BD
Trailer towing
Trailer towing
Driving with a trailer
General information
Your vehicle is primarily intended for transport-
ing people and luggage. However, if you drive
with a trailer, follow the technical requirements,
the operation and driving tips, and the legal reg-
ulations.
Driving with a trailer affects the vehicle's energy
usage, performance, and wear. It also requires
higher concentration from the driver.
Z\ WARNING
Do not transport any people in a trailer due to
the risk of fatal injury.
Technical requirements
Trailer hitch
Only use a trailer hitch with a removable ball
hitch mount and ball hitch. The trailer hitch must
be permitted for the vehicle, the trailer and the
permitted total weight of the trailer being
pulled. Above all, it must be securely and safely
attached to the vehicle trailer.
Never mount a trailer hitch on the bumper. The
trailer hitch must be mounted in a way that does
not impair the function of the bumper. Do not
make any changes to the exhaust system and the
brake system.
Check regularly if the trailer hitch is securely
mounted. Always follow the instructions given by
the trailer hitch manufacturer.
Trailer brakes
If the trailer has its own brake system, then fol-
low the manufacturer specifications. However,
the brake system on the trailer must never be
connected to the vehicle brake system.
Engine cooling system
Driving with a trailer means a higher load on the
engine and the cooling system. The cooling sys-
tem must be designed for additional load and
contain enough coolant > @.
CG) Note
Longer inclines cannot be driven without a
suitable cooling system, especially if the out-
side temperatures are high. Otherwise, this
increases the risk of engine damage.
Operating instructions
Towing capacity
Your vehicle can only be operated with class 1 or
class 2 trailers.
Load distribution
Poor cargo load and distribution can negatively
impact vehicle handling. Load the trailer based
on the following criteria as much as possible:
— Store objects in the vehicle luggage compart-
ment, if possible. The vehicle should always
carry the heaviest possible load and the trailer
should have the lightest possible load.
— Distribute the load in the trailer so that the
heavy objects are as close to the axle as possi-
ble.
— Secure objects so that they do not slide.
— Utilize the maximum permitted tongue weight
if possible.
Tires
Set the tire pressure on your vehicle for a “full
load”; see the tire pressure sticker > page 299. If
necessary, also adjust the tire pressure on the
trailer according to the manufacturer's specifica-
tions.
The trailer and the vehicle should be equipped
with winter tires when driving in winter tempera-
tures.
Outside mirrors
If you cannot see the traffic behind the trailer
with the standard exterior mirrors, then you
must attach additional exterior mirrors. Adjust
them so you have a sufficient visibility behind
you.
Exterior lighting
Follow the legal regulations for lighting on your
trailer that are applicable in the country where
151
>
Page 155 of 360
4N0012721BD
Trailer towing
Hill
When you start driving uphill or downhill, trailers
may tilt or sway sooner than when driving ona
level surface. If small swaying movements have
already occurred, you can stabilize the trailer by
firmly braking immediately. Never attempt to
“straighten out” the trailer by accelerating.
Conventional drive system: Downshift before
driving on hills to utilize the engine braking ef-
fect SA.
Plug-in hybrid drive: reduce the speed and use
the
recuperation braking effect > page 118 to re-
lieve the brakes > A\.
Brakes
When using a trailer with overrun brakes, first
brake gently then quickly. This reduces the risk of
jerking while braking if the trailer wheels lock up.
Engine coolant temperature
Pay attention specifically to the coolant tempera-
ture display when there are high outside temper-
atures, and when driving on long inclines
=> page 14. Shift to a higher gear in a timely man-
ner.
ZA\ WARNING
Constant braking causes the brakes to over-
heat and can substantially reduce braking per-
formance, increase braking distance, or cause
complete failure of the brake system.
153
Page 168 of 360

Driver assistance
Driver assistance
Cruise control system
Applies to: vehicles with cruise control system
The cruise control system assists the driver in
maintaining a constant speed above approxi-
mately 15 mph (20 km/h). The system maintains
the desired speed by braking and accelerating.
ZA WARNING
— Always pay attention to the traffic around
your vehicle when the cruise control system
is in operation. As the driver, you are always
responsible for controlling your vehicle
speed and the distance between your vehicle
and
other vehicles.
— For safety reasons, cruise control should not
be used in the city, in stop-and-go traffic, on
winding roads, and when road conditions are
poor (such as ice, fog, gravel, heavy rain,
and conditions that could lead to hydroplan-
ing), because this increases the risk of an ac-
cident.
— Switch the cruise control off temporarily
when driving in turning lanes, highway exits,
or in construction zones.
—To reduce the risk of an accident, you should
only resume the stored speed if it is suitable
for the current traffic conditions.
C) Note
— Conventional drive system: Before driving
downhill a long distance on a steep hill, de-
crease your speed and select a lower gear.
This makes use of the engine braking effect
and reduces the load placed on the brakes.
— Plug-in hybrid drive: Before driving downhill
a long distance on a steep hill, decrease
your speed and use the braking effect of re-
cuperation > page 118. This reduces the
load on the brakes.
@ Tips
The brake lights turn on when the brakes are
applied automatically.
166
Switching the system on
Applies to: vehicles with cruise control system
BFV-0220
Fig. 123 Lever: switching on the cruise control system
Requirement: The ignition must be switched on.
> To switch the system on, pull the lever toward
you to position @.
The Ga or 8) indicator light and the corre-
sponding message will appear in the instrument
cluster.
A WARNING
If the brakes are malfunctioning (for example,
overheating) while the cruise control system
is switched on, it may shut off automatically.
Preselecting or activating a cruise control
speed
Applies to: vehicles with cruise control system
When the vehicle is stationary, you can preselect
the cruise control speed or activate the speed
while driving.
Requirement: the system must be switched on.
> To preselect a cruise control speed when the ve-
hicle is stationary, tap the lever toward @)/C)
=> page 166, fig. 123.
> To activate the cruise control speed, pull the
lever
toward position @ while driving, or
> To set the current driving speed as the cruise
control speed, press the button @) on the lever.
The active cruise control speed is indicated with
the Gs or kl indicator light in the instrument
cluster.
An additional indicator appears in the head-up
display*.
Page 194 of 360
Parking and maneuvering
Parking and
maneuvering
Introduction
Depending on the vehicle equipment, various
parking aids will help you when parking and ma-
neuvering.
Parking system
The parking system plus assists you while park-
ing using audio and visual signals to warn you
about objects detected in front of, behind, and at
the sides* of the vehicle > page 192.
The rearview camera shows the area behind the
vehicle in the MMI display. The lines in the rear-
view camera image help you to park and maneu-
ver > page 194.
The peripheral cameras are an addition to the
rearview camera and help you to see various
areas around the vehicle while parking and ma-
neuvering > page 194.
The rear cross-traffic assist can warn you of ap-
proaching cross traffic when driving in reverse or
exiting a parking space > page 198.
Settings options
You can adjust parking system functions individu-
ally. The adjustment options depend on the vehi-
cle equipment.
— Activating automatically > page 192
— Front and rear volume > page 193
— Entertainment fader > page 193
— Clean rearview camera > page 195
— View > page 197
— Rear cross-traffic assist > page 198
_ WARNING
Follow the safety precautions and note the
limits of the assist systems, sensors, and
cameras > page 154.
G) Tips
Practicing parking in a traffic-free location or
parking lot to become familiar with the sys-
tems is recommended. Practice parking in
good light and weather conditions.
192
Parking system plus
Activating/deactivating
Applies to: vehicles with parking system plus
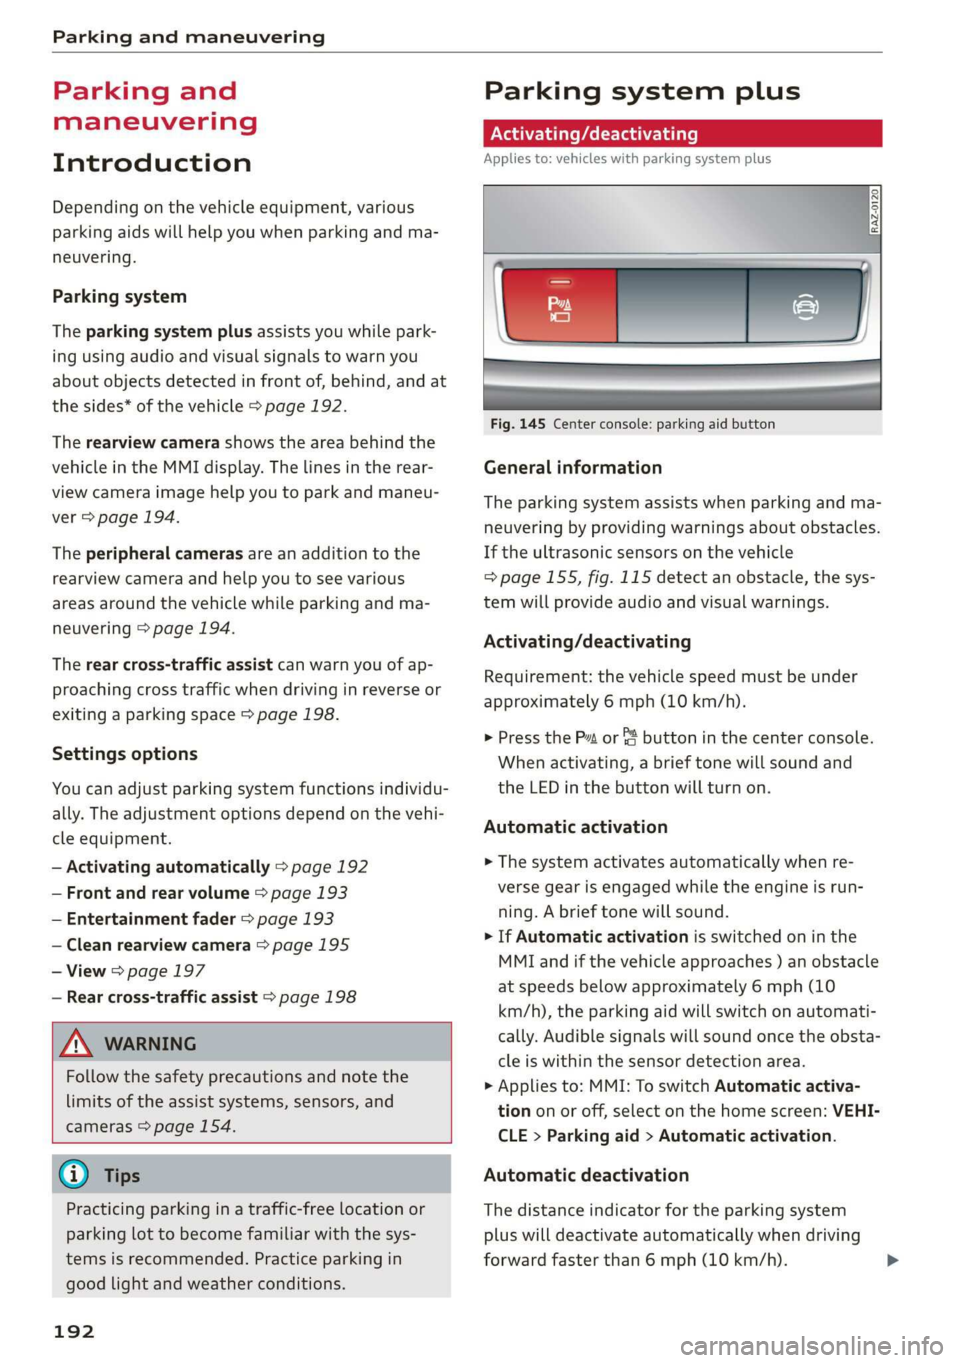
Fig. 145 Center console: parking aid button
General information
The parking system assists when parking and ma-
neuvering by providing warnings about obstacles.
If the ultrasonic sensors on the vehicle
=> page 155, fig. 115 detect an obstacle, the sys-
tem will provide audio and visual warnings.
Activating/deactivating
Requirement: the vehicle speed must be under
approximately 6 mph (10 km/h).
> Press the Pt or & button in the center console.
When activating, a brief tone will sound and
the LED in the button will turn on.
Automatic activation
> The system activates automatically when re-
verse gear is engaged while the engine is run-
ning. A brief tone will sound.
> If Automatic activation is switched on in the
MMI and if the vehicle approaches ) an obstacle
at speeds below approximately 6 mph (10
km/h), the parking aid will switch on automati-
cally. Audible signals will sound once the obsta-
cle is within the sensor detection area.
> Applies to: MMI: To switch Automatic activa-
tion on or off, select on the home screen: VEHI-
CLE > Parking aid > Automatic activation.
Automatic deactivation
The distance indicator for the parking system
plus will deactivate automatically when driving
forward faster than 6 mph (10 km/h).
Page 197 of 360
4N0012721BD
Parking and maneuvering
> Press the & button in the center console. When
activating, a brief tone will sound and the LED
in the button will turn on. Or
> Press bin the upper display if the visual dis-
tance indicator is shown > page 193, fig. 146.
Automatic activation
The system activates automatically when reverse
gear is engaged while the engine is running. A
brief tone will sound.
Automatic deactivation
The system deactivates automatically when driv-
ing forward faster than 6 mph (10 km/h).
ZA WARNING
Follow the safety precautions and note the
limits of the assist systems, sensors, and
cameras > page 154.
(era Wael]
Applies to: vehicles with rearview camera/peripheral cameras
You can manually start the cleaning of the rear-
view camera. The settings depend on the vehicle
equipment.
> Select |---| > Clean rearview camera in the upper
display when the parking system is active.
Z\ WARNING
Follow the safety precautions and note the
limits of the assist systems, sensors, and
cameras > page 154.
Applies to: vehicles with rearview camera/peripheral cameras
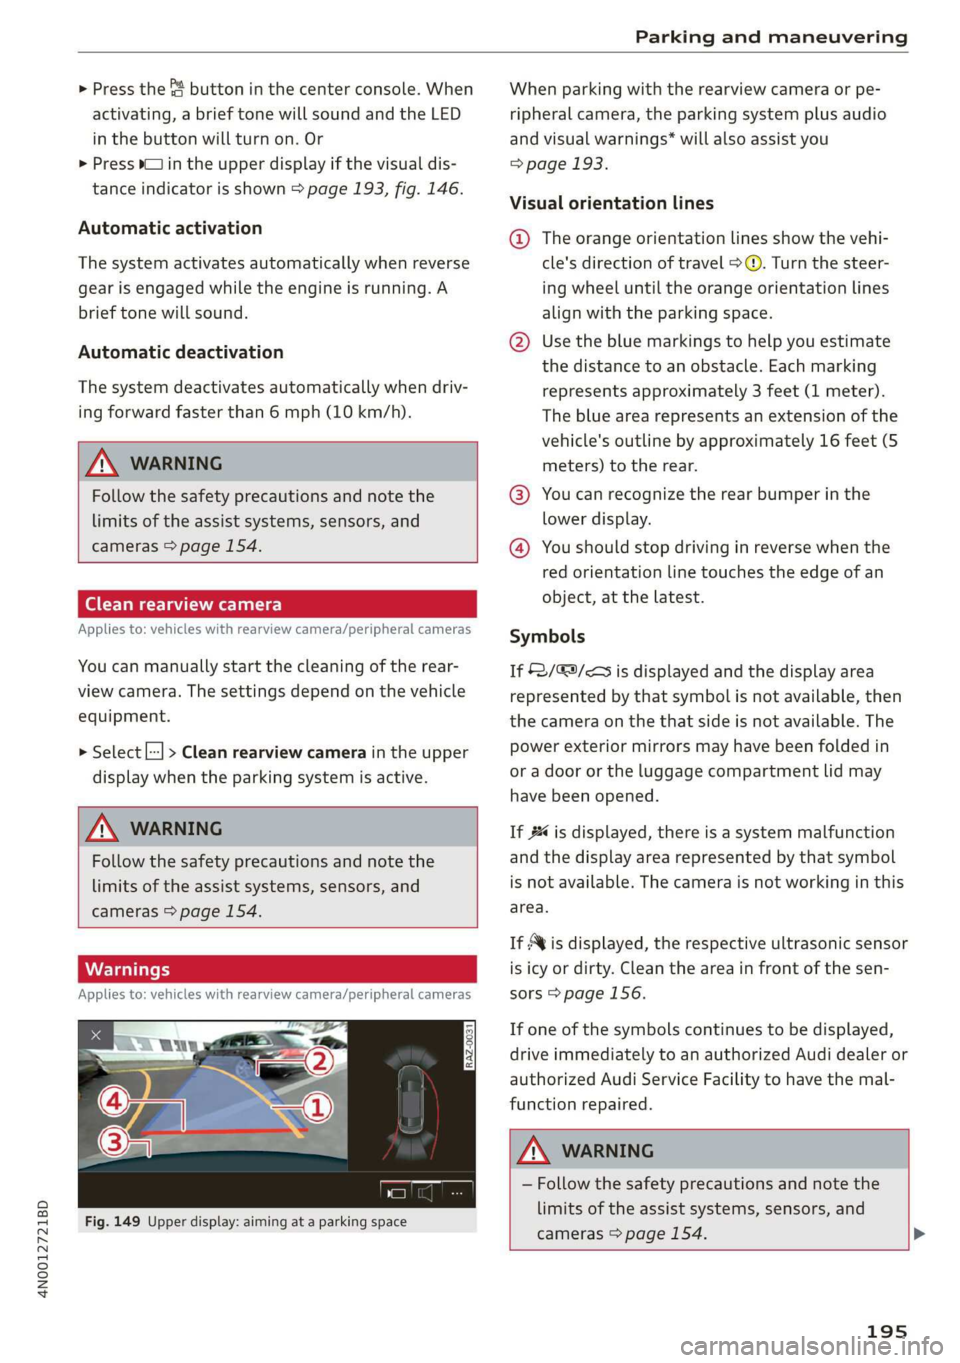
Fig. 149 Upper display: aiming at a parking space
When parking with the rearview camera or pe-
ripheral camera, the parking system plus audio
and visual warnings* will also assist you
=> page 193.
Visual orientation lines
@ The orange orientation lines show the vehi-
cle's direction of travel > ©. Turn the steer-
ing wheel until the orange orientation lines
align with the parking space.
@ Use the blue markings to help you estimate
the distance to an obstacle. Each marking
represents approximately 3 feet (1 meter).
The blue area represents an extension of the
vehicle's
outline by approximately 16 feet (5
meters) to the rear.
@® You can recognize the rear bumper in the
lower display.
@ You should stop driving in reverse when the
red orientation line touches the edge of an
object, at the latest.
Symbols
If $2/&9/< is displayed and the display area
represented by that symbol is not available, then
the camera on the that side is not available. The
power exterior mirrors may have been folded in
or a door or the luggage compartment lid may
have been opened.
If #4 is displayed, there is a system malfunction
and the display area represented by that symbol
is not available. The camera is not working in this
area.
If Avis displayed, the respective ultrasonic sensor
is icy or dirty. Clean the area in front of the sen-
sors > page 156.
If one of the symbols continues to be displayed,
drive immediately to an authorized Audi dealer or
authorized Audi Service Facility to have the mal-
function repaired.
ZA\ WARNING
— Follow the safety precautions and note the
limits of the assist systems, sensors, and
cameras > page 154. >
195
Page 202 of 360
Telephone
Telephone
Introduction
Applies to: vehicles with telephone
You can operate various telephone functions easi-
ly through the MMI in your vehicle.
Depending on the country and the vehicle equip-
ment, the following options may be available:
— Connecting a cell phone with Bluetooth
— Using two telephones
— Using the Audi phone box
— Using the Rear Seat Remote
Z\ WARNING
— Medical experts warn that mobile devices
can interfere with the function of pacemak-
ers. Always maintain a minimum distance of
about 7.9 inches (20 cm) between the mo-
bile device antennas and the pacemaker.
— Do not carry the mobile device in a pocket
directly over the pacemaker when the
phone is switched on.
— Switch the mobile device off immediately
if you suspect it may be interfering with
the pacemaker.
— Do not use the voice recognition system*
= page 38 in emergencies because your
voice may change in stressful situations. The
system may take longer to dial the number
or may not be able to dial it at all. Dial the
emergency number manually.
— Switch your mobile device off in areas where
there is a risk of an explosion. These loca-
tions are not always clearly marked. This
may include gas stations, fuel and chemical
storage facilities or transport vehicles, or lo-
cations where fuel vapors (such as propane
or gasoline vapor in vehicles or buildings),
chemicals or large quantities of dust parti-
cles (such as flour, sawdust or metal) may
be present in the air. This also applies to all
other locations where you would normally
turn your vehicle engine off.
— The demands of traffic require your full at-
tention. Always read the chapter > page 20,
Traffic safety information.
200
@) Note
Read the information about Audi connect, and
be sure to note the connectivity costs section
=> page 216.
@) Tips
— The Bluetooth connection range is limited
to inside the vehicle.
—Aselection of supported Bluetooth devices
can be found in the database for tested mo-
bile devices at www.audi.com/bluetooth.
Setup
Connecting a cell phone via Bluetooth
Applies to: vehicles with telephone
Requirement: The vehicle must be stationary and
the ignition must be switched on. The Bluetooth
settings must be open on your mobile device dur-
ing the connection setup. The mobile device to be
connected must not be actively connected to any
other Bluetooth device. The MMI must only be
connected to one mobile device.
> Enable the Bluetooth function and visibility on
the MMI => page 267 and the cell phone.
> Applies to: MMI: Select on the home screen:
PHONE
> Follow the system instructions. The available
Bluetooth devices will be displayed after sever-
al seconds.
> Press on the desired mobile device in the list of
displayed Bluetooth devices.
> To update the list, press OQ.
A PIN for a secure Bluetooth connection will be
generated.
> Confirm the PIN on your mobile device, or
> Enter the PIN for connecting on your cell
phone. The time allowed for entering the PIN is
limited to approximately 30 seconds.
> Follow the system instructions.
> Pay attention to any other system prompts on
the MMI and on your cell phone.