load capacity AUDI A8 2020 Owners Manual
[x] Cancel search | Manufacturer: AUDI, Model Year: 2020, Model line: A8, Model: AUDI A8 2020Pages: 360, PDF Size: 95.38 MB
Page 104 of 360

Stowing and using
Depending on the equipment, the refrigerator
may be located in the rear behind the center arm-
rest or the sunshade. It refrigerates or freezes
only when the ignition is switched on.
The maximum load capacity is 5.5 lbs (2.5 kg).
Opening and closing
> Pull the release lever (2) to open the refrigera-
tor.
> To close the refrigerator, push the cover back
until it clicks into place.
Switching on and off
> Press the button (@) to switch the cooling func-
tion on or off.
>» Press the button (8) to switch the freezer func-
tion on or off.
Z\ WARNING
— Never overfill the refrigerator. Leave it
closed while driving. There is a risk of injury
in the event of a collision or sudden braking.
— Never store flammable fluids, gas contain-
ers, or similar objects in the refrigerator due
to the risk of an explosion. This also applies
to goods and products that can emit volatile
or flammable gases.
— Fluids may freeze at temperatures of 32° F
(0 °C) and lower. Glass containers could ex-
plode, increasing the risk of injury.
@) Note
The ventilation openings for the refrigerator
are at the rear panel trim panel in the luggage
compartment and must not be covered.
@ Tips
— When the temperature in the luggage com-
partment is high, there may only be a limit-
ed cooling effect. The refrigerator will auto-
matically switch off if the temperature in
the luggage compartment exceeds 131° F
G5°0)
— Remove any condensation with a soft cloth
if necessary.
102
Roof rack
General information
Applies to: vehicles with roof rack mount
(/_
B4H-0334
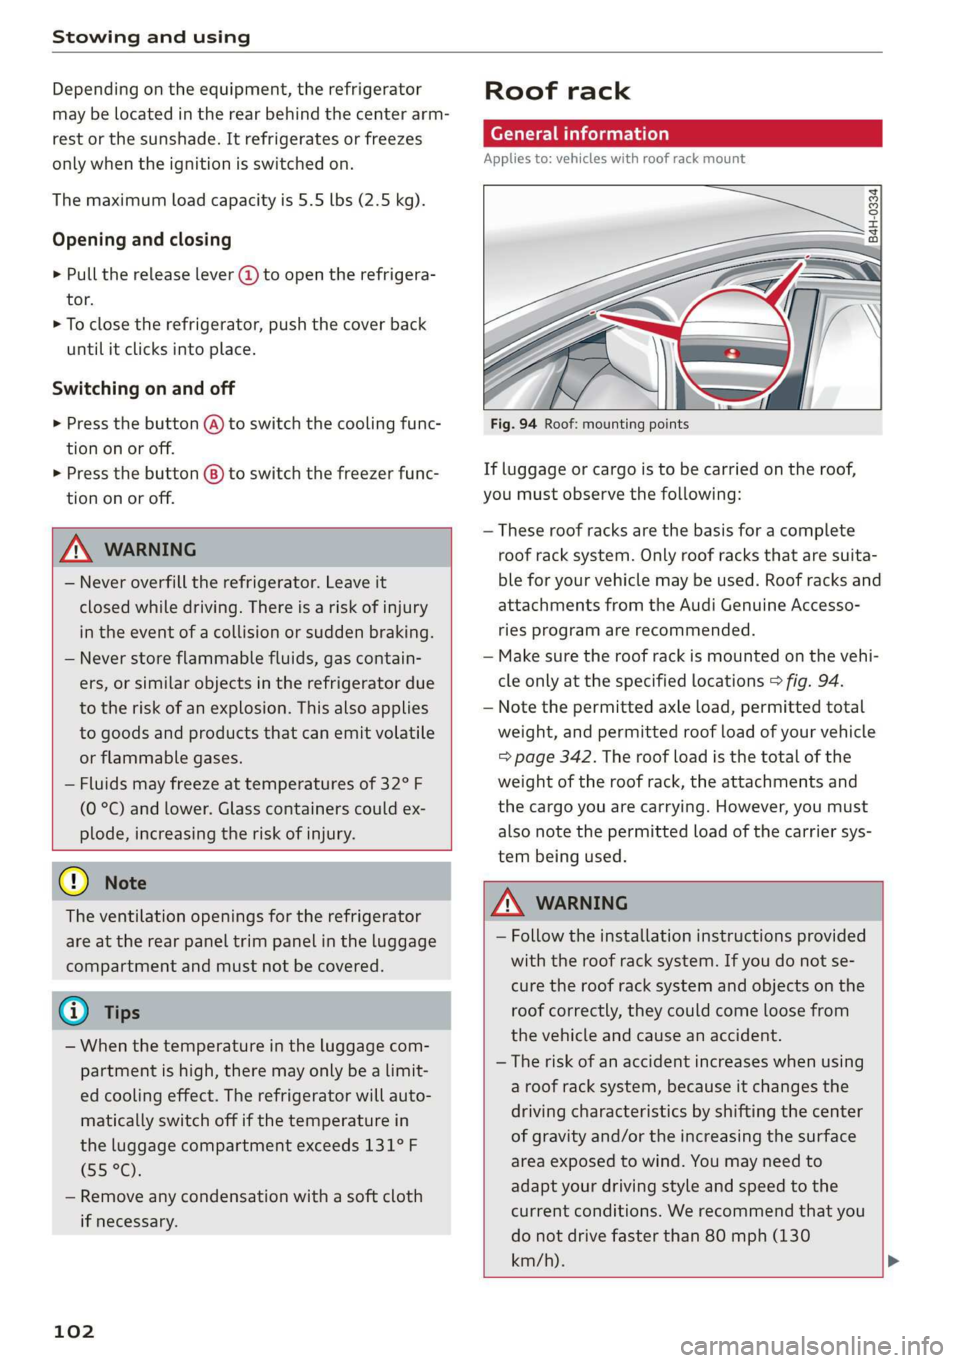
Fig. 94 Roof: mounting points
If luggage or cargo is to be carried on the roof,
you must observe the following:
— These roof racks are the basis for a complete
roof rack system. Only roof racks that are suita-
ble for your vehicle may be used. Roof racks and
attachments from the Audi Genuine Accesso-
ries program are recommended.
— Make sure the roof rack is mounted on the vehi-
cle only at the specified locations > fig. 94.
— Note the permitted axle load, permitted total
weight, and permitted roof load of your vehicle
=> page 342. The roof load is the total of the
weight of the roof rack, the attachments and
the cargo you are carrying. However, you must
also note the permitted load of the carrier sys-
tem being used.
ZA WARNING
— Follow the installation instructions provided
with the roof rack system. If you do not se-
cure the roof rack system and objects on the
roof correctly, they could come loose from
the vehicle and cause an accident.
— The risk of an accident increases when using
a roof rack system, because it changes the
driving characteristics by shifting the center
of gravity and/or the increasing the surface
area exposed to wind. You may need to
adapt your driving style and speed to the
current conditions. We recommend that you
do not drive faster than 80 mph (130
km/h).
Page 153 of 360

4N0012721BD
Trailer towing
Trailer towing
Driving with a trailer
General information
Your vehicle is primarily intended for transport-
ing people and luggage. However, if you drive
with a trailer, follow the technical requirements,
the operation and driving tips, and the legal reg-
ulations.
Driving with a trailer affects the vehicle's energy
usage, performance, and wear. It also requires
higher concentration from the driver.
Z\ WARNING
Do not transport any people in a trailer due to
the risk of fatal injury.
Technical requirements
Trailer hitch
Only use a trailer hitch with a removable ball
hitch mount and ball hitch. The trailer hitch must
be permitted for the vehicle, the trailer and the
permitted total weight of the trailer being
pulled. Above all, it must be securely and safely
attached to the vehicle trailer.
Never mount a trailer hitch on the bumper. The
trailer hitch must be mounted in a way that does
not impair the function of the bumper. Do not
make any changes to the exhaust system and the
brake system.
Check regularly if the trailer hitch is securely
mounted. Always follow the instructions given by
the trailer hitch manufacturer.
Trailer brakes
If the trailer has its own brake system, then fol-
low the manufacturer specifications. However,
the brake system on the trailer must never be
connected to the vehicle brake system.
Engine cooling system
Driving with a trailer means a higher load on the
engine and the cooling system. The cooling sys-
tem must be designed for additional load and
contain enough coolant > @.
CG) Note
Longer inclines cannot be driven without a
suitable cooling system, especially if the out-
side temperatures are high. Otherwise, this
increases the risk of engine damage.
Operating instructions
Towing capacity
Your vehicle can only be operated with class 1 or
class 2 trailers.
Load distribution
Poor cargo load and distribution can negatively
impact vehicle handling. Load the trailer based
on the following criteria as much as possible:
— Store objects in the vehicle luggage compart-
ment, if possible. The vehicle should always
carry the heaviest possible load and the trailer
should have the lightest possible load.
— Distribute the load in the trailer so that the
heavy objects are as close to the axle as possi-
ble.
— Secure objects so that they do not slide.
— Utilize the maximum permitted tongue weight
if possible.
Tires
Set the tire pressure on your vehicle for a “full
load”; see the tire pressure sticker > page 299. If
necessary, also adjust the tire pressure on the
trailer according to the manufacturer's specifica-
tions.
The trailer and the vehicle should be equipped
with winter tires when driving in winter tempera-
tures.
Outside mirrors
If you cannot see the traffic behind the trailer
with the standard exterior mirrors, then you
must attach additional exterior mirrors. Adjust
them so you have a sufficient visibility behind
you.
Exterior lighting
Follow the legal regulations for lighting on your
trailer that are applicable in the country where
151
>
Page 213 of 360

4N0012721BD
Telephone
Ringtone and volume settings
— Ringtone and message volume: you can adjust
the volume of the selected ringtone and the no-
tification volume when a message is received by
moving the position of the slider.
— Ringtone”: available ringtones are played using
the Ringtone function. Press on an entry in the
list.
— Microphone input level: you can adjust the mi-
crophone input level using the slider.
Turn on car phone or data module
Applies to: vehicles with car phone/data module
When this function is switched on, you can use
the car phone or data module.
As long as the car phone was not turned off sepa-
rately the last time it was used, it will turn on au-
tomatically when the ignition is switched on.
Edit voicemail number
You can change your voicemail number.
Enable VoLTE
When this function is switched on, Voice over
LTE* will be supported.
Network settings
— Login to mobile phone network: select to log
into your cell phone service provider network
automatically or manually.
— Network selection: Requirement: the data
module must be switched on and Login to mo-
bile phone network must be set to Manual. Se-
lect a network manually from the list of availa-
ble networks at the present location.
Car phone serial number (IMEI):
Applies to: vehicles with car phone
The serial number (IMEI) of your car phone is dis-
played.
@ Tips
— Several mobile devices can be paired with
the MMI, but only two* mobile devices can
be actively connected.
—To delete all paired Bluetooth devices, the
Bluetooth function can be reset to the fac-
tory default settings > page 267.
Directory settings
Applies
to: vehicles with telephone
> Applies to: MMI: Select on the home screen:
PHONE > Contacts > <2.
Switching between two mobile devices
Requirement: telephone 1 and telephone 2 must
be connected.
Switch telephones: the device name of the avail-
able mobile device is displayed. You can switch
the phone by pressing the button.
The directory for the selected phone will be dis-
played.
Hide grayed-out contacts
When this function is switched on, contacts that
have no phone numbers stored for them will be
hidden.
Sort order
You can sort the contacts in alphabetical order by
Last name or First name.
Download contacts
Requirement: a mobile device must be connected
to the MMI.
To update the contacts in the MMI, you can man-
ually download your mobile device contacts. De-
pending on the mobile device, you may need to
disconnect and reconnect the Bluetooth connec-
tion to update the contacts.
Memory capacity
You can manage up to 23,000 contacts. You can
also download up to 5,000 contacts from maxi-
mum four mobile devices. You can also import up
to 3,000 contacts from a storage medium.
Importing and exporting contacts
Requirement: an SD card must be in the SD card
reader* = page 250 or a USB storage device must
be connected to the Audi music interface
=> page 253.
211
Page 292 of 360

Wheels
Tire designations
© 2 2 x ©
oO
Fig. 189 Tire designations on the side-
wall
@ Tires for passenger vehicles
(if applicable)
“P” indicates a tire for a passen-
ger vehicle. “T” indicates a tire
designated for temporary use.
@ Nominal width
Nominal width of the tire be-
tween the sidewalls in millime-
ters. In general: the larger the
number, the wider the tire.
@) Aspect ratio
Height/width ratio expressed as a
percentage.
290
@) Tire construction
“R” indicates a radial tire.
©) Rim diameter
Size of the rim diameter in inches.
© Load index and speed rating
The load index indicates the tire's
load-carrying capacity.
The speed rating indicates the
maximum permitted speed. Also
see > A in General information on
page 289.
“EXTRA LOAD”, “xl” or “RF” indi-
cates that the tire is reinforced or
is an Extra Load tire.
Speed rat- /Maximum permitted speed
ing
P up to 93 mph (150 km/h)
Q up to 99 mph (160 km/h)
R up to 106 mph (170 km/h)
s up to 110 mph (180 km/h)
T up to 118 mph (190 km/h)
U up to 124 mph (200 km/h)
H up to 130 mph (210 km/h)
Vv up to 149 mph (240 km/h)?
Zz above 149 mph (240 km/h)?)
w up to 168 mph (270 km/h)?
Y up to 186 mph (300 km/h)
@) For tires above 149 mph (240 km/h),
tire manufacturers sometimes use the
code “ZR”.
Page 294 of 360

Wheels
Glossary of tire and loading
terminology
Accessory weight
means the combined weight (in
excess of those standard items
which may be replaced) of auto-
matic transmission, power steer-
ing, power brakes, power win-
dows, power seats, radio, and
heater, to the extent that these
items are available as factory-in-
stalled equipment (whether in-
stalled or not).
Aspect ratio
means the ratio of the height to
the width of the tire in percent.
Numbers of 55 or lower indicate a
low sidewall for improved steer-
ing response and better overall
handling on dry pavement.
Bead
means the part of the tire that is
made of steel wires, wrapped or
reinforced by ply cords and that is
shaped to fit the rim.
Bead separation
means a breakdown of the bond
between components in the bead.
292
Cord
means the strands forming the
plies in the tire.
Cold tire inflation pressure
means the tire pressure recom-
mended by the vehicle manufac-
turer for a tire of a designated
size that has not been driven for
more than a couple of miles (kilo-
meters) at low speeds in the three
hour period before the tire pres-
sure is measured or adjusted.
Curb weight
means the weight of a motor ve-
hicle with standard equipment in-
cluding the maximum capacity of
fuel, oil, and coolant, air condi-
tioning and additional weight of
optional equipment.
Extra load tire
means a tire designed to operate
at higher loads and at higher in-
flation pressures than the corre-
sponding standard tire. Extra load
tires may be identified as “XL”,
“xl”, “EXTRA LOAD”, or “RF” on
the sidewall.
Page 295 of 360

4N0012721BD
Wheels
Gross Axle Weight Rating
(“GAWR”)
means the load-carrying capacity
of a single axle system, measured
at the tire-ground interfaces.
Gross Vehicle Weight Rating
(“GVWR”)
means the maximum total loaded
weight of the vehicle.
Groove
means the space between two ad-
jacent tread ribs.
Load rating (code)
means the maximum load that a
tire is rated to carry for a given in-
flation pressure. You may not find
this information on all tires be-
cause it is not required by law.
Maximum load rating
means the load rating fora tire at
the maximum permissible infla-
tion pressure for that tire.
Maximum loaded vehicle
weight
means the sum of:
(a) Curb weight
(b) Accessory weight
(c) Vehicle capacity weight, and
(d) Production options weight
Maximum (permissible)
inflation pressure
means the maximum cold infla-
tion pressure to which a tire may
be inflated. Also called “maxi-
mum inflation pressure.”
Normal occupant weight
means 150 lbs. (68 kilograms)
times the number of occupants
seated in the vehicle up to the to-
tal seating capacity of your vehi-
cle.
Occupant distribution
means distribution of occupants
in a vehicle.
Outer diameter
means the overall diameter of an
inflated new tire.
Overall width
means the linear distance be-
tween the exteriors of the side-
walls of an inflated tire, including
elevations due to labeling, deco-
rations, or protective bands or
ribs.
Ply
means a layer of rubber-coated
parallel cords.
293
Page 298 of 360

Wheels
by the tire manufacturer. This in-
formation is used to contact con-
sumers if a tire defect requires a
recall.
Vehicle capacity weight
means the rated cargo and lug-
gage load plus 150 lbs. (68 kilo-
grams) times the vehicle's desig-
nated seating capacity.
Vehicle maximum load on the
tire
means that load on an individual
tire that is determined by distrib-
uting to each axle its share of the
maximum loaded vehicle weight
and dividing by two.
Vehicle normal load on the tire
means that load on an individual
tire that is determined by distrib-
uting to each axle its share of the
curb weight, accessory weight,
and normal occupant weight (dis-
tributed in accordance with > ta-
ble on page 301) and dividing by
two.
Occupant loading and distri-
bution for vehicle normal load
for various designated seating
capacities
Refer to the tire inflation pressure
label > page 299, fig. 192 for the
296
number of seating positions. Re-
fer to the table > table on
page 301 for the number of peo-
ple that correspond to the vehicle
normal load.
New tires or wheels
Audi recommends having all work
on tires or wheels performed by
an authorized Audi dealer or au-
thorized Audi Service Facility.
These facilities have the proper
knowledge and are equipped with
the required tools and replace-
ment parts.
>New tires do not yet have the
optimal gripping properties.
Drive carefully and at moderate
speeds for the first 350 miles
(500 km) with new tires.
> Only use tires with the same de-
sign, size (rolling circumfer-
ence), and as close to the same
tread pattern as possible on all
four wheels.
>Do not replace tires individually.
At least replace both tires on the
same axle at the same time.
> Audi recommends that you use
Audi Original Tires. If you would
like to use different tires, please
note that the tires may perform >
Page 301 of 360

4N0012721BD
Wheels
install the tires from the rear axle
on the front axle and vice versa.
This will allow the tires to have
approximately the same length of
service life.
For unidirectional tires, make sure
the tires are installed according to
the running direction indicated on
the tire sidewall > page 321.
Hidden damage
Damage to tires and rims can of-
ten occur in locations that are hid-
den. Unusual vibrations in the ve-
hicle or pulling to one side may
indicate that there is tire damage.
Reduce your speed immediately.
Check the tires for damage. If no
damage is visible from the out-
side, drive slowly and carefully to
the nearest authorized Audi deal-
er or authorized Audi Service Fa-
cility to have the vehicle inspect-
ed.
Z\ WARNING
Tread that has worn too low or
uneven tread depths on the
tires can reduce driving safety.
This can increase the risk of an
accident because it has a nega-
tive effect on handling, driving
through curves, and braking,
and because it increases the
risk of hydroplaning when driv-
ing through deep puddles.
Tire pressure
B4l-1383
Fig. 191 Driver's side B-pillar: tire pres-
sure label
B8K-1151
@ SEATING CAPACITY. “TOTAL uj FRONT ul REAR a) (ooun NOMBRE DE PLACES TOTAL AVANT ARRIERE soa
‘Tho combined woight of occupants and cargo shi — Ko OF pm ibs. Le poids total des occupants et du chargement n =... a,
TIRE SIZE
PNEU _| DIMENSIONS
FRONT
AVANT
REAR
ARRIERE
‘SPARE
DE SECOURS
COLD TIRE PRESSURE
PRESSION DES PNEUS A FROID
as KPA, Ml PSI
a KPA, Ml PSI
a KPA, Ml PSI
Fig. 192 Tire pressure label
The correct tire pressure for tires
installed at the factory is listed on
a label. The label is located on the
B-pillar > fig. 191, > fig. 192.
Use the tire pressure specified for
a normal vehicle load when the
vehicle is partially loaded > table
on page 301. If driving the vehi-
cle when fully loaded, you must
increase the tire pressure to the
maximum specified pressure > A. >
299
Page 305 of 360

4N0012721BD
Wheels
from handling properly and in-
crease the risk of the loss of
vehicle control.
—The brakes on a vehicle that
has been overloaded may not
be able to stop the vehicle
within a safe distance.
—Tires on a vehicle that has
been overloaded can fail sud-
denly, including a blowout and
sudden deflation, causing loss
of control and a crash.
—Always make sure that the to-
tal load being transported -
including the weight of a trail-
er hitch and the tongue
weight of a loaded trailer -
does not make the vehicle
heavier than the vehicle’s
Gross Vehicle Weight Rating.
Determining correct load
Talis
Use the example below to calcu-
late the total weight of the pas-
sengers and luggage or other
things that you plan to transport
so that you can make sure that
your vehicle will not be overload-
ed.
Steps for Determining Correct
Load Limit
1. Locate the statement “THE
COMBINED WEIGHT OF OCCU-
PANTS AND CARGO SHOULD
NEVER EXCEED XXX KG OR XXX
LBS” on your vehicle’s placard
(tire inflation pressure label)
> page 299, fig. 192.
2. Determine the combined
weight of the driver and pas-
sengers that will be riding in
your vehicle.
3. Subtract the combined weight
of the driver and passengers
from “XXX” kilograms or “XXX”
pounds shown on the sticker
=> page 299, fig. 192.
4. The resulting figure equals the
available amount of cargo and
uggage load capacity. For ex-
ample, if the “XXX” amount
equals 1400 lbs. and there will
be five 150 lbs. passengers in
your vehicle, the amount of
available cargo and luggage
oad capacity is 650 lbs.
(1400-750 (5 x 150) = 650
bs.)
5. Determine the combined
weight of luggage and cargo
being loaded on the vehicle.
That weight may not safely
303
>
Page 306 of 360

Wheels
exceed the available cargo and
luggage load capacity calculat-
ed in Step 4.
6. If your vehicle will be towing a
trailer, load from your trailer
will be transferred to your vehi-
cle. Consult this manual to de-
termine how this reduces the
available cargo and luggage
load capacity of your vehicle.
> Check the tire sidewall
(=> page 290, fig. 189) to deter-
mine the designated load rating
for a specific tire.
Wheel bolts and rims
Wheel bolts
Wheel bolts must be clean and loosen/tighten
easily. You will need a special adapter to loosen
the anti-theft wheel bolts* > page 319.
Rims
Rims with a bolted rim ring* or with bolted wheel
covers* consist of multiple pieces. These compo-
nents were bolted together using special bolts
and a special procedure. You must not repair or
disassemble them > A\.
ZA WARNING
Wheel bolts that are tightened or repaired in-
correctly can become loose and result in loss
of vehicle control, which increases the risk of
an accident. For the correct tightening specifi-
cation, see > page 322, Finishing.
— Always keep the wheel bolts and the threads
in the wheel hub clean and free of grease.
— Only use wheel bolts that fit the rim.
— Always have damaged rims repaired by an
authorized Audi dealer or authorized Audi
Service Facility. Never repair or disassemble
304
rims yourself, because this increases the risk
of
an accident.
Loose wheel warning
Applies to: vehicles with loose wheel warning
Within the limits of the system, the loose wheel
warning in the instrument cluster warns you if
one or more wheels are loose.
Using the ABS sensors, the loose wheel warning
system compares the vibration characteristics of
the individual tires. If one or more wheels are
loose, it will be indicated in the instrument clus-
ter display with the fi indicator light and a mes-
sage. If only one wheel is affected, the location
of that wheel will be indicated.
Messages
fi Wheel bolts loose. Please safely stop the ve-
hicle and check all wheel bolts!
Loose wheel warning for at least one wheel > A\.
Check the wheel bolts on all wheels with the
wheel wrench (vehicle tool kit). Have the tighten-
ing specification checked as soon as possible with
a torque wrench. Drive carefully until then. For
the correct tightening specification, see
=> page 322, Finishing.
fi Wheel assessment active. Please continue
driving carefully
After this message appears and you have checked
the wheel bolts, the assessment phase begins
when the vehicle is in motion. This may take sev-
eral minutes.
& Loose wheel warning: malfunction! See
owner's manual
There is a system malfunction. Drive immediately
to an authorized Audi dealer or authorized Audi
Service Facility to have the malfunction repaired.
ZA\ WARNING
Wheel bolts that are tightened incorrectly can
become loose and result in loss of vehicle con-
trol, which increases the risk of an accident.
— If a message appears, reduce your speed im-
mediately and avoid any hard steering or >