remove seats AUDI A8 2020 Owners Manual
[x] Cancel search | Manufacturer: AUDI, Model Year: 2020, Model line: A8, Model: AUDI A8 2020Pages: 360, PDF Size: 95.38 MB
Page 29 of 360
4N0012721BD
Touch displays
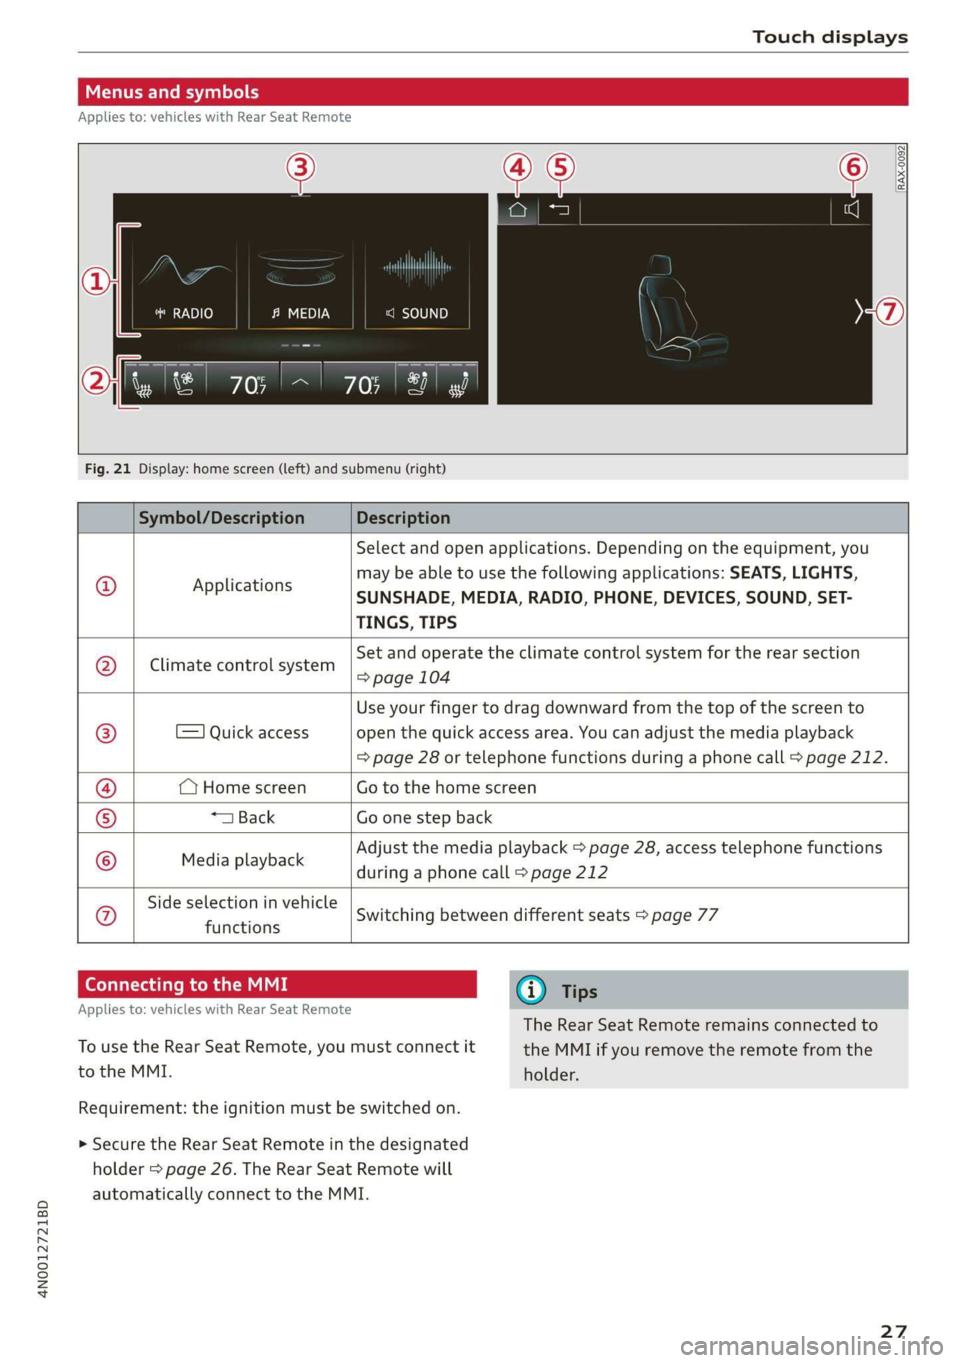
Menus and symbols
Applies to: vehicles with Rear Seat Remote
RADIO c=)
RAX-0092
Smet) (7)
Fig. 21 Display: home screen (left) and submenu (right)
Symbol/Description Description
© Applications
Select and open applications. Depending on the equipment, you
may be able to use the following applications: SEATS, LIGHTS,
SUNSHADE, MEDIA, RADIO, PHONE, DEVICES, SOUND, SET-
TINGS, TIPS
Climate control system
Set and operate the climate control system for the rear section
=> page 104
=) Quick access
Use your finger to drag downward from the top of the screen to
open the quick access area. You can adjust the media playback
=> page 28 or telephone functions during a phone call > page 212.
(Home screen Go to the home screen
*1 Back Go one step back
Media playback
Adjust the media playback > page 28, access telephone functions
during a phone call > page 212
Side selection in vehicle
functions Q}]e
|@Oe|
©
|
0
Switching between different seats > page 77
Connecting to the MMI G@) Tips
Applies to: vehicles with Rear Seat Remote
The Rear Seat Remote remains connected to
To use the Rear Seat Remote, you must connect it the MMI if you remove the remote from the
to the MMI. holder.
Requirement: the ignition must be switched on.
> Secure the Rear Seat Remote in the designated
holder > page 26. The Rear Seat Remote will
automatically connect to the MMI.
27
Page 31 of 360
4N0012721BD
Touch displays
Rear Seat Remote
Dimensions (height x width x depth) 3.39 in x 6.38 in x 0.43 in (86 mm x 162 mmx
11 mm)
Weight
0.58 lbs (261 g)
Rear Seat Entertainment
(Audi tablet)
Introduction
Applies to: vehicles with Audi tablet
You can control available sources in the vehicle
(such as the radio) using the Audi tablet and lis-
ten to them through the vehicle speakers or
headphones. You can also display vehicle infor-
mation (such as the next oil change service). The
Audi tablet also has applications and functions
that are not related to the vehicle.
ZA WARNING
— As the driver, do not allow usage of the Audi
tablet to distract you from driving, as this
could increase the risk of an accident. For
example, do not reach behind you while
driving to operate the Audi tablet.
— Children in rear-facing child safety seats in
the rear: remove the Audi tablet from the
backrest on the front seat to reduce the risk
of
injury. Read the instructions in the chap-
ter > page 91.
— The Audi tablet can only be operated when
the vehicle is stationary or when it is secure-
ly positioned in the designated holder in the
vehicle. Like all loose objects, it could be
thrown through the vehicle and cause seri-
ous injuries in a collision. If the Audi tablet
is not in the designated holder, it must al-
ways be securely stowed while driving.
— Do not use any wireless devices on the front
seats within range of the airbags while driv-
ing. Also read the warnings in the chapter
=> page 86.
— The back of the Audi tablet can become hot
while charging. Pay attention to the housing
temperature, and be careful when removing
the Audi tablet from the holder.
@) Note
— Always follow the information found in >®
in General information on page 216.
— Protect the Audi tablet against prolonged
exposure to direct sunlight.
— Extremely high or low temperatures that
can occur inside vehicles may damage the
Audi tablet or impair its performance. Never
leave your Audi tablet in the vehicle in ex-
tremely high or low temperatures.
— Protect the Audi tablet from coming into
contact with any fluids.
G) Tips
— If the Audi tablet is used when the ignition
is switched off or outside of the range of the
MMI, then only the non-vehicle applications
and functions will be available.
— Vehicle settings are only possible through
the MMI.
— Please note that a Wi-Fi connection does
not automatically make it possible to use
the
Internet. For additional information,
see the chapter > page 216.
— The Audi tablet makes it possible to access
services from external providers. Permanent
availability cannot be guaranteed, because
that depends on the service provider.
— When playing online media sources, there
may be longer loading times or restrictions
on media playback, depending on the Inter-
net connection or the Wi-Fi usage (for ex-
ample, if there is intensive usage by multi-
ple devices on the hotspot, such as tablets
or laptops).
— The Audi tablet has an anti-theft protection
feature: it can only connect to the MMI of
the associated vehicle. Also, the Audi tablet
will be disabled if it has not been connected
to the MMI for longer than 30 days. To ena-
ble it again, connect the Audi tablet to the
29
>
Page 33 of 360
4N0012721BD
Touch displays
Securing the Audi tablet
Requirement: the two buttons @) ° fig. 24 must
be in the retracted position.
> Hold the Audi tablet in both hands during the
entire process.
» Engage the Audi tablet at the contact strip @
> fig. 25.
> Carefully press the Audi tablet toward the Audi
tablet holder @) > fig. 25 until the Audi tablet
locks into place audibly.
@ Tips
If the Audi tablet is not in its holder and is ex-
posed to extremely high or low temperatures,
it may turn off automatically for safety rea-
sons.
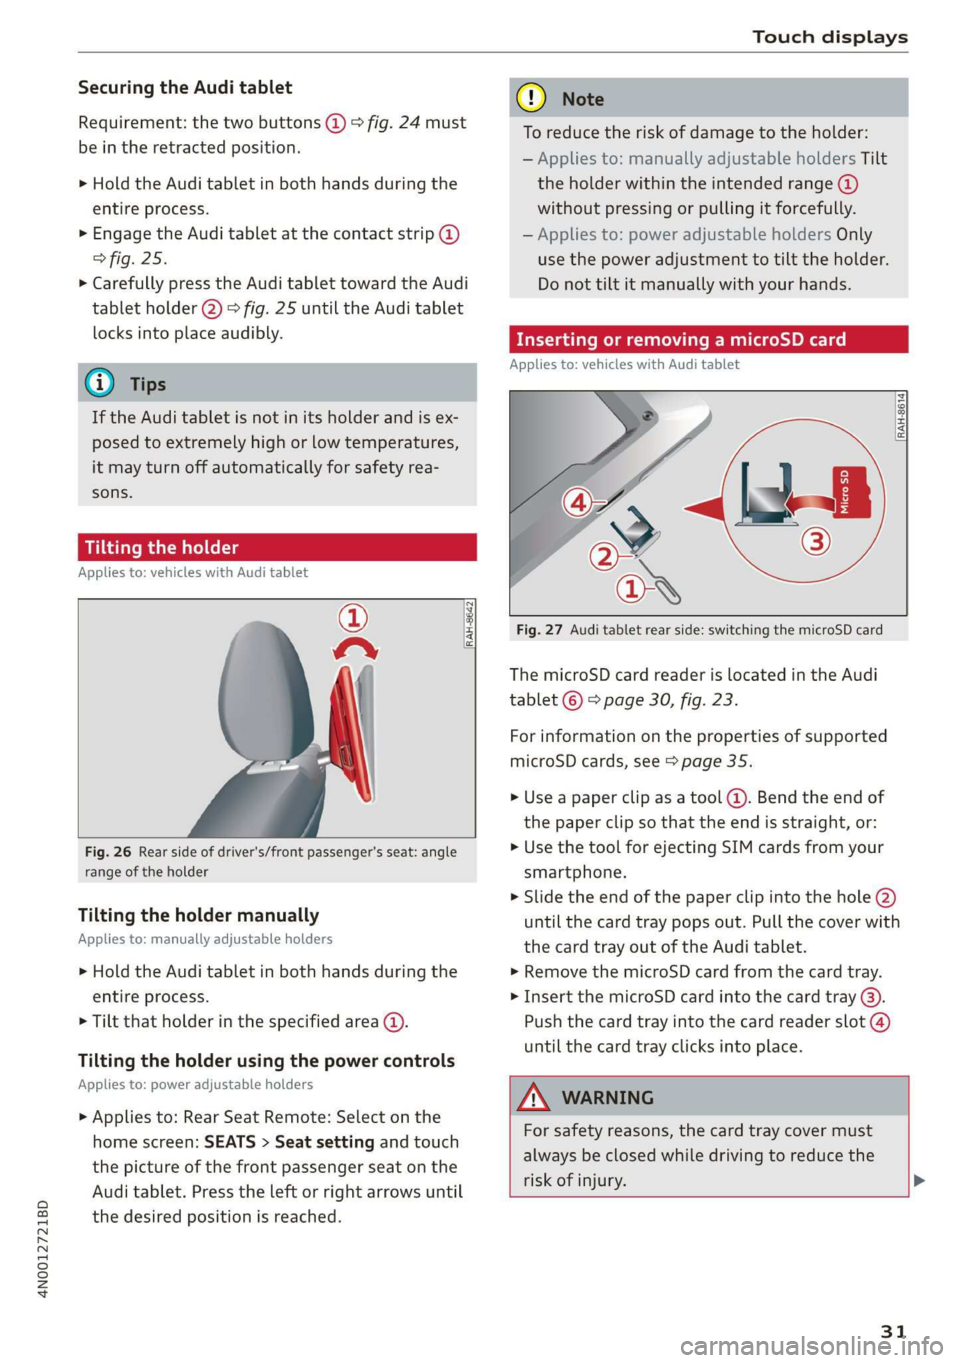
Tilting the holder
Applies to: vehicles with Audi tablet
wy
RAH-8642|
Fig. 26 Rear side of driver's/front passenger's seat: angle
range of the holder
Tilting the holder manually
Applies to: manually adjustable holders
> Hold the Audi tablet in both hands during the
entire process.
> Tilt that holder in the specified area @).
Tilting the holder using the power controls
Applies to: power adjustable holders
> Applies to: Rear Seat Remote: Select on the
home screen: SEATS > Seat setting and touch
the picture of the front passenger seat on the
Audi tablet. Press the left or right arrows until
the desired position is reached.
® Note
To reduce the risk of damage to the holder:
— Applies to: manually adjustable holders Tilt
the holder within the intended range @)
without pressing or pulling it forcefully.
— Applies to: power adjustable holders Only
use the power adjustment to tilt the holder.
Do not tilt it manually with your hands.
Inserting or removing a microSD card
Applies to: vehicles with Audi tablet
RAH-8614 fi
Fig. 27 Audi tablet rear side: switching the microSD card
The microSD card reader is located in the Audi
tablet © > page 30, fig. 23.
For information on the properties of supported
microSD cards, see > page 35.
» Use a paper clip as a tool (@). Bend the end of
the paper clip so that the end is straight, or:
> Use the tool for ejecting SIM cards from your
smartphone.
> Slide the end of the paper clip into the hole @)
until the card tray pops out. Pull the cover with
the card tray out of the Audi tablet.
» Remove the microSD card from the card tray.
> Insert the microSD card into the card tray @).
Push the card tray into the card reader slot @)
until the card tray clicks into place.
AN WARNING
For safety reasons, the card tray cover must
always be closed while driving to reduce the
risk of injury. >
31
Page 58 of 360

Opening and closing
Operating the roof from the rear*
> Tilting the roof: briefly press the > switch* in
the rear door downward once to the second lev-
el.
> Closing the tilted roof: pull the > switch* up-
ward briefly to the second Level.
> Opening the roof: press the 2S switch* in the
rear door downward again briefly to the second
level.
> Closing the roof: pull the 2> switch* upward
briefly to the second level.
> Opening partially: pull or press the 2> switch*
to the first level until the roof reaches the de-
sired position. Or:
> Applies to: Rear Seat Remote: Select on the
home screen: Blinds. Press on the picture of
the roof to operate it.
Quick opening and closing
You can also open or close the roof and front sun-
shade from the cockpit in one movement.
> Opening the roof and sunshade: slide the 2>
switch back briefly twice in a row to the second
level @).
> Closing the opened roof: push the 2S switch
forward briefly twice in a row to the second lev-
el.
Roof emergency closing
If an object is detected when closing, the roof
will open again automatically. In this case, you
can then close it with the power emergency clos-
ing function.
> Within five seconds after the sunroof opens au-
tomatically, pull the applicable button until the
roof is closed.
ZA\ WARNING
To reduce the risk of injury, always pay atten-
tion when closing the roof. Always switch the
ignition off and take the key with you when
leaving the vehicle.
)_ This function is not available in all countries.
56
C@) Note
Always close the roof when you leave the vehi-
cle and when there is precipitation to reduce
the risk of damage to the interior equipment,
particularly the electronic equipment.
Gi) Tips
— After switching off the ignition, the roof and
sunshades can still be operated for several
minutes as long as neither of the front
doors are opened.
— It is not possible to open the roof when
temperatures are too low.
Opening and closing the rear window
Tete
Applies to: vehicles with a sunshade on the rear window
The sunshade on the rear window can be operat-
ed both from the cockpit and from the rear seats.
Operating the sunshade on the rear window
> Applies to: MMI: Opening and closing the sun-
shade: Press [4] on the lower display. Or:
> Press the [2:] button briefly in the rear door. Or:
> Applies to: Rear Seat Remote: Select on the
home screen: Blinds. Press on the picture of
the rear window sunshade to operate it.
Valet parking
Applies to: vehicles with valet parking function
The valet parking function can protect the lug-
gage compartment from unauthorized access.
The [VALET] button for valet parking is in the
glove compartment.
You can switch the valet parking function on, for
example when someone else is parking your vehi-
cle ). The vehicle can be driven, locked, and un-
locked using the vehicle key, but access to the
luggage compartment is blocked.
> Remove the mechanical key > page 47.
> Press the [VALET] button in the glove compart-
ment. The LED in the button turns on if the
function is switched on.
Page 78 of 360

Sitting correctly and safely
vehicle interior during sudden driving or
braking maneuvers, which increases the risk
of an accident. Store objects securely while
driving.
— Applies to: vehicles with front center airbag:
The center armrest must be closed while
driving. Otherwise, the protective function
of the front center airbag could be impaired
because it deploys from the driver's seat
backrest. This increases the risk of injury.
Rear seats
(ee eels)
Z\ WARNING
— The power seats can also be adjusted when
the ignition is switched off. To reduce the
risk of injury, children should never be left
unattended in the vehicle for this reason.
— Be careful when adjusting the seat. Unsu-
pervised or careless seat adjustment could
cause parts of the body to get pinched,
which increases the risk of injury.
C) Note
Before adjusting the seat position, you must
remove the retainers for the LATCH child safe-
ty seat restraint system, if installed.
G) Tips
At the same time, only move the respective
seat using the controls.
76
Adjusting seats with buttons
Applies to: vehicles with power adjustable rear seats
You can adjust the basic settings using the but-
tons.
©
S|
Ss x a
oo
Fig. 64 Rear center armrest/full-length center console:
seat adjustment buttons
The settings depend on the vehicle equipment.
Adjusting the lumbar support
> To adjust the curvature of the lumbar support,
press the left or right button @.
> To adjust the height of the lumbar support,
press the upper or lower button (@).
Adjusting the backrests
> To move the backrest forward or backward,
press the button (2) to the left or right.
Adjusting the head restraints
> See > page 81
Adjusting the seat position
> To adjust the seat forward or backward, press
the button @) to the left or right. The backrest
will automatically adjust with it.
>
To move the seat upward or downward, press
the button @) upward or downward.
Adjusting the front passenger's seat
See > page 77
Adjusting the comfort position
See > page 78
Page 83 of 360
4N0012721BD
Sitting correctly and safely
Head restraints
General information
Applies to: vehicles with adjustable head restraints
B4G-0454
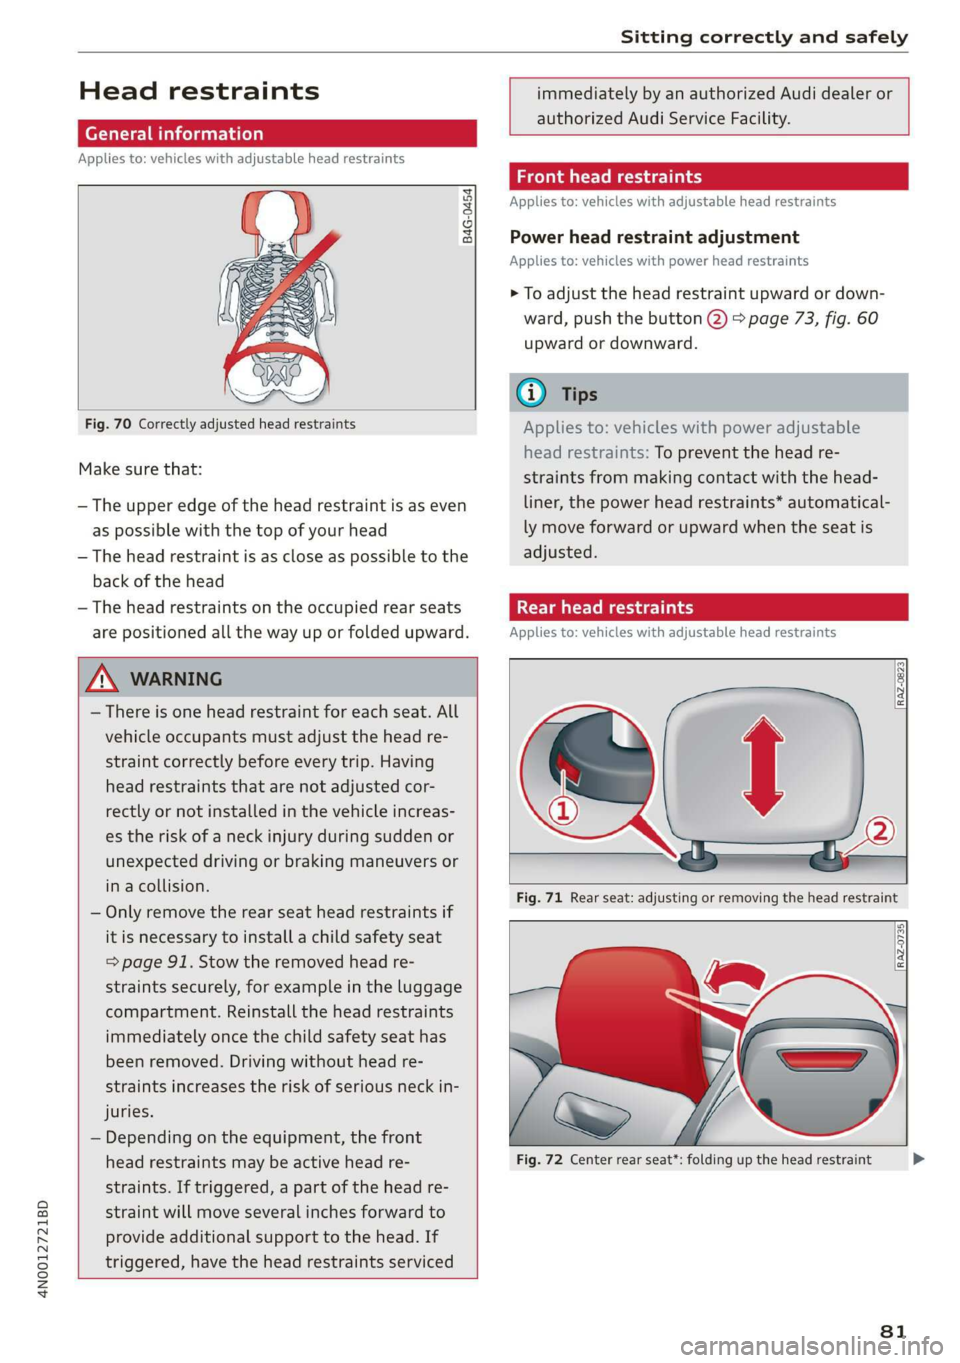
Fig. 70 Correctly adjusted head restraints
Make sure that:
— The upper edge of the head restraint is as even
as possible with the top of your head
— The head restraint is as close as possible to the
back of the head
— The head restraints on the occupied rear seats
are positioned all the way up or folded upward.
immediately by an authorized Audi dealer or
authorized Audi Service Facility.
Front head restraints
Applies to: vehicles with adjustable head restraints
Power head restraint adjustment
Applies to: vehicles with power head restraints
> To adjust the head restraint upward or down-
ward, push the button @) > page 73, fig. 60
upward or downward.
@) Tips
Applies to: vehicles with power adjustable
head restraints: To prevent the head re-
straints from making contact with the head-
liner, the power head restraints* automatical-
ly move forward or upward when the seat is
adjusted.
Taal eM ary
Applies to: vehicles with adjustable head restraints
Z\ WARNING
— There is one head restraint for each seat. All
vehicle occupants must adjust the head re-
straint correctly before every trip. Having
head restraints that are not adjusted cor-
rectly or not installed in the vehicle increas-
es the risk of a neck injury during sudden or
unexpected driving or braking maneuvers or
in a collision.
— Only remove the rear seat head restraints if
it
is necessary to install a child safety seat
= page 91. Stow the removed head re-
straints securely, for example in the luggage
compartment. Reinstall the head restraints
immediately once the child safety seat has
been removed. Driving without head re-
straints increases the risk of serious neck in-
juries.
— Depending on the equipment, the front
head restraints may be active head re-
straints. If triggered, a part of the head re-
straint will move several inches forward to
provide additional support to the head. If
triggered, have the head restraints serviced
Fig. 71 Rear seat: adjusting or removing the head restraint
Fig. 72 Center rear seat*: folding up the head restraint
81
>
Page 84 of 360

Sitting correctly and safely
Adjusting the outer head restraints
Applies to: vehicles with manual head restraints
> To adjust the head restraint upward, slide it un-
til it locks into place.
> To adjust the head restraint downward, press
the button @) and slide the head restraint. Re-
lease the button and slide the head restraint
farther until it locks into place.
Applies to: vehicles with power head restraints
> To adjust the head restraint upward or down-
ward, push the button 2) > page 76, fig. 64
forward or backward. Or:
> Applies to: Rear Seat Remote: To adjust the
head restraint upward or downward: select on
the home screen: Seats > Setting and press on
the picture of the head restraint for the respec-
tive seat. Press the up or down arrows until the
desired position is reached.
Adjusting the center head restraint
> Fold the head restraint upward until it clicks in-
to place > fig. 72.
> To fold the head restraint downward, press the
button on the back of the head restraint.
Removing the headrests
Applies to: vehicles with removable head restraints
> Move the head restraint upward all the way.
> Insert a suitable object, such as the the extend-
ed vehicle key or mechanical key, into the re-
lease point @ on the inside or outside of the
base.
> Press the button @) and pull the head restraint
out of the backrest > A\ in General informa-
tion on page 81.
Installing the headrests
Applies to: vehicles with removable head restraints
> Slide the posts on the head restraint down into
the guides until the posts click into place.
> Press the button @) and slide the head restraint
all the way down. It should not be possible to
remove the head restraint from the backrest
without pressing the button.
82
Safety belts
General information
Each seat is equipped with a three-point safety
belt. Safety belts that are worn correctly are the
most effective way to reduce the risk of serious or
fatal injuries in a collision. Therefore, wear your
safety belt correctly and make sure that all vehi-
cle passengers are also wearing their safety belts
correctly when the vehicle is moving.
Even though your vehicle is equipped with an air-
bag system, every vehicle passenger must still al-
ways wear the appropriate safety belt. In addi-
tion to their normal protective function, safety
belts also hold vehicle occupants in the correct
seating position in the event of a collision so that
the
airbags can deploy correctly and provide addi-
tional protection. Safety belts provide protection
during collisions when the airbags do not deploy
or if they have already deployed.
ZX WARNING
The risk of serious or fatal injury increases if
the safety belt is not fastened, if it is worn in-
correctly, or if it is damaged.
— All vehicle occupants, including the driver,
must fasten their safety belts correctly be-
fore every trip and must always keep their
safety belts fastened during the trip, regard-
less of whether the seat is equipped with an
airbag or not. This also applies to children
that are seated in a child safety seat that is
appropriate for their weight and age and
that is secured with a safety belt.
— In the event of a collision, vehicle occupants
that are not wearing safety belts could be
propelled through the vehicle interior and
collide with vehicle components, such as the
steering wheel, instrument panel, wind-
shield, or doors. In some situations, vehicle
occupants could also be ejected from the ve-
hicle. Vehicle occupants in the rear seats
who do not wear safety belts not only en-
danger themselves, but also other people in
the vehicle.
— Only one person may be fastened with a
safety belt at a time. Never secure more
Page 93 of 360

4N0012721BD
Sitting correctly and safely
which increases the risk of serious or fatal
injury. Always secure child safety seats on
the rear seats. If special circumstances re-
quire the use of a child safety seat on the
front passenger's seat, always make sure
that PASSENGER AIR BAG OFF 3; re-
mains on while driving. If
PASSENGER AIR BAG OFF #¥; does not
turn on, remove the child safety seat and in-
stall it again according to the child safety
seat manufacturer instructions. If
PASSENGER AIR BAG OFF %% still does
not turn on, the front passenger's seat must
not be used. Drive to an authorized Audi
dealer or authorized Audi Service Facility
and have the airbag system inspected.
— Fluids, electronic devices, or mechanical
damage on the front passenger's seat may
cause the front passenger seat occupant de-
tection to malfunction. The system may
then incorrectly detect if the front passeng-
er's seat is occupied. As a result, it could de-
ploy the front passenger’s airbag incorrectly
or fail to deploy it, which increases the risk
of serious or fatal injury. Make sure that no
wet objects (such as a wet hand towel) and
no fluids come into contact with the front
passenger's seat cushion. If the front pas-
senger's seat becomes wet, dry it immedi-
ately. Make sure no electronic devices (such
as a laptop or a retrofitted seat heater) are
on the front passenger's seat. Do not trans-
port any objects on or under the front pas-
senger's seat.
— Seat covers or protective covers may prevent
the advanced airbag system from correctly
detecting child safety seats or passengers in
the front passenger's seat. You must not use
seat covers or protective covers on the front
passenger's seat that are not specifically ap-
proved for use on Audi seats with an ad-
vanced airbag system.
Child safety seats
General information
When installing and using child safety seats, fol-
low the information in this Owner's Manual, the
applicable state and federal regulations, and the
manufacturer instructions for the child safety
seat.
You can also obtain useful and current informa-
tion from the following sources:
U.S. National Highway Traffic Safety Adminis-
tration
http://www.nhtsa.gov
http://www.safercar.gov
National SAFE KIDS Campaign
http://www.safekids.org
SafetyBeltSafe U.S.A.
http://www.carseat.org
Transport Canada Information Centre
http://www.tc.gc.ca/roadsafety
Audi Customer Experience Center
https://www.audiusa.com/help/contact-us
https://www.audi.ca/ca/web/en/models/layer/
contact.html
ZA WARNING
To reduce the risk of serious or fatal injuries,
children must always be secured in the vehicle
with a child safety seat that is appropriate for
their body size, weight, and age.
— Children ages 12 and under must be trans-
ported using the appropriate child safety
seat. Note differences in regulations be-
tween states and countries.
— Child safety seats secured incorrectly in the
vehicle may cause serious or fatal injuries in
the event of an accident. Always secure the
child safety seat according to the manufac-
turer instructions.
— Children or babies must not under any cir-
cumstances be held on the lap of the driver
or other passengers while driving.
— Do not secure more than one child in a child
safety seat.
— Never allow a child to sit in a child safety
seat unsupervised.
— Never allow children to ride unsecured in the
vehicle or to stand or kneel on the seats
while driving. In the event of an accident, a
child could be propelled through the vehicle.
91
Page 94 of 360
Sitting correctly and safely
This can cause serious or fatal injuries for
the child and passengers.
— If children use an incorrect seating position
while driving, they have a higher risk of in-
jury during a sudden braking maneuver or
accident. This especially applies to children
in the front passenger's seat or children who
have their head near the side airbag deploy-
ment area, if the airbag system is deployed
during an accident. This incorrect seating
position can cause severe or even fatal inju-
ries.
— Make sure there is enough space in front of
the child in the child safety seat. If necessa-
ry, adjust the angle and position of the seat
in front of the child safety seat.
— Applies to: vehicles with Audi tablet: If you
secure a rear-facing child safety seat on the
rear seat, remove the Audi tablet from the
backrest on the front seat.
— The rear side of a forward-facing child safety
seat should be positioned as close as possi-
ble to the backrest on the vehicle seat. If the
head restraints make it difficult to install a
child safety seat, adjust or remove them
= page 81. Reinstall the head restraints im-
mediately once the child safety seat has
been removed.
— NEVER use a rear-facing child safety seat on
a seat with an ACTIVATED FRONT AIRBAG;
this could cause DEATH or SERIOUS INJU-
RIES to a CHILD.
— Always secure child safety seats on the
rear seats. If exceptional circumstances re-
quire the child safety seat to be placed on
the front passenger's seat, then the front
passenger's airbag must be deactivated.
Always make sure that
PASSENGER AIR BAG OFF 8; remains
on while driving. If
PASSENGER AIR BAG OFF ; does not
turn on, remove the child safety seat and
install it again according to the child safe-
ty seat manufacturer instructions. If
PASSENGER AIR BAG OFF %%; still
does not turn on, the front passenger's
seat must not be used. Drive to an author-
ized Audi dealer or authorized Audi Service
92
Facility and have the airbag system in-
spected.
— If you must use a forward-facing child safety
seat on the front passenger's seat, move the
seat as far back as possible so that it is as
far as possible from the front passenger's
airbag. While doing this, make sure the seat
can be adjusted all the way. A child in a child
safety seat on the front passenger's seat can
receive a severe impact if the front passeng-
er's airbag deploys, which increases the risk
of serious or fatal injury.
— Replace the child safety seat after an acci-
dent because there could be damage that is
not visible.
— Even if a child is not sitting in the child safe-
ty seat, the child safety seat must be se-
cured. An unsecured child safety seat may
be thrown through the vehicle interior dur-
ing sudden braking maneuvers or an acci-
dent.
(eye ta em Seidl m imal lela)
Always secure children in a child safety seat de-
signed for the body size, weight, and age of the
child.
You can secure child safety seats in your vehicle
using the lower LATCH anchors or the safety
belts. You can also secure child safety seats to
the top tether anchor. Depending on the child
safety seat, it may also be necessary to secure it
to the top tether anchor. In Canada, securing for-
ward-facing child safety seats to the top tether
anchors is required by law.
Always transport children in the rear seats
Accident statistics show that children that are se-
cured correctly in the rear seats are safer than in
front seats. Always transport children in suitable
child safety seats secured on the rear seats.
In exceptional circumstances: transporting
children in the front passenger's seat
If exceptional circumstances require the child
safety seat to be placed on the front passenger's
seat, then the front passenger's airbag must be
deactivated. Please note the important
Page 96 of 360
Sitting correctly and safely
reach of the child > A\ in Securing child safety
seats with a safety belt on page 95.
> Secure the child safety seat according to the
child safety seat manufacturer instructions.
> Pull on the child safety seat to check if both
sides are engaged correctly in the LATCH an-
chors.
> If possible, also secure the child safety seat to
the respective top tether anchor on the seat
=>page 95.
Z\ WARNING
The LATCH anchors in the vehicle are only de-
signed for child safety seats with the LATCH
system. To reduce the risk of serious or fatal
injury, never secure other child restraint sys-
tems, belts, or objects to the anchors.
@ Tips
The LATCH anchors are designed for a total
weight (child and child safety seat combined)
up to 65 lbs (29 kg). If the total weight is
greater than this, the child safety seat must
be secured with the vehicle safety belt.
Securing child safety seats with a safety
Ptah
Follow the safety precautions > page 91. The
front passenger’s seat is a dangerous location for
a child, even with an advanced airbag system. If
exceptional circumstances require the child safe-
ty seat to be placed on the front passenger's
seat, then the front passenger's airbag must be
deactivated. Please note the important informa-
tion for this > page 92, Correct positioning for
children and > page 89, Advanced airbag sys-
tem.
Securing child safety seats
> Applies to: vehicles with power-adjustable rear
bench seat: If you secure a child safety seat on
the rear seat, move the rear seat all the way
back and downward and adjust the backrest to
be as upright as possible.
> Activate the child safety lock > page 53.
94
> If you secure a child safety seat to the rear seat,
secure any unused safety belts that are within
reach of the child > A\, > page 96.
> If you secure a child safety seat to the front
passenger's seat, adjust the front passenger's
seat to the highest position.
> Secure the child safety seat according to the
child safety seat manufacturer instructions.
> If necessary, activate the belt retractor lock
=> page 94, Activating the belt retractor lock.
> If the child safety seat is secured on the front
passenger's seat, adjust the front passenger's
seat backrest until it rests flat against the child
safety seat. Also make sure that the upper safe-
ty belt fixture is behind the child safety seat.
> If you secure a child safety seat on the rear
seat, also secure it to the correct top tether an-
chor if possible > page 95.
Activating the belt retractor lock
If you secure a child safety seat using the vehicle
safety belt, you must activate the belt retractor
lock. Follow the child safety seat manufacturer
instructions.
The
belt retractor lock prevents the safety belt
from becoming loose while driving, which could
result in the child safety seat no longer being ad-
equately secured.
>» Secure the child safety seat according to the
child safety seat manufacturer instructions.
While doing so, pull out the safety belt. Insert
the safety belt into the belt latch that belongs
to that seat until it audibly locks.
> Pull the upper belt out completely and then al-
low it to retract. You will hear a clicking sound
while the belt is retracting. It will not be possi-
ble to pull the safety belt out any farther.
> Push the child safety seat into the seat and al-
low the belt to retract more.
> Make sure that the child safety seat cannot
move more than 1 inch (2.5 cm).
Deactivating the belt retractor lock
> Unbuckle the safety belt from the belt latch.
> Remove the child safety seat according to the
manufacturer instructions.
> Allow the safety belt to retract completely. The
belt retractor lock is deactivated.