ignition AUDI A8 2021 Owners Manual
[x] Cancel search | Manufacturer: AUDI, Model Year: 2021, Model line: A8, Model: AUDI A8 2021Pages: 362, PDF Size: 99.29 MB
Page 9 of 362
4N0012721BF
Quick access
—Park assist plus ............... 198
— Driver assistance systems ...... 153
@_ Depending on equipment:
—Cup holder ..............00.. 95
—SOCkEt: ss seas ¢ 5 cease go eR Fe ee 94
@0) Depending on equipment:
— Starting the engine if there is a
malfunction ................. 108
— Audi music interface .......... 252
—Audi phone box ............... 211
@) Electromechanical parking brake
button 2... 6... cece ee ee eee ee 121
@ Automatic transmission selector
lever... 2... cece eee eee eee ee 109
@ [START ENGINE STOP] button .... 107
@4 Steering wheel adjustment ...... 78
@5) Lever for:
— Cruise control system ......... 163
— Adaptive cruise assist .......... 166
@8 Connection port for the On Board
Diagnostic System (OBD) ........ 333
@) Buttons for:
> LIQHtS sc ss sees ¢ 2 wees 3s ewes G 58
—All-weather lights ............ 58
— Rear fog lights ............... 58
Hood release .............0.00. 276
@9) Button for:
— Luggage compartment lid ...... 48
— Fuel filler door release (plug-in
hybrid drive) ............0.00. 27
60 Exterior mirror adjustment ...... 64
@2 Buttons for:
— Power windows .............. 52
—Child safety lock .............. 51
@) Tips
Some the equipment listed here is only instal-
led in certain models or is available as an op-
tion.
Indicator lights overview
The indicator lights in the instrument cluster
blink or turn on. They indicate functions or mal-
functions. Some warning and indicator lights
turn on when you switch the ignition on and must
turn off when the drive system is switched on or
while driving.
With some indicator lights, messages may ap-
pear and warning signals may sound. The indica-
tor lights and messages may be covered by other
displays. To show them again, select the second
tab for messages with the multifunction steering
wheel & page 13.
Some indicator lights in the display can display in
several colors.
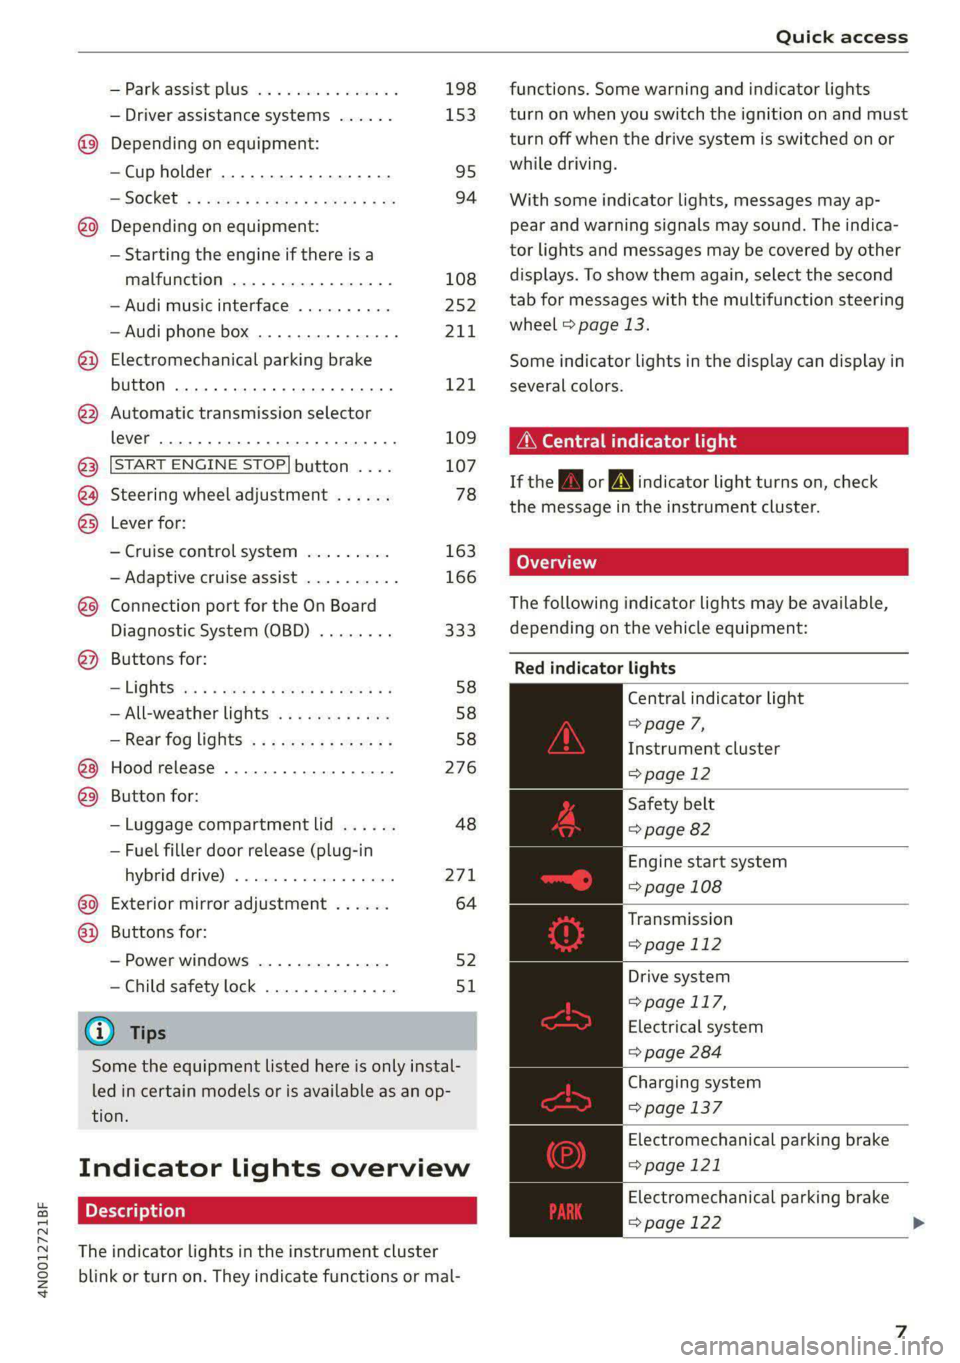
ONC eae sh
If the A or A indicator light turns on, check
the message in the instrument cluster.
The following indicator lights may be available,
depending on the vehicle equipment:
Red indicator lights
Central indicator light
=> page 7,
Instrument cluster
=> page 12
Safety belt
=> page 82
Engine start system
=> page 108
Transmission
=> page 112
Drive system
=> page 117,
Electrical system
=> page 284
Charging system
=> page 137
Electromechanical parking brake
=> page 121
Electromechanical parking brake
=> page 122
Page 15 of 362
4N0012721BF
Instrument cluster
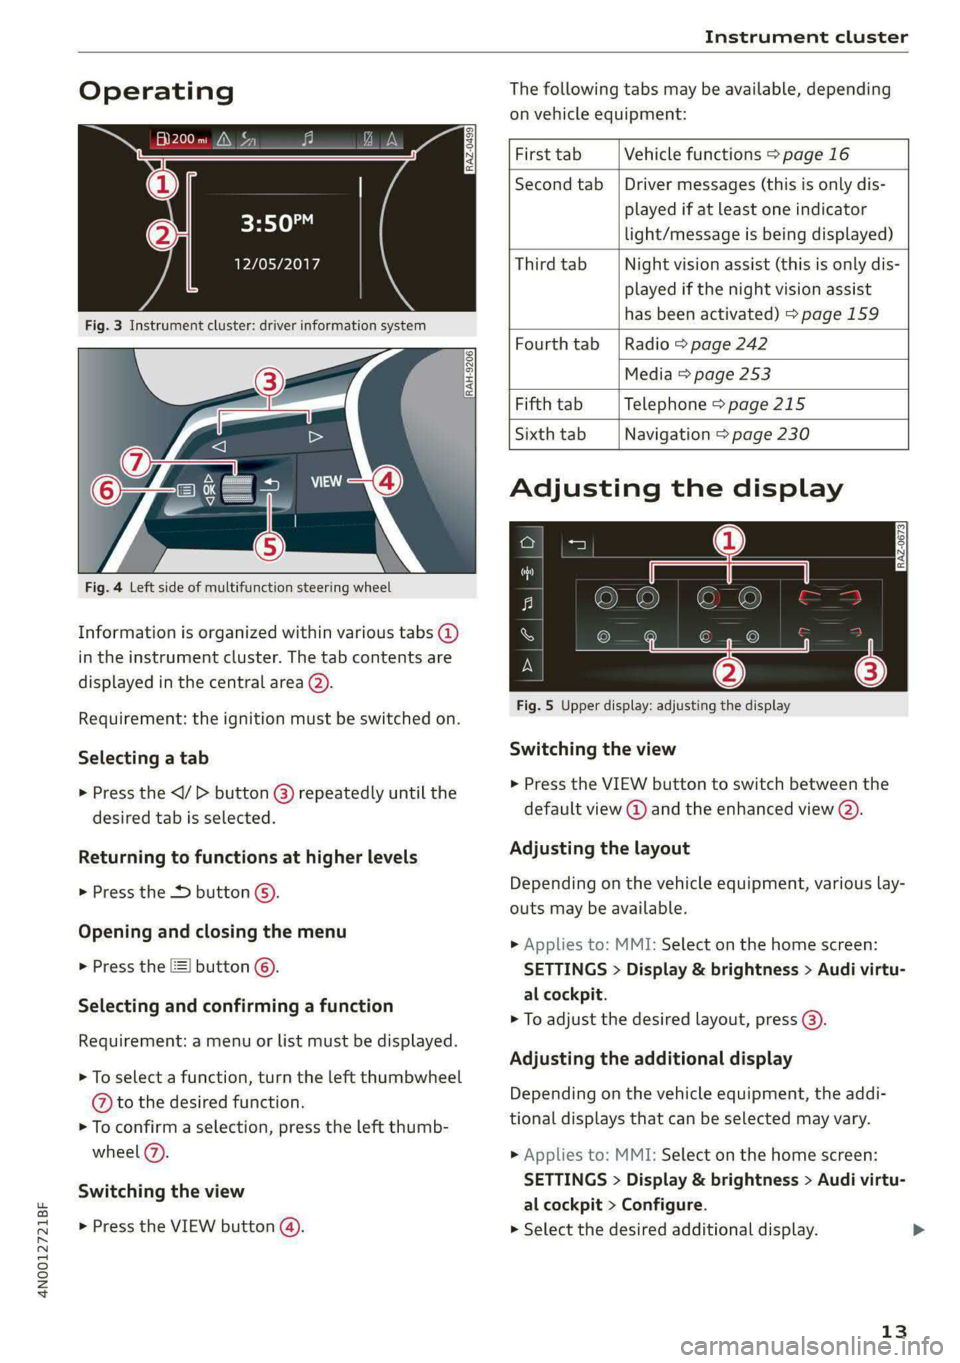
Operating The following tabs may be available, depending
on vehicle equipment:
First tab Vehicle functions > page 16
Second tab | Driver messages (this is only dis-
played if at least one indicator -5QPM
ce light/message is being displayed)
12/05/2017 Third tab Night vision assist (this is only dis-
played if the night vision assist
has been activated) > page 159
Fourth tab |Radio > page 242
Media > page 253
Fifth tab Telephone > page 215
Sixth tab Navigation > page 230
Fig. 3 Instrument cluster: driver information system
RAH-9206|
Adjusting the display
=I eR S| >| nN x ec
Fig. 4 Left side of multifunction steering wheel
Information is organized within various tabs @)
in the instrument cluster. The tab contents are
displayed in the central area (2).
i Bad P Fig. 5 Upper display: adjusting the display
Requirement: the ignition must be switched on.
Selecting a tab Switching the view
> Press the button @) repeatedly until the
desired tab is selected.
> Press the VIEW button to switch between the
default view @ and the enhanced view (2).
Returning to functions at higher levels Adjusting the layout
> Press the *> button ©) Depending on the vehicle equipment, various lay-
outs may be available.
Opening and closing the menu
P 9 9 > Applies to: MMI: Select on the home screen:
> Press the [=] button ©). SETTINGS > Display & brightness > Audi virtu-
al cockpit. 5 firmi fi ‘
Selecting arid eantirming’s function > To adjust the desired layout, press @).
Requirement: a menu or list must be displayed.
Adjusting the additional display
> To select a function, turn the left thumbwheel , ; ; ;
@ to the desired function. Depending on the vehicle equipment, the addi-
» To confirm a selection, press the left thumb- tional displays that can be selected may vary.
wheel (2). >» Applies to: MMI: Select on the home screen:
SETTINGS > Display & brightness > Audi virtu-
al cockpit > Configure.
> Press the VIEW button @). > Select the desired additional display.
Switching the view
13
Page 16 of 362

Instrument cluster
Reducing the display
Depending on the vehicle equipment, you can
hide the central area in the instrument cluster.
> Select on the instrument cluster: vehicle func-
tions tab > E] button > Reduced display.
Coolant temperature
display
Applies to: vehicles with a coolant temperature indicator
The coolant temperature display @ > page 12
only functions when the ignition is switched on.
To reduce the risk of engine damage, please ob-
serve the following notes about the temperature
ranges.
Cold range
If only the LEDs at the bottom of the gauge turn
on, the engine has not reached operating tem-
perature yet. Avoid high engine speeds, full accel-
eration, and heavy engine loads.
Normal range
The engine has reached its operating tempera-
ture once the LEDs up to the center of the gauge
turn on. If the | indicator light in the instru-
ment cluster display turns on, the coolant tem-
perature is too high > page 281.
@) Note
— Auxiliary headlights and other accessories in
front of the air intake impair the cooling ef-
fect of the coolant. This increases the risk of
the engine overheating during high outside
temperatures and heavy engine load.
— The front spoiler also helps to distribute
cooling air correctly while driving. If the
spoiler is damaged, the cooling effect will
be impaired and the risk of the engine over-
heating will increase. See an authorized
Audi dealer or authorized Audi Service Fa-
cility for assistance.
Tachometer
The tachometer (@) 9 page 12 displays the engine
speed in revolutions per minute (RPM). The be-
ginning of the red zone in the tachometer indi-
14
cates the maximum permissible engine speed for
all gears once the engine has been broken in. Be-
fore reaching the red zone, you should shift into
the next higher gear, select the "D" or "S" selec-
tor lever position, or remove your foot from the
accelerator pedal.
Displaying the tachometer
Applies to: vehicles with plug-in hybrid drive
> Applies to: MMI: Select on the home screen:
SETTINGS > Display & brightness > Audi virtu-
al cockpit > Left dial > Tachometer or Com-
bined.
Engine speed limitation
If the Bw indicator light turns on, the engine will
be automatically limited to the RPM displayed in
the instrument cluster. This will protect the en-
gine components, for example during a cold start
or from overheating.
The engine speed limitation is deactivated if you
release the accelerator pedal while the engine is
at normal operating temperature.
If the engine speed limitation was activated by
an engine control malfunction, the indicator
light also turns on. Make sure the engine speed
does not go above the speed displayed, for exam-
ple when downshifting. Drive to an authorized
Audi dealer or authorized Audi Service Facility im-
mediately to have the malfunction corrected.
C) Note
The needle in the tachometer may only be in
the red area of the gauge for a short period of
time before there is a risk of damaging the
engine. The location where the red zone be-
gins varies depending on the engine.
Page 18 of 362

Instrument cluster
When engine oil temperatures are low, the dis-
play --- °F (--- °C) appears in the instrument clus-
ter. The engine has reached its operating temper-
ature when the engine oil temperature is be-
tween 176 °F (80 °C) and 248 °F (120 °C) under
normal driving conditions. The engine oil temper-
ature may be higher if there is heavy engine load
and high temperatures outside. This is not a
cause for concern as long as the B or 2 indica-
tor lights do not turn on.
Boost indicator
Applies to: vehicles with boost indicator
Depending on vehicle equipment, the current en-
gine load (meaning the current boost pressure)
may be indicated by a bar in the instrument clus-
ter.
> Open the vehicle functions tab and switch to
the enhanced view > page 13.
Vehicle functions
The trip computer is displayed in the first tab of
the driver information system. Additional vehicle
functions can be accessed depending on the vehi-
cle equipment.
> Press the [=] button on the multifunction steer-
ing wheel.
— Trip computer > page 16
— Reduced display > page 14
— Reset trip odometer > page 15
— Energy flow display > page 115
—Lap times > page 158
— Lap statistics > page 159
On-board computer
Resetting values to zero
Requirement: the Consumption, Short-term
memory, or Long-term memory display must be
selected.
> To reset the values in one of the memories to
zero, press and hold the left thumbwheel on
16
the multifunction steering wheel for one sec-
ond, or
> Select on the instrument cluster: vehicle func-
tions tab > EI button > Reset mi.
Depending on the vehicle equipment, you can call
up the following displays in the on-board com-
puter one at a time by turning the left thumb-
wheel on the multifunction steering wheel:
— Time and date > page 263
— Plug-in hybrid drive: range display
— Average consumption > page 16
— Short-term memory overview
— Long-term memory overview
— Energy consumers > page 16
— Driver assistance
— Traffic sign recognition and traffic light infor-
mation
Short-term memory and long-term memory
The short-term memory collects driving informa-
tion from the time the ignition is switched on un-
til it is switched off. If you continue driving within
two hours after switching the ignition off, the
new values will be included when calculating the
current trip information.
Unlike the short-term memory, the long-term
memory is not erased automatically. You can se-
lect the time period for evaluating trip informa-
tion yourself.
Average consumption
The current consumption can be shown using a
bar graph. The average consumption stored in
the short-term memory is also displayed. If the
bar is green, your vehicle is saving energy (for ex-
ample, using recuperation).
Energy consumers
The Energy consumers view lists other equip-
ment that is currently affecting fuel consump-
tion. The display shows up to three equipment
items. The equipment using the most power is
listed first. If more than three items using power
are switched on, the equipment that is currently
using the most power is displayed. A gauge also
shows the current total consumption of all other
equipment.
Page 28 of 362
Touch displays
Accepting suggested words or selecting
entries from the results list
> To accept a suggested word (2) or select an en-
try from the results list @), press on it.
> To display more content in the results list, drag
your finger upward or downward on the screen.
Setting the input language or keyboard
layout
> Applies to MMI: Select on the home screen:
SETTINGS > Language & keyboard > Keyboard.
> To define additional input languages, press the
© button.
> To change the keyboard layout for an input lan-
guage, press >. For example, you can select be-
tween QWERTZ and QWERTY.
Rear Seat Remote
Introduction
Applies to: vehicles with Rear Seat Remote
With Rear Seat Remote, you can control conven-
ience and Infotainment system functions in the
rear of the vehicle, such as the climate control
system or the media playback in the vehicle.
ZA\ WARNING
— As the driver, do not allow usage of the Rear
Seat Remote to distract you from driving, as
this could increase the risk of an accident.
For example, do not reach behind you while
driving to operate the Rear Seat Remote.
— The Rear Seat Remote can only be operated
when the vehicle is stationary or when the
remote is securely positioned in the desig-
nated holder in the vehicle. Like all loose ob-
jects, it could be thrown through the vehicle
and
cause serious injuries in a collision. If
the Rear Seat Remote is not in the designat-
ed holder, it must always be securely stowed
while driving.
— Do not use any wireless devices on the front
seats within range of the airbags while driv-
ing. Also read the warnings in the chapter
> page 84.
— The Rear Seat Remote can become hot while
charging. Pay attention to the housing and
display temperature, and be careful when
26
removing the Rear Seat Remote from the
holder.
— There are magnets located on the back of
the Rear Seat Remote and in the designated
holder. For people with pacemakers, the
electromagnetic radiation may impair pace-
maker function. Always maintain a mini-
mum distance of approximately 6 inches (15
cm) from the magnets.
@) Note
— Always follow the information found in 9®
in General information on page 222.
— Protect the Rear Seat Remote against pro-
longed exposure to direct sunlight.
— Extremely high or low temperatures that
can occur inside vehicles can damage the
Rear Seat Remote and/or impair the device
performance. Never leave your Rear Seat
Remote in the vehicle in extremely high or
low temperatures.
— Protect the Rear Seat Remote from coming
into contact with any fluids.
G) Tips
— Please note that the Rear Seat Remote can
be used only when the ignition is switched
on and within range of your vehicle's active
Wi-Fi hotspot.
— Please note that a Wi-Fi connection does
not automatically make it possible to use
the Internet. For additional information,
see the chapter > page 222.
— When playing online media sources, there
may be longer loading times or restrictions
on media playback, depending on the Inter-
net connection or the Wi-Fi usage (for ex-
ample, if there is intensive usage by multi-
ple devices on the hotspot).
— Signals from Bluetooth devices and Wi-Fi
hotspots within range of the vehicle may
impair the vehicle Wi-Fi services. If multiple
Bluetooth devices and Wi-Fi hotspots are
within range of the vehicle, it may cause re-
duced data transfer rates, connection inter-
ruptions, or limitations when streaming me-
dia.
Page 29 of 362
4N0012721BF
Touch displays
— The system complies with United States FCC
regulations and ISED regulations
=> page 341.
Applies to: vehicles with Rear Seat Remote
a
=.
S
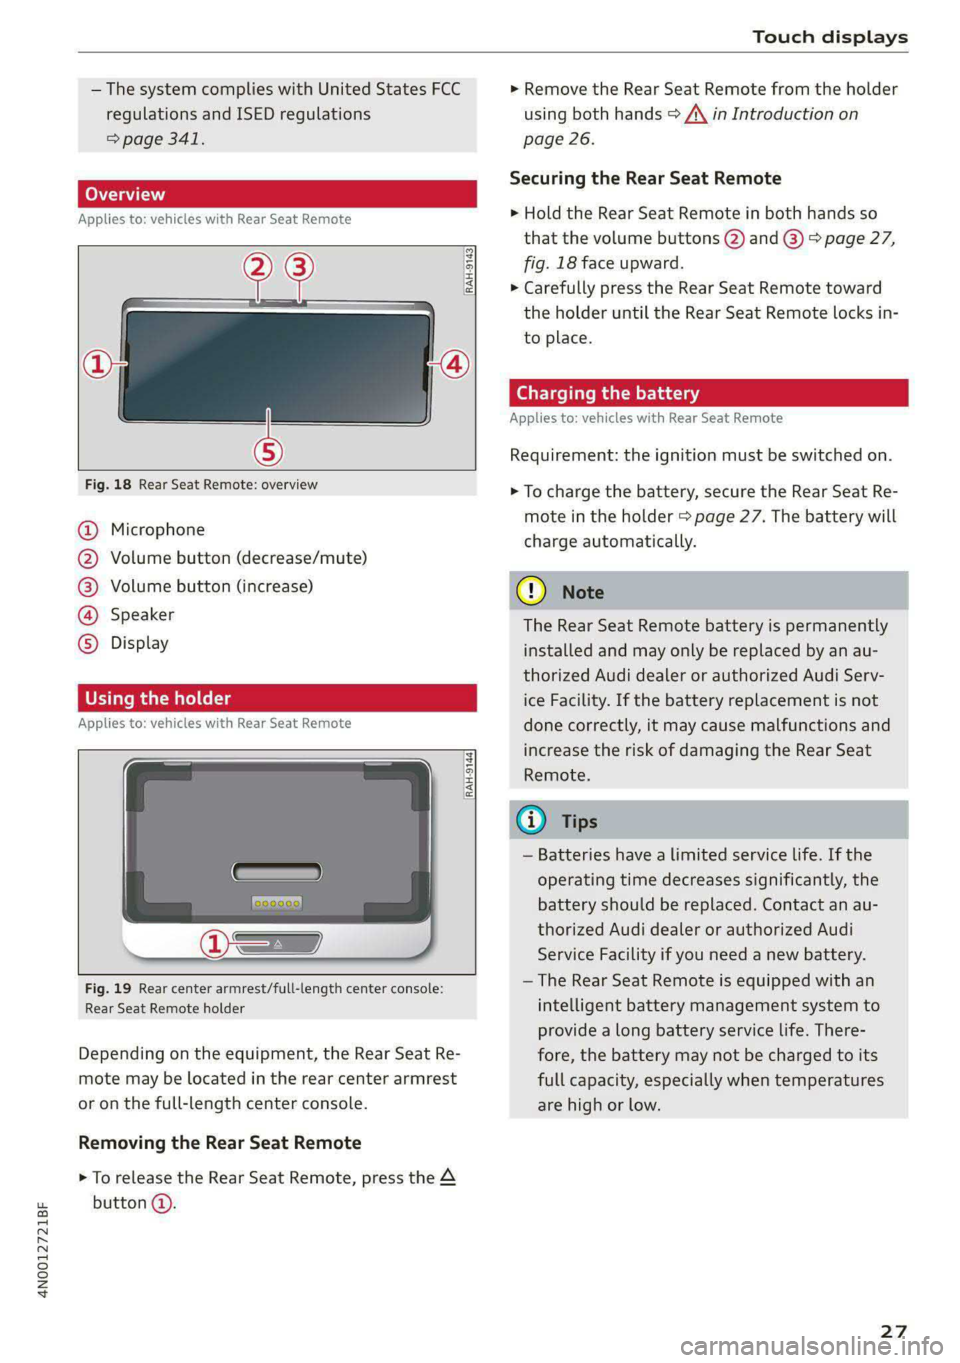
Fig. 18 Rear Seat Remote: overview
a] g
| = <
ic
@ Microphone
@ Volume button (decrease/mute)
@®) Volume button (increase)
@ Speaker
©) Display
Using the holder
Applies to: vehicles with Rear Seat Remote
[RAH-9144)
Fig. 19 Rear center armrest/full-length center console:
Rear Seat Remote holder
Depending on the equipment, the Rear Seat Re-
mote may be located in the rear center armrest
or on the full-length center console.
Removing the Rear Seat Remote
> To release the Rear Seat Remote, press the A
button @.
> Remove the Rear Seat Remote from the holder
using both hands > A\ in Introduction on
page 26.
Securing the Rear Seat Remote
> Hold the Rear Seat Remote in both hands so
that the volume buttons @) and @) > page 27,
fig. 18 face upward.
> Carefully press the Rear Seat Remote toward
the holder until the Rear Seat Remote locks in-
to place.
Charging the battery
Applies to: vehicles with Rear Seat Remote
Requirement: the ignition must be switched on.
> To charge the battery, secure the Rear Seat Re-
mote in the holder > page 27. The battery will
charge automatically.
G) Note
The Rear Seat Remote battery is permanently
installed and may only be replaced by an au-
thorized Audi dealer or authorized Audi Serv-
ice Facility. If the battery replacement is not
done correctly, it may cause malfunctions and
increase the risk of damaging the Rear Seat
Remote.
@) Tips
— Batteries have a limited service life. If the
operating time decreases significantly, the
battery should be replaced. Contact an au-
thorized Audi dealer or authorized Audi
Service Facility if you need a new battery.
— The Rear Seat Remote is equipped with an
intelligent battery management system to
provide a long battery service life. There-
fore, the battery may not be charged to its
full capacity, especially when temperatures
are high or low.
27
Page 30 of 362

Touch displays
Menus and symbols
Applies to: vehicles with Rear Seat Remote
RAX-0092
RADIO fA MEDIA SOUND | (7)
Fig. 20 Display: home screen (left) and submenu (right)
Symbol/Description Description
Select and open applications. Depending on the equipment, you
Applications may be able to use the following applications: SEATS, LIGHTS, ME-
DIA, RADIO, PHONE, DEVICES, SOUND, SETTINGS, TIPS
Set and operate the climate control system for the rear section
=> page 100
Climate control system
Use your finger to drag downward from the top of the screen to
=) Quick access open the quick access area. You can adjust the volume or open tele-
phone functions during a phone call > page 214.
(Home screen Go to the home screen
a Back Go one step back
Adjusting the volume, opening telephone functions during a phone
Media playback gall: noge 214
Side selection in vehicle
functions
Connecting to the MMI G) Tips
Applies to: vehicles with Rear Seat Remote
Switching between different seats > page 75 Q/e
|@Oe@;
©
|
O|
©
The Rear Seat Remote remains connected to
To use the Rear Seat Remote, you must connect it the MMI if you remove the remote from the
to the MMI. holder.
Applies to: vehicles with Rear Seat Remote
Requirement: the ignition must be switched on.
> Secure the Rear Seat Remote in the designated
holder > page 27. The Rear Seat Remote will
automatically connect to the MMI. The Rear Seat Remote settings can be set in the
MMI, for example to restrict operation by chil-
dren.
28
Page 36 of 362
Voice recognition system
Voice recognition system
General information
Applies to: vehicles with voice recognition system
You can operate many functions in the vehicle
easily using voice commands.
Using the voice recognition system optimally
> Speak clearly and distinctly at a normal volume.
Speak louder when driving faster.
> Emphasize the words in the commands evenly
and do not leave long pauses.
> Close the doors, the windows, and the sunroof*
to reduce background noise. Make sure that
passengers are not speaking when you are giv-
ing a voice command.
> Do not direct the vents toward the hands-free
microphone, which is in the roof headliner near
the front interior lights.
> Only the driver should speak to the system, be-
cause the handsfree microphone is aimed to-
ward this seating position.
ZA\ WARNING
— Direct your full attention to driving. As the
driver, you have complete responsibility for
safety in traffic. Only use the functions in
such a way that you always maintain com-
plete control over your vehicle in all traffic
situations.
— Do not use the voice recognition system in
emergencies because your voice may change
in stressful situations. The system may take
longer to dial the number or may not be
able to dial it at all. Dial the emergency
number manually.
G) Tips
There are no voice guidance* prompts when a
dialog is active.
34
Description
Operating the voice recognition system
Applies to: vehicles with voice recognition system
iS] (2) ie
>| |
STEN
Daa) re
Neer) a
Connect 5
Pre)
oy c a
ey
Cesc >
coy
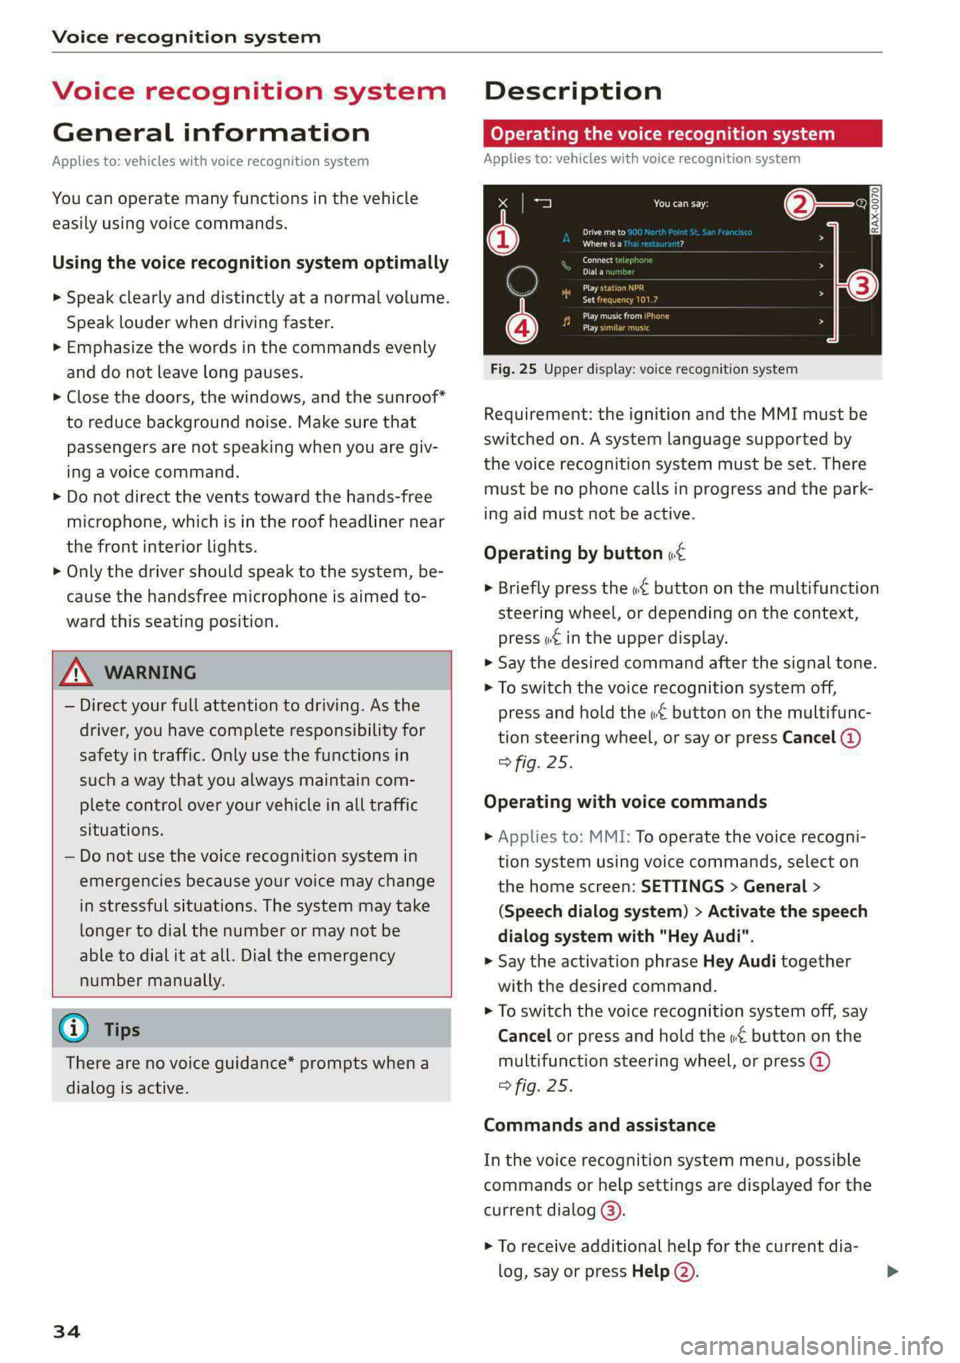
Fig. 25 Upper display: voice recognition system
Requirement: the ignition and the MMI must be
switched on. A system language supported by
the voice recognition system must be set. There
must be no phone calls in progress and the park-
ing aid must not be active.
Operating by button «¢
> Briefly press the «€ button on the multifunction
steering wheel, or depending on the context,
press we in the upper display.
> Say the desired command after the signal tone.
> To switch the voice recognition system off,
press and hold the «€ button on the multifunc-
tion steering wheel, or say or press Cancel (@)
> fig. 25.
Operating with voice commands
> Applies to: MMI: To operate the voice recogni-
tion system using voice commands, select on
the home screen: SETTINGS > General >
(Speech dialog system) > Activate the speech
dialog system with "Hey Audi".
> Say the activation phrase Hey Audi together
with the desired command.
> To switch the voice recognition system off, say
Cancel or press and hold the «£ button on the
multifunction steering wheel, or press @)
> fig. 25.
Commands and assistance
In the voice recognition system menu, possible
commands or help settings are displayed for the
current dialog @).
> To receive additional help for the current dia-
log, say or press Help (2).
Page 37 of 362

4N0012721BF
Voice recognition system
> To pause voice recognition, say or press Pause
@). To reactivate voice recognition, press ()
again or briefly press the «€ button on the mul-
tifunction steering wheel.
Additional functions
Applies to: vehicles with voice recognition system
Command during voice output
If the function is switched on, you can simply say
a new command during a prompt.
> Applies to: MMI: Select on the home screen:
SETTINGS > General > Speech dialog system >
Allow commands during voice output.
Online recognizer
Applies to: vehicles with online recognizer
You can activate the online recognizer for addi-
tional functions and to improve the results of
voice recognition. A supported menu language
must be selected. When there is an active Inter-
net connection, the spoken command is evaluat-
ed in the vehicle and online.
> When you switch on the voice recognition sys-
tem for the first time, a menu for the online
recognizer will open, or
» Applies to MMI: Select on the home screen:
SETTINGS > General > Speech dialog system >
Consent to online speech recognizer.
> Read the licensing agreements and accept
them.
Amazon Alexa
Applies to: vehicles with Amazon Alexa Integration
You can activate Amazon Alexa to access certain
functions. A reduced number of commands for
Amazon Alexa are available during this.
Requirement: you must be logged in to your
myAudi account in the vehicle. The online recog-
nizer must be activated. A system language that
is supported by both the voice recognition system
and Amazon Alexa must be selected.
> Applies to: MMI: Select on the home screen:
USER > Connect to Amazon Alexa.
> Follow the instructions in the display.
>» Applies to: MMI: To operate Amazon Alexa us-
ing voice commands, select on the home
screen: SETTINGS > General > (Speech dialog
system) > Activate the speech dialog system
with "Hey Audi".
>» Say the activation phrase “Alexa” together with
the desired command.
() Note
Read the information about Audi connect, and
be sure to note the connectivity costs section
=@ in General information on page 222.
@ Tips
Audi provides access to services from third
party providers. Permanent availability cannot
be guaranteed, because that depends on the
third party provider.
External voice operation
Applies to: vehicles with external speech dialog system
You can access and control the voice operation on
a connected mobile device through your vehicle.
Switching external voice operation on or off
Requirement: the ignition and the MMI must be
switched on. A cell phone must be connected to
the MMI with the Handsfree profile > page 209.
The mobile device being connected must have
voice control that can be controlled externally.
There must be no phone calls in progress and the
parking aid must not be active.
> To switch on the external voice operation, press
and hold the «€ button longer on the multifunc-
tion steering wheel.
> To switch off the external voice operation, press
and hold the «€ button longer on the multifunc-
tion steering wheel or press Cancel.
Using external voice operation
» Say the desired command after the signal tone.
> To reactivate voice recognition when it is
paused, press the w£ button briefly on the mul-
tifunction steering wheel or press Resume.
@) Tips
Audi simply provides access to control your
cell phone with voice operation and does not
35
>
Page 43 of 362
4N0012721BF
Opening and closing
Opening and closing
Central locking
General information
Z\ WARNING
— If you leave the vehicle, switch the ignition
off and take the key with you. This applies
particularly when children remain in the ve-
hicle. Otherwise, children could start the ve-
hicle or operate electrical equipment (such
as power windows), which increases the risk
of an accident.
— Applies to vehicles with anti-theft alarm sys-
tem: When the vehicle is locked from the
outside, no one - especially children - should
remain in the vehicle, because the windows
can no longer open from the inside
=> page 44, Anti-theft alarm system.
Locked doors make it more difficult for
emergency workers to enter the vehicle,
which puts lives at risk.
All doors and the luggage compartment lid can
be centrally unlocked and locked at once. You can
select in the MMI if the entire vehicle or only the
driver's door should unlock when unlocking the
vehicle > page 42. The turn signals flash twice
when you unlock the vehicle and flash once when
you lock the vehicle. If they do not flash when
locking, check if all doors and lids are closed.
Depending on the vehicle equipment, you may
have different options for centrally unlocking and
locking your vehicle.
— Vehicle key > page 46
— Sensors in the door handles > page 46
— Lock cylinder in the driver's door > page 44
— Interior central locking switch > page 43
Vehicle key
The term “vehicle key” refers to the remote con-
trol key or convenience key*. The convenience
key* is a remote control key with special func-
tions > page 46 and > page 107.
Power closing*
When closing a door or the luggage compart-
ment lid, you only have to Let it fall lightly into
the latch. It then closes automatically > A.
Automatic locking
If you unlock the vehicle but then do not open
any of the doors, the luggage compartment, or
the hood within a short period time, the vehicle
locks again automatically. This feature prevents
the vehicle from being accidentally left unlocked
for a long period of time.
Automatic locking (Auto Lock)
The Auto Lock function locks all doors and the
luggage compartment lid once the speed has ex-
ceeded approximately 9 mph (15 km/h). The ve-
hicle will unlock again if the unlock function in
the central locking switch is pressed, the “P” gear
is engaged, or the ignition is switched off.
You can open the doors individually from the in-
side by pulling the door handle one time. To open
the rear doors individually, you must pull the
door handle twice.
In the event of a crash with airbag deployment,
the doors will also automatically unlock to allow
access to the vehicle.
Unintentionally locking yourself out
Only lock your vehicle when all of the doors and
the luggage compartment lid are closed and
there is no key in the vehicle. This reduces the
risk of locking yourself out accidentally.
The
following features help to reduce the risk of
locking your vehicle key in the vehicle:
— If the driver's door is open, the vehicle cannot
be locked by pressing the & button on the re-
mote control key or by touching the locking
sensor* on a door.
— If the vehicle key that was used most recently is
inside the luggage compartment, the luggage
compartment lid will automatically open again
after it closes > ©.
— If the vehicle key that was last used is detected
inside the vehicle, then the vehicle cannot be
locked from the outside > ©.
41