tow AUDI A8 2021 Owners Manual
[x] Cancel search | Manufacturer: AUDI, Model Year: 2021, Model line: A8, Model: AUDI A8 2021Pages: 362, PDF Size: 99.29 MB
Page 5 of 362
4N0012721BF
Table of contents
All wheel drive (quattro).............. 128
Electronic Stabilization Control......... 129
High-voltage system............. I31
Generalinformation................. 131
Charging the high-voltage battery...... 131
Charging equipment................. 138
Trailer towing.................055 147
Driving with atrailer................. 147
Assist systems................... 150
Assist systems............... eee 150
General information................. 150
Surrounding area detection............ 151
Switching the systems on and off....... 153
Driving information.............. E55
Speed warning system..............-. 155
Camera-based traffic sign recognition... 155
Traffic light information.............. 157
Laptimer................0..0.0000. 158
Night vision assist..............-.00. 159:
Integrated Toll Module............... 161
Driver assistance................. 163
Cruise control system..........0.0 eee 163
Efficiency assist..............2--004. 164
Adaptive cruise assist............00-. 166
Distance Warning « « wese« + 6 wou ss ese & « 175
Lane departure warning.............4. 176
Audi presense............-.22+-- 0s 178
Sidesassist wsscon x ssescs « 7 ermewn vv suaseme © 8 oe 182
Exit warning .................2.00005 184
Intersection assistant................ 185
Emergencyassists. «icin wasn 3 3 wore oo 186
Parking and maneuvering....... 188
IMEROGUCUION « » see x 2 savas a 2 eae 4 & wee 188
Parking aid plus..................04. 188
Rearview camera and peripheral cameras. 191
Rear cross-traffic assist... ............. 195
Assisted:parkinng « coins 6 asus ¢ 0 caus 6 5 ue 196
Park assist plus.................0.-. 198
Remote controlled parking............ 202
Maneuver.assistis « + cess » semen « wanes a 2 x 207
Infotainment system............ 209
Telephone............... cece eee 209
INthOAUCEION:: « « sews « ¢ news ¢ © mee a x eee 209
SOLU o cncses vo sess + 8 cosine 6 5 ameueus ¥ tuesenens 209
Using the Audi phone box............. 211
Using the Rear Seat Remote........... 214
Using the telephone..............006- 215
Settings............0 0.00.00. 2 eee 218
ME@SSEGES syems 5 2 wom ¢ 5 aan Ff perm FE 219
Troubleshooting sci: 2 aww o 2 wwe 2 2 wow 220
Audi connect..................... 222
Generalinformation................. 222
Audi connect Infotainment............ 222
Using a Wi-Fi hotspot................ 223
Audi connect Infotainment services..... 223
Audi connect vehicle control services.... 224
Settings............0..0 200-02 225
TrOUBlESHOOtING gas 2 s geay s 5 nome & a ae 226
Emergency call................... 227
OVERVIEW some: » = meus <2 came & eee bo ee 227
Emergency call «: issios ¢ sce w ¥ wane wo narem 227
Online roadside assistance............ 228
Navigation «.. < oics seis sc ewe ee os 230
Opening navigation.................. 230
myAudi navigation.................05 230
Entering adestination................ 231
Stopping route guidance.............. 234
Map... sce cece eee eee 234
Alternative routes.............2.-04. 236
Additional functions................. 236
Satellite map............... 0c eee 237
ElGGtriGHanGe veces ¢ ¢ cawy 9 = seme 7 2 ee & 238
Map:updates « ccc xs sco vo eens eo wees 238
Traffic incidents........ 0.00... eee eee 239
SGQtinGS seuss = » aus « Hewes Heme Fx ORE 240
Radio.......... 0... eee 242
Generalinformation................. 242
Radio functions sive. cies as wee 2s wee 243
Online radio... . eee ee eee eee 246
Options and settings................. 248
TroubleShOOting ewes vs woe as eas oe ees 249
Page 6 of 362
Table of contents
Co | fan a 250
General information................. 250
DVD: drive « swe s 2 awe 2 ewes 2 ewe see 250
Bluetooth audio player............... 251
Amazon Alexa.... 2.0.0. cece eee eee 251
Multimedia connections.............. 252
Playing medias. « & ssc 2c ewae « owe oo ee 253
Options and settings................. 257
Supported media and file formats...... 258
Troubleshooting ewies 2 < sce se enw so xy 259
Audi smartphone interface...... 261
S@tUD « ses + y gam peas + yoms os Bene 261
Troubleshooting.............-..00005 262
Additional settings.............. 263
Systemisettingsc « + cssuene so mvswee a soseeue vs 263
Software update........... 0.0 e eee 264
Connected devices..............2---5 265
Legal.information ss « sess s+ ama sx ween « 266
Additional information.......... 268
Brands and licenses...............-4- 268
Maintenance and Care........... 269
Checking and Filling............. 269
Fuel... cee eee 269
Refueling ......... 0... ce eee ee eee eee 270
Emissions control system............. 273
Engine:compartmMentss. scsi so vec eo cee 274
Engineoil........ 00... eee eee eee 277
COOLINGSYSEEM « « sees & = nets 5 = eetew so ore 281
Brake:fluid «2 csoswe s 2 wscceve ov eevee oo erm 283
Electrical system. ...........002-0 00 284
Battery: » = sees = » mean 5 4 meee ye ee Gt BE 284
Windshield washer system...........- 287
Service interval display............... 287
WWATEBUSE. core 5 6 sae oo sms oo ee oo oe 289
Wheels and Tires...........--0000 00s 289
Tire pressure monitoring system....... 307
Care and cleaning................ 310
Generalinformation................. 310
Carwashes ; aves + + sews ss ews se eee ee 310
Cleaning and care information......... 311
Taking your vehicle out of service....... 316
DO.It YOUSUF ovis. io 6 sssicone 3 6 excess 8 4 sane 317
Emergency assistance........... Sly
Generalinformation................. 317
Equipment sncseas xo wexeas ae seems as arvuews ¥ 2 317,
Tire mobility kit.............0...000- 317
Replacing wheels................-00. 319
Space-saving spare tire............... 323
Jump starting....................00. 323
"TOWING © szerws = i sates & 2 a £ § See 5g ee 325
Fuses and bulbs.................. 328
Fuses... 0... eee eee eee 328
BULDS ccs = seme x eens ot ewe ve ee a Pe 332
Customer information........... 333
Data Privaes:s ss seus ss gown se wom ss 333
PRIVAGY, MOLICE «sues 2 w avin w semecwns w vues a 333
Image recording..............00-000- 333
DatainieMmories:: < + sen x = wees sp eee eas 333
Transmitted information.............. 335
Accessories and technical
OMAMGES. « & cicrees 5 2 sn. 6 a snore 0 soe wo 338
Warranty... . 0. ee eee cece 338
Audi Literature Shop..............--- 338
Driving in other countries............. 338
Maintenance, repairs, and technical
modifications. ........ 0... cee eee eee 338
Accessories and parts.............0-. 340
Reporting Safety Defects.............. 340
Declaration of compliance for
telecommunications equipment and
electronic systeMS........0 cece ee eeee 341
Teennical datas: ¢ «ox. is meen ss ees 343
Identification data................ 00% 343
Vehicle data... 2... . ee eee eee eee ee 343
TAA Sis scence: oo cesses 2 v wee © o omen © 2 ove 345
Page 21 of 362
4N0012721BF
Touch displays
tating
Applies to: touch displays
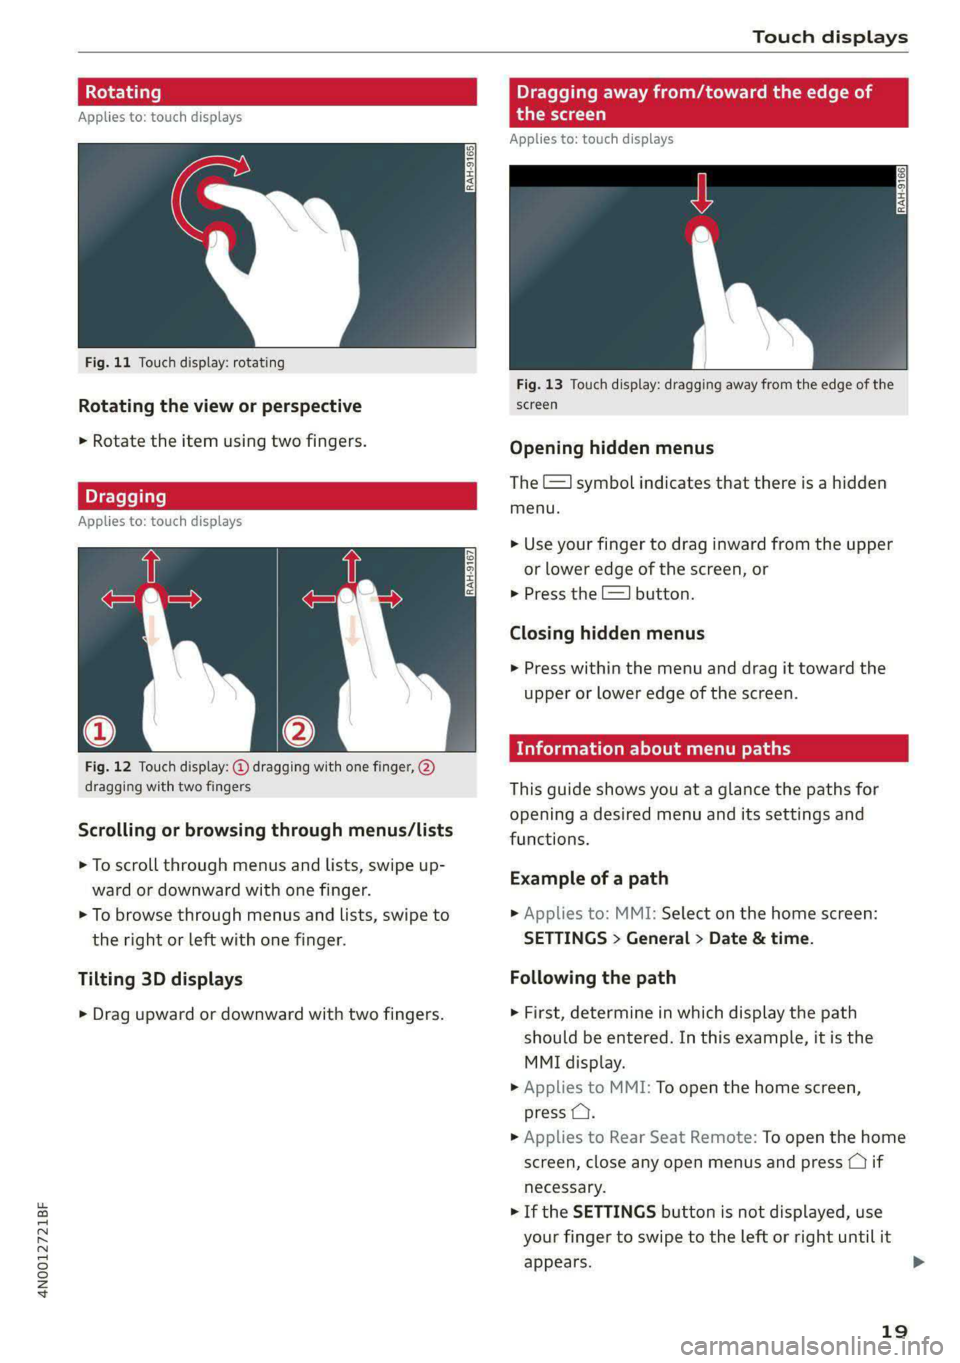
Fig. 11 Touch display: rotating
Rotating the view or perspective
> Rotate the item using two fingers.
gging
Applies to: touch displays
Fig. 12 Touch display: @ dragging with one finger, @
dragging with two fingers
Scrolling or browsing through menus/lists
> To scroll through menus and lists, swipe up-
ward or downward with one finger.
> To browse through menus and lists, swipe to
the right or left with one finger.
Tilting 3D displays
> Drag upward or downward with two fingers.
Dragging away from/toward the edge of
the screen
Applies to: touch displays
Fig. 13 Touch display: dragging away from the edge of the
screen
Opening hidden menus
The E=] symbol indicates that there is a hidden
menu.
> Use your finger to drag inward from the upper
or lower edge of the screen, or
> Press the =] button.
Closing hidden menus
> Press within the menu and drag it toward the
upper or lower edge of the screen.
nformation about menu paths
This guide shows you at a glance the paths for
opening a desired menu and its settings and
functions.
Example of a path
> Applies to: MMI: Select on the home screen:
SETTINGS > General > Date & time.
Following the path
> First, determine in which display the path
should be entered. In this example, it is the
MMI display.
>» Applies to MMI: To open the home screen,
press ().
> Applies to Rear Seat Remote: To open the home
screen, close any open menus and press (1) if
necessary.
> If the SETTINGS button is not displayed, use
your finger to swipe to the left or right until it
appears.
19
>
Page 22 of 362
Touch displays
> Press the SETTINGS button.
> If the General button is not displayed, swipe
toward the left or right with one finger until it
appears.
> Press the General button.
> If the Date & time button is not displayed,
swipe upward or downward with one finger un-
tilit appears.
> Press the Date & time button.
G) Tips
If a menu or symbol is in parentheses in the
path, for example, (General) or ({23), then it is
an optional menu item that does not need to
be used in every system.
You can adjust or turn off the MMI touch display
feedback.
> Applies to MMI: Select on the home screen:
SETTINGS > Display & Brightness > MMI.
Possible settings:
— Brightness
— Touchscreen feedback
Multi Media Interface
De AUC eel
Audi recommends performing certain Infotain-
ment system functions, such as entering a desti-
nation, only when the vehicle is stationary. Al-
ways be prepared to stop operating the Infotain-
ment system in the interest of your safety and
the safety of other road users.
ZA WARNING
Only use the Infotainment system when road,
traffic, weather, and visibility conditions per-
mit and always in a way that allows you to
maintain complete control over your vehicle.
@ Tips
Certain functions are not available while driv-
ing.
20
Wiis mela mel mela
Switching the MMI on or off
> To switch the MMI off, press and hold the
On/Off knob > page 37, fig. 27 until the up-
per display and all Infotainment system func-
tions are switched off.
> To switch the MMI on, press the On/Off knob.
Restarting the MMI
>» Press and hold the On/Off knob for at least 10
seconds.
Switching displays on or off
> To switch the upper display off, press [oJ on the
lower display.
> To switch the upper display on, touch the upper
display or press (Jon the lower display.
> To switch both displays on or off, press and hold
Co] on the lower display.
Introduction
You can display and operate Infotainment system
and vehicle functions using both of the Multi Me-
dia Interface (MMI) touch displays.
Configuration wizard
After starting for the first time, the configuration
wizard helps you to set up the vehicle, for exam-
ple to set the desired system language and con-
nect a telephone.
> Follow the instructions in the display.
> Applies to: MMI: To access the configuration
wizard at a later time, select on the home
screen: HELP > Configuration wizard.
Tool tips
You can have tool tips displayed if necessary.
They introduce various MMI functions to you.
> Applies to: MMI: To open the tool tips, select on
the home screen: HELP > Tool tips > Basic in-
formation or Expert information.
> Follow the instructions in the display.
Page 25 of 362
4N0012721BF
Touch displays
Using favorites
> Applies to: MMI: Select on the home screen:
FAVORITES. The stored favorites will be dis-
played.
> To access a stored favorite, press that favorite.
Stored favorites can only be deleted or config-
ured in the corresponding menu (such as RADIO).
Arranging information tiles
> Applies to: MMI: Select on the home screen:
FAVORITES.
> Press and hold the desired information tile.
> Pull the information tile into the desired posi-
tion.
> Press Done to confirm the configuration.
Off O88 o8 of
O88 o8 af
O88 o8 of ef
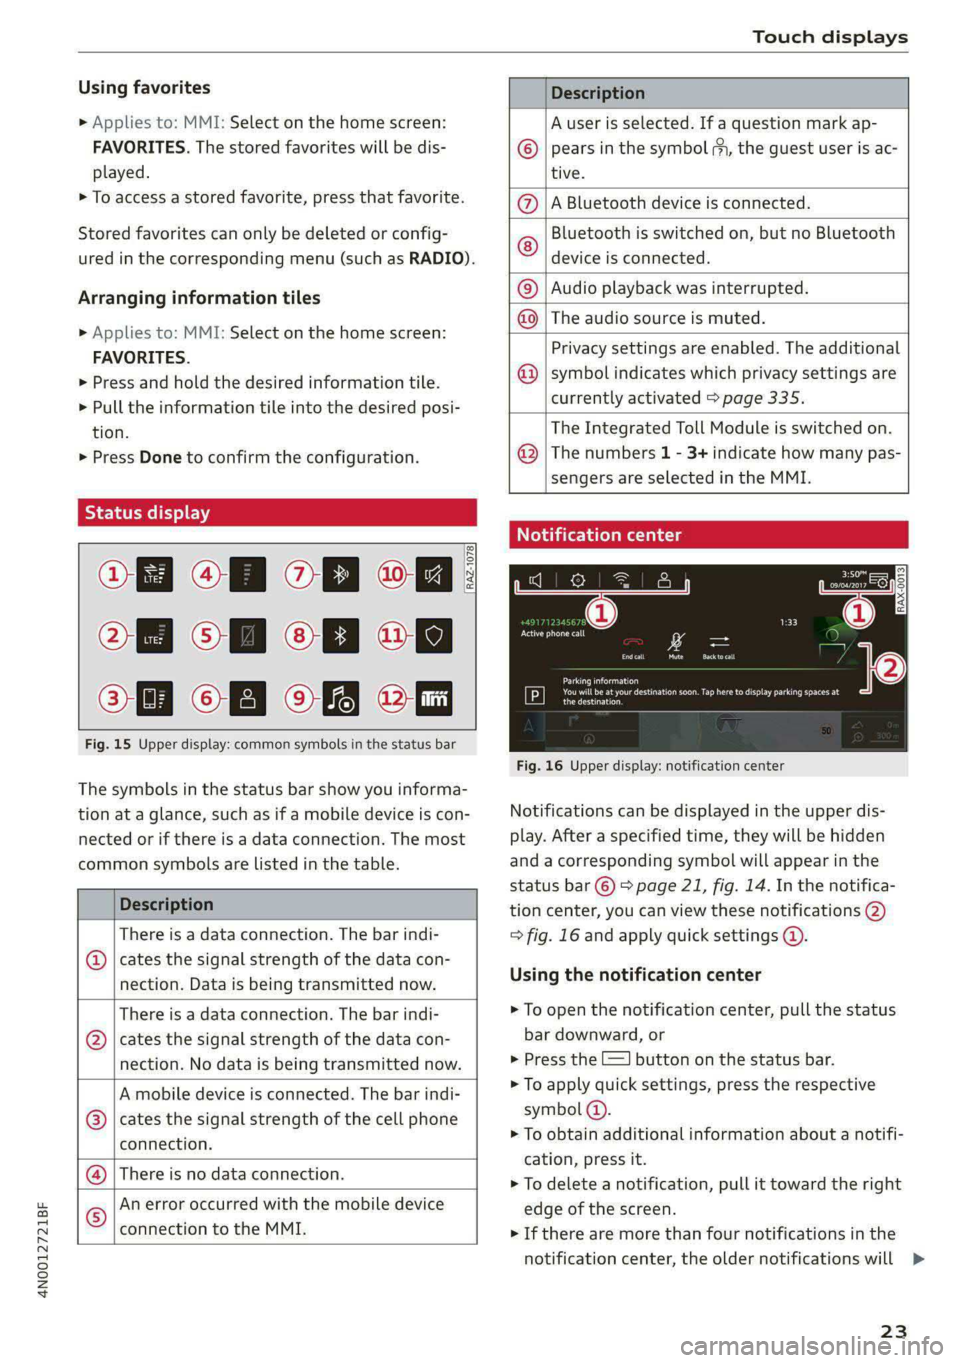
Fig. 15 Upper display: common symbols in the status bar
[RAZ-1078
The symbols in the status bar show you informa-
tion at a glance, such as if a mobile device is con-
nected or if there is a data connection. The most
common symbols are listed in the table.
Description
There is a data connection. The bar indi-
@ | cates the signal strength of the data con-
nection. Data is being transmitted now.
There is a data connection. The bar indi-
@ | cates the signal strength of the data con-
nection. No data is being transmitted now.
A mobile device is connected. The bar indi-
@ | cates the signal strength of the cell phone
connection.
There is no data connection. ®
An error occurred with the mobile device
connection to the MMI. ©
Description
A user is selected. If a question mark ap-
pears in the symbol ;h, the guest user is ac-
tive.
A Bluetooth device is connected.
Bluetooth is switched on, but no Bluetooth
device is connected. ©
|Q|
©
Audio playback was interrupted.
©|© The audio source is muted.
Privacy settings are enabled. The additional
symbol indicates which privacy settings are
currently activated > page 335.
The Integrated Toll Module is switched on.
The numbers 1 - 3+ indicate how many pas-
sengers are selected in the MMI.
Notification center
feo}
©
©
RAX-0013
Re it
Cres
Cea)
oe eo En
Pere
Fig. 16 Upper display: notification center
Notifications can be displayed in the upper dis-
play. After a specified time, they will be hidden
and a corresponding symbol will appear in the
status bar ©) > page 21, fig. 14. In the notifica-
tion center, you can view these notifications @
= fig. 16 and apply quick settings @.
Using the notification center
> To open the notification center, pull the status
bar downward, or
> Press the =] button on the status bar.
> To apply quick settings, press the respective
symbol @).
> To obtain additional information about a notifi-
cation, press it.
> To delete a notification, pull it toward the right
edge of the screen.
> If there are more than four notifications in the
notification center, the older notifications will
23
>
Page 28 of 362
Touch displays
Accepting suggested words or selecting
entries from the results list
> To accept a suggested word (2) or select an en-
try from the results list @), press on it.
> To display more content in the results list, drag
your finger upward or downward on the screen.
Setting the input language or keyboard
layout
> Applies to MMI: Select on the home screen:
SETTINGS > Language & keyboard > Keyboard.
> To define additional input languages, press the
© button.
> To change the keyboard layout for an input lan-
guage, press >. For example, you can select be-
tween QWERTZ and QWERTY.
Rear Seat Remote
Introduction
Applies to: vehicles with Rear Seat Remote
With Rear Seat Remote, you can control conven-
ience and Infotainment system functions in the
rear of the vehicle, such as the climate control
system or the media playback in the vehicle.
ZA\ WARNING
— As the driver, do not allow usage of the Rear
Seat Remote to distract you from driving, as
this could increase the risk of an accident.
For example, do not reach behind you while
driving to operate the Rear Seat Remote.
— The Rear Seat Remote can only be operated
when the vehicle is stationary or when the
remote is securely positioned in the desig-
nated holder in the vehicle. Like all loose ob-
jects, it could be thrown through the vehicle
and
cause serious injuries in a collision. If
the Rear Seat Remote is not in the designat-
ed holder, it must always be securely stowed
while driving.
— Do not use any wireless devices on the front
seats within range of the airbags while driv-
ing. Also read the warnings in the chapter
> page 84.
— The Rear Seat Remote can become hot while
charging. Pay attention to the housing and
display temperature, and be careful when
26
removing the Rear Seat Remote from the
holder.
— There are magnets located on the back of
the Rear Seat Remote and in the designated
holder. For people with pacemakers, the
electromagnetic radiation may impair pace-
maker function. Always maintain a mini-
mum distance of approximately 6 inches (15
cm) from the magnets.
@) Note
— Always follow the information found in 9®
in General information on page 222.
— Protect the Rear Seat Remote against pro-
longed exposure to direct sunlight.
— Extremely high or low temperatures that
can occur inside vehicles can damage the
Rear Seat Remote and/or impair the device
performance. Never leave your Rear Seat
Remote in the vehicle in extremely high or
low temperatures.
— Protect the Rear Seat Remote from coming
into contact with any fluids.
G) Tips
— Please note that the Rear Seat Remote can
be used only when the ignition is switched
on and within range of your vehicle's active
Wi-Fi hotspot.
— Please note that a Wi-Fi connection does
not automatically make it possible to use
the Internet. For additional information,
see the chapter > page 222.
— When playing online media sources, there
may be longer loading times or restrictions
on media playback, depending on the Inter-
net connection or the Wi-Fi usage (for ex-
ample, if there is intensive usage by multi-
ple devices on the hotspot).
— Signals from Bluetooth devices and Wi-Fi
hotspots within range of the vehicle may
impair the vehicle Wi-Fi services. If multiple
Bluetooth devices and Wi-Fi hotspots are
within range of the vehicle, it may cause re-
duced data transfer rates, connection inter-
ruptions, or limitations when streaming me-
dia.
Page 29 of 362
4N0012721BF
Touch displays
— The system complies with United States FCC
regulations and ISED regulations
=> page 341.
Applies to: vehicles with Rear Seat Remote
a
=.
S
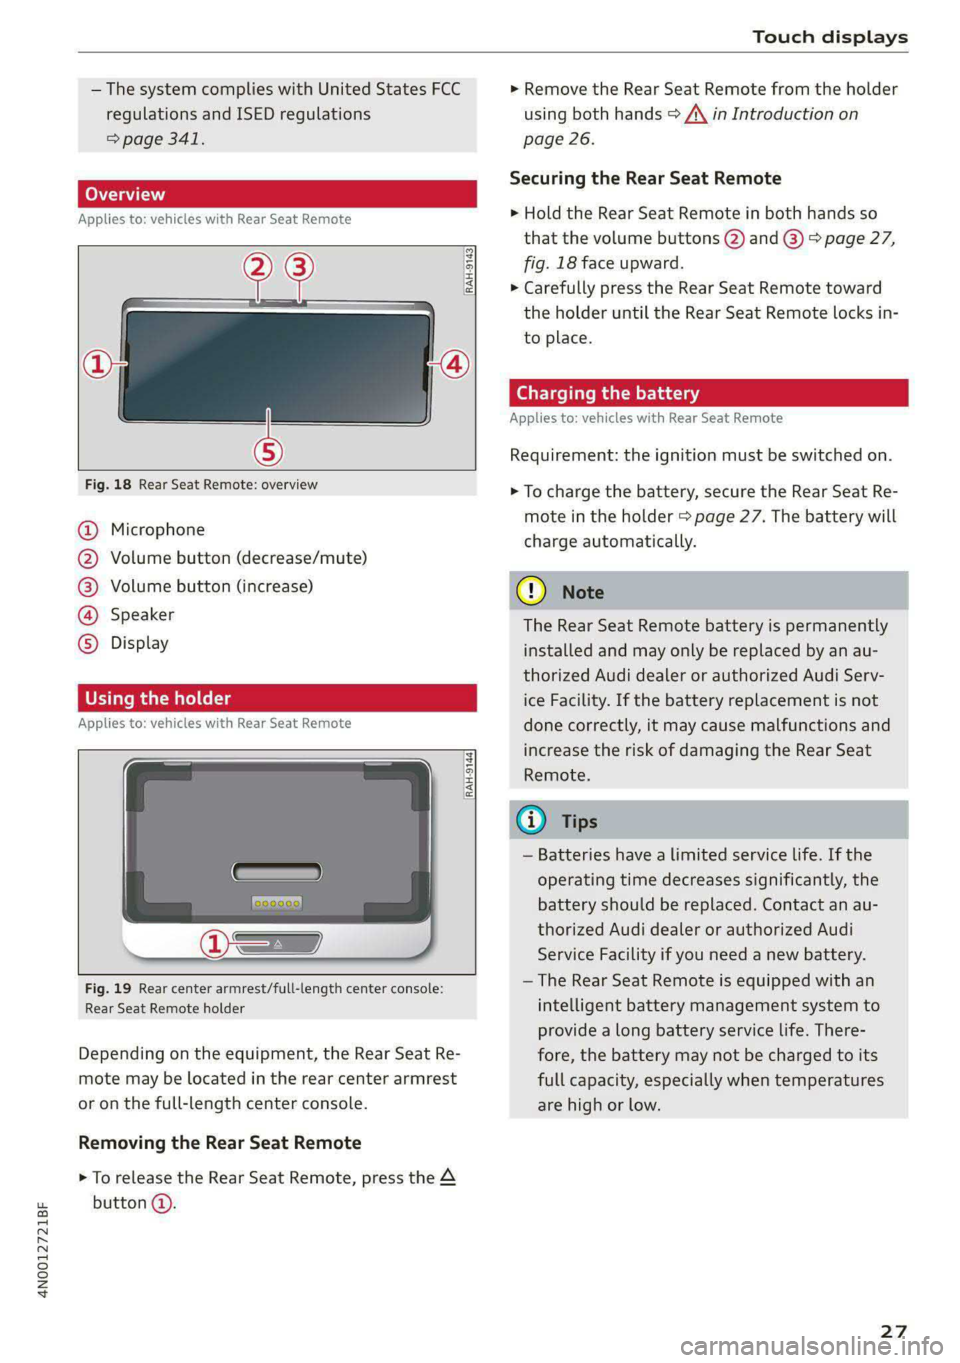
Fig. 18 Rear Seat Remote: overview
a] g
| = <
ic
@ Microphone
@ Volume button (decrease/mute)
@®) Volume button (increase)
@ Speaker
©) Display
Using the holder
Applies to: vehicles with Rear Seat Remote
[RAH-9144)
Fig. 19 Rear center armrest/full-length center console:
Rear Seat Remote holder
Depending on the equipment, the Rear Seat Re-
mote may be located in the rear center armrest
or on the full-length center console.
Removing the Rear Seat Remote
> To release the Rear Seat Remote, press the A
button @.
> Remove the Rear Seat Remote from the holder
using both hands > A\ in Introduction on
page 26.
Securing the Rear Seat Remote
> Hold the Rear Seat Remote in both hands so
that the volume buttons @) and @) > page 27,
fig. 18 face upward.
> Carefully press the Rear Seat Remote toward
the holder until the Rear Seat Remote locks in-
to place.
Charging the battery
Applies to: vehicles with Rear Seat Remote
Requirement: the ignition must be switched on.
> To charge the battery, secure the Rear Seat Re-
mote in the holder > page 27. The battery will
charge automatically.
G) Note
The Rear Seat Remote battery is permanently
installed and may only be replaced by an au-
thorized Audi dealer or authorized Audi Serv-
ice Facility. If the battery replacement is not
done correctly, it may cause malfunctions and
increase the risk of damaging the Rear Seat
Remote.
@) Tips
— Batteries have a limited service life. If the
operating time decreases significantly, the
battery should be replaced. Contact an au-
thorized Audi dealer or authorized Audi
Service Facility if you need a new battery.
— The Rear Seat Remote is equipped with an
intelligent battery management system to
provide a long battery service life. There-
fore, the battery may not be charged to its
full capacity, especially when temperatures
are high or low.
27
Page 31 of 362
4N0012721BF
Touch displays
» Applies to MMI: Select on the home screen:
SETTINGS > Display & brightness > Operation
in rear.
Possible settings:
Block Rear Seat Remote with parental
control button
When the function is switched on and parental
control is activated > page 51, the Rear Seat
Remote is blocked.
Block rear A/C oper. with parental ctrl.
button
When the function is switched on and parental
control is activated, climate control operation us-
ing the Rear Seat Remote is blocked. You can con-
tinue to operate all other content with the Rear
Seat Remote.
Technical data
Applies to: vehicles with Rear Seat Remote
Rear Seat Remote
Display OLED, 5.7" screen, 1920 x 1680 pixels
Battery Lithium polymer (2700 mAh)
Dimensions (height x width x depth) 3.39 in x 6.38 in x 0.43 in (86 mm x 162 mmx
11mm)
Weight
0.58 lbs (261 g)
Screens in rear)
Introduction
Applies to: vehicles with screens in rear
Using screens in the rear, you can play multime-
dia content in the rear seats of your vehicle. The
screens are controlled either using the touch dis-
play or the applicable app on your mobile device,
depending on the context.
ZA WARNING
—As the driver, do not allow usage of the
screens in the rear to distract you from driv-
ing, as this could increase the risk of an acci-
dent. For example, do not reach behind you
while driving to operate the screens in the
rear.
— Children in rear-facing child safety seats in
the rear: remove the screens in the rear
from the backrests on the front seats to re-
duce the risk of injury. Read the instructions
in the chapter > page 88.
2) At the time this manual was printed, screens in the rear
were equipment in development. Your vehicle may not be
equipped with screens in the rear.
— The screens in the rear can only be operated
when the vehicle is stationary or when they
are securely positioned in the designated
holders in the vehicle. Like all loose objects,
they could be thrown through the vehicle
and cause serious injuries in a collision. If
the screens in the rear are not in the desig-
nated holders, they must always be securely
stowed while driving.
— Do not use any wireless devices on the front
seats within range of the airbags while driv-
ing. Also read the warnings in the chapter
> page 84.
CG) Note
— Read the information about Audi connect,
and be sure to note the connectivity costs
section >@ in General information on
page 222.
— Protect the screens in the rear from pro-
longed exposure to direct sunlight.
29
Page 36 of 362
Voice recognition system
Voice recognition system
General information
Applies to: vehicles with voice recognition system
You can operate many functions in the vehicle
easily using voice commands.
Using the voice recognition system optimally
> Speak clearly and distinctly at a normal volume.
Speak louder when driving faster.
> Emphasize the words in the commands evenly
and do not leave long pauses.
> Close the doors, the windows, and the sunroof*
to reduce background noise. Make sure that
passengers are not speaking when you are giv-
ing a voice command.
> Do not direct the vents toward the hands-free
microphone, which is in the roof headliner near
the front interior lights.
> Only the driver should speak to the system, be-
cause the handsfree microphone is aimed to-
ward this seating position.
ZA\ WARNING
— Direct your full attention to driving. As the
driver, you have complete responsibility for
safety in traffic. Only use the functions in
such a way that you always maintain com-
plete control over your vehicle in all traffic
situations.
— Do not use the voice recognition system in
emergencies because your voice may change
in stressful situations. The system may take
longer to dial the number or may not be
able to dial it at all. Dial the emergency
number manually.
G) Tips
There are no voice guidance* prompts when a
dialog is active.
34
Description
Operating the voice recognition system
Applies to: vehicles with voice recognition system
iS] (2) ie
>| |
STEN
Daa) re
Neer) a
Connect 5
Pre)
oy c a
ey
Cesc >
coy
Fig. 25 Upper display: voice recognition system
Requirement: the ignition and the MMI must be
switched on. A system language supported by
the voice recognition system must be set. There
must be no phone calls in progress and the park-
ing aid must not be active.
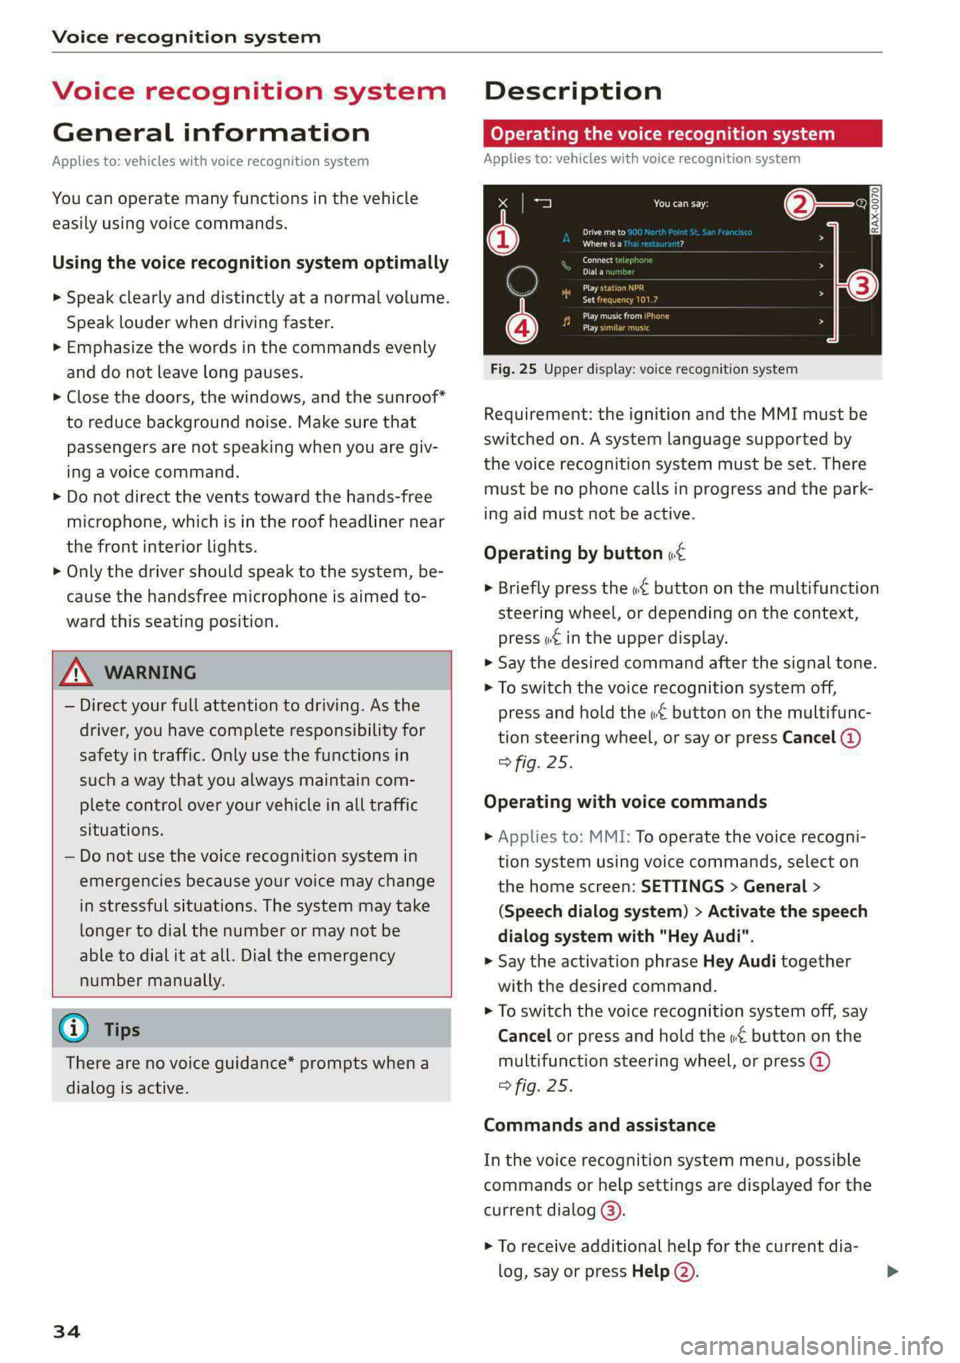
Operating by button «¢
> Briefly press the «€ button on the multifunction
steering wheel, or depending on the context,
press we in the upper display.
> Say the desired command after the signal tone.
> To switch the voice recognition system off,
press and hold the «€ button on the multifunc-
tion steering wheel, or say or press Cancel (@)
> fig. 25.
Operating with voice commands
> Applies to: MMI: To operate the voice recogni-
tion system using voice commands, select on
the home screen: SETTINGS > General >
(Speech dialog system) > Activate the speech
dialog system with "Hey Audi".
> Say the activation phrase Hey Audi together
with the desired command.
> To switch the voice recognition system off, say
Cancel or press and hold the «£ button on the
multifunction steering wheel, or press @)
> fig. 25.
Commands and assistance
In the voice recognition system menu, possible
commands or help settings are displayed for the
current dialog @).
> To receive additional help for the current dia-
log, say or press Help (2).
Page 47 of 362
4N0012721BF
Opening and closing
Interior/towing protection monitor
The alarm will be triggered if there are move-
ments detected in the vehicle interior (for exam-
ple, by animals) or if there is a change in the vehi-
cle angle (for example, when the vehicle is being
towed).
You can prevent the alarm from being triggered
by deactivating the interior/towing protection
monitor.
Deactivating the interior/towing protection
monitor
There are the following options for deactivating
the interior/towing protection monitor:
> Press the @ button on the vehicle key a second
time within two seconds. Or
» Applies to: vehicles with convenience key:
Touch the sensor on the door handle a second
time within two seconds. Or
> Turn the mechanical key in the door lock to the
close position a second time within two sec-
onds.
> Applies to: vehicles with MMI: Select on the
home screen: VEHICLE > Settings & Service >
Interior monitoring.
If you lock the vehicle, then the interior/towing
protection monitor will stay off until the next
time the vehicle is unlocked.
ZA\ WARNING
No one, especially children, should stay in the
vehicle when it is locked from the outside, be-
cause the windows can no longer be opened
from the inside. Locked doors make it more
difficult for emergency workers to enter the
vehicle, which puts lives at risk.
@) Tips
The interior/towing protection monitor only
functions correctly when the windows and the
panorama glass roof* are closed.
RAZ-0621
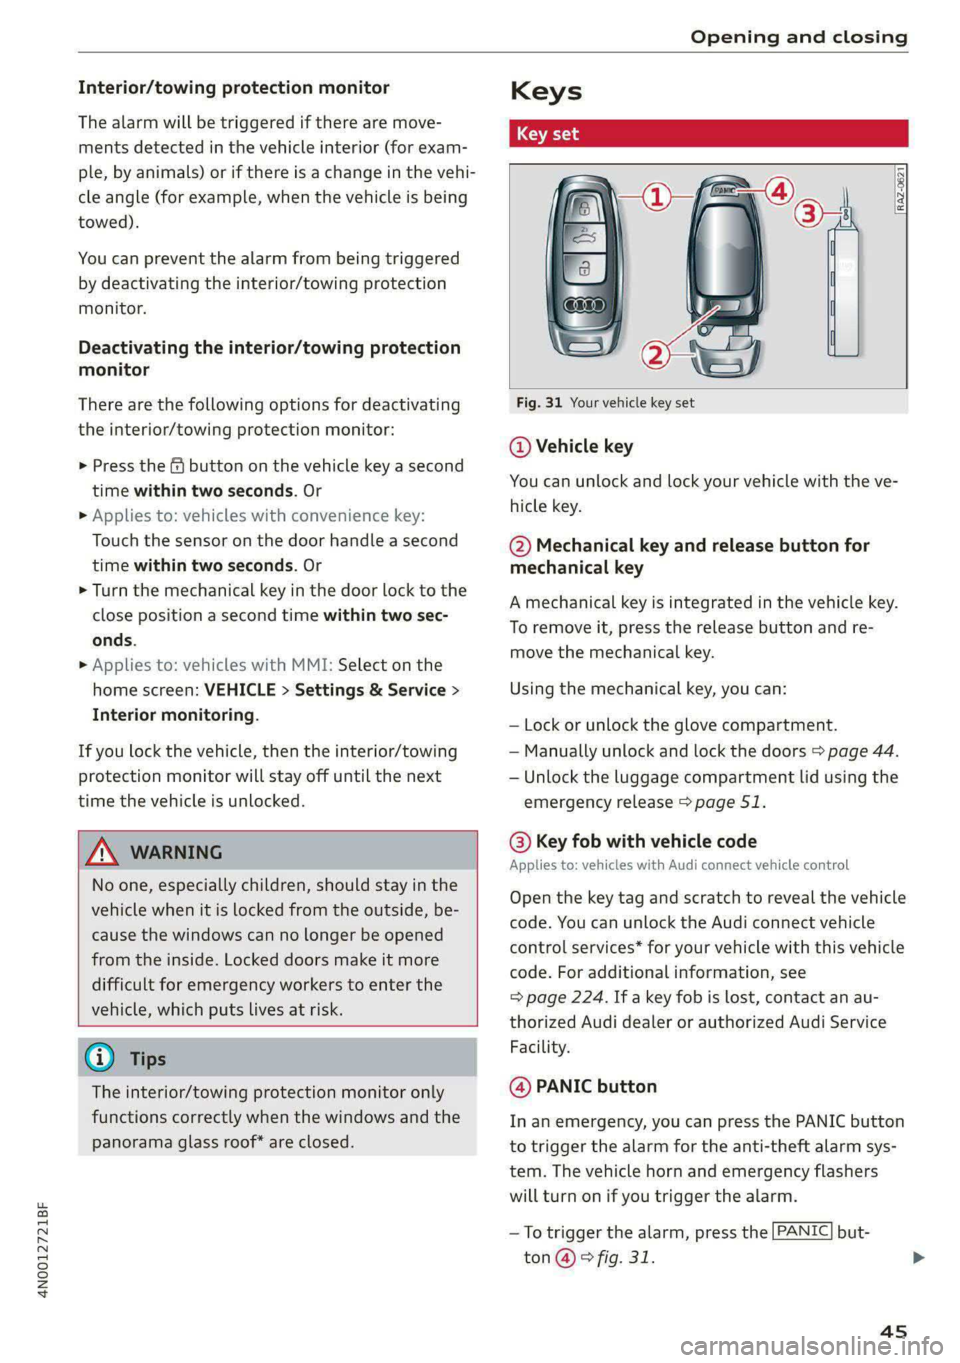
Fig. 31 Your vehicle key set
@ Vehicle key
You can unlock and lock your vehicle with the ve-
hicle key.
@ Mechanical key and release button for
mechanical key
A mechanical key is integrated in the vehicle key.
To remove it, press the release button and re-
move the mechanical key.
Using the mechanical key, you can:
— Lock or unlock the glove compartment.
— Manually unlock and lock the doors > page 44.
— Unlock the luggage compartment lid using the
emergency release > page 51.
@ Key fob with vehicle code
Applies to: vehicles with Audi connect vehicle control
Open the key tag and scratch to reveal the vehicle
code. You can unlock the Audi connect vehicle
control services* for your vehicle with this vehicle
code. For additional information, see
= page 224. If a key fob is lost, contact an au-
thorized Audi dealer or authorized Audi Service
Facility.
@ PANIC button
In an emergency, you can press the PANIC button
to trigger the alarm for the anti-theft alarm sys-
tem. The vehicle horn and emergency flashers
will turn on if you trigger the alarm.
—To trigger the alarm, press the [PANIC] but-
ton @ © fig. 31.
4s