lock AUDI ALLROAD 2000 Owners Manual
[x] Cancel search | Manufacturer: AUDI, Model Year: 2000, Model line: ALLROAD, Model: AUDI ALLROAD 2000Pages: 306, PDF Size: 9.95 MB
Page 6 of 306
----------------------------------------------TABLE OFCONT ENTS
I GENERAL ILLUSTRATION
General illustration 0 0 0. • • • 8
Warning and indicator lights 10
I SAFETY
FIRST
W elcome ... 0 0 0 •• •• 13
Safety first 0 0
• 0 • 0 0 0 0 • 0 •
13
Safety belts
• . . 0 0 0 • 0 0
14
Airbag system 0 ••••••• 0 0 • • • • • • • 25
Child safety ........ 0 • 0 0 0 0 0 0 0 0 0 44
I CONTROLS AND EQUIPMENT
Keys 0 0 0 0 0 0 0 0 0 0 0 •••• ••••• 0 0 • • 0
56
Power locks 0 0 0 0
Power windows
Mirrors 0 •• 0 0 0 •••
Head restraints
Front seats 0 0 0 •
0.- . 0 0 0 • • 59
69
• •• - •••• 0 ••• 0 72
75
•• 0 •• 0 76
Memory for front seats , .... 0 •• 0 81
Center armrest 0 0 0 0 0 0 0 0 0 •••••• 0 85 Rear
seats 0 0 •• 0 •• 0 • • • • • •
86
Luggage compartment , 0 0 88
Rear facing child seat bench 0 0 0 0 0 92
Ski sack 0 0 0 0 0 0 0 0 0 0 0 0 0 0 0 0.
96
Adjustable steering column
(tilt and telescopic) 0 0 0 0 • 0 0
98
Pedals 0 0 • 0 0 0 0 0 0 0 0 0 0 0 0 0 0 0 0 0 0 0 , 1 02
Parking brake lever 0 • 0 0 0 0 0 0 0 •• 0 1 03
5-speed automatic transmission
(Trptronic ®) 0 0 0 0 0 0 0 0 0 0 • 0 0 0 0 0. 0 • 104
Acoustic park assist
112
Ignition switch 0 0 0 0 0 0 0
1 13
Starting procedures . 0 • • 114
Stopping engine 0 0 0 0 0 0 • • • 115
Instrument cluster 0 0 0 0 0 0 116
Service Interval Display
121
Warning I Indic ator lights 0 0 0 0 0 0 • 122
On Board Diagnostic system 0 0 0 128
Driver information system 0 • 0 • • • 130
Menu display 0 0 0 0 0 0 0 0 0 0 0 0 0
0 131
Rear lid I door open indicator 0 0 0 137
Outside air temp erature 0 • 0 0 0 0 0 0 137 Radio
frequency display 13
8
Auto-Check system 0 0 0 o 0 138
Speed warning . 0 0 0 • 0 0 • • • • 0 • 0 0 144
Tr ip computer 0 0 0 0 0 0 •• 0
146
Switches 0 • 0 •• 0 0 0 0 • 0 0 0 0 148
Ride height adjustment
(4 Level Air Suspension) 0
153
Turn signals,
headlight dimmer switch lever 0 0 156
Cruise control 0 0 0 0 0 0 0 0 0 0 0 0 0 0 0 • • 158
Wiper and washer system 0 ••• 0 0 150
Climate controls 0 0 0 0 0 0 0 0 0 0 0 • 0 152
Power roof 0 0 0 0 0 0 0 • 0 0 0 0 0 • • • • • • 168
Int erior lights, reading lights 171
Luggage compartment light 0 0 0 0 172
Audi Homelink ®
Uni versal Transmitter . 0 0 • • • •
173
Sun visors 00 00 00 00 ... • .. •
177
Sun shade 0 0 0 0 0 0 0 0 •• , • • • ••• 0 0 177
Glo ve compartment
Coat hooks
Ashtray 178
179
180
5
Page 7 of 306

TABLE OF CO
NTENTS----------------------------------------------
Cigar ette lighter I Socket ....... 181
Storage compartments
Steering wheel with
Audio controls .......••.... 0
Steering wheel with
radio and telephone equipment
in the steering wheel .
Mobile telephones and
CB radios ..
earphone ..•
Roof rack ... ..
I VEHICLE
OPERATION
The first 1,000 miles (1 500 km)-182
18 5
186
189 19 0
191
and afterwa rds ....... ....... .. 193
Operate your vehicle safely . . . . . 194
Operate your vehicle economically
and minimize pollution . . 195
Driving on rough roads or
rugged terrain . . . . . . . . . . 199
Braking . . . . . . . . . . . . . . . . . 201
Ele ctronic differential lock
(EDL) 204
6 Electronic
Stability Program
(ESP) .. .. .. .. .. .. .. .. .. 205
Driving with your quattro® . . . . . . 207
Trailer towing . . . . . . . . _ ... _ . . 208
I VEHICLE
CARE
Cleaning and protection 212
Fuel tank . . . . . . . .
222
Fuel supply . _ .... .. _ . . . . . . . . . . 225
Maintenance ..• •. .
Engine hood .
. . .
Engine compartment
Engine oil ..... ..... .
Engine cooling system
o •• •••
Power steering
Brake fluid ..
Battery ...
Air cleaner
Spark plugs
Belts . . . . .
. __ ..• .. ...
Windshield I
headlight washer container ..... 228
231
232
234
238
241
242
244 248
249
249
250 Wiper
blades
lires I Wheels
Difficult operating
conditions ...... . .
Additional accessories, Modifications and
Parts replacement ...... . .
I DO-IT-YOURSELF
SERVICE
First aid kit ....•.
Emergency
warning triangle . . . . . . . . .
Jack and tools ... .• . _ .. ..• .. ..
Spare wheel .. .. . .. ... . ..
Changing a wheel . . . • . . . . .
Fuses ........ .. . . . .. .. _ .. ..
Replacing bulbs
Installing I
replacing a radio
Emergency starting
Emergency towing with
commercial tow truck
Lifting vehicle .... . 251
252
262
262
263
263
264
266
267 274
277
277
278
281
283
Page 10 of 306
1
2
3
4 5
6
7
8
9
10
11 12
13 14
15
16
17 Power
window switches
Door handle
Power locking switch
Light switch
Air vents
Turn signals I headlight dimmer switch lever ...
Cruise control ................. .............
Instrument illumination
Horn, driver's airbag •••••
0 •• 0 •• 0 0 •• 0 ••• 0 ••• 0
Radio I CD I buttons ................
........
Radio I CD I telephone buttons ...............
Instrument cluster ....... ... ... ... ... .. .....
Warning I indi cator lights ••••••••
0 0
••••••••••
Windshield wiper I washer lever ..............
Tri p computer function control switch .........
Steering lock I ignition I starter switch
Switch for the Electronic Stability Program (i::SP)
Switches for the ride heigh t adjustment and
level display •••••••••••••••
0 •• 0 •• 0 0 •• 0 0 ••••
Emergenc y flasher
Cup holder
Glove compartment (lockable)
Front passenger's airbag
Radio Page
69
59 62
148 165
15 6
15 8
149
25
185
18 6
11 6
12 2
16 0
146
113
15 2
15 3
15 2
18 2
17 8
25 -------GE NERA L ILLUST
RATION
Page
18 Thumb wheel for seat heating
150
19 Switch for rear window defogger 151
20 Climate controls
162
21 Ashtray ...................................
180
Cigarette lighter ............................ 181
22 Gearshift lever or
Selector lever ..............................
104
23 Adjuster control for outside mirrors
72
24 Parking brake lever
103
25 Navigation System switch or
Cup holder
•••••••••••••••• 0 •••• 0 •••• 0 •••••
182
26 Storage compartment
27 Service wallet compartment
183
28 Adjustable steering wheel
98
29 Data Link Connector (DLC) for On Board
Diagnostics (OBD)
128
30 Release lever for engine hood 231
31 Memory for driver's seat
81
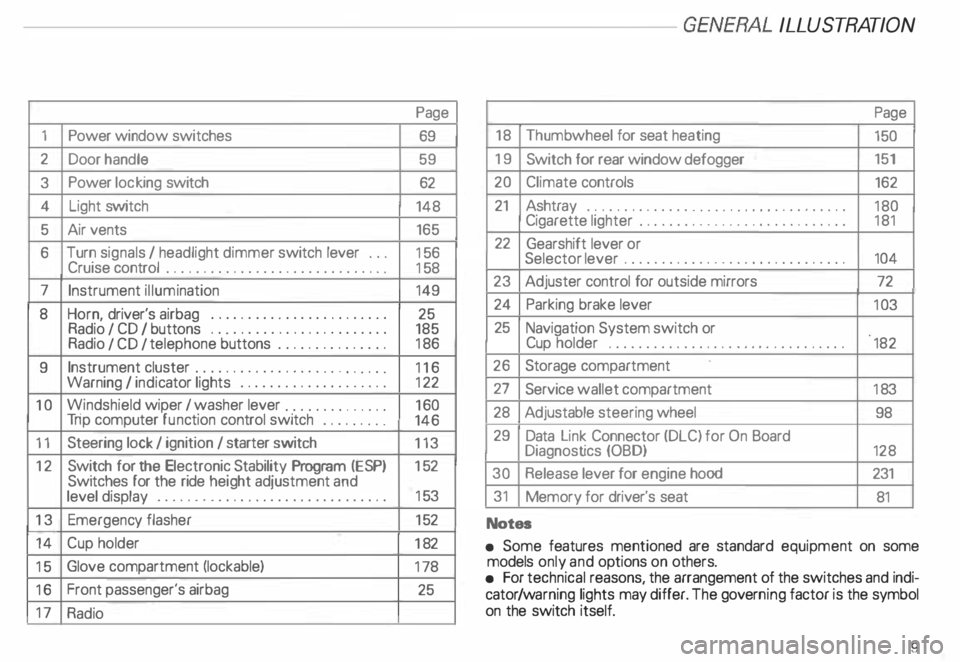
Notes
• Some features mentioned are standard equipment on some
models only and options on others.
• For technical reasons, the arrangement of the switches and indi
cator /warning lights may differ. The govern ing factor is the symbol
on the switch itself.
9
Page 11 of 306
GENERA L
ILL USTR ATION----------------------
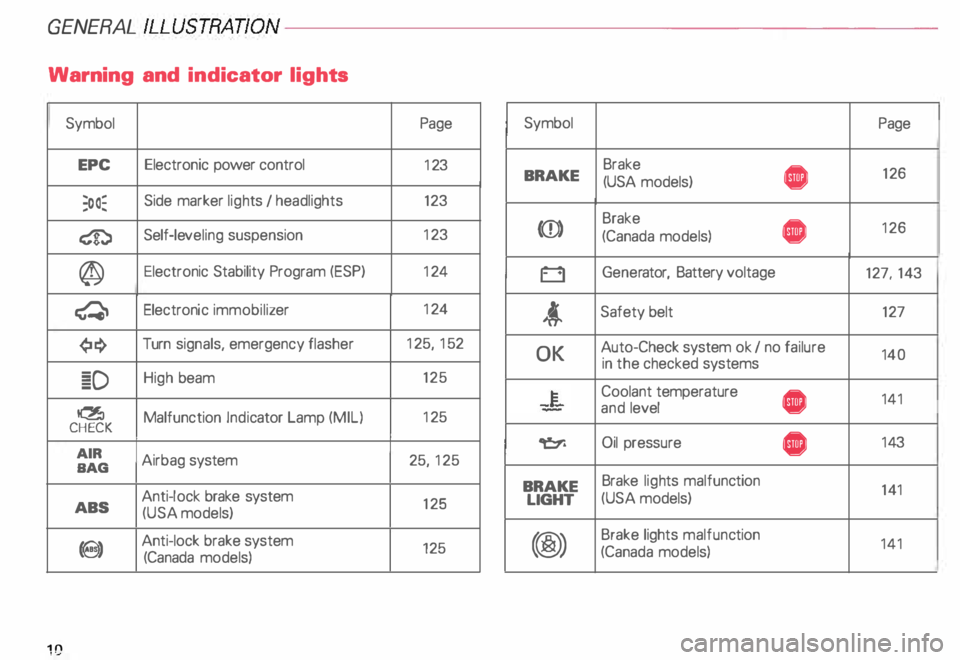
Warning and indicator lights
Symbol Page Symbol
Page
EPC Electronic
power control
123 Brake
• 126
BRAKE
(USA models)
;oo� Side
marker lights I headlights 123
� Self-le
veling suspension 12
3 (CD) Brake
• 12
6
(Canada models)
@ Electronic
Stability Program (ESP) 12
4
0 Gener
ator, Battery voltage
127, 143
� Electronic
immobilizer 12
4
t Safety
belt 127
¢!:} Turn
signals, emergency flasher 12
5, 152
� D High
beam 125
� Malfunction Indicator Lamp (MIL) 12
5
CHECK
AIR Airbag system 25, 125
BAG OK
Auto-Check
system ok I no failure
140
in the checked systems
-�- Coolant
temperature
• 141
and level
� Oil pressure
• 14
3
ABS Anti-lock
brake system
125
(USA models) BRAKE
Brake
lights malfunc tion
141
LIGHT (USA
models)
9) Anti-lock
brake system
125
(Canada models) (@) Brake
lights malfunc tion
141
(Canada models)
10
Page 19 of 306
SAFETY RRST---------------------------------------------------
How to wear safety belts
properly
Safety belts must always be prop
erly positioned across the strongest
bones of your body.
�W ARNING
Always fasten your safety belts
before driving off. Always make
sure your passengers are properly
restra ined -even those sitting in
the rear.
Safety belts can work only when
used properly. Never wear safety
belts in any other way than illus
trated and described in this sec
tion. Always observe the follow
ing precautions:
• Never wear belts twisted.
18 '41
WARNING continued
• Never strap more than one par
son, including small children, into
any belt. It is especially dangerous
to place a safety belt over a child
sitting on your lap.
• Never place your feet on the in
strument panel or on the seat.
Always keep both feet on the floor
in front of the seat.
• Never wear belts over rigid or
breakable objects in or on your
clothing, such as eye glasses,
pens, keys, etc., as these may
cause injury.
• Do not wear the shoulder part of
the belt under your arm or other
wise out of position.
• Several layers of heavy clothing
may interfere with proper posi
tioning of belts and reduce the
overall effectiveness of the sys
tem. �
WARNING continued
• Never allow safety belts to be
come damaged by being caught in
door or seat hardware. Always
keep belt buckles free of any ob
struction that may prevent secure
locking.
• Never use comfort clips or de
vices that create slack in the
shoulder belt portion. However,
clips may be required for the
proper use of some child restraint
systems.
• To rn or frayed safety belts can
tear and damaged belt hardware
can break in an accident. Inspect
belts periodically.
If belts show damage to webbing,
bindings, buckles. or retractors,
have them replaced.
Page 20 of 306
fh1
WARNING continued
• Keep the belts clean.
Dirty belts may not work properly
- see also .. Cleaning and protec
tion .. page 218.
• Safety belts that have been
worn and loaded in an accident
must be replaced with the correct
replacement safety belt by an au
thorized Audi Dealer. Replace
ment may be necessary even if
damage cannot be clearly seen.
• Safety belt anchorages that
have been loaded in an accident
must be inspected by a qualified
workshop or an authorized Audi
Dealer.
• Never modify. disassemble, or
try to repair your safety belts. Seating capacity
Your Audi has 5 seating positions, 2 in the
front and 3 in the rear. Each seating position
has a safety belt.
�W ARNING
Never let more people ride in the
vehicle than there are seat belts
available. Be sure everyone riding
in the vehicle is correctly re
strained with a separate seat belt. SA
FETY FIRST
Lap- shoulder belt
The front and rear seats are equipped with
three-point safety belts.
The three-point belts in the front passenger
and rear positions each have a convertible
locking feature in addition to the emergency
locking feature. The convertible locking fea
ture is used when a child seat is installed,
see page 51.
The retractors in the combination lap-shoul
der belts allow the system to adjust to your
size and movements as long as the pull on
the belt is slow.
Hard braking or a collision locks the belt. The
belt will a I so lock when you drive up or down
a steep hill or in a sharp curve.
19
Page 21 of 306
SA
FETY RRST-----------------------------------------------------
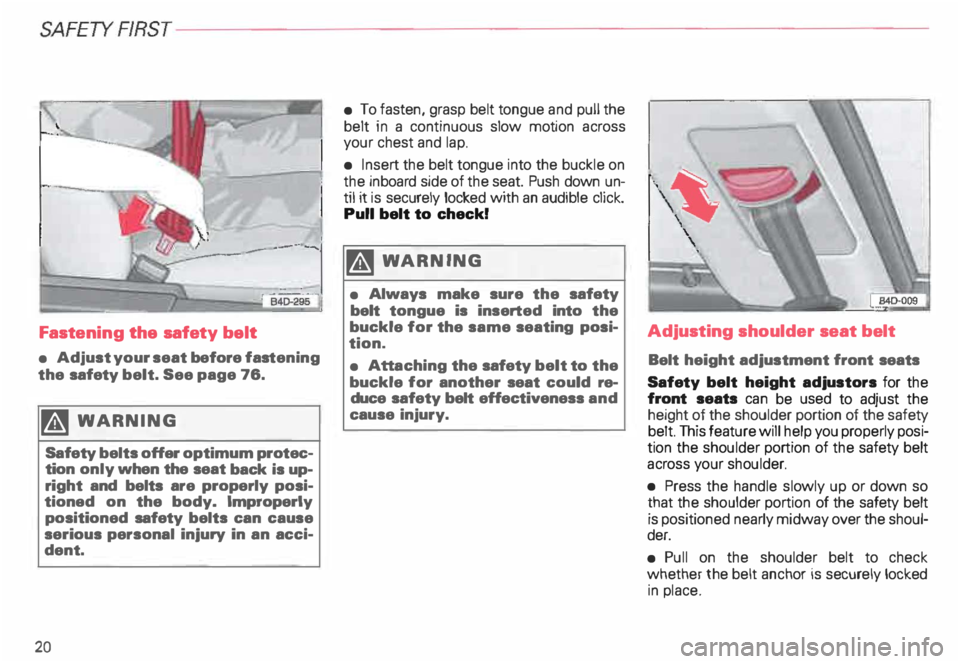
Fastening the safety belt
• Adjust your seat before fastening
the safety belt. See page 76.
� WARN ING
Safety belts offer optimum protec
tion only when the seat back is up
right and belts are properly posi
tioned on the body. Improperly
positioned safety belts can cause
serious personal injury in an acci
dent.
20 •
To fasten, grasp belt tongue and pull the
belt in a continuous slow motion across
your chest and lap.
• Insert the belt tongue into the buckle on
the inboard side of the seat. Push down un
til it is securely locked with an audible click.
Pull belt to check!
� WARNING
• Always make sure the safety
belt tongue is inserted into the
buckle for the same seating posi
tion.
• Att aching the safety belt to the
buckle for another seat could re
duce safety belt effectiveness and
cause injury. Adjusting
shoulder seat belt
Belt height adjustment front seats
Safety belt height adjustors for the
front seats can be used to adjust the
height of the shoulder portion of the safety
belt. This feature will help you properly posi
tion the shoulder portion of the safety belt
across your shoulder.
• Press the handle slowly up or down so
that the shoulder portion of the safety belt
is positioned nearly midway over the shoul
der.
• Pull on the shoulder belt to check
whether the belt anchor is securely locked
in place.
Page 24 of 306
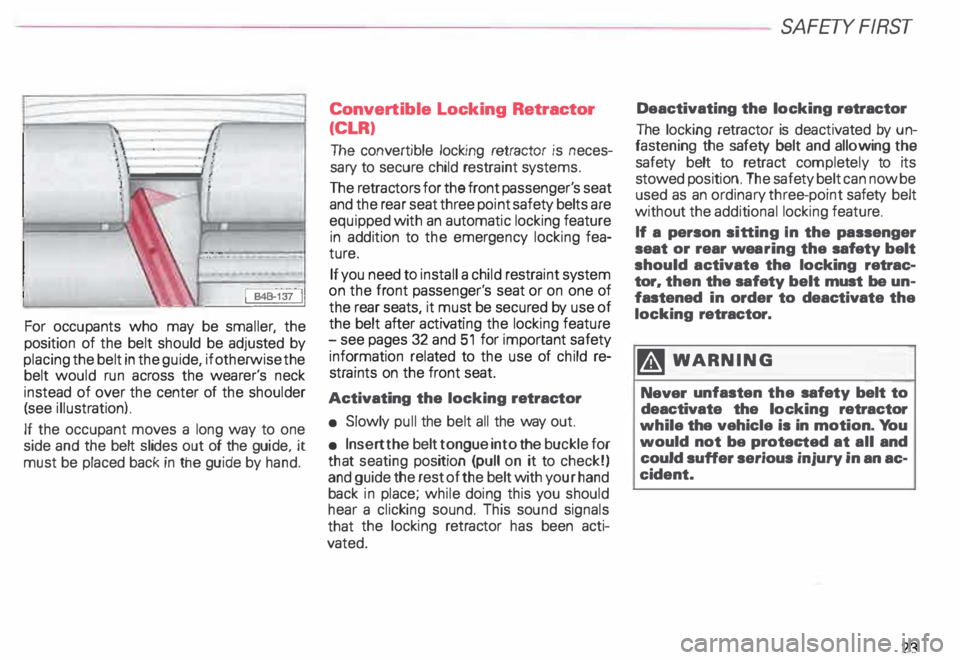
For
occupants who may be smaller, the
position of the belt should be adjusted by
placing the belt in the guide, if otherwise the
belt would run across the wearer's neck
instead of over the center of the shoulder
(see illustration).
If the occupant moves a long way to one
side and the belt slides out of the gu id e . it
must be placed back in the guide by hand. Convert
ible Locking Retractor
(CLR)
The convertible locking retractor is neces
sary to secure child restraint systems.
The retractors for the front passenger's seat
and the rear seat three point safety belts are
equipped with an automatic locking feature
in addition to the emergency locking fea
ture.
If you need to install a child restraint system
on the front passenger's seat or on one of
the rear seats, it must be secured by use of
the belt after activating the locking feature
-see pages 32 and 51 for important safety
information related to the use of child re
straints on the front seat.
Activating the locking retractor
• Slowly pull the belt all the way out.
• Insert the belt tongue into the buckle for
tha t seating position (pull on it to check!)
a n d guide the rest of the belt with your hand
back in place; while doing this you should
hear a clicking sound. This sound signals
that the locking retractor has been acti
vated. SA
FETY FIRST
Deactivating the locking retractor
The locking retractor is deactivated by un
fas te n ing the safety belt and allowing the
safety belt to retract completely to its
stowed position. The safety belt can now be
used as an ordinary three-point safety belt
without the additional locking feature.
If a person sitting In the passenger
seat or rear wearing the safety belt
should activate the locking retrac
tor. then the safety belt must be un
fastened in order to deactivate the
locking retractor.
� WARN ING
Never unfasten the safety belt to
deactivate the locking retractor
while the vehicle is in motion. You
would not be protected at all and
could suffer serious injury in an ac
cident.
Page 32 of 306
-----------------------------------------------------SAFETY RRST
�W ARNING
• Never sit closer than 10 inches
(25 em) to the stee ring wheel.
• If you cannot sit more than
10 inches (25 em) from the steer
ing wheel, we recommend that
you investigate whether adaptive
equipment may be available to
help you reach the pedals and in
crease your seating distance from
the steering wheel.
Adjusting the steering wheel
For detailed steps for adjusting the steering
wheel please see "Adjustable steering col
umn" page 98.
Adjust the steering wheel so that the steer
ing wheel and airbag cover points at your
chest and not at your face. The steer ing
wheel should be adjusted so that you can
hold the outer rim of the steering wheel
comfortably with your hands at the 3 o'clock
and 9 o'clock positions. �W
ARNING
• Pointing the steering wheel to
ward your face decreases the abil
ity of the supplementa l driver's air
bag to protect you in an accident.
• Holding the steering wheel the
wrong way can cause serious inju
ries to the hands, arms and head if
the driver's airbag inflates.
• Never hold the steering wheel at
the 12 o'clock position or with
your hands at other positions in
side the steering wheel rim or on
the steering wheel hub.
Adjusting the passenger's seat
For detailed steps for adjusting the pas
senger's seat please see "Front Seats" on
page 76.
We recommend that you adjust the passen
ger's seat as follows:
- backrest upright (never reclined)
place your feet on the floor in front of the
passenger's seat adjust
the passenger's seat as far as pos
sible to the rear of the fore and aft adjust-
1)1ent range.
�W ARNING
• Always keep both feet on the
floor in front of the seat.
• Never place your feet on the in
strument panel or on the seat. If
the airbag inflates and your feet
are on the instrument panel or on
the seat, your could receive seri
ous personal injuries.
Some other important points to
know
Because airbags inflate in the blink of an eye
with great force, things you have on your lap
or have placed on the seat could become
dangerous projectiles and be pushed into
you if the airbag inflates.
Always head all WARNINGS
on next page.
31
Page 52 of 306
Securing a child seat
Convertible Locking Retractor
The retractors for the rear seat three-po int
safety belts and the front passenger three
point safety belt have a conver tible locking
feature in addition to the emergency locking
feature.
If you need to install a child seat at an outer
seating position, you must first activate the
conver tible locking feature. Then secure the
child seat by using the seat belt. �W
ARNING
• Never install rear-facing child
seats or infant carriers on the front
passenger seat. A child will be se
riously injured and can be killed
when the passenger airbag in
flates.
• The inflating airbag will hit the
child seat or infant carrier with
great force and will smash the
child seat and child against the
backrest. center arm rest. or door.
• Always install rear-facing child
seats or infant carriers on the rear
seat if the front passenger airbag
has not been deactivated. SA
FETY FIRST
�W ARNING
• Forward-fa cing child seats or in
fant carriers installed on the front
passenger's seat may interfere
with the deployment of the airbag
and cause serious injury to the
child. Allow a child to travel on the
front passenger's seat only in a for
ward- facing child restraint system
specif ically designed and ap
proved by the child restraint
manufacturer for use in the front
with airbags. Make sure the pas
senger seat is in the rearmost posi
tion. It is always safer to install a
child seat in the rear.
51