roof AUDI ALLROAD 2000 Owners Manual
[x] Cancel search | Manufacturer: AUDI, Model Year: 2000, Model line: ALLROAD, Model: AUDI ALLROAD 2000Pages: 306, PDF Size: 9.95 MB
Page 6 of 306
----------------------------------------------TABLE OFCONT ENTS
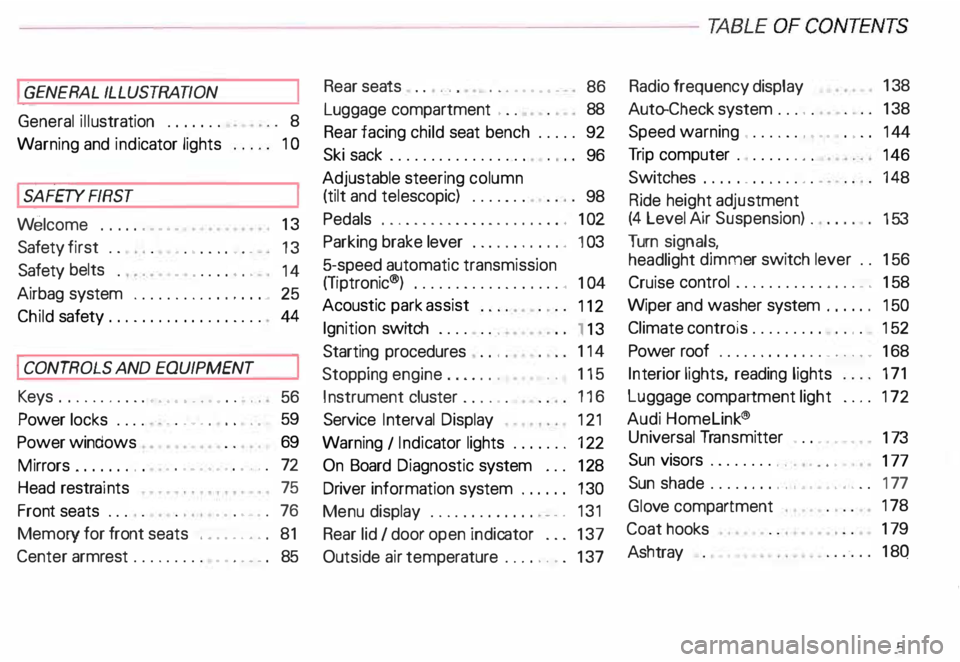
I GENERAL ILLUSTRATION
General illustration 0 0 0. • • • 8
Warning and indicator lights 10
I SAFETY
FIRST
W elcome ... 0 0 0 •• •• 13
Safety first 0 0
• 0 • 0 0 0 0 • 0 •
13
Safety belts
• . . 0 0 0 • 0 0
14
Airbag system 0 ••••••• 0 0 • • • • • • • 25
Child safety ........ 0 • 0 0 0 0 0 0 0 0 0 44
I CONTROLS AND EQUIPMENT
Keys 0 0 0 0 0 0 0 0 0 0 0 •••• ••••• 0 0 • • 0
56
Power locks 0 0 0 0
Power windows
Mirrors 0 •• 0 0 0 •••
Head restraints
Front seats 0 0 0 •
0.- . 0 0 0 • • 59
69
• •• - •••• 0 ••• 0 72
75
•• 0 •• 0 76
Memory for front seats , .... 0 •• 0 81
Center armrest 0 0 0 0 0 0 0 0 0 •••••• 0 85 Rear
seats 0 0 •• 0 •• 0 • • • • • •
86
Luggage compartment , 0 0 88
Rear facing child seat bench 0 0 0 0 0 92
Ski sack 0 0 0 0 0 0 0 0 0 0 0 0 0 0 0 0.
96
Adjustable steering column
(tilt and telescopic) 0 0 0 0 • 0 0
98
Pedals 0 0 • 0 0 0 0 0 0 0 0 0 0 0 0 0 0 0 0 0 0 0 , 1 02
Parking brake lever 0 • 0 0 0 0 0 0 0 •• 0 1 03
5-speed automatic transmission
(Trptronic ®) 0 0 0 0 0 0 0 0 0 0 • 0 0 0 0 0. 0 • 104
Acoustic park assist
112
Ignition switch 0 0 0 0 0 0 0
1 13
Starting procedures . 0 • • 114
Stopping engine 0 0 0 0 0 0 • • • 115
Instrument cluster 0 0 0 0 0 0 116
Service Interval Display
121
Warning I Indic ator lights 0 0 0 0 0 0 • 122
On Board Diagnostic system 0 0 0 128
Driver information system 0 • 0 • • • 130
Menu display 0 0 0 0 0 0 0 0 0 0 0 0 0
0 131
Rear lid I door open indicator 0 0 0 137
Outside air temp erature 0 • 0 0 0 0 0 0 137 Radio
frequency display 13
8
Auto-Check system 0 0 0 o 0 138
Speed warning . 0 0 0 • 0 0 • • • • 0 • 0 0 144
Tr ip computer 0 0 0 0 0 0 •• 0
146
Switches 0 • 0 •• 0 0 0 0 • 0 0 0 0 148
Ride height adjustment
(4 Level Air Suspension) 0
153
Turn signals,
headlight dimmer switch lever 0 0 156
Cruise control 0 0 0 0 0 0 0 0 0 0 0 0 0 0 0 • • 158
Wiper and washer system 0 ••• 0 0 150
Climate controls 0 0 0 0 0 0 0 0 0 0 0 • 0 152
Power roof 0 0 0 0 0 0 0 • 0 0 0 0 0 • • • • • • 168
Int erior lights, reading lights 171
Luggage compartment light 0 0 0 0 172
Audi Homelink ®
Uni versal Transmitter . 0 0 • • • •
173
Sun visors 00 00 00 00 ... • .. •
177
Sun shade 0 0 0 0 0 0 0 0 •• , • • • ••• 0 0 177
Glo ve compartment
Coat hooks
Ashtray 178
179
180
5
Page 7 of 306

TABLE OF CO
NTENTS----------------------------------------------
Cigar ette lighter I Socket ....... 181
Storage compartments
Steering wheel with
Audio controls .......••.... 0
Steering wheel with
radio and telephone equipment
in the steering wheel .
Mobile telephones and
CB radios ..
earphone ..•
Roof rack ... ..
I VEHICLE
OPERATION
The first 1,000 miles (1 500 km)-182
18 5
186
189 19 0
191
and afterwa rds ....... ....... .. 193
Operate your vehicle safely . . . . . 194
Operate your vehicle economically
and minimize pollution . . 195
Driving on rough roads or
rugged terrain . . . . . . . . . . 199
Braking . . . . . . . . . . . . . . . . . 201
Ele ctronic differential lock
(EDL) 204
6 Electronic
Stability Program
(ESP) .. .. .. .. .. .. .. .. .. 205
Driving with your quattro® . . . . . . 207
Trailer towing . . . . . . . . _ ... _ . . 208
I VEHICLE
CARE
Cleaning and protection 212
Fuel tank . . . . . . . .
222
Fuel supply . _ .... .. _ . . . . . . . . . . 225
Maintenance ..• •. .
Engine hood .
. . .
Engine compartment
Engine oil ..... ..... .
Engine cooling system
o •• •••
Power steering
Brake fluid ..
Battery ...
Air cleaner
Spark plugs
Belts . . . . .
. __ ..• .. ...
Windshield I
headlight washer container ..... 228
231
232
234
238
241
242
244 248
249
249
250 Wiper
blades
lires I Wheels
Difficult operating
conditions ...... . .
Additional accessories, Modifications and
Parts replacement ...... . .
I DO-IT-YOURSELF
SERVICE
First aid kit ....•.
Emergency
warning triangle . . . . . . . . .
Jack and tools ... .• . _ .. ..• .. ..
Spare wheel .. .. . .. ... . ..
Changing a wheel . . . • . . . . .
Fuses ........ .. . . . .. .. _ .. ..
Replacing bulbs
Installing I
replacing a radio
Emergency starting
Emergency towing with
commercial tow truck
Lifting vehicle .... . 251
252
262
262
263
263
264
266
267 274
277
277
278
281
283
Page 61 of 306
CONTROLS AND
EQUIPMENT--------------------
Remember- the panic function can be seen
and heard by other motorists and I or per
sons near you.
Use the panic function only if you
are In an emergency situation.
�W ARNING
Do not leave children unattended
in the vehicle especially with ac
cess to the remote control. There
mote control could be used to lock
the doors delaying access to the
children in an emergency.
Resetting the remote control
If your vehicle will not lock using the remote
control . it could be that the code for the con
trol unit and key needs to be reset. This can
occur if you frequently use the remote c �m
trol while standing outside of the effective
range.
60 Resetting
procedure
1 - To synchronize, press button A or but
ton Con the remote control one time.
2 - Then, within one minute, lock or un
lock the driver's door with the master
key.
The system is now functional.
Operating locks using the key
• To lock and unlock the vehicle from
the outside, turn the key in the lock of the
driver's door or the rear lid.
Yo u can also lock and unlock the vehicle by
turning the key in the re ar lid lock. See
page 63.
• Turn the key one time only to unlock
(A) either the driver's door or respectively
the rear lid.
• Turn the key two times to unlock all ve
hicle doors and the rear lid. Convenience
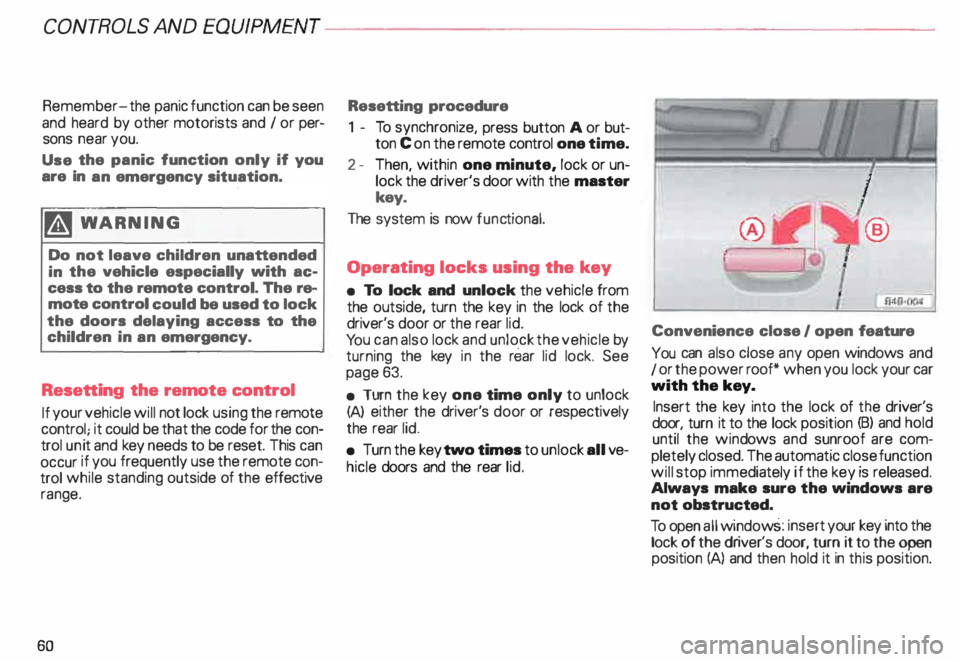
close I open feature
You can also close any open windows and
1 or the power roof* when you lock your car
with the key.
Insert the key into the lock of the driver's
door, turn it to the lock position (B) and hold
until the wind ows and sunroof are com
pletely closed. The automatic close function
will stop immediately if the key is released.
Always make sure the windows are
not obstructed.
To open all window s: insert your key into the
lock of the dr iver's door, turn it to the open
position (A) and then hold it in this position.
Page 92 of 306
--------------------CONTROLS AND
EQUIPMENT
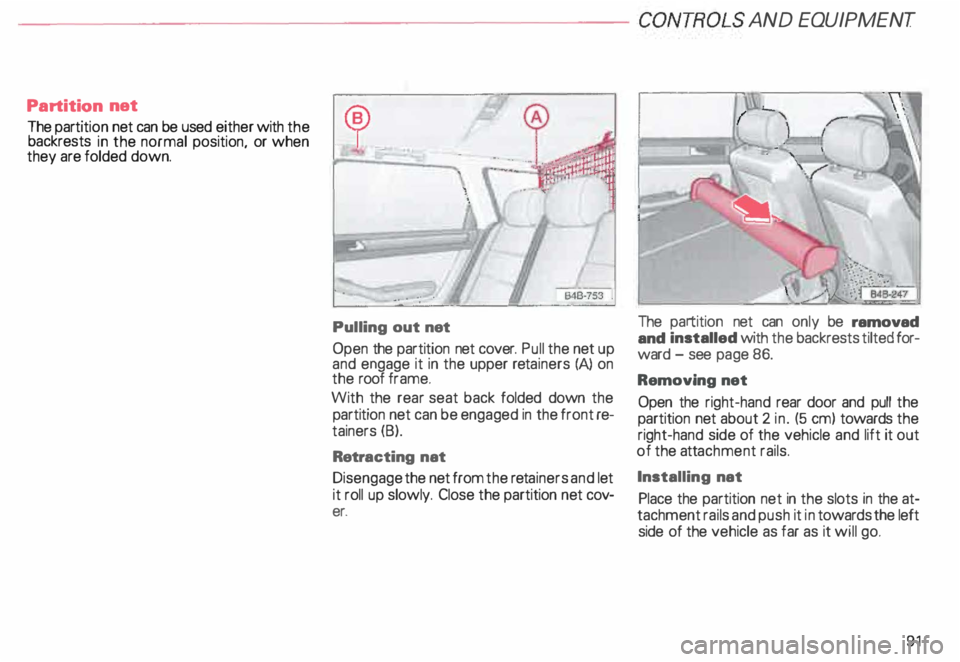
Partition net
The partit ion net can be used either with the
backrests in the normal position, or when
they are folded down.
Pulling out net
Open the partition net cover. Pull the net up
and engage it in the upper retainers (A) on
the roof frame.
With the rear seat back folded down the
partition net can be engaged in the front re
tainers (B).
Retra cting nat
Disengage the netfromthe retainers and let
it roll up slowly. Close the partition net cov
er. The
partition net can only be ramovad
and installed with the backrests tilted for
ward -see page 86.
Removing net
Open the right-hand rear door and pull the
partition net about 2 in. (5 em) towards the
right-hand side of the vehicle and lift it out
of the attachment rails.
Installing nat
Place the partition net in the slots in the at
tachment rails and push it in towards the left
side of the vehicle as far as it will go.
91
Page 154 of 306
Ride height adjustment (4 Level Air Suspension)
......., _____ ___ �--
-�
�. 842· 8!18 ..J
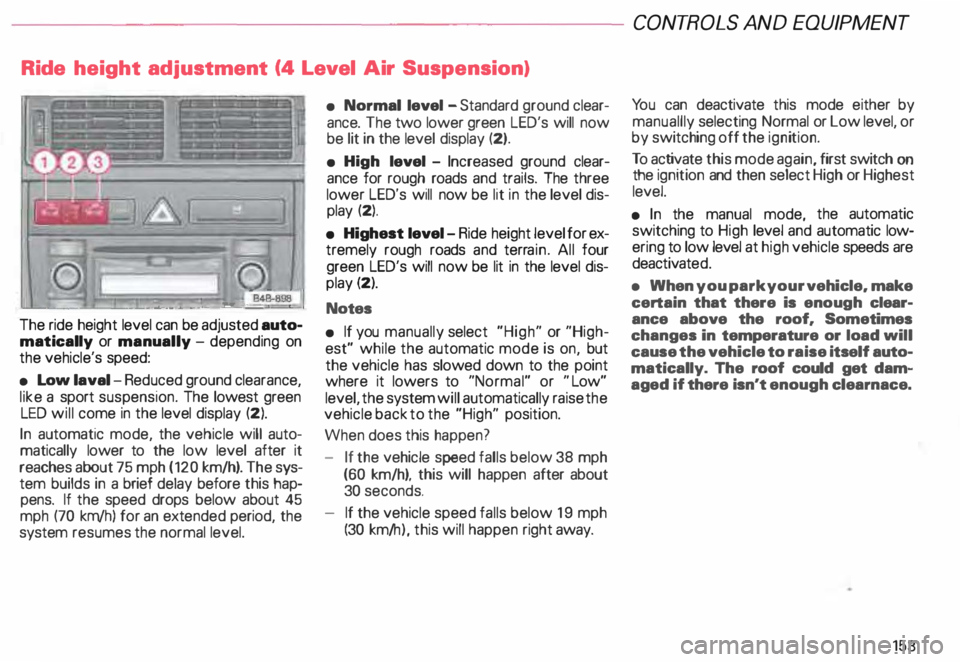
The ride height level can be adjusted auto
matically or manually -depending on
the vehicle's speed:
• Low laval -Reduced ground clearance,
like a sport suspension. The lowest green
LED will come in the level display (2).
In automatic mode, the vehicle will auto
matically lower to the low level after it
reaches about 75 mph (120 km/h). The sys
tem builds in a brief delay before this hap
pens. If the speed drops below about 45
mph (70 km/h) for an extended period, the
system resumes the normal level. •
Normal level -Standard ground clear
ance. The two lower green LED's will now
be lit in the level display (2).
• High level -Increased ground clear
ance for rough roads and trails. The three
lower LED's will now be lit in the level dis
play (2).
• Highest level-Ride height level for ex
tremely rough roads and terrain. All four
green LED's will now be lit in the level dis
play (2).
Notes
• If you manually select "High" or "High
est" while the automatic mode is on, but
the vehicle has slowed down to the point
where it lowers to "Normal" or "Low"
level, the system will automatically raise the
vehicle back to the "High" position.
When does this happen?
- If the vehicle speed falls below 38 mph
(60 km/h), this will happen after about
30 seconds.
- If the vehicle speed falls below 19 mph
(30 km/ h), this will happen right away. CONT
ROLS AND EQUIPMEN T
Yo u can deactivate this mode either by
manuallly selecting Normal or Low level, or
by switching off the ignition.
To activate this mode again, first switch on
the ignition and then select High or Highest
level.
• In the manual mode, the automatic
switching to High level and automatic low
ering to low level at high vehicle speeds are
deactivat ed.
• When you park your vehicle. make
certain that there is enough clear
ance above the roof. Sometimes
changes in temperature or load will
cause the vehicle to raise itself auto
matically. The roof could get dam
aged if there isn't enough clearnace.
153
Page 167 of 306
CONT
ROLS AND EQUIPMENT
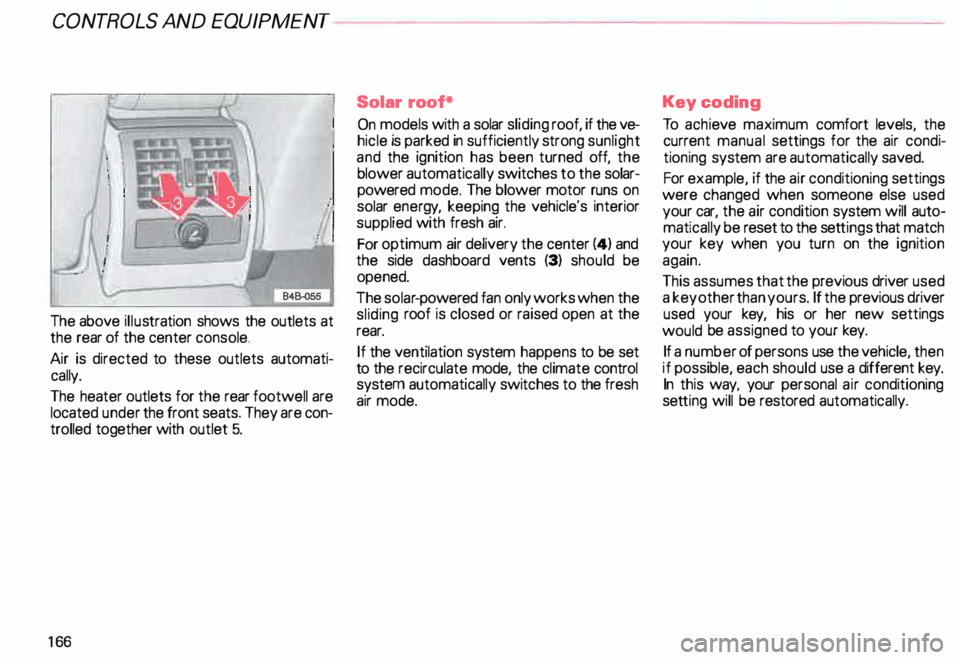
The above illustration shows the outlets at
the rear of the center console.
Air is directed to these outlets automati
cally.
The heater outlets for the rear footwall are
located under the front seats. They are con
trolled together with outlet 5.
16 6 Solar
roof*
On models with a solar sliding roof, if the ve
hicle is parked in sufficiently strong sunlight
and the ignition has been turned off, the
blower automatically switches to the solar
powered mode. The blower motor runs on
solar energy, keeping the vehicle's interior
supplied with fresh air.
For optimum air delivery the center (4) and
the side dashboard vents (3) should be
opened.
The solar -powered fan only works when the
sliding roof is closed or raised open at the
rear.
If the ventilation system happens to be set
to the recirculate mode, the climate control
system automatically switches to the fresh
air mode. Key
coding
To achie ve maximum comfort levels, the
current manual settings for the air condi
tioning system are automatically saved.
For example, if the air conditioning settings
were changed when someone else used
your car, the air condition system will auto
matically be reset to the settings that match
your key when you turn on the ignition
again.
This assumes that the previous driver used
a key other than yours. If the previous driver
used your key, his or her new settings
would be assigned to your key.
If a number of persons use the vehicle, then
if possible, each should use a different key.
In this way, your personal air conditioning
set ting will be restored automatically.
Page 168 of 306
---------------------CONTROLS AND
EQUIPMENT
General notes
• Vehicle heating is depend upon tne tem
perature of the engine coolant -therefore,
your vehicle interior will warm uponly when
the engine has reached its operating tem
perature.
When the ambient temperature is too low,
the fan only switches to high speed modes
when the coolant has reached a sufficiently
high temperature, or when the ® button
has been depressed.
• Keeping the air intake slots in front of the
windshield free from ice, snow and debris
helps to make sure that the climate control
system will work properly.
• When the air conditioner compressor is
on it reduces both the temperature and the
humid ity of the air inside the vehicle. This
prevents the windows from fogging up.
• The air conditioner works best with the
windows and power roof* closed. •
If the inside temperature is very high af
ter the vehicle has been parked in the sun,
open windows and allow the hot air to es
cape before switching on the air condi
tioner.
• The dust and pollen filter will prevent
dust and pollen etc. in the outside air from
entering the car. Switch to air recirculation
to prevent unpleasant fumes from entering
the vehicle.
If water drips under the
vehicle ...
At high outside temperatures and humidity,
condensation may drip from the evaporator.
This is normal and does not indicate a leak.
If the airflow is not cool ...
• At low ambient temperatures the air con
ditioner compressor switches off automati
cally. The compressor cannot be switc hed
on again in this case, even by pressing the
AUTO button. •
The air conditioner may switch itself off
temporarily to ensure sufficient engine
cooling when the engine is running at full
load.
The air conditioner will also be switched off
temporarily in the kick-down function. See
page 109.
• Check the air conditioning fuse on the
fuse p imel -see page 27 4. Have it replaced,
if necessary.
• If you suspect that the air conditioner is
damaged, for instance after an accident,
switch to the ECON and have the system
examined immediately for leaks or other
damage.
167
Page 169 of 306
CONTROLS AND
EQUIPMENT--------------------
Maintenance
• For maximum efficiency of the air condi
tioner the dust and pollen filter elements
must 'be replaced at the intervals indicated
in the Maintenance Schedule.
• The condenser must be checked regu
larly to make sure it is clean. If it becomes
obstructed by dirt or insects, spray 1t clear
with water.
• Repairs to the Audi air condition
ing system require specialized
knowledge and special tools.
If the system is not functioning
properly, contact your Audi Dealer.
16 8 Power roof*
The roof will slide open or tilt up at the rear
as required. When the ignition is on it can be
opened and closed by turning the rota�
control next to the interior light. The roof 1s
tilted open or closed by pressing or pulling
the control -see illustration.
When turning the ignition off, however, the
sunr oof can still be operated as long as the
driver's and front passenger's door are
closed. When either door is opened, sliding
roof operation will be deactivated .
Always close the roof completely if you are
going to park your vehicle and leave. �W
ARNING
Be careful when closing the power
roof 1 tilt roof. Not paying atten
tion could cause you or others to
be caught and injured as the roof
closes. To help avoid injuries
caused by closing the roof, always
take your key whenever you leave
your vehicle.
Page 170 of 306
;
\ I
\. ,. _
---________.)
---------� =::�1
Opening and closing
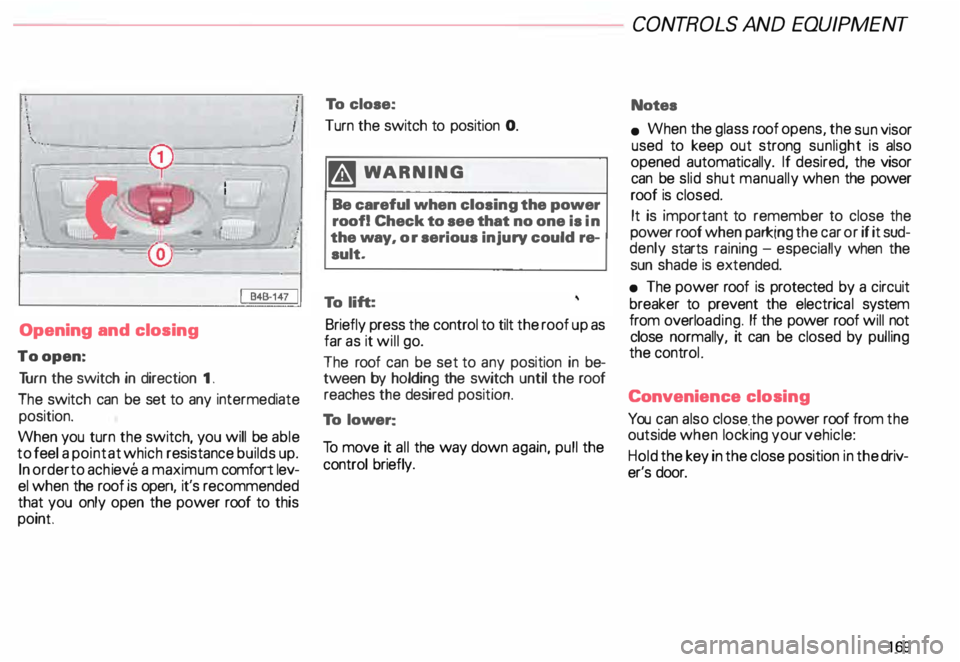
To open: Tu rn the switch in direction 1.
The switch can be set to any intermediate
position.
When you turn the switch, you will be able
to feel a point at which resistance builds up.
In order to achieve a maximum comfort lev
el when the roof is operi, it's recommended
that you only open the power roof to this
point To
close:
Turn the switch to position 0.
�W ARNING
Be careful when closing the power
roof! Check to see that no one is in
the way, or serious injury could re
sult.
To lift:
Briefly press the control to tilt the roof up as
far as it will go.
The roof can be set to any position in be
tween by holding the switch until the roof
reaches the desired position.
To lower:
To move it all the way down again, pull the
control briefly. CONT
ROLS AND EQUIPMENT
Notes
• When the glass roof opens, the sun visor
used to keep out strong sunlight is also
opened automatically. If desired, the visor
can be slid shut manually when the power
roof is closed.
It is important to remember to close the
power roof when parking the car or if it sud
denly starts raining -especially when the
sun shade is extended.
• The power roof is protected by a circuit
breaker to prevent the electrica l system
from overlo ading. If the power roof will not
close normally, it can be closed by pulling
the controL
Conv enience closing
You can also close . the power roof from the
outside when locking your vehicle:
Hold the key in the close position in the driv
er's door.
169
Page 171 of 306
CONT
ROLS AND
EQUIPMENT---------------------
.·
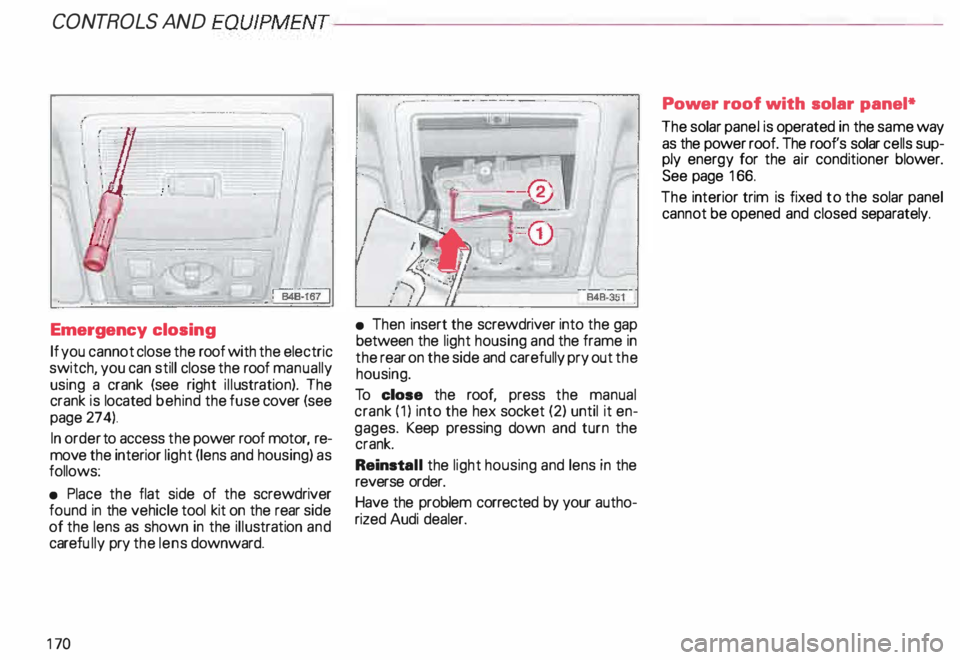
Emergency closing
If you cannot close the roof with the electric
switch, you can still close the roof manually
using a crank (see right illustr ation). The
crank is located behind the fuse cover (see
page 274).
In order to access the power roof motor, re
move the interior light (lens and housing) as
follows:
• Place the flat side of the screwdriver
found in the vehicle tool kit on the rear side
of the lens as shown in the illustration and
carefu lly pry the lens downward.
17 0 •
Then insert the screwdriver into the gap
between the light housing and the frame in
the rear on the side and carefully pry out the
housing.
To close the roof, press the manual
crank (1) into the hex socket (2) until it en
gages. Keep pressing down and turn the
crank.
Reinst all the light housing and lens in the
reverse order.
Have the problem corrected by your autho
rized Audi dealer. Power
roof with solar panel*
The solar panel is operated in the same way
as the power roof. The roof's solar cells sup
ply energy for the air conditioner blower.
See page 166.
The interior trim is fixed to the solar panel
cannot be opened and closed separately.