connect AUDI E-TRON 2019 Owners Manual
[x] Cancel search | Manufacturer: AUDI, Model Year: 2019, Model line: E-TRON, Model: AUDI E-TRON 2019Pages: 310, PDF Size: 81.91 MB
Page 5 of 310
4KE012721BB
Table of contents
High-voltage system............. 104
Generalinformation................. 104
Charging the high-voltage battery...... 105
Charging equipment................. 112
Trailer towing.................0.-. 120
Driving with atrailer................. 120
Assist systems................... 123
ASSIST SYSTEMS ic: 6 & cas 5c cae 5 ow i238
General information................. 123
Surrounding area detection............ 124
Switching the systems on and off....... 126
Driving information.............. 128
Speed warning system..............-- 128
Camera-based traffic sign recognition... 128
Traffic light information.............. 130
NightiVision aSSistix = «xem : s ases : soe 131
Integrated Toll Module............... 133
Driver assistance................. 134
Cruise control system's.o. « cees ss rows ss 134
Efficiency assist...............--005. 135
Adaptive cruise assist................ 139
Distance warning .............e0e000. 147
Lane departure warning............... 147
Audi presense........... 0. cece eee 150
SIG@iASSISE sew: » 2 cues = y ewe ae AeA Ge we 154
EXIEWAPniNng sive «6 ccerane 2 @ soeee «0 cuesime @ 6 156
Intersection assistant................ 157
Emergency assist... ....:seeceeeevees 158
Parking and maneuvering....... 160
IRCROAWECION « = eas x o sees 5 o eee ge oe 160
Parking system plus...............00. 160
Rearview camera and peripheral cameras. 162
Rear cross-traffic assist............... 166
Adjusting the parking aids............. 167
Infotainment system............ 169
Telephone... - es.s =) gees be eens ces 169
TEROMUCLION 5 scoane a vanes » 6 nani + 6 exeemn 169
Setup... eee eee eee eee 170
Disconnecting a mobile device......... 171
Using the Audi phone box............. 171
Using the telephone.................. 173
M@SSAG@S ves s x sere + & ewe ¢ o eee § eee 178
SOPGINGS sacs +o aeowens w evewens a x euswoe a» eemeoe 180
Instrument cluster...............0008 182
Troubleshooting sacs ss sews + ¢ wae 3 x ew 182
Audi connect..................... 184
Generalinformation..............05- 184
Audi connect Infotainment............ 185
Using a Wi-Fi hotspot................ 185
Audi connect Infotainment services..... 185
Audi connect vehicle control services.... 186
SQECINOS cccssin ws eseuwie x priesens wm sores w 6 syenne 188
Troubleshooting..................5-. 190
Emergency call..................- 491,
Overview... .... 0... eee eee eee 191
EM@rgency Call + wsws « zaen 3 = suze 3 2 reR 191.
Online roadside assistance............ 192
Navigation. « : ssc < : soos sp eens ss 193
Opening navigation.................. 193
myAudi navigation.................0. 193
Entering adestination................ 194
Stopping route guidance.............. 199
MAP ieccsie 9 2 wxotiose 1 ssumene of 9 enwEem 4 ot tase & Oo we 199
Personal route assistance............. 201
‘Alternative roUtes:: « + wean 2 & wane 2 & eevwe 202
Additional functions................. 202
Satellite map.......... cc cece 204
Electric:range sass s x meas 5 ¢ cues ¥ ¢ mes 204
Mapruipdates. 2 caus + x res ao nenene 2 9 one 204
Traffic information...............0005 206
Options and settings................. 207
Troubleshooting wisi. cs vere ewer sv ere 209
RaGIO:: » acs ¢ = seen ¢ » ees y ¢ eS EE eee 210
Opening theradio'. « sas a 6 ssn s & sess 210
Radio functions..............0000005 211
Options and settings................. 215
Troubleshooting sis «6 ween oo wane 6 + eae 216
Media................. 0 eee eee eee 217
General information................. 217:
SD card reader.............-00000005 217
DVD drive... 2. . eee ee eee 217
Bluetooth audio player............... 218
Online media.......... ee eee eee eee 219
Amazon Alexa....... 0.00.0 ee eee eae 220
Multimedia connections.............. 220
Page 6 of 310
Table of contents
Playing medias. « ssiie vo sence yo weve » 6 ene 221
Options and settings..............0.. 225
Supported media and file formats...... 227
Troubleshooting wwii «s wwine ev eee ae eae 228
Audi smartphone interface...... 229
SOtUP 8 wceow oo anew 3 wai oo nae @ ¥ ORI 6 229
TrOUBLESHOOEING weiner sv ermcnve » 1 eretane ww wenn 230
Additional settings.............. 231,
SyStem/Setings'. « « scare © « sosnore w 2 eee ¥ 6 231
Connected devices................--- 232
Legalinformation................... 233
Maintenance and Care........... 235
Checking and Filling............. 235
Motorcompartmentss wisi ss wessa ee concn 235
Cooling systeM....... 2... eee eee eee 237
Brake fluid: « « sacs = seems sy eees oy cee 239
Electrical-system ies <2 eswa s 6 ese es een 239
Battery. ........ 0.0... cee ee 240
Windshield washer system...........- 241
Service interval display............... 242
Wheels .......... 00... 243
Wheels and Tires « us ss ewe ss un ga 243
Tire pressure monitoring system....... 260
Care and cleaning................ 263
General information................. 263
Car washes ........ 0... e eee 263
Cleaning and care information......... 264
Taking your vehicle out of service....... 268
Do: It YOUFSELF cas « ations ¢ ean ss eee 269
Emergency assistance........... 269
General information 0... ccc ees 269
Equipment..................0.00005 269
Tire mobility Kit os ss ceca se eee + cers 269
Changingatire..................000. 271
Collapsible spare tire................. 275
JUMP Starting « sows ss vers & o cows + & sees 276
TOWING) cnasers © « sonsene % 5 anssaas 6 # sacuins & # simare 276
Fuses and bulbs.................. 279
FUSES sacs vo cscs x a eros we ena Woo cae woe 279
Bulbs... 2. eee eee ee 282
Customer information........... 283
Data privacy..................000. 283
Image recording............seeeeeees 283
Datamemoniesy. « s sscams sv sume ov ene a 0s 283
Transmitted information.............. 284
Accessories and technical
CHANGES... 1... eee eee eee 286
Warranty......... 00-000. e eee eee 286
Audi Literature Shop..............00. 286
Driving in other countries............. 286
Maintenance, repairs, and technical
MOGIFIcAatIONS vase x x mem = x saw x 2 sue 286
Accessories and parts................ 288
Reporting Safety Defects.............. 288
Declaration of compliance for
telecommunications equipment and
electronic systems............---0000- 289
Technical data..................8. 291
Identification data................00. 291
Vehicle dataiscs: = s xews 2s eens sp oes ye 291
Index... 0.2... eee 293
Page 9 of 310
4KE012721BB
Quick access
Cup Holders: « sesccces < ence wo esenene 75
— Audi phone box ............... 171
— Starting the motor when there is
@ MMALRUNCHION: ¢ « sais 9 v nara x 2 ae 87
Socket ........00002 cece ee eee 75
@ Electromechanical parking brake
button ....... 0... 0c eee 93
@0 Selector lever ................. 88
@) [START STOP] button ............ 86
@) Steering wheel adjustment ...... 59
@3) Lever for:
— Cruise control system ......... 134
— Adaptive cruise assist .......... 139
@ Data link connector for On Board
Diagnostic System (OBD) ........ 283
@3) Hood release ................-. 236
@8 Memory function buttons ........ 63
@) Buttons for:
—Lights ...............2..000. 44
—All-weather lights ............ 44
— Rear fog lights ............... 44
Luggage compartment lid button . 35
@9) Exterior mirror adjustment ...... 48
G9 Buttons for:
— Power windows .............. 39
— Child safety lock .............. 39
@ Tips
Some the equipment listed here is only instal-
led in certain models or is available as an op-
tion.
Indicator lights overview
The indicator lights in the instrument cluster
blink or turn on. They indicate functions or mal-
functions.
With some indicator lights, messages may ap-
pear and warning signals may sound. The indica-
tor lights and messages may be covered by other
displays. To show them again, select the second
tab for messages with the multifunction steering
wheel © page 12.
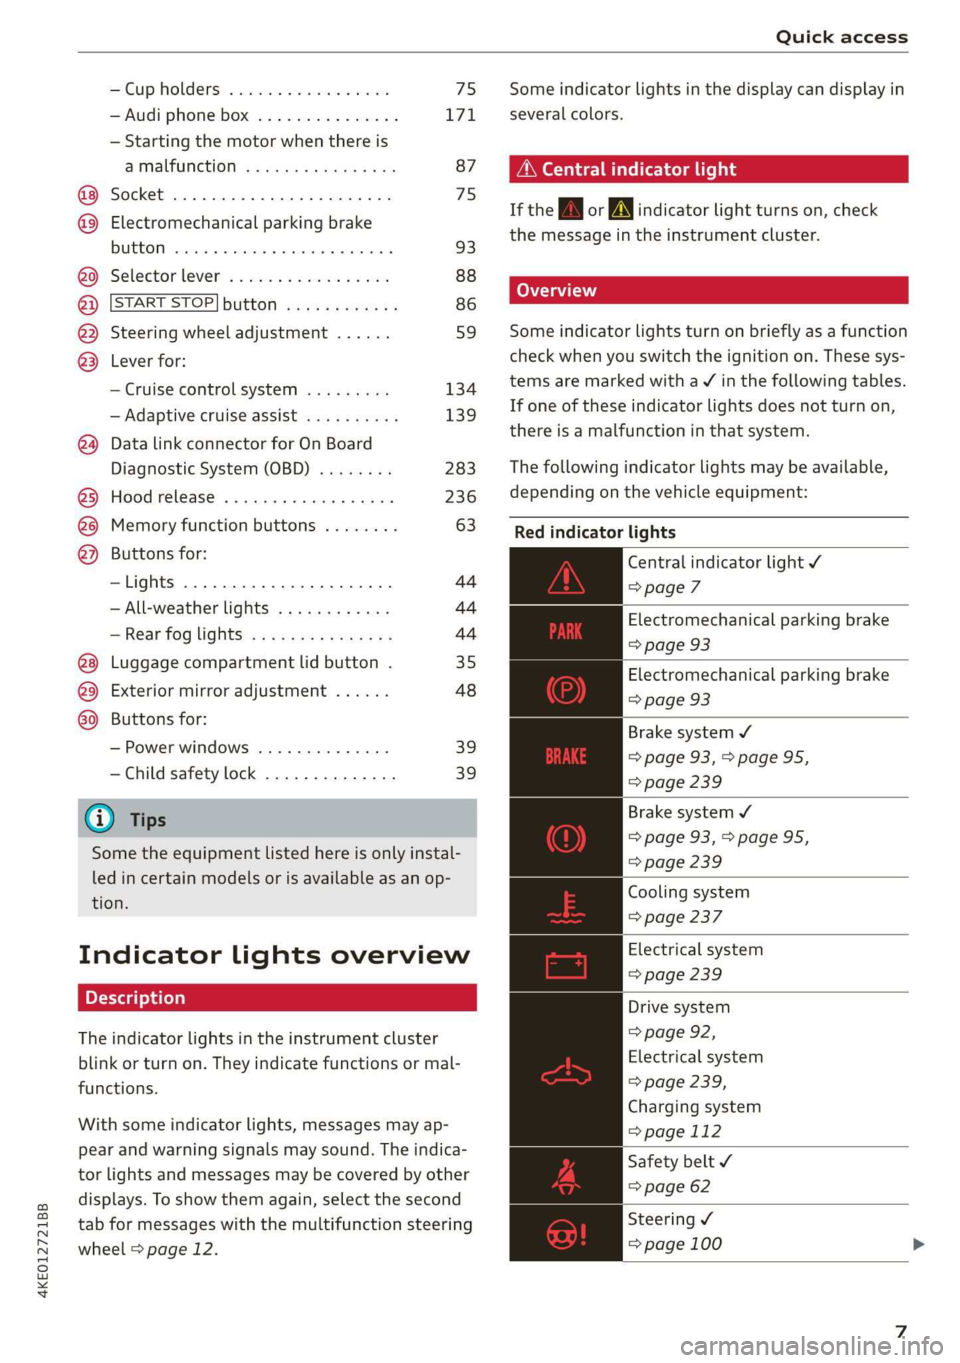
Some indicator lights in the display can display in
several colors.
A\ Central indicator light
If the wA or indicator light turns on, check
the message in the instrument cluster.
Some indicator lights turn on briefly as a function
check when you switch the ignition on. These sys-
tems are marked with a V in the following tables.
If one of these indicator lights does not turn on,
there is a malfunction in that system.
The following indicator lights may be available,
depending on the vehicle equipment:
Red indicator lights
Central indicator light ¥
=> page 7
Electromechanical parking brake
=> page 93
Electromechanical parking brake
=> page 93
Brake system ¥
=> page 93, > page 95,
=> page 239
Brake system 4
=> page 93,>page 95,
=> page 239
Cooling system
=> page 237
Electrical system
=> page 239
Drive system
=> page 92,
Electrical system
=> page 239,
Charging system
=>page 112
Safety belt
=> page 62
Steering ¥
=> page 100
Page 21 of 310
4KE012721BB
Touch displays
Configuring quick access
> Press and hold a button on the home screen
display area or in the quick access bar.
> To move a button to the quick access bar, pull it
from the display area to the quick access bar.
> To adjust the placement of the buttons in the
quick access bar, pull them to the desired posi-
tion in the bar.
G) Tips
The position of © cannot be adjusted.
Display area
You can freely change the location of the buttons
on the home screen display area.
Configuring the display area
> Press and hold a button on the home screen
display area.
> To adjust the placement of the buttons, pull
them to the desired locations.
Switching between menu pages
If a menu contains multiple menu pages, febatd iS
displayed in the display area. The white bar
shows the location of the current menu page.
> To switch between menu pages, swipe your fin-
ger to the right or left.
Off Of o8
Om of am
Of of of
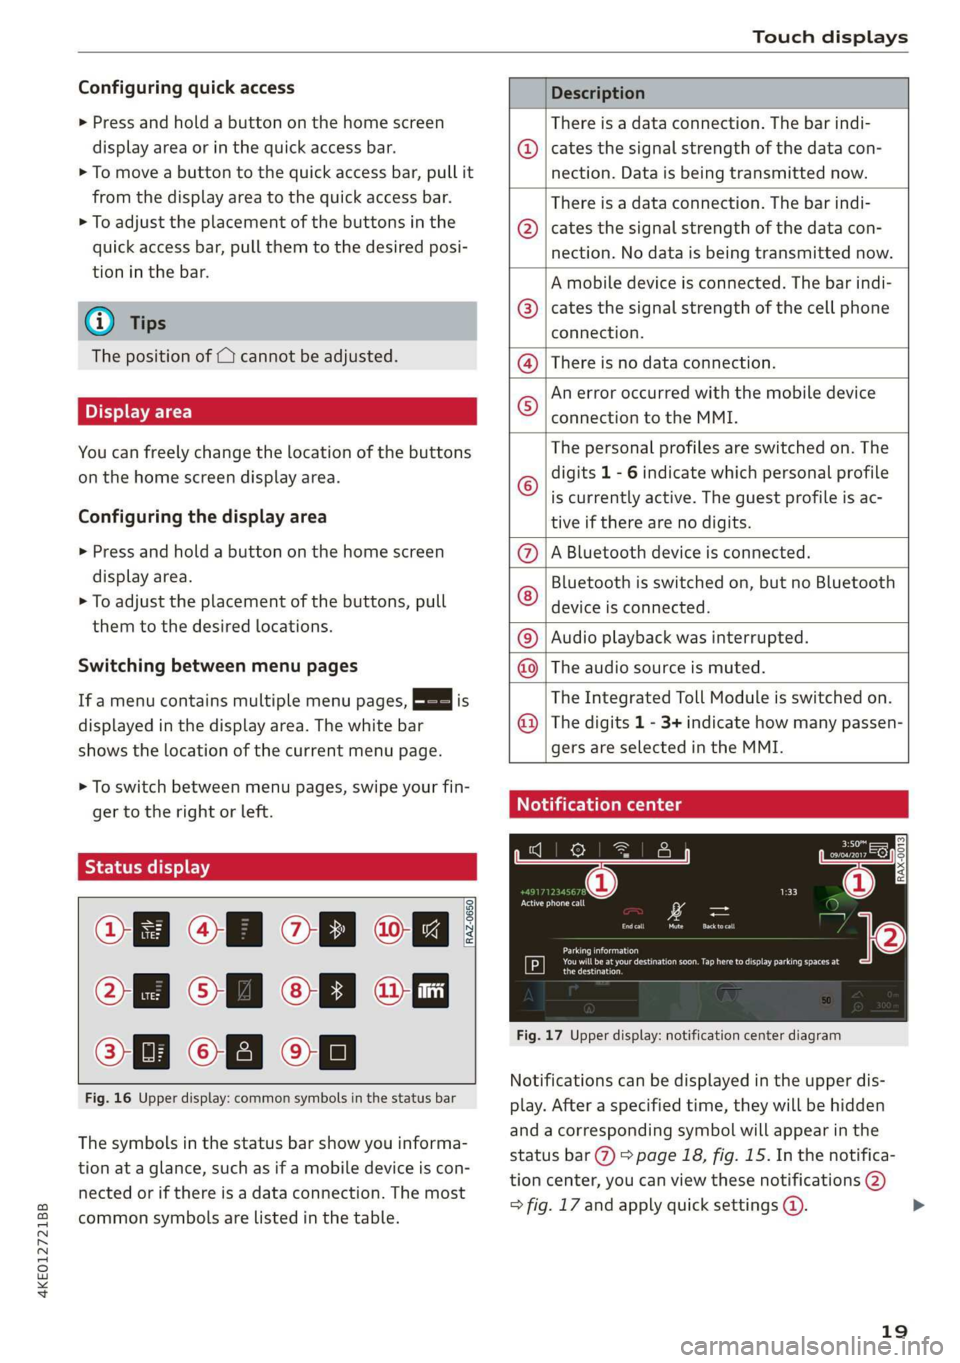
Fig. 16 Upper display: common symbols in the status bar
RAZ-0650
The symbols in the status bar show you informa-
tion at a glance, such as if a mobile device is con-
nected or if there is a data connection. The most
common symbols are listed in the table.
Description
There is a data connection. The bar indi-
@ | cates the signal strength of the data con-
nection. Data is being transmitted now.
There is a data connection. The bar indi-
@ | cates the signal strength of the data con-
nection. No data is being transmitted now.
A mobile device is connected. The bar indi-
@® | cates the signal strength of the cell phone
connection.
There is no data connection. ®
An error occurred with the mobile device
connection to the MMI. ©
The personal profiles are switched on. The
digits 1 - 6 indicate which personal profile
is currently active. The guest profile is ac-
tive if there are no digits.
A Bluetooth device is connected.
Bluetooth is switched on, but no Bluetooth
device is connected.
®©®
Ee
©
Audio playback was interrupted.
The audio source is muted.
The Integrated Toll Module is switched on.
The digits 1 - 3+ indicate how many passen-
®
|O|©
gers are selected in the MMI.
Celtic Leos
EI som
Cr
RAX-0013
Oe
Cruel
rs = =
Cee)
Tr SRS aC Looe Cece g
the destination.
Fig. 17 Upper display: notification center diagram
Notifications can be displayed in the upper dis-
play. After a specified time, they will be hidden
and a corresponding symbol will appear in the
status bar @) > page 18, fig. 15. In the notifica-
tion center, you can view these notifications @)
> fig. 17 and apply quick settings @.
19
>
Page 22 of 310
![AUDI E-TRON 2019 Owners Manual Touch displays
Using the notification center
> To open the notification center, pull the status
bar downward, or
>» Press the E=] button on the status bar.
> To apply quick settings, press th](/img/6/57624/w960_57624-21.png "AUDI E-TRON 2019 Owners Manual Touch displays
Using the notification center
> To open the notification center, pull the status
bar downward, or
>» Press the E=] button on the status bar.
> To apply quick settings, press th")
Touch displays
Using the notification center
> To open the notification center, pull the status
bar downward, or
>» Press the E=] button on the status bar.
> To apply quick settings, press the respective
symbol @).
> To obtain additional information about a notifi-
cation, press it.
> To delete a notification, pull it toward the right
edge of the screen.
> If there are more than four notifications in the
notification center, the older notifications will
be hidden. To display the older notifications,
drag your finger upward on the screen.
Setting displayed content
You can set whether some notifications should be
displayed.
> To set the displayed content, press @, or
> Applies to MMI: Select on the home screen:
SETTINGS > Notifications.
> Select and confirm which notifications should
be displayed.
Possible quick settings
Description
Apply sound settings
Open menu settings
Manage connected devices
Manage personal profiles
Set date and time
Set displayed content in the noti-
fication center
Depending on the vehicle equipment, you can op-
erate various functions in the function bar.
Description
Switch hill descent assist on or off
Opens the garage door opener
function
20
Symbol Description
Press: shows settings for the
ae head-up display
Press and hold: switches the
head-up display on or off
Press: switches the upper display
on or off
Press and hold: switches both dis-
plays on or off
Shortcuts
By creating shortcuts, you have quick access to
various items, such as radio stations, frequently
used contacts, or vehicle settings.
Adding shortcuts
The «+» buttons in the upper display indicate, for
example, if a selected radio station can be added
to the shortcuts. Depending on the context, you
may also be able to add items from a list to the
shortcuts.
> Press +++ or press and hold an item ina list.
>» Press Save as a shortcut. The selected item will
be added to the shortcuts on the lower display
and displayed as a tile.
Using shortcuts
> Press the aat (4) > page 18, fig. 15 button in the
function bar on the lower screen. The saved
shortcuts will be displayed or hidden.
> To access the stored function, press the respec-
tive tile.
Moving or deleting shortcuts
> Press and hold a shortcut on the lower display.
> To adjust the order of the shortcuts, drag a
shortcut to the desired location.
> To delete a shortcut, press ®.
Page 26 of 310
Voice recognition system
Voice recognition system
General information
Applies to: vehicles with voice recognition system
You can operate many functions in the vehicle
easily using voice commands.
Using the voice recognition system optimally
> Speak clearly and distinctly at a normal volume.
Speak louder when driving faster.
> Emphasize the words in the commands evenly
and do not leave long pauses.
> Close the doors, the windows, and the sunroof*
to reduce background noise. Make sure that
passengers are not speaking when you are giv-
ing a voice command.
> Do not direct the vents toward the hands-free
microphone, which is in the roof headliner near
the front interior lights.
> Only the driver should speak to the system, be-
cause the handsfree microphone is aimed to-
ward this seating position.
ZA\ WARNING
— Direct your full attention to driving. As the
driver, you have complete responsibility for
safety in traffic. Only use the functions in
such a way that you always maintain com-
plete control over your vehicle in all traffic
situations.
— Do not use the voice recognition system in
emergencies because your voice may change
in stressful situations. The system may take
longer to dial the number or may not be
able to dial it at all. Dial the emergency
number manually.
G) Tips
There are no voice guidance* prompts when a
dialog is active.
24
Operating
Applies to: vehicles with voice recognition system
See
Dat)
Where is a
Connect
Diala
coy
Es
ea
cog
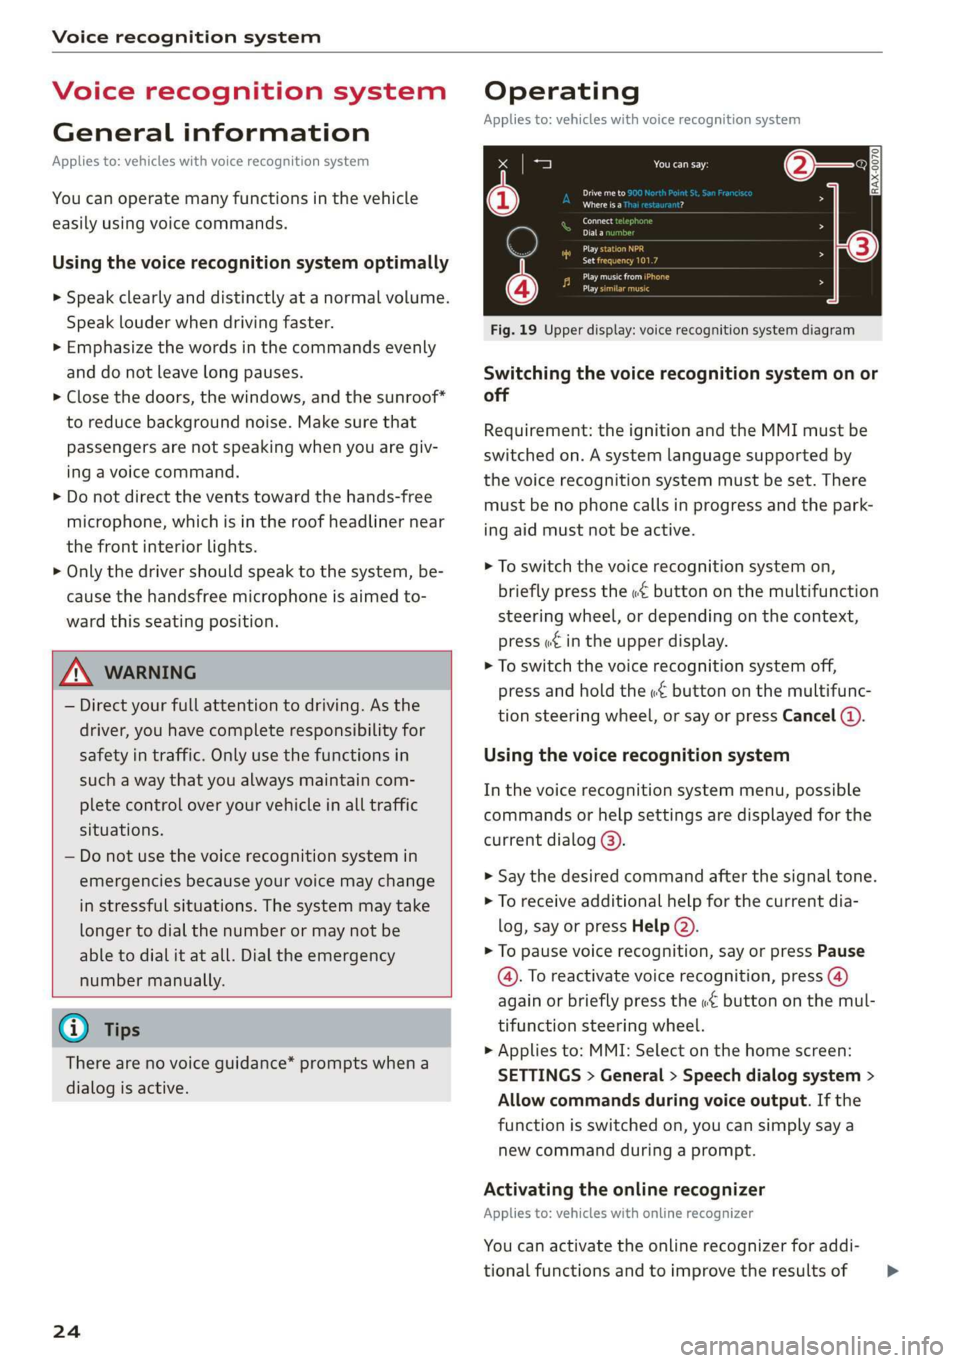
Fig. 19 Upper display: voice recognition system diagram
Switching the voice recognition system on or
off
Requirement: the ignition and the MMI must be
switched on. A system language supported by
the voice recognition system must be set. There
must be no phone calls in progress and the park-
ing aid must not be active.
> To switch the voice recognition system on,
briefly press the «€ button on the multifunction
steering wheel, or depending on the context,
press we in the upper display.
> To switch the voice recognition system off,
press and hold the « button on the multifunc-
tion steering wheel, or say or press Cancel (4).
Using the voice recognition system
In the voice recognition system menu, possible
commands or help settings are displayed for the
current dialog @).
> Say the desired command after the signal tone.
> To receive additional help for the current dia-
log, say or press Help (2).
> To pause voice recognition, say or press Pause
@. To reactivate voice recognition, press (@)
again or briefly press the «€ button on the mul-
tifunction steering wheel.
> Applies to: MMI: Select on the home screen:
SETTINGS > General > Speech dialog system >
Allow commands during voice output. If the
function is switched on, you can simply say a
new command during a prompt.
Activating the online recognizer
Applies to: vehicles with online recognizer
You can activate the online recognizer for addi-
tional functions and to improve the results of >
Page 27 of 310
4KE012721BB
Voice recognition system
voice recognition. A supported menu language
must be selected. When there is an active Inter-
net connection, the spoken command is evaluat-
ed in the vehicle and online.
> When you switch on the voice recognition sys-
tem for the first time, a menu for the online
recognizer opens. Or:
> Applies to: MMI: Select on the home screen:
SETTINGS > General > Speech dialog system >
Consent to speech dialog system online recog-
nizer.
> Read the licensing agreements and accept
them.
Activating Amazon Alexa!)2)
Applies to: vehicles with Amazon Alexa Integration
You can activate Amazon Alexa to access special
additional functions. A supported menu lan-
guage must be selected. A reduced number of
commands are available during this.
Requirement: you must be logged in to your
myAudi account in the vehicle.
> Applies to: MMI: Select on the home screen:
USER > Connect to Amazon Alexa.
> Follow the instructions in the display.
> After connecting successfully, turn on the voice
recognition system as normal > page 24,
Switching the voice recognition system on or
off, say the activation word “Alexa”, and then
say the desired command.
©) Note
Read the information about Audi connect, and
be sure to note the connectivity costs section
=@ in General information on page 184.
External voice operation
Applies to: vehicles with external speech dialog system
You can access and control the voice operation on
a connected mobile device through your vehicle.
2) AUDI AG provides access to services from third party pro-
viders. Permanent availability cannot be guaranteed, be-
cause that depends on the third party provider.
2) In preparation at the time of printing.
Switching external voice operation on or off
Requirement: the ignition and the MMI must be
switched on. A cell phone must be connected to
the MMI with the Handsfree profile > page 170.
The mobile device being connected must have
voice control that can be controlled externally.
There must be no phone calls in progress and the
parking aid must not be active.
> To switch on the external voice operation, press
and hold the «€ button longer on the multifunc-
tion steering wheel.
> To switch off the external voice operation, press
and hold the «€ button longer on the multifunc-
tion steering wheel or press Cancel.
Using external voice operation
> Say the desired command after the signal tone.
> To reactivate voice recognition when it is
paused, press the «¢ button briefly on the mul-
tifunction steering wheel or press Resume.
G@) Tips
AUDI AG simply provides access to control
your mobile device with voice operation and
does not assume any responsibility for the
content and commands within the external
voice control.
25
Page 30 of 310
Personalization
myAudi in the vehicle. Follow the system in-
structions and save your desired personal pro-
file. You will then always be logged in automat-
ically when your personal profile is active.
— Bluetooth device 1/Bluetooth device 2*: Re-
quirement: after a Bluetooth device has been
paired with the MMI, you must be logged in to
myAudi in the vehicle. Follow the system in-
structions and save the desired Bluetooth de-
vice. You will be automatically logged in when
your Bluetooth device is connected to the MMI,
and automatically logged out when the Blue-
tooth connection to your mobile device is dis-
connected.
To transfer existing destinations from the MMI to
your myAudi account one time, confirm the sys-
tem prompts with Yes.
@) Tips
— For some Audi connect Infotainment serv-
ices, you may also have to enter your myAu-
di access information when accessing serv-
ices in the MMI.
— Regardless of the key user and additional
users, you can only connect one myAudi ac-
count to your vehicle.
eee
Applies to: vehicles with user management
The vehicle owner must be set up as the key user
for some Audi connect vehicle control services,
which depend on the vehicle equipment.
Setting the key user
Requirement: a key user must not be set yet.
> To set a key user for the vehicle, you will need a
myAudi account. Register at my.audi.com.
>» Add your vehicle at my.audi.com and then veri-
fy your myAudi account directly.
> You can also verify your myAudi account later.
Log in at my.audi.com with your access infor-
mation and verify your myAudi account using
the verification process that is provided.
> Applies to MMI: Select on the home screen:
USER > User management > (Key user) > Set
key user.
238
> Applies to: MMI: Follow the system instructions
and enter the 10-digit vehicle code > page 33.
The key user is set. You have the rights to use
the Audi connect vehicle control services
= page 186 that depend on vehicle equipment
as well as the ability to manage other vehicle
functions and any other users.
Managing additional users
Depending on the vehicle equipment, you can
grant authorization for additional users to use
Audi connect vehicle control services at my.audi.
com.
Removing the key user
If you remove the key user, all other users and
their authorizations will be deleted. It will no
longer be possible to use the Audi connect vehi-
cle control services, depending on the vehicle
equipment.
Requirement: a key user must be set.
> Applies to: MMI: Select on the home screen:
USER > User management > (Key user) > Re-
move key user.
G) Tips
— Depending on the vehicle equipment, you
may be able to reset specific functions to
the factory default settings.
— Depending on the vehicle equipment, log-
ging into myAudi in the vehicle may not be
required to use Audi connect vehicle control
services.
—If you sell your vehicle, remove the key user
and reset all settings to the factory set-
tings.
— Store the vehicle code in a secure place. It
may be necessary to re-enter the vehicle
code.
— Pay attention to upper- and lower-case let-
ters when entering the vehicle code.
— If you do not have the 10-digit vehicle code,
contact an authorized Audi dealer or author-
ized Audi Service Facility.
Page 35 of 310
4KE012721BB
Opening and closing
difficult for emergency workers to enter the
vehicle, which puts lives at risk.
Keys
LET
RAZ-0021
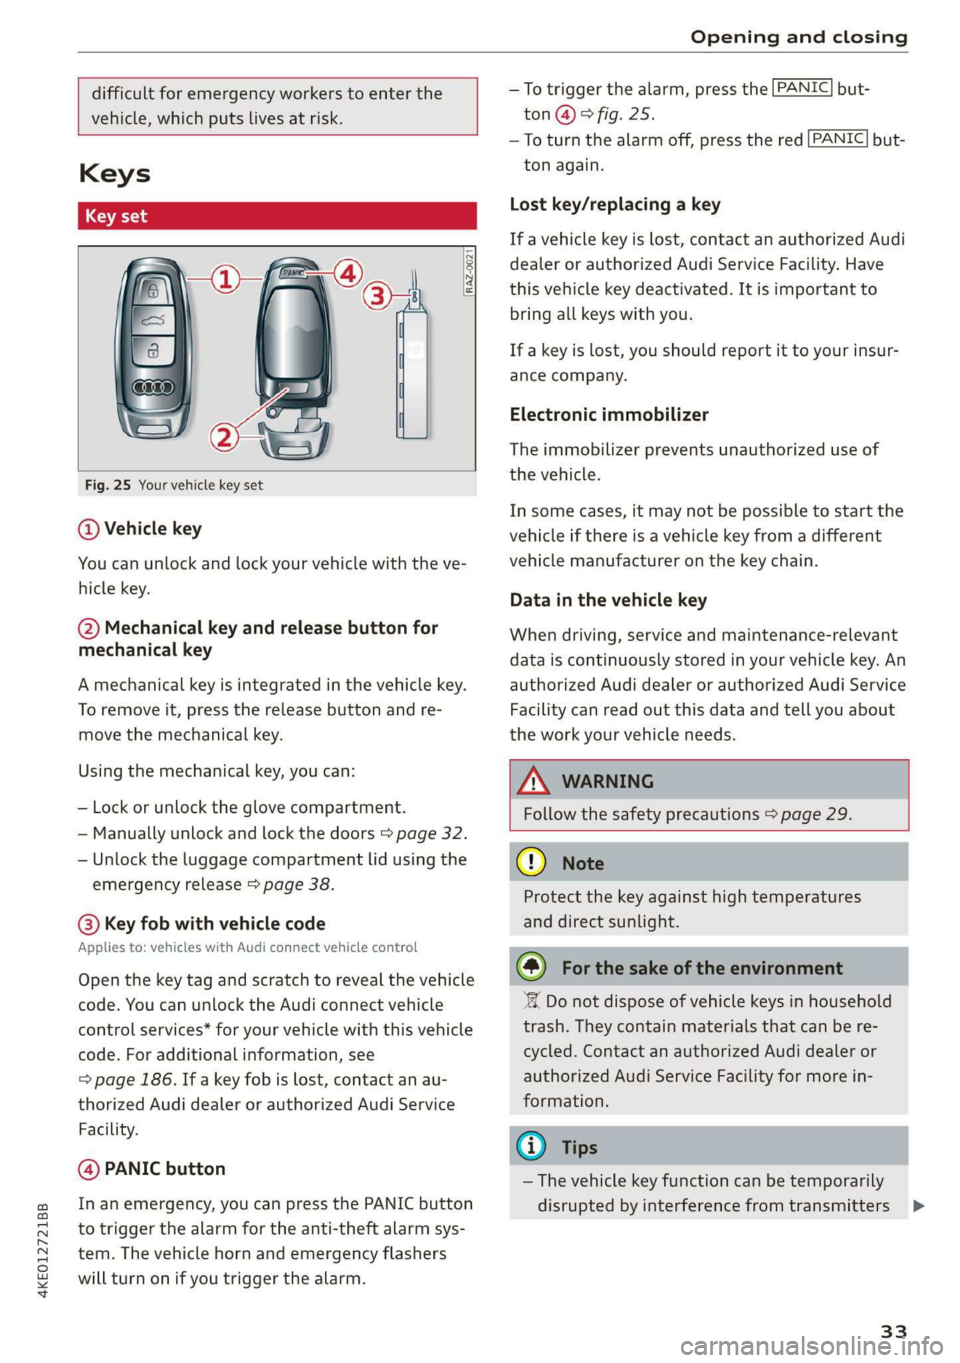
Fig. 25 Your vehicle key set
@ Vehicle key
You can unlock and lock your vehicle with the ve-
hicle key.
@ Mechanical key and release button for
mechanical key
A mechanical key is integrated in the vehicle key.
To remove it, press the release button and re-
move the mechanical key.
Using the mechanical key, you can:
— Lock or unlock the glove compartment.
— Manually unlock and lock the doors > page 32.
— Unlock the luggage compartment lid using the
emergency release > page 38.
@® Key fob with vehicle code
Applies to: vehicles with Audi connect vehicle control
Open the key tag and scratch to reveal the vehicle
code. You can unlock the Audi connect vehicle
control services* for your vehicle with this vehicle
code. For additional information, see
=> page 186. If a key fob is lost, contact an au-
thorized Audi dealer or authorized Audi Service
Facility.
@ PANIC button
In an emergency, you can press the PANIC button
to trigger the alarm for the anti-theft alarm sys-
tem. The vehicle horn and emergency flashers
will turn on if you trigger the alarm.
—To trigger the alarm, press the [PANIC] but-
ton @) © fig. 25.
—To turn the alarm off, press the red
ton again.
PANIC] but-
Lost key/replacing a key
If a vehicle key is lost, contact an authorized Audi
dealer or authorized Audi Service Facility. Have
this vehicle key deactivated. It is important to
bring all keys with you.
If a key is lost, you should report it to your insur-
ance company.
Electronic immobilizer
The immobilizer prevents unauthorized use of
the vehicle.
In some cases, it may not be possible to start the
vehicle if there is a vehicle key from a different
vehicle manufacturer on the key chain.
Data in the vehicle key
When driving, service and maintenance-relevant
data is continuously stored in your vehicle key. An
authorized Audi dealer or authorized Audi Service
Facility can read out this data and tell you about
the work your vehicle needs.
Z\ WARNING
Follow the safety precautions > page 29.
@® Note
Protect the key against high temperatures
and direct sunlight.
(@) For the sake of the environment
X Do not dispose of vehicle keys in household
trash. They contain materials that can be re-
cycled. Contact an authorized Audi dealer or
authorized Audi Service Facility for more in-
formation.
@) Tips
— The vehicle key function can be temporarily
disrupted by interference from transmitters
33
>
Page 63 of 310
4KE012721BB
Sitting correctly and safely
that are seated in a child safety seat that is
appropriate for their weight and age and
that is secured with a safety belt.
In the event of a collision, vehicle occupants
that are not wearing safety belts could be
propelled through the vehicle interior and
collide with vehicle components, such as the
steering wheel, instrument panel, wind-
shield, or doors. In some situations, vehicle
occupants could also be ejected from the ve-
hicle. Vehicle occupants in the rear seats
who do not wear safety belts not only en-
danger themselves, but also other people in
the vehicle.
Only one person may be fastened with a
safety belt at a time. Never secure more
than one person, including children, with a
single safety belt.
Never allow children or infants to ride on an-
other person's lap and be belted into the
safety belt with them.
Insert the belt buckle only in the belt latch
belonging to the corresponding seat, so that
the protective function is not impaired.
To ensure the maximum protective function
of the safety belts, all vehicle passengers
must sit in the correct seating position
=> page 56.
Check the condition of your vehicle’s safety
belts regularly. If you find damage to the
belt webbing, the belt connections, the re-
tractor, or the buckle, have the damaged
safety belt replaced by an authorized Audi
dealer or authorized Audi Service Facility.
The safety belts must not be removed or
modified in any way. Do not attempt to re-
pair the safety belts yourself.
Safety belts that are strained during an acci-
dent, and thus stretched, must be replaced
by an authorized Audi dealer or authorized
Audi Service Facility.
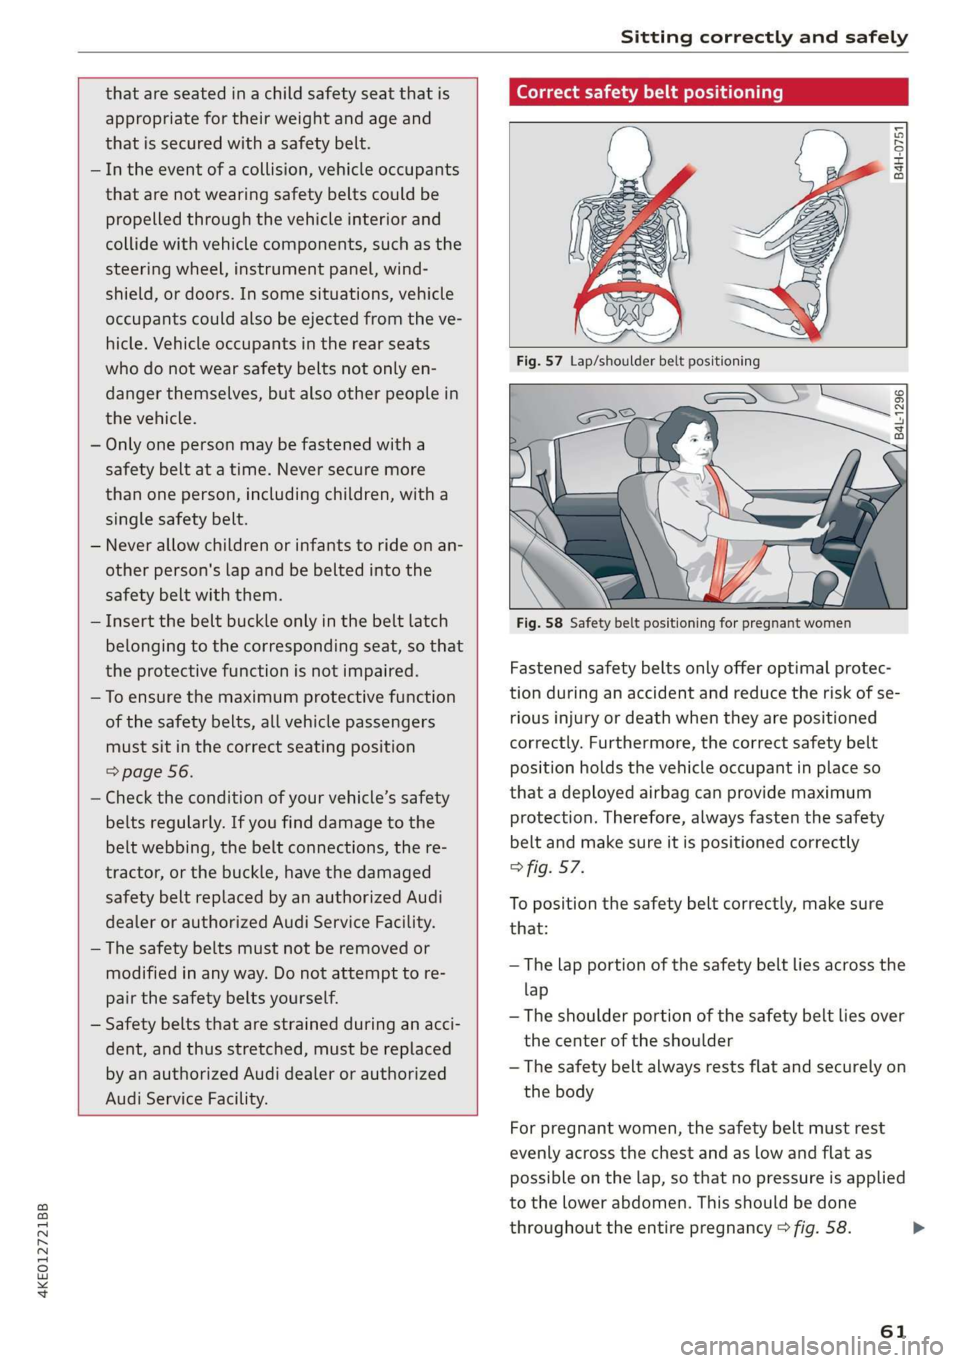
Correct safety belt positioning
B4H-0751
Fig. 58 Safety belt positioning for pregnant women
:
B4L-1296
Fastened safety belts only offer optimal protec-
tion during an accident and reduce the risk of se-
rious injury or death when they are positioned
correctly. Furthermore, the correct safety belt
position holds the vehicle occupant in place so
that a deployed airbag can provide maximum
protection. Therefore, always fasten the safety
belt and make sure it is positioned correctly
> fig. 57.
To position the safety belt correctly, make sure
that:
— The lap portion of the safety belt lies across the
lap
—The shoulder portion of the safety belt lies over
the center of the shoulder
— The safety belt always rests flat and securely on
the body
For pregnant women, the safety belt must rest
evenly across the chest and as low and flat as
possible on the lap, so that no pressure is applied
to the lower abdomen. This should be done
throughout the entire pregnancy > fig. 58.
61
>