roof AUDI E-TRON 2019 Owners Manual
[x] Cancel search | Manufacturer: AUDI, Model Year: 2019, Model line: E-TRON, Model: AUDI E-TRON 2019Pages: 310, PDF Size: 81.91 MB
Page 4 of 310
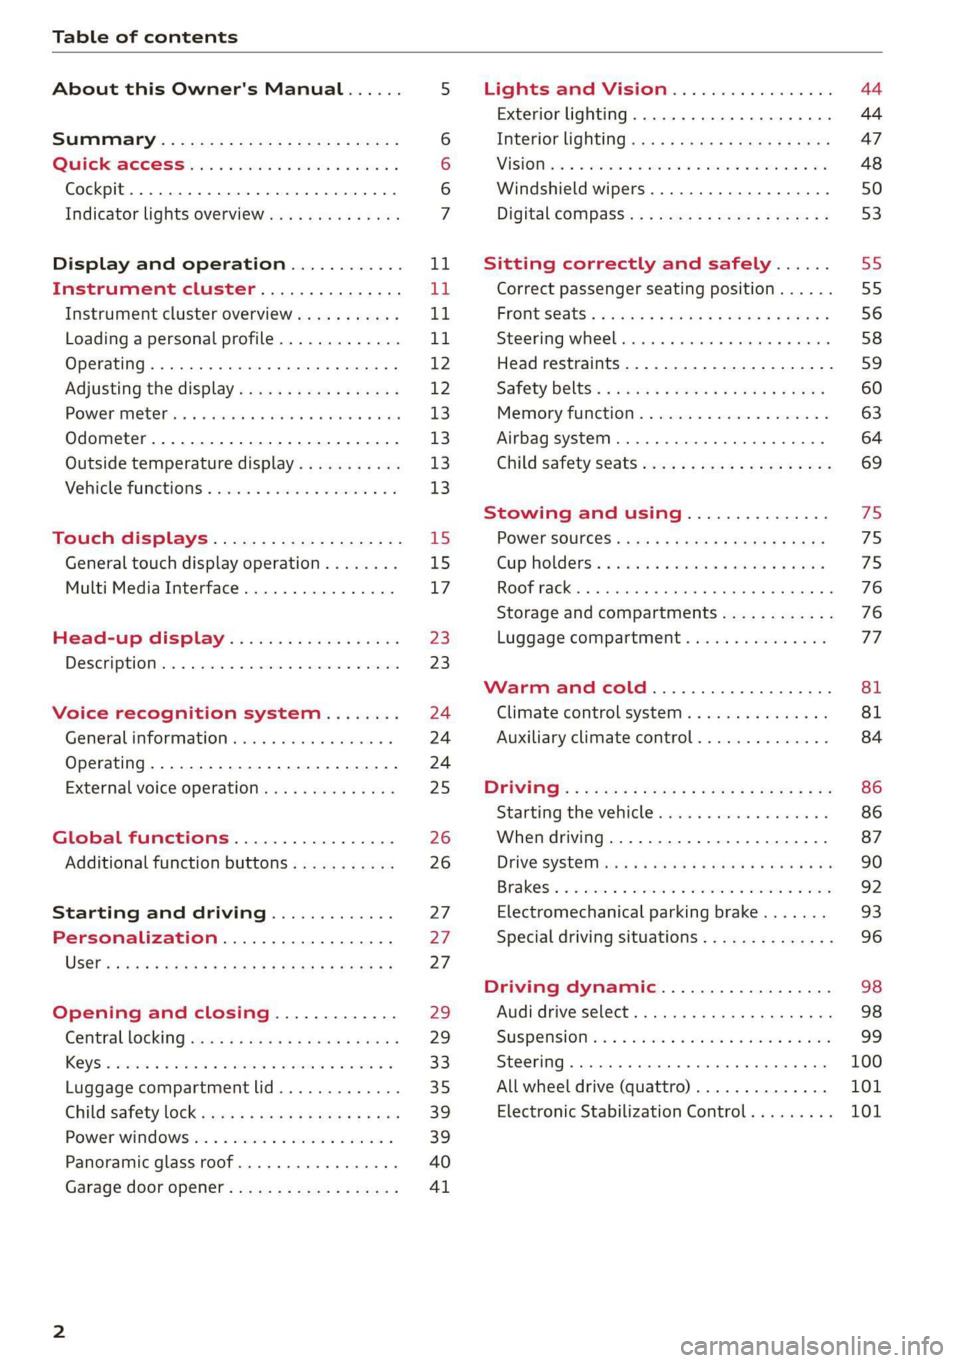
Table of contents
About this Owner's Manual......
SUMIMALY: ; « ss6% : osen ss sean cs poe s
QC CCeS Skis: si esis a 6 ores os ewe
Cockpit... 2... ee eee eee eee
Indicator lights overview...........0.
Display and operation............
Instrument cluster...............
Instrument cluster overview...........
Loading a personal profile.............
Operating. ........ 20.00. cece eee eee
Adjusting the display.................
POWORIMELCP ois 6 «. sxwwsne v6 snares « a: sauers « rns
Odometer............ 0. cee eee eee eee
Outside temperature display...........
Vehicle functions « se-0 2. ese ve eee ees
Touch displays....................
General touch display operation........
Multi Media Interface................
Head-up display..................
DESCHIPELOIN:. 6 & averse « a emennne «2 aoetine % » oxemene
Voice recognition system........
General information wo. cee. eco es
Operating..................0..0000.
External voice operation..............
Global functions.................
Additional function buttons...........
Starting and driving.............
Personalization..................
Opening and closing.............
Centrallocking quae « x saws < # ame x Rae 3
KRY S « sscesws wv o swasaus va aecuns w stuns wv esi
Luggage compartment lid.............
Childsatety lock sms ¢ ¢ sees so cen a ees
Power windows ...........--000-e0 00
Panoramic glass roof...............4.
Garage door opener..............00..
NOD
OO
15 15
17
23
23
24 24 24
25
26
26
27 27 27
29)
29
33 35
39 39
40
Al
Lights and Vision................. 44
Exterior lighting. ...............000ee 44
Interior lightinGisws « 2 wove + ¢ wees os ewe 47
ViSIOM iss +o sea « 5 wore oo semen W armen © oi 48
Windshield wipers................45- 50
Digital compass: s : sees s sees sz wees se 53
Sitting correctly and safely...... 55
Correct passenger seating position...... 55
FrOnUSCAUS: « warns s x moves 6 2 KaeER § MEER 3 56
Steering wheel. ........... 00. - ee eee 58
Head restraints...................00. 59
Safety belts:: ¢ excess meas os eee ae ee 60
Memory function..............-.000- 63
Airbag system ..... 2... eee eee ee 64
Child safety seats................004. 69
Stowing and using............... 75
POWEF SOURCES sans « 3 some ao meas sf eo 75
Gup holders. «sass. + «snes sv somwaee + = comers 75
Roof rack... 6.66. eee eee ee eee eee eee 76
Storage and compartments............ 76
Luggage compartment............... 77
Warm and cold................... 81
Climate control system............... 81
Auxiliary climate control.............. 84
DFIVITIG:: © nce c 5 qome 5 s eee go Be ge ws 86
Starting the vehicle ............0eeeee 86
When driving...............02--000- 87
Drive SYSt@M avis ss exes sv wees oe tees cee 90
Brakests « «: axsvsic w seaweas ww suciawe oo swounee wo ewtea 92
Electromechanical parking brake....... 93
Special driving situations.............. 96
Driving dynamic.................. 98
Audi drive'Select, .c.icisieei cance ene 98
SUSPONS(OM ies 5 o see so coe 5 w seem 9 oes 99
Steering... ..... cece eee ee eee ee 100
All wheel drive (quattro).............. 101
Electronic Stabilization Control......... 101
Page 26 of 310
Voice recognition system
Voice recognition system
General information
Applies to: vehicles with voice recognition system
You can operate many functions in the vehicle
easily using voice commands.
Using the voice recognition system optimally
> Speak clearly and distinctly at a normal volume.
Speak louder when driving faster.
> Emphasize the words in the commands evenly
and do not leave long pauses.
> Close the doors, the windows, and the sunroof*
to reduce background noise. Make sure that
passengers are not speaking when you are giv-
ing a voice command.
> Do not direct the vents toward the hands-free
microphone, which is in the roof headliner near
the front interior lights.
> Only the driver should speak to the system, be-
cause the handsfree microphone is aimed to-
ward this seating position.
ZA\ WARNING
— Direct your full attention to driving. As the
driver, you have complete responsibility for
safety in traffic. Only use the functions in
such a way that you always maintain com-
plete control over your vehicle in all traffic
situations.
— Do not use the voice recognition system in
emergencies because your voice may change
in stressful situations. The system may take
longer to dial the number or may not be
able to dial it at all. Dial the emergency
number manually.
G) Tips
There are no voice guidance* prompts when a
dialog is active.
24
Operating
Applies to: vehicles with voice recognition system
See
Dat)
Where is a
Connect
Diala
coy
Es
ea
cog
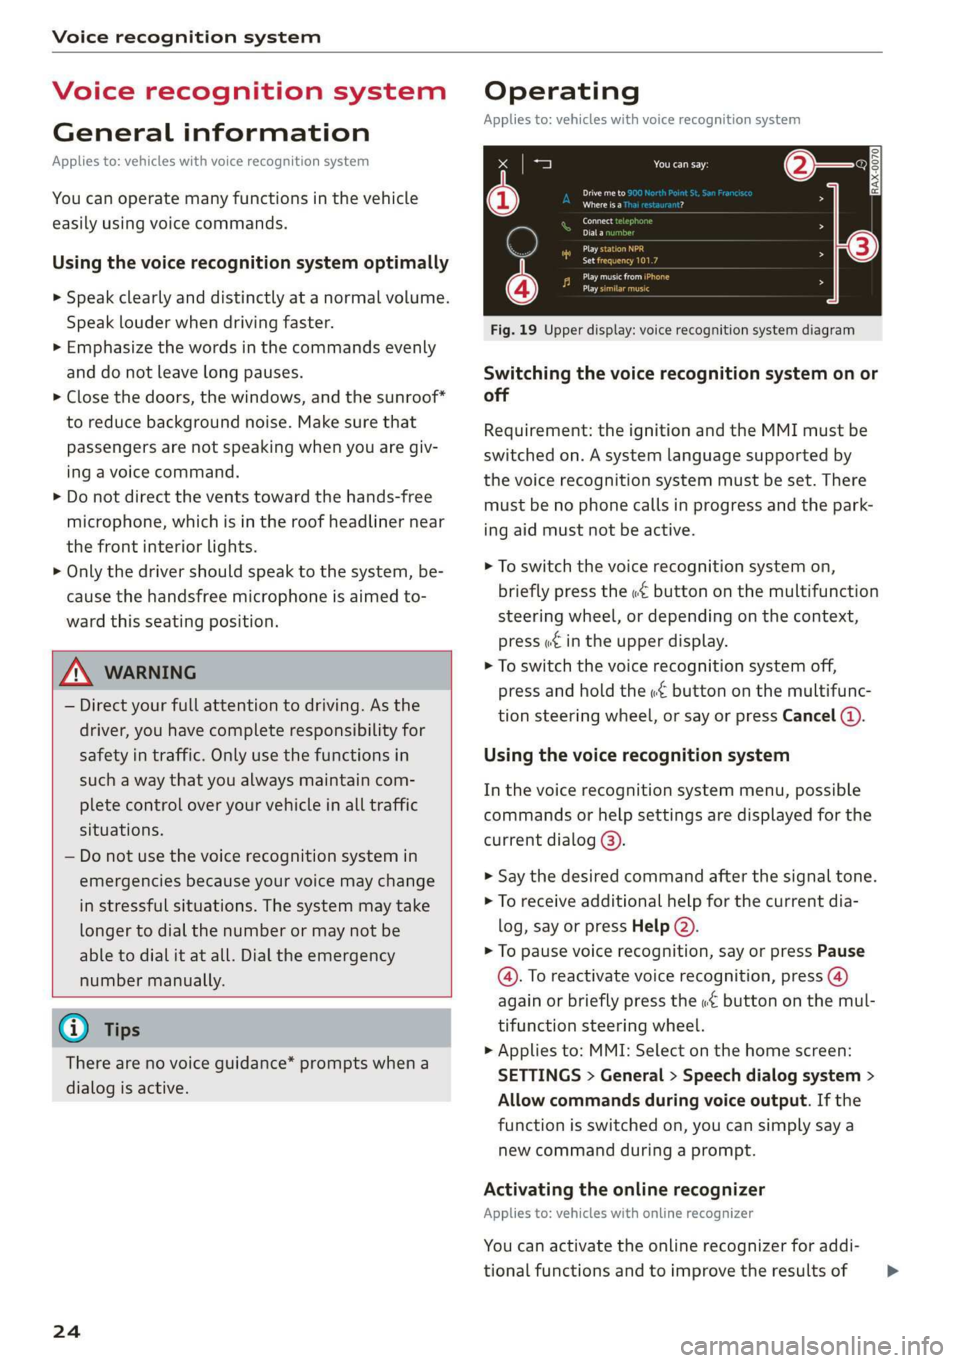
Fig. 19 Upper display: voice recognition system diagram
Switching the voice recognition system on or
off
Requirement: the ignition and the MMI must be
switched on. A system language supported by
the voice recognition system must be set. There
must be no phone calls in progress and the park-
ing aid must not be active.
> To switch the voice recognition system on,
briefly press the «€ button on the multifunction
steering wheel, or depending on the context,
press we in the upper display.
> To switch the voice recognition system off,
press and hold the « button on the multifunc-
tion steering wheel, or say or press Cancel (4).
Using the voice recognition system
In the voice recognition system menu, possible
commands or help settings are displayed for the
current dialog @).
> Say the desired command after the signal tone.
> To receive additional help for the current dia-
log, say or press Help (2).
> To pause voice recognition, say or press Pause
@. To reactivate voice recognition, press (@)
again or briefly press the «€ button on the mul-
tifunction steering wheel.
> Applies to: MMI: Select on the home screen:
SETTINGS > General > Speech dialog system >
Allow commands during voice output. If the
function is switched on, you can simply say a
new command during a prompt.
Activating the online recognizer
Applies to: vehicles with online recognizer
You can activate the online recognizer for addi-
tional functions and to improve the results of >
Page 32 of 310
Opening and closing
ZA WARNING
Follow the safety precautions > page 29.
Z\ WARNING
Applies to: vehicles with power closing
—To reduce the risk of injury, make sure that
the area where the door is closing is clear
during the closing process.
— The closing process can be stopped at any
time by pulling on the outer or inner door
handle.
@) Note
Applies to: vehicles with convenience key
— If the convenience key that was last used is
detected inside the passenger compart-
ment, then the vehicle cannot be locked
from the outside using the sensor. Take the
convenience key with you and lock the vehi-
cle again. Otherwise, the vehicle will not be
protected against unauthorized access.
— If you lock the vehicle using the button on
the vehicle key with the front passenger's
or rear door open while accidentally placing
the key in the passenger compartment and
closing the door, the vehicle will not lock.
The turn signals will flash several times to
indicate this. If you do not open the vehicle
within a short time to remove the vehicle
key, then the vehicle will lock automatically.
This prevents the vehicle from being left un-
locked for long periods of time. The key will
then be locked inside the vehicle.
— If the convenience key* that was used last is
detected inside the luggage compartment,
it will not be possible to lock the luggage
compartment and the luggage compart-
ment lid will open. The turn signals will
flash several times to indicate this. The
doors will lock. Always take the convenience
key with you, or unauthorized people may
be able to enter the vehicle.
@ Tips
— Do not leave valuables unattended in the ve-
hicle. A locked vehicle is not a safe!
30
— The LED in the driver's door rail blinks when
you lock the vehicle. If the LED lights up for
approximately 30 seconds after locking,
there is a malfunction in the central locking
system. Have the problem corrected by an
authorized Audi dealer or authorized Audi
Service Facility.
Setting the central locking system
You can adjust the central locking system to your
preferences. The settings depend on the vehicle
equipment.
> Applies to: MMI: Select on the home screen:
VEHICLE > Settings & Service > Central lock-
ing.
Door unlocking
—If you select All, all doors and the luggage
compartment lid will be unlocked when unlock-
ing.
— If you select Driver's door, only the driver's
door will be unlocked. To unlock all doors and
the luggage compartment lid, press the &@ but-
ton on the vehicle key twice. In vehicles with a
convenience key”, only the driver's door will un-
lock when you pull the driver's door handle. If
you pull another door handle, the entire vehicle
will be unlocked.
The entire vehicle will always be locked when you
press the & button.
Long press to open windows
You can select if all windows and the panoramic
glass roof* should open using the vehicle key
=> page 40, Convenience opening and closing. If
you press and hold the fj button on the vehicle
key, all of the windows and the panoramic glass
roof* will close.
Disable rear lid handle
You can select if the luggage compartment lid
can open with the handle. If you activate this
function, the luggage compartment lid can only
be opened with the <¥ or 4s button on the vehi-
cle key or in the driver's door. In vehicles with a
convenience key*, you can still open the luggage
compartment lid using the handle if an
Page 42 of 310
Opening and closing
> Release the switch and pull it up again for at
least one second.
Z\ WARNING
— Follow the safety precautions > page 29.
— Never close the windows carelessly or in an
uncontrolled manner, because this increases
the risk of injury.
@) Tips
You can still open and close the windows for
several minutes after turning the ignition off.
The power window switch is not disabled until
the driver's door or front passenger's door is
opened.
Convenience opening and closing
Applies to: vehicles with convenience key
Convenience opening or closing the windows
or panoramic glass roof*
You can set in the MMI if all windows or the roof*
should open or close all at once > page 30, Set-
ting the central locking system.
> Press and hold the f or fj button on the vehicle
key until all windows and the roof* have
reached the desired position > /\.
> Applies to: vehicles with convenience key:
Touch the sensor* on one of the door handles
and continue touching it until all of the win-
dows and the roof* are closed. Do not place
your hand in the door handle when doing this.
When all of the windows and the roof* are
closed, the turn signals will flash once.
Z\ WARNING
— Never close the windows or panoramic glass
roof* carelessly or in an uncontrolled man-
ner, because this increases the risk of injury.
— For security reasons, the windows and the
Panoramic glass roof* can only be opened
and closed with the vehicle key at a maxi-
mum distance of approximately 6.5 feet
(2 m) from the vehicle. Always pay attention
when using the ff button to close the win-
dows and the panoramic glass roof* so that
40
no one is pinched. The closing process will
stop immediately when the ff button is re-
leased.
Panoramic glass roof
Operating the panoramic glass roof and
roof sunshade
Applies to: vehicles with panoramic glass roof and roof sun-
shade
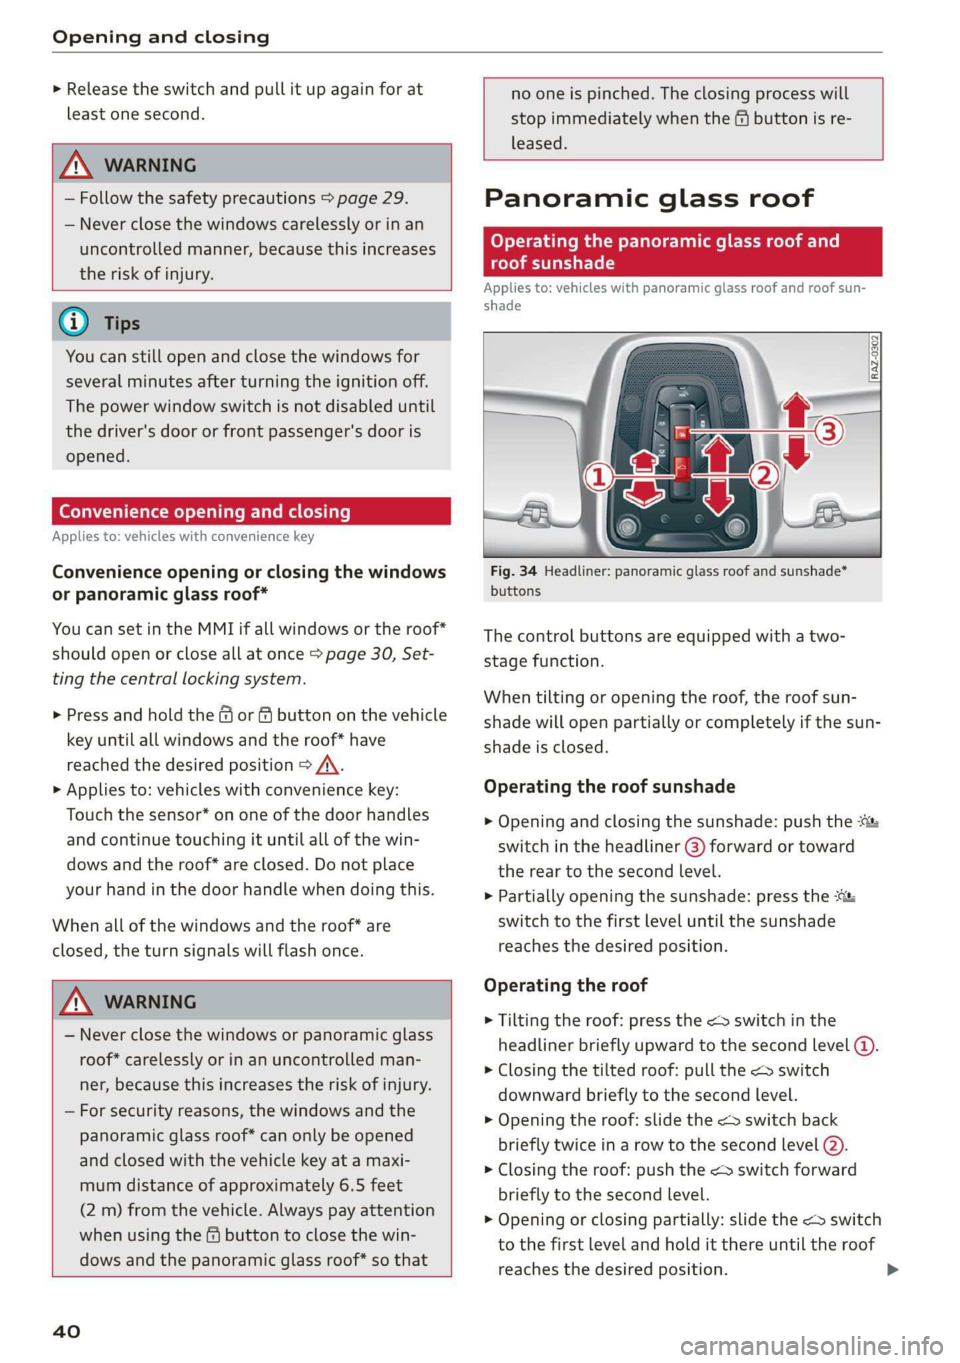
Fig. 34 Headliner: panoramic glass roof and sunshade*
buttons
The control buttons are equipped with a two-
stage function.
When tilting or opening the roof, the roof sun-
shade will open partially or completely if the sun-
shade is closed.
Operating the roof sunshade
> Opening and closing the sunshade: push the
switch in the headliner (3) forward or toward
the rear to the second level.
> Partially opening the sunshade: press the -&&
switch to the first level until the sunshade
reaches the desired position.
Operating the roof
> Tilting the roof: press the <> switch in the
headliner briefly upward to the second level ().
> Closing the tilted roof: pull the <> switch
downward briefly to the second level.
> Opening the roof: slide the <> switch back
briefly twice in a row to the second level (2).
> Closing the roof: push the <> switch forward
briefly to the second level.
> Opening or closing partially: slide the <> switch
to the first level and hold it there until the roof
reaches the desired position.
Page 43 of 310
4KE012721BB
Opening and closing
Quick opening
You can also open the roof and roof sunshade in
one movement.
> Push the <> switch back briefly to the second
level @).
Roof emergency closing
If an object is detected when closing, the roof
will open again automatically. In this case, you
can
then close it with the power emergency clos-
ing function.
> Within five seconds after the sunroof opens au-
tomatically, pull the applicable button until the
roof is closed.
ZA WARNING
To reduce the risk of injury, always pay atten-
tion when closing the roof. Always switch the
ignition off and take the key with you when
leaving the vehicle.
() Note
Always close the roof when you leave the vehi-
cle and when there is precipitation to reduce
the risk of damage to the interior equipment,
particularly the electronic equipment.
@) Tips
— After switching off the ignition, the roof and
sunshades can still be operated for several
minutes as long as neither of the front
doors are opened.
— It is not possible to open the roof when
temperatures are too low.
D_ The possible number of hand-held transmitters depends
on the equipment.
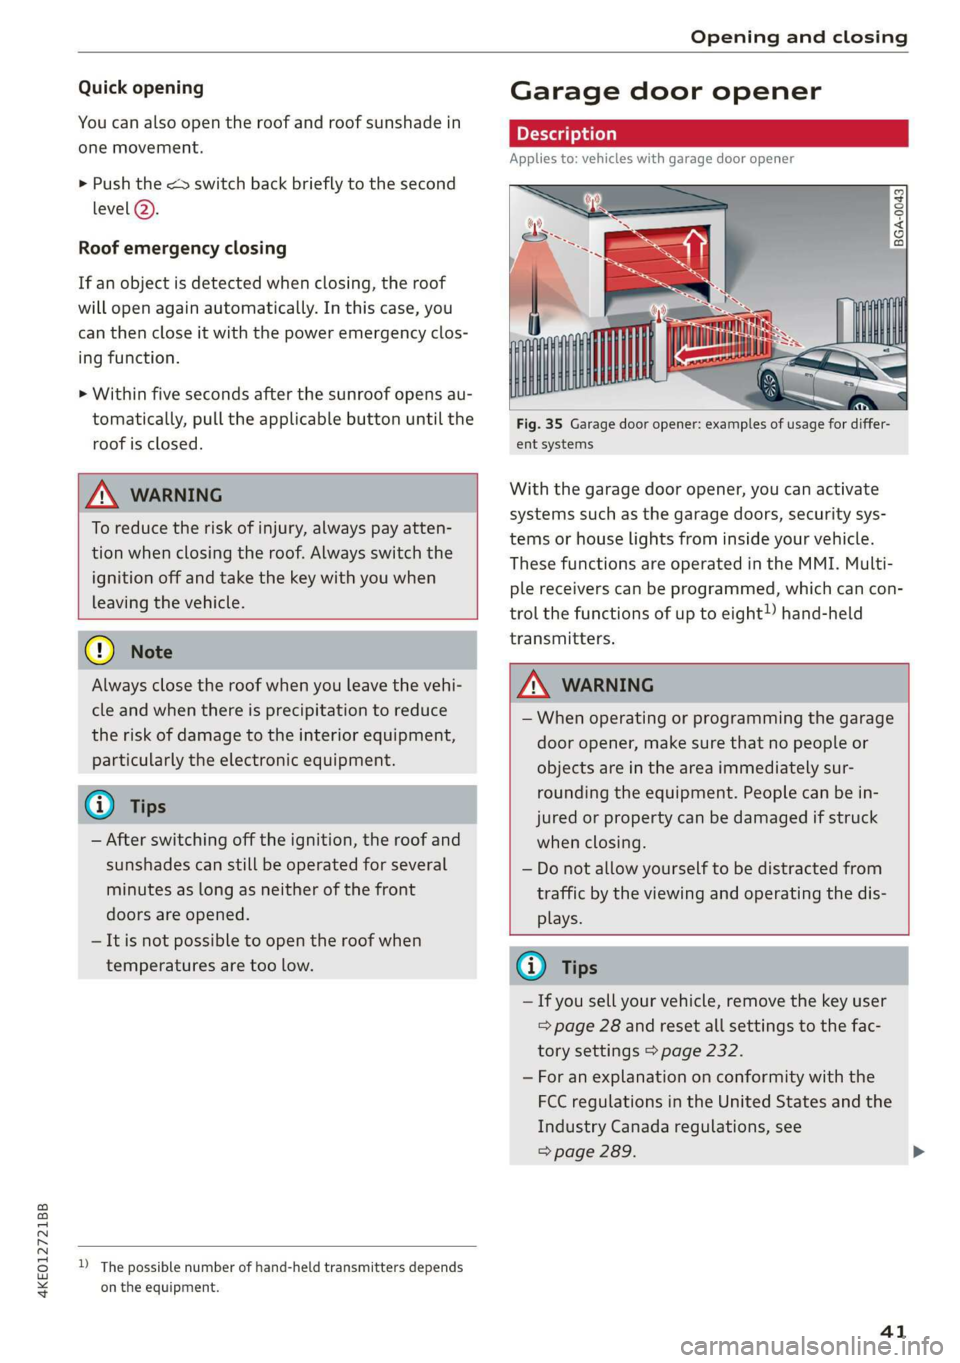
Garage door opener
Applies to: vehicles with garage door opener
io) + 3 g
¢
o a
ent systems
With the garage door opener, you can activate
systems such as the garage doors, security sys-
tems or house lights from inside your vehicle.
These functions are operated in the MMI. Multi-
ple receivers can be programmed, which can con-
trol the functions of up to eight!) hand-held
transmitters.
ZA WARNING
— When operating or programming the garage
door opener, make sure that no people or
objects are in the area immediately sur-
rounding the equipment. People can be in-
jured or property can be damaged if struck
when closing.
— Do not allow yourself to be distracted from
traffic by the viewing and operating the dis-
plays.
G Tips
— If you sell your vehicle, remove the key user
= page 28 and reset all settings to the fac-
tory settings > page 232.
— For an explanation on conformity with the
FCC regulations in the United States and the
Industry Canada regulations, see
=> page 289.
41
Page 58 of 310
Sitting correctly and safely
Front seats
(erreur laced)
Make sure that:
— You can press the pedals down completely
when your legs are slightly bent
— The distance between your upper body and the
steering wheel or instrument panel is at least
10 in (25 cm)
— The distance between your knees and the in-
strument panel is at least 4 in (10 cm)
— Your thighs are lightly supported by the front
surface of the seat
— The backrest is in an upright position and your
back is resting against it
— You have a sufficient view of the area around
the vehicle
— You have a clear view of the instrument cluster,
indicator lights, and the head-up display*
Seat settings menu: quick access
Applies to: vehicles with seat settings in the MMI
If you press on the image of the driver's or front
passenger's seat in the climate control system
menu > page 81, fig. 83 @, you will go directly
to the seat settings for that seat.
Z\ WARNING
— If you are too close to the steering wheel or
instrument panel, the airbag system cannot
provide the optimal protection, which in-
creases the risk of injury and death.
—To reduce the risk of injury in the event of
sudden braking maneuvers or accidents,
never drive with the backrest reclined very
far. The airbag system and seat belts can on-
ly provide optimal protection when the back-
rest is in an upright position and the driver
is wearing the seat belt correctly. If the
backrest is angled back too far, the safety
belt can shift to soft areas of the body, such
as the stomach, which increases the risk of
injury.
—To reduce the risk of an accident, only adjust
the seats when the vehicle is stationary.
— Be careful when adjusting the seat. Lack of
control or attention when adjusting can re-
56
sult in injuries due to pinching to vehicle oc-
cupants both in the front seats and rear
seats.
— Never place objects in the driver's footwell.
Objects could shift and enter the area
around the pedals, which could prevent you
from using them. You would then be unable
to use the pedals if sudden driving or brak-
ing maneuvers were needed, which increas-
es the risk of an accident.
— Make sure that the floor mats are always se-
curely attached.
—To reduce the risk of an accident, never place
additional floor mats or other floor covers
over the installed floor mats, because this
reduces the pedal's range of motion and can
impair pedal operation.
—To reduce the risk of injury, never place your
feet on the instrument panel, out of the
window, or on the seat surfaces. This also
applies to passengers in the rear seats.
@) Note
To reduce the risk of damage, be very careful
when adjusting the seat to make sure the
head restraints do not come into contact with
the headliner or the sunroof*.
@ Tips
At the same time, only move the respective
seat using the controls.
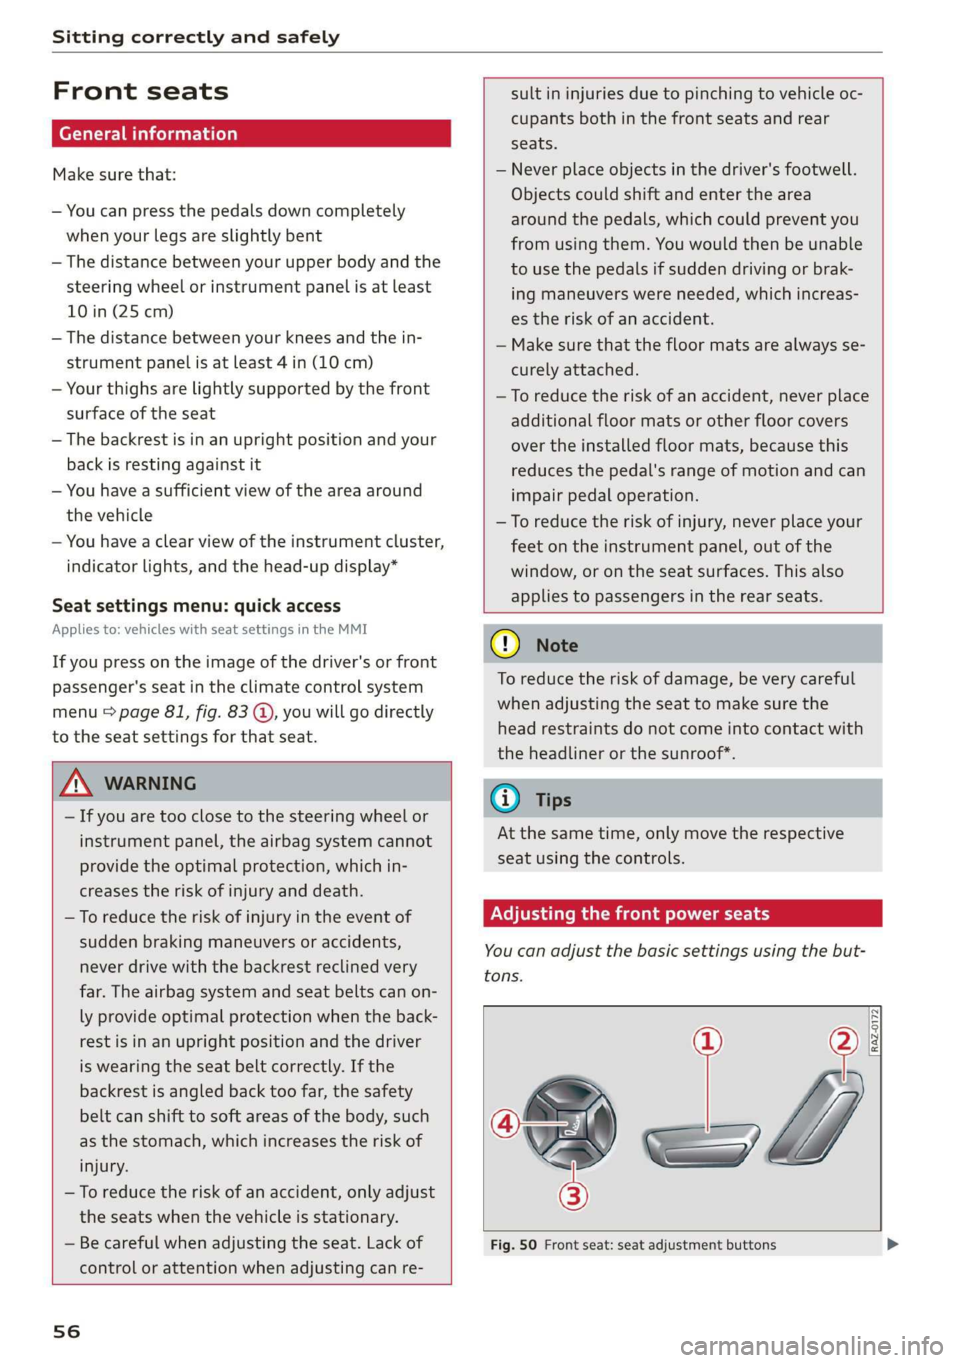
Adjusting the front power seats
You
can adjust the basic settings using the but-
RAZ-0172
tons.
(C—
s =
Fig. 50 Front seat: seat adjustment buttons
Page 78 of 310
Stowing and using
® Note
Beverage containers in the cup holders should
always
have a lid. Otherwise, the liquid inside
could spill and cause damage to vehicle
equipment.
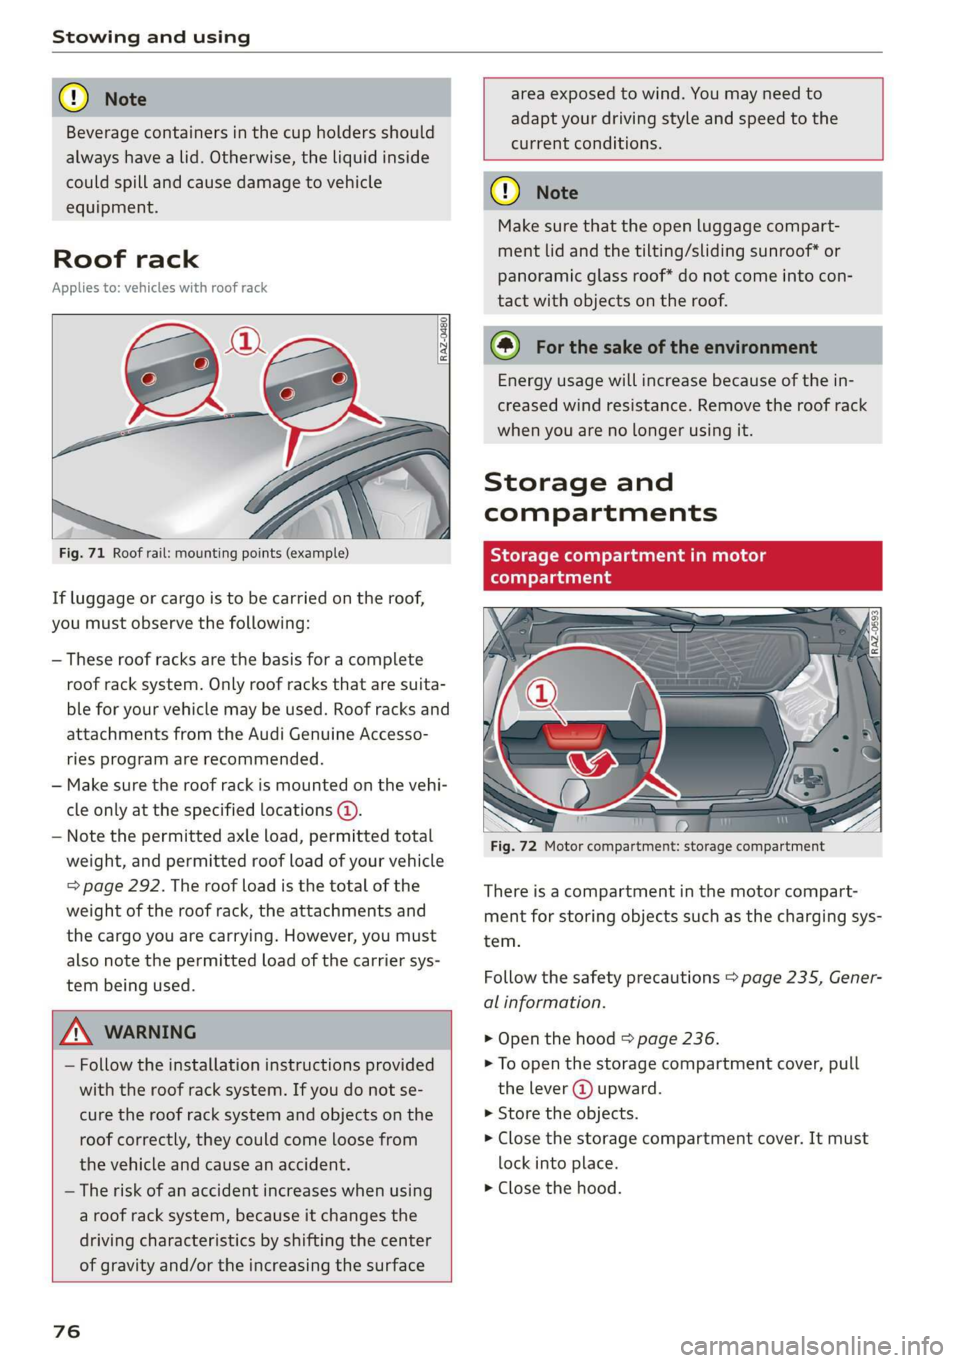
Roof rack
Applies to: vehicles with roof rack
Fig. 71 Roof rail: mounting points (example)
If luggage or cargo is to be carried on the roof,
you must observe the following:
— These roof racks are the basis for a complete
roof rack system. Only roof racks that are suita-
ble for your vehicle may be used. Roof racks and
attachments from the Audi Genuine Accesso-
ries program are recommended.
— Make sure the roof rack is mounted on the vehi-
cle only at the specified locations @.
— Note the permitted axle load, permitted total
weight, and permitted roof load of your vehicle
=> page 292. The roof load is the total of the
weight of the roof rack, the attachments and
the cargo you are carrying. However, you must
also note the permitted load of the carrier sys-
tem being used.
area exposed to wind. You may need to
adapt your driving style and speed to the
current conditions.
ZA WARNING
— Follow the installation instructions provided
with the roof rack system. If you do not se-
cure the roof rack system and objects on the
roof correctly, they could come loose from
the vehicle and cause an accident.
— The risk of an accident increases when using
a roof rack system, because it changes the
driving characteristics by shifting the center
of gravity and/or the increasing the surface
76
o Note
Make sure that the open luggage compart-
ment lid and the tilting/sliding sunroof* or
panoramic glass roof* do not come into con-
tact with objects on the roof.
@) For the sake of the environment
Energy usage will increase because of the in-
creased wind resistance. Remove the roof rack
when you are no longer using it.
Storage and
compartments
Storage compartment in motor
(tonal oy Tada
Fig. 72 Motor compartment: storage compartment
There is a compartment in the motor compart-
ment for storing objects such as the charging sys-
tem.
Follow the safety precautions > page 235, Gener-
al information.
> Open the hood = page 236.
> To open the storage compartment cover, pull
the lever @ upward.
» Store the objects.
> Close the storage compartment cover. It must
lock into place.
> Close the hood.
Page 83 of 310
4KE012721BB
Warm and cold
Warm and cold
Climate control system
Depending on vehicle equipment, your vehicle
may have an automatic climate control system
with:
— Two zones to individually adjust the tempera-
ture and air distribution for the left and right
front sides, or
— Four zones to individually adjust the tempera-
ture, air distribution, and amount of ventilation
at all of the seats.
The climate control system warms, cools, dehu-
midifies, and filters the air in the vehicle interior.
It is the most effective when the windows and
panoramic glass roof* are closed. If there is a
build-up of heat inside the vehicle, ventilation
can help to speed up the cooling process.
The climate control system automatically main-
tains a temperature once it has been set. In all
heating mode functions except defrost, the blow-
er only switches to a higher speed once the mo-
tor coolant has reached a certain temperature.
@ For the sake of the environment
Energy can be saved by switching off the A/C
mode.
@) Tips
—To prevent interference with the heating
and cooling output and to prevent the win-
dows from fogging over, the air intake in
front of the windshield must be free of ice,
snow, and leaves.
— Condensation from the cooling system can
drip and form a puddle of water under the
vehicle. This is normal and does not mean
there is a leak.
— The energy management system may tem-
porarily switch off certain functions, such as
the seat heating” or rear window defogger.
These systems are available again as soon as
the energy supply has been restored.
— Specific settings are stored automatically in
the active personal profile.
uw &
AUTO
ac! @
AUTO
ae
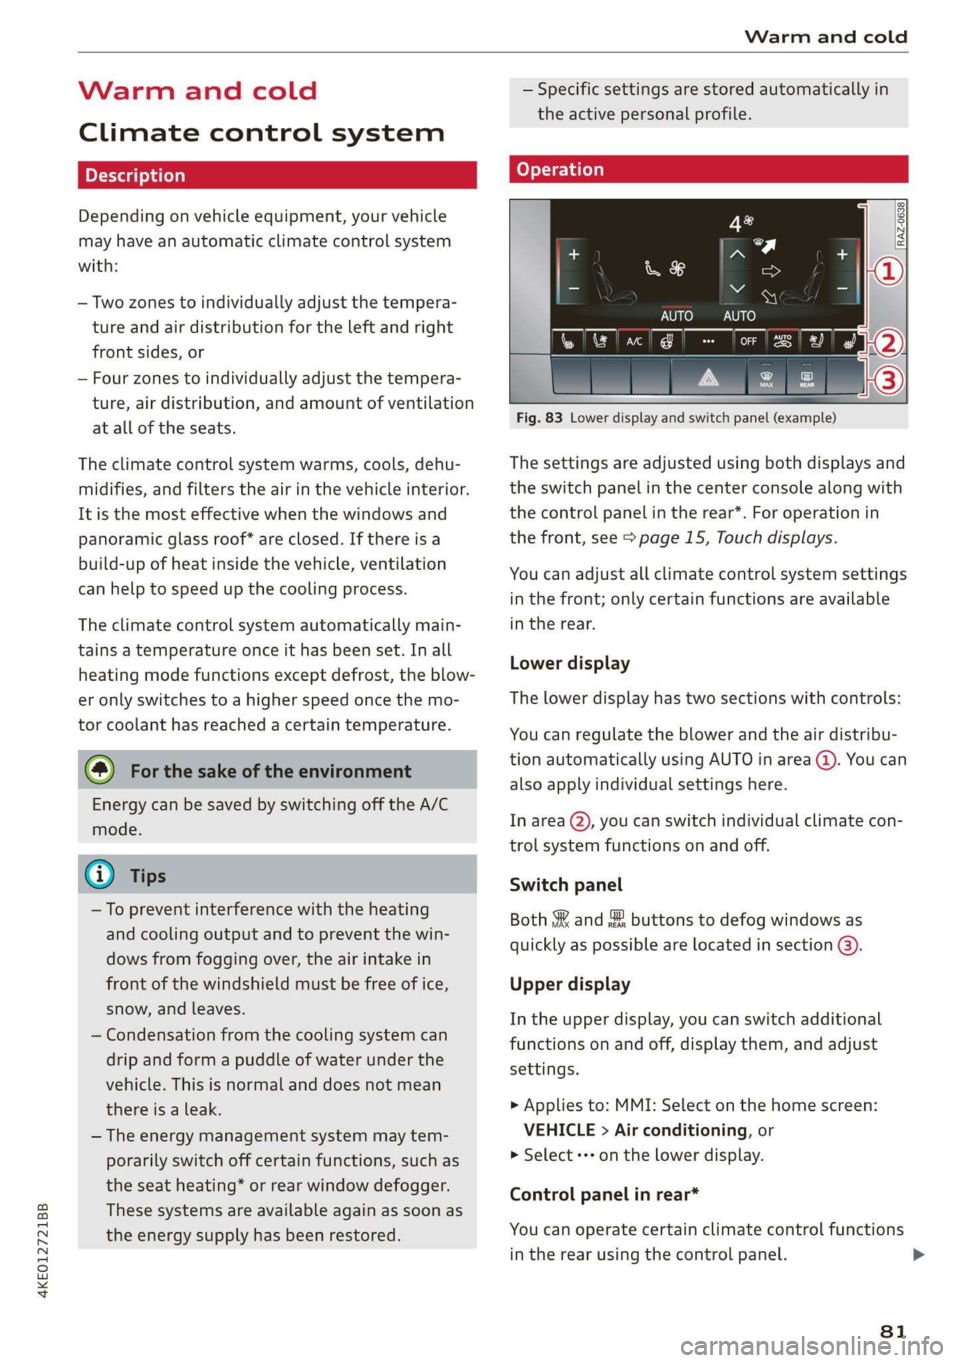
Fig. 83 Lower display and switch panel (example)
The settings are adjusted using both displays and
the switch panel in the center console along with
the control panel in the rear*. For operation in
the front, see > page 15, Touch displays.
You can adjust all climate control system settings
in the front; only certain functions are available
in the rear.
Lower display
The lower display has two sections with controls:
You can regulate the blower and the air distribu-
tion automatically using AUTO in area (@). You can
also apply individual settings here.
In area @, you can switch individual climate con-
trol system functions on and off.
Switch panel
Both & and & buttons to defog windows as
quickly as possible are located in section @).
Upper display
In the upper display, you can switch additional
functions on and off, display them, and adjust
settings.
> Applies to: MMI: Select on the home screen:
VEHICLE > Air conditioning, or
> Select -*- on the Lower display.
Control panel in rear*
You can operate certain climate control functions
in the rear using the control panel.
81
>
Page 93 of 310
4KE012721BB
Driving
Range display
Aa
ey Peron eae RAX-0100
)
Crue
=i)
3
=
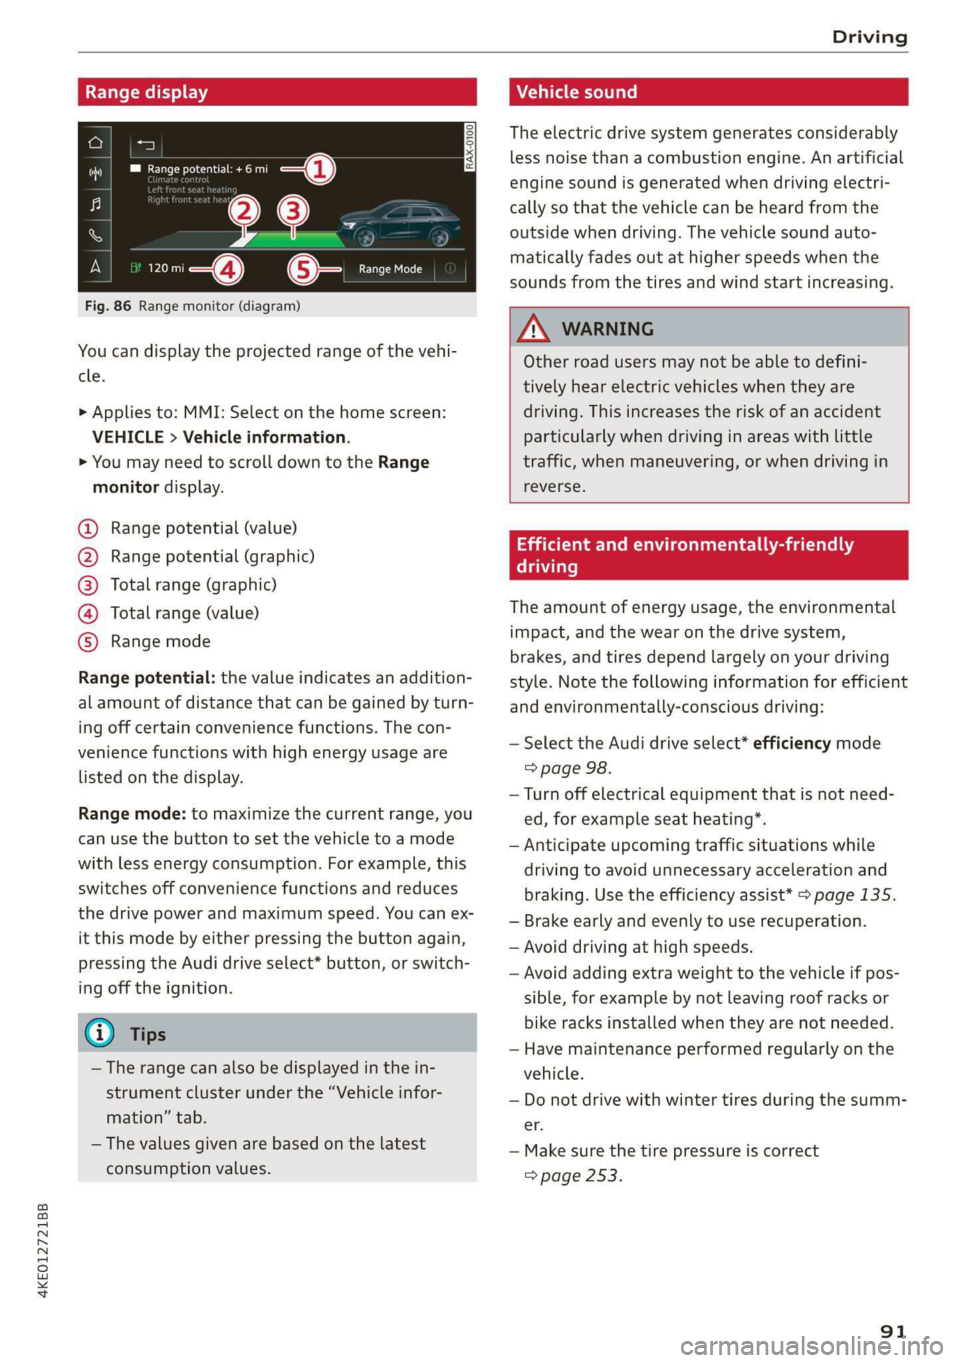
Fig. 86 Range monitor (diagram)
You can display the projected range of the vehi-
cle.
> Applies to: MMI: Select on the home screen:
VEHICLE > Vehicle information.
> You may need to scroll down to the Range
monitor display.
@® Range potential (value)
@ Range potential (graphic)
@®) Total range (graphic)
@ Total range (value)
® Range mode
Range potential: the value indicates an addition-
al amount of distance that can be gained by turn-
ing off certain convenience functions. The con-
venience functions with high energy usage are
listed on the display.
Range mode: to maximize the current range, you
can use the button to set the vehicle to a mode
with less energy consumption. For example, this
switches off convenience functions and reduces
the drive power and maximum speed. You can ex-
it this mode by either pressing the button again,
pressing the Audi drive select* button, or switch-
ing off the ignition.
@) Tips
— The range can also be displayed in the in-
strument cluster under the “Vehicle infor-
mation” tab.
— The values given are based on the latest
consumption values.
Vehicle sound
The electric drive system generates considerably
less noise than a combustion engine. An artificial
engine sound is generated when driving electri-
cally so that the vehicle can be heard from the
outside when driving. The vehicle sound auto-
matically fades out at higher speeds when the
sounds from the tires and wind start increasing.
ZA WARNING
Other road users may not be able to defini-
tively hear electric vehicles when they are
driving. This increases the risk of an accident
particularly when driving in areas with little
traffic, when maneuvering, or when driving in
reverse.
aati ele eyi ata aed (Tare Ag
Taare)
The amount of energy usage, the environmental
impact, and the wear on the drive system,
brakes, and tires depend largely on your driving
style. Note the following information for efficient
and environmentally-conscious driving:
— Select the Audi drive select* efficiency mode
=> page 98.
— Turn off electrical equipment that is not need-
ed, for example seat heating*.
— Anticipate upcoming traffic situations while
driving to avoid unnecessary acceleration and
braking. Use the efficiency assist* > page 135.
— Brake early and evenly to use recuperation.
— Avoid driving at high speeds.
— Avoid adding extra weight to the vehicle if pos-
sible, for example by not leaving roof racks or
bike racks installed when they are not needed.
— Have maintenance performed regularly on the
vehicle.
— Do not drive with winter tires during the summ-
er.
— Make sure the tire pressure is correct
=> page 253.
91
Page 152 of 310
Driver assistance
@ Tips
Always keep your hands on the steering
wheel. The driver is always responsible for ad-
hering to the regulations applicable in the
country where the vehicle is being operated.
Audi pre sense
Introduction
Applies to: vehicles with Audi pre sense
Within the limits of the system, the Audi pre
sense functions can initiate measures in certain
driving situations to protect the vehicle occu-
pants and other road users. Depending on the ve-
hicle equipment, various Audi pre sense systems
may
be installed:
— Audi pre sense basic can react during emergen-
cy and dangerous braking maneuvers and un-
stable driving situations (such as oversteering
or understeering).
— Audi pre sense front!) can detect an impending
frontal impact and react with warnings, braking
interventions, and preemptive safety measures
for the vehicle occupants.
— Audi pre sense rear monitors the rear traffic
behind your vehicle and can react to an impend-
ing rear impact.
— Audi pre sense side can detect an impending
side impact from cross-traffic and vehicles com-
ing from the side, and can initiate preemptive
safety measures.
— The swerve assist can assist you during a
swerving maneuver if it is detected as critical
based on the steering movements.
— The turn assist can detect vehicles in the oppo-
site lane and react with braking maneuvers.
ONT ole eam Leta Leh
Applies to: vehicles with Audi pre sense
Depending on the vehicle speed and the vehicle
equipment, the following functions may be initi-
ated in certain situations:
— Visual and audio warnings
D_ This is not available in some countries.
150
— Activation of the emergency flashers»)
— Reversible tensioning of safety belts
— Closing the windows and panoramic glass roof
— Adjusting the seats
— Other preemptive safety measures by individual
systems
Z\ WARNING
Follow the safety precautions and note the
limits of the assist systems, sensors, and
cameras > page 123.
(i) Tips
— Depending on the risk situation that is de-
tected and the selected Audi drive select*
mode, not all preemptive safety measures
may be initiated under certain circumstan-
ces. Certain functions can be adjusted or
skipped if necessary.
— Audi pre sense may be restricted or unavail-
able under certain circumstances, for exam-
ple if:
— There are passengers with unfastened
safety belts
— It has only been several seconds since the
ignition was switched on The fq indicator
light turns on
— When driving in reverse
— There is an airbag control module mal-
function
— The ESC is limited, switched off, or mal-
functioning > page 102
Audi pre sense basic
Applies to: vehicles with Audi pre sense basic
Audi pre sense basic is automatically active at
speeds of approximately 20 mph (30 km/h) and
higher. Audi pre sense basic can trigger the Audi
pre sense preemptive safety measures during
emergency braking and dangerous braking ma-
neuvers as well as in unstable driving situations,
such as oversteering or understeering.