stop start AUDI E-TRON 2020 Owner's Manual
[x] Cancel search | Manufacturer: AUDI, Model Year: 2020, Model line: E-TRON, Model: AUDI E-TRON 2020Pages: 316, PDF Size: 85.96 MB
Page 202 of 316
Navigation
Changing and loading a previous destination
> Applies to: MMI: Select on the home screen:
NAVIGATION > (88) > Last destinations > Z >
& > Change address > Use address > Start.
Restore last tour
Requirement: a route with at least two stopovers
must have already been canceled.
Your last route is labeled with the © symbol.
» Applies to: MMI: Select on the home screen:
NAVIGATION > (Gs) > Last destinations > Re-
store last tour. Route guidance will start imme-
diately.
Deleting previous destinations
» Applies to: MMI: Select on the home screen:
NAVIGATION > (G8) > Last destinations > Z >
one or more entries or Select all > Delete >
(Done).
@ Tips
The last route will be automatically deleted
from the list if you start a new route guidance
after canceling the route.
Setting a favorite as the destination
Applies to: vehicles with navigation system
You can access frequent destinations in the favor-
ites. You can quickly and easily start route guid-
ance using the home address or business address
function.
Requirement: a favorite must be stored
=> page 206.
» Applies to: MMI: Select on the home screen:
NAVIGATION > (Gs) > Favorites > a destination
> Start. Or
> Applies to: Multifunction steering wheel: Select
in the instrument cluster: Navigation tab >
button > Favorites > a destination.
POIs (Online Points of Interest)
Applies to: vehicles with a navigation system and Audi con-
nect Infotainment
Search for points of interest such as restaurants.
If the MMI is connected to the Internet, points of
200
interest will be automatically included in the
search.
> Applies to: MMI: Select on the home screen:
NAVIGATION > (&a) > Points of interest.
The system always searches in the search area
that is currently selected > table on page 200.
> Searching for points of interest: enter the
name of a POI.
> Searching for a point of interest in a specific
category: Select: a category (for example, res-
taurants) > a point of interest.
> Changing the search area: Requirement: route
guidance must be active. Press (4)/2:9/B! repeat-
edly until the desired search area > table on
page 200 is selected.
Sorting points of interest
Requirement: the MMI must be connected to the
Internet > page 187, Audi connect. You must
have a category selected.
> Press on the respective symbol for sorting until
the desired sorting order is selected.
Search areas in detail
Symbol Description
7) Search nearby
£9 Search along the route
a Search at destination/Search at
stopover
Search nearby: the points of interest will be list-
ed starting from the immediate vicinity around
the vehicle position.
Search along the route: points of interest along
the route can only be selected during active route
guidance. The points of interest are located di-
rectly along or in the immediate vicinity of the
calculated route. You can select points of interest
from various categories. For example, you can
search for a hotel or parking lot along route.
Search at destination/Search at stopover: points
of interest near a destination or a stopover can
only be selected during active route guidance.
You can select points of interest from various cat-
egories. For example, you can search for a hotel
or parking lot at the destination.
Page 204 of 316
Navigation
@® More: see > page 211, Options.
@ Weather: Requirement: the MMI must be
connected to the Internet > page 187, Audi
connect. Also see > page 189.
® Applies to: MMI and telephone
Call: Requirement: a mobile device must be
connected to the MMI = page 173. You will
make a direct call to the phone number that
is stored for the destination.
© Start: starts navigation to the displayed des-
tination directly. The map will be displayed
= page 204, Map operation.
@ Parking: press Parking to search for a park-
ing space at the destination. You can use the
parking space as the destination or stopover.
Details: Requirement: the MMI must be con-
nected to the Internet > page 187, Audi con-
nect.
© Weather at the destination: Requirement:
the MMI must be connected to the Internet
=> page 187, Audi connect.
Display of distance/driving time to the des-
tination
@) Note
Read the information about Audi connect, and
be sure to note the connectivity costs section
=@ in General information on page 187.
Selecting a destination from the map
Applies to: vehicles with navigation system
A point on the map can be used as the destina-
tion.
Opening the map
Applies to: MMI
> Press NAVIGATION on the home screen.
> If necessary, press A to display the map.
Adjusting the scale
> Select: / > select a scale.
Marking the destination
> Press and hold a point on the map until a mark-
ing appears @1) > page 203, fig. 143. Or: the
address of the selected destination is displayed
> page 203, fig. 143.
202
Selecting map content (such as POIs) as the
destination
Requirement: map content must be displayed
=> page 211.
> Press on map content on the map (for example,
@) > page 203, fig. 143).
Selecting the destination
> Select: @) > page 203, fig. 143. Or:
> To display destination details, press on 9
=> page 203, fig. 143 > Start.
Route guidance will be activated and the map will
be displayed > page 203, fig. 142.
SS) ree meee) EL
Applies to: vehicles with navigation system
You can enter additional destinations during ac-
tive route guidance.
Entering a stopover
Requirement: route guidance must be active.
> Enter a destination > page 198.
Displaying stopovers or the route plan
All destinations are listed in the route plan.
> Press on @) > page 203, fig. 142 on the map.
Editing stopovers
> Press on 7) 9 page 203, fig. 142 on the map.
> Adding a stopover: Select: Add destination >
select a destination > Add.
> Moving a stopover: press Z. Touch the > sym-
bol and move the entry to the desired position.
Press Done.
> Deleting a stopover: Select: Z > one or more
entries or Select all > Delete > (Done).
Come eC lle
Applies to: vehicles with navigation system and e-tron route
planner
The MMI includes the charging stations along the
route, if the destination cannot be reached with
the current battery charge level.
Page 205 of 316
4KE012721BE
Navigation
Requirement: the e-tron route planner must be
switched on > page 211. The charging target
must be set to at least 95% > page 113.
Entering a destination using e-tron route
planner
> Enter a destination.
If the destination is out of range, a fast route
with stopovers for charging is automatically sug-
gested.
> To access alternative routes with stopovers for
charging, press “ before you accept the e-tron
route plan.
> To start the suggested route guidance, press
Accept.
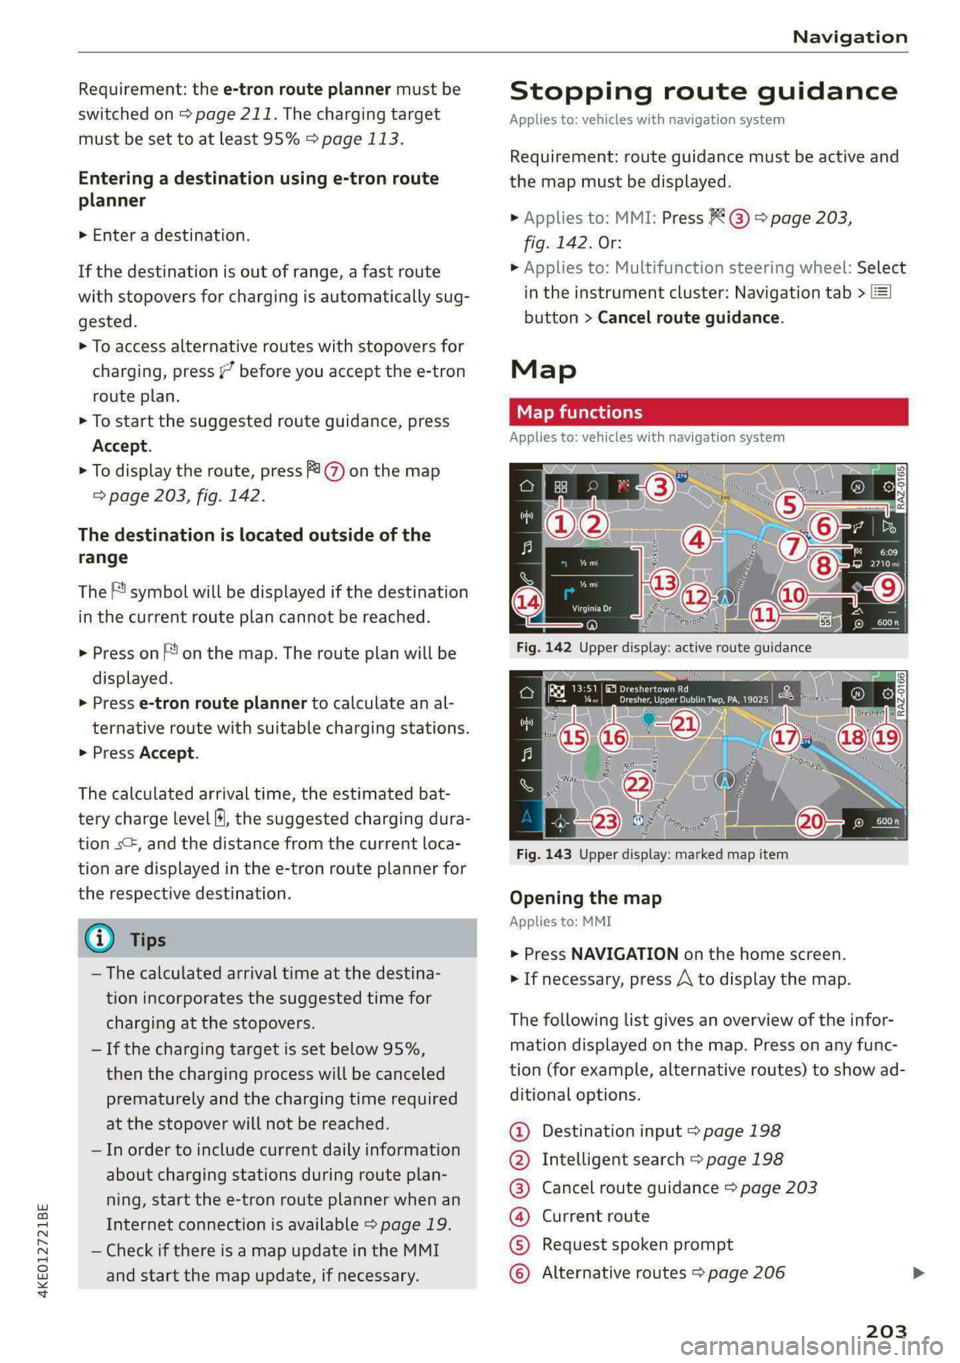
> To display the route, press @ on the map
=> page 203, fig. 142.
The destination is located outside of the
range
The F! symbol will be displayed if the destination
in the current route plan cannot be reached.
> Press on on the map. The route plan will be
displayed.
> Press e-tron route planner to calculate an al-
ternative route with suitable charging stations.
> Press Accept.
The calculated arrival time, the estimated bat-
tery charge level fH, the suggested charging dura-
tion s+, and the distance from the current loca-
tion are displayed in the e-tron route planner for
the respective destination.
@ Tips
— The calculated arrival time at the destina-
tion incorporates the suggested time for
charging at the stopovers.
— If the charging target is set below 95%,
then the charging process will be canceled
prematurely and the charging time required
at the stopover will not be reached.
— In order to include current daily information
about charging stations during route plan-
ning, start the e-tron route planner when an
Internet connection is available > page 19.
— Check if there is a map update in the MMI
and start the map update, if necessary.
Stopping route guidance
Applies to: vehicles with navigation system
Requirement: route guidance must be active and
the map must be displayed.
> Applies to: MMI: Press @) © page 203,
fig. 142. Or:
> Applies to: Multifunction steering wheel: Select
in the instrument cluster: Navigation tab >
button > Cancel route guidance.
Map
Map functions
Applies to: vehicles with navigation system
eRe Pete
Dresher, Upper Dublin Twp, PA, 1
aa Ss)
Fig. 143 Upper display: marked map item
Opening the map
Applies to: MMI
> Press NAVIGATION on the home screen.
> If necessary, press A\ to display the map.
The following list gives an overview of the infor-
mation displayed on the map. Press on any func-
tion (for example, alternative routes) to show ad-
ditional options.
Destination input > page 198
Intelligent search > page 198
Cancel route guidance > page 203
Current route
Request spoken prompt
©OO®OCOLO Alternative routes > page 206
203
Page 206 of 316
Navigation
@
OO@
®
®O®8
©®®
O8
©
®
®
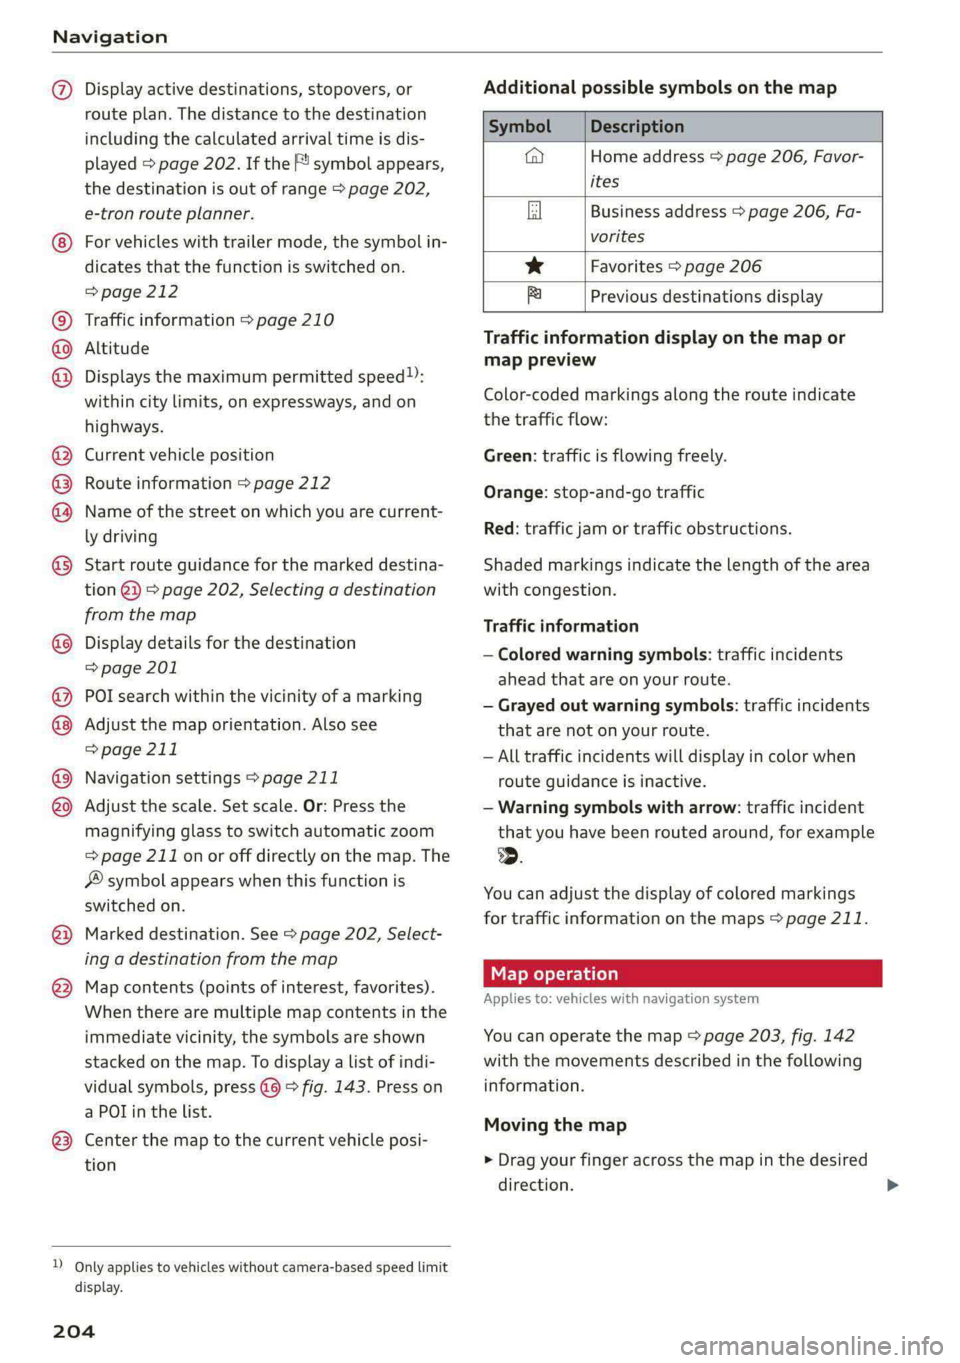
Display active destinations, stopovers, or
route plan. The distance to the destination
including the calculated arrival time is dis-
played > page 202. If the symbol appears,
the destination is out of range > page 202,
e-tron route planner.
For vehicles with trailer mode, the symbol in-
dicates that the function is switched on.
=>page 212
Traffic information > page 210
Altitude
Displays the maximum permitted speed):
within city limits, on expressways, and on
highways.
Current vehicle position
Route information > page 212
Name of the street on which you are current-
ly driving
Start
route guidance for the marked destina-
tion @)) > page 202, Selecting a destination
from the map
Display details for the destination
=> page 201
POI search within the vicinity of a marking
Adjust the map orientation. Also see
=> page 211
Navigation settings > page 211
Adjust the scale. Set scale. Or: Press the
magnifying glass to switch automatic zoom
=> page 211 onor off directly on the map. The
symbol appears when this function is
switched on.
Marked destination. See > page 202, Select-
ing a destination from the map
Map contents (points of interest, favorites).
When there are multiple map contents in the
immediate vicinity, the symbols are shown
stacked on the map. To display a list of indi-
vidual symbols, press @9 9 fig. 143. Press on
a POT in the list.
Center the map to the current vehicle posi-
tion
1) Only applies to vehicles without camera-based speed limit
display.
204
Additional possible symbols on the map
Symbol Description
@ Home address > page 206, Favor-
ites
Business address > page 206, Fa-
vorites
* Favorites > page 206
fa Previous destinations display
Traffic information display on the map or
map preview
Color-coded markings along the route indicate
the traffic flow:
Green: traffic is flowing freely.
Orange: stop-and-go traffic
Red: traffic jam or traffic obstructions.
Shaded markings indicate the length of the area
with congestion.
Traffic information
— Colored warning symbols: traffic incidents
ahead that are on your route.
— Grayed out warning symbols: traffic incidents
that are not on your route.
— All traffic incidents will display in color when
route guidance is inactive.
— Warning symbols with arrow: traffic incident
that you have been routed around, for example
2.
You can adjust the display of colored markings
for traffic information on the maps > page 211.
Map operation
Applies to: vehicles with navigation system
You can operate the map > page 203, fig. 142
with the movements described in the following
information.
Moving the map
> Drag your finger across the map in the desired
direction.
Page 207 of 316
4KE012721BE
Navigation
Moving the map quickly
> Swipe your finger across the map in the desired
direction and lift your finger off the map.
Zooming in on the map
> Place two fingers on the map and pull your fin-
gers apart. Or: double tap on the map with one
finger.
Zooming out on the map
> Place two fingers on the map and pull your fin-
gers together. Or: double tap on the map with
two fingers.
Rotating the map
> Rotate the map using two fingers.
Tilting the map
> Drag upward or downward with two fingers.
G) Tips
Certain gestures may not be available on all
touch displays or in every menu.
Navigation view with te guidance
started
Applies to: vehicles with navigation system and Audi virtual
cockpit
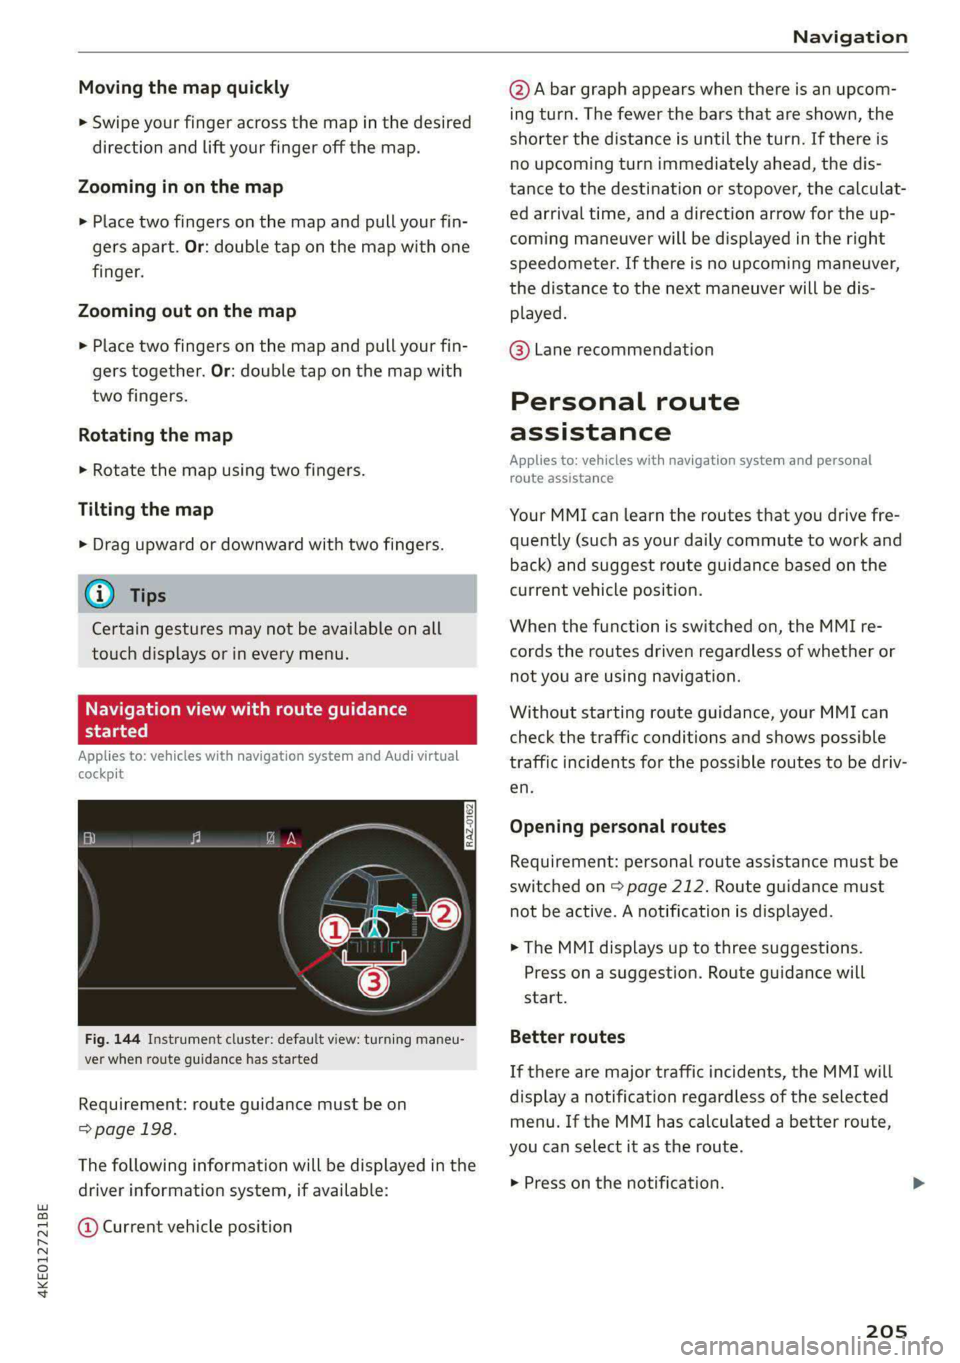
Fig. 144 Instrument cluster: default view: turning maneu-
ver when route guidance has started
Requirement: route guidance must be on
=> page 198.
The following information will be displayed in the
driver information system, if available:
@ Current vehicle position
@A bar graph appears when there is an upcom-
ing turn. The fewer the bars that are shown, the
shorter the distance is until the turn. If there is
no upcoming turn immediately ahead, the dis-
tance to the destination or stopover, the calculat-
ed arrival time, and a direction arrow for the up-
coming maneuver will be displayed in the right
speedometer. If there is no upcoming maneuver,
the distance to the next maneuver will be dis-
played.
@® Lane recommendation
Personal route
assistance
Applies to: vehicles with navigation system and personal
route assistance
Your MMI can learn the routes that you drive fre-
quently (such as your daily commute to work and
back) and suggest route guidance based on the
current vehicle position.
When the function is switched on, the MMI re-
cords the routes driven regardless of whether or
not you are using navigation.
Without starting route guidance, your MMI can
check the traffic conditions and shows possible
traffic incidents for the possible routes to be driv-
en.
Opening personal routes
Requirement: personal route assistance must be
switched on > page 212. Route guidance must
not be active. A notification is displayed.
> The MMI displays up to three suggestions.
Press on a suggestion. Route guidance will
start.
Better routes
If there are major traffic incidents, the MMI will
display a notification regardless of the selected
menu. If the MMI has calculated a better route,
you can select it as the route.
> Press on the notification.
205
Page 208 of 316
Navigation
As soon as you switch off personal route assis-
tance, your personal routes will no Longer be re-
corded. Routes that were already stored remain
stored.
Deleting personal routes
> Applies to: MMI: Select on the home screen:
NAVIGATION > <2} > Personal route assistance
> Delete recordings from the last 24 hours or
Delete all personal routes and destinations.
@ Tips
If personal route assistance is switched off
and you press F&, the personal route assis-
tance settings will be displayed > page 212.
Alternative routes
Applies to: vehicles with navigation system
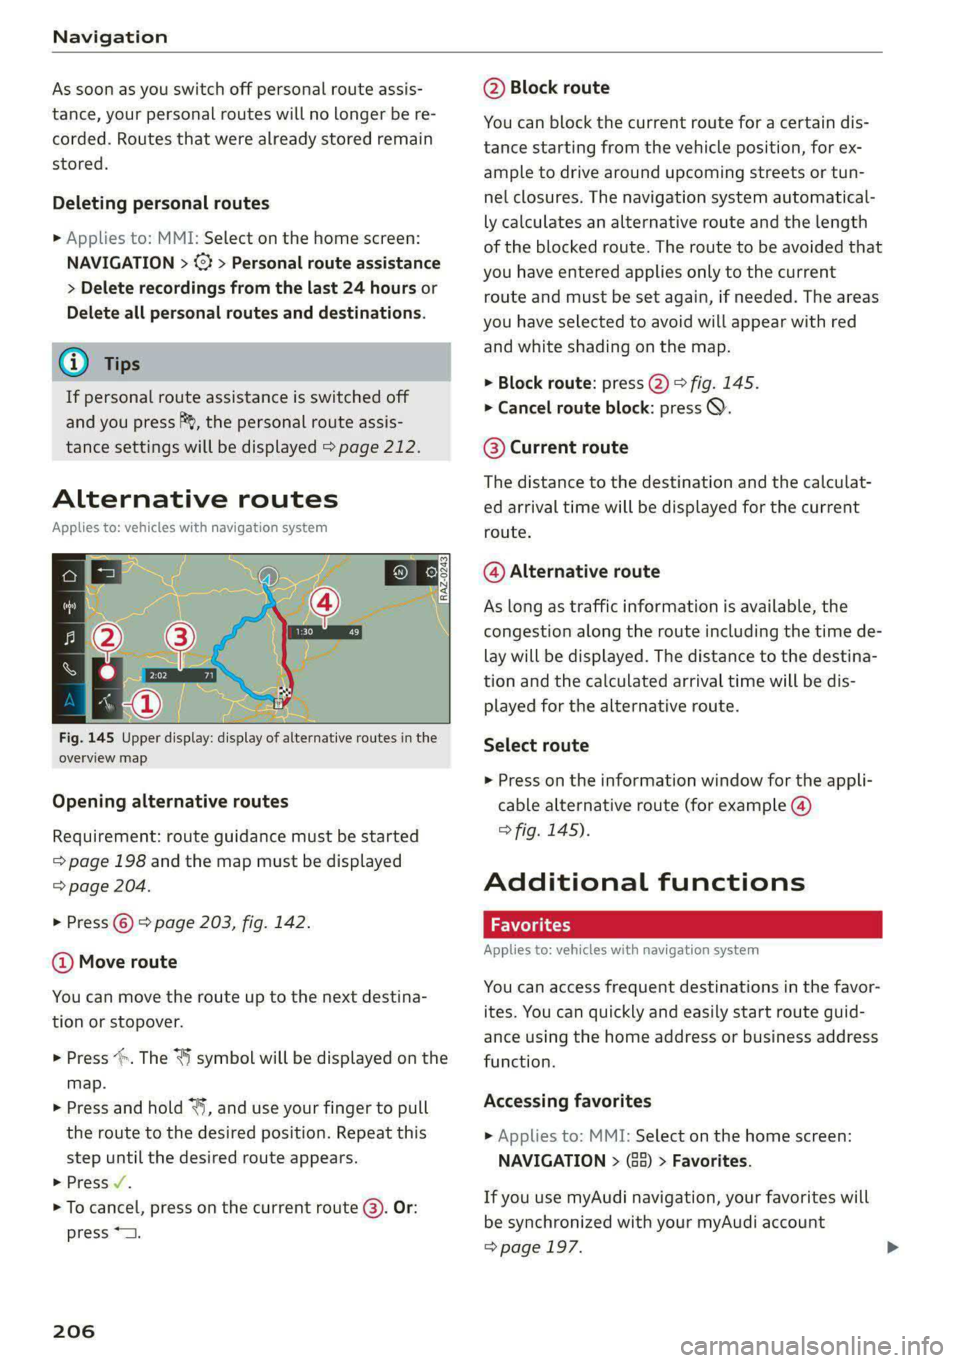
Fig. 145 Upper display: display of alternative routes in the
overview map
Opening alternative routes
Requirement: route guidance must be started
= page 198 and the map must be displayed
=> page 204.
> Press © > page 203, fig. 142.
@ Move route
You can move the route up to the next destina-
tion or stopover.
> Press “. The “J symbol will be displayed on the
map.
> Press and hold “, and use your finger to pull
the route to the desired position. Repeat this
step until the desired route appears.
> Press /.
> To cancel, press on the current route ©. Or:
press *2.
206
@ Block route
You can block the current route for a certain dis-
tance starting from the vehicle position, for ex-
ample to drive around upcoming streets or tun-
nel closures. The navigation system automatical-
ly calculates an alternative route and the length
of the blocked route. The route to be avoided that
you have entered applies only to the current
route and must be set again, if needed. The areas
you have selected to avoid will appear with red
and white shading on the map.
> Block route: press @) > fig. 145.
> Cancel route block: press Q.
©® Current route
The distance to the destination and the calculat-
ed arrival time will be displayed for the current
route.
@ Alternative route
As long as traffic information is available, the
congestion along the route including the time de-
lay will be displayed. The distance to the destina-
tion and the calculated arrival time will be dis-
played for the alternative route.
Select route
> Press on the information window for the appli-
cable alternative route (for example @)
> fig. 145).
Additional functions
Favorites
Applies to: vehicles with navigation system
You can access frequent destinations in the favor-
ites. You can quickly and easily start route guid-
ance using the home address or business address
function.
Accessing favorites
» Applies to: MMI: Select on the home screen:
NAVIGATION > (68) > Favorites.
If you use myAudi navigation, your favorites will
be synchronized with your myAudi account
=> page 197.
Page 214 of 316
Navigation
— Traffic obstructions
— Traffic information
Map colors
— Automatic: the map display adapts to the light-
ing conditions (for example, by changing from
day to night when driving through a tunnel).
— Day or Night
Map orientation
— 2D map or 2D north: the current vehicle posi-
tion is displayed. The map is oriented in the di-
rection of travel or to the north.
— 3D map: the current vehicle position is shown
on a three-dimensional map and is oriented in
the direction of travel.
— Overview: the entire route from the vehicle po-
sition to the destination or the next stopover is
displayed on the map. The map is oriented to
the north.
Automatic zoom
— On: the map scale is adapted automatically de-
pending on the type of road being traveled (ex-
pressway, highway, other roads) so that you al-
ways have an optimal overview of the road
ahead. When route guidance is active, the scale
is adjusted automatically for a better detailed
view when there are upcoming maneuvers.
— Intersection: when route guidance is active, the
scale is adjusted automatically for a better de-
tailed view when there are upcoming maneu-
vers.
— Off
MMI map contents/Map content: you can switch
the display of additional information (such as
POIs) on the map in the upper display on or off.
Note the following for the 3D city model > ©.
Voice guidance
Voice guidance: you can adjust the navigation
prompts. With the Traffic setting, the MMI will
only give prompts if there are traffic incidents on
your route.
Voice guidance during phone call
Entertainment fader during navigation: the au-
dio playback volume is temporarily lowered when
navigation prompts are active.
212
Route criteria
You can adjust which route criteria should be al-
lowed or avoided for the route calculation.
HOV/carpool lanes
Highways
Toll roads
Ferries
e-tron route planner
This function can be switched on and off.
Route information
When this function is switched on and route
guidance is active, route information ©)
=> page 203, fig. 142 is displayed. The next ma-
neuver will be displayed at the bottom. POIs and
traffic information will also be displayed. Press
route
information to display a preview of the next
maneuver on the map. You can switch the follow-
ing information on or off in route information.
— POIs along the route
— Traffic information
Personal route assistance
Personal route assistance is switched off at the
factory.
Your trips are recorded and destinations are sug-
gested by the MMI when this function is switched
on > page 205.
Trailer mode
Trailer mode is switched off at the factory.
When the function is switched on, the maximum
permitted speed for vehicles with trailers is in-
cluded during route guidance and the calculated
arrival time is adjusted accordingly. When the
function is switched on, the symbol @)
=> page 203, fig. 142 is displayed on the map.
Presentation mode
In presentation mode, the system simulates driv-
ing along the planned route without the vehicle
actually moving. You can use Specify starting
point when you would like to calculate a route
starting
from a location other than the current >
Page 221 of 316
4KE012721BE
Radio
Starting/stopping podcast playback
> Press P/Il.
Previous/next podcast
> Press Ki/DI.
Changing the playback position
> You can adjust the playback position using the
knob.
Displaying the online radio menu
> Press oa.
Switching to radio
> Press Source. The sources in the Radio menu
are displayed.
Podcast favorites
You can store podcasts in the Podcast favorites.
Requirement: the playback view for a podcast
must be displayed.
> Press ¥ © > page 215, fig. 150.
Requirement: a list with podcasts must be dis-
played.
> Press and hold an entry in the list until the Op-
tions menu appears.
> Press Save podcast.
Listening to a podcast favorite
Requirement: the podcast favorites list must be
displayed. At least one podcast favorite must be
stored.
> Press on the desired podcast.
Scrolling through podcast favorites
Requirement: the podcast favorites list must be
displayed. At least one podcast favorite must be
stored.
> Swipe to the left or right with your finger.
Displaying all podcast favorites
Requirement: the podcast favorites list must be
displayed. At least one podcast favorite must be
stored.
> Press All.
Editing podcast favorites
> Deleting podcast favorites: press W in the
playback view, or
> In the podcast favorites list, select: All > Z >
one or more podcasts or Select all > Delete >
(Done).
Requirement: the podcast favorites list must be
displayed.
> Moving a podcast favorite: Select: All > Z.
> Touch the $ symbol and move the entry to the
desired position.
> Press Done.
Options and settings
Requirement: the playback view @) > page 215,
fig. 150 must be displayed.
> Press More (9, or
Requirement: a list with radio stations or pod-
casts* must be displayed > page 214, fig. 148.
>» Press and hold an entry in the list until the Op-
tions menu appears.
Depending on the selected source, the following
functions
may be available.
Storing a favorite
See > page 216.
Radio text
See > page 217.
Scan
All channels in the current channel list will be
played for several seconds each.
Scan smart favorites
All smart favorites will be played for several sec-
onds. The stored song on the smart favorite
channel will be played from the beginning
= page 217. To switch to the previous or next
smart favorite, press the On/Off knob briefly to
the left or right.
219
>
Page 231 of 316
4KE012721BE
Media
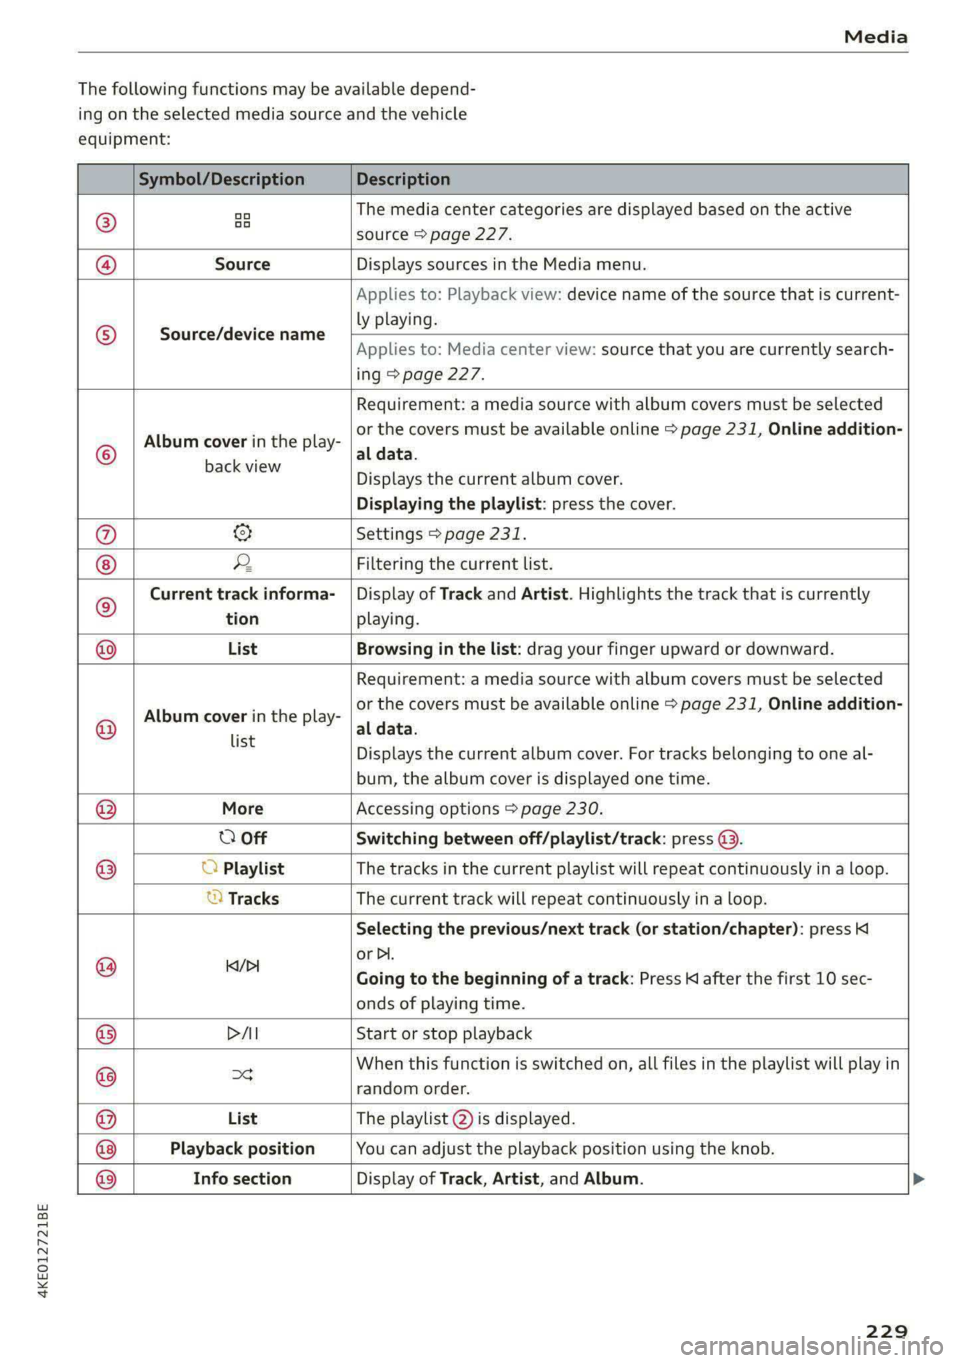
The following functions may be available depend-
ing on the selected media source and the vehicle
equipment:
Symbol/Description Description
®
oo oo The media center categories are displayed based on the active
source > page 227.
@ Source Displays sources in the Media menu.
Source/device name
Applies to: Playback view: device name of the source that is current-
ly playing.
Applies to: Media center view: source that you are currently search-
ing > page 227.
©
Album cover in the play-
Requirement: a media source with album covers must be selected
or the covers must be available online > page 231, Online addition-
al data.
eae Displays the current album cover.
Displaying the playlist: press the cover.
@ & Settings > page 231.
2 Filtering the current list.
© Current track informa- | Display of Track and Artist. Highlights the track that is currently
tion playing.
List Browsing in the list: drag your finger upward or downward.
©
Album cover in the play-
Requirement: a media source with album covers must be selected
or the covers must be available online > page 231, Online addition-
al data.
Playback position You can adjust the playback position using the knob.
Info section
list
s Displays the current album cover. For tracks belonging to one al-
bum, the album cover is displayed one time.
® More Accessing options > page 230.
O Off Switching between off/playlist/track: press @.
® O Playlist The tracks in the current playlist will repeat continuously in a loop.
© Tracks The current track will repeat continuously in a loop.
Selecting the previous/next track (or station/chapter): press Kl
or Dl.
KY/PI
@ Going to the beginning of a track: Press K after the first 10 sec-
onds of playing time.
® PAI Start or stop playback
en this function is switched on, all files in the playlist will play in @ xe When this f ioni itched \ files in the playli ill play i
random order.
® List The playlist @ is displayed.
© Display of Track, Artist, and Album.
229
Page 246 of 316
Checking and Filling
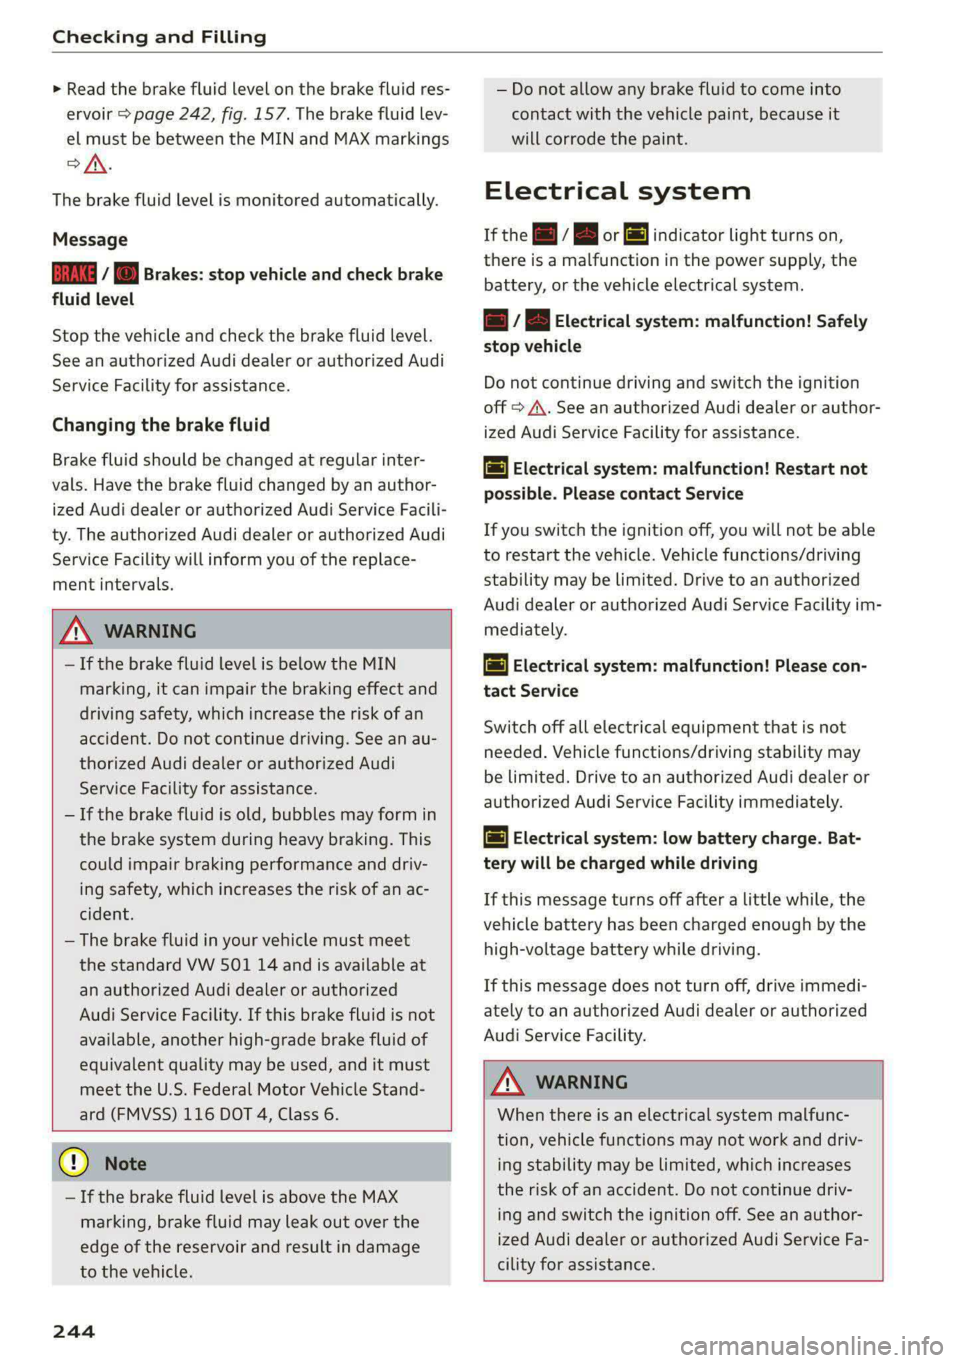
> Read the brake fluid level on the brake fluid res-
ervoir > page 242, fig. 157. The brake fluid lev-
el must be between the MIN and MAX markings
>A.
The brake fluid level is monitored automatically.
Message
Ga I © Brakes: stop vehicle and check brake
fluid level
Stop the vehicle and check the brake fluid level.
See an authorized Audi dealer or authorized Audi
Service Facility for assistance.
Changing the brake fluid
Brake fluid should be changed at regular inter-
vals. Have the brake fluid changed by an author-
ized Audi dealer or authorized Audi Service Facili-
ty. The authorized Audi dealer or authorized Audi
Service Facility will inform you of the replace-
ment intervals.
Z\ WARNING
— If the brake fluid level is below the MIN
marking, it can impair the braking effect and
driving safety, which increase the risk of an
accident. Do not continue driving. See an au-
thorized Audi dealer or authorized Audi
Service Facility for assistance.
— If the brake fluid is old, bubbles may form in
the brake system during heavy braking. This
could impair braking performance and driv-
ing safety, which increases the risk of an ac-
cident.
— The brake fluid in your vehicle must meet
the standard VW 501 14 and is available at
an authorized Audi dealer or authorized
Audi Service Facility. If this brake fluid is not
available, another high-grade brake fluid of
equivalent quality may be used, and it must
meet the U.S. Federal Motor Vehicle Stand-
ard (FMVSS) 116 DOT 4, Class 6.
@) Note
— If the brake fluid level is above the MAX
marking, brake fluid may leak out over the
edge of the reservoir and result in damage
to the vehicle.
244
— Do not allow any brake fluid to come into
contact with the vehicle paint, because it
will corrode the paint.
Electrical system
If the c= / B or [jm] indicator light turns on,
there is a malfunction in the power supply, the
battery, or the vehicle electrical system.
= / B Electrical system: malfunction! Safely
stop vehicle
Do not continue driving and switch the ignition
off > A\. See an authorized Audi dealer or author-
ized Audi Service Facility for assistance.
= Electrical system: malfunction! Restart not
possible. Please contact Service
If you switch the ignition off, you will not be able
to restart the vehicle. Vehicle functions/driving
stability may be limited. Drive to an authorized
Audi dealer or authorized Audi Service Facility im-
mediately.
= Electrical system: malfunction! Please con-
tact Service
Switch off all electrical equipment that is not
needed. Vehicle functions/driving stability may
be limited. Drive to an authorized Audi dealer or
authorized Audi Service Facility immediately.
= Electrical system: low battery charge. Bat-
tery
will be charged while driving
If this message turns off after a little while, the
vehicle battery has been charged enough by the
high-voltage battery while driving.
If this message does not turn off, drive immedi-
ately to an authorized Audi dealer or authorized
Audi Service Facility.
Z\ WARNING
When there is an electrical system malfunc-
tion, vehicle functions may not work and driv-
ing stability may be limited, which increases
the risk of an accident. Do not continue driv-
ing and switch the ignition off. See an author-
ized Audi dealer or authorized Audi Service Fa-
cility for assistance.