transmission AUDI E-TRON 2020 Owners Manual
[x] Cancel search | Manufacturer: AUDI, Model Year: 2020, Model line: E-TRON, Model: AUDI E-TRON 2020Pages: 316, PDF Size: 85.96 MB
Page 9 of 316
4KE012721BE
Quick access
— Audi musicinterface .......... 225
— Audi phone box ............... 175
—SDcardreader ............... 222
SOGKEE vcs sw isiness x x seein sw oem a ws 75
@ Electromechanical parking brake
BUtEON acces ox comme: « 2 sure 2 3 conte © 96
@® Selector lever ..............00. 90
@) [START STOP] button ............ 88
@) Steering wheel adjustment ...... 59
@3) Lever for:
— Cruise control system ......... 139
— Adaptive cruise assist .......... 142
@4 Connection port for the On Board
Diagnostic System (OBD) ........ 288
@3) Hood release ..........-..-0005 241
@8 Memory function buttons ........ 64
@) Buttons for:
PELIQHES ac x 2 wsvcene ao esezoss vo aenere @ s 45
—All-weather lights ............ 45
Luggage compartment lid button . 35
@9) Exterior mirror adjustment ...... 49
69 Buttons for:
— Power windows ............0. 39
—Child safety lock .............. 39
G) Tips
Some the equipment listed here is only instal-
led in certain models or is available as an op-
tion.
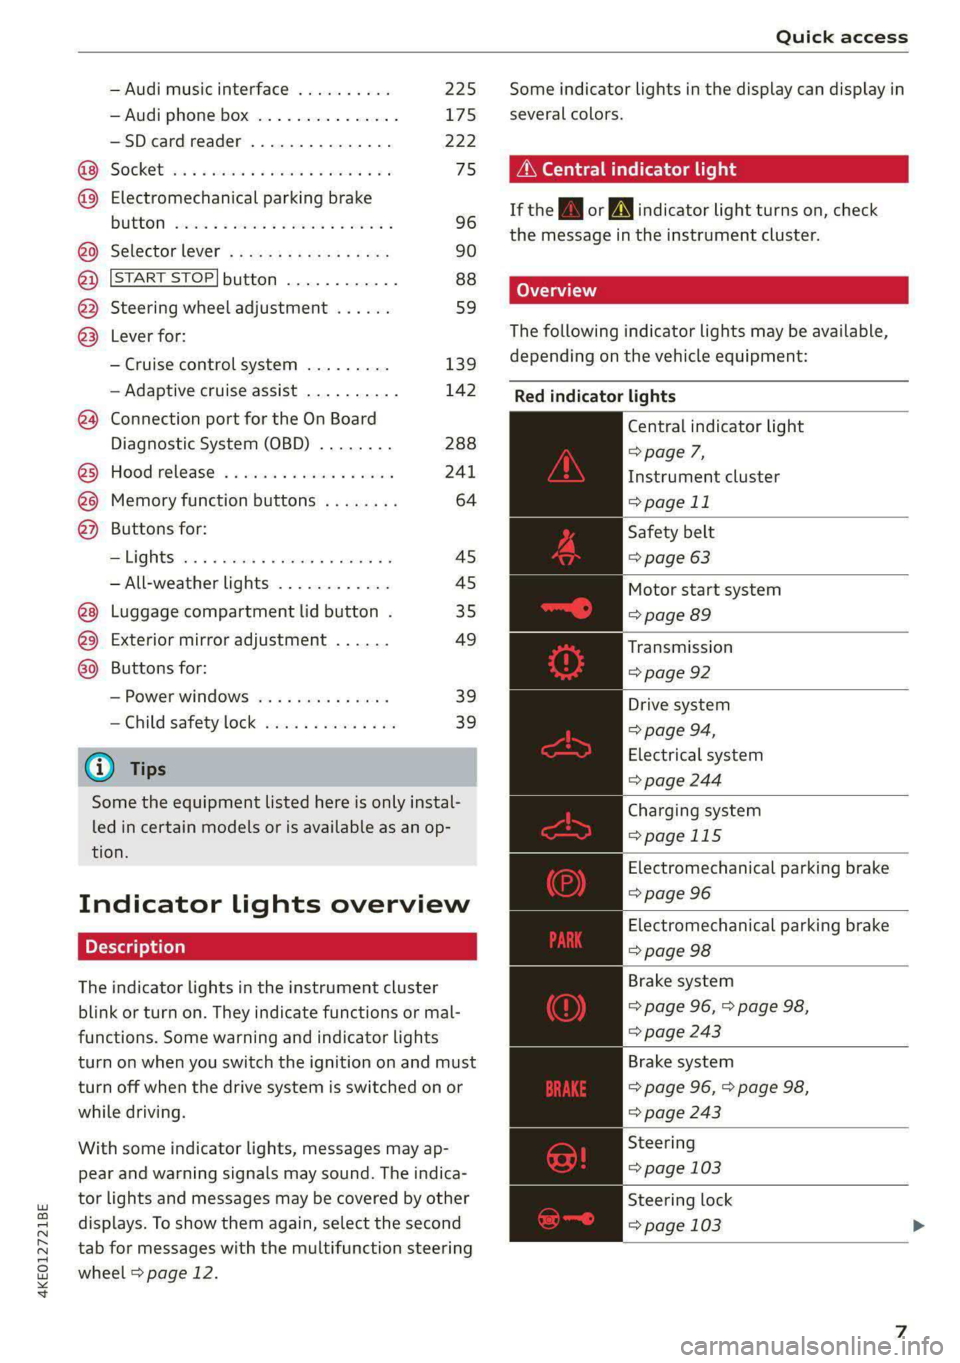
Indicator lights overview
The indicator lights in the instrument cluster
blink or turn on. They indicate functions or mal-
functions. Some warning and indicator lights
turn on when you switch the ignition on and must
turn off when the drive system is switched on or
while driving.
With some indicator lights, messages may ap-
pear and warning signals may sound. The indica-
tor lights and messages may be covered by other
displays. To show them again, select the second
tab for messages with the multifunction steering
wheel > page 12.
Some indicator lights in the display can display in
several colors.
A\ Central indicator light
If the A or indicator light turns on, check
the message in the instrument cluster.
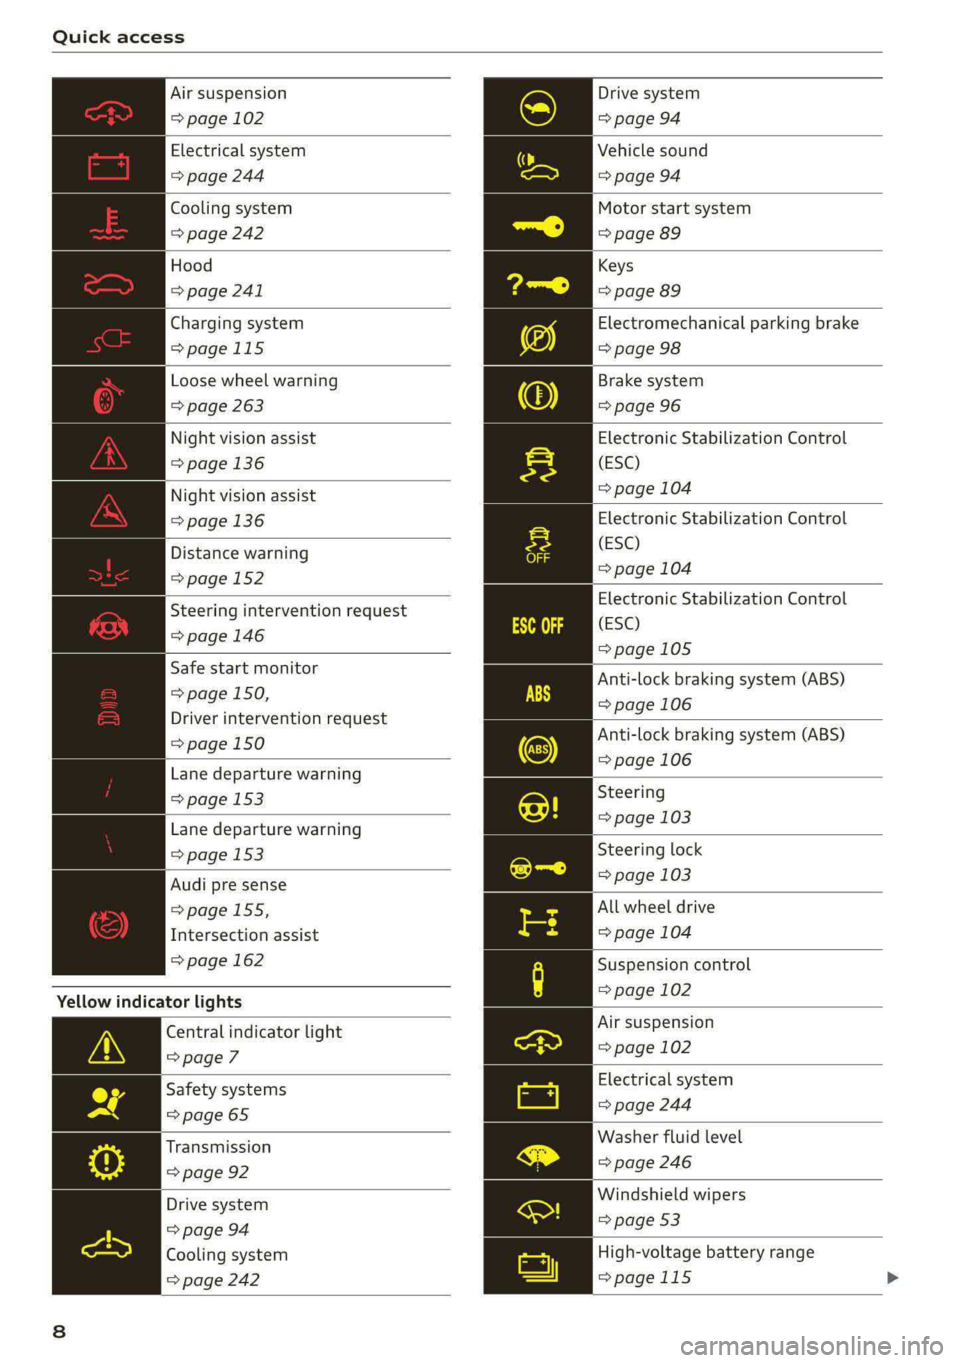
The following indicator lights may be available,
depending on the vehicle equipment:
Red indicator lights
Central indicator light
=> page 7,
Instrument cluster
=> page 11
Safety belt
=> page 63
Motor start system
=> page 89
Transmission
=> page 92
Drive system
=> page 94,
Electrical system
=> page 244
Charging system
=>page 115
Electromechanical parking brake
=> page 96
Electromechanical parking brake
=> page 98
Brake system
=> page 96, > page 98,
=> page 243
Brake system
=> page 96, > page 98,
=> page 243
Steering
=> page 103
Steering lock
=> page 103
Page 10 of 316
Quick access
Air suspension
=> page 102
Electrical system
=> page 244
Cooling system
=> page 242
Hood
=> page 241
Charging system
=>page 115
Loose wheel warning
=> page 263
Night vision assist
=> page 136
Night vision assist
=>page 136
Distance warning
=> page 152
Steering intervention request
=> page 146
Safe start monitor
=> page 150,
Driver intervention request
=> page 150
Lane departure warning
=> page 153
Lane departure warning
= page 153
Audi pre sense
=> page 155,
Intersection assist
=> page 162
Yellow indicator lights
Central indicator light
=> page 7
Safety systems
=> page 65
Transmission
=> page 92
Drive system
=> page 94
Cooling system
=> page 242
Drive system
=> page 94
Vehicle sound
=> page 94
Motor start system
=> page 89
Keys
=> page 89
Electromechanical parking brake
=> page 98
Brake system
=> page 96
Electronic Stabilization Control
(ESC)
=> page 104
Electronic Stabilization Control
(ESC)
=> page 104
Electronic Stabilization Control
(ESC)
=>page 105
Anti-lock braking system (ABS)
=> page 106
Anti-lock braking system (ABS)
=> page 106
Steering
=> page 103
Steering lock
=> page 103
All wheel drive
=> page 104
Suspension control
= page 102
Air suspension
=> page 102
Electrical system
=> page 244
Washer fluid level
=> page 246
Windshield wipers
=> page 53
High-voltage battery range
>page 115
Page 44 of 316

Opening and closing
These functions are operated in the MMI. Multi-
ple receivers can be programmed, which can con-
trol the functions of up to eight!) hand-held
transmitters.
ZA WARNING
— When operating or programming the garage
door opener, make sure that no people or
objects are in the area immediately sur-
rounding the equipment. People can be in-
jured or property can be damaged if struck
when closing.
— Do not allow yourself to be distracted from
traffic by the viewing and operating the dis-
plays.
@ Tips
— If you sell your vehicle, remove the key user
= page 28 and reset all settings to the fac-
tory settings > page 237.
— For an explanation on conformity with the
FCC regulations in the United States and the
Industry Canada regulations, see
=> page 295.
@) Tips
Before you program your system to the ga-
rage door opener, first check the compatibili-
ty:
— Ask an authorized Audi dealer or authorized
Audi Service Facility or check at www.
homelink.com. You can also find more infor-
mation about HomeLink there.
— You can display information about Home-
Link (compatibility level/status/country
code/HomeLink generation) in the MMI:
— Select on the home screen: VEHICLE > Set-
tings & Service > Garage door opener > (i).
Applies to: vehicles with garage door opener
Requirements: the remote control transmitter
must be programmed > page 42, the vehicle
)) The possible number of hand-held transmitters depends
on the equipment.
42
must be within range of the system, and the igni-
tion must be switched on.
There are multiple options to open or close the
system (such as the garage door).
> If you have only programmed one remote con-
trol transmitter, press the -@ button on the
lower display. Or
> If you have programmed multiple remote con-
trol transmitters, press the -@ button on the
lower display and then press the respective sys-
tem button. Or
> If you have configured the programmable
steering wheel button*, press the > button
=> page 26 and then press the respective button
for the system. Or
> Applies to: vehicles with location pairing: If you
have programmed Location pairing, press the
button for it on the upper display (notification
center > page 19). As you approach the system,
the button is displayed on the MMI.
If transmission was successful, the message:
Send to: XXX will appear.
Applies to: vehicles with garage door opener
You can program both fixed code and rolling code
systems in the MMI using the procedure that is
described.
Requirement: the ignition must be switched on.
Programming the system
Applies to: MMI
Requirement: the hand transmitter must be
present and the vehicle must be within range of
the system (such as the garage door) that you
would like to program.
> If you are programming the garage door opener
for the first time, press the - button on the
lower display. Follow the instructions in the
MMI. Or
> If you would like to program other systems, se-
lect on the home screen: VEHICLE > Settings &
Service > Garage door opener. Select the >
Page 92 of 316

Driving
pedal and always shift into “P” when the ve-
hicle is stopped.
— If you leave the vehicle, switch the ignition
off and take the key with you. This is espe-
cially important when leaving persons or an-
imals in the vehicle. Otherwise, the vehicle
could start unintentionally, the parking
brake could release, or electronic equipment
could activate, which increases the risk of an
accident.
— No persons or animals should be left in a
locked vehicle. Locked doors make it more
difficult for emergency workers to enter the
vehicle, which puts lives at risk.
— If you do not begin driving immediately af-
ter releasing the brake pedal, your vehicle
may begin to roll backward. Press the brake
pedal or set the parking brake immediately.
@) Note
If you have to stop on an incline, always press
the brake pedal to hold the vehicle in place to
reduce the risk of the vehicle rolling back-
ward. Do not try to hold the vehicle in place
by pressing and holding the accelerator pedal.
The transmission can overheat, which increas-
es the risk of damage.
Hill hold assist
If you take your foot off of the brake pedal when
driving on hills, the braking force will be held for
several seconds. At that time, you can start driv-
ing without the vehicle rolling backward.
Requirement: the driver's door must be closed,
the drive system must be active, and the vehicle
must be traveling uphill.
> To activate hill hold assist, press and hold the
brake pedal for several seconds while the vehi-
cle is stationary.
Use the hold assist > page 97 when the braking
force should be applied for more than several
seconds.
90
ZA WARNING
— If you do not begin driving immediately af-
ter releasing the brake pedal, your vehicle
may begin to roll backward. Press the brake
pedal
or set the parking brake immediately.
— The hill hold assist cannot hold the vehicle
on inclines in every scenario (for example,
on slippery or icy ground).
Gears and driving programs
RAZ-0570
i
Fig. 83 Center console: hand rest with selector lever
The selector Lever is located on the side of the
hand rest. You can operate the selector lever us-
ing your thumb and index finder. Operation is
similar to a vehicle with an automatic transmis-
sion.
The gears are displayed next to the hand rest.
— P (Park)
— R (Reverse)
—N (Neutral)
—D (Drive)
Selecting a gear
Requirement: the ignition must be switched on.
— Bring the vehicle to a full stop and press the
brake pedal.
—To select the nearest gear, move the selector
lever forward or back until you feel the first
pressure point.
—To skip a gear (for example, move from “D” to
“R”), move the selector lever past the pressure
point in the desired direction.
— The label next to the selector lever for the se-
lected gear will light up.
Page 93 of 316

4KE012721BE
Driving
“N” (Neutral) gear
In the “N” gear, power is not transmitted to the
driving wheels. Use the “N” gear in a car wash
(with conveyor belts), for example.
If you unintentionally select “N” while driving
(faster than 1 mph (2 km/h)), you can also shift
back to “D” without pressing the brake pedal.
For safety reasons, the vehicle cannot be locked
when the transmission is in the "N” gear.
“Pp” (Park) gear
The vehicle is secured from rolling away by the
parking lock when in the “P” gear.
— Bring the vehicle to a full stop and press the
brake pedal.
— Press the “P” button @ on the selector lever.
— The “P” next to the selector lever will light up.
“P” engages automatically if you switch the drive
system off while the “D” or “R” gear is selected.
If you switch the drive system off in “N”, “P” will
engage automatically after approximately 30 mi-
nutes.
If you want to switch from “P” to “D” or “R”, the
drive system must be active.
Selecting the driving program
Various driving programs can be selected when in
the “D” gear. The programs influence how the ac-
celerator pedal and drive system respond.
If you select the dynamic or offroad Audi drive
select* mode, the “S” driving program will be ac-
tivated. If you select efficiency, “E” will be acti-
vated. When the ignition is switched off, the driv-
ing program may be reset to “D”.
To switch between the current driving program
and “S”, push the selector lever toward the rear.
ZA WARNING
— Before you start driving, check if the label
for the desired selector lever position next
to the selector lever is lit up.
— Always secure your vehicle from rolling
away. Press the brake pedal or shift to “P”.
When leaving the vehicle, also set the park-
ing brake.
— To reduce the risk of an accident, do not
press the accelerator pedal when changing
gears if the vehicle is stationary and the
drive system is active.
— Never select the “R" or "P” gears while driv-
ing. Doing so could cause an accident.
—The vehicle can roll even if the ignition is
switched off.
(Gi) Tips
If you shift between “D” and “R” within one
second, you do not need to press the brake
pedal. This makes it possible to “rock” the ve-
hicle if it is stuck, for example.
Accelerator pedal
You can accelerate the vehicle using the accelera-
tor pedal.
Maximum acceleration
If you press the accelerator pedal all the way
down, the motor’s full power will be used and
you will reach maximum acceleration, also called
“kick-down”.
Applies to: vehicles with boost function: In the
“S” driving program, even more power is utilized
for a brief period of time via the boost function.
The availability of this function depends on the
charge level of the high-voltage battery and the
temperature of the drive system components,
among other things.
Z\ WARNING
The driving wheels could spin and the vehicle
could swerve on slick or slippery road surfaces
when using kick-down, which increases the
risk of an accident.
Launch Control
Applies to: vehicles with Launch Control
Launch Control provides the best possible accel-
eration when starting from a stop.
91
Page 94 of 316
Driving
Requirements
— Driving program “S” > page 91 or the dynamic
Audi drive select* mode must be selected
=> page 101.
— The boost function is available > page 91.
Using Launch Control
— Press the brake pedal with your left foot and
hold it all the way down for at least one second.
— With the brake pedal pressed, press the accel-
erator pedal all the way down with your right
foot at the same time.
— As soon as the colored edge of the power meter
actively flashes, remove your foot from the
brake pedal.
ZA WARNING
Only use Launch Control when road and traffic
conditions allow it and other road users will
not be endangered or impacted by your driv-
ing and the vehicle's acceleration. The driving
wheels could spin and the vehicle could
swerve, especially on slick or slippery road
surfaces, which increases the risk of an acci-
dent.
@) Note
When accelerating using Launch Control, all
vehicle components are subject to heavy
loads. This can result in increased wear.
G) Tips
After accelerating using the Launch Control,
the temperature of some vehicle components
may increase greatly. If that happens, the
function will not be available for a few mi-
nutes to reduce the risk of damage. After a
cool-down period, Launch Control will be
available again.
Messages
& Transmission: malfunction! Safely stop vehi-
cle
Do not continue driving. Stop the vehicle as soon
as possible in a safe location and secure it so it
92
does not roll. See an authorized Audi dealer or
authorized Audi Service Facility for assistance.
i] Selector lever: malfunction! Gear change on-
ly possible if using both shift paddles.
There is a system malfunction in the selector lev-
er. You can continue driving with restricted func-
tion. The selector lever is not working. Gears can
only be selected by tapping both shift paddles at
the same time when the vehicle is stationary. The
“P” gear is automatically engaged when you
switch off the drive system. Drive to an author-
ized Audi dealer or authorized Audi Service Facili-
ty immediately to have the malfunction correct-
ed.
i P button: malfunction! Auto P when engine
off. Please contact Service
There is a malfunction in the "P" button on the
selector lever. The “P” gear is automatically en-
gaged when you switch off the drive system.
Drive to an authorized Audi dealer or authorized
Audi Service Facility immediately to have the
malfunction corrected.
i Danger of rolling away! P not possible.
Please apply parking brake
The parking lock can no longer be engaged. Drive
to an authorized Audi dealer or authorized Audi
Service Facility immediately to have the malfunc-
tion corrected.
Drive system
ada ee tee Tn)
Vehicles with an electric drive system are pow-
ered by an electric motor. The drive power de-
pends on the temperature and the charge level of
the high-voltage battery.
The vehicle is able to recover energy by using “re-
cuperation”. The electric drive system operates
like a generator and converts a large portion of
kinetic energy into electrical energy that is stored
in the high-voltage battery. The vehicle is braked
during recuperation, which is similar to the >
Page 136 of 316

Driving information
Traffic light information
Applies to: vehicles with traffic light information
Fig. 100 Instrument cluster: traffic light information dis-
play
The traffic light information gives you a speed
recommendation in order to reach the next traffic
light when it is green @, or it informs you of the
wait time at the next red light (2). Once traffic
light data is received, the traffic light information
will be displayed in the instrument cluster and in
the head-up display*. If the vehicle is in an area
with traffic light information but cannot receive a
traffic light signal, then a gray traffic light sym-
bol will be displayed @).
General information
The traffic light information is subject to system
limitations and may be unavailable or only parti-
ally available in the following situations:
— Ifthe permitted speed limit is exceeded
— If driving below a certain speed limit
— If the next traffic light is less than approxi-
mately 100 feet (30 m) away
— Ifthe estimated wait time at a red light is less
than four seconds
—If there is no traffic light data available
— If emergency response vehicles or public transit
systems are active
— If traffic lights are in construction zones or be-
ing serviced
— If there are warnings from the camera-based
traffic sign recognition*
— If the camera-based traffic sign recognition* is
malfunctioning or not available
— If the data connection has been interrupted
134
— If data transmission is deactivated in the priva-
cy settings
— If the subscription has expired
If this is the case, the menu item will be grayed-
out or it will not be possible to select it.
ZA\ WARNING
— When traffic light information is shown, al-
so always pay attention to the traffic situa-
tion, the distance to other vehicles, and the
area around the vehicle. The driver is always
responsible for assessing the traffic situa-
tion.
— Always adapt your speed to the current
weather, road and traffic conditions. The dis
played information must never cause you to
ignore legal traffic regulations and pose a
safety risk.
— Regardless of the traffic light information,
you should always monitor your speed using
the speedometer and make sure you are ad-
hering to the legal speed limit.
— The traffic light information does not adjust
your vehicle's speed to the speed recom-
mendation shown in the display.
— Observe the safety precautions and note the
limits of the assist systems, sensors, and
cameras > page 127.
(i) Tips
— Traffic light information was only available
in select cities at the time this manual was
printed.
— Traffic light information is not available na-
tionwide.
— The functions depend on the navigation da-
ta* being up-to-date and correct identifica-
tion by the traffic sign recognition*.
— Incorrect values from the camera-based
traffic sign recognition* or outdated naviga-
tion system* map data can result in missing
or incorrect display images.
— Certain traffic lights can automatically ad-
just to the current traffic situation. If this
occurs, the display of traffic light informa-
tion can change suddenly.
Page 137 of 316

4KE012721BE
Driving information
— The traffic signs on the road always take pri-
ority over the display. The driver is always
responsible for adhering to the regulations
applicable in the country where the vehicle
is being operated.
— Units of measurement and language set-
tings are displayed based on how they were
set in the MMI system settings > page 236.
Applies to: vehicles with traffic light information
Switching traffic light information on and
off
The system can be switched on and off in the
MMI 2 page 130.
Accessing traffic light information
> Select in the instrument cluster: vehicle func-
tions tab > Traffic signs.
G@) Tips
If another tab or another function is selected
in the instrument cluster, the traffic light in-
formation will appear in the status bar on the
instrument cluster.
Messages
Applies to: vehicles with traffic light information
Malfunction! See owner's manual
The system could not be configured, for example
due to a network malfunction. Switch the igni-
tion off and shut down the vehicle to restart the
system. Wait several minutes until the vehicle
has shut down completely and then switch the
ignition back on.
Function currently unavailable. See owner's
manual
There is a temporary system malfunction. Check
if one or more of the following situations applies
and correct the issue if necessary:
— Traffic light information is switched off
— Data transmission is deactivated
— The vehicle is not equipped with traffic sign rec-
ognition.
— There is no valid license
— Traffic light information is not available in that
area
Night vision assist
Applies to: vehicles with night vision assist
Night vision assist helps you when it is dark by
using an infrared camera to monitor the area in
front of your vehicle, within the limits of the sys-
tem. It can display objects up to a distance of ap-
proximately 1000 feet (300 m).
Pedestrian and wild animals are detected by
measuring the temperature difference between
the object and the background. Pedestrians and
wild animals will not be detected if the tempera-
ture difference is too small. The pedestrian and
wild animal marking feature is deactivated at
temperatures above approximately 77 °F (25 °C)
and when it is light outside.
The thermal image detected by the camera is dis-
played in the instrument cluster. Warm areas
generally appear lighter and cold areas appear
darker.
The camera for the night vision assist is located
in the vehicle's radiator grille > page 129. Make
sure the night vision camera is not covered by
stickers, deposits, or any other obstructions be-
cause this can impair the night vision assist func-
tion. Follow the information about cleaning
=> page 268.
ZA WARNING
— Observe the safety precautions and note the
limits of the assist systems, sensors, and
cameras > page 127.
— Night vision assist can only detect pedes-
trians and wild animals located within the
range of the infrared camera.
— Night vision assist cannot detect pedes-
trians or wild animals and mark them if:
— They are not in an upright position, for ex-
ample if they are sitting or lying down
and/or >
135
Page 179 of 316
4KE012721BE
Telephone
@) Tips
— Only one mobile device at a time can be
charged wirelessly in the Audi phone box.
— Strong transmission quality* cannot be
guaranteed if more than one cell phone is in
the box.
— To reduce the risk of malfunctions, make
sure the mobile device is positioned correct-
ly in the Audi phone box.
— Make sure there are no objects between the
Audi phone box and the mobile device.
— Placing the mobile device in a bag or protec-
tive sleeve inside the Audi phone box can in-
terfere with the connection to the external
antenna*.
— Metallic objects in the Audi phone box block
the wireless charging of your mobile device
and calls made using the exterior antenna”*.
— The maximum charging output is 5 W.
—The charging time and temperature will vary
depending on the mobile device being used.
— You can purchase a USB adapter from an au-
thorized Audi dealer or authorized Audi
Service Facility, or at specialty stores.
— Audi recommends using Audi Genuine Ac-
cessories. Audi has verified their reliability,
safety, and suitability.
Using the telephone
Accessing the telephone functions
Applies to: vehicles with telephone
a) aa a)
Q
~—*\ Por ©
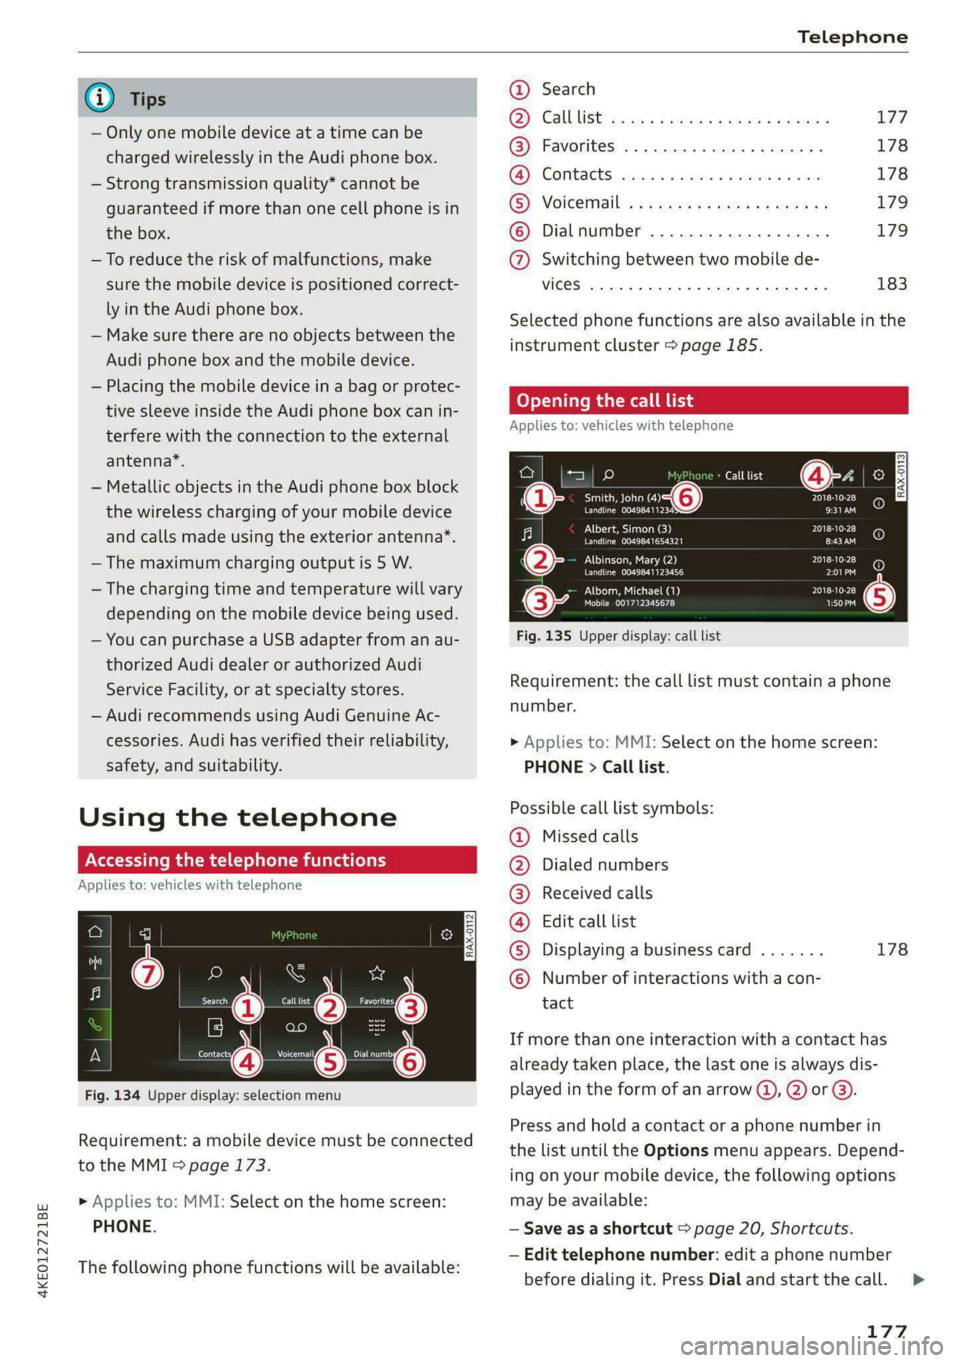
Fig. 134 Upper display: selection menu
Requirement: a mobile device must be connected
to the MMI > page 173.
> Applies to: MMI: Select on the home screen:
PHONE.
The following phone functions will be available:
@ Search
2) Calblist) gees x: news =» seme s x oes + 177
@® Favorites ..........0.0.0.0.00. 178
@ Contacts ......... 0 eee eee eee 178
(5) Voicetriail; «ss cena x » eee 2 ¢ cones: 179
© Dialnumber ................... 179
@ Switching between two mobile de-
VICES oo eee eee ee cece ee eee 183
Selected phone functions are also available in the
instrument cluster > page 185.
Opening eet
Applies to: vehicles with telephone
eis
Turse) “@
ecm PED
Albert, Simon (3)
Call list
2018-10-28
9:31AM
Prats}
8:43 AM eee aera)
2018-10-28
2:01 PM
PLE lea cad
Perm Eee
ela arta
Remar EDL)
2018-10-28
1:50PM
Fig. 135 Upper display: call list
Requirement: the call list must contain a phone
number.
> Applies to: MMI: Select on the home screen:
PHONE > Call list.
Possible call list symbols:
Missed calls
Dialed numbers
Received calls
Edit call list
Displaying a business card 178
©OOOCOLO Number of interactions with a con-
tact
If more than one interaction with a contact has
already taken place, the last one is always dis-
played in the form of an arrow @), @) or @).
Press and hold a contact or a phone number in
the list until the Options menu appears. Depend-
ing on your mobile device, the following options
may be available:
— Save as a shortcut > page 20, Shortcuts.
— Edit telephone number: edit a phone number
before dialing it. Press Dial and start the call.
177
>
Page 196 of 316
Emergency call
Emergency call
Overview
Applies to: vehicles with emergency call function
An emergency call is a combination of data trans-
mission and a phone call. The data transmission
from your vehicle forwards important informa-
tion, such as the vehicle and position data, to the
emergency call center.
Depending on the country and the vehicle equip-
ment, the following functions may be available:
With the emergency call, you can call for help in
dangerous situations as quickly as possible. Use
this function when emergency help is needed
=> page 194.
— Audi connect emergency call (TPS emergency
call). This eCall system uses emergency call
centers operated by third party providers.
With online roadside assistance, you can request
assistance if there is a breakdown or a minor acci-
dent > page 195.
ZX WARNING
In areas with poor GPS reception or outside
the coverage range of the respective cell
phone service provider, some functions and/or
services may not be available, it may not be
possible to send or receive data, or functional-
ity may be limited.
@) Tips
To see which data can be transmitted, visit
your Audi country or sales region website at
www.audi.com.
Emergency call
Applies to: vehicles with emergency call function
The services are provided through a SIM card in-
stalled in the vehicle. Services are provided as-
suming that the cell phone network required for
the installed SIM card is functioning and availa-
ble for use. The available services set by Audi AG
are only available within the cell phone network
194
coverage area for the cell phone service provider
selected by Audi AG.
@ Tips
— The emergency call function cannot be deac-
tivated in the Infotainment system settings.
— The availability of the TPS emergency call is
limited to certain times.
—The costs for call and data connections for
TPS emergency calls is included in the price
of the services.
Functions
Applies to: vehicles with emergency call function
A TPS emergency call can be made manually or
automatically > page 194.
Making an emergency call
Applies to: vehicles with emergency call function
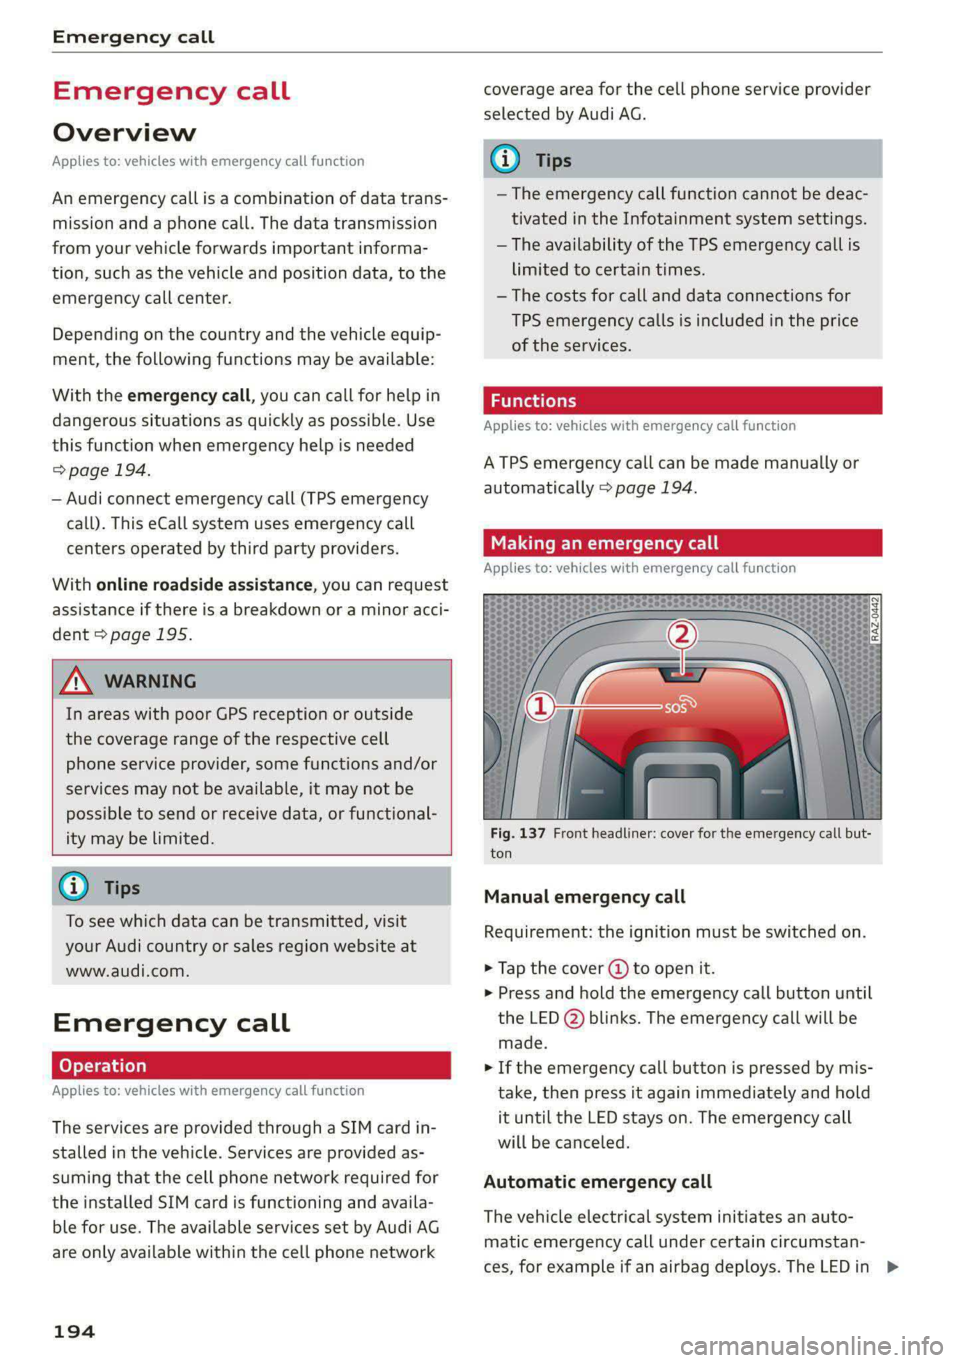
Fig. 137 Front headliner: cover for the emergency call but-
ton
Manual emergency call
Requirement: the ignition must be switched on.
> Tap the cover (J) to open it.
> Press and hold the emergency call button until
the LED @) blinks. The emergency call will be
made.
> If the emergency call button is pressed by mis-
take, then press it again immediately and hold
it until the LED stays on. The emergency call
will be canceled.
Automatic emergency call
The vehicle electrical system initiates an auto-
matic emergency call under certain circumstan-
ces, for example if an airbag deploys. The LEDin >