interior lights AUDI E-TRON 2021 Owners Manual
[x] Cancel search | Manufacturer: AUDI, Model Year: 2021, Model line: E-TRON, Model: AUDI E-TRON 2021Pages: 308, PDF Size: 83.91 MB
Page 4 of 308
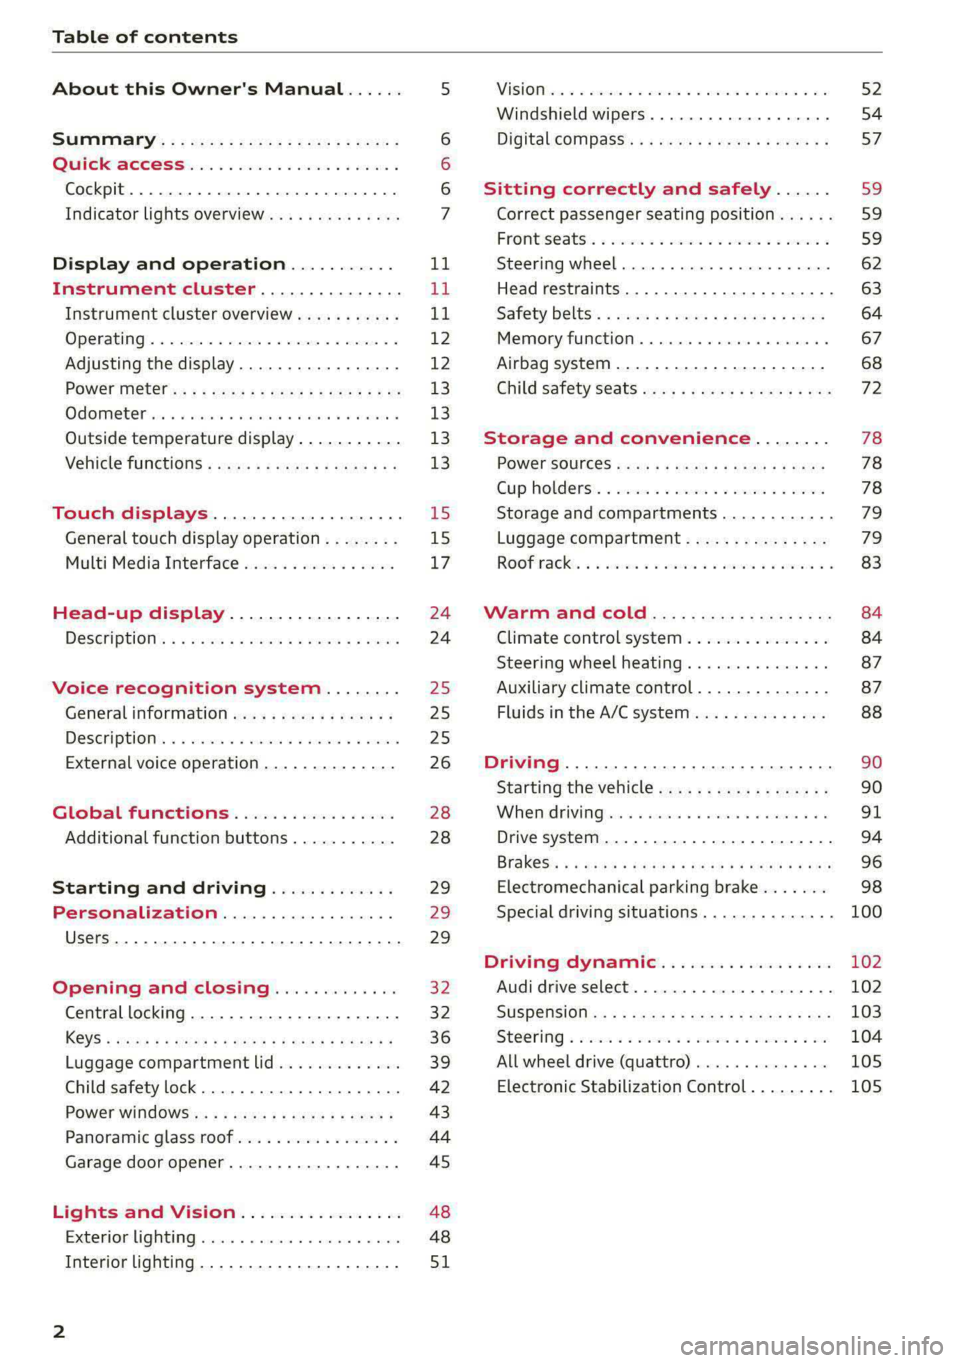
Table of contents
About this Owner's Manual......
SUMIMAry: < = exe : eens: Seen cs sens
QutckeaeCe ssh: «i esis se ois a eaves @
Cockpit. ...... 0... eee eee eee eee
Indicator lights overview...........4..
Display and operation...........
Instrument cluster...............
Instrument cluster overview...........
Operating. ecccuse w+ were oo wens oo ayes 9 ¥
Adjusting the display.................
POWErMe@tel ss « » wees = 5 gees ey ewe xe
OdOMeter sic oo sisiecs a werner » ome ee irae «
Outside temperature display...........
Vehicle functions « sce. ss saes ae sees aes
Touch displays....................
General touch display operation........
Multi Media Interface................
Head-up display..................
DeSGriptlOlls « ¢ sans a ¢ wee a ¢ saws § eae
Voice recognition system........
General information..............4..
DESCRIPTION. 4 & wisevus sa stenius ow aresiue 6 ¥ renin
External voice operation..............
Global Functions’. vc. 6s css se cess
Additional function buttons...........
Starting and driving.............
Personalization..................
Luggage compartment lid.............
Child safety lock........... 00. cece eee
POWEF WINdOWS:: « x sso ¥ 2 eure 9 2 ea
Panoramic glass:n00fiecis < « svsvine so siswes «
Garage door opener...........-.00005
Lights and Vision.................
EXEROPLUGHELAG, soosece « » enscet oo snsuein © 0 asee
Interior lighting..............-...0--
NOD
OO
11
ga:
11 12 12 13 13 13
13
15
15
17
24 24
25
25
25
26
28
28
29
29 29
32 32
36 39
42 43
44
45
48
48
51
ViSIOM i & & soscone wo coasaie 3 w aeeeane © w cease ow 52
Windshield wipers...............000 54
Digital COMPdSS's s s wae se wees se ees ve 57
Sitting correctly and safely...... 59
Correct passenger seating position...... 59
Frontis@ats:. = csv 2» ewes 2 o wom ws eon © 59
SLESKIMG WHEEL eseiince 4 0 eowcene s sontone o 6 axottene 62
Head restraints...................05. 63
Safety belts's « sso: s swans 5 ¢ eeies 5 2 awn 64
Memory function.............. 00s eee 67
Airbag system...............2220005 68
Child
safety seats ..........00 eee eae 72
Storage and convenience........ 78
POWEr SOUFCES seis = = eeu 2 + cee 2 + Hes 78
Cup Rolders': « sis ss ems os ence ee eee 78
Storage and compartments............ 79
Luggage compartment............... 79
Roofirackss + ¢ sseis eevee ev ena oo ween eo 83
Warm and cold.................6. 84
Climate control system............... 84
Steering wheel heating.............-. 87
Auxiliary climate control.............- 87
Fluids in the A/C system.............. 88
Driving ........... 0. cee ee eee 90
Starting the vehicle................-. 90
When:driving jac: 2 + srcwie sv snsine oo earn vos 91
Drive system. ......... 0.0.00 .002000. 94
Brakesi: « « sia < anne 3 gene 3 x nOuR Fs cee 96
Electromechanical parking brake....... 98
Special driving situations.............. 100
Driving dynamic.................. 102
Audi drive select..............000000. 102
SUSPeNSION ss « = seus + < HeeS 4c REER x BRE 103
StOGFING « wicca x cases « 2 oresess a cae © H Lod 104
All wheel drive (quattro).............. 105
Electronic Stabilization Control......... 105
Page 27 of 308

4KE012721BF
Voice recognition system
Voice recognition system
General information
Applies to: vehicles with voice recognition system
You can operate many functions in the vehicle
easily using voice commands.
Using the voice recognition system optimally
> Speak clearly and distinctly at a normal volume.
Speak louder when driving faster.
» Emphasize the words in the commands evenly
and do not leave long pauses.
> Close the doors, the windows, and the sunroof*
to reduce background noise. Make sure that
passengers are not speaking when you are giv-
ing a voice command.
> Do not direct the vents toward the hands-free
microphone, which is in the roof headliner near
the front interior lights.
> Only the driver should speak to the system, be-
cause the handsfree microphone is aimed to-
ward this seating position.
ZA\ WARNING
— Direct your full attention to driving. As the
driver, you have complete responsibility for
safety in traffic. Only use the functions in
such a way that you always maintain com-
plete control over your vehicle in all traffic
situations.
— Do not use the voice recognition system in
emergencies because your voice may change
in stressful situations. The system may take
longer to dial the number or may not be
able to dial it at all. Dial the emergency
number manually.
G) Tips
There are no voice guidance* prompts when a
dialog is active.
Description
eye aU mame ees eR
Applies to: vehicles with voice recognition system
Se
Drive me to
Where is a a
Connect
Pre)
Play
Eg
Maes
coy
Fig. 18 Upper display: voice recognition system
Requirement: the ignition and the MMI must be
switched on. A system language supported by
the voice recognition system must be set. There
must be no phone calls in progress and the park-
ing aid must not be active.
Operating by button «£
> Briefly press the «€ button on the multifunction
steering wheel, or depending on the context,
press we in the upper display.
> Say the desired command after the signal tone.
> To switch the voice recognition system off,
press and hold the «€ button on the multifunc-
tion steering wheel, or say or press Cancel (@)
> fig. 18.
Operating with voice commands
> Applies to: MMI: To operate the voice recogni-
tion system using voice commands, select on
the home screen: SETTINGS > General >
(Speech dialog system) > Activate the speech
dialog system with "Hey Audi".
> Say the activation phrase Hey Audi together
with the desired command.
> To switch the voice recognition system off, say
Cancel or press and hold the «£ button on the
multifunction steering wheel, or press @)
> fig. 18.
Commands and assistance
In the voice recognition system menu, possible
commands or help settings are displayed for the
current dialog @).
> To receive additional help for the current dia-
log, say or press Help (2).
25
Page 47 of 308
4KE012721BF
Opening and closing
> Push the 2S switch back briefly to the second
level 2) twice in a row.
Roof emergency closing
If an object is detected when closing, the roof
will open again automatically. In this case, you
can then close it with the power emergency clos-
ing function.
> Within five seconds after the sunroof opens au-
tomatically, pull the applicable button until the
roof is closed.
Z\ WARNING
To reduce the risk of injury, always pay atten-
tion when closing the roof. Always switch the
ignition off and take the key with you when
leaving the vehicle.
@) Note
Always close the roof when you leave the vehi-
cle and when there is precipitation to reduce
the risk of damage to the interior equipment,
particularly the electronic equipment.
G) Tips
— After switching off the ignition, the roof and
sunshades can still be operated for several
minutes as long as neither of the front
doors have been opened.
— It is not possible to open the roof when
temperatures are too low.
Garage door opener
Applies to: vehicles with garage door opener
With the garage door opener, you can activate
systems such as the garage doors, security sys-
tems or house lights from inside your vehicle.
These functions are operated in the MMI. Multi-
ple receivers can be programmed, which can con-
trol the functions of up to eight!) hand-held
transmitters.
)) The possible number of hand-held transmitters depends
on the equipment.
ZA\ WARNING
— When operating or programming the garage
door opener, make sure that no people or
objects are in the area immediately sur-
rounding the equipment. People can be in-
jured or property can be damaged if struck
when closing.
— Do not allow yourself to be distracted from
traffic by the viewing and operating the dis-
plays.
Gi) Tips
— If you sell your vehicle, reset all settings to
the factory default settings > page 229.
— The system complies with United States FCC
regulations and ISED regulations
=> page 288.
G) Tips
Before you program your system to the ga-
rage door opener, first check the compatibili-
ty:
— Ask an authorized Audi dealer or authorized
Audi Service Facility or check at www.
homelink.com. You can also find more infor-
mation about HomeLink there.
— You can display information about Home-
Link (compatibility level/status/country
code/HomeLink generation) in the MMI:
— Select on the home screen: VEHICLE > Set-
tings & Service > Garage door opener > @.
Applies to: vehicles with garage door opener
Requirements: the remote control transmitter
must be programmed > page 46, Program-
ming, the vehicle must be within range of the
system, and the ignition must be switched on.
There are multiple options to open or close the
system (such as the garage door).
45
Page 53 of 308

4KE012721BF
Lights and Vision
When the emergency flashers are turned on, the
a and B indicator lights will flash at the same
time.
You can indicate a lane change or a turn when the
emergency flashers are switched on by using the
turn signal lever. The emergency flashers stop
temporarily.
The emergency flashers also work when the igni-
tion is turned off.
@) Tips
You should switch the emergency flashers on
if:
— you are the last car in a traffic jam so that
all other vehicles approaching from behind
can see your vehicle
— your vehicle has broken down or you are
having an emergency
— your vehicle is being towed or if you are tow-
ing another vehicle
Messages
If the Ea indicator light turns on, a bulb has
failed. The displayed message indicates the cause
and possible solutions. If one of the messages re-
mains on, drive immediately to an authorized
Audi dealer or authorized Audi Service Facility to
have the malfunction repaired.
Bg) Audi adaptive light: malfunction! See own-
er's manual
Adaptive light* is not working. The headlights
still function. Drive immediately to an authorized
Audi dealer or authorized Audi Service Facility to
have the malfunction repaired.
High beam assistant: malfunction! See own-
er's manual
You can still switch the high beams on or off
manually. Drive immediately to an authorized
Audi dealer or authorized Audi Service Facility to
have the malfunction repaired.
High beam assistant: currently unavailable.
Camera view limited due to surroundings. See
owner's manual
This message appears if the camera's visual field
is blocked. The system will switch itself off. Try
switching the systems on later.
a Automatic headlights: malfunction! See
owner's manual
The light/rain sensor is malfunctioning. When
the AUTO light function is on, the low beams will
remain switched on at all times for safety rea-
sons. Drive immediately to an authorized Audi
dealer or authorized Audi Service Facility to have
the malfunction repaired.
Interior lighting
Front interior lighting
Fig. 37 Headliner: interior lighting
Interior lighting buttons
ax* — Interior lighting on/off
4J- Door contact switch on/off. The interior light-
ing is controlled automatically.
Touch-sensitive reading lights
> To turn a reading light on or off, touch the sur-
face @ briefly.
> To activate the manual dimming function,
touch the surface @) when the light is switched
off and keep touching it until the desired
brightness is reached.
51
Page 54 of 308

Lights and Vision
Tata
RAZ-1100
Fig. 38 Headliner: reading lights
Reading lights
> To switch the reading lamp on or off, press the
S button @.
> To activate the manual dimming function*,
touch the surface while the light is switched off
“~¥@ and keep touching it until the desired
brightness is reached.
Interior lighting
Applies to: vehicles with interior lighting
The ambient lighting turns on when the ignition
is switched on. The ambient lighting is deactivat-
ed when the lights are set to OFF.
You can adjust the interior lighting individually.
The settings depend on the vehicle equipment.
> Applies to MMI: Select on the home screen: VE-
HICLE > Light & Visibility > Interior lighting.
You can choose from various color profiles, such
as Maritime.
Additional settings and profiles:
— Brightness: you can adjust the brightness for
all of the interior lighting.
— Individual: you can adjust the brightness and
color of the interior lighting separately, divided
into contour and surface lighting.
— Audi drive select: the contour and surface
lighting color changes depending on the select-
ed drive select* mode.
G) Tips
Depending on vehicle equipment, when the
drive select function is activated, the color of
52
the contour and surface lighting may briefly
change to red or blue when the interior tem-
perature is manually increased or decreased.
Eyal) by
You can adjust the instrument and display illumi-
nation separately. The settings depend on the ve-
hicle equipment.
> Applies to MMI: select on the home screen:
SETTINGS > Display & brightness.
Possible settings in the MMI:
— Cockpit dimming
— Head-up display
—MMI
— Audi virtual cockpit
Vision
Adjusting exterior mirrors
~
9
O
© ©
Fig. 39 Driver's door: knob for the exterior mirrors
> Turn the knob in the driver's door to the desired
Position:
0 - Deactivates all adjustment functions.
Q/ © -Selects the left or right exterior mirror.
To adjust the mirror glass in a mirror, press the
knob in the desired direction.
GR - Heats* the mirror glass depending on the
outside temperature.
S) - Folds the exterior mirrors*. To fold the mir-
rors out, turn the knob to one of the other posi-
tions. In the MMI, you can select if the mirrors
fold in automatically when you lock the vehicle
> page 33.
Page 55 of 308
4KE012721BF
Lights and Vision
Front passenger's exterior mirror tilt
function*
Requirement: the knob must be in the position
for the front passenger’s exterior mirror.
The mirror surfaces tilt slightly when reverse
gear is selected to provide a better view, for ex-
ample of the edge of the curb.
You can adjust the mirror surface by turning the
knob in the desired direction.
The mirror moves from the reversing position
back to the original position:
— When you switch the ignition off
— When you drive forward at speeds faster than 9
mph (15 km/h).
— When the knob is no longer in the position for
the front passenger exterior mirror
ZA WARNING
Curved mirror surfaces (for example convex)
enlarge the field of vision. However, they
make objects in the mirror appear smaller and
farther away. When using these mirrors to es-
timate your distance to vehicles behind you
when changing lanes, you could estimate in-
correctly, which increases the risk of an acci-
dent.
() Note
— Applies to: vehicles with power folding exte-
rior mirrors: If the mirror housing was
moved by outside forces (such as an impact
when maneuvering), you must use the pow-
er folding function to fold the mirror all the
way out. The mirrors will make a loud noise
when they latch into place. The mirror hous-
ing must not be moved back into place by
hand because this could impair the function
of the mirror mechanism.
— Applies to: vehicles without power folding
exterior mirrors: If the mirror housing was
moved by outside forces (such as an impact
when maneuvering), you must move it back
in place by hand.
— If you wash the vehicle in an automatic car
wash, you must fold the exterior mirrors in
to reduce the risk of damage to the mirrors.
Never fold power folding exterior mirrors*
by hand. Only fold them in and out using
the power controls.
Gi) Tips
If the power adjusting function malfunctions,
the glass in both mirrors can be adjusted by
pressing on the edge of it by hand.
Dimming the mirrors
Automatic dimming rearview mirror
> The interior and exterior mirrors dim automati-
cally when light shines on them, for example
from headlights on a vehicle behind you.
ZA WARNING
—If the glass on an automatic dimming mirror
breaks, electrolyte can leak out. This liquid
can irritate the skin, eyes and respiratory
system. If there is contact with the fluid,
flush immediately with plenty of water. Con-
sult a physician if necessary.
— Repeated or long-term exposure to electro-
lyte fluid can lead to irritation of the air-
ways, especially in people with asthma or
other respiratory conditions. Take deep
breaths immediately after leaving the vehi-
cle or, if this is not possible, open all of the
doors and windows as wide as possible.
— If electrolyte fluid comes into contact with
the eyes, flush them thoroughly with plenty
of clean water for at least 15 minutes and
then seek medical attention.
— If electrolyte fluid comes into contact with
the skin, flush the affected area with clean
water for at least 15 minutes, and then
clean with soap and water and seek medical
attention. Clean affected clothing and shoes
thoroughly before wearing again.
— If the fluid was swallowed and the person is
conscious, flush the mouth with water for at
least 15 minutes. Do not induce vomiting
unless this is recommended by medical pro-
fessionals. Seek medical attention immedi-
ately.
53
Page 56 of 308
Lights and Vision
If the glass on an automatic dimming mirror
breaks, electrolyte can leak out. This liquid
damages plastic surfaces and paint. Clean
this liquid as quickly as possible, for example
with a wet sponge.
— If the light reaching the rearview mirror is
obstructed, the automatic dimming mirror
will not function correctly,
— The automatic dimming mirrors do not dim
when the interior lighting is turned on or
the reverse gear is selected.
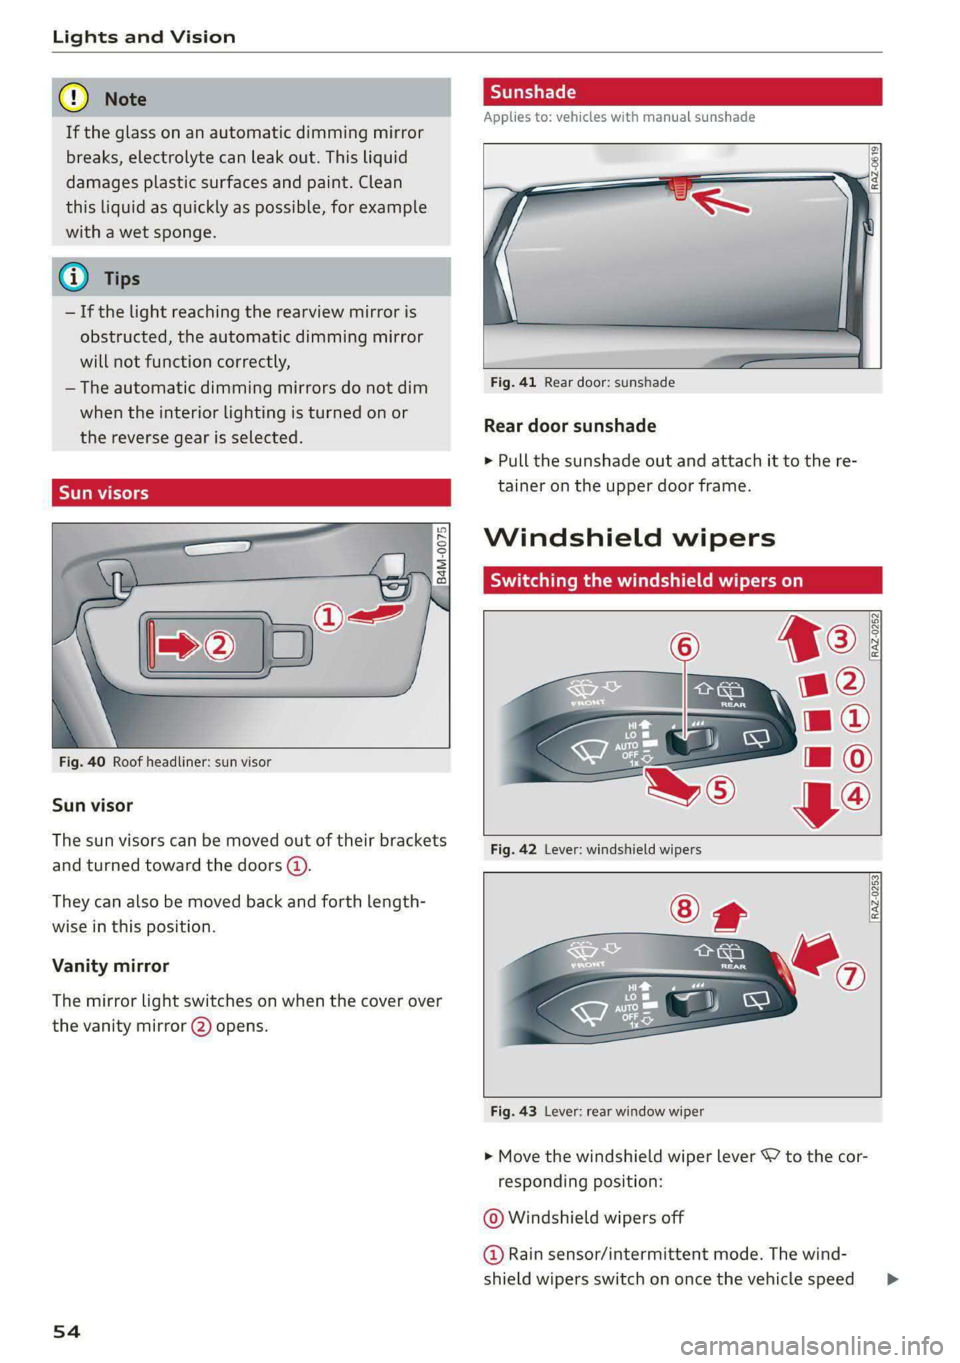
Sun visors
Fig. 40 Roof headliner: sun visor
Sun visor
The sun visors can be moved out of their brackets
and turned toward the doors @).
They can also be moved back and forth length-
wise in this position.
Vanity mirror
The mirror light switches on when the cover over
the vanity mirror @) opens.
54
Applies to: vehicles with manual sunshade
Fig. 41 Rear door: sunshade
Rear door sunshade
> Pull the sunshade out and attach it to the re-
tainer on the upper door frame.
Windshield wipers
Switching the windshield wipers on
RAZ-0253
Fig. 43 Lever: rear window wiper
> Move the windshield wiper lever 7 to the cor-
responding position:
© Windshield wipers off
@ Rain sensor/intermittent mode. The wind-
shield wipers switch on once the vehicle speed >
Page 60 of 308
Lights and Vision
Adjusting the magnetic zone
Applies to: vehicles with digital compass
BFV-0293
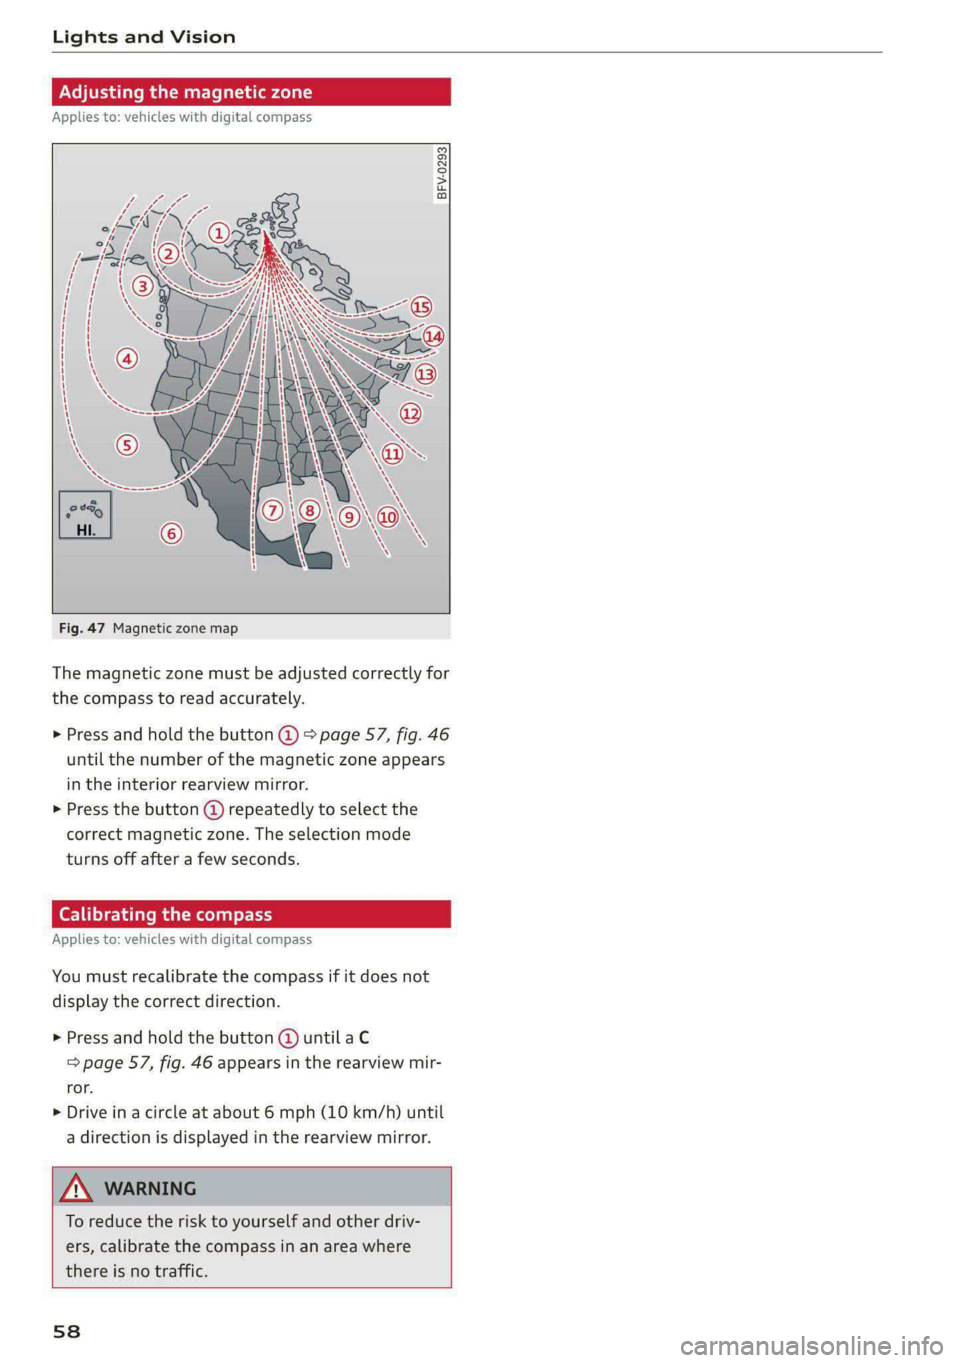
Fig. 47 Magnetic zone map
The magnetic zone must be adjusted correctly for
the compass to read accurately.
> Press and hold the button @ > page 57, fig. 46
until the number of the magnetic zone appears
in the interior rearview mirror.
> Press the button (@) repeatedly to select the
correct magnetic zone. The selection mode
turns off after a few seconds.
Calibrating the compass
Applies to: vehicles with digital compass
You must recalibrate the compass if it does not
display the correct direction.
> Press and hold the button @ until aC
=> page 57, fig. 46 appears in the rearview mir-
ror.
> Drive in a circle at about 6 mph (10 km/h) until
a direction is displayed in the rearview mirror.
To reduce the risk to yourself and other driv-
ers, calibrate the compass in an area where
there is no traffic.
58
Page 89 of 308
4KE012721BF
Warm and cold
— Only use the fragrance function* in modera-
tion and take any other passengers and ani-
mals into consideration when using the
function. An overlap of different scents or
odors could cause discomfort. If there is
discomfort, reduce the intensity or switch
the fragrance function* off. Only use fra-
grances that are approved by Audi.
Adjusting the vents
You can open and close the vents using the
thumbwheels. The levers adjust the direction of
the airflow from the vents.
Additional settings
You can adjust additional settings.
> Applies to: MMI: Select on the home screen:
VEHICLE > Air conditioning > <2.
Fragrance
Applies to: vehicles with fragrance function
Using Fragrance selection, you can select the fra-
grance and see the fill level of the fragrance.
You can select the strength of the scent with Fra-
grance level.
Footwell temperature*
You can adjust the footwell temperature for the
driver and front passenger.
Steering wheel heating
ice moal
Applies to: vehicles with steering wheel heating
> Press @ to switch steering wheel heating on or
off.
You can also operate the steering wheel heating
using the multifunction steering wheel
=> page 28.
Messages
Applies to: vehicles with steering wheel heating
@ Steering wheel heating: on / Steering wheel
heating: off
This message appears if you have switched the
steering wheel heating on or off.
Steering wheel heating: malfunction! See own-
er's manual
If this message appears, there is a malfunction.
Drive immediately to an authorized Audi dealer
or authorized Audi Service Facility to have the
malfunction repaired.
Auxiliary climate control
Applies to: vehicles with auxiliary climate control
The auxiliary climate control system warms or
cools the vehicle interior. The vehicle will turn on
the auxiliary climate control system if needed,
depending on the last temperature that was set
with the climate control system controls. This
function can be used when the drive system is
switched off.
You can turn the auxiliary climate control system
on and off immediately in the MMI or set a timer.
Requirement: the charge level of the high-volt-
age battery must be sufficient.
@ Tips
— Using the auxiliary climate control while
charging can also reduce the charge level of
the high-voltage battery.
— Starting or stopping the vehicle will not
switch off the auxiliary climate control auto-
matically.
Applies to: vehicles with auxiliary climate control
Applies to: MMI: Select on the home screen: VE-
HICLE > Air conditioning > f.
Immediate start
You can immediately switch the auxiliary climate
control on and off using the f button. When this
function is switched on, a colored bar lights up
over the button and the remaining time is dis-
played.
87
Page 131 of 308
4KE012721BF
Assist systems
Assist systems
General information
Sra eel delay
ZA\ WARNING
— As the driver, you are always completely re-
sponsible for all driving tasks. The assist
systems cannot replace the driver's atten-
tion. Give your full attention to driving the
vehicle, and be ready to intervene in the
traffic situation at all times.
— Activate the assist systems only if the sur-
rounding conditions permit it. Always adapt
your driving style to the current visual,
weather, road, and traffic conditions.
— Loose objects can be thrown around the ve-
hicle interior during sudden driving or brak-
ing maneuvers, which increases the risk of
an accident. Store objects securely while
driving.
— For the assist systems to be able to react
correctly, the function of the sensors and
cameras must not be restricted. Note the in-
formation on sensors and cameras
= page 130.
@ Tips
— Pay attention to applicable local regulations
relating to driving tasks, leaving space for
emergency vehicles, vehicle distance, speed,
parking location, wheel placement, etc. The
driver is always responsible for following
the laws that are applicable in the location
where the vehicle is being operated.
— You can cancel a steering or braking inter-
vention by the system by braking or acceler-
ating noticeably, steering, or deactivating
the respective assist system.
— Always check the assist systems settings be-
fore driving. The settings could have been
changed, for example by other drivers or by
using another user.
System limitations
ZA\ WARNING
—The use of an assist system cannot over-
come the natural laws of physics. A collision
cannot be prevented in certain circumstan-
ces.
— Warnings, messages, or indicator lights may
not be displayed or initiated on time or cor-
rectly, for example, if vehicles are approach-
ing very fast.
— Corrective interventions by the assist sys-
tems, such as steering or braking interven-
tions, may not be sufficient or they may not
occur. Always be ready to intervene.
@) Tips
— Due to the system limitations when detect-
ing the surrounding area, the systems may
warn or intervene unexpectedly or too late
in certain situations. The assist systems may
also interpret a driving maneuver incorrectly
and then warn the driver unexpectedly.
— The systems may not function as expected
in unusual driving situations, such as driving
offroad, on unpaved roads, on loose ground,
on inclines, or on grooves in the road.
— The systems may not function correctly in
unclear traffic situations, such as turning
lanes, exit ramps, construction zones, rises
or dips that obstruct visibility, intersections,
toll stations, or city traffic.
— The detection of the surrounding area can
be limited, for example by vehicles driving
ahead or by rain, snow, heavy spray, or light
shining into the camera.
—In trailer mode, some assist systems may be
limited, may not react as usual, or may be
unavailable. Please refer to the instructions
for towing a trailer located in > page 126.
— The steering wheel touch recognition may
be limited when you wear gloves. Steering
intervention requests from the steering as-
sist systems may occur more frequently.
— If accessories have been mounted on the
steering wheel, the steering assist systems
may
be limited. The frequency of steering
129
>