fog light AUDI Q2 2021 Owner´s Manual
[x] Cancel search | Manufacturer: AUDI, Model Year: 2021, Model line: Q2, Model: AUDI Q2 2021Pages: 364, PDF Size: 87.77 MB
Page 51 of 364
Lights and vision
Lights and vision
Exterior lights
Switching lights on and off
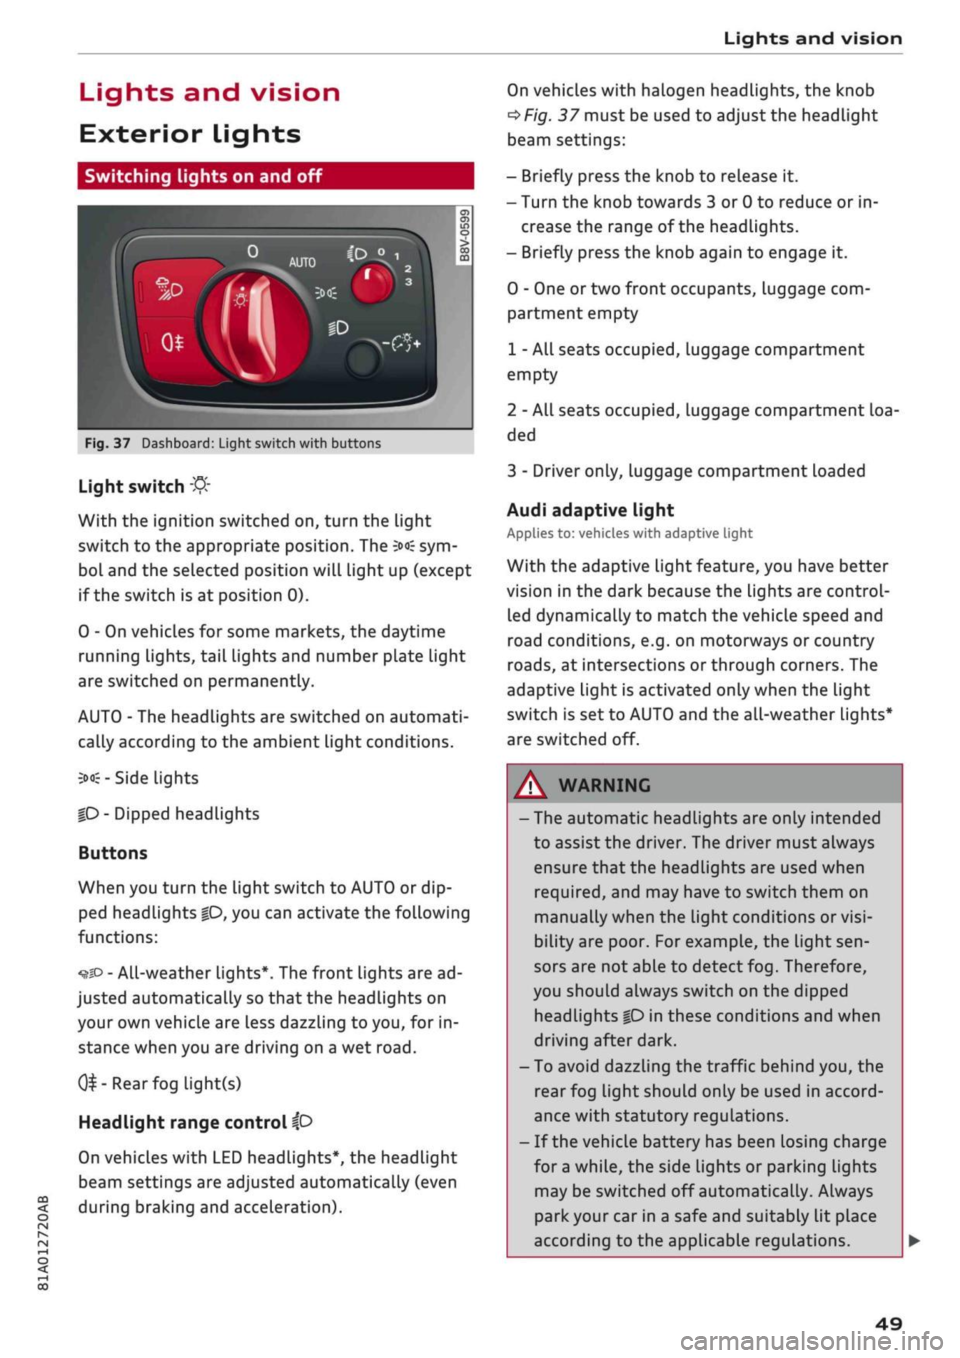
Fig.
37 Dashboard: Light switch with buttons
CO
<
O
rN rN
•-i
00
Light switch
:&
With the ignition switched on, turn the light
switch to the appropriate position. The
3»€
sym
bol and the selected position will light up (except
if the switch is at position 0).
0 - On vehicles for some markets, the daytime
running lights, tail lights and number plate Light
are switched on permanently.
AUTO - The headlights are switched on automati
cally according to the ambient light conditions.
3><£-
Side lights
|D
- Dipped headlights
Buttons
When you turn the light switch to AUTO or dip
ped headlights
|0,
you can activate the following
functions:
•^SD
- All-weather lights*. The front lights are ad
justed automatically so that the headlights on
your own vehicle are less dazzling to
you,
for in
stance when you are driving on a wet
road.
0^-Rear
fog light(s)
Headlight range control
ip
On vehicles with LED headlights*, the headlight
beam settings are adjusted automatically (even
during braking and acceleration).
On vehicles with halogen headlights, the knob
^Fig.
37 must be used to adjust the headlight
beam settings:
- Briefly press the knob to release it.
- Turn the knob towards 3 or 0 to reduce or in
crease the range of the headlights.
- Briefly press the knob again to engage it.
0 - One or two front occupants, luggage com
partment empty
1 - All seats occupied, luggage compartment
empty
2 - All seats occupied, Luggage compartment loa
ded
3 - Driver only, luggage compartment loaded
Audi adaptive light
Applies to: vehicles with adaptive light
With the adaptive light feature, you have better
vision in the dark because the Lights are control
led dynamically to match the vehicle speed and
road conditions, e.g. on motorways or country
roads,
at intersections or through corners. The
adaptive light is activated only when the Light
switch is set to AUTO and the all-weather Lights*
are switched off.
WARNING
- The automatic headlights are only intended
to assist the driver. The driver must always
ensure that the headlights are used when
required,
and may have to switch them on
manually when the light conditions or
visi
bility are poor. For example, the light
sen
sors are not able to detect fog. Therefore,
you should always switch on the dipped
headlights
|0
in these conditions and when
driving after dark.
- To avoid dazzling the traffic behind you, the
rear fog light should only be used in accord
ance with statutory regulations.
- If the vehicle battery has been losing charge
for
a
while, the side lights or parking lights
may be switched off automatically. Always
park your car in a safe and suitably lit place
according to the applicable regulations.
49
Page 53 of 364
Lights and vision
CO
<
O
rN rN
•-i
00
• Press the lever forwards (3)
^>page
50,
Fig. 38
to activate the main beam assist. The indicator
lamp
^/fi8
will light up in the instrument
cluster display and the main beams will be
switched on/off automatically. An indicator
lampBS
lights up when the main beams are
switched on.
Switching the main beams on/off manually
If the main beams are not switched on or if the
headlights are not dipped as expected, you can
control the dip function manually:
• To switch on the main beams manually, push
the lever forwards
(3).
The indicator Lamp
g
will
Light
up. To dip the headlights again, pull
the lever towards you 0.
• To dip the headlights manually, pull the lever
towards you
@.
The main beam assist will be
deactivated.
Flashing the headlights
• Pull the lever towards you
@
to flash the
head
lights when the main beam assist is activated
and the main beams are dipped. The main
beam assist will remain activated.
Driver messages in the instrument cluster
display
13
Main beam assist: system fault!
1H
Main beam assist: fault. See owner's manual
Drive to a qualified workshop soon and have the
fault rectified. You can still switch the main
beam headlights on and off manually.
13
Main beam assist: currently unavailable. No
camera view
HI
Main beam assist: currently unavailable.
Camera view restricted due to surroundings.
See owner's manual
The camera vision is impaired, e.g. by stickers or
dirt. Please clean the windscreen.
The sensor is located in the mounting for the in
terior mirror. Do not affix any stickers on this sec
tion of the windscreen.
A WARNING
The main beam assist is only intended to as
sist the driver. The driver must always ensure
that the headlights are used when required,
and may have to switch them on or off
man
ually, e.g. when the Light conditions or visibili
ty are poor. In the following situations
man
ual intervention may be necessary:
- Hazardous weather conditions such as fog,
heavy rain and snow or water splashes
- Roads on which oncoming traffic is partially
concealed (e.g. on motorways)
- Indiscernible road users (e.g. cyclists with
poor lighting)
- Tight corners, steep hill crests or valleys
- Poorly lit towns
- Highly reflective objects, such as road signs
-Windscreen misted up, dirty, frosted or cov
ered by stickers in front of the sensor
Adjusting the settings for the exterior
lighting
You
can change the settings for these functions
on the infotainment system.
• Select the following on the infotainment sys
tem:
IMENUI
button > Car
>
left control button
> Vehicle settings > Exterior lighting.
Automatic headlights*
The following settings are available in the Auto
matic headlights menu:
Activation time* - You can determine how soon
the lights are switched on by using the settings
early*, medium* or late* to adjust the sensitivity
of the light sensor.
Main beam assist* - You can switch the main
beam assist* on/off.
Entry/exit
lights*
You can switch the entry/exit lights* on and off.
They illuminate the area around the vehicle after
dark when you unlock the vehicle or when the ig
nition has been switched off and the driver's door
opened.
•
51
Page 106 of 364

Driver assist systems
Driver assist systems Cruise
control,
system
Speed warning function
Applies to: vehicles with speed warning function
The speed warning function can
help
you keep
below a pre-set maximum speed. It can be set,
changed and deleted on the infotainment sys
tem.
The speed warning function will warn you if the
vehicle exceeds the pre-set maximum speed. The
system gives an audible warning signal if the set
speed is exceeded by a small amount. At the
same time, a warning lamp [5] and a message
will appear on the instrument cluster display.
The indicator Lamp [5] and the message will dis
appear when the road speed drops below the set
value.
You are recommended to store this speed limit
warning if you wish to be reminded of a particu
lar speed limit. This could be when driving in
countries with general speed limits, or if you
need to keep below a particular speed when
win
ter tyres are fitted, etc.
Setting speed limit warning
•
Select the following on the infotainment sys
tem:
IMENUI
button > Car > left control button
> Driver assist > Speed warning > manual.
© Note
- Please bear in mind that, even with the
speed warning function, it is still important
to keep a check on the car's speed with the
speedometer and to observe the statutory
speed limits.
- On vehicles for some markets, the speed
warning function warns you when you reach
a speed of 120 km/h. This speed limit warn
ing is preset at the factory.
Switching on
Applies to: vehicles with cruise control system
The cruise control system allows you to drive at a
constant speed of 20 km/h or
higher.
Fig.
94 Control lever for cruise control system
• Pull
the lever to position
®
<^>Fig.
94 to switch
on the system.
•
Drive at the speed you wish to set the system
to.
• Press the button marked ® to store the speed.
The indicator lamp
[3]
in the instrument cluster
will light up. Information is also provided in the
head-up display*.
The instrument cluster display will briefly
indi
cate the stored or
pre-selected
speed.
A constant speed is maintained by adjusting the
engine power or braking the vehicle accordingly.
WARNING
- Always direct your full attention to the
road,
even when you are using the cruise control
system.
It is always the driver who is re
sponsible for determining the speed and for
keeping a safe distance to the other vehicles
on the
road.
- For safety reasons, the cruise control sys
tem must not be used in city traffic, stop-
and-go traffic, on roads with a lot of bends
or in difficult or slippery driving conditions
(such as ice, fog, Loose grit or gravel, heavy
rain,
etc.) - risk of accident!
- When you take a turn-off, drive along a mo
torway exit lane or pass through roadwork
104
Page 108 of 364
Driver assist systems
Automatic deactivation
Cruise control system: currently unavailable.
See owner's manual
The cruise control system has been automatically
deactivated because the system has detected a
fault which could impair its function. Try switch
ing the cruise control system on again later.
A WARNING
Do not resume the programmed cruising
speed if this is too high
for
the traffic condi
tions - this can cause accidents.
Speed Limiter
Description
Applies to: vehicles with speed limiter
®
LIM
•
km/h
|
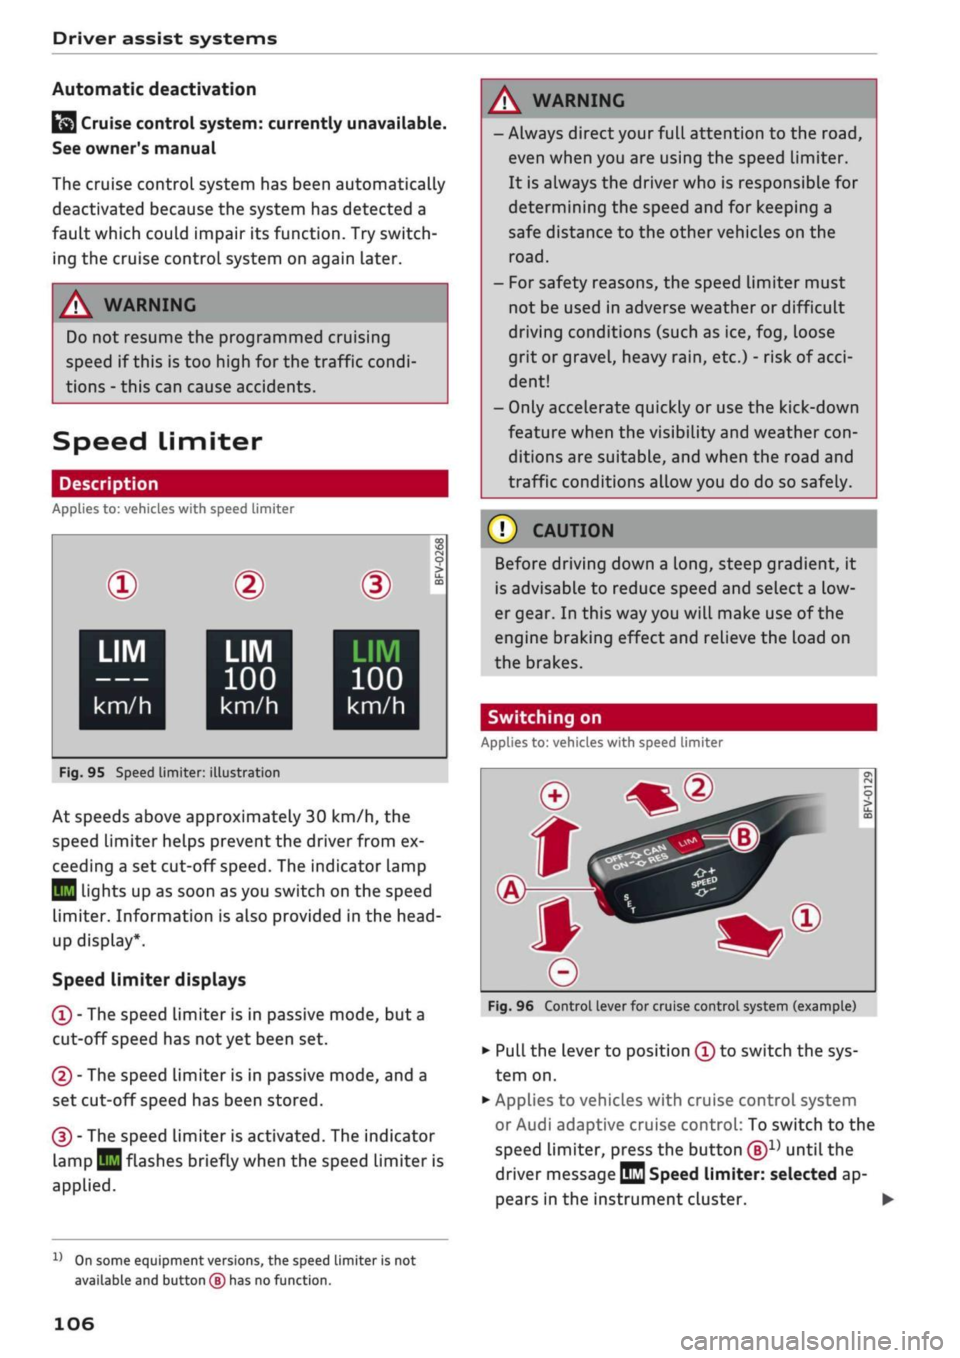
Fig.
95 Speed limiter:
©
LIM
100
km/h
illustration
BFV-0268
LIM
100
km/h
At speeds above approximately 30 km/h, the
speed limiter helps prevent the driver from ex
ceeding a set cut-off
speed.
The indicator lamp
Q
Lights up as soon as you switch on the speed
limiter. Information is also provided in the head-
up display*.
Speed limiter displays
© - The speed limiter is in passive mode, but a
cut-off speed has
not
yet been set.
®
- The speed limiter is in passive mode, and a
set cut-off speed has been stored.
® - The speed limiter is activated. The indicator
lamp
BH
flashes briefly when the speed limiter is
applied.
A WARNING
- Always direct your full attention to the
road,
even when you are using the speed limiter.
It is always the driver who is responsible for
determining the speed and for keeping a
safe distance to the other vehicles on the
road.
- For safety reasons, the speed limiter must
not be used in adverse weather or difficult
driving conditions (such as ice, fog, loose
grit or gravel, heavy
rain,
etc.) - risk of
acci
dent!
- Only accelerate quickly or use the kick-down
feature when the visibility and weather
con
ditions are suitable, and when the road and
traffic conditions allow you do do so safely.
Before driving down a
long,
steep gradient, it
is advisable to reduce speed and select a low
er gear. In this way you will make use of the
engine braking effect and relieve the Load on
the brakes.
Switching on
Applies to: vehicles with speed limiter
Fig.
96 Control lever for cruise control system (example)
•
Pull the lever to position © to switch the sys
tem on.
•
Applies to vehicles with cruise control system
or Audi adaptive cruise control: To switch to the
speed limiter, press the button
®1)
until the
driver message
QQ
Speed limiter: selected ap
pears in the instrument cluster. •
l)
On some equipment versions, the speed limiter is not
available and button
(B)
has no function.
106
Page 110 of 364
Driver assist systems
Camera-based traffic
sign recognition
Description
Applies to: vehicles with camera-based traffic sign recogni
tion
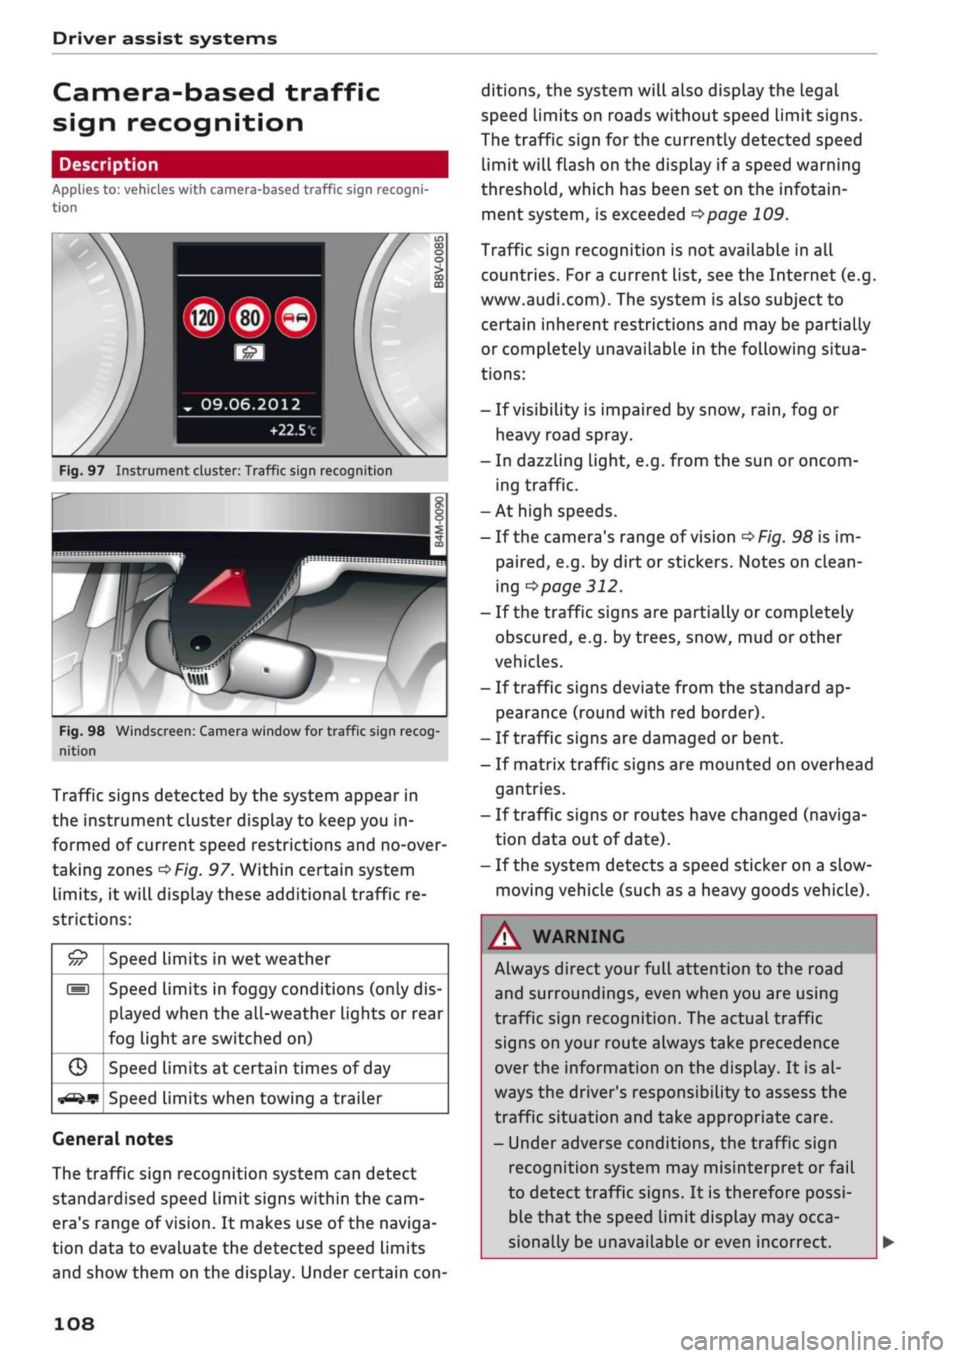
Fig.
97 Instrument cluster: Traffic sign recognition
Fig.
98 Windscreen: Camera window for traffic sign recog
nition
Traffic signs detected by the system appear in
the instrument cluster display to keep you in
formed of current speed restrictions and no-over
taking zones
^>Fig.
97. Within certain system
limits,
it will display these additional traffic re
strictions:
£5
///
s
G
^-if?
Speed limits in wet weather
Speed limits in foggy conditions (only dis
played when the all-weather lights or rear
fog light are switched on)
Speed limits at certain times of day
Speed limits when towing a trailer
General notes
The traffic sign recognition system can detect
standardised speed Limit signs within the cam
era's range of
vision.
It makes use of the naviga
tion data to evaluate the detected speed limits
and show them on the display. Under certain
con
ditions, the system will also display the legal
speed limits on roads without speed Limit signs.
The traffic sign for the currently detected speed
limit will flash on the display if
a
speed warning
threshold,
which has been set on the infotain
ment system, is exceeded
^page
109.
Traffic sign recognition is not available in all
countries. For
a
current list, see the Internet (e.g.
www.audi.com). The system is also subject to
certain inherent restrictions and may be partially
or completely unavailable in the following situa
tions:
- If visibility is impaired by snow,
rain,
fog or
heavy road spray.
- In dazzling light, e.g. from the sun or oncom
ing traffic.
-At high speeds.
- If the camera's range of vision
^>Fig.
98 is im
paired,
e.g. by dirt or stickers. Notes on clean
ing
•=>
page 312.
- If the traffic signs are partially or completely
obscured,
e.g. by trees, snow, mud or other
vehicles.
- If traffic signs deviate from the standard ap
pearance (round with red border).
- If traffic signs are damaged or bent.
- If matrix traffic signs are mounted on overhead
gantries.
- If traffic signs or routes have changed (naviga
tion data out of date).
- If the system detects a speed sticker on a slow-
moving vehicle (such as a heavy goods vehicle).
WARNING
Always direct your full attention to the road
and surroundings, even when you are using
traffic sign recognition. The actual traffic
signs on your route always take precedence
over
the information on the display. It is al
ways the driver's responsibility to assess the
traffic situation and take appropriate care.
- Under adverse conditions, the traffic sign
recognition system may misinterpret or fail
to detect traffic signs. It is therefore possi
ble that the speed limit display may occa
sionally be unavailable or even incorrect.
108
Page 111 of 364
Driver assist systems
CO
<
O
rN rN
t-H
o <
- The traffic sign detection system does not
adjust the speed of your vehicle to the speed
limits.
The speed limit displayed in the instrument
cluster is given in the units applicable in a
particular country.
Controls
Applies to: vehicles with camera-based traffic sign recogni
tion
-22.0-C
Fig.
99 Instrument cluster: Secondary display
Calling up the traffic sign recognition
•
Call up the first tab (on-board computer) using
the
GL>]
button on the multi-function steering
wheel.
•
Applies to vehicles with analogue instrument
cluster: Press the
LU]
button and select Traffic
signs from the menu.
•
Applies to vehicles with Audi virtual cockpit: Se
lect the display for Traffic signs.
Displaying signs for trailers
You can also display speed limits which apply
specifically to vehicles towing a trailer1).
•
Select the following on the infotainment sys
tem:
|MENU|
button > Car
>
left control button
Driver assist
>
Traffic signs
>
Automatic trailer
recognition.
Setting the maximum speed for a trailer
You can set the maximum speed permitted for
your
type of
trailer15.
If
you
do not enter
a
value,
x)
Applies to factory-fitted towing brackets only
the system will show the maximum national
speed limit for vehicles towing a trailer.
•
Select the following on the infotainment sys
tem:
|MENU|
button Car
>
left control button
Driver assist
>
Traffic signs
>
Trailer: highest
speed.
Setting speed warning
You can set a warning threshold up to
15
km/h.
The traffic sign for the currently detected speed
limit will flash on the display if the selected
warning threshold is exceeded.
•
Select the following on the infotainment sys
tem:
IMENU|
button > Car
>
left control button
> Driver assist
>
Speed warning
>
Traffic sign
based.
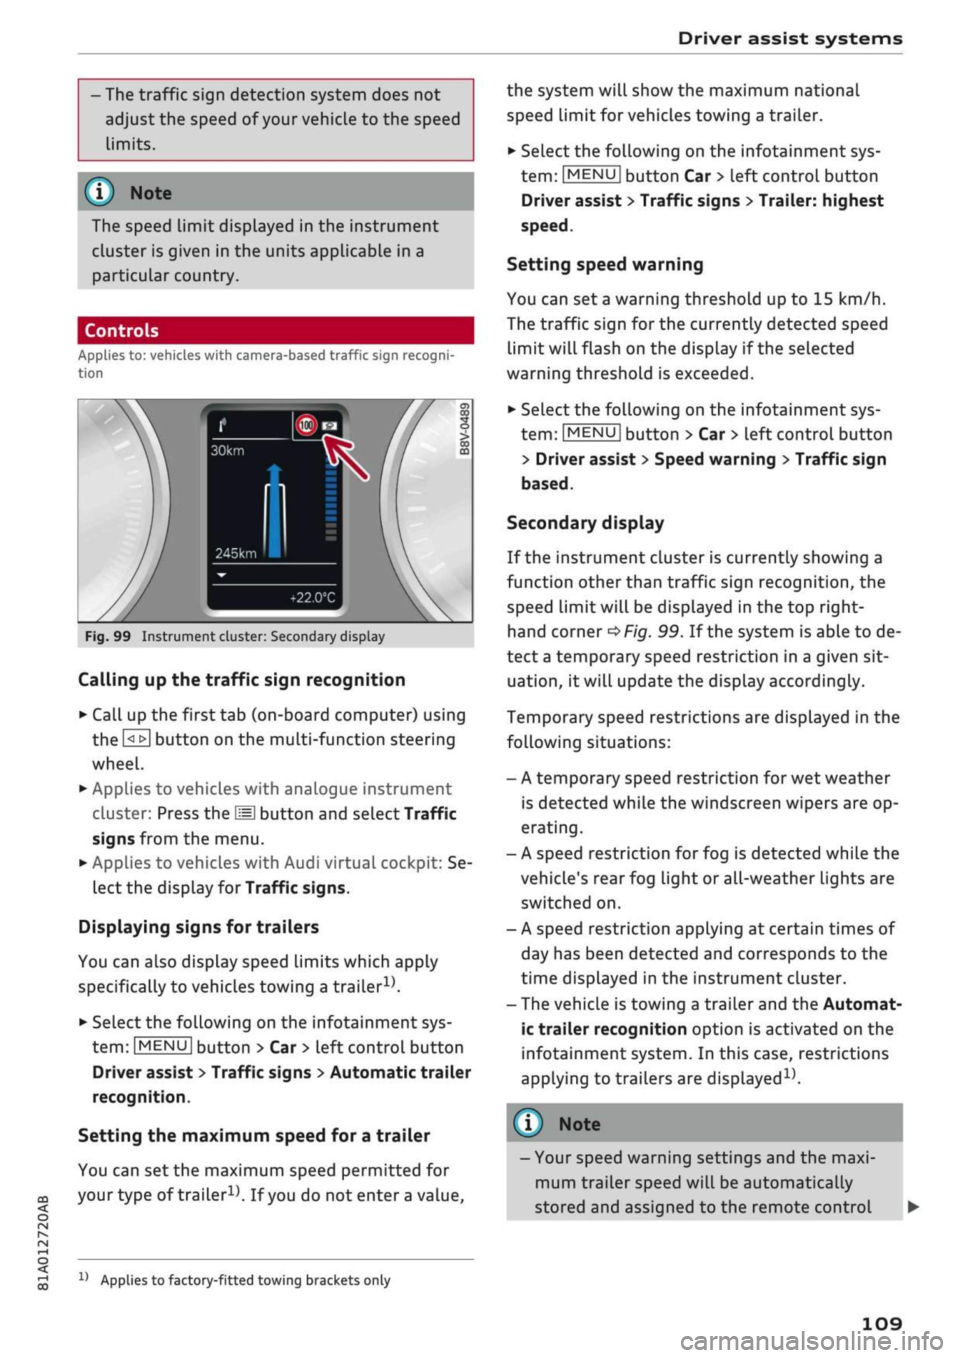
Secondary display
If the instrument cluster is currently showing a
function other than traffic sign recognition, the
speed limit will be displayed in the top right-
hand corner
^Fig.
99. If the system is able to de
tect
a
temporary speed restriction in a given sit
uation,
it will update the display accordingly.
Temporary speed restrictions are displayed in the
following situations:
- A temporary speed restriction for wet weather
is detected while the windscreen wipers are op
erating.
- A speed restriction for fog is detected while the
vehicle's rear fog light or all-weather lights are
switched on.
- A speed restriction applying at certain times of
day has been detected and corresponds to the
time displayed in the instrument cluster.
- The vehicle is towing a trailer and the Automat
ic trailer recognition option is activated on the
infotainment system. In this case, restrictions
applying to trailers are
displayed15.
© Note
- Your speed warning settings and the maxi
mum trailer speed will be automatically
stored and assigned to the remote control
109
Page 124 of 364
Driver assist systems
provided tempt you into taking any risks when
driving - this can cause accidents.
- Please note that pre sense front can give
warnings or apply the brakes unexpectedly.
Always secure your luggage to prevent dam
age and possible injury.
- Due to inherent system limitations, false ac
tivation of the system is possible.
- Please note that the sensor is not always
able to detect all objects which may repre
sent a potential hazard - risk of accident!
- Pre sense front does not react to the follow
ing:
oncoming traffic in the same lane, sta
tionary or stopped persons, pedestrians
crossing the road at an angle, groups of
people, animals, or objects that are hard to
recognise •=>
A in General notes on
page 112.
A WARNING
The pre sense front functions may be restric
ted or unavailable in situations such as the
following:
- If objects such as crash barriers or other
vehicles are reflecting additional light.
- At tunnel entrances.
- In heavy fog,
rain,
road spray or snow.
- If the radar sensor is dirty, frosted, dam
aged or covered.
- When driving through a corner.
-Applies to: front-wheel drive vehicles: If the
ESC system has been partially or fully deac
tivated.
© CAUTION
Impacts or damage to the bumper, wheel
arches or underbody can cause misalignment
of the sensor. This can impair the function of
the pre sense front system. Have the systems
checked by a
quaLified
workshop.
© Note
-The automatic brake application with in
creasing brake force can be cancelled by ap
plying the brakes yourself or by pressing the
accelerator firmly or by taking evasive ac
tion.
- Applies to: front-wheel drive vehicles: Cer
tain pre sense front functions are deactiva
ted when the ESC
offroad
mode is switched
on and when reversing.
- Applies to: front-wheel drive vehicles: The
pre sense is deactivated if you restrict or
switch off the ESC
^>page
146.
Settings on the infotainment system
Applies to: vehicles with Audi pre sense front/Audi adaptive
cruise control
•
Select the following on the infotainment sys
tem:
|MENU|
button > Car > left control button
> Driver assist > Audi pre sense.
System - The pre sense functions can be switched
on/off.
Advance
warning15
- You can switch the advance
warning off or set the warning time for pre sense
front (early/medium/late).
Start by setting the advance warning to early. If
you then find that the system warns you earlier
than desired, you can set the advance warning to
medium.
The advance warning should be set to
late only in exceptional cases, such as during very
dynamic driving.
If a system or the advance warning function is
switched off, it will be automatically activated
again the next time you switch on the
ignition15.
Driver messages
Applies to: vehicles with Audi pre sense
Audi pre sense: fault. Please contact work
shop
This message appears if the functions of the pre
sense system are impaired. An impairment can
occur, for example, if a sensor fails. If the mes
sage remains displayed permanently, drive to a
qualified workshop soon and have the fault
recti
fied.
•
x)
Not available on vehicles for some markets.
122
Page 126 of 364

Driver assist systems
the lane markings or may respond incorrect-
iy.
- In certain circumstances, for instance if
visi
bility is poor, the setting for the steering in
put may temporarily be switched from "ear
ly"
to "late"
«.
- In certain driving conditions, such as ruts in
the road surface, adverse cambers or side
winds, the assistance provided by the steer
ing correction may be insufficient to keep
the vehicle in the middle of the lane.
- For safety reasons, the active lane assist
must not be used in poor weather or in
diffi
cult or slippery road conditions (such as ice,
fog,
loose grit or gravel, heavy
rain,
snow,
etc.) - risk of accident!
Switching on/off
Applies to: vehicles with Audi active lane assist
Fig.
114 Turn signal lever: Button for active lane assist
--•
In
s^\
l'fV
A
Fig.
115 Wind
sist
SSS1M
screen:
Ca
o
o
o o
5
^Aw ^
mera
window for active lane as-
•
Press the button
^Fig.
114 to switch the sys
tem on/off. The indicator lamp in the instru
ment cluster will light up or go out.
Analogue in
strument clus
ter
Green lines
7
V
-
Yellow lines
•/
V
Audi virtual
cockpit/head-
up display*
Green Line(s)
(left/right)
7
V
Red line
(Left/right)
7 V
Grey Line(s)
(left/right)
7 V
Meaning on
corresponding
side
The active Lane
assist is
switched on
and ready to
warn.
The active lane
assist warns
you before you
cross the Lane
demarcation.
In addition,
the steering
wheel vibrates
slightly.
The active Lane
assist is
switched on
but not ready
to warn.
The system may be switched on but not ready to
warn due to the following reasons:
- There are no Lane markings.
- The system cannot detect the relevant lane
markings (e.g. temporary markings for road
works or markings obscured by snow, dirt, rain
or adverse light).
- The vehicle's speed is below 65 km/h, the
speed at which the lane assist system is activa
ted (the threshold may vary in different export
markets).
- The traffic lane is too narrow or too wide.
- The bend is too tight.
- You have taken your hands off the steering
wheel.
- Make sure that the camera window
^>Fig.
115
is not covered with stickers or
similar objects. Notes on cleaning
^>page
312.
l)
This function is not available on all export versions.
124
Page 277 of 364
Safe driving
•
Distribute the load evenly in the luggage com
partment.
•
Place heavy items as far forward as possible in
the luggage compartment and secure them
properly
<^>Fig.
214.
•
Secure the load with the stretch net* or with
non-elastic straps secured to the fastening
rings
^>page
62.
© CAUTION
A WARNING
- Loose items in the luggage compartment
are a safety hazard: they can move suddenly
and impair the handling of the vehicLe as a
result of the change in weight distribution.
- In an accident or a sudden manoeuvre, loose
objects in the passenger compartment can
be flung forward - risk of injury! Always
stow objects safely in the luggage compart
ment and secure them on the fastening
rings.
Use suitable securing straps, particu
larly when transporting heavy objects.
- Transporting heavy objects may affect the
vehicle's handling by shifting the centre of
gravity - this could cause an accident. Take
extra care when driving and adjust your
speed accordingly.
- Never exceed the maximum axle loads or
the maximum gross weight for the vehicLe
^>page
342. Exceeding the permitted axle
loads or gross weight Limit can affect the ve
hicle's handling characteristics, and increase
the risk of accidents, personal injuries or
damage to the vehicle.
- Never leave your vehicLe unattended when
the boot lid is open. Children could climb in
to the boot and close the boot lid from the
inside.
In this case the child would be un
able to get out of the vehicle without help.
This could have fatal consequences.
- Never allow children to play in or around the
vehicle. Always close and lock the boot lid
and all the doors when you leave the
vehi
cle.
- Never let passengers ride in the luggage
compartment. All occupants must be prop
erly restrained by the seat belts at all times
•=>
page
27'5.
Make sure that no hard objects chafe against
the wires of the heating element in the rear
window and damage them.
©
Note
- The tyre pressure must be adjusted accord
ing to the load the vehicle is carrying
<^>page
307.
- Air circulation in the vehicle helps reduce
fogging of the windows. Used air escapes
through ventilation slots in the rear of the
vehicle. Make sure that these ventilation
slots are not obstructed.
- Suitable belts for securing loads to the fas
tening rings* are commercially available.
Fastening rings
Unsecured loads are a hazard to all vehicle occu
pants.
There are fastening rings in the luggage com
partment which can be used to secure luggage
and other objects
^>page
62.
•
Use the fastening rings to secure items safely
in the luggage compartment
<=> A.
During a collision or an accident, even small and
light objects can possess so much energy that
they can cause very severe injuries. The amount
of this "kinetic energy" depends on the speed of
the vehicLe and the weight of the object. The
most significant factor, however, is the speed of
the vehicLe.
For example: an object weighing 4.5 kg is lying
unsecured in the vehicle. During a frontal
colli
sion at a speed of 50 km/h, this object generates
a force corresponding to 20 times its weight.
That means that the effective weight of the ob
ject increases to about 90 kg. You can imagine
the severity of the injuries which might be sus
tained if this "projectile" strikes an occupant as it
flies through the passenger compartment. •
00
273
Page 340 of 364
Fuses and bulbs
You must only replace a bulb with a bulb of the
same type. Information regarding e.g. the wat
tage can be found on the glass or base of the
bulb.
The description for changing the bulb refers to
the Left rear light unit; the procedure for the
right rear Light unit is similar.
You can change the
foLLowing
bulbs yourself:
Changing bulb for turn signals
Applies to: vehicles with halogen headlights
Bulb (12 V)
©Tail
light
© Brake light
© Reversing Light
(4)
Turn signal
©Rearfog
light3'
Version
W16W
P21W
W16W
PY21W
W16W
a'
The bulb for the rear fog light is fitted on one side only. It
is located on the left side on LHD vehicles and on the right
side on RHD vehicles.
Changing headlight
bulbs
Removing cover (engine compartment)
Applies to: vehicles with halogen headlights
^
Fig.
281 Headlight: Cover for turn signal and main beam
headlight
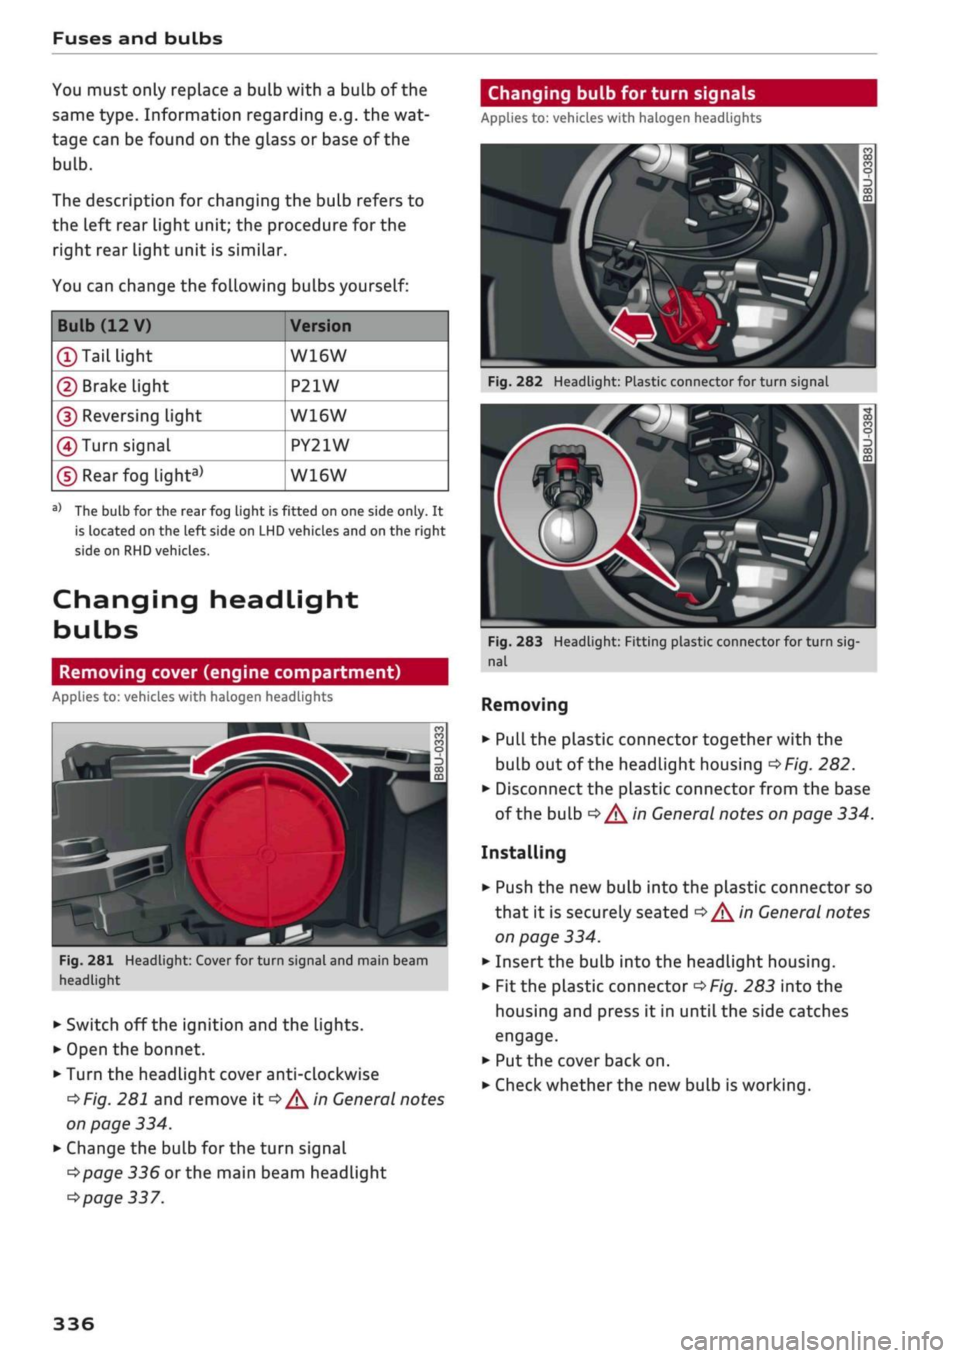
• Switch off the ignition and the lights.
• Open the bonnet.
• Turn the headlight cover anti-clockwise
*Fig.
281 and remove it
*/^
in General notes
on page 334.
• Change the bulb for the turn signal
*page
336 or the main beam headlight
*page
337.
Fig.
282 Headlight: Plastic connector for turn signal
Fig.
283 Headlight: Fitting plastic connector for turn
sig
nal
Removing
• Pull the plastic connector together with the
buLb out of the headlight housing
*Fig.
282.
• Disconnect the plastic connector from the base
of the bulb
*^
in General notes on page 334.
Installing
• Push the new bulb into the plastic connector so
that it is securely seated
*^
in General notes
on page 334.
• Insert the bulb into the headlight housing.
•
Fit
the plastic connector
*Fig.
283 into the
housing and press it in until the side catches
engage.
• Put the cover back on.
• Check whether the new bulb is working.
336