roof AUDI Q3 2015 Owners Manual
[x] Cancel search | Manufacturer: AUDI, Model Year: 2015, Model line: Q3, Model: AUDI Q3 2015Pages: 258, PDF Size: 64.9 MB
Page 4 of 258
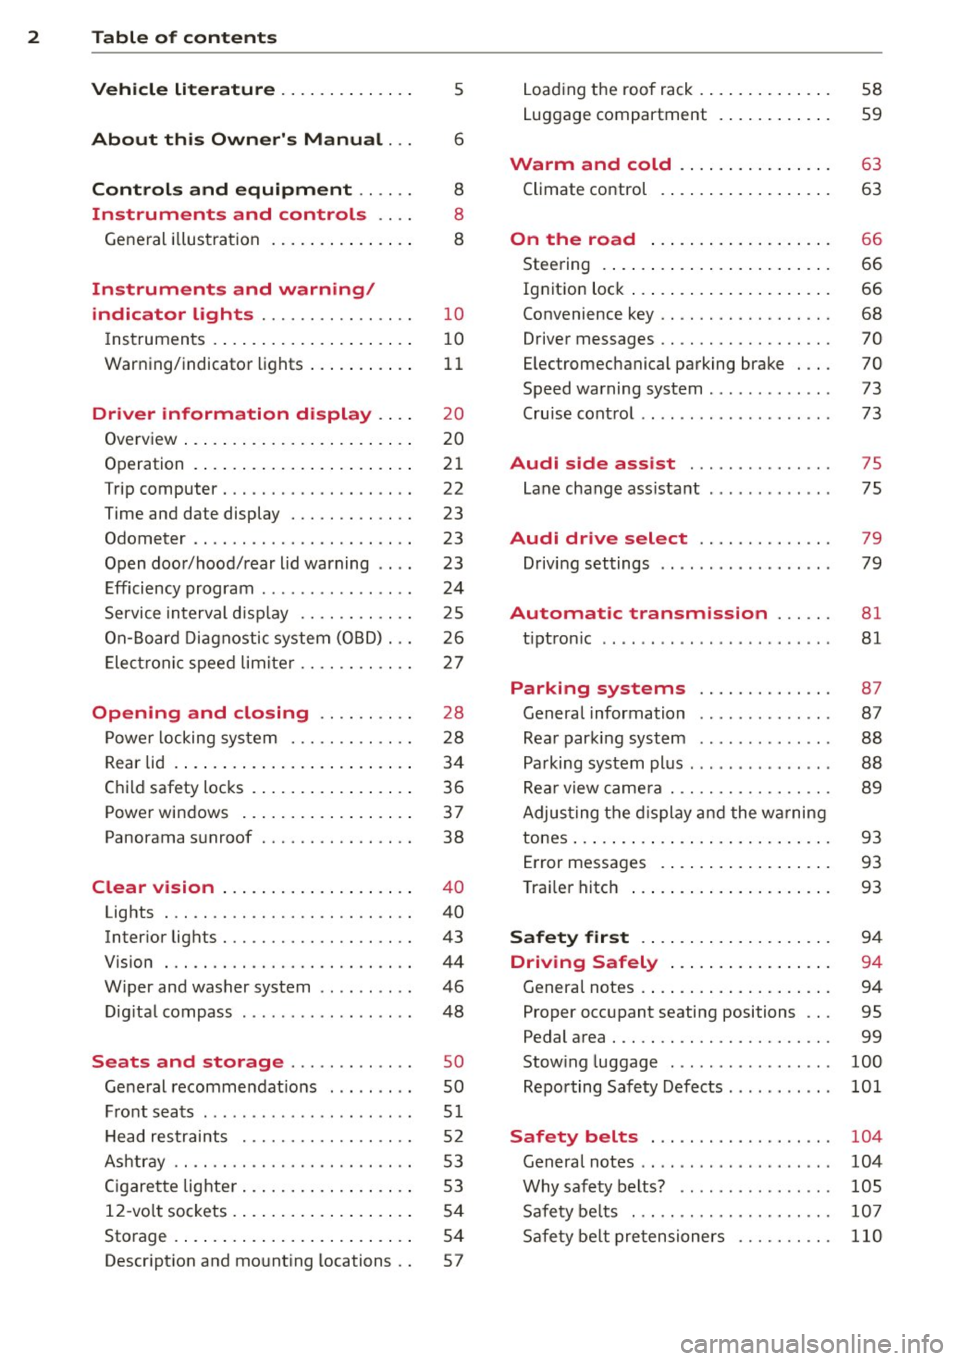
2 Table of contents Vehicle literature .. .. .. .. .. ... .
5
About this Owner's Manual . . . 6
Controls and equipment .. ... .
Ins truments and controls .. . .
General illus tration .... ... .. .. ... .
Instruments and warning /
indicator lights ........ .. .. .. . .
Ins truments . .. .. ..... ... .. .. ... .
War ning/ indi cator lights ... .. ... .. .
Driver information d isplay .. . .
Overview ... ... .. ..... ... .. .. ... .
Operation . .... .. ..... ... .. .. ... .
Trip computer . ........... .... ... .
Time and date display ..... .. .. .. . .
Odometer .. ........ ..... .. ..... .
Open doo r/hood/ rear lid warning .. . .
E fficiency p rogram ......... ... .. . .
S ervice in terval d isp lay .... .. .. ... .
On -Board D ia gnostic system ( OBD) . . . 8
8
8
1 0
1 0
11
2 0
20
2 1
22
23
23
23
24
2 5
26
Ele ctr onic spee d lim iter . . . . . . . . . . . . 2 7
Opening and closing .. .. .. .. . .
Powe r locking sy stem ..... .. .. .. . .
Rear lid ..... .. .. ..... ... .. .. ... .
C hil d safety locks . ..... ... .. .. ... .
Power win dows .. ..... ... .. .. ... .
Panorama s unroof ........ .. .. ... .
Clear vision .. .. ..... ... .. .. ... .
Lights . .. .. .. . .......... .. .. ... .
Inter ior lights ............. ... ... .
V 1s 1on . ...... ........... .... ... .
W iper and washer system . ... .. .. . .
Di gita l compass ........... ... .. . .
Seats and storage ...... ..... . .
Ge neral recomme ndat ions ..... .. . .
F ront sea ts .... .... ...... .. .. .. . .
H ead re straints .......... .. .. .. . .
Ashtr ay .. .. ............. ....... .
C igare tte lig hte r . ...... ... .. .. ... .
1 2- vo lt sockets . .. ..... ... .. .. ... .
Sto rage ..... .. .. ..... ... .. .. ... . 28
2
8
3 4
3 6
37
38
4 0
40
43
44
46
4 8
so
so
51
5 2
53
53
5 4
54
Descr ipt ion and mo unt ing locations . . 57 L
oad ing the roof rack . .. ..... .... . .
Luggage compartment . ..... ... .. .
Warm and cold .. ... ..... ... .. .
Climate control . .... .. ..... .... . .
On the road ... .. ... ..... ... .. .
Stee ring . ..... .. .. .... .... ... .. .
Ig nit ion lock ..... ... .. ..... .... . .
Convenience key .. ... .......... .. .
D river messages .. ............... .
E lectromechanical parking brake . .. .
Speed warning system . .......... . .
Cru ise cont ro l .. .. ............... .
Audi side assist .............. .
Lane change ass istant . .......... . .
Audi dr ive select ... ... ..... .. .
Driving set tings .. ..... ......... . .
Automatic transmission ... .. .
tiptron ic .. .. .. .. .. ... .. ... ..... .
Parking systems
58
59
63
63
66
66
66
68
70
70
73
73
75
75
79
79
81
81
87
Genera l information . . . . . . . . . . . . . . 87
Rea r parking syste m . . . . . . . . . . . . . . 88
P a rking system plus . . . . . . . . . . . . . . . 88
Rea r view came ra . . . . . . . . . . . . . . . . . 89
Adjus ting the display and the w arning
tones ... .. .... .. .. ... ..... ... .. . 93
E rror messages . . . . . . . . . . . . . . . . . . 93
T ra ile r hitch . . . . . . . . . . . . . . . . . . . . . 93
Safety fir st . . . . . . . . . . . . . . . . . . . . 94
Driving Safely . . . . . . . . . . . . . . . . . 94
Genera l notes . . . . . . . . . . . . . . . . . . . . 94
Proper occ upant seating positions . . . 95
Pedal area . . . . . . . . . . . . . . . . . . . . . . . 99
Stow ing luggage . . . . . . . . . . . . . . . . . 100
Reporting Sa fety Defects . . . . . . . . . . . 101
Safety belts . . . . . . . . . . . . . . . . . . . 104
General notes . . . . . . . . . . . . . . . . . . . . 104
Why safety belts? . . . . . . . . . . . . . . . . 105
Safe ty be lts . . . . . . . . . . . . . . . . . . . . . 107
Sa fe ty be lt pretensioners . . . . . . . . . . 110
Page 39 of 258
M N M N
0 ::i co
rl I.O
"' rl
"' rl
.. To turn the child safety locks on , turn the ig
nition key in the direction of the arrow .
.. To turn
off , turn the ignition key opposite
the direction of the arrow.
When the child safety locks are activated, the
inside door handles do not work and the doors
can only be opened from the outside.
Power windows
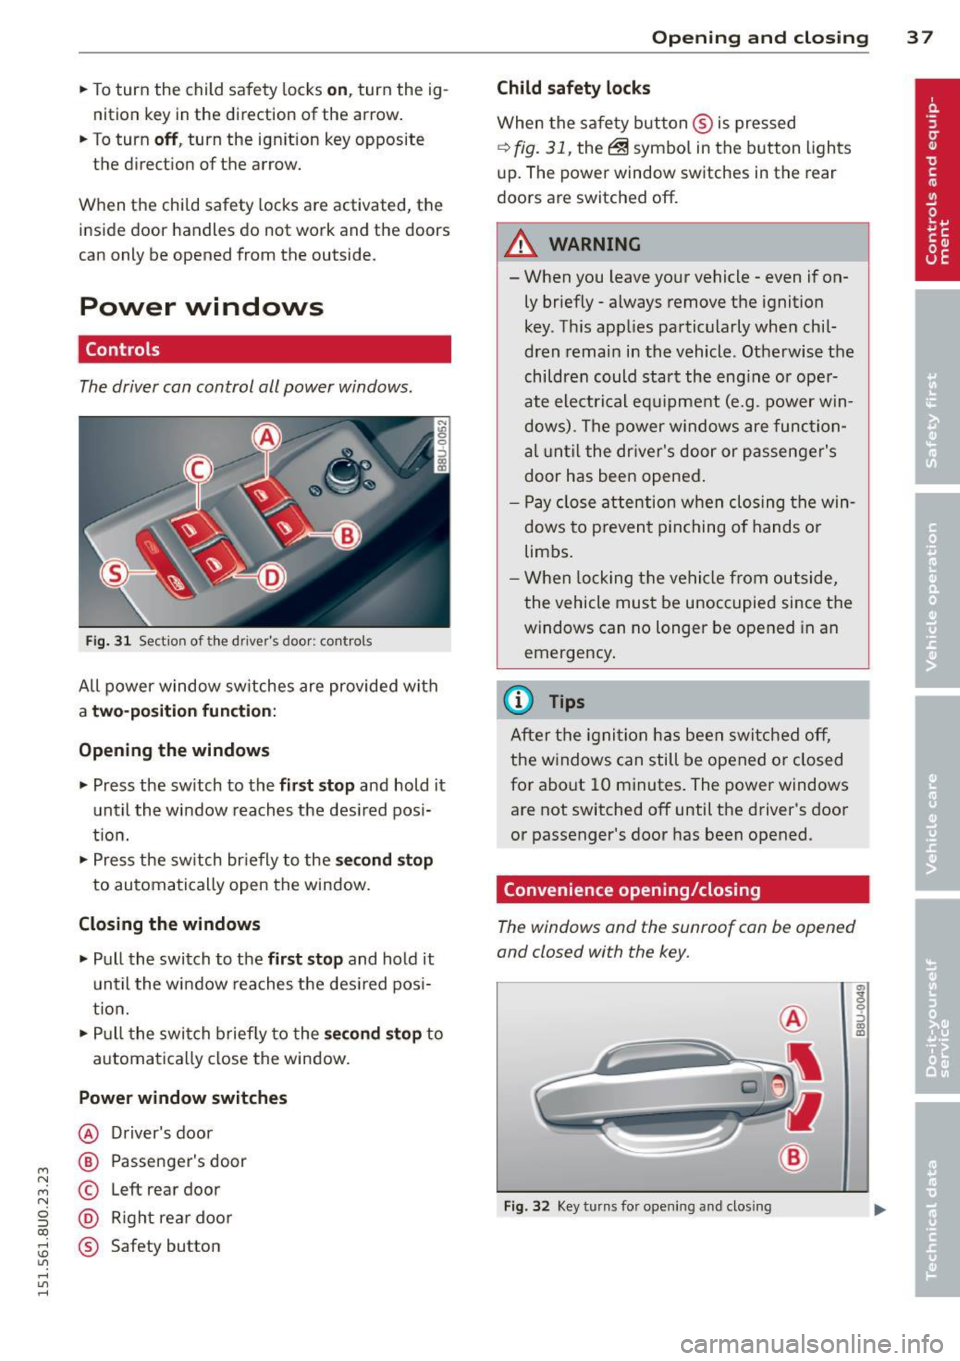
Controls
The driver can control all power windows .
Fig. 31 Section of the driver's door: controls
All power window sw itches are provided with
a t w o-posi tion fun cti on:
Opening th e window s
.. Press the sw itch to the fi rs t sto p and hold it
until the window reaches the desired posi
t ion .
.. Press the sw itch br iefly to the
sec ond s top
to automatically open the window.
Closing th e windows
.. Pull the switch to the fir st stop and hold it
un til the window reaches the des ired pos i
tion.
.. Pull the switch briefly to the
se con d stop to
automatically close the window.
Power wind ow switche s
@ Driver's door
@ Passenger's door
© Left rear door
@ Right rea r doo r
® Safety button
Openin g an d clos ing 3 7
Child safety l ock s
When the safety button ® is pressed
¢ fig. 31, the~ symbol in the button lights
u p. The power window switches in the rear
doors are switched off.
&_ WARNING
--When you leave your vehicle -even if on-
ly briefly· always remove the ignition
key . Th is app lies particularly when chil·
dren remain in the vehicle. Otherwise the
children could start the eng ine or oper
ate electrical equ ipment (e.g. power w in
dows). The power windows are function
a l until the dr iver's door or passenger's
door has been opened.
- Pay close attention when closing the win
dows to prevent p inching o f hands o r
limbs.
- When locking the vehicle from outside,
the vehicle must be unoccupied since the
windows can no longer be opened in an
emergency.
(I} Tips
After the igni tion has been switched off,
the w indows can still be opened or closed
for about 10 minutes . The power windows
are not switched off until the driver's door
or passenger's door has been opened.
Convenience opening/closing
The windows and the sunroof can be opened
and closed with the key.
F ig. 32 Key turns for opening and closing
"' z 9 ::::, a, to
Page 40 of 258
38 Opening and closing
Convenience opening feature
.,. Insert the key into the lock of the driver 's
door .
.,. Turn the key to position
c::> fig. 32@ until all
the windows have reached the desired posi
tion and the sunroof is open.
Convenience closing feature
.,. Turn the key in the lock of the driver's doo r
to the lock position @ until the windows
and the power sunroof are closed
c::> A.
For vehicles w ith pano rama sunroof*: When
you open or close the panorama sunroof*, the
power sunshade will also open or close.
~ WARNING
- Never close the windows and the power
sunroof inattentively and without check
ing -there is risk of injury.
- You must always watch when the win
dows are being ra ised so that no one can
be trapped. If you release the key, the
closing action is immed iately canceled .
- Always read and heed WARNING
c::, &. in
General description on page 28 .
Correcting power window malfunctions
After disconnecting the vehicle battery , the
one-touch up and down feature must be acti
vated again.
.,. Pull the power window switch until the win
dow is comp lete ly raised .
.,. Re lease the switch and pull it again for at
least one second.
.,. Press and hold the electric window sw itch
until the window is fully open .
.,. Re lease the switch and then press it again
for at least one second. You shou ld now be
able to close the window in the usual way.
Panorama sunroof
Description
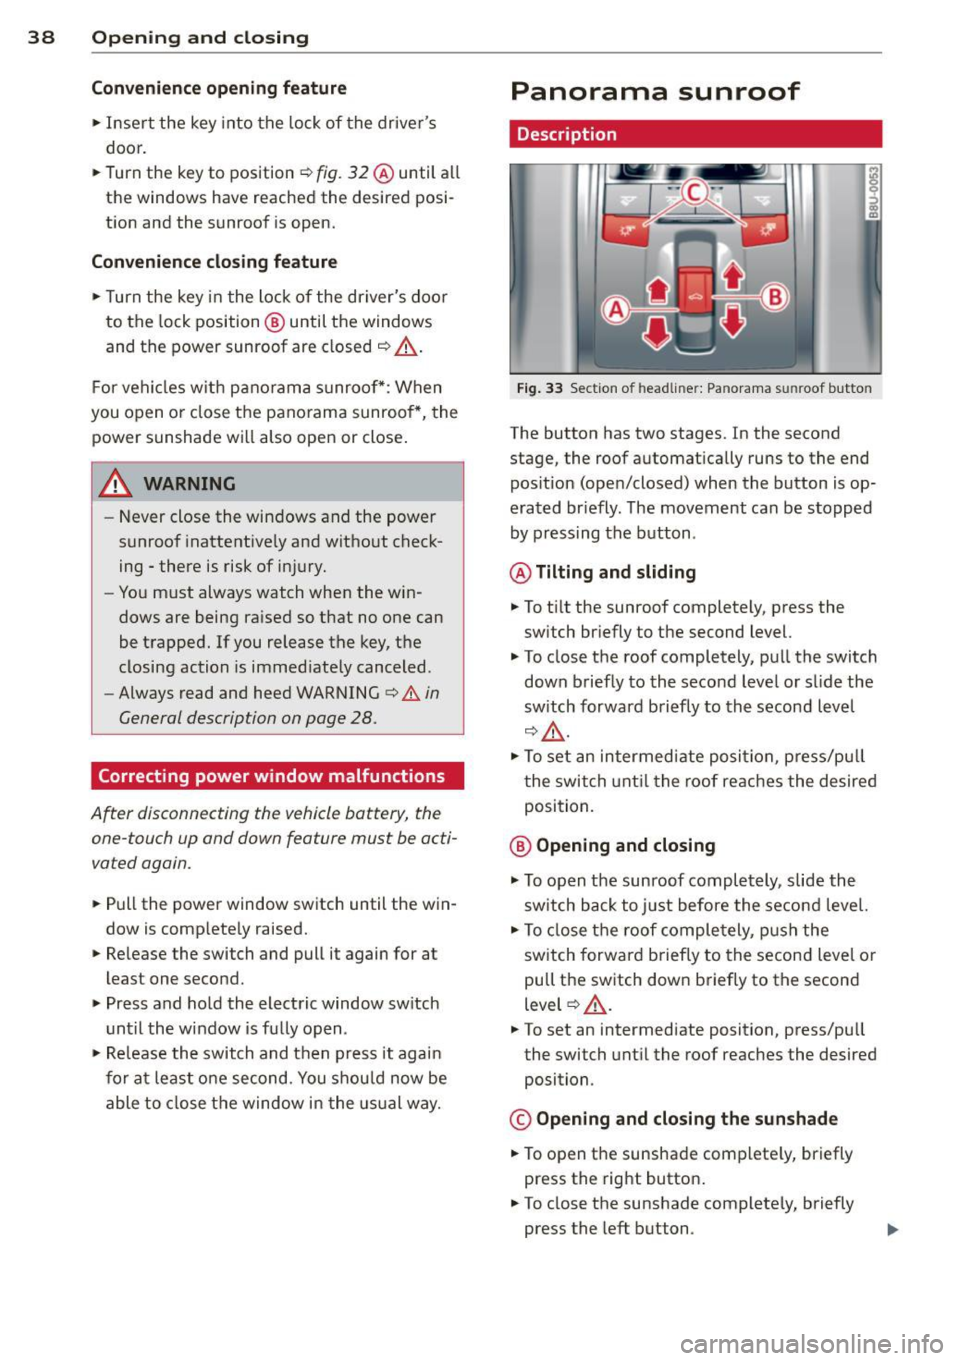
Fig. 33 Section of h eadliner: Pan orama s unroof button
The button has two stages. In the second
stage, the roof automat ically runs to the end
pos ition (open/closed) when the button is op
erated br iefly. The movement can be stopped
by pressing the button .
@ Tilting and sliding
.,. To t ilt the sunroof completely, press the
sw itch briefly to the second level.
.,. To close the roof completely, pull the switch
down briefly to the second level or slide the
switch forward briefly to the second level
c::, A-
.. To set an intermed iate posi tion, press/pu ll
the switch until the roof reaches the desired
position.
@ Opening and closing
.,. To open the sunroof completely, slide the
switch back to just before the second level.
.,. To close the roof completely , push the
switch forward briefly to the second level o r
pull the switch down briefly to the second
level
c::> A .
.,. To set an intermediate position, press/pu ll
the switch until the roof reaches the desired
position .
© Opening and closing the sunshade
.,. To open the sunshade complete ly, briefly
press the right button .
.. To close the sunshade completely, briefly
press the left button .
Page 41 of 258
M N
M N
0 ::i co ,...., \!) 1.1'1 ,...., 1.1'1 ,....,
~ Press the corresponding button again to
stop the sun shade at any intermediate posi
t ion .
After the ignit ion is switched off, yo u can st ill
operate the s unroof fo r abo ut 10 minutes. As
soon as the driver 's or passenger 's door is
opened, the sw itch is inoperative.
A WARNING
Pay careful attention when closing the
sunroof -otherwise serious injury could re
sult! For this reason, a lways remove t he ig
nition key w hen leav ing the veh icle.
(D Note
Always close your sunroof whe n leaving
your veh icle . Sudden rain can ca use dam
age to the inter ior equipment of your vehi
cle, particularly the electronic equipment .
(D Tips
-Information on conven ience opening/
closing
~ page 37 .
-The panorama sunroof can only be
opened when the temperature is warmer
than -4°F
(-20 °() .
Emergency closing of the panorama
sunroof
I f the sun roof detec ts an objec t in its path
when it is closing, it will open again a utomat i
cally. In this case, yo u can close the roof w it h
the power emergency closing function.
~ Wi thin five seconds after the sunroof ope ns
automatica lly, pull the sw itch until the roof
closes .
Opening and clo sin g 39
Page 59 of 258
M N M N
0 ::i co
rl I.O
"' rl
"' rl
any clothing with hard, pointed or heavy
objects in the pockets on the coat hooks.
During sudden braking or in an accident -
especially if the airbag is deployed -
these objects could injure any passen
gers inside the vehicle .
- To reduce the r isk of personal injury in an
acc ident or sudden stop, always keep the
glove compartment closed while driving.
- Read and follow all WARNINGS
Q page 129, Important safety instruc
tions on the side airbag system.
- Hang clothes in such a way that they do
not impair the driver's v ision.
- The coat hooks must only be used for
lightwe ight cloth ing . Do not leave any
heavy o r sharp edged objects in the pock
ets which may interfere with the side cur
tain a irbag deployment and can cause
persona l injury in a crash .
- Do not use coat hangers for hanging
clothing on the coat hooks as this can in
terfere with proper dep loyment of the
side curtain airbags in an accident .
- Do not hang heavy objects on the coat
hooks, as they cou ld cause persona l in
jury in a sudden stop.
- Always keep the compartment above the
rearview mirror closed whi le driving to
reduce the risk of injury in the event of
sudden braking maneuvers or a collision.
(D Note
Objects located on the rear shelf that rub
against the rear w indow cou ld damage the
heating wires for the rear window defog
ger.
@ T ips
- A vent slot is located between the shelf
and the rear window. Do not b lock the
vent with any items you may place on the rear window shelf.
- Do not p lace bulky items on the rear w in
dow shelf as they could restrict or b lock
the driver's vis ion in the rear view mirro r.
S ea ts a nd s to rage 57
Description and
mounting locations
Additional cargo can be carried with a roof
luggage rack.
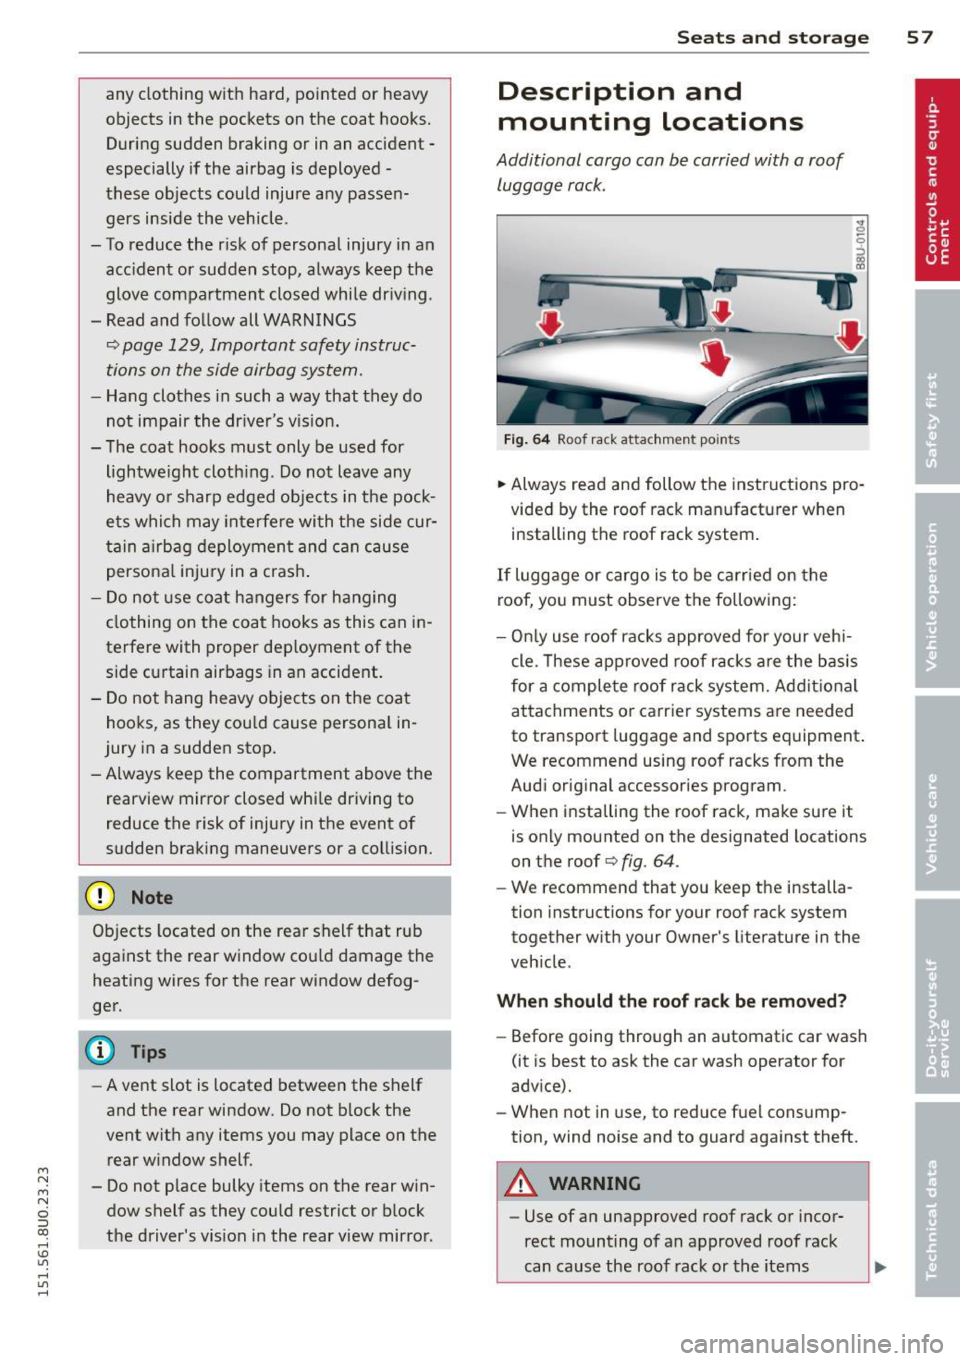
Fig . 64 Roof rack attachment points
.,. Always read and follow the instructions pro
vided by the roof rack manufacturer when
installing the roof rack system .
If luggage or cargo is to be carried on the
roof, you must observe the following:
- On ly use roof racks approved for your vehi
cle. These approved roof racks are the basis
for a complete roof rack system. Additional attachments or carr ier systems are needed
to transport luggage and sports equipment .
We recommend using roof racks from the
Audi original accessories program.
- When installing the roof rack, make sure it
is only mounted on the designated locations
on the roof
Q fig. 64.
-We recommend that you keep the installa
tion instructions for your roof rack system
together with your Owner's literature in the
veh icle .
Wh en sh ould th e roo f rack be re mov ed ?
-Before going through an automatic car wash
(it is best to ask the car wash operator for
advice).
- When not in use, to reduce fuel consump
tion, wind noise and to guard against theft.
A WARNING
-
-Use of an unapproved roof rack or incor-
rect mounting of an approved roof rack
can cause the roof rack or the items
Page 60 of 258
58 Seat s a nd s tor ag e
attached to it to fall off the roof onto the
road .
- Objects falling from the roof of a vehicle
can cause a crash and persona l injury.
- Only mount the roof rack on the desig
nated locations on the roof¢
fig. 64 .
- The roof rack system must be insta lled
exactly according to the instructions pro
vided.
- When driving with a roof rack system,
changes to the center of gravity and wind
resistance can change the vehicle han
dling and lead to a collision . Always
adapt your driv ing and your speed to the
current conditions .
(D Note
-Your vehicle warranty does not cover any
damages to the veh icle caused by using
roof racks or mount ing structures not
approved by Audi for your vehicle . The
same applies to damage resulting from
i nco rrect roof rack installation .
-Always check the roof rack mountings
and hardware before each trip and dur
i ng a tr ip to make sure eve rythi ng is se
cu rely tightened. If ne cessary, retighten
the mo unt ings and check the ent ire sys
tem from time to time.
- After mounting a roof rac k system, or
when you transport objects on the roof
of your vehicle, the height of the vehicle
is natura lly increased . Be careful when
driving under low br idges or in parking
garages for examp le. This could cause
damage to the load and even the vehicle
i tself .
- Make sure that the open rear lid and the
sunroof do not come into contact w ith
objects on the roof .
Loading the roof rack
Always distribute loads evenly. Make sure
any thing on the roof rack is securel y tied
down.
.. Always distrib ute the loads on the roof rack
even ly.
.. Always attac h it em s to the roof rack securely
before you dr ive off .
T he max im um perm issible roof weight is
165 lb (75 kg ). The roof we ight is the total of
the weigh t of the roof rack, the at tachments
and the cargo you are carrying . You must a lso
not exceed the maximum load we ight for the
r oof rack you are using.
When using a roo f rack system which has a
lower load carrying capacity , you must not use
up the tota l maximum permiss ible load carry
ing capac ity specified above. Instead, you
shou ld load the roof rack system only to the
maximum capacity specified by the manufac
tu rer of the roo f rack sys tem.
A WARNING
=
Weak, damaged or imprope r straps used
to secure items to the roof rack can fail
d uring hard braking or in a coll is ion and
cause ser ious personal injury.
- Make sure the roof rack is installed exact
ly as specif ied above ¢
page 5 7.
- Always use s uitable mounting straps for
secur ing items to the roof rack to help
prevent items from sh ifting or flying for
ward .
- Items on the roof rack must always be
securely mounted.
- The use of a roof rack can negatively af
fect the way a vehicle hand les . Cargo
that is large, heavy, bulky, long or flat
will have a greater negat ive influence on
the vehicle's aerodynamics, center of
g rav ity and overall handling. Always
d rive s lowly, avoid s udden bra king and
maneuvers when transporting ca rgo on
the roof of your vehicle .
~
Page 61 of 258
M N M N
0 ::i co
rl I.O
"' rl
"' rl
-Never exceed the maximum permissible
load carry ing capacity of the roof of your
vehicle, the perm issible axle weights and
the permiss ible total weight of your veh i
cle ¢
page 234 , Weights .
(D Note
- Make sure the rear lid does not hit the
cargo on the roof rack when you open it.
On vehicles with automatic rear lid/trunk
lid operation* you may have to adjust the
open position of the rear lid
¢ page 35.
- Remove the roof rack and attachment
before taking your vehicle through an au
tomatic car wash to avoid damage .
@l For the sake of the environment
As a result of the increased w ind resist
ance created by a roof rack, your veh icle is
using fue l unnecessarily . So remove the
roof rack after using it.
Luggage compartment
General information
,& WARNING
Read and heed the importan t safety pre
cautions on ¢
page 100, Stowing lug
gage .
Luggage compartment cover
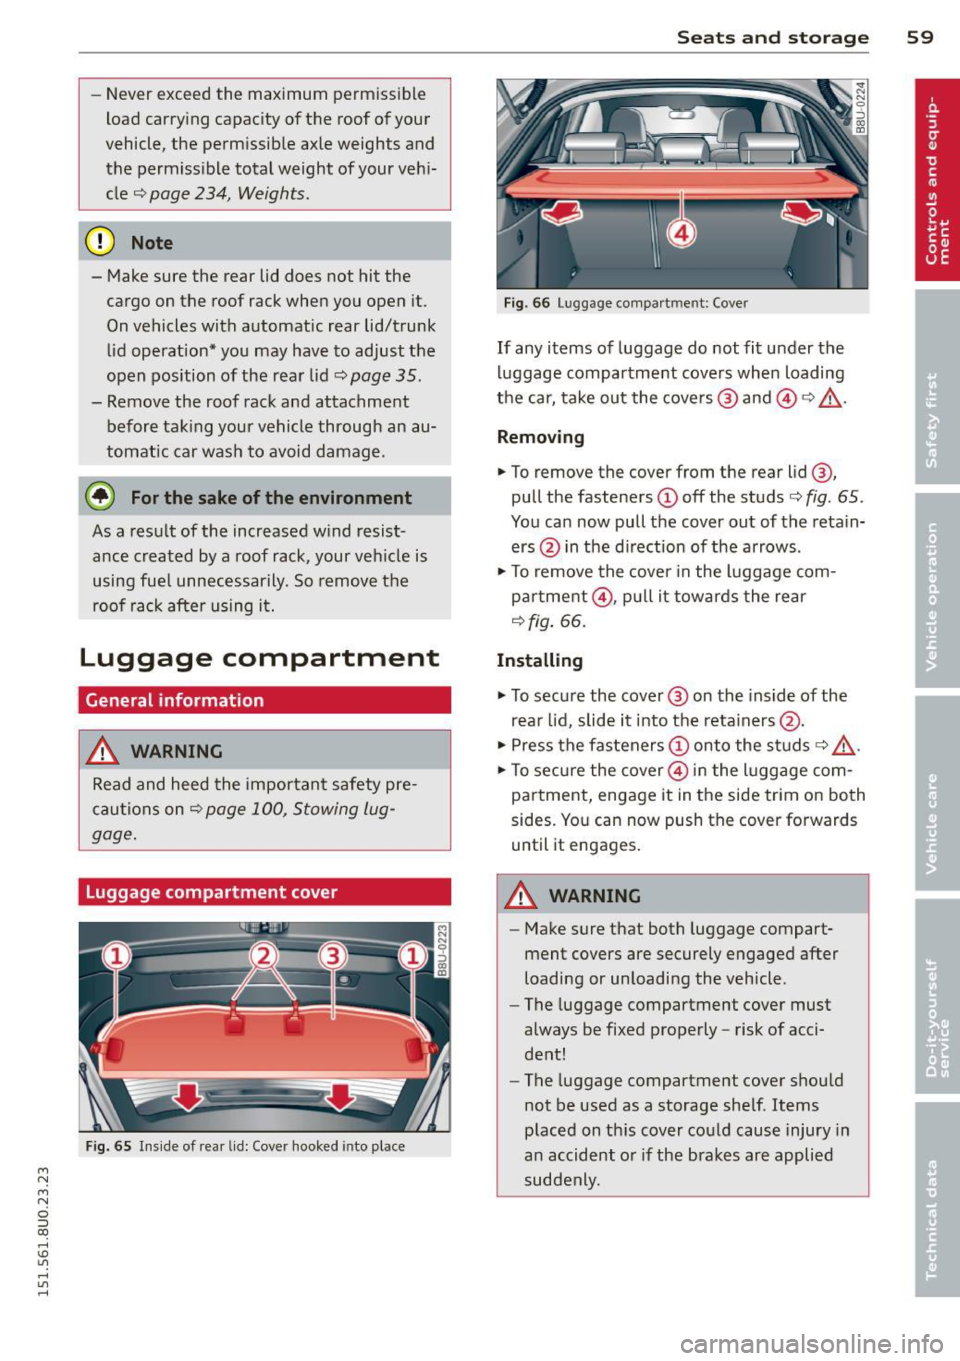
Fig. 65 Inside of re ar lid: Cove r hooked in to pl ace
-
S ea ts a nd s to rage 59
Fig. 66 Lug gage compa rtm en t: Co ver
If any items of luggage do not fit under the
luggage compartment covers when loading
the car, take out the covers @ and @¢,&. .
Remo ving
.,. To remove the cover from the rear lid@,
pull the fasteners
CD off the studs c:> fig. 65 .
You can now pull the cover ou t of the retain
ers @in the d irection of the arrows .
.,. To remove the cove r in the luggage com
p a rtment @, pu ll it towards the rear
¢ fig. 66.
Installing
.,. To secure the cover @ on the inside of the
rea r lid, slide it into the reta iners @.
.,. Press the fasteners
CD onto the studs¢,&. .
.,. To sec ure the cover @ in the luggage com
partment, engage it in the side trim on both
sides. You can now push the cover forwards
until it engages.
,& WARNING
- Make sure that both luggage compart
ment covers are securely engaged after
loading or unloading the vehicle .
- The luggage compartment cover must
always be fixed properly -risk of acci
dent!
- The luggage compartment cover shou ld
not be used as a storage shelf. Items
placed on th is cover could cause injury in
an accident o r if the bra kes are applied
suddenly.
-
Page 65 of 258
M N
M N
0 ::i co ,...., \!) 1.1'1 ,...., 1.1'1 ,....,
Warm and cold Climate control
Description
The climate control system warms, cools and
adds humidity to the a ir in the veh icle inter io r.
It is the most effect ive when the windows and
sunroof are closed . If the re is a build-up of
h eat inside the vehicle, ventilation can help to
speed up the cooling process .
Condensat ion from the cooling sys tem can
drip and form a puddle of water under the ve
hicle. This is normal and does not mean there
is a leak .
Pollution filter
The po llution filte r removes impuri ties, such
as dus t and po llen, from the air.
The air pollutants filter must be changed at
the intervals spec ified in you r Wa rra nty
&
M aintenance book let, so tha t the air condi
tioner can prope rly work .
If you drive your vehicle in an area with h igh
a ir po llution, the fi lter may need to be
changed more frequent ly than specified in
your Aud i Warr anty
& Ma intenance booklet. If
in doubt, ask your authorized A udi Service Ad
visor for advice .
A WARNING
Reduced visibility is dangero us and can
cause accidents.
-
- For safe dr iv ing it is very important that
all windows be free of ice, snow and con
densation.
Warm and c old 63
-Comp letely fam iliarize yourse lf with the
proper use and f unct ion of the heat ing
a nd venti lation system and especially
how to defog and defrost the w indows.
- Never use the windshield wiper/washer
system in freez ing weather unt il you
have warmed the w indshield first, using
the heating and ve ntilation system. The
washer sol ution may freeze on the wi nd
shie ld and re duce visib ility.
0 Note
- If you suspect that the air conditioner
has been damaged, switch t he system
off to avoid furt her damage and have it
in spec ted by a q ual ified dea lership.
- Repairs to the Audi air conditioner re
quire specia l te ch nical know ledge and
speci al to ols. Conta ct an autho rized Aud i
dea ler fo r ass istance.
(® For the sake of the environment
B y reducing the a mou nt of f uel you use,
you also reduce the amount of pollu tants
emitted in to the air.
(D Tips
- Keep the air intake s lots ( in fro nt of the
w indshield) free from ice, snow and de
br is in order to maintain the proper f unc
t ion of the climate control sys tem.
- T he e nergy m ana gement system m ay
switch the seat heating * or rear window
defroster off temporari ly . These systems
are available again as soon as the energy
balance has been resto red.
Page 102 of 258
100 Driving Safel y
Stowing luggage
Loading the luggage compartment
All luggage and other objects must be prop
erly stowed and secured in the luggage com
partment.
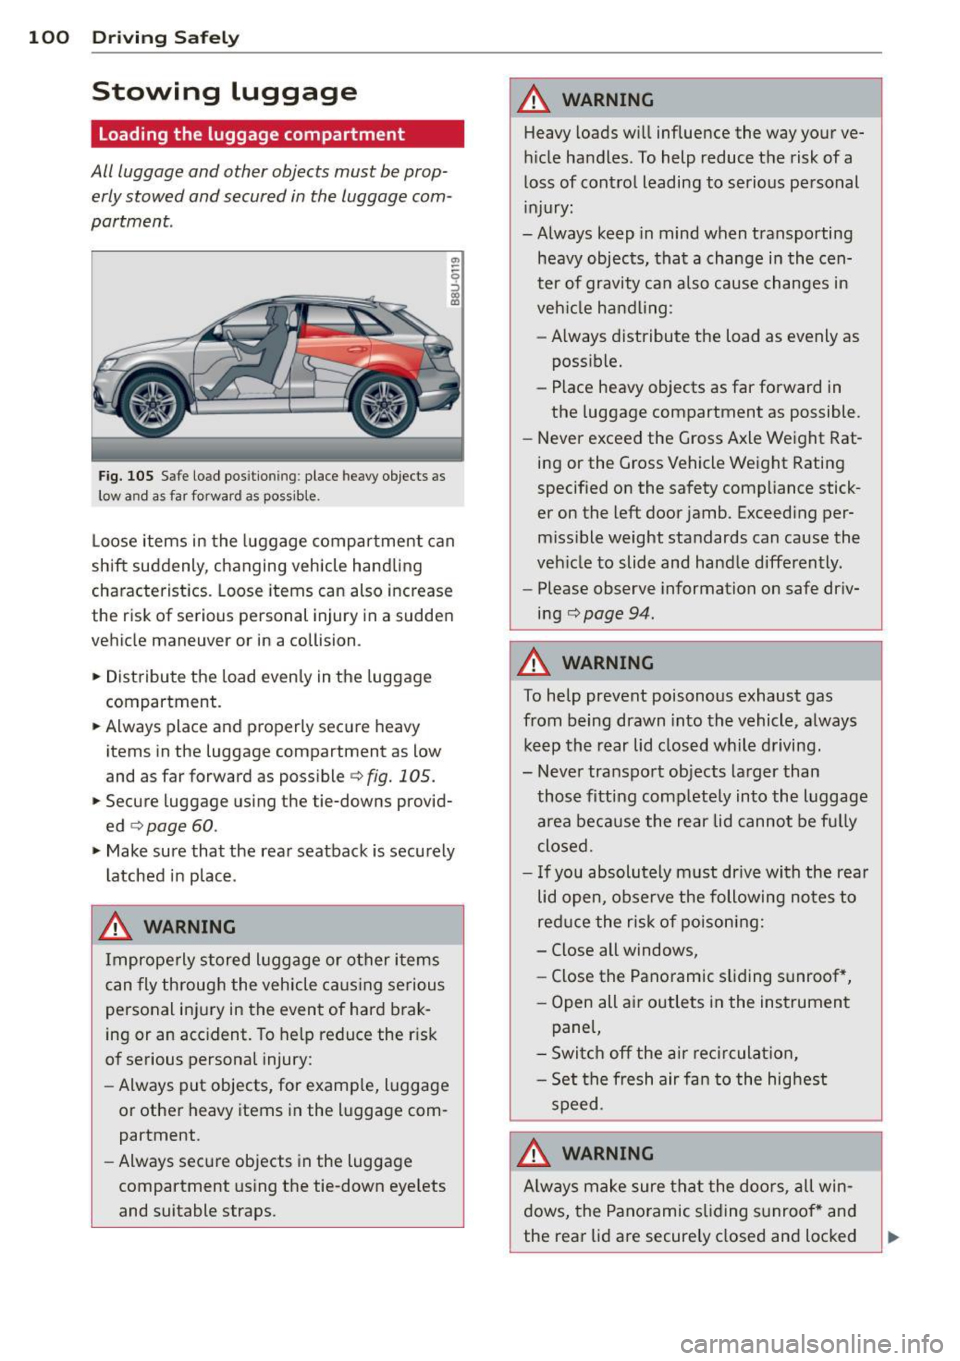
Fig. 105 S afe load pos itio nin g: place heavy objects as
low a nd as far forward as possible .
Loose items in the luggage compartment can
shift suddenly, changing vehicle hand ling
characteristics. Loose items can also increase
the risk of serious personal injury in a sudden
vehicle maneuver or in a collision .
.. Distribute the load evenly in the luggage
compartment .
.. Always place and properly secure heavy
items in the luggage compartment as low
and as far forward as possible
c> fig. 105.
.. Secure luggage using the tie-downs provid
ed
c> page 60.
.. Make sure that the rear seatback is securely
latched in place .
A WARNING
Improperly stored luggage or other items
can fly through the vehicle ca using serious
personal injury in the event of hard brak
ing or an accident. To help reduce the r isk
of serious personal injury:
- Always put objects, for examp le, luggage
or other heavy items in the luggage com
partment.
- Always secure objects in the luggage
compartment using the tie-down eye lets
and suitable straps.
A WARNING
-Heavy loads will influence the way your ve-
hicle handles. To help reduce the risk of a
loss of control leading to serious personal
injury:
-Always keep in mind when transporting
heavy objects, that a change in the cen
ter of gravity can also cause changes in
veh icle handling :
- Always distribute the load as evenly as
possible.
- Place heavy objects as far forward in
the luggage compartment as possible.
- Never exceed the Gross Axle Weight Rat
ing or the Gross Vehicle Weight Rating
specified on the safety compliance stick
er on the left door jamb. Exceeding per
missible weight standards can cause the
veh icle to slide and handle differently.
- Please observe information on safe driv
ing
c> page 94.
A WARNING
-
To help prevent poisonous exhaust gas
from being drawn into the vehicle, a lways
keep the rear lid closed while driving.
- Never transport objects larger than
those fitting comp letely into the luggage
area because the rear lid cannot be fully
closed .
- If you absolutely m ust dr ive with the rear
lid open, observe the following notes to
reduce the risk of poisoning:
- Close all windows,
- Close the Panoramic sliding sunroof *,
- Open all air outlets in the instrument
pane l,
- Switch off the air recirculat ion,
- Set the fresh air fan to the highest
speed.
A WARNING
A lways make sure that the doors, all win
dows, the Panoramic sliding sunroof * and
the rear lid are securely closed and locked
-
Page 117 of 258
M N
M N
0 ::i co ,...., \!) 1.1'1 ,...., 1.1'1 ,....,
airbag. "Low risk" deployment occurs in those
crashes that take place at lower decelerations
as defined in the electronic control unit
c:> page 123, PASSENGER AIR BAG OFF light.
Always remember, a child safety seat or infant
carrier installed on the front seat may be
struck and knocked out of pos ition by the rap
id ly inflating passenger's airbag in a frontal
collision. The airbag could greatly reduce the
effectiveness of the child restraint and even
seriously injure the child during inflat ion .
For this reason, and because the back seat is
the safest place for children -when properly
restrained accord ing to their age and size -we
strongly recommend that children always sit
i n the back seat
c:> page 133, Child Safety.
.&_ WARNING
-
A child in a rearward -facing child sa fety
seat insta lled on the front passenger seat
wi ll be seriously injured and can be ki lled if
the front airbag inflates -even with an Ad
vanced Airbag System .
- The inflating a irbag w ill hit the child
safety seat or infant carrier with great
force and will smash the child safety seat
and child against the backrest, center
armrest, door or roof.
- Always install rear -facing child safety
seats on the rear seat.
- If you must install a rearward facing
child safety seat on the front passenger
seat because of exceptional circumstan
ces and the
PAS SENGER AIR BAG OFF
light does not come on and stay on, im
med iately install the rear-facing child
safety seat in a rear seating posit ion and
have the a irbag sys tem inspected by you r
authorized Aud i dealer.
- Forward-fac ing ch ild safety seats instal
led on the fron t passenger's seat may in
terfere with the deployment of the air
bag and cause serious personal injury to
the chi ld .
A irbag system 11 5
.&_ WARNING
If, in exceptiona l circumstances, you must
install a forward-facing child restraint on
the front passenger's seat:
- Always make sure the forward-facing
seat has been designed and certified by
its manufacturer fo r use on a front seat
with a passenger front and s ide a irbag.
- Never put the forward-facing child re
straint up against or ve ry near the instru
ment panel.
- Always move the passenge r seat into its
rea rmost pos ition in the seat's fore a nd
aft ad justment range, as fa r away from
the airbag as possible before installing
the forward -fac ing chi ld restra int . The
backrest must be adj usted to an up right
position.
- Make sure that the
PASSENGER AIR BAG
OFF
li ght comes on and stays on all the
time whenever the ignition is switched
on.
A WARNING
To reduce the risk of ser ious injury, make
sure that the
PASSENGER AIR BAG OFF
light w ill be displayed whenever a child re
straint is installed on the front passenge r
seat and the ignition is sw itched on .
- If the
PASSENGER AIR BAG OFF light
does not stay on, perform the checks de
scribed
c:> page 123, Monitoring the Ad
vanced Airbag System.
- Ta ke the chi ld restraint off the front pas
senger sea t and install it prope rly at one
of the rear sea t positions if the
PASSEN
GER AIR BAG OFF
light does not stay on.
- Have the airbag system in spe cted by
your author ized Audi dealer immed iate
ly.
- Always carefully follow instr uctions from
child restraint manufacturers when in
stalling child restraints.
•
•