turn signal AUDI Q3 2015 Owners Manual
[x] Cancel search | Manufacturer: AUDI, Model Year: 2015, Model line: Q3, Model: AUDI Q3 2015Pages: 258, PDF Size: 64.9 MB
Page 12 of 258
10 Instruments and warning/indicator lights
Instruments and warning/indicator Lights
Instruments
Instrument cluster and controls
The instrument cluster is your central source of information.
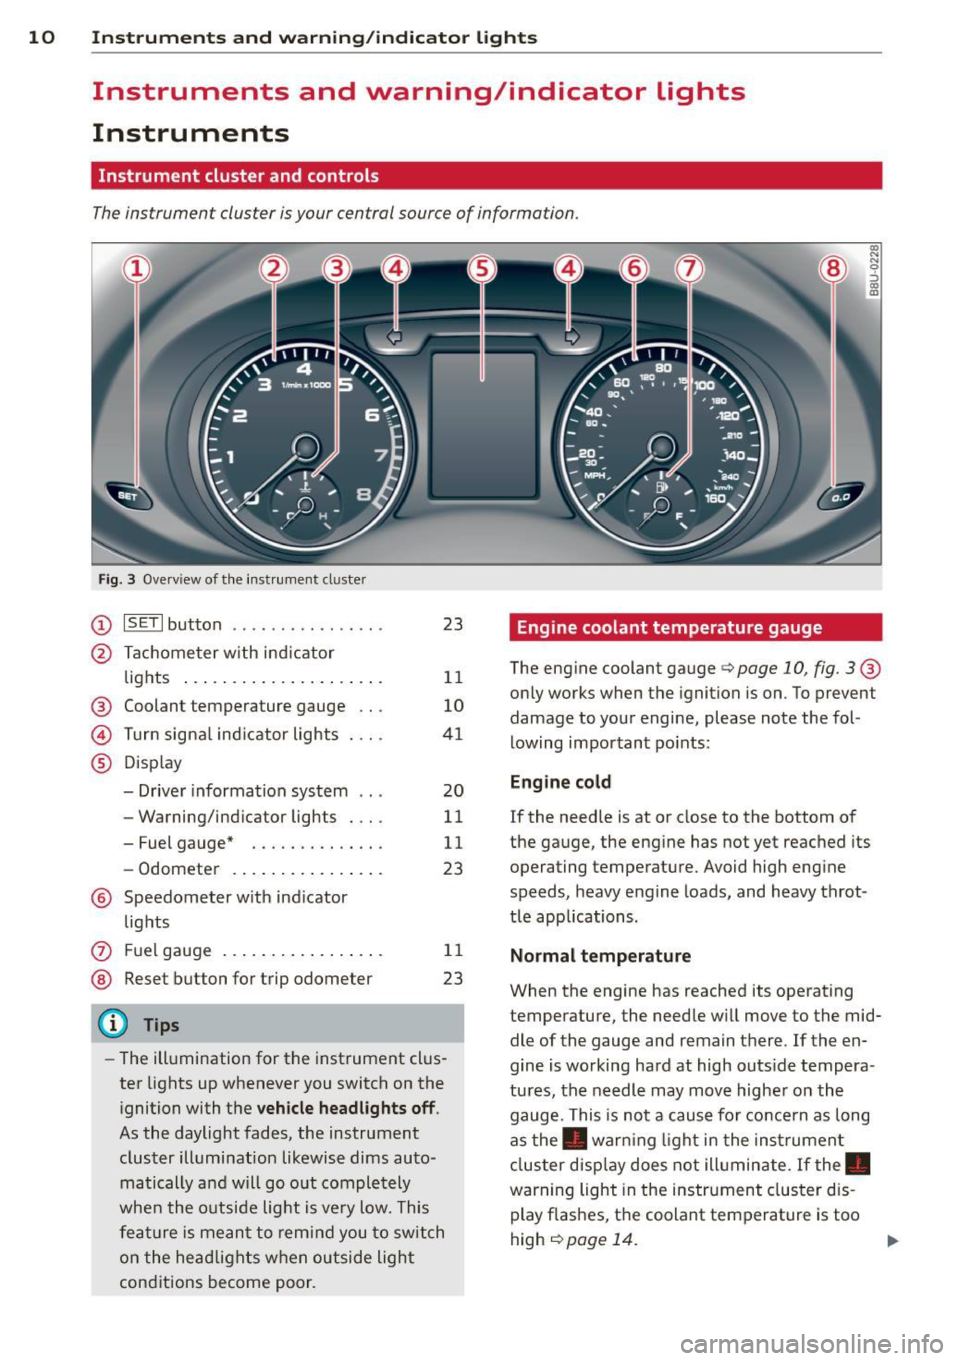
Fig. 3 Ove rv iew of the instrument cluster
(D ISETI button .... .... .. .... . .
@ Tachometer with ind icator
lights .. ............. .... . .
® Coolant temperature gauge .. .
© Turn signal indicator lights . .. .
® Disp lay
- Driver information system .. .
- Warning/indicator lights . .. .
- Fuel gauge* ....... .. .. .. .
- Odometer ........ .... .. . .
® Speedometer with indicator
lights 23
11
10
41
20
11
11
23
(J) Fu el gauge . . . . . . . . . . . . . . . . . 11
® Reset button for trip odometer 23
(D Tips
-The illumination for the instrument clus
ter lights up whenever you switch on the
ignition with the
vehicle headlights off .
As the daylight fades, the instrument
cluster illumination likewise dims auto
matically a nd will go out completely
when the outside light is very low. This
feature is meant to remind you to switch
on the headlights when outside light
conditions become poor .
Engine coolant temperature gauge
CX) N N 0 :'> CX) IX)
The engine coolant gauge q page 10, fig. 3 ®
only works when the ignition is on. To prevent
damage to your engine, please note the fol
lowing important points:
Engine cold
If the needle is at or close to the bottom of
the gauge, the engine has not yet reached its
operating temperature. Avoid high engine
speeds, heavy engine loads, and heavy throt
tle app lications.
Normal temperature
When the engine has reached its operating
temperature, the needle will move to the mid
dle of the gauge and remain there . If the en
gine is working hard at high outs ide tempera
tures, the needle may move higher on the
gauge. This is not a cause for concern as long
as the . warn ing light in the instrument
cluster display does not illuminate. If the.
warning light in the instrument cluster dis
play flashes, the coolant temperature is too
high
¢ page 14. .,.
Page 13 of 258
Instrument s and warnin g/indic ator ligh ts 11
M N
M N
0 ::i co ,...., \!) ..,.,
& WARNING
-Always observe the wa rning in
¢
page 179, before opening the hood
and checking the engine coolant level.
- Never open the engine hood if you see or
hear steam, or if you see engine coolant
dripping from the engine compartment.
You could burn yourself. Let the engine cool off first so that you cannot hear or
see any steam or engine coolant.
(D Note
- Mounting additional lights or accessories
in front of the air inlets reduces the cool
i ng effect of the rad iator. At h igh outside
temperatures or high eng ine load, the
engine could overheat.
- The front spo iler has been designed to
proper ly distr ib ute the cooling air when
the veh icle is moving.
If the spoiler is
damaged, this cou ld redu ce the cooling
effect and the engine co uld then over
heat. Ask yo ur autho rized Aud i de aler f or
assistance.
Tachometer (engine rev counter)
The tachometer indicates the engine RPM
(revolutions per minutes).
If engine R PM drops be low 1,500, you should
downshift to the next lower gear. The red area
at the e nd of the sca le ind icates maximum
permissible engine RPM after the break- in pe
riod. Before reaching this area, move these
l ector lever to position D/S or ease your foot
off the accelerator peda l.
(D Note
The tachometer needle@¢ page 10,
fig. 3 sho uld only briefly be in the red
zone: you could damage your engine! The
beg inning of the red zone varies depend
ing on the engine.
@) For the sake of the environment
Upshift ing early saves fue l and reduces en-
~ gine noise. ,....,
Fuel gauge
T he fuel gauge wo rks only when the ignition is
o n.
When the needle reaches the red a rea, the
warning light
Ii] in the instrume nt cluster
will illuminate
¢ page 18. Time to refuel!
The tota l tank capacity of your ve hicle is listed
i n
¢ page 235.
(1) Note
Never run the ta nk completely dry! An ir
regular supply of f uel can cause engine
misfiring and fuel could enter into the ex
haust system . The catalytic converter
could t hen ove rheat and be damaged.
Warning/indicator
Lights
Description
T he ind icator lights in the instrument cluster
blink or tur n on. They indica te funct io ns or
malfu nctions ¢
.&,..
Messages may appea r with some indicato r
lights. A warning signal may sound at the
same time. The indicato r lights and messages
in the disp lay can be replaced by othe r d is
plays. In the dr iver informa tion system, you
can display the messages aga in
¢ page 21 .
Some indica tors lig hts in the d isplay can turn
on i n severa l colors.
& WARNING ~
- Failure to heed warning ligh ts and other
important vehicle information may res ult
in ser ious personal inj ury or vehicle dam
age.
- Whenever stalled or stoppe d for repair,
move the vehicle a safe d istance off the
road, stop the engine, and turn on the
emergency flasher ¢
page 43.
-The engine compartment o f any motor
ve hicle is a potentially hazardous area.
Before you check anything in the engine
Page 15 of 258
M N
M N
0 ::i co ,...., \!) 1.1'1 ,...., 1.1'1 ,....,
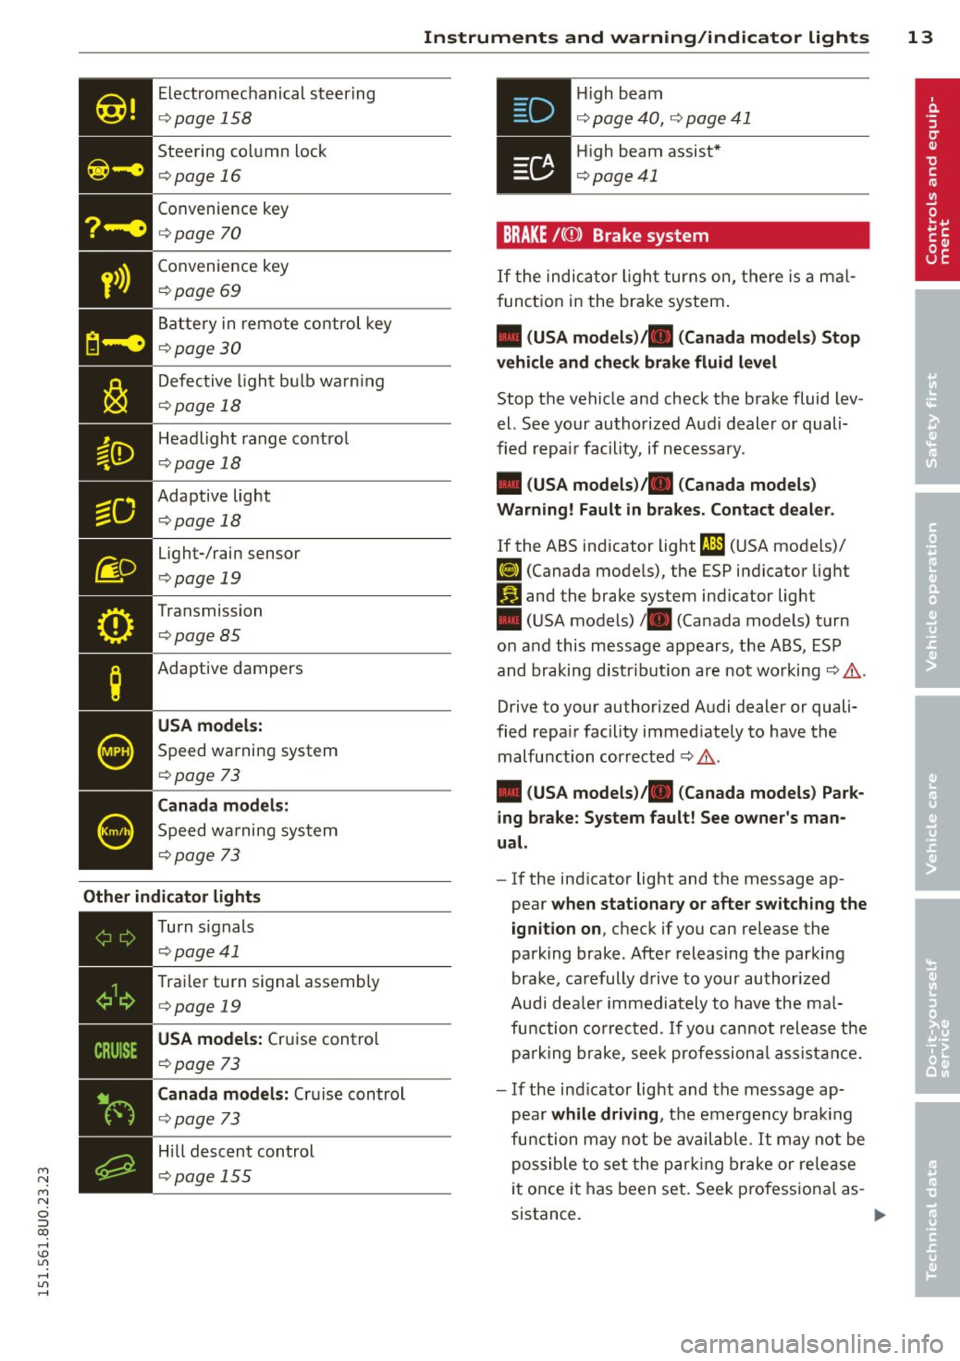
Electromechanical steering
¢page 158
Steering column lock
¢page 16
Convenience key
¢page 70
• Convenience
key ¢page 69
Battery in remote control key
¢ page 30
Defective light bulb warn ing
¢ page 18
Headlight range control
¢page 18
- Adaptive light
- ¢page18
Light-/rain sensor
¢ page 19
Transmission
¢page 85
Adaptive dampers
USA models:
Speed warning system
¢page 73
Canada models:
Speed wa rning system
¢page 73
Other indicator lights
•iii
Turn
signals
¢ page41
• T
rai ler turn signal assembly ¢ page 19
• USA models:
Cruise control
¢
page 73
Canada models: Cruise control
¢page 73
Hill descent control
¢page 155
Instruments and warning/indicator lights 13
.Hi gh beam
• ¢ page 40, ¢ page 41
• High beam assist*
¢page41
BRAKE /((D ) Brake system
If the indicator light turns on, there is a mal
function in the brake system.
• (USA models)/ . (Canada models) Stop
vehicle and check brake fluid level
Stop the veh icle and check the brake fluid lev
el. See your authorized Aud i dealer or quali
fied repa ir facility, if necessary.
• (USA models)/ . (Canada models)
Warning! Fault in brakes. Contact dealer .
If the ABS indicator light t1l1 (USA models)/
fiJ (Canada models), the ESP indicator light
Iii and the brake system ind icator light
• (USA models)/ . (Canada models) turn
on and this message appears, t he ABS, ESP
and braking distr ibution are not working¢&.
Drive to your authorized Audi dealer or quali
fied repa ir facility immed iately to have the
malfunction corrected ¢ & .
• (USA models)/ . (Canada models) Park
ing brake: System fault! See owner's man
ual.
- If the indicator light and the message ap
pear
when stationary or after switching the
ignition on,
check if you can release the
park ing brake . After releasing the parking
brake, carefully drive to your author ized
Audi dea le r im mediately to have the mal
function corrected. If you can not release the
park ing brake , seek professional assistance.
- If the ind icator light and the message ap
pea r
while driving , the emergency brak ing
function may not be available. It may not be
possible to set the parking brake or release
it once it has been set. Seek pro fessiona l as-
sistance. .,.
Page 16 of 258
![AUDI Q3 2015 Owners Manual 14 Instrum ent s and w arn ing /indic ato r light s
(USA models): If the warning light . and the
warning light
ll] appear together, immedi
ately contact your authorized Audi deale AUDI Q3 2015 Owners Manual 14 Instrum ent s and w arn ing /indic ato r light s
(USA models): If the warning light . and the
warning light
ll] appear together, immedi
ately contact your authorized Audi deale](/img/6/57629/w960_57629-15.png)
14 Instrum ent s and w arn ing /indic ato r light s
(USA models): If the warning light . and the
warning light
ll] appear together, immedi
ately contact your authorized Audi dealer or
qua lified workshop to have all brake pads in
spected
¢ page 17.
When the light comes on, an audib le warning
signal is also given .
.&_ WARNING
- Always observe the warnings in
¢ page 179, before opening the hood
and checking the brake fluid.
- Driv ing with low brake fluid is a safety
hazard. Stop the car and get professional
assistance.
- If the . (USA models) . (Canada
models) brake system indicator light
turns on together with the ABS and ESC
indicator lights, the ABS/ESC regu lating
function may have failed. Functions that
stabilize the vehicle are no longer availa
ble. Th is could cause the vehicle to
swerve and increase the risk of sliding .
Drive carefully to the nearest a uthorized
Audi dealer or other qualified workshop
and have the malfunction corrected.
- If the brake warning/indicator light does
not go out after a few seconds and the
park ing brake is released, or lights up
wh ile you are driving, the fluid level in
the brake fluid reservoir is too low .
If you
believe that it is safe to do so, proceed
immediately at low speed to the nearest
authori zed Audi dealer o r qualified wo rk
shop and have the bra ke system inspect
ed.
- Always keep in m ind that after several
brake applicat ions, yo u will need greater
pressure on the brake peda l to stop your
vehicle. Do not re ly on strained brakes to
respond with maxim um stopping power
in critical situations. You must allow for
increased brak ing distances. The extra
distance used up by fad ing brakes could
lead to an acc ident.
PARK !<®> Electromechanical parking brake
The warning/indicator light monitors the
electromechanical parking brake .
If the indicator light. (USA models) •
(Canada models) turns on, the parking brake
was set.
• (USA model s)/. (Canada models ) Press
brake pedal to release parking b ra ke.
To re lease the park ing brake, press the brake
peda l and press the button(®) at the same
t ime or start driving with starting assist
¢ page 71, Starting from rest.
Ill Pa rking br ake : S ys tem f ault! See owne r's
manual.
If the I.II ind ic a tor light tu rns o n and this
message appears, there is a parking b rake
malfunction. Drive to your authorized A udi
dealer or qualified workshop immediately to
have the malfunct ion corrected.
@ Tips
More informat ion on the parking brake
¢page 70 .
-L Engine cooling system
A malfunction in the engine cooling system
must be repaired as soon as possible.
• Turn off engine and ch eck coolant level
T he coolant level is too low .
Do not continue dr iving and turn
off the en
gine. Check the coo lant level
¢ page 186.
-If the coo lant level is too low, add coo lant
¢ page 186. Only continue driving if the in
dicator light turns off.
- If the coo lant level is correct, then the ma l
function may be ca used by fa ilure of the
coolant fan. Do not continue driving. See
your authorized Audi dealer or qualified re pa ir fac ility .
• Coolant temperature! Let engine run
w ith vehicle stationar y.
Page 21 of 258

M N
M N
0 ::i co ,...., \!) ..,.,
,...., ..,., ,....,
Instrument s and warnin g/indic ator ligh ts 19
Go to an authorized dea lership to have the
headlights or the contro l unit for the adaptive
light repa ired.
fi. D Light/rain sensor
Applies to vehicles: with light/rain sensor
t!;I Autom atic he adlight s/wi pers : Sys tem
f ault !
If the indicator light turns on and this mes
sage appears, the light/rain sensor is not
functioning correctly.
For safety reasons the low beams are turned
on permanent ly with the switch in
AUTO .
However, you can continue to turn the lights
on and
off using the light switc h. You can still
control all funct ions that are independent of
the rai n sensor through the windsh ield wiper
lever.
Contact your authorized Audi dealer as soon
as possible to have the prob lem corrected.
¢¢ Turn signals
Whenever you use the left R or the right II
turn signal, the indicator light blinks. When
you use the emergency flashers, both indica tor lights flash.
If one of the turn signal light bulbs burn out,
the turn signa l will blink tw ice as fast as nor
mal. Carefully drive to your author ized A udi
dealer immediately to have the malfunct io n
corrected .
@ Tips
For more information on the turn signals,
see
¢ page 41.
¢1<~ Trailer turn signal assembly
The indicator light also blinks if the turn sig
nal is operated when towing a trailer.
The indicator light. blinks when the turn
signal is used, if a trailer has been properly
connected to the vehicle. If one of the turn signa
l bulbs on the trailer is
burned out or defective, the indicator light
will not blink when you use the turn s ignals.
(D Tips
For vehicles with a trailer hitch that was
insta lled later according to factory specifi
cations, the trailer turn signa l assembly is
actuated.
Page 30 of 258
28 Opening and closing
Opening and closing
Power locking system
General description
The power locking system locks or unlocks all
doors and the rear lid simultaneously.
You can lock and unlock the vehicle centrally.
You have the following choices:
- Remote master key~
page 30,
-Sensors in the front door handle on vehicles
with convenience key* ¢
page 31,
-Power locking switch ins ide¢ page 32,
oder
- Lock cylinder at the driver's door
~page 33.
Automatic locking
The automat ic locking feature locks all the ve
hicle doors and the rear lid when you drive
faster than 9 mph (15 km/h).
The car is unlocked again once the ignition key
is removed. In addition, the veh icle can be un
locked if the opening function in the power
locki ng system switch or at one of the door
levers is actuated.
Addit ionally, in the event of a crash with air
bag deployment the doors are automatically
un locked to all ow access to the vehicle.
Selective unlocking
When you lock the vehicle, the power locking
system w ill lock the doors and the rear lid.
When unlocking, you can set in the rad io or
MMI* whether only the driver's door or the
enti re vehicle should be unlocked
¢page 32.
Anti-theft alarm warning system
If the anti -theft alarm warning system de
tects a break- in into the vehicle, acoust ic and
visua l warning signals are triggered.
The anti-theft alarm system turns on auto matically when you lock the vehicle. It deacti
vates when unlocking using the remote con- trol key or by touching the sensor on the door
handle (convenience key) .
T o switch the alarm off, press the@ button on
the remote control key or conven ience key or
switch the ignition on. The a larm also stops
automatica lly after a certain amount of time .
You can also trigger the alarm by pressing the
PANIC button on your remote-control key.
This will alert other people in case of emer
gency. Press the
PANIC button again to turn
off the a larm .
Turn signals
When you unlock the vehicle, the turn sig nals
flash twice, when you lock it once. If they do
not flash, one of the doors or the luggage
compartment lid is not locked, the ignition is
sti ll switched on or the selector lever is not in
pos ition P.
Unintentionally locking yourself out
In the following cases there are safeguards to
prevent you from locking your remote master
key in the vehicle :
- The vehicle does not lock w ith the central
locking switch if the driver's door is open
~ page 32.
-On veh icles with convenience key*, if the
most recently used master key is in the lug
gage compartment, the rear lid is automati
cally un locked again after it is closed.
Do not lock your veh icle w ith the remote mas
ter key or convenience key* until all doors and
the rear lid are closed. In this way you avoid l ocking yourself out accidentally.
A WARNING
- When you leave the vehicle, always re
move the ignition key and take it with
you . This will prevent passengers (chil -
dren, for example) from accidentally be-
-
ing locked in the vehicle should they acci
denta lly press the power locking switch
in the front doors.
~
Page 43 of 258
M N M N
0 ::i co
rl I.O
"' rl
"' rl
(D Tips
-The light sensor* for headlight control is
located in the rear view mirror mount.
You should therefore not apply any stick
ers to the windshield in this area in order
to prevent malfunctions or failures.
- Some exterior lighting functions can be
ad justed
¢ page 42.
- When you switch off the ignition while
the vehicle's lights are turned on, a buz
zer sounds as long as the driver's door is
open .
- In cool or damp weather, the inside of
the headlights, turn signals and tail
lights can fog over due to the tempera
ture difference between the inside and
outside. They will clear shortly after
switching them on. This does not affect
the service life of the lighting.
- In the event of a light sensor malfunc
tion, the driver is notified in the instru
ment cluster display~
page 19 .
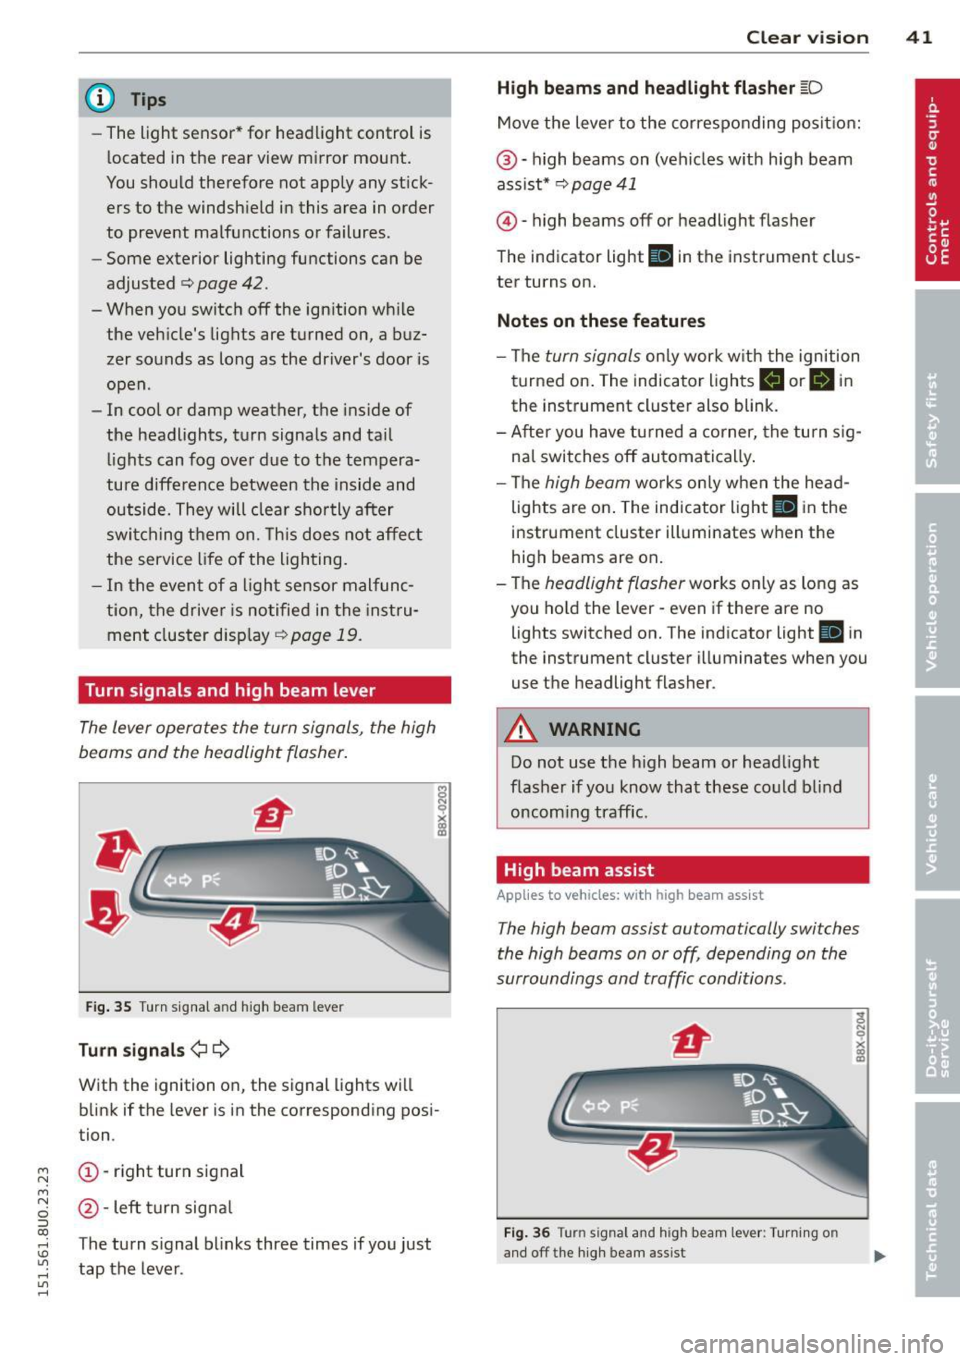
Turn signals and high beam lever
The lever operates the turn signals , the high
b eams and th e headlight flash er.
Fig. 35 Turn signal and high beam leve r
Turn signals ¢i ¢
With the ignition on, the signal lights will
blink if the lever is in the corresponding posi
tion .
(D-right turn signal
@-Left turn signal
T he turn signal blinks three times if you just
tap the lever. Clear
vision 41
High beams
and headlight flasher @:D
Move the lever to the corresponding position:
@-high beams on (vehicles with high beam
assist*
¢ page 41
@ -high be am s off or headligh t fla sher
The indicator light
Ill in the instrument clus
ter turns on.
Notes on these features
-The turn signals only work with the ignition
turned on. The indicator lights
II or Ill in
the instrument cluster also blink.
-After you have turned a corner, the turn sig
nal switches off automatically.
- The
high beam works only when the head
lights are on. The indicator light
El in the
instrument cluster illuminates when the
high beams are on.
- The
headlight flasher works only as long as
you hold the lever -even if there are no
lights switched on. The indicato r light
Iii in
the instrument cluster illuminates when you
use the headligh t flasher .
A WARNING
Do not use the high beam or headlight
flasher if you know that these could blind
oncoming traffic.
High beam assist
Applies to veh icles: w ith high beam assist
-
The high beam assist automatically switches
the high beams on or off, depending on the
surroundings and traffic conditions .
Fig. 36 Turn s ignal an d h igh beam lever : Turning o n
and off the high beam assist
Page 45 of 258
M N M N
0 ::i co
rl I.O
"' rl
"' rl
light switch is in the AUTO position
¢ page 40, fig. 34.
Daytime running lights
USA models : You can switch the dayt ime run
ni ng lights
on an d off .
Canada models:
The function cannot be
turned off .
It is ac tiva ted automat ica lly each
time the ignition is switc hed o n.
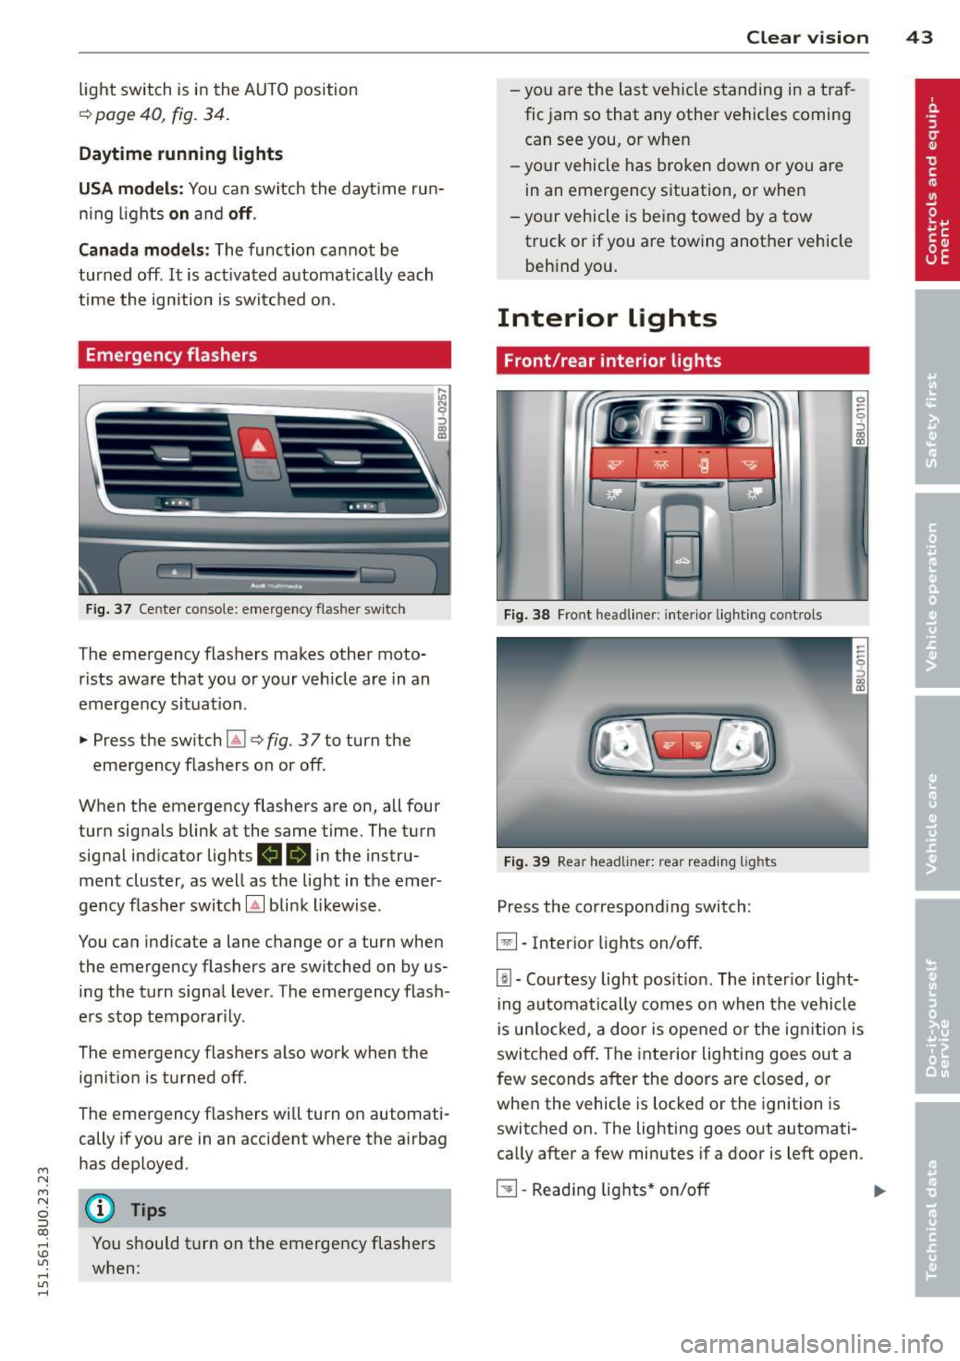
Emergency flashers
Fig . 3 7 Cente r conso le : emerge ncy flashe r sw itch
The emergency flashers makes other moto
rists aware that you or your vehicle are in an
emergency situation .
.,. Press the sw itch
Gil ¢ fig. 3 7 to turn the
emergency flashers on or off.
When the emergency flashers are on, all four turn signals blink at the same time. The turn
signa l ind icator lig hts
II 18 in the instru
ment cluster, as well as the light in t he emer
gency flashe r switch
[Ai bli nk likewise .
You can indicate a lane change or a turn when
the emergency flashers are switched on by us
ing the tu rn signa l lever . The emergency flash
e rs stop temporar ily.
The emergency f lashers also work when the
ignit io n is turned off.
The emergency flashers will turn o n automati
cally if you are in an accident where the airbag
h as dep loyed.
@ Tips
You shou ld t urn on t he emergency flashers
when:
Clear vi sion 43
- yo u are the la st veh icle standing in a t ra f
fic jam so that any other ve hicles coming
can see you, o r whe n
- yo ur vehicle has bro ken dow n or you are
in an emergency s ituation, o r when
- yo ur vehicle is be ing towed by a tow
truck or if you are towing another vehicle
beh ind you.
Interior Lights
Front/rear interior lights
Fig . 38 Fro nt headl iner: int eri or lig h ting co ntro ls
Fi g. 39 Rear headli ner: rea r read ing lig hts
Press the corresponding switch:
~ -In ter ior lig hts on/off .
[ii-Courtesy light pos it io n. The inter ior lig ht
ing auto mati ca lly comes o n when t he ve hicl e
i s un lo cke d, a door i s ope ned or the ig nitio n is
switched off. The interior lighting goes o ut a
few seconds after the doors a re closed, or
whe n the vehicle is locked or the ignition is
switched on. The lighting goes out automati
ca lly after a few minutes if a door is left open .
~ -Read ing lights * on/o ff ..,.
Page 73 of 258
M N
M N
0 ::i co ,...., \!) ..,.,
,...., ..,., ,....,
Emergency brake function
An emergency brake ensures that the vehicle
can be slowed down even if the
normal brakes
fail c::>
page 72, Emergency broking.
& WARNING
If a drive range is engaged with the vehicle
stat ionary and the engine running, you
must in no instance accelerate care lessly.
Otherw ise the vehicle will start to move
immediately -risk of an accident.
(D Tips
- If the parking brake is applied with the
i gnition switched off, the indicator lights
• in the switch and. (USA models) /
• (Canada models) in the instrument
cluster w ill go out after a certa in period
of time.
- Occasional noises when the park ing
brake is applied and re leased a re norma l
and are not a ca use for concern.
- When the vehicle is parked, the parking
brake goes through a se lf-test cycle at
regular intervals. Any assoc iated noises
are norma l.
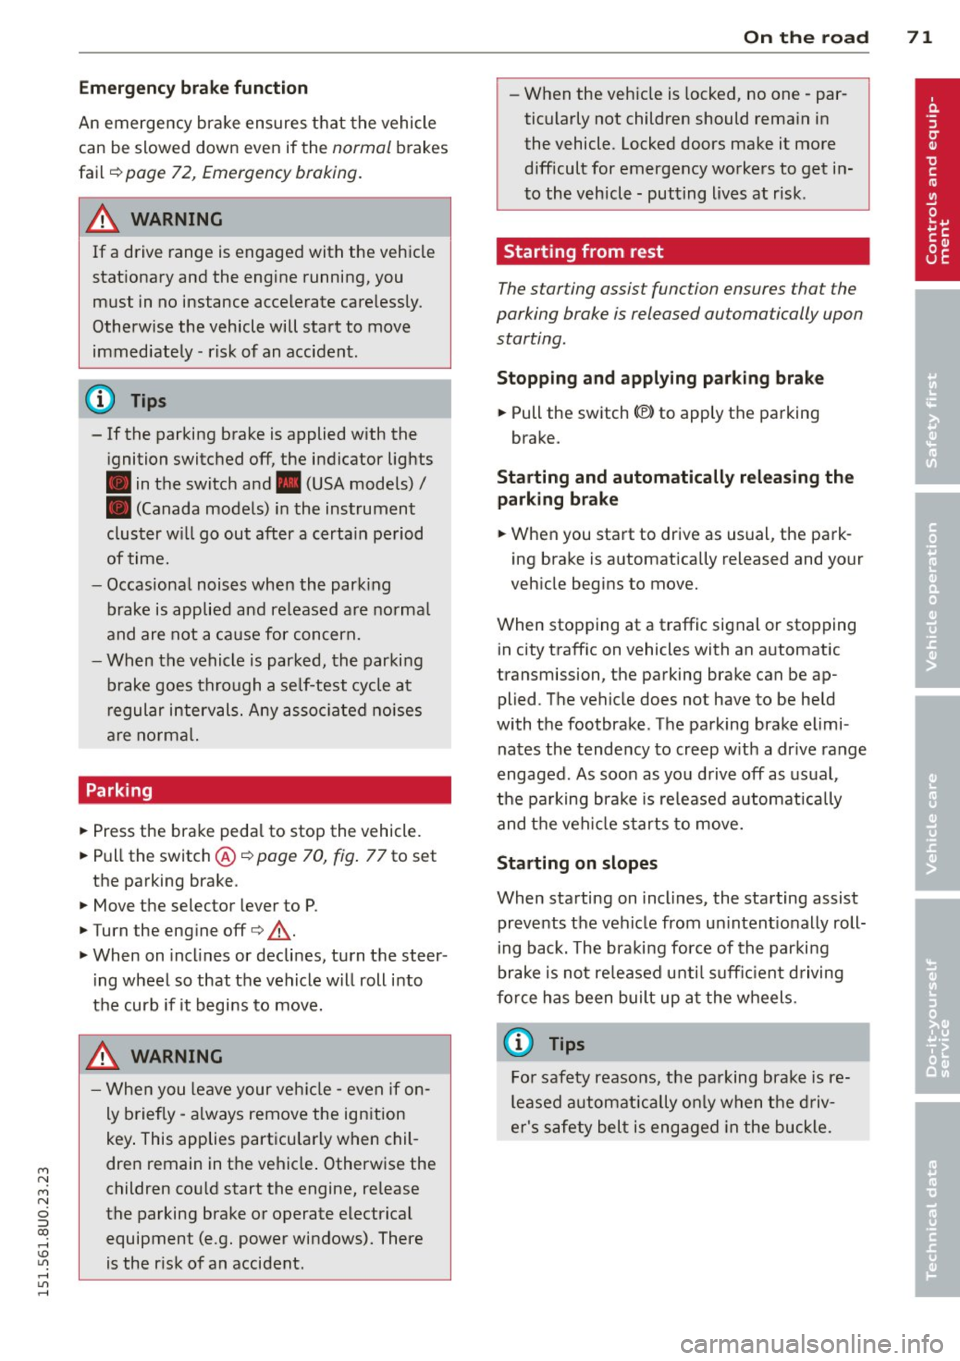
Parking
~ Press the brake peda l to stop the vehicle.
~ Pull the switch@c::> page 70, fig . 77 to set
the parking brake.
~ Move the selector lever to P.
~ Turn the engine off c::> _&.
~ When on incl ines or declines, turn the steer
ing wheel so that the vehicle w ill roll i nto
the curb if it begi ns to move.
& WARNING
- When you leave your veh icle - even if on
ly b riefly- a lways remove the ign ition
key . This applies particularly when chil
dren remain in t he vehicle . Otherwise the
children co uld start the engine, release
the parking brake or operate electrical
equipment (e.g. power windows). There is the r isk of an accident .
On th e ro ad 71
-When the veh icle is locked, no one - par
ticularly not children should rema in in
the vehicle. Locked doors make it more
difficult for emergency wo rkers to get in
to the vehicle - putting lives at risk .
Starting from rest
The starting assist function ensures that the
parking broke is released automatically upon starting.
Stopping and applying park ing brak e
~ Pull the sw itch C®l to apply the pa rking
brake.
Starting and automatically releasing the parking brake
~ When you start to drive as usual, the park
ing brake is a utomatically released and your
veh icle begins to move.
When stopping at a traffic signal or stopping in city traff ic on vehicles with an automatic
transmission, the parking brake can be ap
plied. The vehicle does not have to be held
with the footbrake. The parking brake elimi
nates the tende ncy to creep w ith a dr ive range
engaged. As soon as you d rive off as usual,
t he pa rking bra ke is re leased automatically
and the veh icle s tarts to move.
St arting on slopes
When starting on inclines, the starting assist
prevents the vehicle from un intent io nally roll
ing back. The braking force of the parking
brake is no t re leased unt il su ff ic ient d riving
force has been built up a t the wheels.
(D Tips
Fo r safety reasons, the parking bra ke is re
l eased automatically o nly when the d riv
e r's safety belt is eng aged in the buckle.
Page 77 of 258
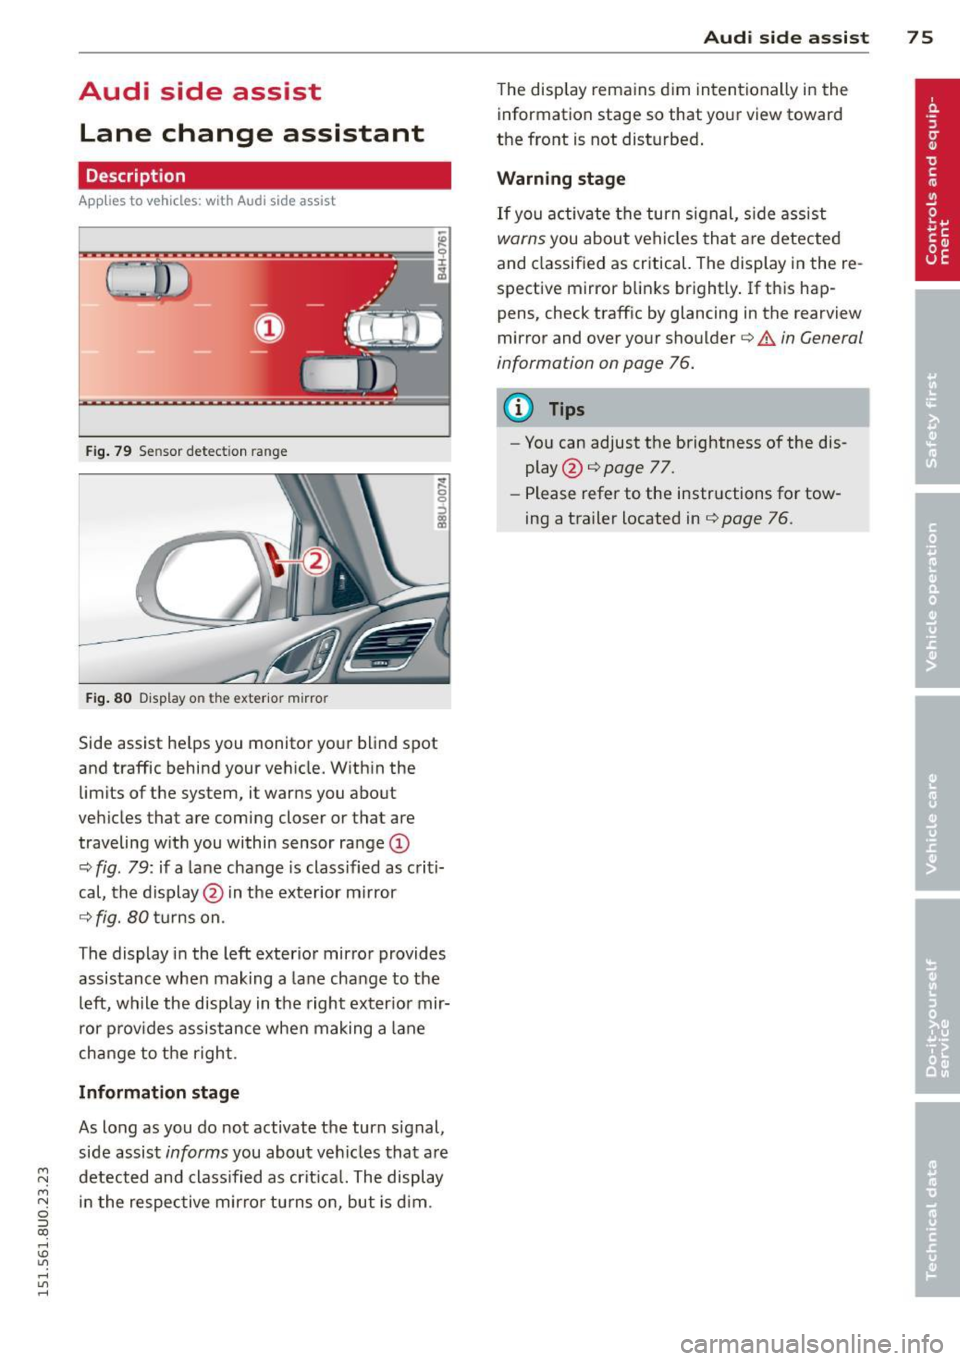
Audi side assist Lane change assistant
Description
Applies to vehicles: with Audi side assist
Fig . 79 Se nsor detec tion ra nge
Fig. 80 Display o n the exter io r mirro r
Side assist he lps you mon itor your blind spot
and traffic behind you r veh icle. W ith in the
limits of the system, it warn s you about
vehicles that are coming closer or that are
traveling w ith you within sensor ra nge
(D
c::, fig . 79: if a la n e change is classified as c riti
cal, the display @in the exterior m irror
c::> fig. 80 tu rns on.
The display in the left exterio r mirror provides
assistance when making a lane cha nge to t he
l eft, while the display in the right exter ior mir
r or p rov ides assistance when making a lane
change to t he righ t.
Information stage
As long as you do not activate the turn signal,
side assist
informs you about vehicles that are
~ detected and class ified as crit ica l. The display M
N in t he respec tive mirro r turns o n, but is d im . 0 ::i co
rl I.O
"' rl
"' rl
Aud i side assist 7 5
The display remains d im intentionally in the
information stage so that your view toward
the front is not disturbed .
Warning st age
If you activate the turn signal, s ide assist
warns you about veh icles tha t are detected
and classified as critical. The display in the re
spective mirror blinks brightly . If this hap
pens, check traff ic by glanc ing in the rearview
mirror and over your shoulder¢
A in General
information on page 76.
@ Tips
- Yo u can adjust the brightness of the dis
play @¢
page 77.
- Please refer to the instructions fo r tow
ing a trailer located in
¢ page 76.