check engine light AUDI Q3 2016 User Guide
[x] Cancel search | Manufacturer: AUDI, Model Year: 2016, Model line: Q3, Model: AUDI Q3 2016Pages: 252, PDF Size: 62.81 MB
Page 182 of 252
Check ing and F illing
Audi oil quality standard
Gas olin e
VW 502 00 or
engi ne vw 50400
Using the proper engine oil is important for the
functionality and service life of the engine. Your
engine was factory-filled with a high-quality oil
which can usually be used throughout the entire
year .
Q) Note
Your Limited New Vehicle Warranty does not
cover damage or malfunctions due to failure
to follow recommended maintenance and use
requirements as set fo rth in the Audi Owner's
Manual and Wa rranty
& Maintenance booklet.
- Use only a high qua lity eng ine oi l th at ex-
pressly complies with the Audi oil qua lity
stan dard specified for your vehi cle's engine.
Using any o ther oil can cause serious engine
damage .
- Do not mix any lubricants o r other addit ives
i nto the engine oil. Doing so can cause en
gine damage.
(D Tips
I f you nee d to add oi l and there is none availa
ble that meets the Audi o il qu ality st andard
your engine requires, you may ad d a total of
no more than 0 .5 quart/liter of a high-quality
"synthet ic"oil that meets the following speci
fications.
- ACEA A3 o r API SM with a viscosity g rade of
SAE OW-30, SAE 5W-30 or SAE 5W-40.
- For more information about engine oi l that
has been approved for your vehicle, please
contact either your authorized Audi dea ler
or Audi Custome r Relat ions at
1 (800) 822-2834 or visit our web site at
www.audiusa.com or www .aud icanada .ca.
Engine oil consumption
The engine in your vehicle depends on an ade
quate amount of oil to lubricate and cool all of
its moving parts .
In order to provide effective lubrication and cool
ing of internal engine components, all internal
180
combust ion engines consume a certa in amo unt
of oil. Oil consumption varies from engine to en
gine and may change significantly over the life of
the engine. Typically, engines w ith a specified
break-in period (see
c:::;, page 159) consume more
o il dur ing the break-in per iod than they consume
af ter o il consumption has stab ilized .
Under normal conditions, the rate of oil con
sumption depends on the quality and viscos ity of
the oil, the RPM (revo lutions per m inute) at
wh ich the engine is operated, the amb ient tem
perature and road condit ions. Further factors a re
the amount of o il di lution from wate r co ndensa
tion or fue l resid ue an d the oxidation level of the
o il. As any engine is sub ject to wear as mileage
builds up, the oi l cons umption may increase over
time unt il replacement of worn components may
become necessary.
With a ll these variab les coming into p lay, no
standard rate of oil consumption can be estab
li shed or specified. The re is no alternative to reg
u lar and frequent checking of the oi l level, see
Note.
If the yellow engine oil level warning symbo l Ell
in the instrument cluster lights up, you sho uld
check the oil level as soon as possible
c:::;, page 181. Top off the oil at your earliest con
venience
c:::;,page 181.
A WARNING
Before you check anyth ing in the e ng ine com
partment, always read and heed all WARN
I NGS
c:::;, .&. in Working in the engin e compart
ment on page 177.
(D Note
Driving w ith an insuffic ient oil level is likely to
cause severe damage to the eng ine.
(D Tips
- The oil pressure warn ing d isplay. is not
an indicator of the oil level. Do not rely on
it. Instead, check the oil level in your en
g ine at regular int ervals , pr eferably each
time you refuel, and alway s before going
on a long trip .
Page 185 of 252
Cooling system
Coolant
The engine coolant performs two functions: it
keeps the engine from overheating and it pro
tects the engine from freezing in the winter .
The cooling system is sealed and generally re
quires little attention.
T he cooling system has been filled at the factory
with a permanent coolant which does not need to
be changed . The coolant consists of a mixture of
specially condit ioned water and the manufactur
er's glycol-basedcoolant add itive G 13 antifreeze
with anticorrosion additives (SO% for USA mod
e ls; 60% for Canada models) . This mixt ure bot h
assures the necessary frost protec tion and pro
tects meta l components in the engine's cooling
system from corrosion and scaling . It also raises
the boiling point of the coolant.
D o not red uce the concent ration of the coolant in
the summer by add ing p la in water.
The propor
tion of coolant addit ive mu st be at least 50 %
but not more than 60 %
to mainta in antifreeze
protection and cooling efficiency. If the coolant
frost protection is too low, the coolant could
freeze and damage the vehicle heating and en
g ine cooling system .
For year-round driving, antifree ze is added at the
factory for temperatures down to :
- -31° F(- 3S°C)USA
- -4 0 ° F ( - 40 °C) Can ada.
If you must add coolant, use a m ixture of water
and coolant addit ive. M ixing the coolant additive
with d istilled water is recommended .
_& WARNING
Before you check anythi ng i n t he engine com
partment, a lways read and heed a ll WARN
INGS
¢ .&. in Working in the engine compart
ment on page 177 .
(D Note
-Befo re winter se ts in, have the coo lant
checked to see if the coolant additive in you r
vehicle is sufficient to meet the cl imate con -
Check ing and Filling
ditions. This is especially important if you
live in a region where the winter is extreme
ly cold. If necessary, increase the proportion
of coolant additive to 60%.
- When adding coolant additive to your cool
ing system, remember :
- We recommend us ing only coolant add i
tive G12+ + or G13 fo r yo ur vehicle. This
coolant addit ive is avai lab le a t aut horized
A udi dealers . O ther types of antifree ze can
significantly reduce corrosion pro tect ion .
The resulting corrosion can cause a loss of
coolant and serious engine damage.
- Do not add any type of radiator leak sealant
to your vehicle's engine coolant. Adding ra
diator repair fluid may adversely affect the
function and performance of your cooling system and cou ld resu lt in damage not cov
ered by your New Veh icle Limited Warra nty .
Checking the engine coolant level
The engine coolant level can be checked with a
quick glance.
Fi g. 1 52 Engin e compar tmen t: Cover o n the coo la n t ex
pans ion tank
.. Before you check anything in the eng ine com
partment,
always r ead and h eed all WARN
INGS ¢ ,A in Working in the engine compart
ment on page 177 .
.. Par k your veh icle on a leve l sur face.
.. Tur n off t he ignit io n .
.. Read the eng ine coolan t leve l from the coo lant
expansion tank
¢ fig . 15 2, ¢ page 179,
fig. 149 .
With a cold engine, the coo lant level
should be b etween the "MIN" and "MAX" mark
ings. When the eng ine is warm, the level may
be slightly above the "MAX" marking. .,..
183
Page 186 of 252
Check ing and F illing
The location of the coolant expansion tank can be
seen in the engine compartment illustration
c::> page 179.
To obtain an accura te reading, the eng ine must
be switched off .
The expans io n tank in your vehicle is equipped
with a n elec tric coolant level sensor.
When the coolant level is too low, the war ning
lig ht in the Auto-Check System
c::> page 14 will
blin k until you add coo la nt and the level has bee n
restored to normal. Even t hou gh the re is an e lec
tr ic coolant level sensor, we still re commend you
check the coo lant level from time to time .
Coolant loss
Coolant loss may indicate a leak in the cooling
system. I n the event of coolant loss, the cooling
system should be inspected immediately by your
author ized Audi dealer. It is not enough me rely
to add coolant.
I n a
se aled system, losses can occur only if the
boi ling point of the coo lant is ex ceeded as a re
sul t of over heat ing.
A WARNING
T he cooling system is unde r pressure and can
get very hot . Red uce the risk of scalding from
hot coolant by following these steps.
- Turn off the eng ine and a llow it to cool
down .
- Protect your face, hands and arms from es
caping fluid and steam by cove ring the ca p
with a la rge, thick rag.
- Turn the cap s lowly and very ca refu lly in a
counter-clockwise direction w hile ap ply ing
light, downwa rd pressure o n the top of the
cap.
- To avo id being burned, do not sp ill anti
freeze or coolant on the exha ust system or
hot eng ine parts. Under certain conditions,
the ethy lene g lycol in e ngine coolant can
catch fire.
(D Note
Do not add any type of radiato r leak sealant
to your veh icle's engine coolant. Adding radia-
184
tor repair fluid may a dverse ly affect the func
tion and performance of your coo ling system
and could result in damage not covered by
your New Vehicle Limited Warranty.
Adding coolant
Be very careful when adding engine coolant.
Befo re yo u check any thing in the engine compart
ment,
always read and heed all WARNINGS
c::>
A in Working in the engine compartment on
page 177.
Requireme nt: The re mus t be a res idual amo unt
of coolant in the expans ion tank
c::> (D .
""Tur n off t he engine .
"" Let the eng ine cool down.
"" Pla ce a thick rag over the coolan t ex pan sio n
tank
c::> page 183, fig. 152 and carefull y turn
the cap counter-clockwise
c::> ,&. .
""Add coolant m ixed in the cor rect rat io
c::>page 183, Coolant up to the MAX ma rking.
"" Make sure that the fluid level remains stab le.
Add more coolant if necessa ry .
"" Twis t the cap o n aga in
tightly.
Replacement eng ine coolant must conform to ex
act specifications
c::> page 183, Coolant.
We recommend using only coo lant ad ditive G 12+
+ , G13 or in an emergency G12+. Do
not use a
different additive. In an emergency use plain wa
te r unt il you can get the cor rect addit ive and ca n
r esto re the cor rect rat io. Thi s should be done as
soon as possib le.
If you have lost a considerable amount of coo l
an t, then you s hou ld add co ld a ntifreeze and cold
water only whe n the engine is co ld.
A lways use
new engine coo lant when ref illing.
Do no t fill c oolant above the "MAX" mark . Excess
coolant will be forced out th rough the pressure
r elief valve in the cap when the engine becomes
hot.
~
Page 188 of 252
Checking and Filling
Brake fluid
Checking brake fluid level
The brake fluid level can be checked with a quick
glance.
Fig. 153 Eng ine compartment: Cover on the brake fluid
r eservoir
Before you check anything in the engine compart
ment,
always read and heed all WARNINGS
¢ A in Working in the engine compartment on
page 177.
., Read the brake fluid level from the brake fluid
reservoir
<=> fig . 153, ¢page 179, fig . 149 . The
brake fluid level must be between the
" MIN"
and "MAX " markings.
The brake fluid reservoir is located at the rear
partition of the engine compartment on the left
side ¢
page 179 .
The fluid level may drop slightly after some time
due to the automatic adjustment of the brake
pads . This is not cause for alarm .
If the brake fluid level falls
considerably below
the ' 'MIN" mark, the brake warning/indicator
light (USA models:
1111 , Canada models:. )
will come on¢
page 13 . Do not continue to oper
ate the vehicle . The complete brake system
should be thoroughly checked by an authorized
Aud i dealer or qualified workshop and the cause
corrected. If the brake fluid level is too low, the
brake warning/indicator light w ill illuminate.
Contact an author ized Audi dealer
immediately.
(D} Tips
The brake fluid reservoir is located under
neath the cover.
186
Changing brake fluid
Have the brake fluid changed by an experienced
technician .
Brake fluid absorbs moisture from the air. If the
water content in the brake fluid is too high, cor
rosion in the brake system may result after ape
riod of time . The boiling po int of the brake fluid
will a lso decrease considerably and decrease
braking performance.
Therefore , the brake fluid must be changed
every
two years .
Always use new brake fluid which con
forms to Feder-al Motor Vehicle Standard "FMVSS
116 DOT 4 ".
The brake fluid reservoir can be difficult to reach ,
therefore, we recommend that you have the
brake fluid changed by your author ized
Audi
dealer .
Your dealer has the correct tools, the
right brake fluid and the know-how to do this for
you.
A WARNING
- Brake fluid is poisonous. It must be stored
only in the closed original container out of
the reach of children!
- Brake fai lure can result from o ld or inappro
priate brake fluid. Observe these precau
tions:
- Use only brake fluid that meets SAE speci
fi cation
J 1703 and conforms to Federal
Motor Veh icle Standard 116. Always check
with your authorized Audi dealer to make
sure you are using the correct brake fluid .
The correct type of brake f luid is also indi
cated on the brake fluid reservoir.
- The brake fluid must be new . Heavy use of
the brakes can cause a vapor lock if the
brake fluid is left in the system too long .
This can seriously affect the efficiency of
the brakes as well as your safety. This
could result in an accident.
(D Note
Brake fluid will damage the paint of your vehi-
cle .
lilJJ,
Page 189 of 252
@ For the sake of the environment
Because of the problem of proper disposal of
brake fluid as we ll as the special toots re
quired and the necessary expertise, we rec
ommend that you have the brake fluid
changed by your authorized Audi dealer .
Battery
General information
Under normal operating conditions, the battery
in your Audi does not need any maintenance.
With
high outside temperatures or long daily
drives we recommend that you have the electro
lyte level checked by an authorized Audi dealer or
qualified workshop. The electrolyte level should
also be checked each time the battery is charged
c> page 189.
Have the battery checked when you take your ve
hicle in for serv ice. You are well advised to re
place a battery t hat is older than 5 years.
With certain types of airbag deployment, the battery is disconnected from the vehicle electri
cal system for safety reasons
c> & in Repair, care
and disposal of the airbags on page 125 .
Disconnecting the battery terminals
Some vehicle functions (power window regula
tors, for example) are lost if the battery termi nals are disconnected. These functions have to be
relearned after the battery terminals are con
nected again. To prevent th is, the battery should
only be disconnected from the vehicle e lectr ica l
system when abso lutely necessary for repairs.
Vehicles not driven for long periods
If you do not drive your vehicle over a period of
several days or weeks, electrical components are
gradually cut back or sw itched off. This reduces
energy consumption and maintains starting ca
pability over a longer pe riod
c> page 157.
Some of the conven ience functions may not oper
ate, such as the interior lights or the power seat
adjustment. The convenience functions will be
available again when you turn on the ignition and
start the engine.
Checking and Filling
Winter operation
During the winter months, battery capacity tends
to decrease as temperatures drop . This is be
cause more power is also consumed while start
ing, and the headlights, rear window defogger,
etc., are used more often.
Avo id unnecessary power consumption, particu
larly in city traffic or when traveling only short
distances . Let your authorized Audi dealer check
the capacity of the vehicle battery before winter
sets in
c> page 189. A well charged battery will
not only prevent starting problems when the
weather is cold, but will also last longer .
(D Tips
If your vehicle is left standing for several
weeks at extremely low temperatures, the ve
hicle battery should be removed and stored
where it w ill not freeze. This will prevent it
from be ing damaged and having to be re
placed.
Working on the battery
Be especially careful when working on or near
the battery.
The battery is located in the engine compart
ment . Before you check anything in the engine
compartment ,
read and heed all WARNINGS
c>,& ,
Always heed the safety warnings, when working
on the vehicle battery or the veh icle electrical
system to prevent injury.
The following WARNINGS are very important
when working on the battery:
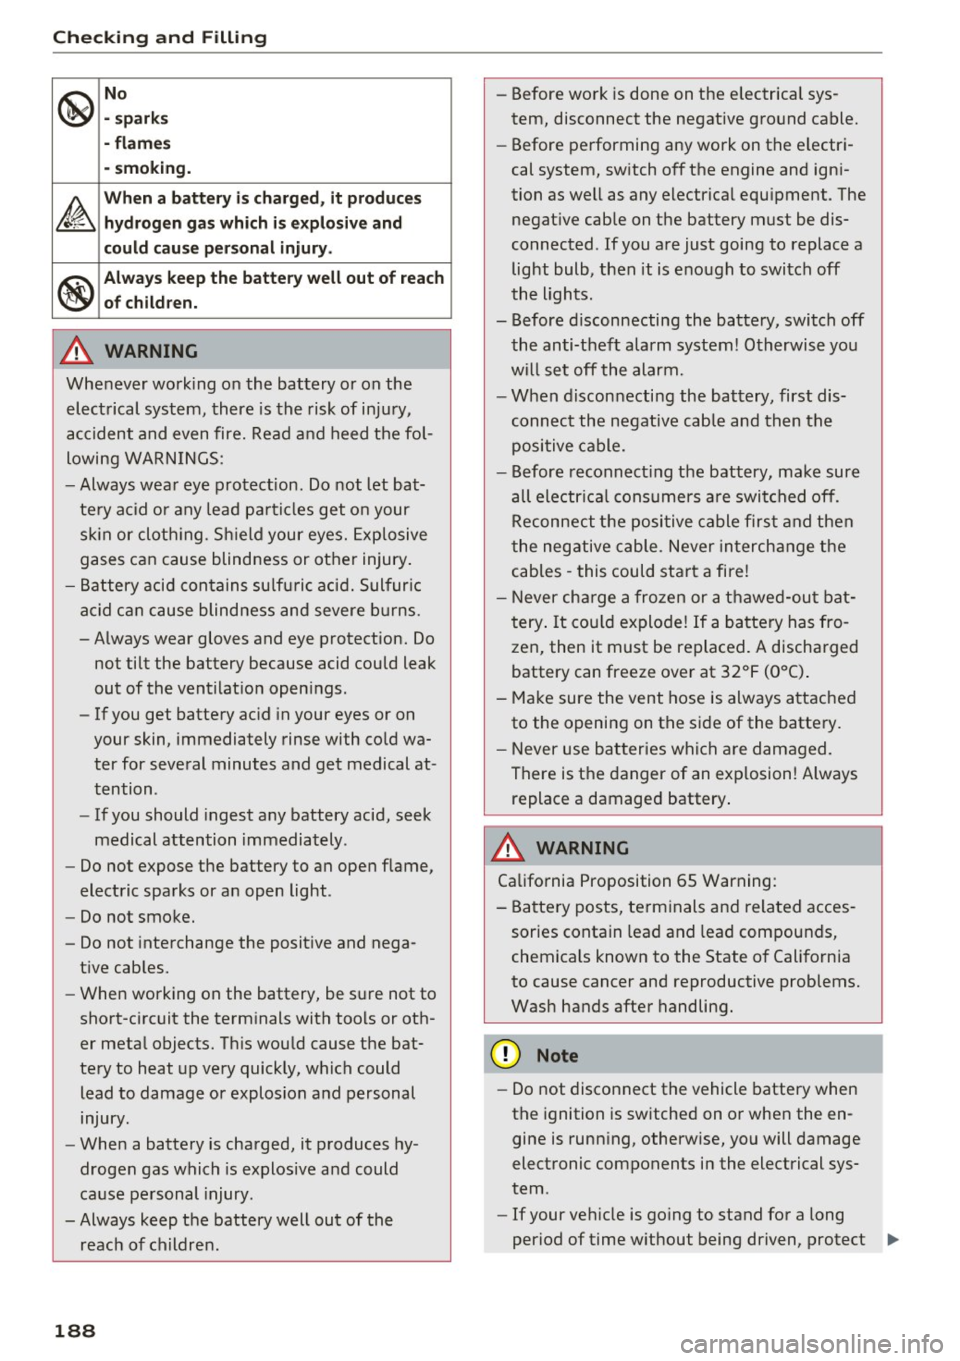
Always heed the following WARNING SYM·
BOLS and safety precautions when working on
the battery.
®
Always wear eye protection.
A
Battery acid contains sulfuric acid. Al-
ways wear gloves and eye protection .
187
Page 190 of 252
Check ing and F illing
@
No
- sp ark s
- flam es
- smoking.
£
When a bat tery is charg ed, it produc es
hydr og en gas which i s ex plo sive and
could c aus e pe rs onal injury .
®
Alwa ys keep the b atter y well out of reach
of chil dren.
A WARNING
Whenever work ing on the battery or on the
elect rical system, there is the risk of injury,
accident and
even fire. Read and heed the fol
lowing WARN INGS :
- Always wea r eye protection. Do not let bat
te ry acid or any lead pa rticles get on your
sk in or cloth ing . Sh ield your eyes. Explosive
gases can cause blindness or other injury .
- Battery acid con tains su lfu ric acid. Sulfur ic
acid c an cause blindness and
severe bu rns.
- Always wear gloves and eye protection. Do
no t tilt the battery because acid could leak
out of the ventilat ion open ings .
- If you get battery ac id in your eyes or on
your skin, immediately rinse with cold wa
ter for several minutes and get medical at tention .
- If you should ingest any battery acid, seek
medical attention immediately .
- Do not expose the battery to an open flame,
electric sparks or an open light .
- Do not smoke.
- Do not interchange the positive and nega-
t ive cables.
- When working on the battery, be sure not to
short-circuit the term inals with tools or oth
er metal objects. Th is wou ld cause the bat
tery to heat up very quickly, which could
lead to damage or explosion and personal
injury .
- When a battery is charged, it produces hy
drogen gas which is explosive and could
ca use personal injury.
- Always keep the battery well out of the reach of ch ildre n.
188
-
-Before wo rk is done on the electrical sys
tem, disconnect the negative gro und cable.
- Before performing any work on the e lectri
cal system, switch off the engine and ign i
tion as well as any electrical equ ipment . The
negat ive cab le on the battery must be dis
connected . If you are just going to replace a
light bulb, then it is enough to switch off
the lights.
- Before d isconnecting the battery, switch off
the an ti-theft alarm system! Otherwise you
will set off the alarm.
- When disconnecting the battery, first dis
connect the negative cab le and then the
positive cable.
- Before reconnect ing the battery, make sure
all electr ica l consume rs a re switched off .
Reconnect the positive cable firs t and then
the negative cable . Never in terch ange t he
cables -this could sta rt a fire!
- Never cha rge a frozen or a thawed-ou t bat
tery . It cou ld explode ! If a ba ttery has fro
zen, then it must be replaced. A discharged
battery can freeze over at 32°F (0°C) .
- Make sure the
vent hose is always attached
to the opening on the side of the battery .
- Never use bat ter ies which are damaged.
There is the danger of an exp losion! Always
replace a damaged battery .
A WARNING
Califo rnia Proposition 65 Warning :
- Ba tte ry posts, te rm inals and related acces
sories contain lead and lead compounds,
chemicals known to the State o f Cali fornia
to cause cancer and reproductive problems.
Wash hands after handling.
(D Note
- Do not disconnect the vehicle battery when
the ignition is switched on or when the en
gine is running, otherwise, you will damage
electronic components in the electrical sys
tem .
- If your veh icle is go ing to stand for a long
period of time w ithout being driven, protect ..,.
Page 221 of 252
.... N
c:i ::J CX)
.... I.Cl U"I
N I.Cl ......
Fuses and bulbs
Fuses
Replacing fuses
A fuse that has blown will have metal strips that
have burned through .
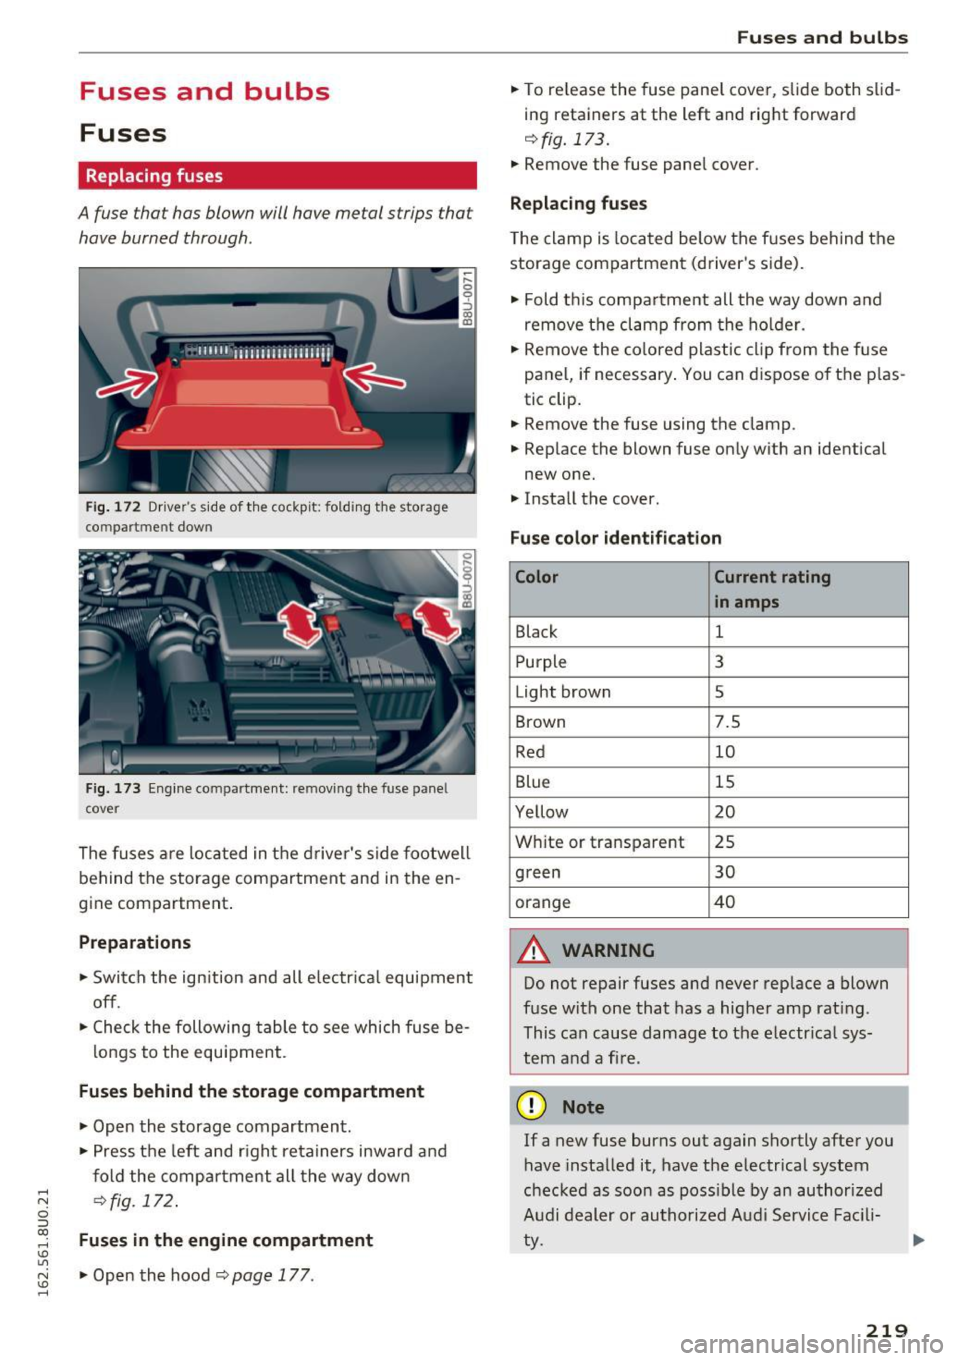
Fig. 172 Driver's side of the cockpit: fol ding the storage
co mpartme nt dow n
Fig. 173 Engine compartment: removing the fuse pane l
cover
The fuses are located in the driver's side footwell
beh ind th e storage compartment and in the en
gin e compartment .
Preparations
.. Switch the ign ition and all electr ical equipment
off.
.. Check the following table to see which fuse be-
longs to the equipment .
Fuses behind the storage compartment
.. Open the storage compartment .
.. Press the left and right retainers inward and
fold the compartm ent all the way down
¢fig . 172 .
Fuses in the engine compartment
.. Open the hood ¢ page 177.
Fuses and bulbs
.. To release the fuse panel cover, slide both slid
in g reta iners at the left and right forward
¢fig. 173 .
.. Remove the fuse panel cover.
Replacing fuses
The clamp is located below the fuses behind the
storage compartm ent (driver's side) .
.. Fold th is compartment all the way down and
remove the clamp from the holder .
.. Remove the colored plastic clip from the fuse
panel, if necessary . You can dispose of the plas
tic clip .
.. Remove the fuse using the clamp .
.. Replace the blown fuse only with an identical
new one .
.. Insta ll the cover.
Fuse color identification
Color Current rating
in amps
Black 1
Pu rple 3
Light brown 5
Brown 7.5
Red 10
Blue 15
Yellow 20
Whi te or transparent 25
green 30
orange 40
A WARNING
Do not repair fuses and never replace a blown
fuse with one that has a higher amp rat ing .
This can cause damage to the electr ical sys
tem and a fire.
(D Note
If a new fuse burns out again shortly after you
have installed it, have the electrical system
checked as soon as poss ible by an authorized
Audi dealer or authorized Audi Service Facili
ty .
219
Page 225 of 252
Emergency situations
General
This chapter is intended for trained emergency
crews and working personnel who have the nec
essary tools and equipment to perform these
operations.
Starting by pushing or
towing
(D Note
Vehicles with an automatic transmission
cannot be started by pushing or towing.
Starting with jumper
cables
If necessary, the engine can be started by con
necting it to the battery of another vehicle .
If the engine should fail to start because of a dis
charged or weak battery, the battery can be con
nected to the battery of
another vehicle, using a
pair of jumper cables to start the engine.
Jumper cables
Use only jumper cables of sufficiently large cross
section
to carry the starter current safely. Refer
to the manufacturer's specifications.
Use only jumper cables with
insulated terminal
clamps which are distinctly marked :
plus(+) cable in most cases colored red
minus(·) cable
in most cases colored black.
A WARNING
Batteries contain electricity, acid, and gas.
Any of these can cause very serious or fatal in
jury. Follow the instructions below for safe
handling of your vehicle's battery.
-Always shield your eyes and avoid leaning
over the battery whenever possible.
-A discharged battery can freeze at tempera
tures just below 32 °F (0 °C). Before con
necting a jumper cable, you must thaw the
Emergency situations
frozen battery completely, otherwise it
could explode .
- Do not allow battery acid to contact eyes or
skin. Flush any contacted area with water immediately.
- Improper use of a booster battery to start a
vehicle may cause an explosion.
- Vehicle batteries generate explosive gases.
Keep sparks, flame and lighted cigarettes
away from batteries.
- Do not try to jump start any vehicle with a
low acid level in the battery .
- The voltage of the booster battery must also
have a 12-Volt rating. The capacity (Ah) of
the booster battery should not be lower
than that of the discharged battery. Use of
batteries of different voltage or substantial
ly different "Ah" rating may cause an explo
sion and personal injury .
- Never charge a frozen battery. Gas trapped
in the ice may cause an explosion.
- Never charge or use a battery that has been
frozen . The battery case may have be weak
ened .
- Use of batteries of different voltage or sub
stantially different capacity (Ah) rating may
cause an explosion and injury. The capacity
(Ah) of the booster battery should not be
lower than that of the discharged battery.
- Before you check anything in the engine
compartment, always read and heed all
WARNINGS
r::!)page 177.
(D Note
-Applying a higher voltage booster battery
will cause expensive damage to sensitive
electronic components, such as control
units, relays, radio, etc.
- There must be no electrical contact between
the vehicles as otherwise current could al
ready start to flow as soon as the positive
(+) terminals are connected.
(D Tips
- The discharged battery must be properly
connected to the vehicle's electrical system. ..,.
223
Page 239 of 252
Important warnings when working on the
battery . . . . . . . . . . . . . . . . . . . . . . . . . . . .
187
Jump starting . . . . . . . . . . . . . . . . . . . . . . . 223
Replacing the battery . . . . . . . . . . . . . . . . 190
Winter operation . . . . . . . . . . . . . . . . . . . . 187
Working on the battery . . . . . . . . . . . . . . . 187
Before driving . . . . . . . . . . . . . . . . . . . . . . . . . 95
Belt tensioners . . . . . . . . . . . . . . . . . . . . . . . 110
Blended gasoline . . . . . . . . . . . . . . . . . . . . . 173
Blower
Automatic climate control system . . . . . . .
65
Manual climate control system . . . . . . . . . . 63
Booster seats . . . . . . . . . . . . . . . . . . . . . . . . 140
Brake fluid
Changing the brake fluid . . . . . . . . . . . . . .
186
Checking the brake fluid level . . . . . . . . . . 186
Brakes . . . . . . . . . . . . . . . . . . . . . . . . . . . . . . 154
Brake booster . . . . . . . . . . . . . . . . . . . . . . . 154
New brake pads . . . . . . . . . . . . . . . . . . . . . 154
Parking brake . . . . . . . . . . . . . . . . . . . . . . . . 71
Brake system
Brake fluid . . . . . . . . . . . . . . . . . . . . . . . . .
186
Brake fluid specifications for refill and re
placement . . . . . . . . . . . . . . . . . . . . . . . . . 186
Brake light defective . . . . . . . . . . . . . . . . . .
18
Fluid reservoir . . . . . . . . . . . . . . . . . . . . . . 186
Warning/indicator lights . . . . . . . . . . . . . . . 13
Worn brake pads symbol . . . . . . . . . . . . . . . 16
Braking
Brake assist . . . . . . . . . . . . . . . . . . . . . . . .
151
Emergency braking funct ion . . . . . . . . . . . . 73
Starting on inclines . . . . . . . . . . . . . . . . . . . 73
Break-in period
Tires . . . . . . . . . . . . . . . . . . . . . . . . . . . . . .
159
Breaking in . . . . . . . . . . . . . . . . . . . . . . . . . . 159
New tires . . . . . . . . . . . . . . . . . . . . . . . . . . 198
Bulbs . . . . . . . . . . . . . . . . . . . . . . . . . . . . . . . 221
C
California Proposition 65 Warning . . . . . . . 178
Battery specific . . . . . . . . . . . . . . . . . . . . . 188
Capacities . . . . . . . . . . . . . . . . . . . . . . . . . . . 230
Engine oil . . . . . . . . . . . . . . . . . . . . . . . . . . 179
Caps for wheel bolts , removing . . . . . . . . . . 215
Care . . . . . . . . . . . . . . . . . . . . . . . . . . . . . . . . 168
Index
Cargo area
refer to Loading the luggage compart-
ment...... ... .. .. .................
100
Cargo floor . . . . . . . . . . . . . . . . . . . . . . . . . . . 61
Catalytic converter . . . . . . . . . . . . . . . . . . . . 159
Center armrest . . . . . . . . . . . . . . . . . . . . . . . . 51
Centra l locking . . . . . . . . . . . . . . . . . . . . . . . . 27
Central locking sw itch . . . . . . . . . . . . . . . . . 31
Convenience key . . . . . . . . . . . . . . . . . . . . . . 30
Emergency locking . . . . . . . . . . . . . . . . . . . . 32
Luggage compartment lid . . . . . . . . . . . . . . 33
Panorama roof . . . . . . . . . . . . . . . . . . . . . . . 37
Powe r windows . . . . . . . . . . . . . . . . . . . . . . 3 7
Remote control key . . . . . . . . . . . . . . . . . . .
29
Certification . . . . . . . . . . . . . . . . . . . . . . . . . 235
Changing engine oil . . . . . . . . . . . . . . . . . . . 182
Checking
Engine coolant level . . . . . . . . . . . . . . . . . .
183
Child restraints
Danger of using child restraints in the front
seat....... ... .. .. ................ .
113
Where can I get additional information
about child restraints and their use? . . . .
149
Child restraints system anchors. . . . . . . . . . 144
Child safety . . . . . . . . . . . . . . . . . . . . . . . . . .
132
Important safety instructions for using child
safety seats . . . . . . . . . . . . . . . . . . . . . . . .
135
Important th ings to know when driving with
children . . . . . . . . . . . . . . . . . . . . . . . . . . .
132
Installing a child restraint using the LATCH
system . . . . . . . . . . . . . . . . . . . . . . . . . . . .
146
Mounting and re leasing the anchorage
hook . . . . . . . . . . . . . . . . . . . . . . . . . . . . . .
146
Tether anchors . . . . . . . . . . . . . . . . . . . . . . 147
Tether s traps . . . . . . . . . . . . . . . . . . . . . . . 147
Child safety lock
Rear doors . . . . . . . . . . . . . . . . . . . . . . .
35, 36
Child safety seats
Booster seats . . . . . . . . . . . . . . . . . . . . . . .
140
Convertible child seats . . . . . . . . . . . . . . . 138
Convertible locking retractor . . . . . . . . . . 143
Danger of using child restraints in the front
seat...... .... .. .. ............... ..
113
How do I properly install a child safety seat
in my vehicle? . . . . . . . . . . . . . . . . . . . . . . .
135
Infant seats . . . . . . . . . . . . . . . . . . . . . . . . 137
LATCH system . . . . . . . . . . . . . . . . . . . . . . 146
237
Page 242 of 252
Index
Engine compartment . . . . . . . . . . . . . . . . . . 179
Opening the hood . . . . . . . . . . . . . . . . . . . 177
Overview . . . . . . . . . . . . . . . . . . . . . . . . . . . 179
Safety instructions . . . . . . . . . . . . . . . . . . . 177
Working the engine compartment . . . . . . 177
Engine coolant system ................ .
Adding coolant .................. ... .
Checking coolant level ............ ... .
Checking the engine coolant level .. .. .. .
Radiator fan .. .. ................... .
Engine hood 183
184
183
183 18S
Closing . . . . . . . . . . . . . . . . . . . . . . . . . . . . 177
Engine oil . . . . . . . . . . . . . . . . . . . . . . . . . . . 179
Adding . . . . . . . . . . . . . . . . . . . . . . . . . . . . 181
Addit ives. . . . . . . . . . . . . . . . . . . . . . . . . . . 181
Changing . . . . . . . . . . . . . . . . . . . . . . . . . . 182
Checking the oil level . . . . . . . . . . . . . . . . . 181
Dipstick. . . . . . . . . . . . . . . . . . . . . . . . . . . . 181
Indicator light . . . . . . . . . . . . . . . . . . . . . . . 17
Oil consumption . . . . . . . . . . . . . . . . . . . . . 180
Oil grades . . . . . . . . . . . . . . . . . . . . . . . . . . 179
Pressure malfunction . . . . . . . . . . . . . . . . . 15
Sensor defective . . . . . . . . . . . . . . . . . . . . . . 17
Specif ication and viscos ity . . . . . . . . . . . . . 179
Use . . . . . . . . . . . . . . . . . . . . . . . . . . . . . . . 181
Engine speed limitation . . . . . . . . . . . . . . . . . 17
Environment Catalytic converter . . . . . . . . . . . . . . . . . . . 159
Disposing of your vehicle battery . . . . . . . 190
Driving at high speeds . . . . . . . . . . . . . . . . 161
Fuel . .. .. .. .. .. ... .. ..... ..... .. .. . 175
Leaks under your vehicle . . . . . . . . . . . . . . 177
Letting the vehicle stand and warm up . . . 161
Proper disposal of drained brake flu id . . . 186
Proper disposal of drained engine coolant 184
Proper disposal of drained engine o il 181, 182
Recycling used engine oil . . . . . . . . . . . . . 181
Roof rack . . . . . . . . . . . . . . . . . . . . . . . . . . . 5 7
Unleaded fuel . . . . . . . . . . . . . . . . . . . . . . . 173
What should I do with an old battery? 190
EPC
refer to Electronic power control . . . . . . . . 17
ESC Automatic post-collision braking system . 152
ESC offroad mode . . . . . . . . . . . . . . . . . . . . . 152
Event Data Recorder (EDR) . . . . . . . . . . . . . 150
Expansion tank . . . . . . . . . . . . . . . . . . . . . . . 183
240
Exterior lighting . . . . . . . . . . . . . . . . . . . . . . . 39
Exterior mirrors Adjusting . . . . . . . . . . . . . . . . . . . . . . . . . . . 43
Heating . . . . . . . . . . . . . . . . . . . . . . . . . . . . . 43
F
Fan
Radiator 185
Fastening Booster seats . . . . . . . . . . . . . . . . . . . . . . . 140
Convertible child safety seats . . . . . . . . . . 138
Infant seats . . . . . . . . . . . . . . . . . . . . . . . . 137
Floor mats . . . . . . . . . . . . . . . . . . . . . . . . . . . 100
Fold ing chocks . . . . . . . . . . . . . . . . . . . . . . . 212
Folding the rear seats . . . . . . . . . . . . . . . . . . . 59
Foot pedals . . . . . . . . . . . . . . . . . . . . . . . . . . . 99
For the sake of the env ironment
Environmentally-friendly driving . . . . . . . 160
Gasoline fumes and the env ironment . . . . 175
Rear window defogger . . . . . . . . . . . . . . . . . 64
Refueling . . . . . . . . . . . . . . . . . . . . . . . . . . 175
Front airbags Description . . . . . . . . . . . . . . . . . . . . . . . . . 116
How they work . . . . . . . . . . . . . . . . . . . . . . 120
Frontal collisions and the laws of physics . . 105
Front seats Adjusting . . . . . . . . . . . . . . . . . . . . . . . . . . . 97
Child restraints in the front seat . . . . . . . . 113
also refer to Seats . . . . . . . . . . . . . . . . . . . . 49
Fuel Additives. . . . . . . . . . . . . . . . . . . . . . . . . . . 173
Blended gasoline . . . . . . . . . . . . . . . . . . . . 173
Current consumption . . . . . . . . . . . . . . . . . . 22
Filler neck..... .. .. ............... .. 174
Fuel gauge . . . . . . . . . . . . . . . . . . . . . . . 10, 11
Gasoline . . . . . . . . . . . . . . . . . . . . . . . . . . . 173
Gasoline add it ives . . . . . . . . . . . . . . . . . . . 174
Low fuel level symbol . . . . . . . . . . . . . . . . . 17
Octane rating . . . . . . . . . . . . . . . . . . . . . . . 173
Recommendation . . . . . . . . . . . . . . . . . . . . 173
Refueling . . . . . . . . . . . . . . . . . . . . . . . . . . 175
Saving fuel . . . . . . . . . . . . . . . . . . . . . . . . . 160
Tank capacity . . . . . . . . . . . . . . . . . . . . . . . 230
Tank system . . . . . . . . . . . . . . . . . . . . . . . . . 17
Fuel economy messages (efficiency program)
24