airbag off AUDI Q3 2016 Owners Manual
[x] Cancel search | Manufacturer: AUDI, Model Year: 2016, Model line: Q3, Model: AUDI Q3 2016Pages: 252, PDF Size: 62.81 MB
Page 5 of 252
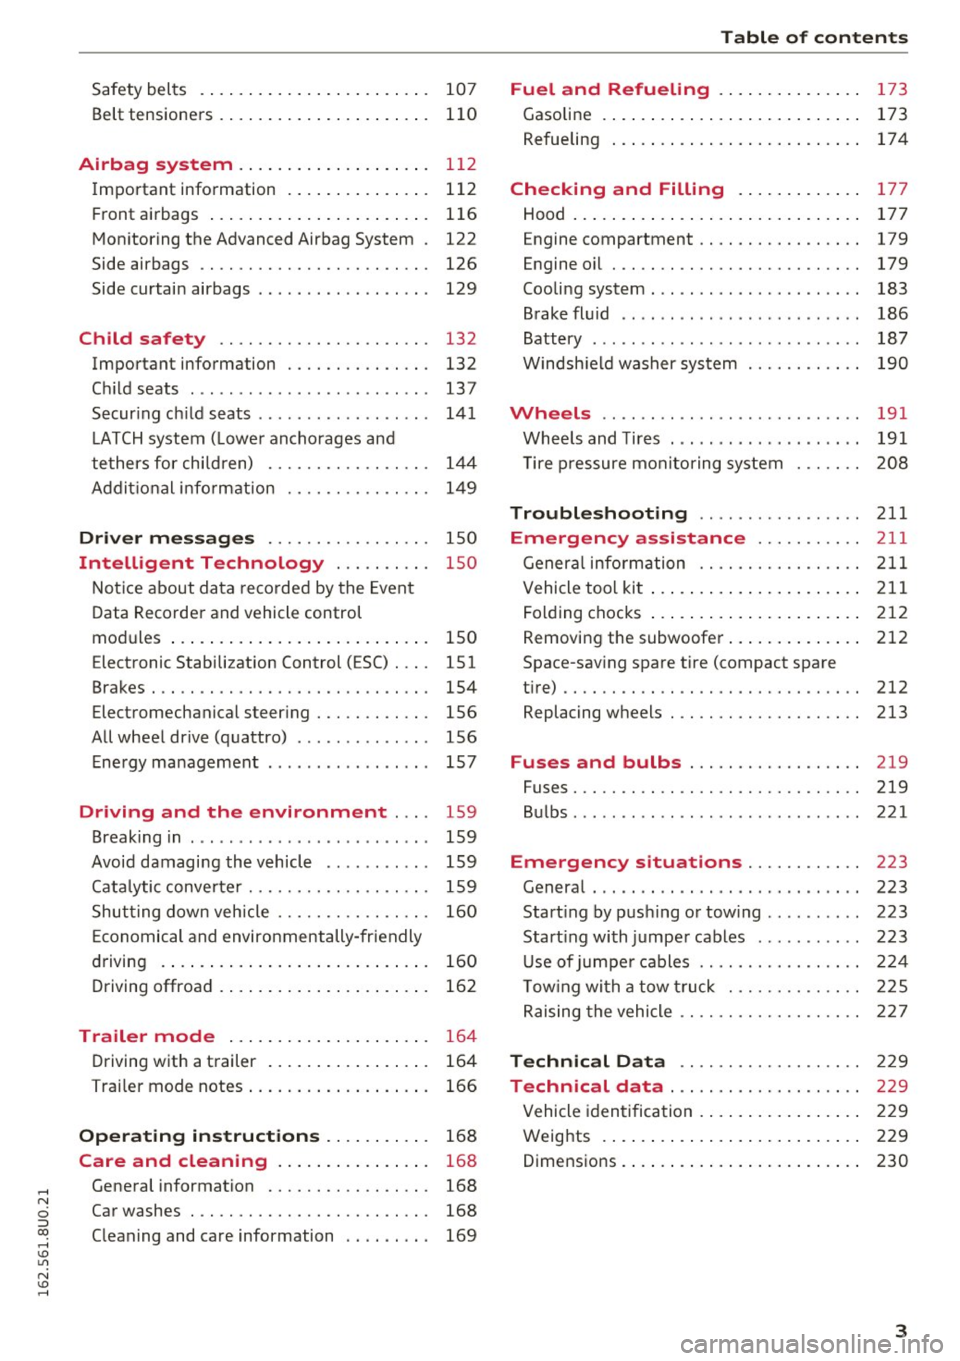
Safety belts . . . . . . . . . . . . . . . . . . . . . . . . 107
Belt tensioners . . . . . . . . . . . . . . . . . . . . . . 110
Airbag system ............... .... . 112
Important information . . . . . . . . . . . . . . . 112
Front airbags ...................... . 116
Monitoring the Advanced Airbag System . 122
Side airbags . . . . . . . . . . . . . . . . . . . . . . . . 126
Side curtain airbags . . . . . . . . . . . . . . . . . . 129
Child safety . . . . . . . . . . . . . . . . . . . . . . 132
Important information . . . . . . . . . . . . . . . 132
Child seats ............... ...... ... . 13 7
Securing child seats . . . . . . . . . . . . . . . . . . 141
LATCH system (Lower anchorages and
tethers for children) . . . . . . . . . . . . . . . . .
144
Addit ional information 149
Driver messages . . . . . . . . . . . . . . . . . 150
Intelligent Technology . . . . . . . . . . 150
Notice about data recorded by the Event
Data Recorder and vehicle control
modul es . . . . . . . . . . . . . . . . . . . . . . . . . . .
150
Electronic Stabilization Control ( ESC) . . . . 151
Brakes . . . . . . . . . . . . . . . . . . . . . . . . . . . . . 154
Electromechanical steering . . . . . . . . . . . . 156
All wheel drive (quattro) . . . . . . . . . . . . . . 156
Energy management . . . . . . . . . . . . . . . . . 157
Driving and the environment . . . . 159
Breaking in . . . . . . . . . . . . . . . . . . . . . . . . . 159
Avoid damaging the vehicle . . . . . . . . . . . 159
Catalytic converter . . . . . . . . . . . . . . . . . . . 159
Shutting down vehicle . . . . . . . . . . . . . . . . 160
Economical and environmentally-friendly
driving . . . . . . . . . . . . . . . . . . . . . . . . . . . .
160
Driving offroad . . . . . . . . . . . . . . . . . . . . . . 162
Trailer mode . . . . . . . . . . . . . . . . . . . . . 164
Driving with a trailer . . . . . . . . . . . . . . . . . 164
Trailer mode notes . . . . . . . . . . . . . . . . . . . 166
Operating instructions . . . . . . . . . . . 168
Care and cleaning . . . . . . . . . . . . . . . . 168
General information . . . . . . . . . . . . . . . . . 168
Car washes . . . . . . . . . . . . . . . . . . . . . . . . . 168
Cleaning and care information . . . . . . . . . 169
Table of contents
Fuel and Refueling . . . . . . . . . . . . . . .
173
Gasoline . . . . . . . . . . . . . . . . . . . . . . . . . . . 173
Refueling . . . . . . . . . . . . . . . . . . . . . . . . . . 17 4
Checking and Filling . . . . . . . . . . . . . 177
Hood . . . . . . . . . . . . . . . . . . . . . . . . . . . . . . 177
E ngine compa rtment . . . . . . . . . . . . . . . . . 179
Engine oil . . . . . . . . . . . . . . . . . . . . . . . . . . 179
Cooling system . . . . . . . . . . . . . . . . . . . . . . 183
Brake fluid . . . . . . . . . . . . . . . . . . . . . . . . . 186
Battery . . . . . . . . . . . . . . . . . . . . . . . . . . . . 187
Windshield washer system 190
Wheels ........ .. ................. 191
Wheels and Tires . . . . . . . . . . . . . . . . . . . . 191
Tire pressure monitoring system 208
Troubleshooting ............. .. .. 211
Emergency assistance . . . . . . . . . . . 211
General information . . . . . . . . . . . . . . . . . 211
Vehicle tool kit . . . . . . . . . . . . . . . . . . . . . . 211
Folding chocks . . . . . . . . . . . . . . . . . . . . . . 212
Removing the subwoofer............. . 212
Space-saving spare tire (compact spare
tire).. .. .. .. .. .. .. .... ... .. .. .. .. ..
212
Replacing wheels . . . . . . . . . . . . . . . . . . . . 213
Fuses and bulbs . . . . . . . . . . . . . . . . . . 219
Fuses. .... .. .. .. .. ....... ........ .. 219
Bulbs . . . . . . . . . . . . . . . . . . . . . . . . . . . . . . 221
Emergency s ituations . . . . . . . . . . . . 223
General . . . . . . . . . . . . . . . . . . . . . . . . . . . . 223
Starting by pushing or towing . . . . . . . . . . 223
Start ing with jumper cables ........... 223
Use of jumper cables . . . . . . . . . . . . . . . . . 224
Towing with a tow truck . . . . . . . . . . . . . . 225
Raising the vehicle . . . . . . . . . . . . . . . . . . . 227
Technical Data . . . . . . . . . . . . . . . . . . . 229
Technical data . . . . . . . . . . . . . . . . . . . . 22 9
Vehicle identification . . . . . . . . . . . . . . . . . 229
Weights . . . . . . . . . . . . . . . . . . . . . . . . . . . 229
D . . 1mens1ons
.. .. . ... ................ . 230
3
Page 18 of 252
Instruments and indicator lights
@-Steering column lock
• Steering fault! Do not driv e vehicle!
If the indicator light turns on and the message
appears, there is an electro nic steer ing colum n
lock malf unct ion . You cannot switch the ign it ion
on.
Do
not tow your vehicle because it cannot be
steered . Seek profess ional assistance .
m Steering lock: System fault ! Plea se contact
d e aler.
If the indicator lig ht turns on and the message
appears, there is an electronic steer ing column
lock malfunct ion.
D rive to yo ur authorized Aud i dea le r i mmediately
to have the ma lfunction corrected .
A WARNING
Your vehicle must not be towed in the event
of a malfunction in the elect ronic steering
co lumn lock because it cannot be steered due
to the locked steering. If it is towed with the
steering locked, there is the r isk of an acci
de nt.
;;,I C; Electronic Stabilization Control (ESC)
If the GI indicato r light b lin ks w hile driving, the
E S C or ASR (Anti-S lip Reg ulat ion) is actively reg u
lating.
I f the
GI indicato r light turns on, the system has
sw itched the ESC off. In this case, you can switch
the ig nition off and t hen o n to switch the ESC on
aga in. The indica tor ligh t turns off when the sys
tem is func tioning fully .
I f the
II indicato r light turns on, ESC was re
s tricted o r swit ched off using the
I .$ OF FI button
~ page 151.
Stabilization control (ESC /ABS): Fault! See
owner 's manual
If the ind icator lig ht I) and the ABS i ndicator
light
D (USA models) ; tlJ (Canada models)
turn on and the message appea rs, the A BS or
e lec tron ic diffe rentia l lock is malfunct io ni ng .
16
This also causes the ESC to malfunc tion. The
bra kes sti ll function with their norma l power, but
ABS is not active .
Drive to your au thor ized A udi d ealer immedi ate ly
to have the mal function cor rected.
A WARNING
If t he 1111 (USA mode ls)/ . (Canada mo d
e ls) bra ke system indicator light turns on to
gethe r with the ABS and ESC ind icator lights,
the ABS/ESC regulating function may have
failed. F unctions that stabilize the vehicle a re
n o longer ava ilab le. This could ca use the vehi
cle to
swerve and increase the risk of slidi ng.
Dr ive ca refully to the nearest au tho riz e d Au di
deale r and h ave the m alfunction correc ted.
© Tips
Fo r addi tional in format ion on ESC and ABS,
r efe r to ~
page 151 .
!I.: Safety systems
The E,I indi cato r light mon itors the safe ty sys
tems (e.g. airbags, pretens io ners) and illumi
nates for a few seconds each t ime yo u switch the
i gnition on .
I f the
E,i ind ic a tor light does not go ou t, or if it
ill umina tes whi le yo u are driv ing , or if it st arts to
blink, the n there is a malfunction somewhere in
the system . If the light does not i lluminate when
yo u sw itch the ignition on, this a lso means there
i s a ma lfunction.
A WARNING
If you have a ma lfunction in the safety sys
tems, contact yo ur authorized Aud i dealer im
mediately. Otherwise the safety sys tems may
not work prope rly in an accident.
(0) Worn brake pads
ll] Brake pads!
If the warning light illuminates, immediately
contact your author ized Audi dealer or qua lified
workshop to have all b rake pads inspected . On
U SA mode ls t he war ning l ight
ll] comes on ..,.
Page 29 of 252
Opening and closing
Central locking
General description
The power locking system locks or unlocks all
doors and the rear lid simultaneously.
You can lock and unlock the vehicle centrally. You
have the following choices:
- Remote master key¢
page 29,
- Sensors in the front door handle on vehicles
with convenience key *
¢ page 30,
-Power locking switch insid e¢ page 31, oder
- Lock cylinder at the driver's door~
page 32.
Automatic locking
The automatic locking feature locks all the vehi cle doors and the rear lid when you drive faster
than
9 mph (15 km/h) .
The car is un locked again once the ignition key is
removed. In addition, the vehicle can be unlocked
if the opening function in the power locking sys
tem switch or at one of the door levers is actuat
ed.
Addit ionally, in the event of a crash with airbag
deployment the doors are automatically un
locked to allow access to the veh icle .
Selective unlocking
When you lock the vehicle, the power locking sys
tem will lock the doors and the rear lid. When
unlocking, you can set in the rad io or MMI*
whether
only the driver's door or the entire vehi
cle should be un locked ¢
page 31 .
Anti-theft alarm warning system
If the anti-theft alarm warn ing system detects a
break-in into the vehicle, acoustic and visua l
warn ing s ignals are triggered .
The anti-theft alarm system turns on automati
cally when you lock the vehicle. It deactivates
when unlocking using the remote control key or
~ by touc hing the sensor on the door handle (con-
ci ~ venience key).
Opening and closing
To switch the alarm off, p ress the@ button on
the remote contro l key or convenience key or
switch the ign ition on. The alarm also stops auto
matically after a certa in amount of t ime.
You can also trigger the alarm by pressing the
PANIC button on your remote-control key. This
will a lert other people in case of emergency .
Press the
PANIC button again to turn off the
alarm.
Turn signals
When you unlock the vehicle, the turn signals
flash twice, when you lock it once . If they do not
flash, one of the doors or the luggage compart
ment lid is not locked, the ign ition is still switch
ed on or the selector lever is not in position
P.
Unintentionally locking yourself out
In the following cases there are safeguards to
prevent you from locking your remote master key
in the veh icle:
- The vehicle does not lock with the central lock
ing switch if the driver's door is open
¢page 31.
-On vehicles with convenience key*, if the most
recent ly used master key is in the luggage com
partment, the rear lid is automatically unlocked
aga in after it is closed.
Do not lock your veh icle with the remote master
key or convenience key* until all doors and the
rear lid are closed. In this way yo u avoid locking
yourself out acc identally.
A WARNING
-- When you leave the vehicle, always remove
the ignition key and take it with you . This
will prevent passengers (children, for exam
p le ) from accidenta lly being locked in the
veh icle should they accidentally press the
power locking switch in the front doors.
- Do not leave children inside the vehicle un
supervised. In an emergency it would be im
possible to open the doors from the outside
without the key. .,.
27
Page 33 of 252
..... N
c:i ::J CX)
..... I.Cl U"I
N I.Cl ......
off unnecessary convenience functions. It is
possible that you will not be able to unlock
your vehicle using these convenience func tions .
- For Declaration of Compliance to United
States FCC and Industry Canada regulations
¢ page 235.
Locking and unlocking the vehicle from
inside
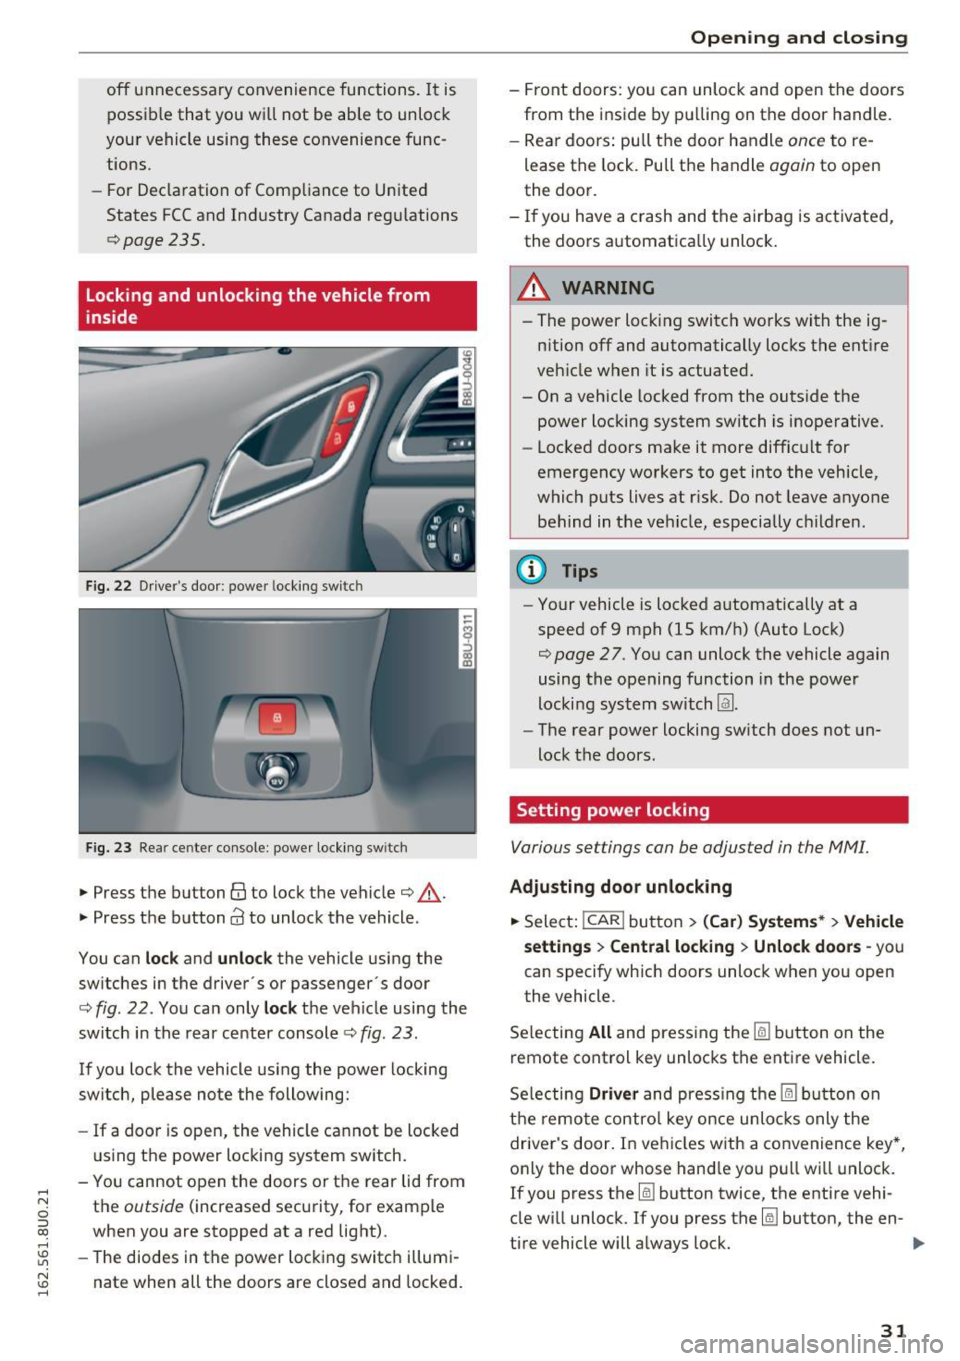
Fig. 22 Driver's door : power locking switc h
Fig. 23 Rear ce nter console: power locking switc h
• Press the button@ to lock the vehicle¢.&_.
• Press the button
Cd to unlock the vehicle .
You can
lock and unlock the vehicle using the
switches in the driver's or passenger· s door
¢
fig. 22. You can only lock the vehicle using the
switch in the rear center console
c:> fig. 23 .
If you lock the vehicle using the power locking
switch , please note the following:
- If a door is open, the vehicle cannot be locked
using the power locking system switch.
- You cannot open the doors or the rear lid from
the
outside (increased security, for example
when you are stopped at a red light).
- The diodes in the power locking switch illumi
nate when all the doors are closed and locked.
Opening and closing
-Front doors: you can unlock and open the doors
from the inside by pulling on the door handle.
- Rear doors: pull the door handle
once to re
lease the lock. Pull the handle
again to open
the door.
- If you have a crash and the airbag is activated,
the doors automatically unlock.
A WARNING
-- The power locking switch works with the ig-
nition off and automatically locks the entire
vehicle when it is actuated.
- On a vehicle locked from the outside the power locking system switch is inoperative.
- Locked doors make it more difficult for
emergency workers to get into the vehicle,
which puts lives at risk. Do not leave anyone
behind in the vehicle, especially children.
(D Tips
-Your vehicle is locked automatically at a
speed of 9 mph (1S km/h) (Auto Lock)
¢
page 27. You can unlock the vehicle again
using the opening function in the power
locking system switch
Im.
- The rear power locking switch does not un
lock the doors.
Setting power locking
Various settings can be adjusted in the MM!.
Adjusting door unlocking
• Select: !CAR ! button> (Car) Systems*> Vehicle
settings
> Central locking > Unlock doors -you
can specify which doors unlock when you open
the vehicle .
Selecting
All and pressing the~ button on the
remote control key unlocks the entire vehicle.
Selecting
Driver and pressing the~ button on
the remote control key once unlocks only the
driver's door. In vehicles with a convenience key*,
only the door whose handle you pull will unlock.
If you press the
[ru button twice, the entire vehi
cle will unlock. If you press the~ button, the en-
tire vehicle will always lock. ..,.
31
Page 44 of 252
Lights and Vision
Emergency flashers
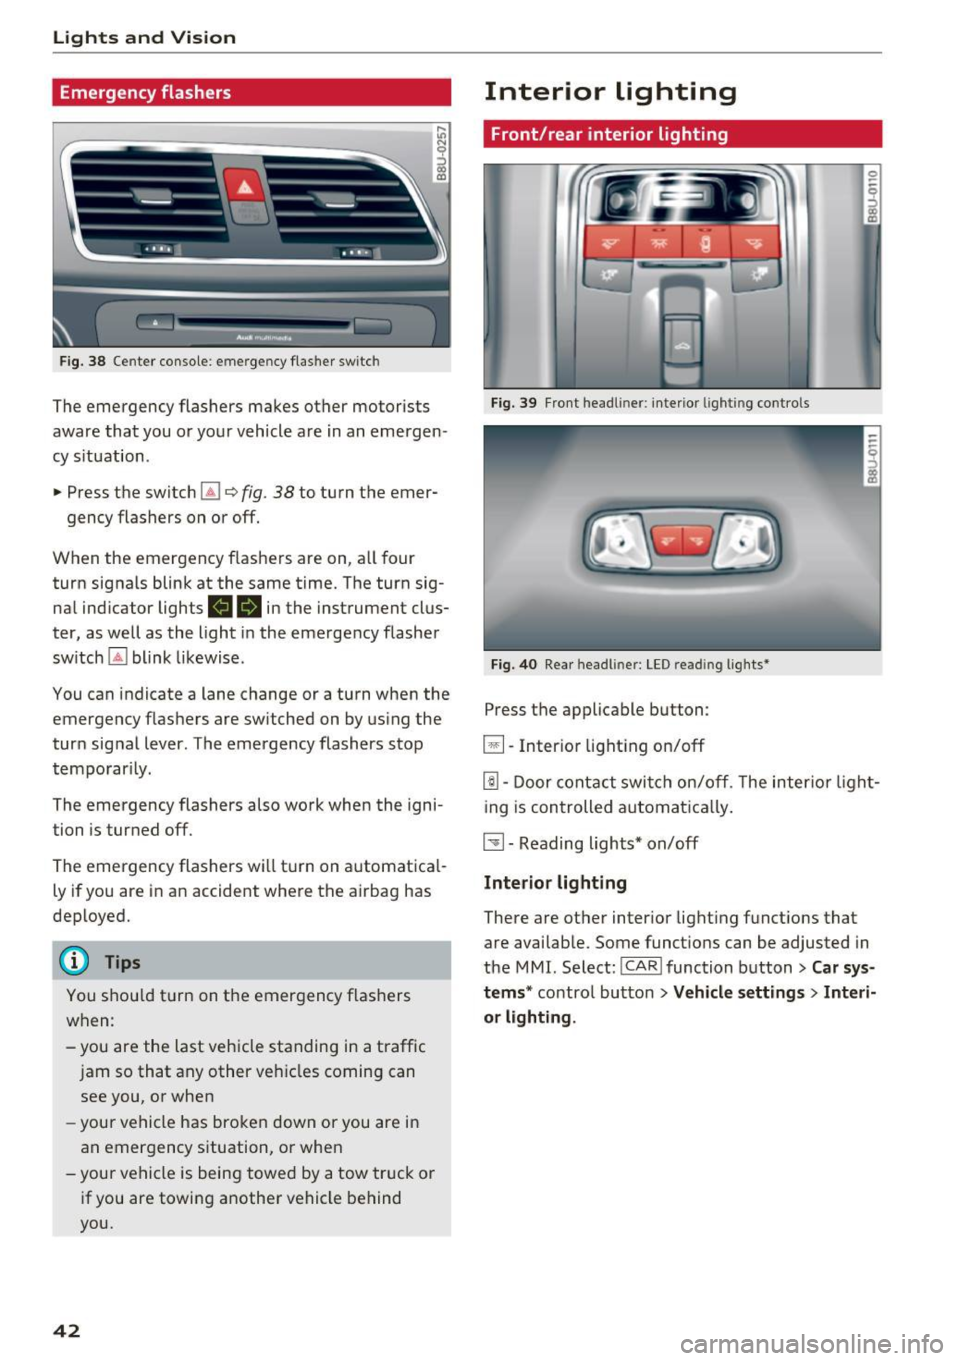
Fig. 38 Cente r console: eme rge ncy flasher sw itc h
The emergency flashers makes other motorists
aware that you or your vehicle are in an emergen
cy s ituation .
.. Press the switch
l1J c> fig. 38 to turn the emer-
gency flashers on or off.
When the em ergency f lashers are on , a ll four
turn signals blink at the same time. The turn sig
na l indicator lights
BIB in the instrument clus
ter, as well as the light in the emerge ncy flasher
sw itch ~ blink likewise .
You can indicate a lane change or a turn when the emergency flashers are sw itched on by using the
turn sig nal lever . The emergency flashers stop
temporar ily.
The emergency flashers also wo rk when the igni
tion is turned off.
The emergency flashers wi ll tur n on a utomat ica l
ly if you are in an accident where th e airbag has
dep loyed.
@ Tips
You s hou ld t urn on the emergency flashers
when :
-you are the last veh icle standing in a traffic
j am so that any other ve hicles coming can
see you, o r when
- your ve hicle has broke n down or you are in
an emergency situation, o r when
-your ve hicle is being towe d by a tow truck or
if you are towing another vehicle behind
you.
42
Interior lighting
Front/rear interior lighting
Fi g. 39 Front head liner: interio r li ghtin g con trols
Fi g. 40 Rea r h eadl iner: LED re ad in g li ghts•
Press t he applicable button :
~ -Inter io r l ight ing on/off
[!] . Door cont act swi tch on/off . T he inter io r li ght
i ng is controlled automa tic a lly .
~- Reading lights* on/off
Interior lighting
There are ot her inter ior light ing f unct ions that
are avai lable. Some funct ions can be adjusted in
the MMI. Select:
l cAR ! function button > Car sys
tems *
contro l butto n > Vehicle settings > Interi
or lighting .
Page 51 of 252
Seats and storage
General information
Important information
A WARNING
-
Refer to ¢ page 95, Driving safety for i m
portant information, tips, suggestions and
warnings that you should read and follow for
your own safety and the safety of your pas
sengers.
Why is your seat adjustment so important?
The safety belts and the airbag system can only
provide maximum protection if the front seats
are correctly adjusted.
There are various ways of adjusting the front
seats to provide safe and comfortable support
for the driver and the front passenger. Adjust
your seat properly so that:
- you can easily and quick ly reach all the switches
and controls in the instrument pane l
- your body is properly supported thus reducing
physical stress and fatigue
- the safety belts and airbag system can offer
maximum protection
¢ page 112.
In the following sections, you will see exact ly
how you can best adjust your seats.
There are special regulations and instructions for in stalling a ch ild safety seat on the front pas
senger's seat . Always follow the information re
garding child safety provided in
¢ page 132,
Child safety .
A WARNING
Incorrect seating position of the driver and all
other passengers can result in serious person
al injury.
- Always keep yo ur feet on the floor when the
vehicle is in motion -never put your feet on
top of the instrument pane l, out of the win
dow or on top of the seat cushion. Th is ap
plies especially to the passengers. If your
seating pos it ion is inco rrect, you increase
Seat s and sto rage
the risk of injury in the case of sudden brak
ing or an accident. If the airbag inflates and
the seating posit ion is incorrect, th is could
result in persona l injury or even death.
- It is important for both the driver and front
passenger to keep a distance of at least
10 inches (25 cm) between themselves and
the steering wheel and/or instrument pan
el. If you're sitt ing any closer than this, the
ai rbag system cannot protect you properly.
I n addition, the front seats and head re
stra ints must be adjusted to you r body
height so that they can give you maximum
protection.
- Always try to keep as much dis tance as pos
sible between yourself and the steering
wheel or instrument pane l.
- Do not adjust the driver's o r front passeng
er's seat while the vehicle is moving . Your
seat may move unexpectedly, causing sud
den loss of vehicle contro l and personal in
jury. If you ad just your seat while the veh icle
is moving, you are o ut of pos ition.
Driver's seat
The correct seat position is important for safe
and relaxed driving.
We recommend that you adjust the driver's seat
in the following manner:
.. Adjust the seat in fore and aft direction so that
you can easi ly push the pedals to the f loor
while keeping yo ur knees slight ly bent ¢
A in
Why is your seat adjustment so important? on
page 49.
.. Adjust the seatback so that when you sit with
your back against the seatback, you can still
grasp the top of the stee ring wheel.
.. Adj ust the head restra int so the uppe r edge is
as
even as possib le w it h the top of yo ur head. If
tha t is no t possible, t ry to adjus t the hea d re
st raint so tha t it is as close to this pos it ion as
possible
¢ page 51. .,.
49
Page 53 of 252
.... N
c:i :::J CX)
.... I.Cl U"I
N I.Cl ......
the front button up/down. To adjust the rear seat
cushion, press the rear button up/down.
@-Moving the seat forward/back: press the but
ton forward/back.
© -Adjusting the backrest angle: press the but
ton forward/back.
@ -Lengthen ing/shortening the upper thigh
support* : lift the handle .
.&_ WARNING
- Only adjust the front seat with when the ve
hicle is stationary. Otherwise, this increases
the risk of an acc ident
- The power adjustment for the front seats al
so works with the ignition switched off or
with the ignition key removed . For this rea
son, children should never be left unattend
ed in the veh icle -they could be injured!
- Exerc ise caution when adjusting the seat
height. Unsupervised or careless seat ad
justment can p inch fingers or hands causing
injuries.
- To reduce the risk of injury during sudden
braking or in a collision, the driver and front
passenger should not have their backrests in
the reclined position while driving or riding .
The safety belts and airbag system can pro
vide the greatest protection possible when
the backrests are in the upright position and
the safety belts are worn correctly. The
more a backrest is reclined, the greater the
risk of injury due to an incorrect seating po
sition and safety belt position .
Seats and storage
Front center armrest
Applies to vehicles: with front center armrest
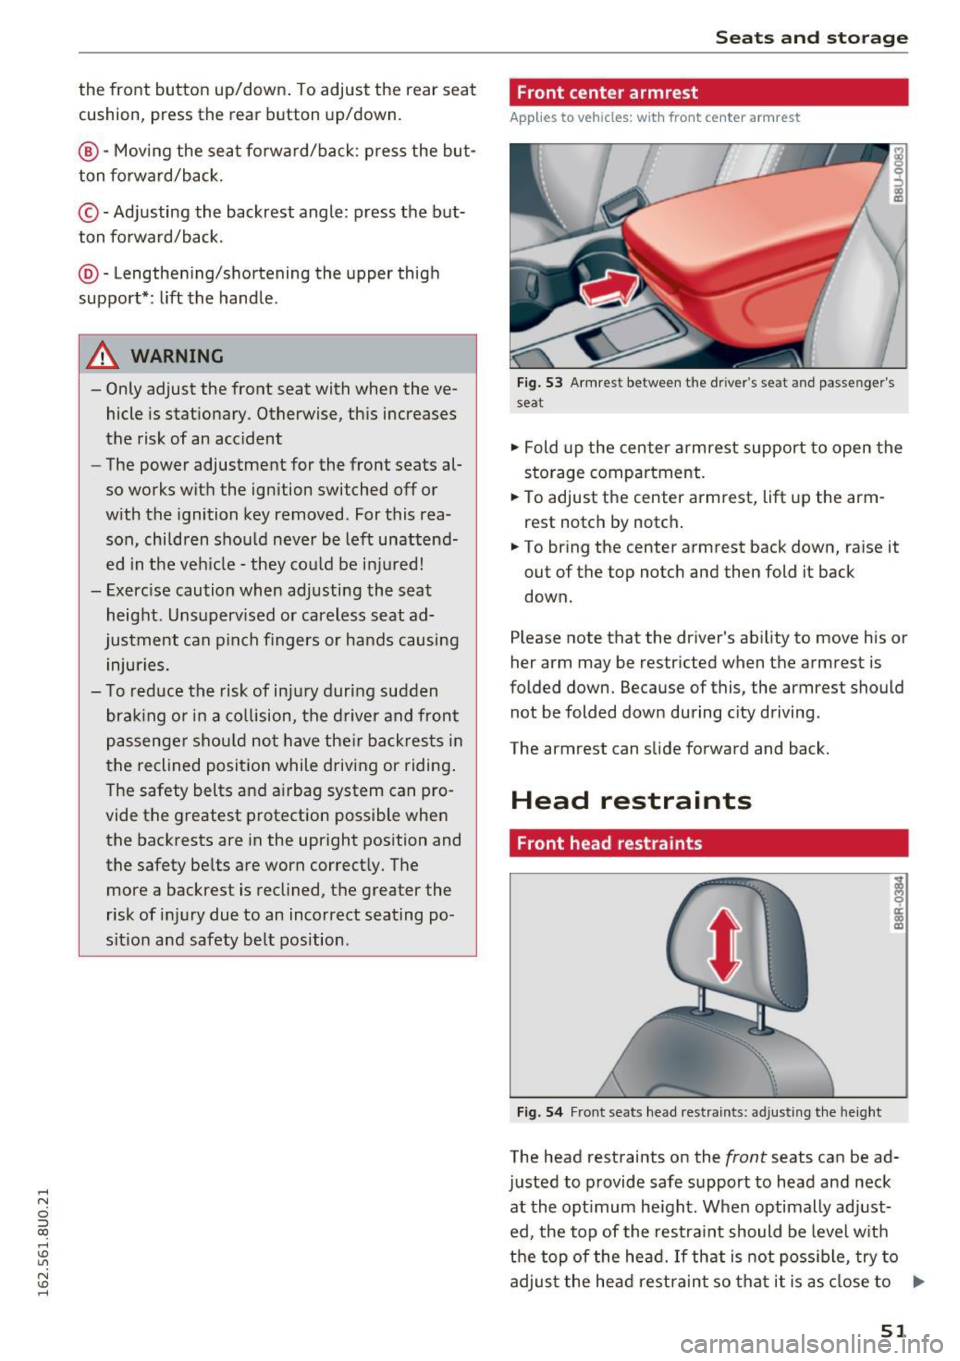
Fig. 53 Armrest betwee n the dr iver 's seat and passenger's
seat
.,. Fold up the center armrest support to open the
storage compartment .
.,. To adjust the center armrest, lift up the arm
rest notch by notch.
.,. To bring the center armrest back down, raise it
out of the top notch and then fold it back
down.
Please note that the driver's ability to move his or
her arm may be restricted when the armrest is
folded down. Because of this, the armrest should
not be folded down during city driving.
The armrest can slide forward and back.
Head restraints
Front head restraints
Fig. 54 Front seats head res traints: adjusting the height
The head restraints on the front seats can be ad
justed to provide safe support to head and neck at the opt imum height . When optimally adjust-
ed, the top of the restraint should be level with
the top of the head. If that is not poss ible, try to
adjust the head restraint so that it is as close to ..,.
51
Page 56 of 252
Sea ts and stor age
of injuries, never leave ch ildren unattended in
the vehicle with the veh icle key.
(D Note
- To reduce the risk of damage to the vehicle
electrica l system, never attempt to charge
the vehicle battery by connecting accesso
ries that prov ide power , such as solar panels
or battery chargers, to the 12 Volt sockets
or the cigarette lighter .
- To reduce the risk of damage to the sockets,
only use plugs that fit correct ly.
{!) Tips
The vehicle battery drains when accessories
are turned on but the engine is off.
Storage
General overview
A WARNING
- Always remove objects from the instrument panel. Any items not put away could slide
around inside the vehicle wh ile driving or
when accelerat ing or when applying the
brakes or when drivi ng a round a corner .
- When you are dr iving make sure that any
thing you may have placed in the center con
so le or othe r storage locations cannot fall
o ut into the footwells. In case of sudden
br ak in g you would not be able to brake or
acce lerate .
- Any pieces of cloth ing that you have hung
up mus t not in te rfe re with the driver 's view.
The coat hooks a re designed only fo r light
weight clothing. Never hang any clothing
with hard, pointed or heavy objects in the
pockets on the coat hooks. Dur ing sudden
braking or in an accident- especially if the
airbag is deployed -these objects could in
jure any passengers inside the vehicle .
54
Beverage holders
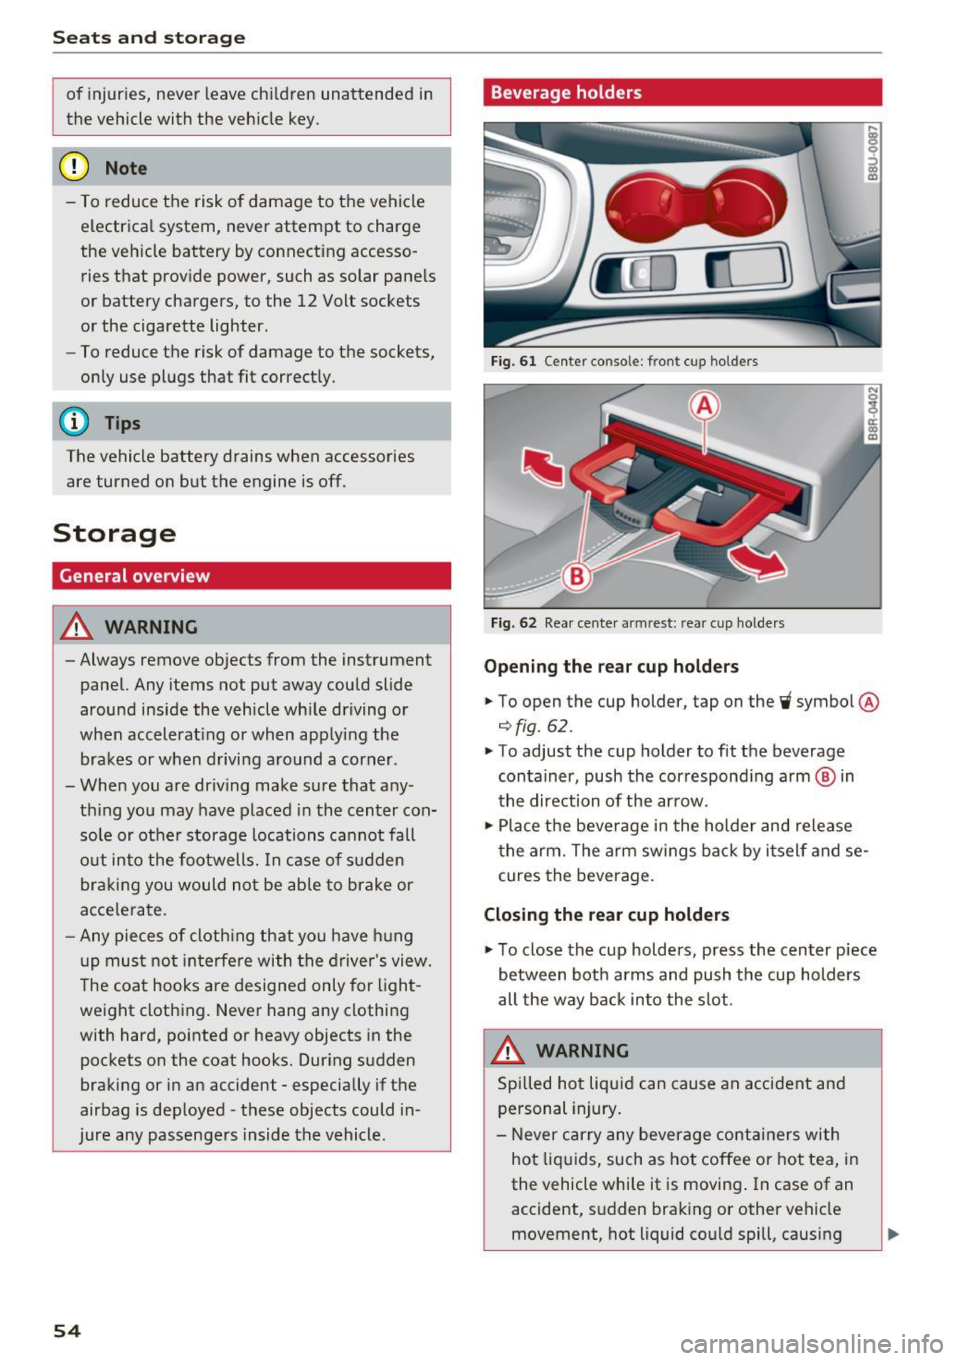
Fig. 61 Center consol e: fr ont cup holders
Fi g. 62 Rea r cen te r armrest : rea r cup ho lde rs
Opening the re a r cup ho lder s
.. To open the cup holder , tap on the~ symbol @
¢fig. 62.
.. To adjust the cup holder to fit the beverage
container, push the correspond ing arm ® in
the direction of the ar row .
.,. Place the beverage in the holder and release
t he arm. The a rm swings ba ck by i tself and se
cures the beverage .
Closing the rear cup holders
.,. To close the cup holders , press the center piece
between both arms and push the cup holders
all the way back into the slot.
A WARNING
Spilled ho t liqui d can cause a n accident and
personal injury .
- Never carry any beverage containers with
ho t liquids, such as hot coffee or hot tea, i n
the vehicle while it is moving . In case of an
accident, s udden braking or other vehicle
movement, hot liquid cou ld spill , causing
-
Page 58 of 252
Seats and storage
To switch the cooling off
.,. Turn the rotary switch @clockwise to switch
the cooling off.
The cooling box works only in the cooling mode.
If the climate control is in the heating mode, we
recommend switching the cooling box off.
& WARNING
To reduce the risk of personal injury in an acci
dent or sudden stop, always keep the glove
compartment closed while driving.
Additional storage
There are a variety of storage compartments and
fasteners in various places in the vehicle.
- In the front center console.
- At the front end of the front seats*. You can
store objects weighing up to 3.3 lbs (1.5 kg) in
the drawer and objects weighing up to 2.2 lbs (1 kg) in the hinged compartment.
- In the door trim.
- Coat hooks next to and above the rear doors.
- Nets* on the backrests of the front seats.
- Coat hooks/retaining hooks in the luggage
compartment.
& WARNING
- When driving, do not leave any hard objects
on the rear window shelf or allow your pet
to sit on the shelf. They could become a haz
ard for vehicle occupants in the event of
sudden braking or a crash.
- Always remove objects from the instrument
panel. Any items not stored could slide
around inside the vehicle while driving or
when accelerating or when applying the
brakes or when driving around a corner.
- When you are driving make sure that any
thing you may have placed in the center con
sole or other storage locations cannot fall
out into the footwells. In case of sudden
braking you would not be able to brake or
accelerate.
- Any articles of clothing that you have hung
up must not interfere with the driver's view.
56
The coat hooks are designed only for light
weight clothing. Never hang any clothing
with hard, pointed or heavy objects in the pockets on the coat hooks. During sudden
braking or in an accident - especially if the
airbag is deployed - these objects could in
jure any passengers inside the vehicle.
- To reduce the risk of personal injury in an
accident or sudden stop, always keep the
glove compartment closed while driving.
- Read and follow all WARNINGS
~ page 128, Important safety instructions
on the side airbag system.
-Hang clothes in such a way that they do not
impair the driver's vision.
- The coat hooks must only be used for light
weight clothing. Do not leave any heavy or
sharp edged objects in the pockets which
may interfere with the side curtain airbag
deployment and can cause personal injury in
a crash.
- Do not use coat hangers for hanging cloth
ing on the coat hooks as this can interfere
with proper deployment of the side curtain airbags in an accident.
- Do not hang heavy objects on the coat
hooks, as they could cause personal injury in
a sudden stop.
- Always keep the compartment above the
rearview mirror closed while driving to re
duce the risk of injury in the event of sudden
braking maneuvers or a collision.
(D Note
Objects located on the rear shelf that rub
against the rear window could damage the heating wires for the rear window defogger.
(D Tips
-A vent slot is located between the shelf and
the rear window. Do not block the vent with
any items you may place on the rear window
shelf.
- Do not place bulky items on the rear window shelf as they could restrict or block the driv
er's vision in the rear view mirror.
Page 69 of 252
..... N
c:i ::J CX)
..... I.Cl U"I
N I.Cl ......
Driving
Steering
Manually adjustable steering wheel
The steering wheel position is fully adjus table up
and down and forward and back .
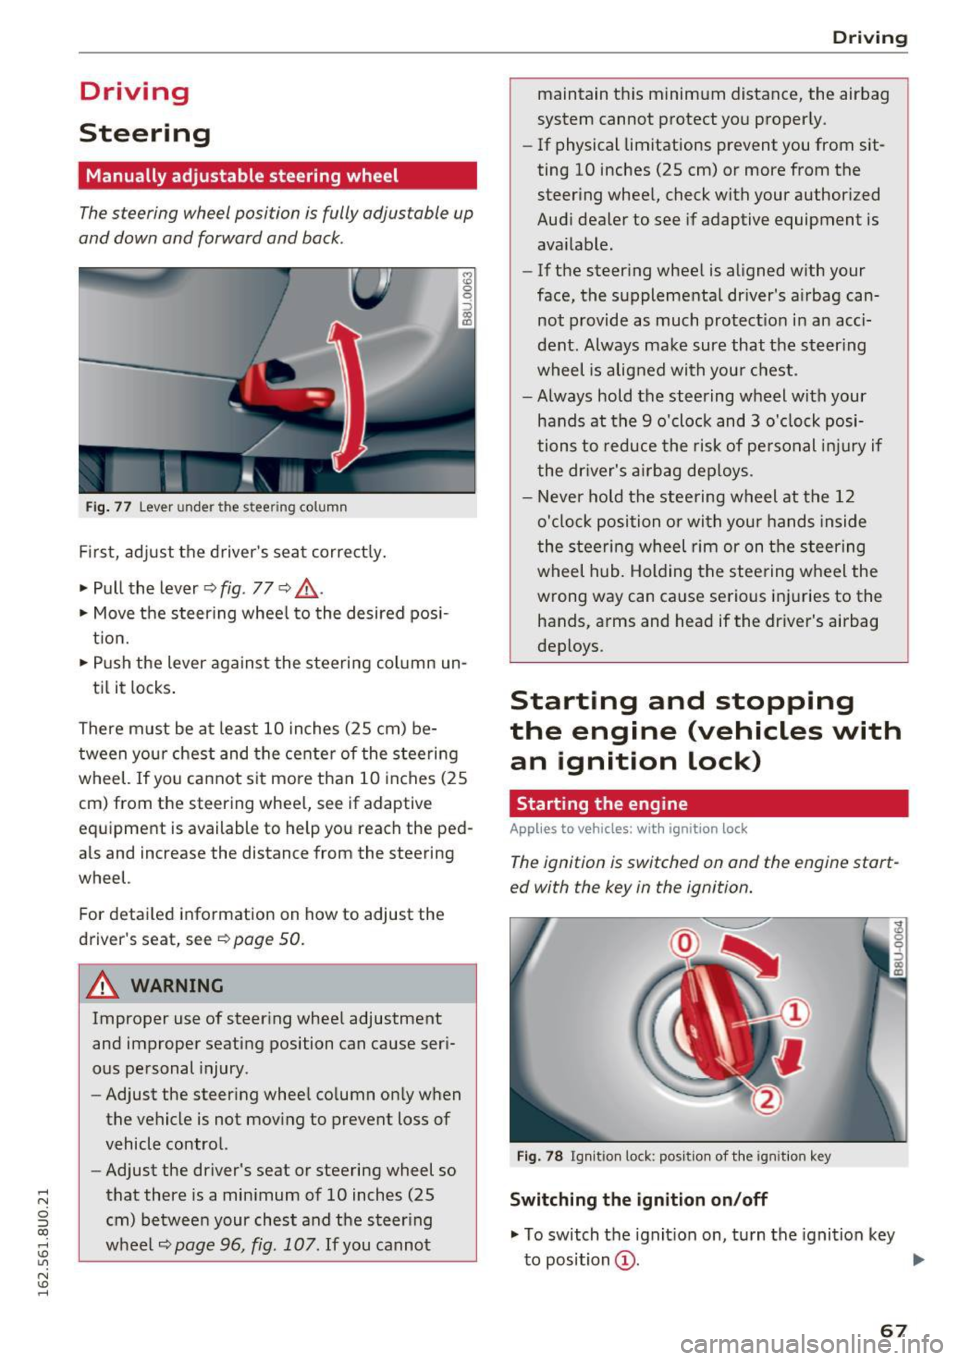
Fig. 77 Lever under the ste ering column
Fi rst, ad just t he driver 's sea t correct ly.
• Pull the lever ~
fig. 77 ~ .&,.
• Move the steer ing whee l to the desired posi
t ion.
• Push the lever against the steeri ng column un-
ti l it locks .
There must be a t least 10 inches (25 cm) be
tween your chest and the center of the stee rin g
wheel. If yo u cannot sit mo re than 10 inches (25
cm) from the steering whee l, see if adaptive
equipment is available to help you reach the ped
als and increase the distance from the steering
wheel.
F or detai led information on how to adjust the
driver's seat, see
~ page 50 .
.&_ WARNING
Improper use of steer ing whee l adjustment
and improper seating position can cause ser i
ous pe rsonal injury.
- Adjust the steer ing whee l co lumn on ly w hen
the vehicle is not mov ing to prevent loss of
vehicle control.
- Adjust the driver's seat or steering wheel so
that there is a min imum of 10 inches (25
cm) betwee n your chest and t he s teer ing
wheel
~page 96, fig. 107 . If you cannot
-
Drivi ng
maintain t his minim um distance, the airbag
system cannot p rotect yo u proper ly.
- If physical limitations prevent you from sit
ting 10 inches (25 cm) or more from the
steer ing whee l, check with your author ized
Audi dealer to see if adaptive equipment is
ava ilable.
- If the steer ing whee l is aligned w ith your
face, the supplementa l driver's a irbag can
not provide as much protect io n in an acc i
dent. Always make sure that the steer ing
wheel is aligned with you r chest.
- Always hold the steering wheel w ith your
hands at the 9 o'clock and 3 o' clock posi
tions to reduce the risk of pe rso nal injur y if
the dr iver's a irbag dep loys .
- Never ho ld the stee ring wheel at the 12
o'cl ock position or wi th you r hands inside
the stee rin g wheel rim or on the s teer ing
wheel h ub. Holding the stee ring w heel the
wrong way can cause serious inj uries to the
hands, arms and head if the driver's airbag
deploys .
Starting and stopping
the engine (vehicles with
an ignition lock)
Starting the engine
Applies to veh icles: w it h ign ition lock
The ignition is switched on and the engine start
ed with the key in the ignition.
Fig. 78 Ignit io n lock: positio n of th e ig ni tion key
Switching the ignition on /off
• To switch t he ignit ion on, t urn the igni tion key
to position
(D . ..,.
67