engine coolant AUDI Q3 2017 Owner´s Manual
[x] Cancel search | Manufacturer: AUDI, Model Year: 2017, Model line: Q3, Model: AUDI Q3 2017Pages: 236, PDF Size: 58.93 MB
Page 168 of 236
Check ing and F illing
areas, into open streams or down sewage
drains .
- Recycle used engine oil by taking it to a used
engine oil collection facility in your area, or
contact a service station .
Cooling system
Coolant
The engine coo ling system is filled wi th a mixture
of pur ified w ate r a nd coolan t addit ive at the fa c
tory . T h is coo lant must not be not changed.
The coolant leve l is monito red throug h the . in
d icator light~
page 13 . Howeve r, we do re com
mend occasionally check ing the coo la nt level
manually.
I f you must add coolant, use a m ixt ur e of wa ter
and coolant addit ive. M ixing the coolant additive
with d istilled wate r is recommen ded .
Coolant additive
The coolant additive is made of a nti-freezi ng a nd
corros ion protection agents . Only use the fo llow
i n g coolant add it ives. These additives may be
mixed w it h each other.
Coolant additive Specification
G13 TL774J
G12++ T
L 774 G
The amount of coo lant additive that needs to be
mixed wit h wate r depends on the climate where
the vehicle will be operated . If the coolant addi
tive percentage is too low, the coolant can freeze
and damage the engine.
Coolant Freeze protec-
additive tion
Warm reg ions min . 40% m in . -13 °F
max . 45% (
- 25
°()
Co ld regions min. 50% max
. -40 °F
max. 55% (-40 °()
0 Note
- Befo re the start of winter, have your author
i zed Audi dealer or authorized A udi Service
Fac ility check if the coolant additive in you r
166
vehicle matches t he percentage app ropriate
for the climate . This is especially important
when driving in colder climates.
- If the app ropriate coo lant additive is not
available in an eme rgency, do not add any
other additive. You could damage the en
gine. If this happens, only use water and re
store the correct m ixture ratio with t he
specified coo lant add itive as soo n as poss i
bl e.
- Only ref ill w ith new coolant.
- Radiator sealant must not be mixed with
the coolant.
· Adding coolant
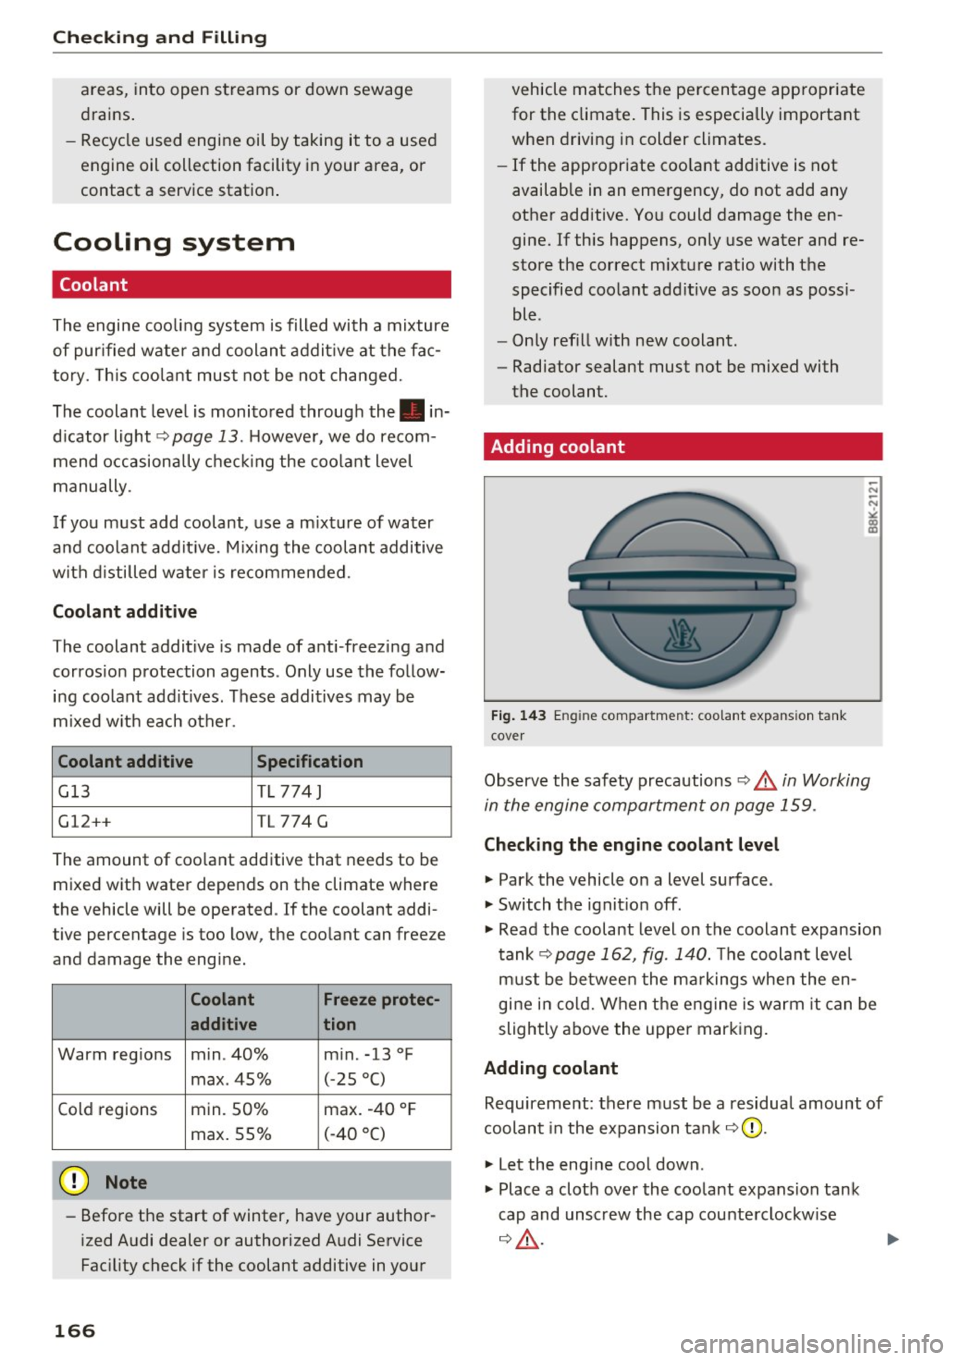
Fi g. 14 3 En gin e compartment: coo lant expa nsio n ta nk
cove r
Observe the safety precautions ~.& in Working
in the engine compartment on page 159 .
Checking the engine coolant level
.. Park the vehicle on a level surface .
.. Switch the ignit io n off.
.. Read the coolant level on the coolant expansion
t ank ~
page 162, fig. 140. The coolant leve l
m ust be be twee n the m arkings when the en
gi ne i n co ld. W hen t he engine is warm it can be
slightly above the upper mar king.
Adding coolant Requirement: there must be a residua l amount of
coolan t in the expansion tank ~(}).
.,. Let the engi ne cool down .
.. Place a clot h over the coolant expans ion tank
cap and unscrew the cap counte rclockw ise
~ .& -
Page 169 of 236
00
00
......
"' ,....
"' ...... 0 0 :::,
00
~ Add coolant mixed in the correct ratio
¢ page 166 up to the upper marking.
~ Make sure that the fluid level rema ins stable.
Add more coolant if necessary.
~ Close the cap securely.
Coolant loss usually indicates there is a leak. Im
mediately drive your vehicle to an authorized
Audi dealer or authori zed Audi Service Facility
and have the cooling system inspected. If the
cooling system is not leaking, a loss can come
from the coolant boiling through overheating
and be ing pushed out of the cooling system.
.&, WARNING
The cool ing system is pressu rized and can be
come very hot. To reduce the r is k of burns
from hot coolant :
- Do not open the coo lant expansion tank cap
when the engine is hot. This increases the risk of burns.
- Stop the engine and allow it to cool.
- Protect your face, hands and arms from es -
caping coolant and steam by covering the
coolant tank cap with a large, thick cloth .
- T urn the coo lant tank cap co unterclo ckwise
slowly and keep light pressu re on the cap .
- T o reduce the risk of burns , do not allow any
antifreeze o r coolant to drip onto the ex
haust system or hot engine components.
T he ethylene glycol in engine coolant can
catch fire under certain circumstances .
- T he coo lant add itive and the coolant can be
dangerous to your health . For this reason,
keep the coolant in the original container
and away from children. There is a risk of
poisoning.
- When working in the engine compartment,
remember that the radiator fan can switch
on even if the ignition is switched off, which
increases the risk of injury .
Do not add coolant if the expansion tank is
empty. Air could enter the cooling system and
damage the engine. If this is the case, do not
cont inue driv ing . See an authorized Audi deal -
Check ing and Filling
er or authorized Aud i Service Facility for assis
tance .
- Before the start of winter, have your author
ized Aud i dea ler or a uthorized Audi Serv ice
Facility check if the coolant additive in your
vehicle matches the percentage appropriate
for the climate. This is especially important
when driving in colder climates.
- If the appropr iate coo lant add itive is not
availab le in an emergency, do not add any
other additive . You could damage the en
gine. If this happens, only use water and re
store the correct m ixtu re ratio with the
specified coolant add it ive as soo n as poss i
ble .
- Only refill w ith new coolant.
- Radiator sealant must not be mixed with
the coolant .
Radiator fan
T he radiator fan switches on automatically by it
self.
An auxiliary e lectr ic radiator fan switches on and
off depend ing on coolant temperature and other
vehicle operating conditions.
After you switch the engine off, the auxiliary fan c a n continue running for up to 10 m inutes - even
with the ignition off . It can even switch on aga in
later by itself ¢.& , if
- the temperature of the engine coolant rises due
to the heat build-up from the engine in the en
gine compartment, or
- the engine compartment heats up bec ause the
veh icle is parked in in tense sunlight.
.&, WARNING
--
- To reduce the r isk of personal injury never
touch the radiator fan .
- The auxiliary e lectr ic fan is temperature
controlled and can switch on s uddenly even
when the engine is not runn ing .
- The auxiliary radiator fan sw itches on auto
mat ica lly when the eng ine coolant reaches a
certa in temperature and will continue to run
until the coolant temperature d rops .
167
Page 185 of 236
00
00
......
"' ,....
"' ...... 0 0 :::,
00
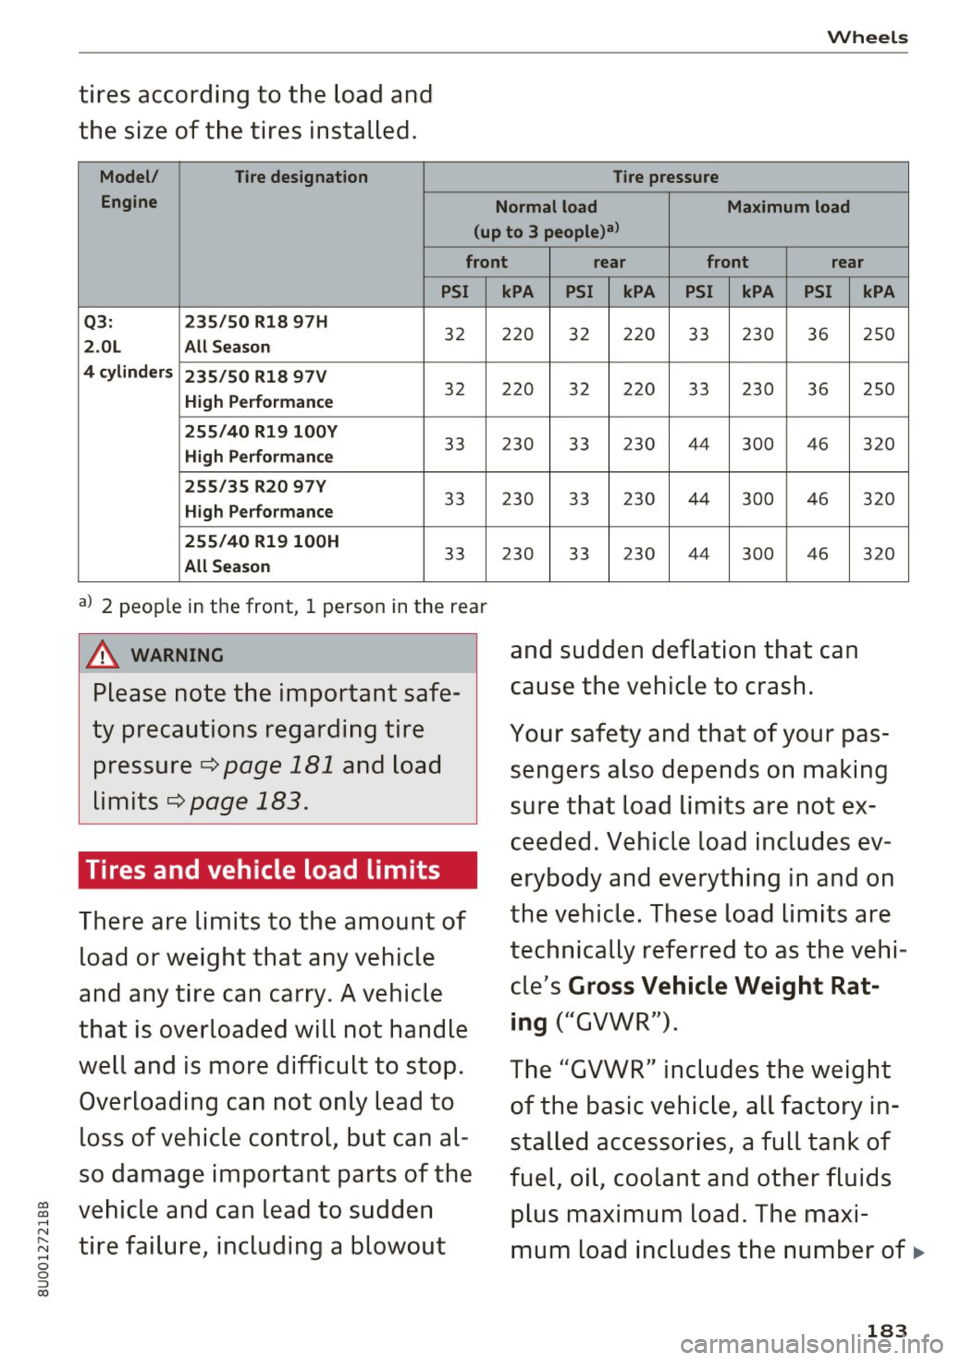
tires according to the load and
the size of the tires installed .
Model/
Tire designation
Engine
Wheels
Tire pressure
Normal load Maximum load
(up to 3 people)a>
front rear front rear
PSI
Q3: 235/50 Rl8 97H
32 2.0L All Season
4 cylinders 235/50 Rl8 97V
High Performance
32
255/40 Rl9 l00Y
33 High Performance
255/35 R20 97Y
33 High Performance
255/40 Rl9 l00H
33 All Season
a) 2 people in the front, 1 person in the rear
A WARNING
Please note the important safe
ty precautions regarding tire pressure
c:::> page 181 and load
limits
c:::> page 183.
Tires and vehicle load limits
There are limits to the amount of
load or weight that any vehicle
and any tire can carry. A vehicle
that is overloaded will not handle
well and is more difficult to stop.
Overloading can not only lead to
loss of vehicle control, but can al
so damage important parts of the
vehicle and can lead to sudden
tire failure, including a blowout
kPA PSI kPA PSI kPA PSI
220 32 220 33 230 36
220 32 220 33 230 36
23 0 33 230 44
300 4
6
230 33 230 44 300 46
23 0
33 230
44 3
00 4
6
and sudden deflation that can
cause the vehicle to crash.
kPA
250
250
320
320
3 20
Your safety and that of your pas
sengers also depends on making
sure that load limits are not ex
ceeded. Vehicle load includes ev
erybody and everything in and on
the vehicle . These load limits are
technically referred to as the vehi
cle's
Gross Vehicle Weight Rat
ing
("GVWR").
The "GVWR" includes the weight
of the basic vehicle, all factory in
stalled accessories, a full tank of
fuel, oil, coolant and other fluids
plus maximum load. The maxi
mum load includes the number of.,.
183
Page 209 of 236
00
00
......
"' ,....
"' ...... 0 0 :::,
00
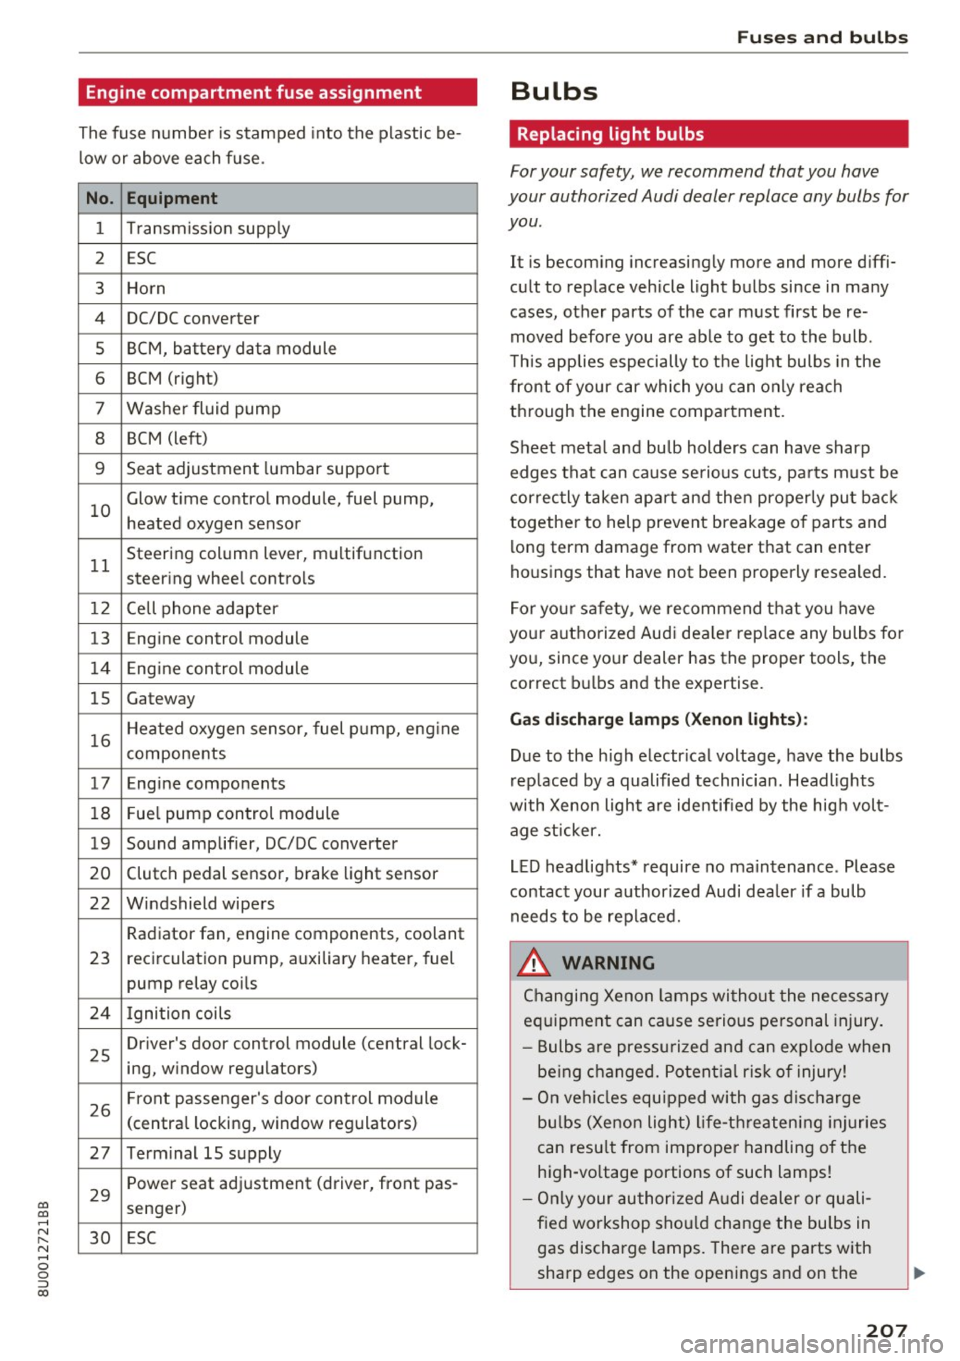
Engine compartment fuse assignment
The fuse number is stamped into the plastic be
low or above each fuse.
No. Equipment
1 Transmiss ion supply
2 ESC
3 Horn
4 DC/DC
converter
5 BCM, battery data module
6 BCM (right)
7 Washer fluid pump
8 BCM (left)
9 Seat adjustment lumbar support
10 Glow time
control module, fuel pump,
heated oxygen sensor
11 Steering
column lever, multifunction
steer ing whee l controls
1 2 Cell phone adapter
13 En
gine control module
14 Engine control module
15 Gateway
16 Heated oxygen sensor, fuel pump, eng
ine
components
17 Engine components
18 Fue
l pump control module
19 Sound amplifier, DC/DC converter
20 Clutch pedal sensor, brake light sensor
22 Windshield wipers Radiator fan, engine components, coolant
23 recirculation pump, auxiliary
heater, fuel
pump relay coils
24 Ignition coils
25 Driver's door
control module (central lock-
ing, window regulators)
26 Front passenger's door control module
(centra
l locking, window regulators)
27 Term inal 15 supply
29 Power seat adjustment (driver,
front pas-
senger)
30 ESC
Fu ses an d bulb s
Bulbs
Replacing light bulbs
For your safety, we recommend that you have
your authorized Audi dealer replace any bulbs for
you .
It is becoming increasingly more and more diffi
cult to replace vehicle light bulbs since in many
cases, other parts of the car must first be re
moved before you are able to get to the bulb .
T his applies especially to the light bulbs in the
front of your car which you can only reach
through the engine compartment .
Sheet metal and bu lb holders can have sharp
edges that can cause serious cuts, pa rts must be
correctly taken apart and then properly put back
together to help prevent breakage o f parts and
long term damage from water that can enter
housings that have not been properly resealed.
For your safety, we recommend that you have
your authorized Aud i dea ler rep lace any bulbs fo r
you, since your dealer has the proper tools, the
correct bulbs and the expertise.
Gas di schar ge la mps (Xe no n ligh ts):
Due to the high electr ical voltage, have the bulbs
rep laced by a qualified technician. Headlights
with Xenon light are identified by the hig h volt
age st icker.
LED headlights* require no maintenance . Please
contact your authorized Audi dea ler if a bulb
needs to be replaced.
_&. WARNING
Changing Xenon lamps wi thout the necessary
equipment can cause serious personal injury .
- Bulbs are pressu rized and can explode when
be ing changed. Potent ial ris k of injury!
- On veh icles equipped with gas disc harge
bu lbs (Xenon light) life-threatening injuries
can resu lt from improper handling of the
high-vo ltage portions of such lamps!
- Only your authorized A udi dealer or quali
f ied workshop sho uld change the bulbs in
gas discharge lamps. There are parts with
sharp edges on the openings and on the
207
Page 217 of 236
a:,
a:,
.... N
" N .... 0 0 ::, a:,
Technical data
Vehicle specifications
XXXXX XX · X · XXXX XXX xx
CD-+ IAH RIG.- IOENT • NII. VOE£ • WIT • Nil. XXXXXX XX XX X XX XXX XXX
IYP/TYP! XXX XXX
xx xxxxxxx xx xx xx
XXX KW XXX
a.;. C1lll /TRANS. lllllE xxxx XXX XXX ®i 11)10Al<8 ./lil1R.k8.
©+ I.AO OIR. / IN NENAllSSl.
XXXX I XXXX XXX I XX PAI NT IIO. / ffT£ml
II. • AIJSlit / OPTIONS
EOA 70 5 4U B 6XM SSG SRW
2 EH JO Z 1LB 1AS l BA
3FC SM U 7Xl
F O A 9G3 OG7 OYH OJF
TL 6 3KA 8EH UlA X 9B OZ7
l XW
803 908 8Z4 020
7T6 CV7 7KO 4X3 2K 2
3 L4 4KC 3YO 413 50 2
lS A 7GB 01A 4GO
XX . X XX X XX X
xxxx
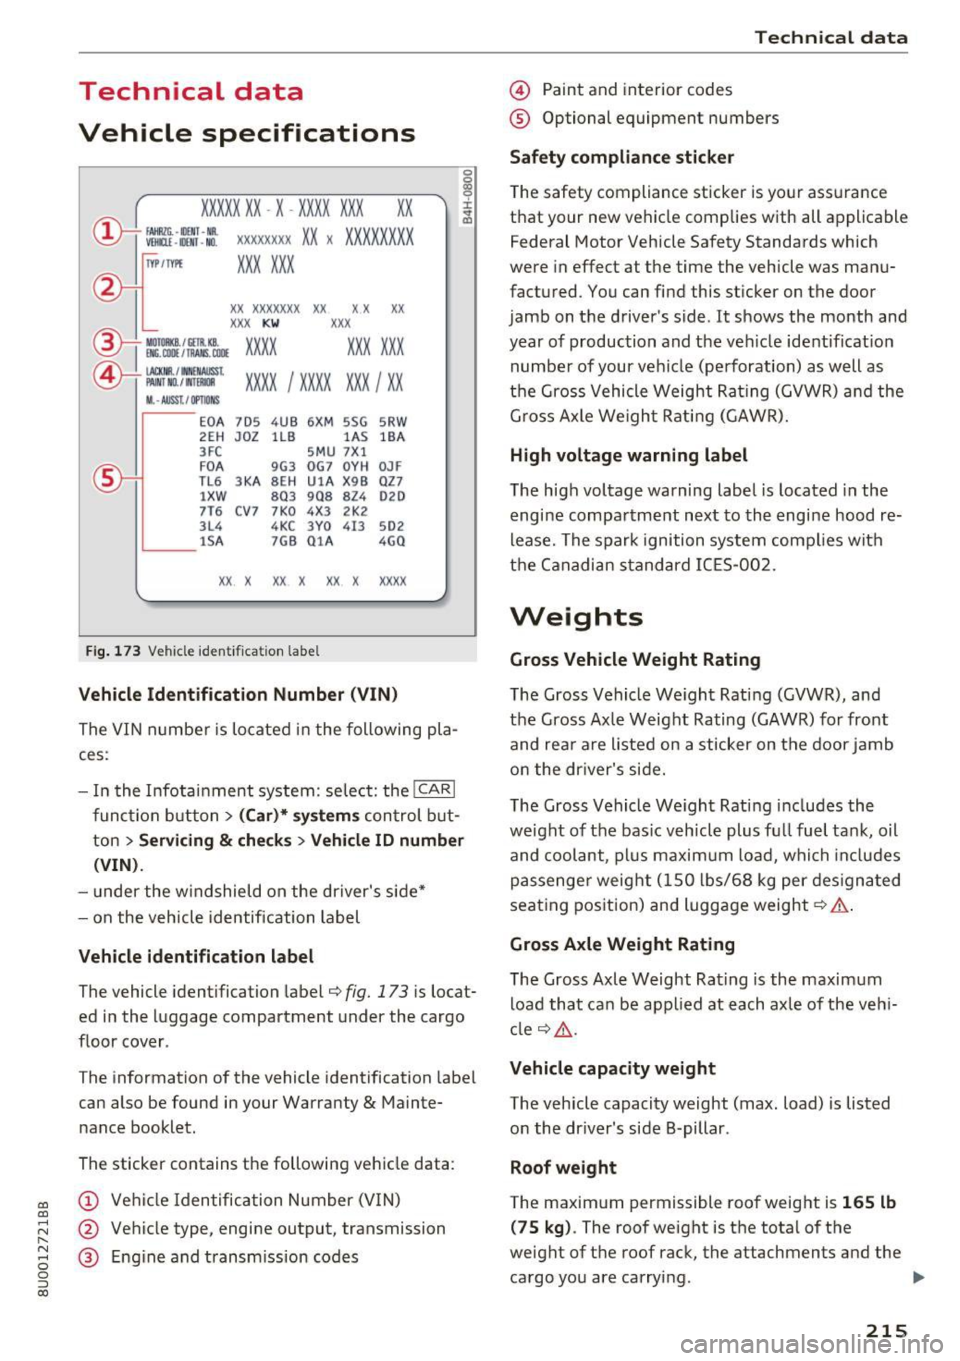
Fig. 173 Vehicl e identifica tion labe l
Vehicle Identification Number (VIN)
The VIN number is located in the following pla
ces :
0
0
a, '? :x: .,. al
-In the Infotainment system: se lect: the !CARI
func tion button > (Car}* systems control but
ton
> Servicing & checks > Vehicle ID number
(VIN).
- under the windshield on the driver's side*
- on the vehicle identification label
Vehicle identification label
The vehicle identification label¢ fig. 173 is locat
ed in the luggage compartment under the cargo
floor cover .
T he information of the vehicle identification label
can also be found in your Warranty
& Mainte
nance booklet.
The sticker contains the following vehicle data :
@ Vehicl e Identification Number (VIN)
@ Veh icle type, engine output, transmission
@ E ng ine and transm ission codes
Technical data
@ Paint and interior codes
® Optional equipment numbers
Safety compliance sticker
The safety compliance sticker is your assurance
that your new vehicle complies with all applicable
Federal Motor Vehicle Safety Standards which
were in effect at the time the vehicle was manu
factured. You can find this sticker on the door
jamb on the driver's side .
It shows the month and
year of production and the veh icle identificat ion
number of your vehicle (perforation) as well as
the Gross Vehicle Weight Rating (GVWR) and the
Gross Axle We igh t Rating (GAWR).
High voltage warning label
The high voltage warning label is located in the
engine compartment next to the engine hood re
lease. The spark ignition system complies with
the Canadian standard ICES-002.
Weights
Gross Vehicle Weight Rating
The Gross Vehicle We ight Rating (GVWR), and
the Gross Axle Weight Rating (GAWR) for front
and rear are listed on a sticker on the door jamb
o n the driver's side.
The Gross Vehicle We ight Rating includes the
we ight of the bas ic vehicle plus fu ll fuel tank, oil
and coolant, plu s maximum load, which includes
passenge r weight (1S0 lbs/68 kg per designated
seat ing position) and luggage weight¢.& .
Gross Axle Weight Rating
The Gross Axle Weight Rating is the maximum
load that can be applied at each axle of the vehi
cl e ¢ _& .
Vehicle capacity weight
The vehicle capacity weight (max. load) is listed
on the dr iver 's side 8-pillar .
Roof weight
The maximum p ermissible roof we ight is 165 lb
(7 5 kg). The roof weight is the total of the
weight of the roof rack, the attachments and the cargo you are carrying . ..,.
215
Page 221 of 236
00
00
......
"' ,....
"' ...... 0 0 :::,
00
today's a utomo biles, have steadily reduced the
scope of maintenance and repairs which can be
carried out by veh icle owners.
Also , sa fet y a nd
en vironmental
concerns place very strict limits
on the nature of repairs and adjustments to en
g ine and transm ission parts wh ich an owner can
pe rform .
Maintenance, adjustments and repairs usually re
qu ire special tools, test ing devices and other
equ ipment available to specially trained work
shop perso nnel i n order to assure proper per
formance, re liability a nd safety of the ve hicle and
its many systems.
Improper maintenance, adjustments and repairs
can impair the operation and re liab il ity of you r
vehi cle and eve n void your vehicle warra nty .
Therefo re, proof of se rvicing in accordance with
the m aintenance schedule may be a condition fo r
upho ld ing a possib le warranty claim made wi thin
the warranty period.
Above all , ope rational safety can be adversely af
fected, cre ating unnecessa ry risks fo r yo u and
your passengers.
I f in doubt about any se rvicing, have it done by
your author ized Audi dealer or any other prope rly
eq uipped and qua lified workshop. We strongly
urge you to g ive your author ized Audi dealer the
opportunity to perform a ll scheduled mainte
nance and necessary repairs. Your dealer has the
fac ilities, original parts and trained specialists to
keep your veh icle running properly .
Pe rforming limit ed ma intenance yourself
The fo llow ing pages describe a limited number of
procedures which can be performed on your vehi
cle with o rdinary tools, should the need arise and
tra ined personnel be unavailable. Before per
forming any of these procedures, always thor
ough ly read a ll of the app licab le text and careful
ly follow the instructions g iven . Always rigorously
observe the
WARNINGS prov ided .
Before you check an ything in the eng ine com
partment, alw ays read and heed all WARNINGS
c::> .&. and c::> .&. in Working in the engine compart
ment on page 159 .
Consumer inf ormation
A WARNING
- Ser ious personal in jury may occur as a result
of improperly performed maintenance, ad
justments or repairs .
- Always be extremely careful when work ing
on the vehicle. Always follow commonly ac
cepted safety practices and general com mo n sense. Never risk pe rsonal injury.
- Do not attempt any of the mai ntenance,
checks or repairs described on t he following
pages if you are not fu lly familiar wi th these
or other proce dures with respect to the ve
h icle, o r are uncerta in how to pro ceed.
- Do not do a ny work withou t the prope r tools
a nd eq uipment. H ave the necessary wo rk
done by your au thorized Audi dealer or an
other proper ly equipped and qualified work
shop.
- The engine compa rtment of any motor ve hi
cle is a potent ially hazardous area . Never
reach into the area around or touch the radi
ator fan.
It is temperature controlled and
can switch on suddenly - even when the en
g ine is off and the ignition key has been re
moved. The rad iator fan switches on au to
mat ica lly when the coo la nt reaches a certain
tem perature and will continue to r un until
the coolant tem pera ture drops.
- Always remove t he ignition key befo re any
one gets under the vehicle.
- Always support your veh icle with safety
s tands if i t is necessary to work u nder neat h
the vehicle . The jack* s upplied w ith the vehi
cle is not adequate fo r this purpose and
could collapse caus ing serious personal in
jury.
- If you m ust wor k unde rneath the vehicle
with the w heels on the g round, always make
sure the vehicle is on level ground, that the
wheels a re always sec urely blocked and that
the engine cannot be started.
- Always make sure the transmission se lector
lever (automatic transmiss ion) is in P (Park
position) and the park brake is applied.
219
Page 222 of 236
Consumer inf orm ation
@ For the sake of the env ironment
- Changing the engine settings wi ll adversely
affect emission levels. Th is is detrimental to
the environment and increases fuel con
sumption.
- A lways observe environmental regu lations
when disposing of old engine o il, used brake
fl ui d, d irty engine coolant, spent batteries
or worn out tires.
- Undeployed airbag modules and pretension
ers mig ht be classified as Perchlorate Mate
rial -special handl ing may apply, see
www.dtsc .ca.gov/hazardouswaste/perchlo
r ate. When the vehicle or parts of the re
straint system including airbag modu les
safety be lts wi th pretensioners are scrap
ped, all applicab le laws and regulations
must be observed. Your authorized Audi
dealer is familiar with these requirements
and we recommend that you have your deal er perform this service for you.
Accessories and technical changes
Additional accessories and parts replacement
Always consult an authorized Audi dealer before
purchasing accessories.
Your vehicle incorporates the latest safety design
features ensuring a high standard of active and passive safety.
This safety could be comp romised by non-ap
proved changes to the vehicle . For this reason, if
parts have to be replaced, please observe the fo l
lowing points when insta lling addit ional accesso
ries:
Approved Audi accessories and genuine Audi parts are available from author ized Audi dealers.
These dealers also have the necessary facilities,
too ls and trained specialists to install the parts
and accessories properly.
220
A WARNING
-
Using the wrong spare parts or using non-ap-
proved accessories can cause damage to the
vehicle and serious personal injury.
- Use only accessories expressly approved by
Aud i and genuine Audi spare parts
- These parts and accessor ies have been spe
cially designed to be used on your vehicle.
- Never install accessor ies such as telephone
cradles or beverage holders on airbag covers
or w ith in the airbag deployment zones. Do
ing so will increase the risk of injury if a ir
bags are triggered in an accident!
- Before you check anything in the eng ine
compartment, always read and heed all
WARN INGS
Qpage 159.
(D Note
-If items other than genu ine Audi spare
parts, add-on equipment and accessory
items are used or if repair wor k is not per
formed a ccording to specified methods, this
c an resul t in severe damage to you r vehi
cle's eng ine and body (such as corrosion)
and adve rsely af fect your vehicle's war ranty.
- I f emergency repai rs must be performed
elsewhere, have the vehicle exam ined by an
authorized A udi dealer as soon as possib le .
- T he manuf acture r ca nnot be held liable for
damage which occurs d ue to failure to com
ply with these stipulations.
Technical Modifications '
Our guidelines must be complied with when tech
nical modifications are made .
Always consult an a uthorized Audi de aler bef ore
sta rt ing work on any modifica tions.
This will help ensure that vehicle fu nction, per
fo rmance and safety are not impaired
Q ,& .
Attempting to work on electronic components
and the software used with them can cause mal
funct io ns. Because of the way elect ronic compo
nen ts a re interconnected with each othe r, such
malfunc tions c an also have an adverse affect on
othe r systems that are not d irectl y involved. This ..,.
Page 226 of 236
Index
Cleaning plastic parts . . . . . . . . . . . . . . . . . . 193
Cleaning rims . . . . . . . . . . . . . . . . . . . . . . . . 192
Cleaning textiles . . . . . . . . . . . . . . . . . . . . . . 194
Climate control system Driv e select . . . . . . . . . . . . . . . . . . . . . . . . . . 83
Climate control system (automatic) Adjusting the temperature . . . . . . . . . . . . . 57
Air distribution .... ........... .... .... 57
Air vents . . . . . . . . . . . . . . . . . . . . . . . . . . . . 57
AUTO (automatic mode) . . . . . . . . . . . . . . . 57
Blower . . . . . . . . . . . . . . . . . . . . . . . . . . . . . 57
Changing the temperature unit . . . . . . . . . 57
Defrosting the windshield . . . . . . . . . . . . . . 57
Description . . . . . . . . . . . . . . . . . . . . . . . . . . 53
Operation . . . . . . . . . . . . . . . . . . . . . . . . . . . 56
Rear window defogger . . . . . . . . . . . . . . 55, 57
Recirculation mode . . . . . . . . . . . . . . . . . . . 56
Synchronizing . . . . . . . . . . . . . . . . . . . . . . . . 57
Climate control system (manual)
Adjusting the temperature . . . . . . . . . . . . . 55
Air distribution, air vents . . . . . . . . . . . . . . . 55
Blower . . . . . . . . . . . . . . . . . . . . . . . . . . . . . 54
Defrosting the windows . . . . . . . . . . . . . . . 55
Description . . . . . . . . . . . . . . . . . . . . . . . . . . 53
Operation . . . . . . . . . . . . . . . . . . . . . . . . . . . 54
Rear window defogger . . . . . . . . . . . . . . . . . 55
Recircula tion mode . . . . . . . . . . . . . . . . . . . 54
Closing Hood . . . . . . . . . . . . . . . . . . . . . . . . . . . . . . 161
Panorama glass roof . . . . . . . . . . . . . . . . . . 33
Windows . . . . . . . . . . . . . . . . . . . . . . . . . . . 32
Closing/opening By remote control . . . . . . . . . . . . . . . . . . . . 25
W ith the central locking switch . . . . . . . . . 27
W ith the convenience key . . . . . . . . . . . . . . 26
With the door lock . . . . . . . . . . . . . . . . . . . . 28
Cockpit (overview) . . . . . . . . . . . . . . . . . . . . . . 6
Color number . . . . . . . . . . . . . . . . . . . . . . . . 215
Com ing home . . . . . . . . . . . . . . . . . . . . . . . . . 36
Compartments . . . . . . . . . . . . . . . . . . . . . 47, 48
Compass in the mirror . . . . . . . . . . . . . . . . . . 42
Compl iance . . . . . . . . . . . . . . . . . . . . . . . . . . 221
Consumer information . . . . . . . . . . . . . . . . . 218
Consumer Information . . . . . . . . . . . . . . . . . 107
Consumption (fuel) ................ 20, 215
Contacting NH TSA . . . . . . . . . . . . . . . . . . . . 107
224
Convenience key
Indicator lights . . . . . . . . . . . . . . . . . . . . . . 63
Start ing the engine . . . . . . . . . . . . . . . . . . . 62
Stopping the engine . . . . . . . . . . . . . . . . . . 62
Switching the ignition on . . . . . . . . . . . . . . 62
Unlocking /locking . . . . . . . . . . . . . . . . . . . . 26
Convenience opening/closing
Convertible child safety seats
Convertible locking retractor ............ 32
144
Activating . . . . . . . . . . . . . . . . . . . . . . . . . . 149
Deactivating . . . . . . . . . . . . . . . . . . . . . . . . 149
Using to secure a child safety seat . . . . . . 149
Cooling mode (automatic climate control sys-
tem) . . . . . . . . . . . . . . . . . . . . . . . . . . . . . . . . 56
Cooling mode (manual climate control sys-
tem) . . . . . . . . . . . . . . . . . . . . . . . . . . . . . . . . 54
Cooling system Adding coolant . . . . . . . . . . . . . . . . . . . . . . 166
Coolant . . . . . . . . . . . . . . . . . . . . . . . . . . . . 166
Coolant level checking . . . . . . . . . . . . . . . . 166
Coolant temperature . . . . . . . . . . . . . . . . . . . 8
Indicator light . . . . . . . . . . . . . . . . . . . . . . . 13
Crossing water . . . . . . . . . . . . . . . . . . . . . 58 , 67
Cruise control system
Chang ing speed . . . . . . . . . . . . . . . . . . . . . . 79
Overriding the cruise control system . . . . . 79
Preselecting speed . . . . . . . . . . . . . . . . . . . . 79
Switching off . . . . . . . . . . . . . . . . . . . . . . . . 79
switching on . . . . . . . . . . . . . . . . . . . . . . . . . 78
Cup holders . . . . . . . . . . . . . . . . . . . . . . . . . . . 47
Current consumption 20
D
Data recorder . . . . . . . . . . . . . . . . . . . . . . . . . 98
Date .......... .................... .... 9
Daytime running lights . . . . . . . . . . . . . . . . . 35
Declaration of compliance Audi s ide ass ist . . . . . . . . . . . . . . . . . . . . . 221
Cell phone package . . . . . . . . . . . . . . . . . . 221
Conv enience key . . . . . . . . . . . . . . . . . . . . . 221
Cruise control . . . . . . . . . . . . . . . . . . . . . . . 221
E le ctronic immobilizer................ 221
Remote control key . . . . . . . . . . . . . . . . . . 221
Defect ive light bulb
Indicator light . . . . . . . . . . . . . . . . . . . . . . . 16
Page 227 of 236
00
00
......
"' ,....
"' ...... 0 0 :::,
00
Defrosting (windows)
Manual climate control system . . . . . . . . . . 55
Defrosting (windshield)
Automatic climate control system . . . . . . . 57
DEF (instrument cluster) . . . . . . . . . . . . . . . . 10
Det ermin ing correct load limit . . . . . . . . . . 185
Digital compass . . . . . . . . . . . . . . . . . . . . . . . 42
Dimensions . . . . . . . . . . . . . . . . . . . . . . . . . . 216
Dimming the rearview mirror . . . . . . . . . . . . 38
Display Cleaning . . . . . . . . . . . . . . . . . . . . . . . . . . . 193
Distance . . . . . . . . . . . . . . . . . . . . . . . . . . . . . 20
Doors Child safety lock............... ..... .. 31
Emergency locking . . . . . . . . . . . . . . . . . . . . 28
Driver information system
Driver messages . . . . . . . . . . . . . . . . . . . . . . 20
Efficiency program............ .. .... .. 21
Indicator lights . . . . . . . . . . . . . . . . . . . . . . 10
On-board computer . . . . . . . . . . . . . . . . . . . 20
Operating using the multifunction steering
wheel . . . . . . . . . . . . . . . . . . . . . . . . . . . . . . 20
Operating using windshie ld wiper lever . . . 19
Overview . . . . . . . . . . . . . . . . . . . . . . . . . . . . 19
Service interval display . . . . . . . . . . . . . . . 170
D river seat
refer to Seating position
101
Drive select
Indicator light . . . . . . . . . . . . . . . . . . . . . . . 17
also refer to Audi drive select . . . . . . . . . . . 83
Driving economically . . . . . . . . . . . . . . . . . . . 58
Driving offroad . . . . . . . . . . . . . . . . . . . . . . . . 66
Driving safely . . . . . . . . . . . . . . . . . . . . . . . . 100
Driving through water . . . . . . . . . . . . . . . 58, 67
Dr iving time . . . . . . . . . . . . . . . . . . . . . . . . . . 20
Dust filter
refer to Pollutant filter . . . . . . . . . . . . . . . . 53
E
EDL
refer to Electronic Differentia l Lock . . . . . . 92
Eff iciency program
Fuel economy messages . . . . . . . . . . . . . . . 22
Other equipment . . . . . . . . . . . . . . . . . . . . . 21
Overview . . . . . . . . . . . . . . . . . . . . . . . . . . . . 21
Elect rome chanica l park ing brake . . . . . . . . . 64
Index
El ectromechanical steering . . . . . . . . . . . . . . 96
I ndica tor light . . . . . . . . . . . . . . . . . . . . . . . 96
El ectron ic differentia l lock
Indicator light . . . . . . . . . . . . . . . . . . . . . . . 14
Electron ic Differential Lock . . . . . . . . . . . . . . 92
Electronic immobilizer . . . . . . . . . . . . . . . . . . 24
Electronic stabilization control
Indicator light . . . . . . . . . . . . . . . . . . . . . . . 14
Electronic Stabilization Control . . . . . . . . . . . 92
Hill descent assist . . . . . . . . . . . . . . . . . . . . 94
Offroad mode . . . . . . . . . . . . . . . . . . . . . . . . 93
Emergency assistance . . . . . . . . . . . . . . . . . 197
Emergency braking function . . . . . . . . . . . . . 65
Emergency flashers . . . . . . . . . . . . . . . . . . . . 36
Indicator light . . . . . . . . . . . . . . . . . . . . . . . 17
Emergency locking front passenger's door . . 28
Emergency operation
Front passenger's door . . . . . . . . . . . . . . . . 28
Fuel filler door . . . . . . . . . . . . . . . . . . . . . . 158
Luggag e compartment lid . . . . . . . . . . . . . . 31
Panorama roof . . . . . . . . . . . . . . . . . . . . . . . 34
Sun shade (roof) . . . . . . . . . . . . . . . . . . . . . 34
Emergency release Selector lever . . . . . . . . . . . . . . . . . . . . . . . . 72
Emergency starting . . . . . . . . . . . . . . . . . . . 209
Emissions data . . . . . . . . . . . . . . . . . . . . . . . 215
Energy management . . . . . . . . . . . . . . . . . . . 97
Indicator light . . . . . . . . . . . . . . . . . . . . . . . 13
Engine Coolant . . . . . . . . . . . . . . . . . . . . . . . . . . . . 166
Engine data . . . . . . . . . . . . . . . . . . . . . . . . 217
Start ing with jumper cables ........... 209
Start ing (convenience key) . . . . . . . . . . . . . 62
Starting (ignition lock) . . . . . . . . . . . . . . . . 60
Stopping (convenience key) . . . . . . . . . . . . . 62
Stopping (ignition lock) . . . . . . . . . . . . . . . . 61
Engine compartment Open ing/closing the hood . . . . . . . . . . . . . 161
Ove rview . . . . . . . . . . . . . . . . . . . . . . . . . . . 162
Safety precautions . . . . . . . . . . . . . . . . . . . 159
Engine control (indicator light) . . . . . . . . . . . 15
Engine coolant Radiator fan . . . . . . . . . . . . . . . . . . . . . . . . 167
Eng ine oil . . . . . . . . . . . . . . . . . . . . . . . . . . . 162
Adding . . . . . . . . . . . . . . . . . . . . . . . . . . . . 164
Changing . . . . . . . . . . . . . . . . . . . . . . . . . . 165
Checking the engine oil level . . . . . . . . . . . 164
225
Page 228 of 236
Index
Dipstick. . . . . . . . . . . . . . . . . . . . . . . . . . . . 164
Economy ... .... ... . ...... ... .. .. ... 164
Indicator light . . . . . . . . . . . . . . . . . . . . 13, 15
O il cons umption . . . . . . . . . . . . . . . . . . . . . 163
O il grades . . . . . . . . . . . . . . . . . . . . . . . . . . 162
Specification and viscos ity . . . . . . . . . . . . . 162
Engine speed limitation (indicator light) . . . 15
E nvi ronment
C ata lytic converte r . . . . . . . . . . . . . . . . . . . 158
P roper disposal of drained e ngine o il . . . . 165
Unleaded f uel . . . . . . . . . . . . . . . . . . . . . . . 15 5
E PC (engine control) . . . . . . . . . . . . . . . . . . . . 15
E SC
Automatic post-co llision brak ing system . . 92
also refer to Electronic stabilization control .92
E vent Data Recorder (EDR) . . . . . . . . . . . . . . 98
Exterior lighting . . . . . . . . . . . . . . . . . . . . . . . 35
Exterior mirrors Adjusting . . . . . . . . . . . . . . . . . . . . . . . . . . . 38
Dimming . .. .... .. ........ ... .. .. .. .. 38
H eat ing . . . . . . . . . . . . . . . . . . . . . . . . . . . . . 38
F
Fasten ing
Booster seats . . . . . . . . . . . . . . . . . . . . . . . 145
Conver tible ch ild safety seats . . . . . . . . . . 144
I nfant seats . . . . . . . . . . . . . . . . . . . . . . . . 143
Floor mats . . . . . . . . . . . . . . . . . . . . . . . . . . . 105
F oldi ng cho cks . . . . . . . . . . . . . . . . . . . . . . . 198
Foldi ng the rea r seats . . . . . . . . . . . . . . . . . . . 49
F oot pedals . . . . . . . . . . . . . . . . . . . . . . . . . . 104
F or the sake of the enviro nment
E nvironme ntally -fr iendly driv ing . . . . . . . . 58
F ue ling . . . . . . . . . . . . . . . . . . . . . . . . . . . . 157
L eaks . . . . . . . . . . . . . . . . . . . . . . . . . . . . . . 160
Rear win dow defogger . . . . . . . . . . . . . . 55, 57
Roof rack . . . . . . . . . . . . . . . . . . . . . . . . . . . 52
F ree ze protection
Coolant . . . . . . . . . . . . . . . . . . . . . . . . . . . . 166
Front airbags Descr ipt io n . . . . . . . . . . . . . . . . . . . . . . . . . 12 1
H ow t hey wo rk . . . . . . . . . . . . . . . . . . . . . . 126
Frontal col lisions and the laws of p hys ics . . 110
226
Front seats
Adjusting 102
Child restra ints in the front seat . . . . . . . . 118
also refer to Seats . . . . . . . . . . . . . . . . . . . . 44
Fuel Additives. . . . . . . . . . . . . . . . . . . . . . . . . . . 155
B lended gasoline . . . . . . . . . . . . . . . . . . . . 155
Cons umption . . . . . . . . . . . . . . . . . . . . . . . 215
Current consumpt ion . . . . . . . . . . . . . . . . . . 20
Filler neck . . . . . . . . . . . . . . . . . . . . . . . . . . 156
Fuel gauge . . . . . . . . . . . . . . . . . . . . . . . . . 8, 9
Fuel tank capaci ty .. .. ........ ..... .. 216
Gasoline . . . . . . . . . . . . . . . . . . . . . . . . . . . 155
Gasoline add it ives . . . . . . . . . . . . . . . . . . . 156
Ind icator lig ht . . . . . . . . . . . . . . . . . . . . . . . 15
Oct ane ra ting . . . . . . . . . . . . . . . . . . . . . . . 155
Recommenda tion . . . . . . . . . . . . . . . . . . . . 155
Saving fuel . . . . . . . . . . . . . . . . . . . . . . . 58 , 83
Fuel economy messages (efficiency prog ram) .22
Fueling Fuel f iller door emergency release . . . . . . 158
Fuel gauge . . . . . . . . . . . . . . . . . . . . . . . . . . . 9
Fuel tank capacity ......... ........ .. 216
Open ing the fue l filler door . . . . . . . . . . . . 15 7
Fuses Ass ignment . . . . . . . . . . . . . . . . . . . . . . . . 206
Replacing . . . . . . . . . . . . . . . . . . . . . . . . . . 205
G
Garment hooks . . . . . . . . . . . . . . . . . . . . . . . . 48
Gas disch arge lamps . . . . . . . . . . . . . . . . . . . 207
G lossary of t ire and loading te rm inology . . 173
G love compartment . . . . . . . . . . . . . . . . . . . . 47
G ross Veh icle Weig ht Rating (GVWR) . . . . . 215
Ground clearance . . . . . . . . . . . . . . . . . . . . . . 67
H
Headlight range contro l
Ind icator light . . . . . . . . . . . . . . . . . . . . . . . 16
Hea dlight range contro l system . . . . . . . . . . 35
Head lights . . . . . . . . . . . . . . . . . . . . . . . . . . . 36
Cleaning . . . . . . . . . . . . . . . . . . . . . . . . . . . 1 92
Hea dlight range cont ro l sys tem . . . . . . . . . 35
Head restraints . . . . . . . . . . . . . . . . . . . . . . . 103
Adjust ing . ...... ... ...... .... 45, 46, 103
Removing a nd insta lling . . . . . . . . . . . . . . . 46