infotainment AUDI Q3 2018 User Guide
[x] Cancel search | Manufacturer: AUDI, Model Year: 2018, Model line: Q3, Model: AUDI Q3 2018Pages: 230, PDF Size: 57.03 MB
Page 88 of 230

Parking systems
Switching between the rearview camera and
optical display
.. Press the Graphic control button ®
t=:> page 86, fig. 92 to see the optical display.
• Press the
Rear view control button to see the
rearview camera image.
Switching off
.. Drive faster than 6 mph (10 km/h), or
.. Press the p,,.,.6. button, or
• Switch the ignition off .
@ Tips
The visual display in the left part of the dis
play should help you detect the critical veh icle
areas.
Perpendicular parking
Applies to: vehicl es with parking system plus with rearv iew
camera
This view may be used when parking in a garage
or in a parking space.
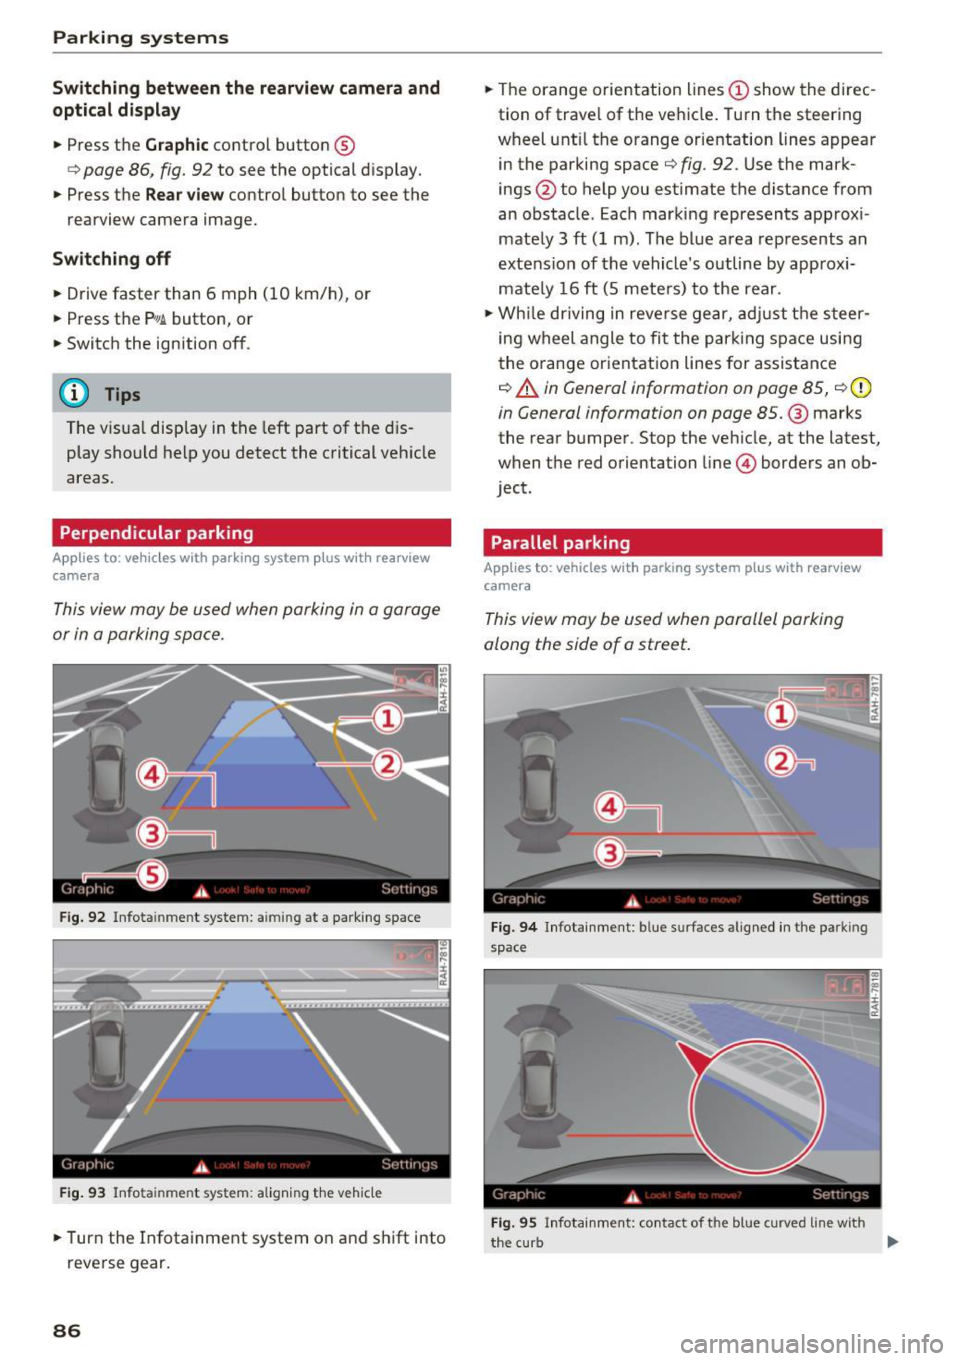
Fig . 92 Infota inme nt system: a iming at a parking space
Fig. 93 Infota in me nt system: a lign ing the veh icle
.. Turn the Infotainment system on and shift into
reverse gear.
86
.. The orange orientation lines (D show the direc
tion of travel of the vehicle. Turn the steering
wheel unt il the orange orientation lines appear
in the parking space
t=:> fig . 92 . Use the mark
ings @to help you estimate the distance from
an obstacle . Each marking represents approx i
mately 3
ft (1 m). The blue area represents an
extension of the vehicle's outline by approxi
mately 16
ft (5 meters) to the rear .
.. While driving in reverse gear, adjust the steer
ing wheel angle to fit the park ing space using
the orange orientation lines for assistance
¢ A in General information on page 85, ¢ (D
in General information on page 85 .@ marks
the rear bumper . Stop the veh icle, at the latest,
when the red orientation line© borders an ob
ject .
Parallel parking
App lies to : vehicles with parking system plus with rearview
camera
This view may be used when parallel parking
along the side of a street.
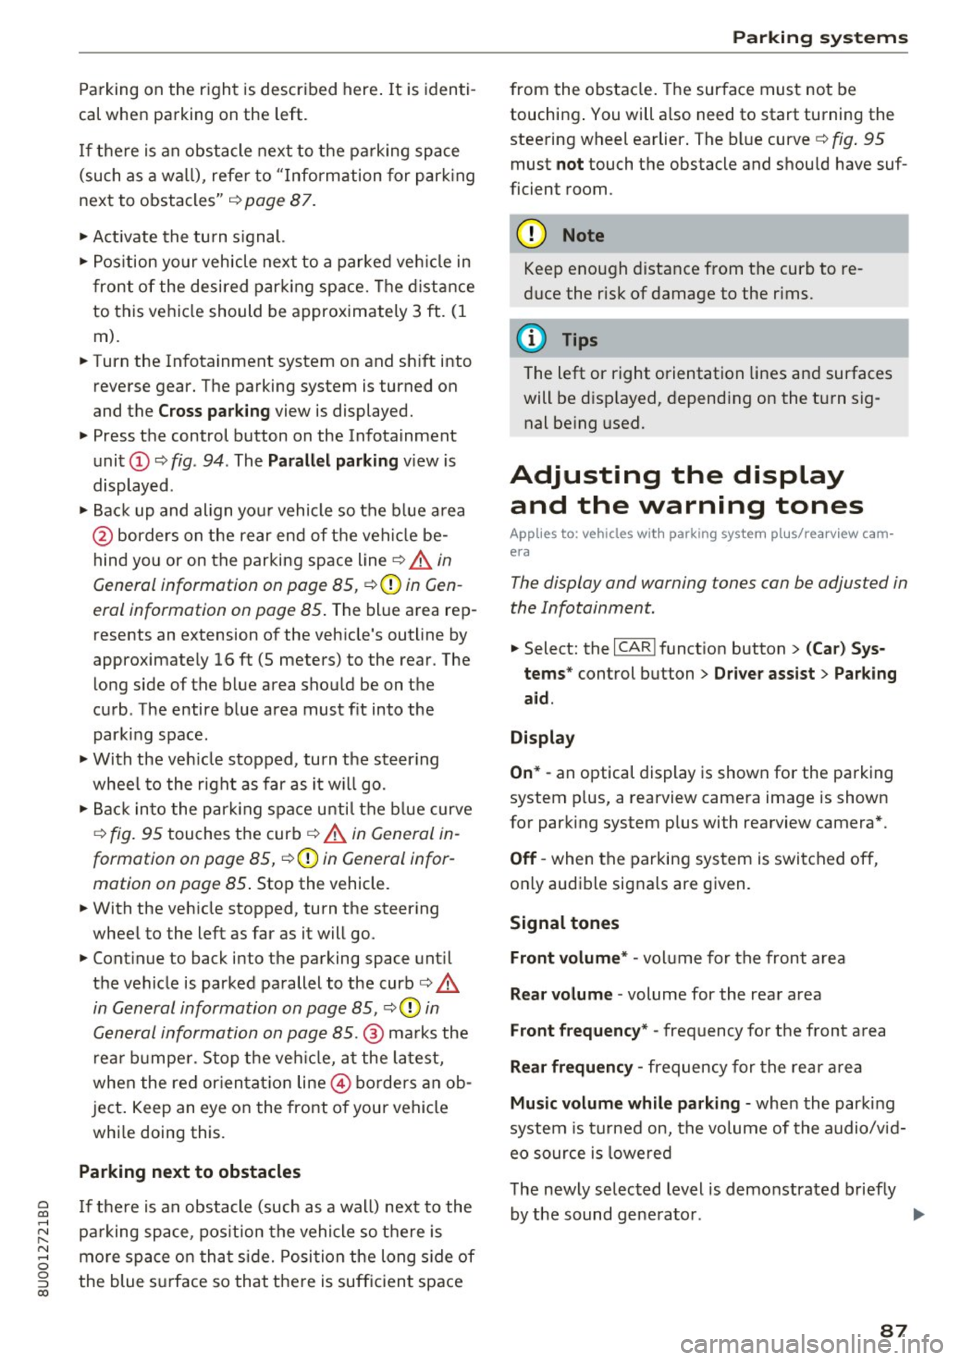
Fig. 94 Infotainment : b lue s urfaces aligned in the parkin g
space
Fig. 95 Infotai nment: contact of t he blue curved line w ith
the curb
II-
Page 89 of 230

Parking on the r ight is described here . It is identi
cal when parking on the left.
I f the re is an obstacle next to the pa rking space
(such as a wa ll), refer to "Information for par king
next to obstacles" ¢
page 87.
~ Activate the tu rn s ignal.
~ Pos ition your vehicle next to a parked veh icle in
front of the desired parking space. The d istance
to this vehicle should be approximately 3 ft. (1
m) .
~ Turn the Infotainment system on and sh ift into
reverse gear. The parking system is turned on
and the
Cr oss park ing view is displayed.
~ Press the control button on the Infotainment
unit
(D ¢ fig . 94 . The Parall el parking view is
displayed .
~ Backup and align you r vehicle so the b lue a rea
@ borders on the rear end of the veh icle be
hind you or on the parking space line
¢ .&. in
General information on page 85,
¢ -Ol) in Gen
eral information on page 85 .
The blue area rep
resents an extension of the veh icle's outline by
approxim ately 16 ft (5 meters) to the rear. The
long side of the blue area shou ld be on the
curb . The entire blue area must fit into the
park ing space.
~ With the veh icle stopped, turn the steer ing
whee l to the r ight as far as it w ill go.
~ Bac k in to the park ing space unti l the b lue curve
¢ fig. 95 tou ches the curb¢.&. in Gen eral in
formation on page 85, ¢(Din General infor
mation on page 85 .
Stop the vehicle.
~ With the vehicle stopped, turn the steer ing
wheel to the left as far as it will go .
~ Continue to back into the parking space un til
the veh icle is parked parallel to the curb¢&.
in General information on page 85 , ¢ (Din
General information on page 85.@
ma rks the
rea r bumpe r. Stop t he veh icle, a t the la test,
when the red or ien tat io n line @ borders an ob
ject . Keep an eye on the front o f your vehicle
whi le doing this.
Parking next to obstacles
~ I f the re is an obstacle (such as a wall) next to the ......
~ pa rking space, pos ition the vehicle so t here is
8 mo re space on that side. Posi tion the long s ide of
g the blue s urface so that the re is sufficient space 00
Parking sy stem s
from the obstacle. The surface must not be
touching . You will a lso need to start turning the
stee ring wheel earlier . The bl ue curve
r:=:> fig . 95
must not touch the obstacle and shou ld have suf
ficien t room .
@ Note
Keep eno ugh distance from the curb to re
duce the risk of damage to the r ims.
(D Tips
The left or right orientation lines and surfaces
will be d isp layed , depend ing on the tu rn sig
nal be ing used.
Adjusting the display
and the warning tones
Applies to : vehicles wit h parking system pl us/rearview cam
era
The display and warning tones can be adjus ted in
the Infotainment.
~ Select: the I CAR I funct ion button > ( C ar) Sys
tems *
control but ton > Driver assist > Parking
aid .
Display
On * -
an optical display is shown for the parking
system p lus, a rearview came ra image is shown
for parking system plus with rearview camera*.
Off -when the parking system is switched off,
o n ly audib le signals are given .
Signal tones
Front volume* -
vol ume for the front area
Rear volume -volume for the rear area
Front frequency * -frequency for the front area
Rear frequency -frequency for the rea r a rea
Music volume while parking -when the par kin g
system is turned on, the vo lume of the audio/v id
eo source is lowered
The newly se lected level is demonstrated briefly
by the sound gene ra to r. .,.
87
Page 90 of 230

Parking sy stem s
(D Tips
-The warning tones can also be adjusted d i
rect ly from the visua l display or the rearv iew
camera image*. Simply press the
S ettings
control button.
- Changed settings are act ivated when the
parking system is switched on again.
- The settings are automatically stored and
assigned to the remote control key that is in
use.
Error messages
A pp lies to: ve hicles w ith parkin g system plus/rearview cam·
e ra
There is an error in the system if the LED in the
P,#A button is bl inking and yo u hear a continuous
alarm for a few seconds after switching on the parking system or when the parking system is al
ready act ivated. If the error is not corrected be
fore you switch off the ig nition, the LED in the
p,,; A
button will blink the next t ime you sw itch on the
pa rking system by s hift ing into reverse .
If a sensor is faulty, the~ symbol will appear in
front of/behind the vehicle in the Infotainment
d isplay. If a rear sensor is faulty, only obstacles
that are in areas @ and @ are displayed
¢page 83, fig. 85. If a front sensor is faulty, on ly
obstacles that a re in areas © and @are dis
p layed.
Drive to an authorized Aud i dea ler or authorized
Aud i Serv ice Facility immediately to have t he
malfunct io n corrected.
Trailer hitch
App lies to: ve hicles w ith parkin g system plus/rearview cam
era a nd trail er hitc h
For veh icles using the trailer socket, the parking
system rear sensors are not activated when you
shift into reverse gear or whe n you press the
p,, ;A
button . This results in the follow ing restr ictions .
Parking system plus*
There is no d istance warning for the rear. The
front sensors remain activated . The visual display
sw itches to tra iler mode .
88
Parking sy stem plus and rearview c amera *
There is no distance warning for the rear. The
front sensors remain activated . The visua l display
switches to trailer mode . The rearview camera
image will not show the orientation lines and the
blue surfaces.
(D Tips
Tra iler hitches that are not installed at the
factory may cause the parking system to mal
funct ion or they may restr ict its function.
Page 202 of 230

Fuses and bulbs
(D Tips
-The following table does not list fuse loca
tions that are not used.
- Some of the equipment listed in the follow
ing tables applies only to certain model ver
sions or certain optional equipment.
Fuse assignment, cockpit
The fuse number is stamped into the plastic be
low or above each fuse.
No. Equipment
1 LED headlight (left)
2 LED headlight (
right)
5 LED headlight (left)
6 LED headlight (right)
7 Steering lock
8 Convenience access contro
l module
9 Airbag control module, AIRBAG OFF
indi-
cator light
12
Transmission control module, selector
mechanism
Air quality sensor for cl imate control sys-
tern, heated w indow washer nozzles,~
button, reverse light,(®) button, oil level
13 sensor, climate contro
l system, seat occu-
pant detection system, seat heating, but-
tons in the center console, automatic dim-
ming mirror
Engine control module , quattro control
modu le, transmission control module,
14 brake lights, electromechanica
l steering,
Gateway control module, trai ler hitch con-
trol module, ESC control module, light
switch, damping control module
Headlight range control module, instru-
ment illumination, headlights (left, right),
15 diagnostic connector, crankcase housing
heater, a
ir flow sensor, socket relay, DC/
DC converter
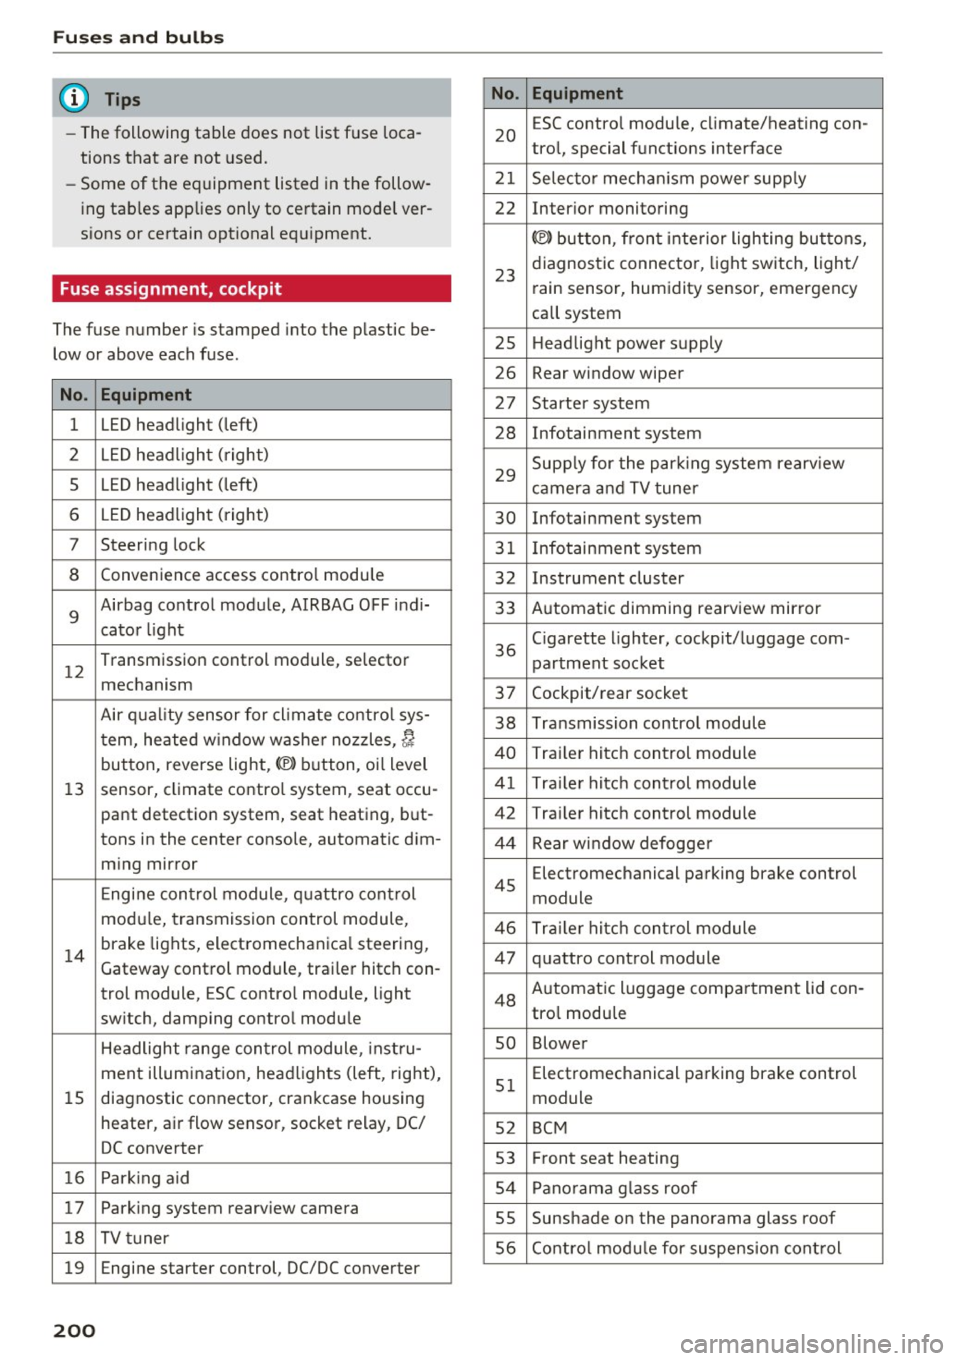
16 Parking aid
17 Parking system rearview camera
18 TV tuner
19 Engine starter control, DC/DC converter
200
No
. Equipment
20 E
SC contro l module, climate/heating con-
trol, special functions interface
21 Selector mechanism power supply
22 Interior monitoring
(®) button, front interior lighting buttons,
23 diagnostic connector, light
switch, light/
rain sensor, humidity sensor, emergency
call system
25 Headlight power supply
26 Rear window wiper
27 Starter system
28 Infotainment system
29 Supply for
the park ing system rearview
camera and TV tuner
30 Infotainment system
31 Infotainment system
32 Instrument cluster
33 Automatic dimming rearview mirror
36 Cigarette lighter, cockpit/luggage com
-
partment socket
37 Cockpit/rear socket 38 Transmission contro l module
40 Trailer hitch control module 41 Trailer hitch control module
42 Trai ler hitch control module
44 Rear window defogge r
4S Electromechanical parking brake control
module
46 Trailer hitch control module
47 quattro control module
48 Automatic luggage compartment lid con-
tro
l modu le
so Blowe r
51 Electromechanical parking brake control
module
52 BCM
53 Front seat heating
54 Panorama gla ss roof
55 Sunshade on the panorama glass roof
56 Contro l modu le for suspension control
Page 211 of 230

a
co
.... N
" N .... 0 0 ::, co
Technical data
Vehicle specifications
XXXXX XX · X · XXXX XXX xx
CD-+ IAH RIG. • IOEN T • NII. VOE£ • WIT • Nil. XXXXXX XX XX X XX XXX XXX
IYP/TYP! XXX XXX
xx xxxxxxx xx xx xx
XXX KW XXX
®i 11)10Al<8./lil1R.k8. a.;. C1lll /TRANS. lllllE xxxx XXX XXX
©+ I.AO OIR. / IN NENAllSSl.
PAI NT IIO. / ffT£ml XXXX I XXXX XXX I XX
II. • AIJSlit / OPTIONS
EOA 70 5 4U B 6XM SSG SRW
2 EH JO Z 1LB 1AS l BA
3FC SM U 7Xl
F O A 9G3 OG7 OYH OJF
TL 6 3KA 8EH UlA X 9B OZ7
l XW
803 908 8Z4 020
7T6 CV7 7KO 4X3 2K 2
3 L4 4KC 3YO 413 50 2
lS A 7GB 01A 4GO
XX . X XX X XX X
xxxx
Fig. 169 Vehicl e identifica tion labe l
Vehicle Identification Number (VIN)
The VIN number is located in the following pla
ces :
- In the Infotainment system: se lect: the
!CARI
func tion button > (Car)* systems control but
ton
> Servicing & checks > VIN number .
-under the windshield on the driver's side*
- on the vehicle identification label
Vehicle identification label
0
0
a, '? :x: .,. al
The vehicle identification label ¢ fig. 169 is locat
ed in the luggage compartment under the cargo
floor cover.
The information of the vehicle identification label
can also be found in your Warranty
& Mainte
nance booklet.
The sticker contains the following vehicle data :
(D Vehicle Identification Number (VIN)
@ Vehicle type, engine output, transmission
@ Engine and transmission codes
@ Paint and interior codes
Technical data
® Optional equipment numbers
Safety compliance sticker
The safety compliance sticker is your assurance
that your new vehicle complies w ith all applicable
Federal Motor Vehicle Safety Standards which
were in effect at the time the vehicle was manu
factured. You can find this sticker on the door
jamb on the driver's side. It shows the month and
year of production and the vehicle identification number of your vehicle (perforation) as well as
the Gross Vehicle Weight Rating (GVWR) and the Gross Axle We ight Rating (GAWR) .
High voltage warning label
The high voltage warning label is located in the
engine compartment next to the engine hood re
lease. The spark ignition system complies with
the Canadian standard ICES-002.
Notes about technical
data
The values may vary based on special equipment
as well as market-specific equipment and meas
uring methods.
Please note that the specifications listed in the
vehicle documentation a lways take precedence .
© Tips
Missing technical data was not available at
the time of pr int ing .
Weights
Gross Vehicle Weight Rating
The Gross Vehicle Weight Rating (GVWR), and
the Gross Axle Weight Rating (GAWR) for front
and rear are listed on a sticker on the door jamb
on the dr iver's side .
The Gross Vehicle Weight Rating includes the
weight of the bas ic vehicle plus full fuel tank, oil
and coolant, plus maximum load , which includes
passenger weight (150 lbs/68 kg per designated
seating position) and luggage weight¢.&,. . .,.
209