infotainment AUDI Q3 2018 Owners Manual
[x] Cancel search | Manufacturer: AUDI, Model Year: 2018, Model line: Q3, Model: AUDI Q3 2018Pages: 230, PDF Size: 57.03 MB
Page 9 of 230
0 co ......
"' ,....
"' ...... 0 0 :::,
00
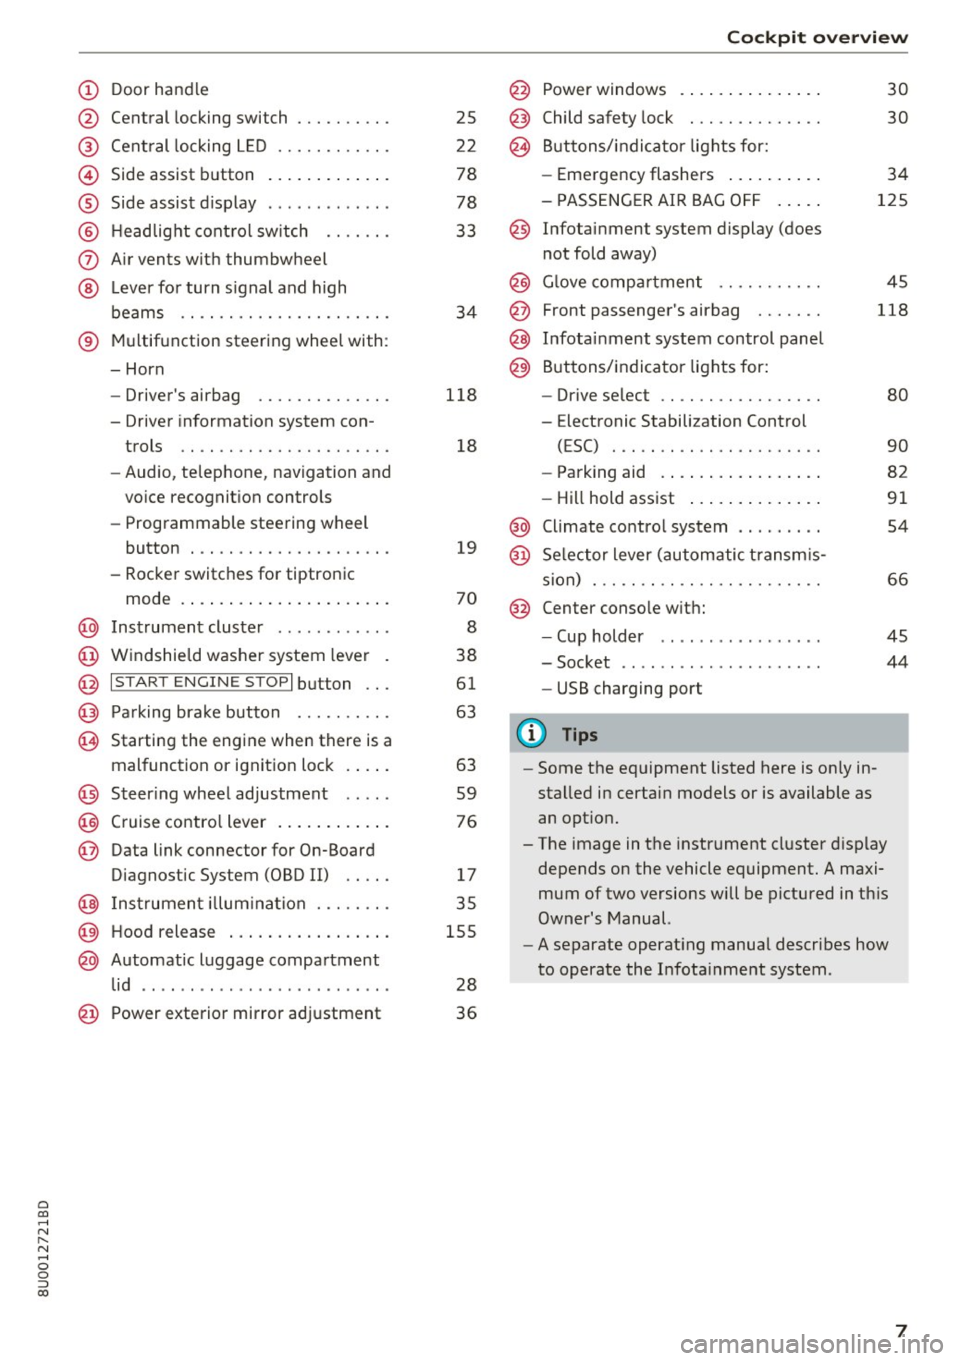
(!) Door handle
@
®
©
®
®
(J)
®
Central locking switch
Cent ral locking L ED ......... .. .
Side assist button
Side assist d isplay
H eadlight cont rol sw itch .... .. .
A ir vents with thumbwheel
L ever for turn s ignal and h igh
beams .. .. .... . .......... .. .
® Multifunction ste ering wheel with :
- Horn
- Driver's airbag ........... .. .
- Driver information system con-
trols .. .. ............... .. .
- Audio , te lephone, nav igation and
vo ice recognit ion controls
- Programmable steering wheel
button . .. .. ........... .. .. .
- Rocker switches for tiptronic
mode . ... .. ... ..... ... .. .. .
@ Instrument cluster ........... .
@ Windshield washer system lever
@ I S TART EN GIN E ST OPI button .. .
@ Pa rking brake button ....... .. .
~ Starting the engine when there is a
malfunction or ignition lock . ... .
@ Steer ing whee l adjustment .... .
@ Cruise contro l lever .... ... .. .. .
@ Data link connector for On-Board
Diagnostic System (OBD II) .. .. .
@ Inst rument illum ination ... .. .. .
@ Hood r ele as e .... ..... ... .. .. .
@ Automat ic luggage compartment
lid .. .. ... ............. ..... .
25
2 2
78
78
33
34
118
18
19
70
8
38
61
63
63
59
76
17
35
155
28
@ Power exterior mirror adjustment 3 6
Cockpit o ve rv iew
@ Power windows . .. .. .. ..... .. .
@ Child safety lock ............. .
@ Buttons/indi cator lights for:
- Eme rgency flashers .. ..... .. .
- PASSENG ER AIR BAG O FF .... .
@ Infotainment system display (does
not fold away)
@ G love compartment .......... .
@ Front passenger's airbag ...... .
@ Infota inment system control panel
@ Buttons/indicator lights for:
- Drive se lect .. .. ............ .
- E lectronic Stabilization Control
( E SC) . .. .. .. .. ....... ..... .
30
30
34
125
45
118
80
90
- Park ing aid . . . . . . . . . . . . . . . . . 82
- Hill hold ass ist . . . . . . . . . . . . . . 91
@ Climate contro l system . . . . . . . . . 54
@ Se lector lever (automatic transm is -
sion) . . . . . . . . . . . . . . . . . . . . . . . . 66
@ Center conso le w ith:
- Cup holder . . . . . . . . . . . . . . . . . 45
- Socket . . . . . . . . . . . . . . . . . . . . . 44
- USB charging port
(D Tips
-Some the eq uipment listed here is on ly in
sta lled in certain models or is available as
an opt ion.
- The image in the instrument cluster d isplay
depends on the vehicle equipment. A maxi
mum of two versions will be pictured in th is
Owner's Manual.
- A separate operat ing manua l describes how
to operate the Infota inment system .
7
Page 24 of 230
Opening and closing
Opening and closing
Central locking
Description
You can lock and unlock the vehicle centrally . You
have the following options:
- Remote control key <=>
page 24,
-Sensors in the door handles" <=> page 24,
-Inner central locking switch <=>page 25, or
- Lock cylinder on the driver's door<=>
page 26.
Turn signals
The turn s ignals flash twice when you unlock the
veh icle and flash once when you lock the vehicle.
If they do not flash, then the ignition may still be
sw itched on, or one of the doors or the luggage
compa rtment lid may be open, fo r example.
Automatic locking (Auto Lock)
The Auto Lock function locks all doors and the
luggage compartment lid once the speed has ex
ceeded approx imately 9 mph (15 km/h).
The vehicle will unlock again if the ignition key* is
removed, the opening function from the central
locking switch is activated, or one of the door
handles is operated .
In the event of a crash with airbag deployment,
the doors will also automatically unlock to allow
access to the vehicle.
Selective door unlocking
The doors and luggage compartment lid wi ll lock
when they close. You can set in the Infotainment
system if
only the driver's door or the entire vehi
cle should unlock when unlocking<=>
page 26,
Setting the central locking system .
Unintentionally locking yourself out
Only lock your vehicle when all of the doors and
the luggage compartment lid are closed and the
remote control key is not in the vehicle. This
helps to prevent you from locking yourself out
accidentally .
The fo llow ing conditions prevent you from lock
ing your remote control key in the vehicle :
22
-If the driver's door is open, the vehicle cannot
be locked by pressing the
!'.II button on the re
mote contro l key or by touching the locking
sensor* on a door .
- If the most recently used convenience key* is in
the luggage compartment, the luggage com
partment lid automatically unlocks again after
closing it<=>
page 2 7. The emergency flashers
blink four t imes.
- If the convenience key* that was last used is de
tected inside the veh icle, then the vehicle will
not be able to lock from the outside .
A WARNING
-Always take the key with you when leaving
your vehicle, even if for a short pe riod of
time. This applies particularly when children
remain in the vehicle. Otherwise, children
could start the engine or operate electrical
equipment (such as power windows), which increases the risk of an accident.
- No one, especially children, should stay in
the vehicle when it is locked from the out
side, because the windows can no longer be
opened from the inside <=>
page 2 7. Locked
doors make it more difficult for emergency
workers to get into the vehicle, which puts
lives at r isk .
A WARNING
Appl ies to: ve hicles with ignition loc k
Do not remove the key from the ignition lock
until the vehicle has come to a complete stop.
Otherwise, the steering lock could engage
suddenly and increase the risk of an accident.
(D Tips
-Do not leave va luables unattended in the ve
hicle. A loc ked vehicle is not a safe!
- The LED in the dr iver's door rail b links when
you lock the vehicle. If the LED lights up for
approximate ly 30 seconds after locking,
there is a malfunction in the centra l locking
system . Have the problem corrected by an
authorized Audi dealer or authorized Aud i
Service Facility.
Page 27 of 230
a
co
...... N r-,. N
"" 0 0 ::, co
.. To open the luggage compartment lid, press
the grip p iece in the luggage compartment lid
¢page 27.
Locking the vehicle
.. Place the selector lever in the P position, or else
the vehicle will not be able to lock .
.. To lock the vehicle, close the door and touch
the sensor on the door handle
once¢ fig. 16,
¢ ,&.. Do not hold the door handle while doing
this.
Unlocking and locking the vehicle can only be
done at the front doors. The remote control key
cannot be more than approximately 4 ft (1.5 m)
away from the door handle . It makes no differ
ence whether the remote control key is in your
jacket pocket, purse or briefcase .
The door cannot be opened for a brief period di rectly after locking it. Th is way you have the op
portunity to check if the doors locked correctly .
You can set in the Infotainment system if
only
the driver's door or the entire vehicle should un lock when unlocking ¢
page 26.
A WARNING
Read and following all warnings¢.& in De
scription on page 22.
(D} Tips
If your vehicle is left standing for a long peri
od of time, note the following:
- The proximity sensor switches off after a
few days to save energy. You then have to
pull once on the door handle to unlock the
vehicle and a second time to open it .
- The energy management system gradually
turns off unnecessary convenience functions
to prevent the vehicle battery from draining
and to maintain the vehicle's ability to start
for as long as possible. You then may no
longer be able to unlock your vehicle with
this convenience function.
Opening and closing
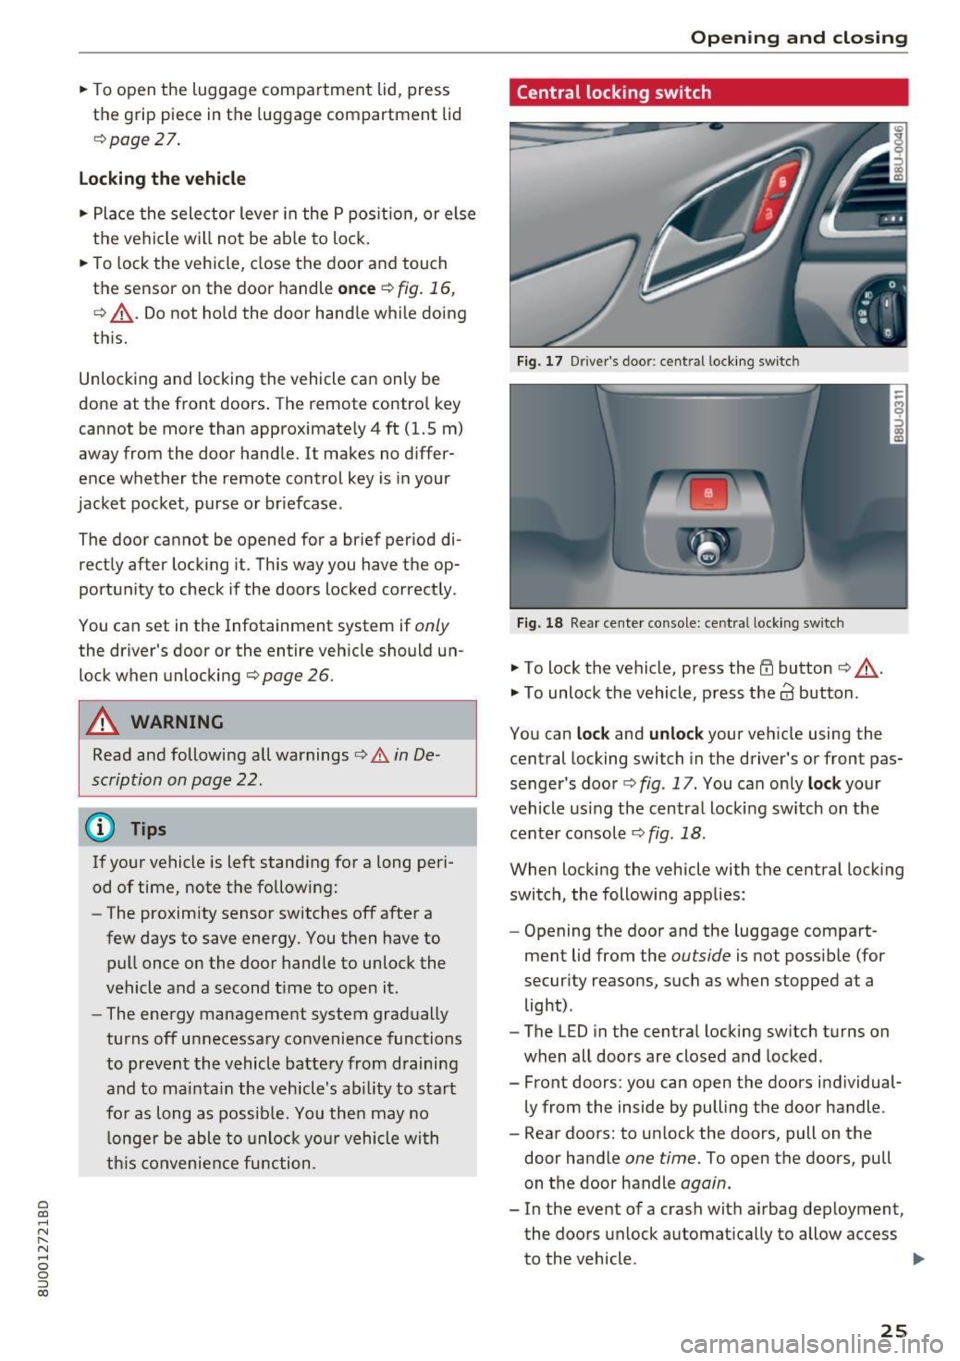
Central locking switch
Fig. 17 Driver 's doo r: centr al locking switc h
Fig. 18 Rear center co nsole: ce ntra l locking sw itch
• To lock the vehicle, press the ff! button ¢ ,A.
• To unlock the vehicle, press the al button .
You can
lock and unlock your vehicle using the
central locking switch in the driver's or front pas
senger's door¢
fig. 17 . You can only lock your
vehicle using the central locking switch on the
center console
¢ fig . 18 .
When locking the vehicle with the central locking
switch, the following applies:
- Opening the door and the luggage compart
ment lid from the
outside is not possible (for
security reasons, such as when stopped at a light) .
- The L ED in the central locking switch turns on
when all doors are closed and locked.
- Front doors : you can open the doors individual
ly from the inside by pulling the door handle .
- Rear doors: to unlock the doors, pull on the door handle
one time. To open the doors, pull
on the door handle
again.
- In the event of a crash with airbag deployment, the doors unlock automatically to allow access
to the vehicle .
IJII>
25
Page 28 of 230
Opening and clo sin g
_& WARNING
- Read and following all warn ings c::> .&. in De
scription on page
22 .
- The centra l locking switch also works when
the ignition is switched off and automatical
ly locks the entire vehicle when the
i'.D but
ton is pressed.
- The central locking switch is inoperative
when the vehicle is locked from the outside .
- Locked doors make it more difficult for
emergency workers to get into the vehicle,
which puts lives at risk. Do not leave anyone behind i n the vehicle, especially children .
(D Tips
-Your vehicle locks automatically when it
reaches a speed of 9 mph (15 km/h) (Auto
Lock)
c::> page 22 . You ca n unlock the vehicle
again using the
63 button in the central loc k
i ng swi tch.
- The doors cannot be unlocked with the cen
tral lock ing swi tch on the rear center con
sole .
Setting the central locking system
In the Infotainment system, you can set which
doors the central locking system will unlock .
• Select : the !CARI function button> (Ca r) Sys
t e m s*
contro l button > Vehicle s ettings > (Ce n
t ral l ocking )*.
Unlo ck doors
- you can decide if All doors or only
the
D riv er door should unlock . The luggage com
pa rtment lid also unlocks when
All is se lected. If
you select
Driv er in a veh icle w ith a convenience
key* , only the door whose handle you pull will un
lock .
When the
Dri ver setting is selected , a ll doo rs and
the luggage compa rtment l id will u nlock when
you press the
@ button on the remote control key
tw ice or turn the key in the door lock cylinder in
the opening direction twice .
To ne when lo ckin g -if you se lect On , a tone will
sound when you lock the vehicle.
26
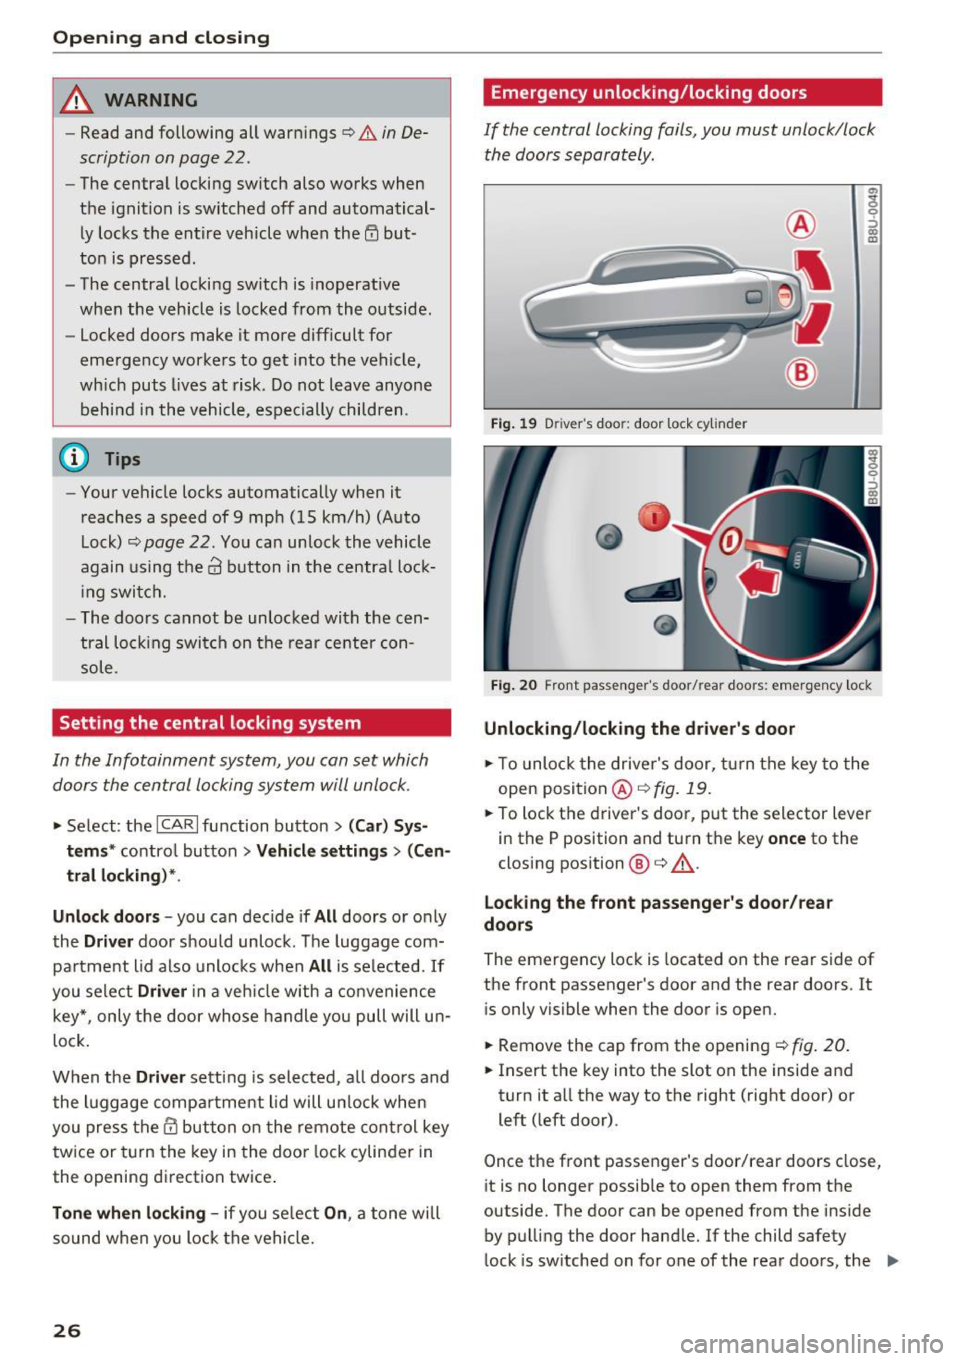
Emergency unlocking/locking doors
If the central locking fails, you must unlock/lock the doors separately.
Fig . 19 Driver 's doo r: door lock cy lin der
a,
i 0 ::, a, m
Fig . 20 Front pas senger's door/ rear doo rs : e mergenc y loc k
Unlocking /locking the d river' s door
• To unlock the driver's door, turn the key to the
open position @
c::>fig. 19.
• To lock the driver's door, put the selector lever
in the P position and turn the key
o nce to the
closing position @
c::> ,&..
Lo cking the front pas senger's d oor /rear
doo rs
The emergency lock is located on the rear side of
the front passenger's door and the rear doors . It
is only visible when the door is open.
• Remove the cap from the opening
c::> fig. 20.
• Insert the key into the slot on the inside and
turn it all the way to the right (right door) or
left (left door).
Once the front passenger's door/rear doors close,
it is no longer possib le to open them from the
outside. The door can be opened from the inside by pulling the door handle. If the child safety
lock is sw itched on for one of the rear doors, the
IJI.
Page 36 of 230
Lights and Vision
-If you turn off the ignition whi le the exter ior
lights are on and open the door, a warning
tone sounds.
- In cool o r damp weather, the inside of the
headlights, turn s ignals and tail lights can
fog over due to the temperature d if f erence
between the inside and outside. They will
clear short ly after switch ing them on. This
does not affect the serv ice life of the light
i ng .
Turn signal and high beam lever
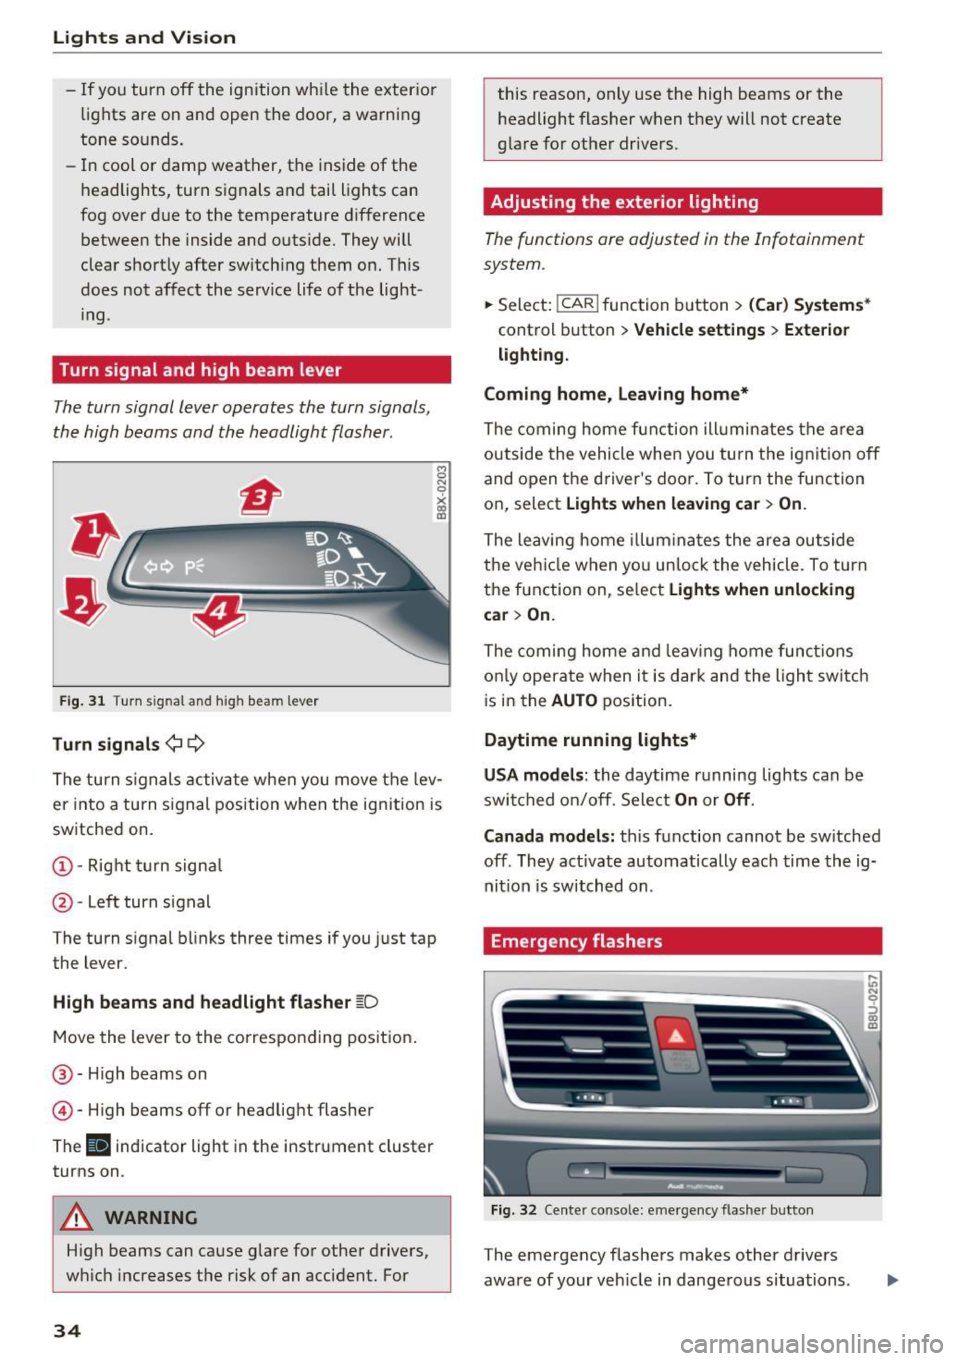
The turn signal lever operates the turn signals,
the high beams and the headlight flasher .
Fig. 31 Turn signal and high beam lever
Tu rn signals ¢ 9
The turn s ignals activate when you move the lev
er into a turn s ignal position w hen the ign ition is
sw itched on.
@ -Right turn signa l
@-Left turn signal
The turn signal blinks three times if you just tap
the lever.
High b eams and headl ight flasher ~D
Move the lever to the co rrespo nd ing pos it ion .
@ -High beams on
© -High beams off or headlig ht flasher
The
II indicator light in the instrument cluster
turns on .
A WARNING
High beams can cause glare fo r other drivers,
w hi ch increases the risk of an accident. For
34
this reason, only use the high beams or the
headlight flasher when they will not create
glare for other dr ivers.
Adjusting the exterior lighting
The functions are adjusted in the Infotainment
system .
.,.. Sele ct: !CAR ! function b utton> (Car ) Systems *
control button > Vehicle settings > Exte rior
lighti ng.
Coming home, Leaving home*
The coming home fun ction ill umin ates the a rea
outside the vehicle when you tu rn the ignit io n off
and open the driver's doo r. To turn the func tion
on, select
Light s when leaving car > On .
The leaving home illum ina tes the area ou tside
the ve hicle when yo u un lo ck the vehicle . To turn
the function on, se lect
Lights when unlocking
car > On.
The coming home and leav ing home func tions
on ly opera te when it is dar k and the l ight switc h
i s in the
AUTO position.
Daytime running lights*
USA models :
the daytime running lights can be
swit ched on/off. Sele ct
On or Off .
Canada models:
this function cannot be sw itched
off . They activate automatically each time the ig
nit ion is switched on .
Emergency flashers
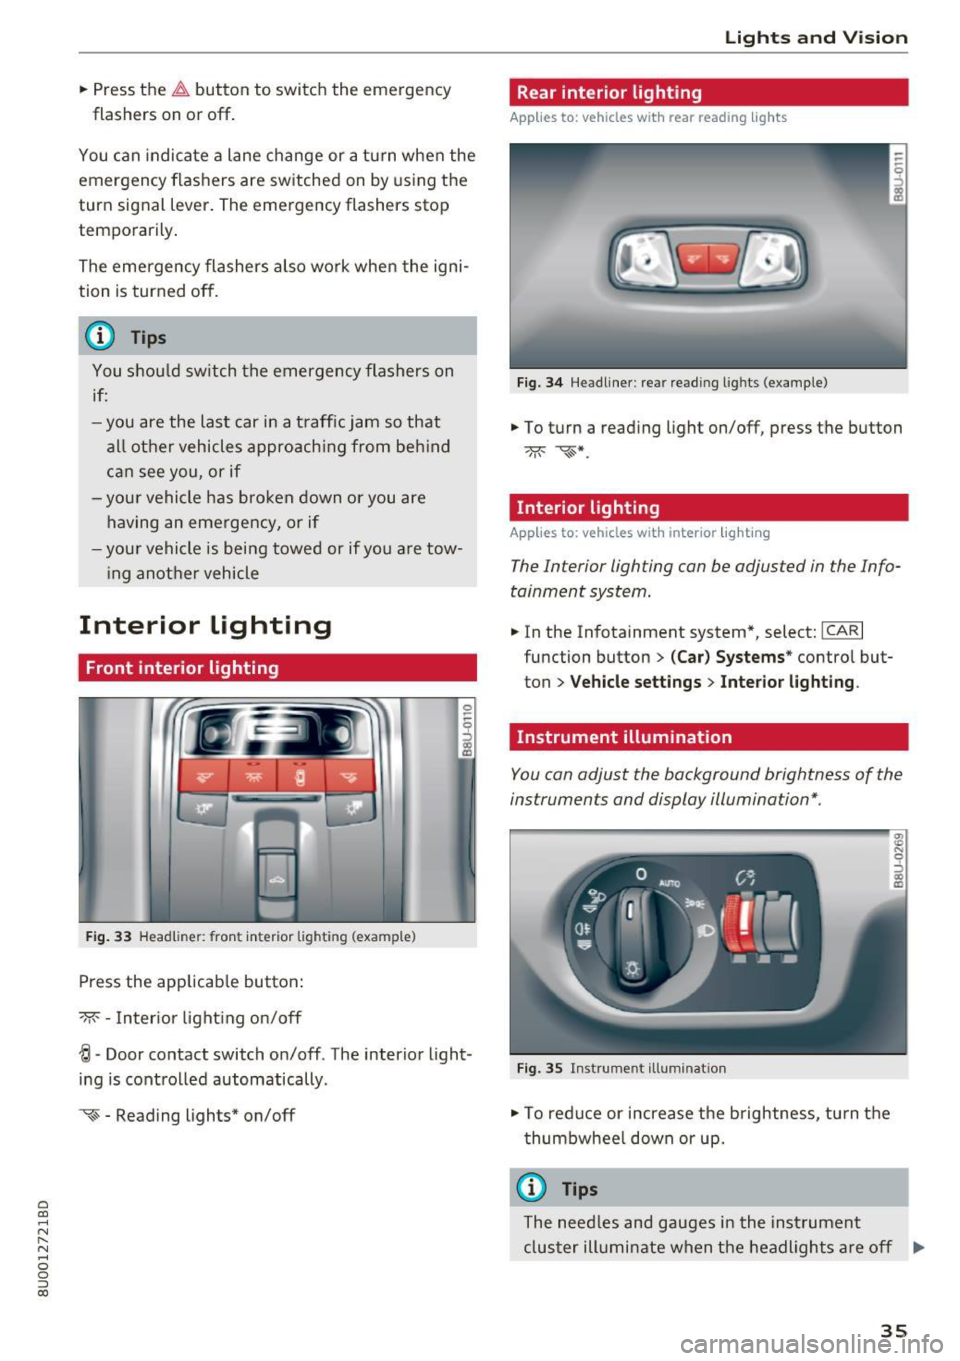
Fig. 32 Center conso le: emerge ncy flasher button
The emergency flashers makes other drivers
aware of your veh icle in dange rous situations.
In N 0
~ Cl) m
Page 37 of 230
a
co
...... N r-N .... 0 0 ::, co
"' Press the &I. button to switch the emergency
flashers on or off.
You can indicate a lane change or a turn when the
emergency flashers are switched on by using the
turn signal lever . The eme rgency flashers stop
temporarily .
The emergency flashers also work when the igni
tion is turned off.
(D Tips
You shou ld sw itch the emergency flashers on
if:
- you are the last car in a t raff ic jam so that
all othe r vehicles approach ing from beh ind
ca n see you, or if
- you r vehicle has bro ken down or you are
having an emergency, or if
- you r vehicle is being towed or if you a re tow
i ng anot her vehicle
Interior Lighting
Front interior lighting
Fig . 33 Headliner: front inter ior lighting (example)
Press the app licab le button :
-M- -Inter ior light ing on/off
0
~
"' a,
~ - Door contact switch on/off . The interior light
ing is controlled automatically.
~ - Reading lights* on/off
Lights and V ision
Rear interior lighting
Applies to: vehicles with rear reading lights
Fig. 3 4 Headliner: rear reading l ights (example)
"' To turn a read ing light on/off, press the button
Interior lighting
Applies to: vehicles with interior lighting
The Interior lighting can be adjusted in the Info
tainment system.
"' In the Infotainment system*, select: ICARI
function button > (Car) Sy stems * control but
ton
> Vehicle setting s > Interior lighting .
Instrument illumination
You can adjust the background brightness of the
instruments and display illumination*.
F ig. 35 Instrument illuminat ion
"' To red uce or increase the b rightness, tu rn the
thumbwhee l down or up.
(D Tips
The need les and gauges i n the inst rument
cluster illumi nate when the headlights a re off
Iii>
35
Page 78 of 230
Ass is tance sy stems
Assistance systems
Speed warning system
Description
Applies to: veh icles with speed warning system
The speed warning system helps you to stay be
low a specified maximum speed that can be set,
changed or deleted in the Infotainment system.
The speed warning system warns you if you are exceeding the maximum speed that you have set .
A warning tone will sound as soon as your speed
exceeds the stored value slightly. The
lGJ (USA
models)
I l•j (Canada mode ls) indicator light
and a message appear in the instrument cluster
d isp lay at the same time . ThP
lGl{t] indicator
light and the message turn off if the speed falls
back below the stored maximum speed .
Sett ing a threshold is recommended if you would
like to be reminded when yo u reach a certa in
maximum speed. Situations where you may want
to do so include driving in a country w ith a gener
al speed limit or if there is a specified maximum
speed for winter tires.
Se tt ing the warning thresho ld
Select:
! CAR I function button> (Car) Sys tem s*
control button > Drive r assis t > Speed w arning .
@ Tips
Regardless of the speed warning system, you
should always monitor your speed using the
speedometer and make sure you are following
the legal speed limit.
76
Cruise control system
Switching on
Applies to: vehicles with cruise control system
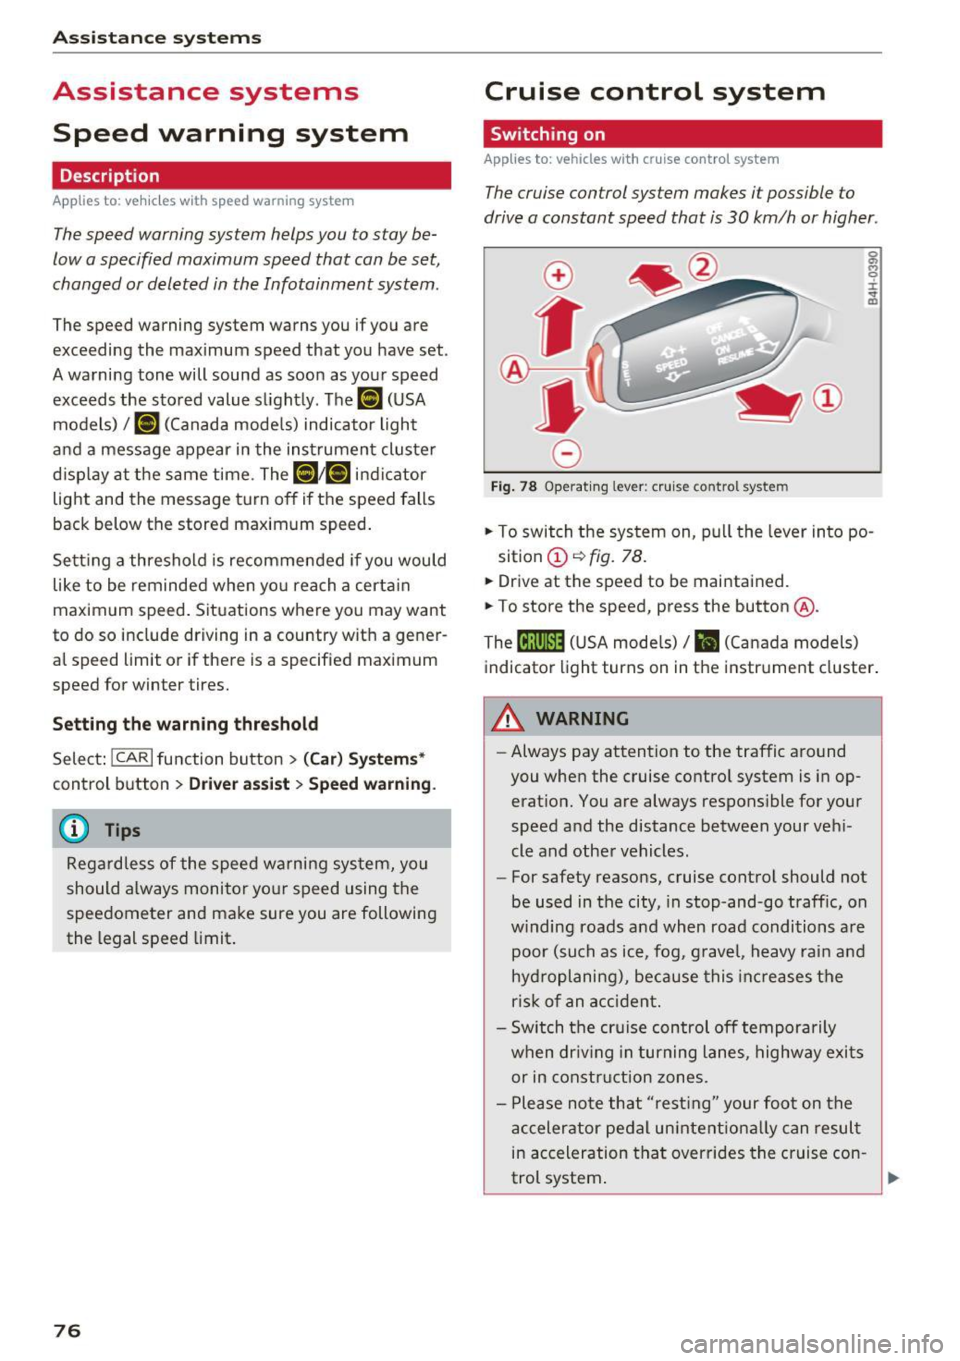
The cruise control system makes it possible to
drive a constant speed that is 30 km/h or higher .
0
f
®l
0
Fig. 78 Operat ing lever : cru ise co ntrol syste m
5:
"' 0 ±
sition
(D ~ fig. 78.
.. Drive at the speed to be maintained.
.. To store the speed, press the button @.
The
(ij;\1)~1~ (USA mode ls)/ B (Canada models)
indicator light turns on in the instrument cluster .
8_ WARNING
-Always pay attention to the traffic around
you when the cruise contro l system is in op
erat ion. You are always respons ible for your
speed and the distance between your veh i
cle and other vehicles.
- For safety reasons, cruise control should not
be used in the city, in stop -and -go traff ic, on
w inding roads and when road conditions a re
poor (such as ice, fog, gravel, heavy rai n and
hyd roplaning), because this inc reases the
r is k of an accident.
- Switch the cruise control off temporarily
when dr iv ing in turning lanes, highway exits
or in constru ction zones.
- P lease note that "rest ing" your foot on the
accelerator pedal un intent iona lly can result
in ac celeration that overrides the c ruise con-
-
trol system . .,.
Page 83 of 230

a
co
...... N r---. N .-< 0 0 ::, co
Auto and Dynamic, using the r:l.l'e'i button in the
center console or by using the Infotainment sys
tem . This allows you to switch between a sporty
and a comfortable driving mode, for examp le.
Description
Applies to: vehicles with Audi drive select
The following systems, among other things, are
influenced by drive select:
Engine and automatic transmission
Depending on the mode, the engine and auto
matic transmission respond more quickly or in a
more balanced manner to accelerator pedal
movements. In the sporty dynamic mode, the
transmission shifts at higher speed ranges .
Suspension control*
The suspension control uses sensors to record in
formation regarding steering movements, brak ing and accelerat ion operations by the driver, as
well as information about the road surface, dr iv
ing speed, and load. With dr ive select, you can
adjust the suspension control to sporty (dynam ic), comfortable (comfort) or balanced (a uto).
Steering
The steering adapts in terms of steering assis
tance . Indirect steering that moves easily as in
comfort mode is especially su ited to long dr ives
on a highway. In contrast, dynamic mode pro
vides sporty, direct steering.
Cornering light*
The cornering light adapts to driving on curves.
The pivot ing action and the lighting also adapt to
the mode.
(D Tips
The S selector lever position automatically en
gages if the dynamic mode is selected.
Assistance systems
Selecting the driving mode
Applies to: vehicles with Audi drive select
Fig. 84 Center console : dr ive select button
.,. To set the mode, press the ~:1;:e'i button repeat
edly until the desired mode is d isplayed in the
instrument cluster. Or
.,. Select in the Infotainment system: ICARlfunc-
tion button
> Comfort , Auto or Dynamic .
You can change the driving mode when the vehi
cle is stationary or while driving . If traff ic per
mits, after changing modes, briefly take your
foot off the accelerator pedal so that the recently
selected mode is also activated for the engine.
Comfort -provides a comfort-or iented vehicle
setup and is suited fo r long drives on h ighways.
Automatic -provides an overall comfortable yet
dynamic driving feel and is suited for everyday
u se.
Dynam ic -gives the driver a sporty driving fee l
and is suited to a sporty driving style.
A WARNING
Pay attention to traffic when operating the
drive select to reduce the ris k of an accident.
81
Page 84 of 230

Parking systems
Parking systems
General information
A ppl ies to: ve hicles w ith a rea r parking sys te m /pa rking sys
tem p lus/rearv iew camera
Depending on your vehicle's equipment, various
parking aids will help you when parking and ma
neuvering.
The
rear park ing system is an audible parking aid
that warns you of obstacles
behind the vehicle
¢ page 83.
The parking system plus assists you when park
ing by audibly and visually indicating objects de
tected
in front of and behind the veh icle
¢ page 83.
The rearview camera shows the area behind the
vehicle in the Infotainment system display . The
lines in the rearview camera image help you to
park or maneuver
¢ page 84.
_& WARNING
-Always look for traff ic and check the area
around your vehicle by looking at it directly
as well . The parking system cannot replace
the driver's attention. The driver is always
responsible when entering or leaving a park
ing space and during similar maneuvers.
- Please note that some surfaces, such as
clothing, are not detected by the system.
- Sensors and cameras have blind spots in
which people and objects cannot be detect
ed. Be especially cautious of small children
and animals.
-
- Always pay attention to the area around the
vehicle -using the rearview mirror, too.
- The sensors can be displaced by impacts or
damage to the radiator grille, bumper,
wheel housing and the underbody . The park
ing system may be impaired as a result.
Have an authorized Audi dealer or author
ized Audi Service Facility check their func
t io n.
- Make sure the sensors are not obstructed by
stickers, deposits or other materia ls. If they
are, the sensor function could be impaired.
82
For additional information on cleaning, see
¢page 185.
(D Note
-Some objects are not detected or displayed
by the system under certain circumstances:
- objects such as barrier chains, trailer draw
bars, vertical poles or fences
- objects above the sensors such as wall ex
tensions
- objects with certain surfaces or structures
such as chain link fences or powder snow
- If you continue driving closer to a low ob
ject, it may disappear from the sensor range. Note that you will no longer be
warned about th is obstacle.
@ Tips
- The system may provide a warning even
though there are no obstacles in the cover
age area in some situations, such as:
- certain road surfaces or when there is tall
grass
- external ultrasonic sources such as from
cleaning vehicles
- in heavy rain, snow, or thick vehicle ex
haust
- We recommend that you practice parking in
a traffic-free location or parking lot to be
come familiar with the system . When doing
this, there should be good light and weath
er conditions.
- The sensors must be kept clean and free of
snow and ice for the parking aid to operate .
For information on cleaning, see
¢page 185.
- You can change the volume and pitch of the
signals as well as the display¢
page 87.
-Please refer to the instructions for towing a
trailer located in
¢page 88.
- What appears in the infotainment display is
somewhat time-delayed.
Page 87 of 230
a
co
...... N r-,. N
'"' 0 0 ::, co
General information
Applies to: vehicles with parking system plus with rearv iew
camera
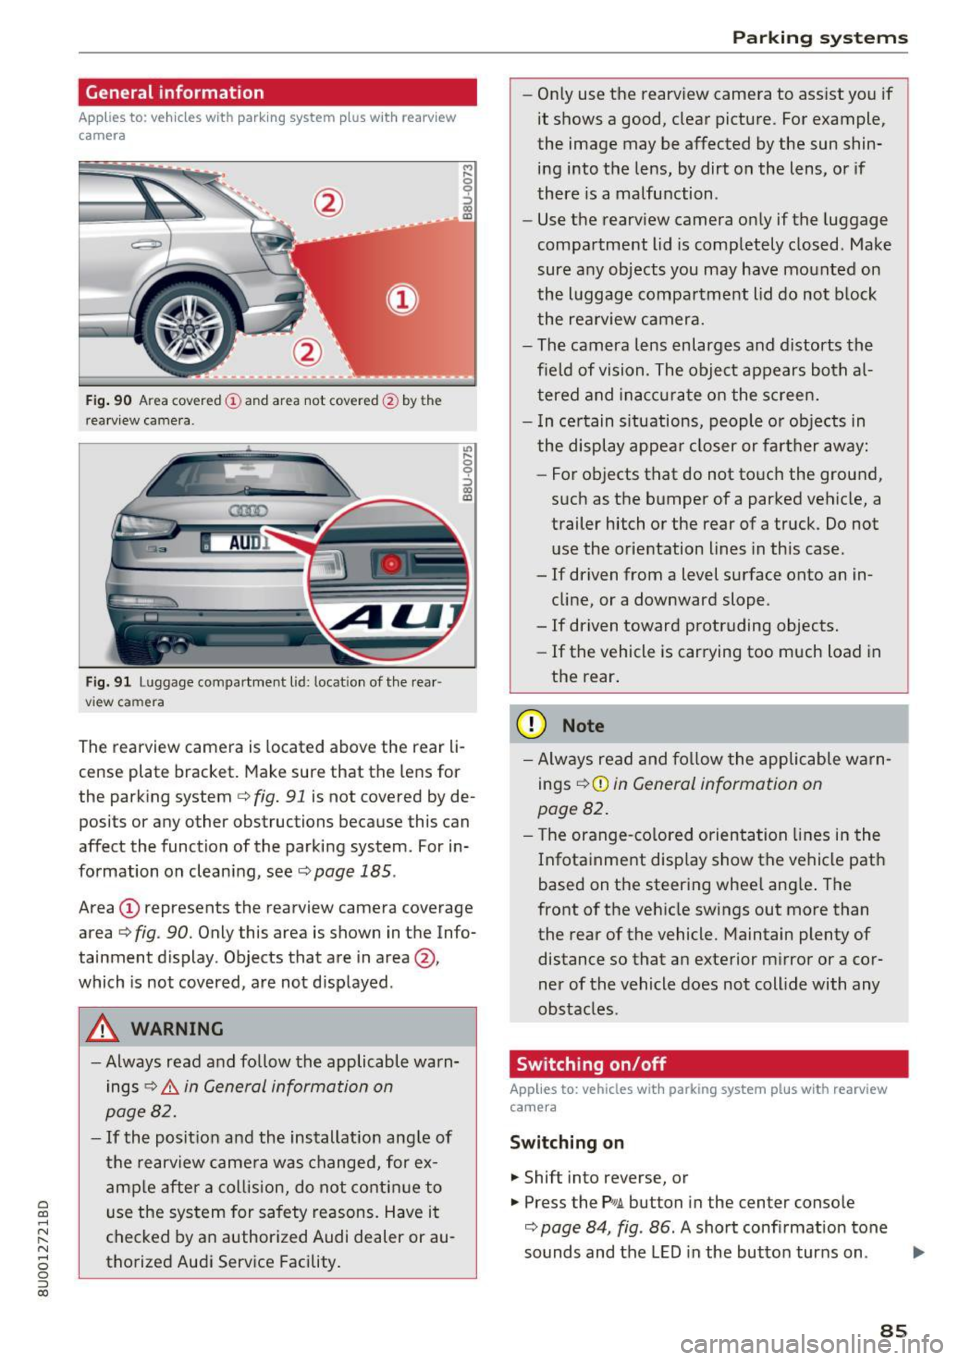
F ig. 90 A rea covered (D an d ar ea not cov ered @ by t he
r ea rvi ew ca mera.
Fig. 91 L u ggage compartment l id : loc ation of the rear ·
vi ew ca mera
,.._ 0
0
::'> co OJ
"' ~ 0
::'> co OJ
The rearview camera is located above the r ear li
c e nse plat e bracket. Mak e sure that the lens for
the park ing system
c> fig. 91 is not covered by de
posi ts or any other obstructions because this can
affect the function of the parking system . For in
formation on clean ing, see
c> page 185 .
Area (D represents the rearview camera coverage
area
c> fig . 90 . Only this area is shown in the Info
tainment display. Objects that are in area@,
which is not covered, are not d isplayed .
A WARNING
-Always read and follow the applicable warn
ings
c> .&. in General information on
page 82.
- If the position and the installat ion ang le of
the rearview came ra was changed, for ex
amp le after a collis ion, do not contin ue to
use the system for safety reasons. Have it
checked by a n author ized Audi dealer or au
thorized Audi Service Facility.
Parking systems
-On ly use the rearv iew camera to ass ist you if
it shows a good, clear picture. For example,
the image may be affected by the sun shin·
ing i nto the lens, by dirt on the lens, or if
there is a malfunction .
- Use the rearv iew camera on ly if the luggage
compa rtment lid is comp letely closed . Make
sure any objects you may have mounted on
the l uggage compar tment lid do not b lock
the rea rview camera.
- The camera lens enlarges and d istorts the
f ield of vision . The object appears both a l
t ered and inac curate on the s creen.
- I n ce rtain s itu ations, people or objects in
the display appea r closer or fa rther away:
- For objects that do not touc h the grou nd,
such as the bumper of a parked vehicle, a
trailer hitch or the rear of a truck . Do not
use the orie ntation lines in this case .
- If driven from a level s urface onto an in
cline, or a downward slope .
- If driven toward protruding objects.
- If the vehicle is carrying too much load in
the rear.
(D Note
-Alw ays read and fo llow the applicable w arn
ings
c> (D in General information on
page 82.
- T he orange-co lored orientation lines in the
Infotainment display show the vehicle path
based on the steering wheel ang le . The
front o f the vehicle swings out more than
the rear of the vehicle. Maintain plenty of distance so that a n exterior m irror or a cor
ner of the vehicle does not coll ide with any
obstacles.
Switching on/off
Applies to: vehicles with parking system plus with rearview
camera
Switching on
... Shift into reverse, or
... Press the Pw.A. but ton in the center console
c> page 84, fig . 86 . A short confirmation tone
sounds and the LED in the butto n tur ns on.
Ill>-
85