warning light AUDI Q3 2018 User Guide
[x] Cancel search | Manufacturer: AUDI, Model Year: 2018, Model line: Q3, Model: AUDI Q3 2018Pages: 230, PDF Size: 57.03 MB
Page 32 of 230
Opening and clo sin g
Child safety lock
The child safety lock prevents the rear doors
from being opened from the inside and the rear
power windows from be operated .
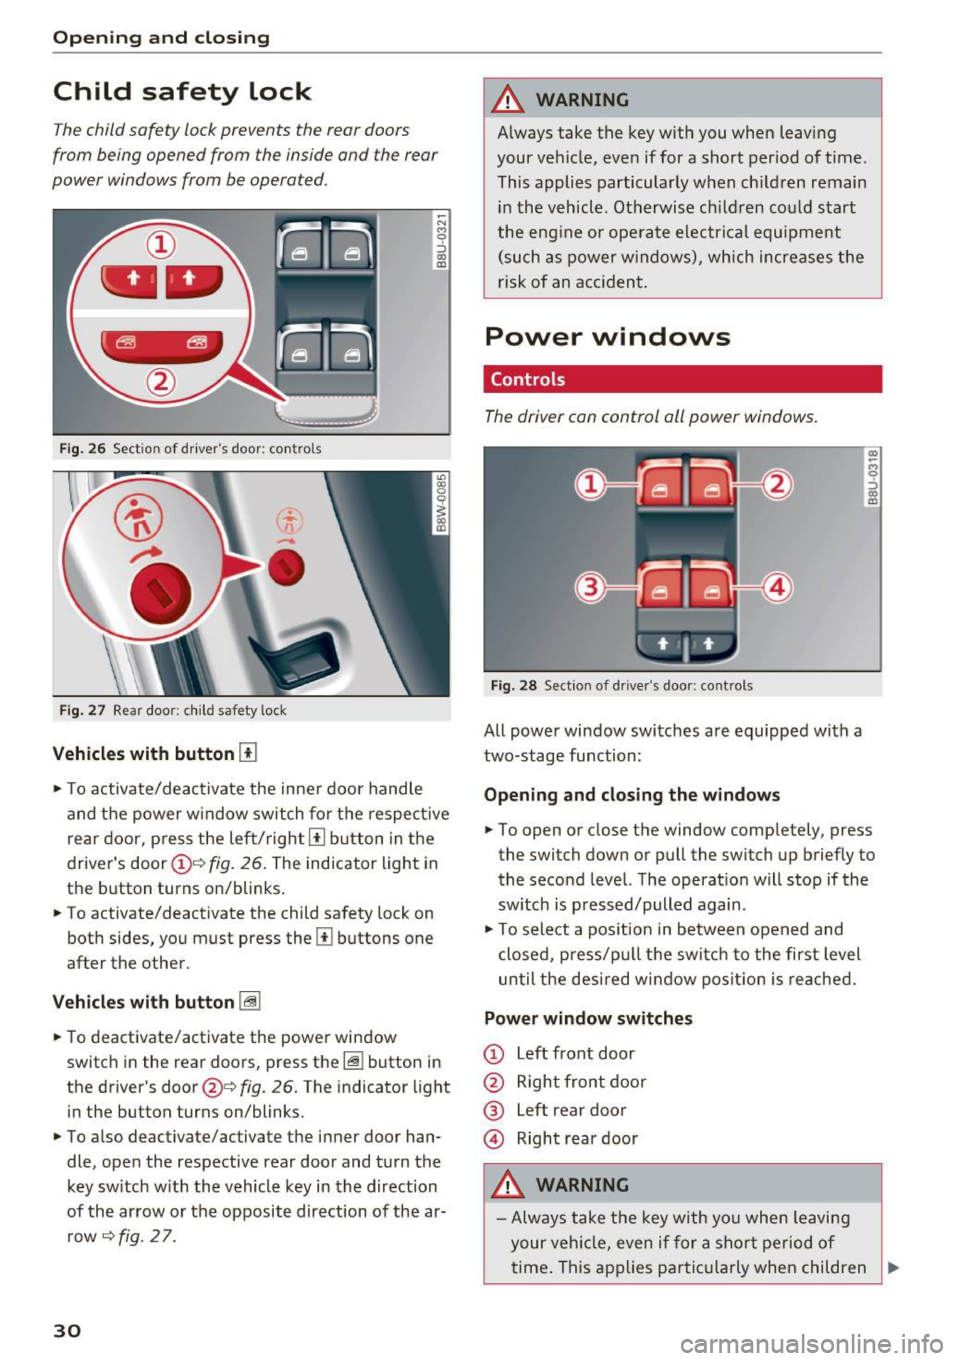
Fig. 26 Sect ion of driver's doo r: co ntrols
F ig. 27 Rear door: c hild safety lock
Vehicles with button [TI
~ N M 9 ::J
co
(D
., To activate/deactivate the inne r door handle
and the power w indow switch for the respective
rea r door, p ress the left/right
[II b utton in the
driver's door(!)'=~
fig. 26. The indicator light in
the button turns on/blinks.
., To activate/deactivate the child safety lock on
both sides, you must press the
Ii] buttons one
after the other.
V eh icl es with button [@
., To deactivate/activate the power window
switch in the rear doors, press the~ button in
the driver's door@¢
fig. 26. The indicator light
in the button turns on/blinks.
., To also deactivate/activate the inner door han
dle, open the respective rear door and turn the key sw itch w ith the vehicle key in the direction
of the arrow or the opposite direction of the ar row
~ fig. 2 7.
30
A WARNING
A lways take the key with you when leaving
your vehicle, eve n if for a short period of time .
This applies particularly w hen ch ildren remain
in the vehicle . Otherwise ch ildren cou ld start
the engine or ope rate electr ical equ ipment
(such as power w indows), which increa ses the
risk of an acciden t.
Power windows
Controls
The driver con control oil power windows.
Fig. 28 Section of driver's door: controls
All powe r window switches are equipped with a
two-stage function:
Openin g and clos in g the w ind ows
(I) ~
9 ::J (I)
(D
., To open or close the window completely, press
the switch down or pull the switch up briefly to
the second level. The operat ion will stop if the
sw itch is p ressed/pulled again .
., To select a position in between opened and
closed, p ress/pu ll the switch to the first level
until the des ired window posit ion is reached.
Power window switches
CD Left front door
@ Right front door
® left
rear door
© Right rear door
A WARNING
- Always take the key with yo u when leaving
your veh icle, even if for a sho rt period of
.
time . This applies parti cularly when children ..,
Page 35 of 230

a
co
...... N r--. N
'"' 0 0 ::, co
Lights and Vision
Exterior Lighting
Switching lights on and off
Fig. 30 Instrument panel: l ig ht switc h
Light s witch ·'!;5- ·
Turn the switch to the corresponding position.
When the lights are sw itched on, the
;oo: symbol
turns on.
0 -lights off. On some market-specific vers ions,
the daytime running lights* will switch on when
the ign ition is switched on in this position .
-USA model s: the daytime running lights switch
on automatically when the ignition is switched
on and the light switch is in the
O position or in
the
AUTO position (on ly in daylight) . The Day
tim e running lights
can be switched on and off
in the radio or the MMI*
c:> page 34, c:> A.
-Canada models: the dayt ime running lights
switch on automatically when the ignition is
switched on and the light switch is set to the
0
pos ition, ;oo: o r the AUTO position (on ly in day
li gh t)
c::> A .
AUTO* -automatic headlights switch o n and off
depending on br ightness, for example in tw ilight,
du ring ra in or in tunne ls .
::oo: -Parking lights
io -Low beam headlights
io -All weather ligh ts. T urn the switch to parking
light
; oo : or low beam head light io . Pull the
sw itch up to the first notch@.
0$-Rear fog lights . Tur n the switch to parking
l ight
000: o r low beam head light gD. P ull the
switch up to the second notch @.
Lights and V ision
All-weather lights
T he front lights are adjusted au toma tic a lly so
t h at there is less g lare for the driver from his or
her own lights, fo r example whe n roads are wet.
Automatic dynamic headlight range control
Yo ur vehicle is equ ipped with a headlight range
contro l system so tha t there is less g la re for on
com ing traff ic if the vehicle load changes. The
headlig ht range also adjusts automatica lly when
braking and acce lerating.
Static cornering light *
The s tat ic co rnering light may be available de
pend ing on veh icle equipment and it only works
when the light switc h is in the AUTO pos ition. The
corner ing light switches on automat ica lly at
speeds up to approximately 44 mph (70 km)
when the steering wheel is at a certain angle. The area to the side of the veh icle is illuminated bet
ter when turning .
A WARNING ,-
- Automatic headlights* are on ly intended to
assist the dr iver . T hey do not relieve the
d river of respo nsibi lity to check the head
lights and to tu rn them on m anu ally based
on t he current l ight a nd v is ibility condi tions.
F or exam ple, fog cannot be detected by t he
light sensors. So always switch on the low
beams under these weat her con ditions an d
when dr iv ing in the dark
io.
- The rear fog lights sho uld only be turned on
in accordance w ith traffic regulations, to
prevent glare for traffic behind your vehicle.
- Always observe legal regulations when us
ing the lighting systems described.
@ Tips
- T he lig ht sensor for the automatic he ad
lights * is in the rearview mir ror mount. Do
not p lace any stickers in this area on the
windshield.
- Some exter io r lighting functio ns can be ad
justed
c::> page 34 .
33
Page 36 of 230
Lights and Vision
-If you turn off the ignition whi le the exter ior
lights are on and open the door, a warning
tone sounds.
- In cool o r damp weather, the inside of the
headlights, turn s ignals and tail lights can
fog over due to the temperature d if f erence
between the inside and outside. They will
clear short ly after switch ing them on. This
does not affect the serv ice life of the light
i ng .
Turn signal and high beam lever
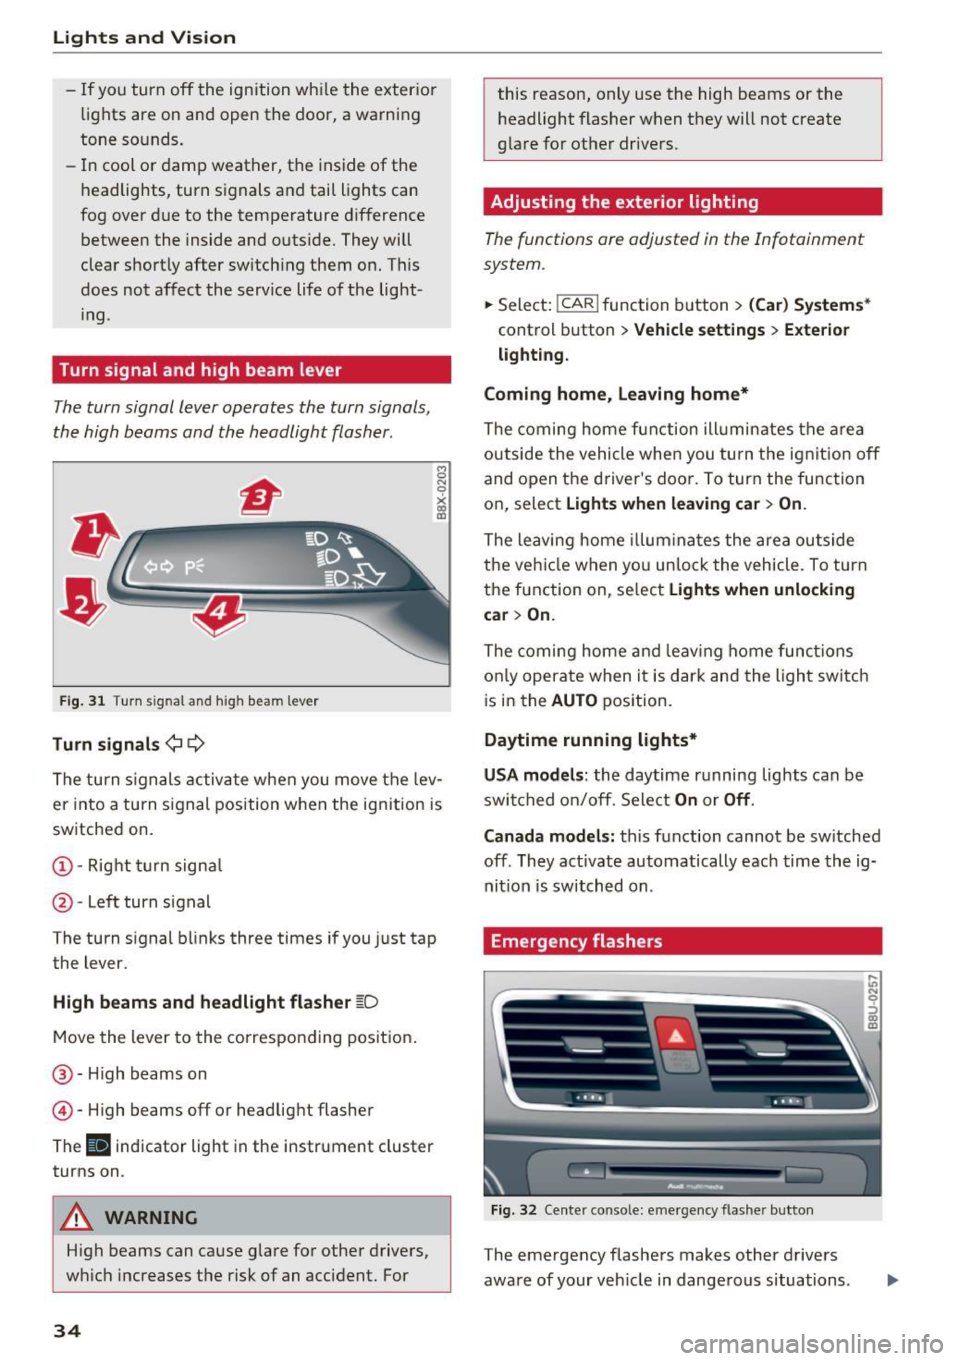
The turn signal lever operates the turn signals,
the high beams and the headlight flasher .
Fig. 31 Turn signal and high beam lever
Tu rn signals ¢ 9
The turn s ignals activate when you move the lev
er into a turn s ignal position w hen the ign ition is
sw itched on.
@ -Right turn signa l
@-Left turn signal
The turn signal blinks three times if you just tap
the lever.
High b eams and headl ight flasher ~D
Move the lever to the co rrespo nd ing pos it ion .
@ -High beams on
© -High beams off or headlig ht flasher
The
II indicator light in the instrument cluster
turns on .
A WARNING
High beams can cause glare fo r other drivers,
w hi ch increases the risk of an accident. For
34
this reason, only use the high beams or the
headlight flasher when they will not create
glare for other dr ivers.
Adjusting the exterior lighting
The functions are adjusted in the Infotainment
system .
.,.. Sele ct: !CAR ! function b utton> (Car ) Systems *
control button > Vehicle settings > Exte rior
lighti ng.
Coming home, Leaving home*
The coming home fun ction ill umin ates the a rea
outside the vehicle when you tu rn the ignit io n off
and open the driver's doo r. To turn the func tion
on, select
Light s when leaving car > On .
The leaving home illum ina tes the area ou tside
the ve hicle when yo u un lo ck the vehicle . To turn
the function on, se lect
Lights when unlocking
car > On.
The coming home and leav ing home func tions
on ly opera te when it is dar k and the l ight switc h
i s in the
AUTO position.
Daytime running lights*
USA models :
the daytime running lights can be
swit ched on/off. Sele ct
On or Off .
Canada models:
this function cannot be sw itched
off . They activate automatically each time the ig
nit ion is switched on .
Emergency flashers
Fig. 32 Center conso le: emerge ncy flasher button
The emergency flashers makes other drivers
aware of your veh icle in dange rous situations.
In N 0
~ Cl) m
Page 38 of 230
Lights and Vision
and the ignition is switched on . The illum ina
tion reduces automatica lly and eventually
turns
off as brightness outs ide decreases.
This function reminds the driver to turn the
low beams on at the appropriate time.
Vision
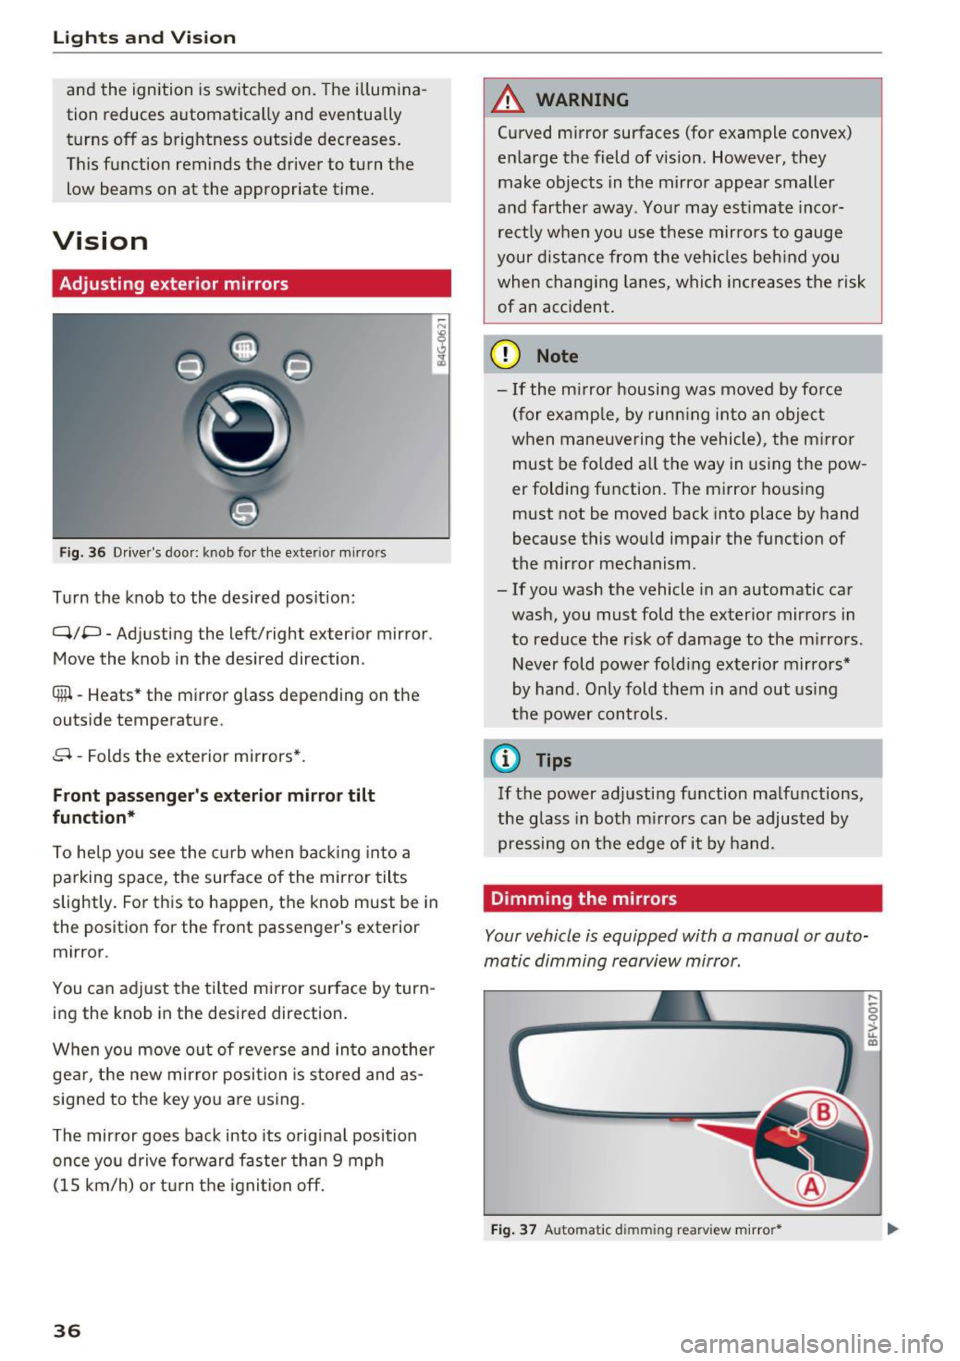
Adjusting exterior mirrors
F ig . 36 Driver's door: knob for th e exterior m irrors
Tu rn the knob to the desired pos ition:
q;p -Adjusting the left/right exterior mirror .
Move the knob in the desired direction .
®l-Heats* the mirror glass depending on the
outside temperat ure.
8 -Folds the exte rior mirrors*.
Front passenger's exterior mirror tilt
function*
To he lp you see the curb w hen ba cking into a
parking space, the surface of the mirror tilts
slightly. For this to happen, the knob must be in
the position for the front passenger's exterior
mirror.
You can adjust the tilted mirror surface by turn
ing the knob in the desired direction.
W hen you move o ut of reve rse and in to another
gear, the new mir ror posi tion is sto red and as
sig ned to the key you are using.
The mir ror goes bac k into its o riginal position
once you drive fo rward faster than 9 mph
(1 5 km/h) or t urn t he igni tion
off.
36
A WARNING
Curved mirror surfaces (for example convex)
enla rge the field of vision. However, they
make ob jects in the mirro r appear smaller
a nd farther away. Your may est imate inco r
rect ly w hen you use these mirro rs to gauge
your distan ce from the veh icles beh ind you
when chang ing lanes, whi ch in cr eases the risk
of an acc ident .
(D Note
-If the m irror housing w as moved by fo rce
(for examp le, by run ning into an object
when maneuve ring the vehicle), the m irror
must be fo lded a ll the way in using t he pow
er folding function. The mirror hous ing
must not be moved back into place by hand
because this wo uld impair the function of
the mir ror mechanism.
- If you wash the vehicle in an automatic car
wash, you must fold the exter ior mirrors in
to reduce the r isk of damage to the m irro rs.
Never fold power fo lding exterior mirro rs*
by han d. Only fold them in and out using
t h e power con trols.
(D Tips
If the power ad justi ng function ma lf u nctions,
the glass in both m irrors can be adjusted by
pr essi ng on t he edge of it by ha nd.
Dimming the mirrors
Your vehicle is equipped with a manual or auto
matic dimming rearview mirror.
,._
0 0
> u. m
F ig. 37 Automatic d imm ing rearview m irror *
Page 39 of 230
Manual dimming rearvi ew mirr or*
• Pull the lever on the bottom of the mirror back .
Automatic dimming re arview mirror*
• Press the button @to switch the dimming
function on the mirror on or off . If the indicator
light @ turns on , the inter ior and exter ior mir
rors* are dimmed when light shines on them
( for example , headlights shining from a vehicle
behind you) .
A WARNING
If the glass on an automatic dimming mirror
breaks, electrolyte can leak out. This liquid
can irritate the sk in , eyes and respiratory sys
tem. If there is contact with the flu id, flush
immed iately w ith plenty of water . Consult a
physician if necessary.
- Repeated or long -term e xposure to electro
lyte fluid can lead to irritat ion of the a ir
ways, especially in people with asthma or
other resp irato ry co nd it io ns. Take deep
breat hs immed iate ly after leaving the veh i
cl e or, if this is not possib le, open all of t he
doo rs and windows as wide as possible.
- If e lec trolyte flu id ente rs the eyes, flush
them tho roughly with a la rge amou nt of
clean water for at least 15 min utes and then
seek medical attention.
- If e lectrolyte f lu id comes into contact with
the skin, flush t he affected area w ith clean
water for at least 15 minutes and then clean
with soap and water and seek med ical at
tent ion. Clean affected clot hing and shoes
thoroughly before wear ing again .
- I f the fluid was swallowed and the person is
conscious, flush the mouth with water for at
least 15 minutes. Do not induce vom iting
unless this is recommended by med ica l pro
fessionals. Seek med ica l attent ion immed i
ately.
([) Note
If the glass on an automatic dimming mirror
a '.:: breaks, e lectrolyte can leak out . Th is liquid
~ damages plast ic surfaces and pa int. Clean
'"' 0 0 ::, (X)
Lights and V ision
this liquid as quick ly as possible, for example
with a wet sponge .
(D Tips
-If the light reach ing the rearview mirror is
obstructed, the automatic dimming mirror
wi ll not function correctly,
- T he automatic dimming mirrors do not dim
when the interior lighting is turned on or
the reverse gear is se lected.
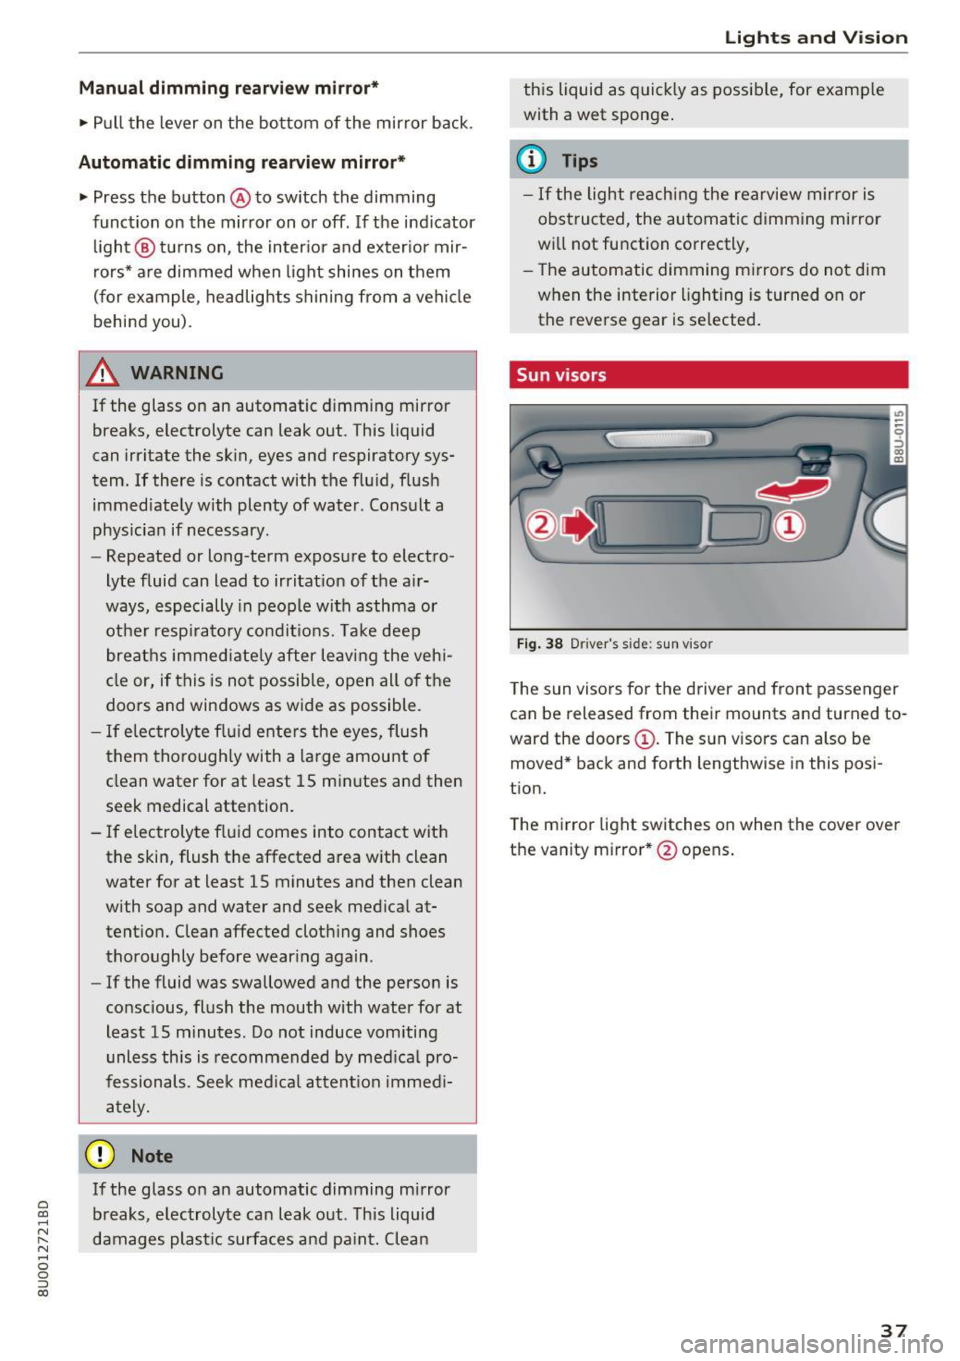
Sun visors
F ig. 38 D river 's s id e: s un vis o r
The sun visors for t he driver and front passenger
can be released from their mounts and turned to
ward the doors@. The sun v isors can also be
moved* b ack and forth lengthwise in this posi
t ion.
T he mirror light switches on when the
cover over
the vanity m irror *@ opens .
37
Page 40 of 230

Lights and Vision
Windshield wipers
Switching the windshield w ipers on
F ig. 39 W indshield wiper lever
F ig. 40 Act uate th e rear window wipe r
Move the windshield wiper lever to the corre
spond ing pos ition:
@ -Windshield wipers off
(D -Interval mode. To increase/decrease the wip
er intervals, move the switch @ to the left/right.
In vehicles with a rain sensor *, the wipers turn on
in the rain once the vehicle speed exceeds ap
proximate ly 2 mph (4 km/h). The higher the sen
sitivity of the rain sensor that is set (switch ® to
the right), the earlier the windshield w ipers react
to mo isture on the windshield .
@-Slow wiping
@-Fast wiping
©-Sing le w ipe. If yo u hold the leve r in this posi
tion longer, t he wipers sw itch from s low w iping
to fast wiping.
® -Clean the windshield . The wipe rs wipe one
time afte r several seconds of dr iv ing to remove
water drop lets . You can swi tch this func tion off
by moving the lever to position ® within 10 sec
onds of the afterwipe . The afterwipe function is
38
reactivated the next time you switch the ignit ion
on .
®-Wipe the rear w indow. The rear w iper moves
about every 6 seco nds.
0 -Clean the rear window . The number of wipes
depends on how long the lever is held in pos it ion
(i) .
& WARNING
-The rain sensor is on ly intended to ass is t th e
driver . The driver may still be responsible
for manually switch ing the wipers on based
on visibility conditions .
- Th e windsh ield may not be treated with wa
ter-repelling windshield coating agents . Un
favorable conditions, such as wetness, dark
ness or low sun, can result in i ncreased
glare, which increases the risk of an acci
dent. Wiper blade chatter is also possible.
- Properly functioning windshield wiper
blades are required for a clea r view and safe
driving
~ page 39, Replacing windshield
wiper blades .
(D Note
-If there is frost, make sure the windshield
wiper blades are not frozen to the wind
shield . Swi tching on the w indshield w ipers
when the b lades are frozen to the win d
shield can damage the w iper blades.
- Th e windsh ie ld w iper system must be
switche d off (lever in posi tion
@ ) before us
ing a ca r wash. This prevents the w ipers
from swit ching o n uni ntent iona lly an d caus
ing damage to the winds hield wiper sys tem .
{I) Tips
- The wind shie ld w ipers sw itch off when the
ign ition is swi tched off. You can activa te t he
w indshield wipe rs a fter the ignition is
switched back on by moving the windshield
wiper lever to any position.
- Worn or dirty windshie ld wiper blades resu lt
in streaking . This can affect the rain sensor*
function. Check your windshield wiper blades regula rly. ..,.
Page 41 of 230
0 co ......
"' ,....
"' ...... 0 0 :::,
00
- The washer fluid nozzles for the windshie ld
washer system are heated at low tempera
tures when the ignition is on.
- When stopping temporarily, such as at a
traffic light, the speed of the windshie ld
wipers automatically reduces by one level.
Cleaning the wiper blades
Clean the wiper blades when you see wiper
streaks. Use a soft cloth and a glass cleaner .
Windshield wiper
.. Place the windshield wiper arms in the service
pos ition ¢
page 39.
"'Fold the windshield wiper arms away from the
windshield .
Rear window wiper
.. Fold the wiper arm away from the rear window .
.&_ WARNING
Dirty windshield wiper blades can impair vi
sion, which increases the risk of an accident.
Replacing windshield wiper blades
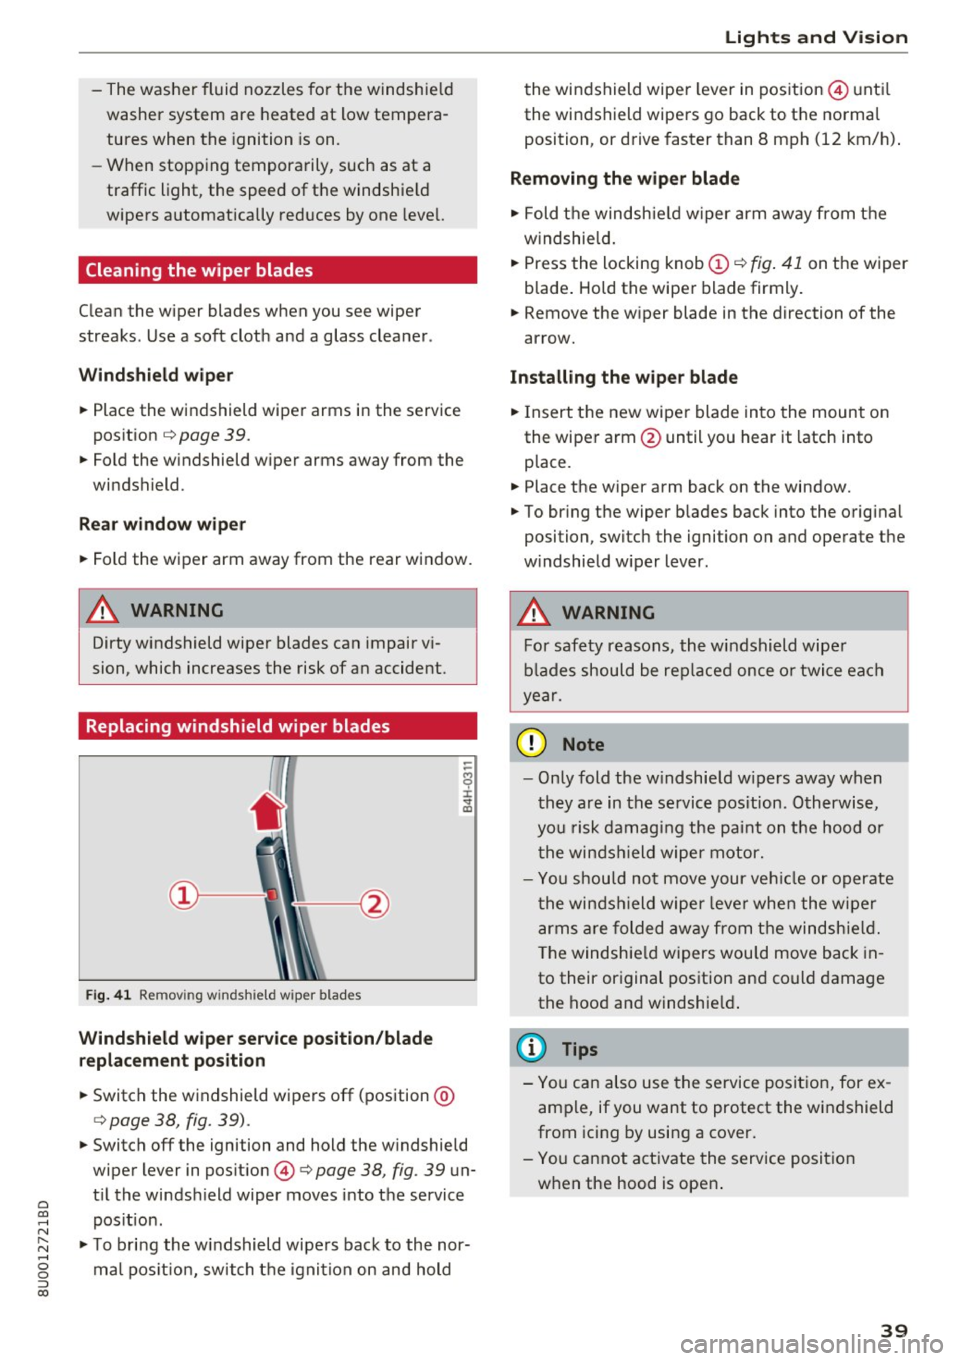
F ig . 41 Remov ing w inds hield w iper blades
Windshield wiper service position/blade
replacement position
.. Switch the windshield wipers off (position @
¢page 38, fig. 39) .
-
"'Switch off the ignition and hold the windshield
wiper lever in position @¢
page 38, fig. 39 un
t il the windsh ield wiper moves into the service
pos ition .
"'T o bring the windshield wipers back to the nor
ma l position, switch the ignition on and hold
Lights and Vision
the windshield wipe r lever in pos ition @until
the windshield wipers go back to the normal
position, or drive faster than 8 mph (12 km/h) .
Removing the wiper blade
"' Fold the windshie ld wiper arm away from the
windshield .
.. Press the locking knob
(D ~ fig . 41 on the wiper
blade . Hold the wiper blade firmly.
.. Remove the w iper blade in the direction of the
arrow.
Installing the wiper blade
"'I nsert the new wiper blade into the mount on
the wiper arm @until you hear it latch into
place.
.. Place the wiper arm back on the window.
"' To bring the wiper blades back into the original
position, switch the ignition on and operate the
w indshield w iper lever .
,&. WARNING
----
For safety reasons, the windshield wipe r
blades should be replaced once or twice each
year.
(D Note
- Only fold the w indshield w ipers away when
they are in the service pos ition . Otherwise,
you risk damaging the paint on the hood or
the windsh ield wiper motor.
- You should not move your veh icle or operate
the windsh ield wiper leve r when the wiper
arms are folded away from the windshie ld.
The windshie ld wipers wou ld move back in
to their original position and could damage
the hood and windshie ld.
(D Tips
-You can also use the service position, for ex
ample, if you want to protect the windshield
from icing by using a cover.
- You cannot activate the service position
when the hood is open .
39
Page 42 of 230
Lights and Vision
Replacing rear wiper blades
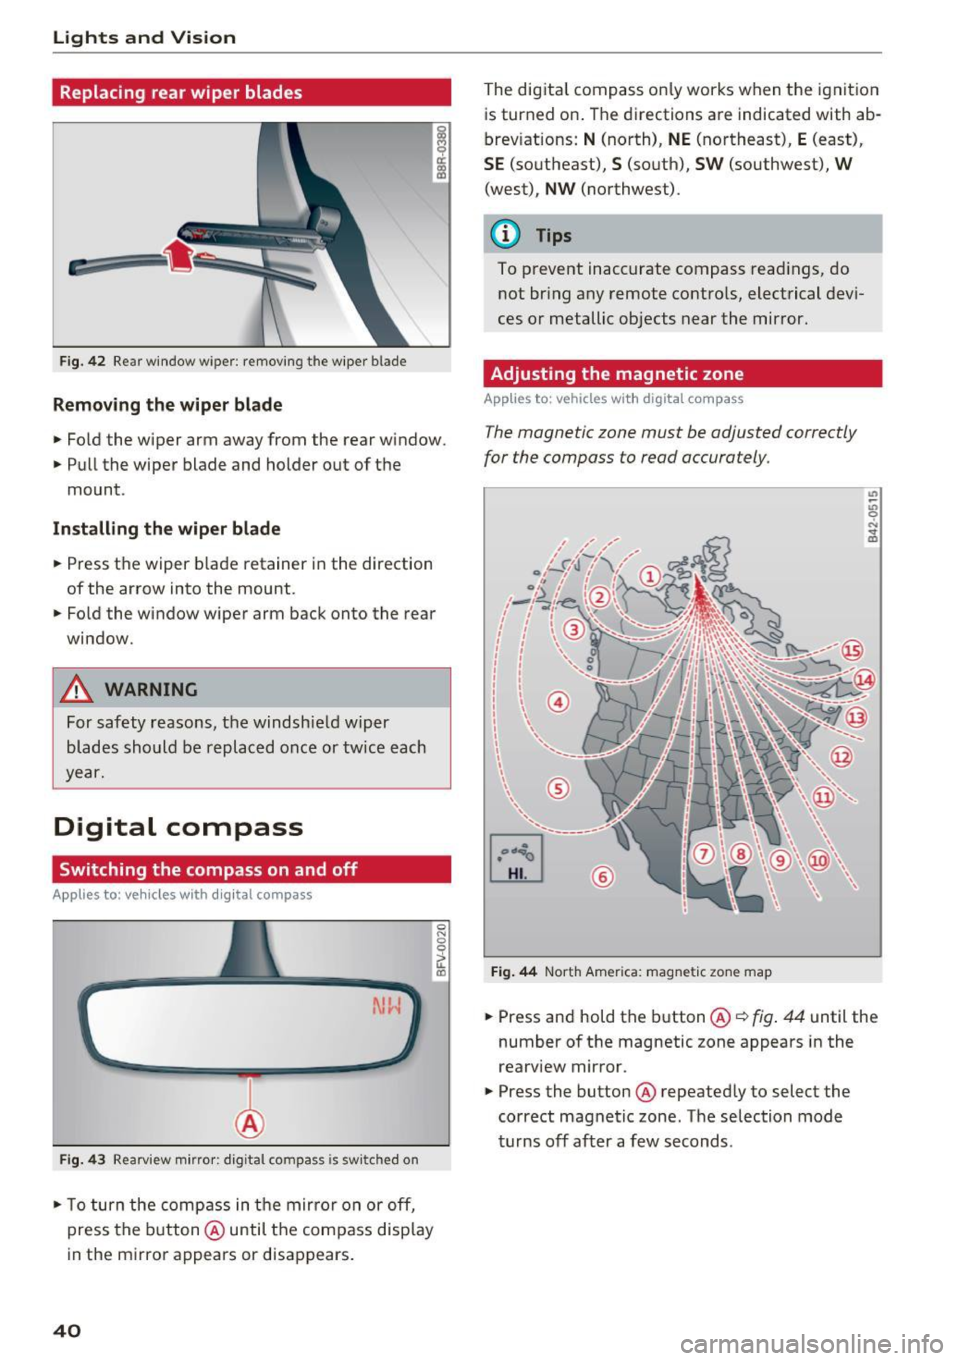
Fig. 42 Rear window wiper: removing the w iper blade
Remov ing the wiper blade
.. Fo ld the wiper arm away from the rear window.
.. Pull the wiper blade and holder out of the
mount.
In stall ing th e wip er blade
.. Press the wiper b lade retainer i n the direction
of the arrow into the mount .
.. Fold the window wiper arm back onto the rear
window .
.,&. WARNING
For safety reasons, the windshie ld wiper
blades should be replaced once or tw ice each
year.
Digital compass
Switching the compass on and off
Applies to: veh icles with d ig ital compass
Fig. 4 3 Rearv iew m irro r: digital compass is sw itched on
.. To turn the comp ass in t he mir ro r on or off,
press the b utton @ until the compass display
in the mirro r appears or disappears .
40
0
fl (0
The dig ital compass on ly works when the ignit io n
is turned on . The directions a re indicated with ab
brev iations:
N (north), NE (northeast), E (east),
SE (so utheast), S (south), SW (southwest), W
(west), NW (northwest).
(l') Tips
To prevent inaccurate compass read ings, do
not br ing any remote contro ls, electrical devi
ces or metallic objects near the mirror.
Adjusting the magnetic zone
App lies to : vehicles with digital compass
The magnetic zone must be adjusted correctly
for the compass to read accurately .
®
Fig. 44 North America: magnetic zone map
.. Press and hold the button @c::> fig . 44 until the
number of the magnetic zone appears in the
rearview mir ror .
.. Press the button @ repeated ly to select the
correct magnetic zone . The selection mode
turns off after a few seconds.
Page 43 of 230
0 co ......
"' ,....
"' ...... 0 0 :::,
00
Calibrating the compass
Appl ies to: vehicl es with digital compass
You must recalibrate the compass if it does not
display the correct direction .
.. Press and hold the button @ ¢ page 40, fig. 43
until a C appears in the interior rearview mirror .
.,. Drive in a circle at about 6 mph (10 km/h) until
a d irection is displayed in the rearview mirro r.
A WARNING
- T o reduce the risk to yourself and othe r driv
ers, cal ibrate the compass in an area where
there is no traffic.
- Always pay attention to the t raff ic and the
area aro und you r vehicle if you are reading
the compass while driving . Light
s and Vision
41
Page 48 of 230
Sea ts and stor age
_&. WARNING
Always keep the glove compartment l id
closed while driv ing to reduce the risk of in
jury.
Additional compartment s
You will find a variety of storage compartments
and holde rs at var ious locations in the veh icle.
- In the door trim panels .
- In the center console .
- On the side of the front seats*. The sliding com-
partment can hold a maximum of 3.3 lbs (1.5
kg) and the folding compartment can hold 2.2
lbs (1 kg).
- Nets* on the backrests of the front seats
- Garment hooks next to and above the rear
doors.
- Bag/securing hooks in luggage compartment.
_&. WARNING
- No heavy or hard objects may be placed on
the storage compartment behind the rear
seat backrest. There is a risk of injur ing the
vehicle passengers when brak ing suddenly .
- Make sure that the view to the rear is not
obstructed by hanging garments .
- Hang only lightweight clothing and be sure that there are no heavy or sharp-edged ob
jects in the pockets .
- Do not use coat hangers to hang garments,
because th is could reduce the effectiveness
of the side curtain airbags* .
- Only use the storage compartments in the
door trim panels to store small objects that
will not st ick o ut of the compartment and
impa ir the range of the side a irbags .
(D Note
Objects on the rear shelf that rub against the
rear window can damage the rear window
heating wires .
46
Luggage compartment
General information
_&. WARNING
Read and follow the important safety precau
tions in ¢page
102.
Luggage compartment cover
Applies to: vehicles with luggage compartment cover
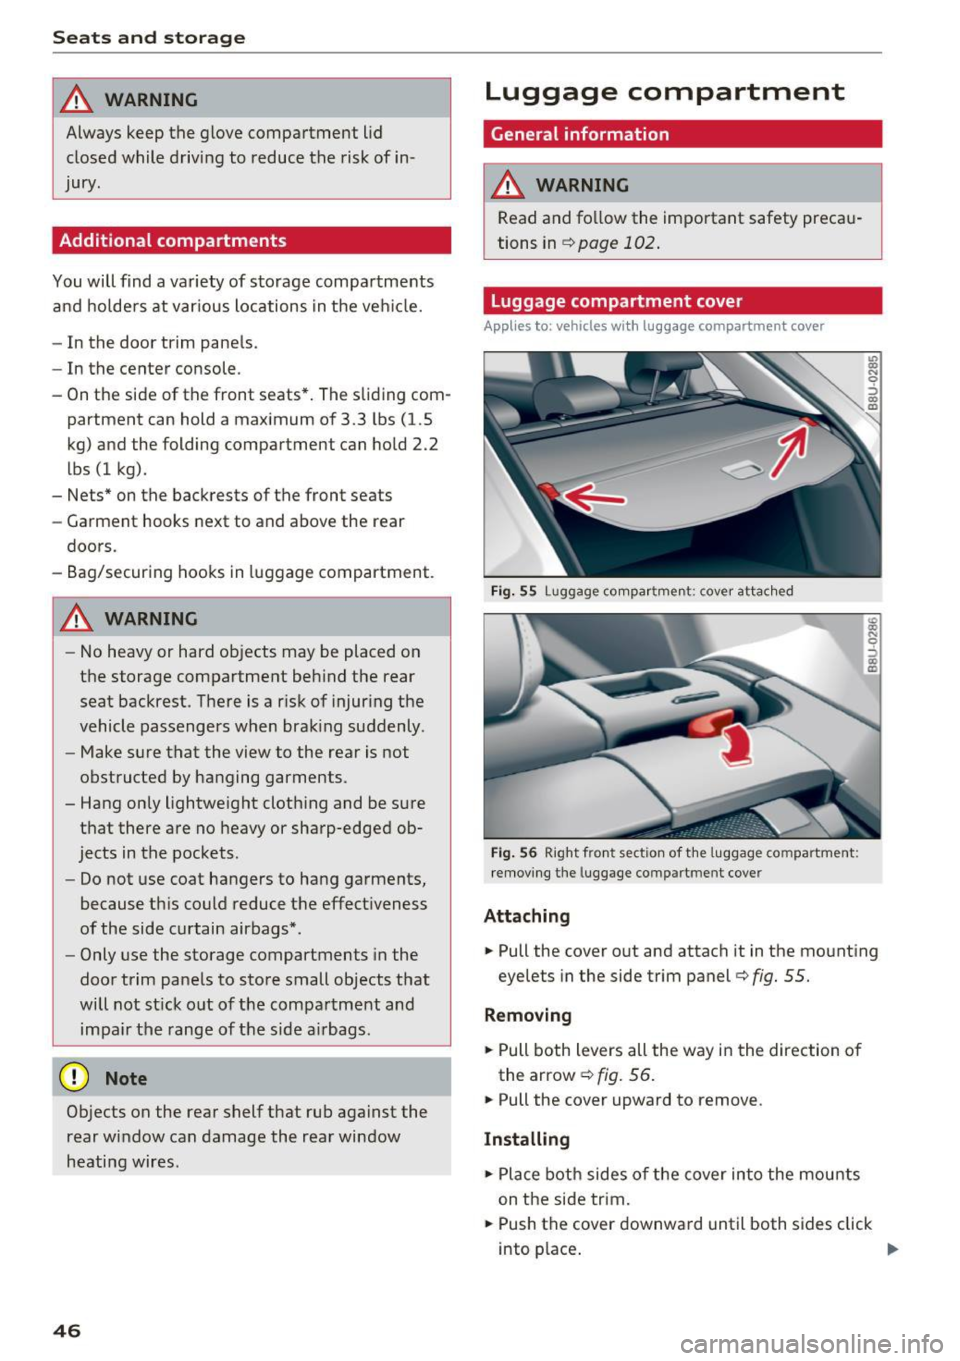
Fig . 55 Lug gage co mpar tmen t: c over attac hed
Fig . 56 Right fron t sec tio n of the luggage co m partment:
remov ing the luggage co mpartm ent cove r
Attaching
-
.. Pull the cover out and attach it in the mounting
eyelets in the side trim panel ¢
fig. 55.
Removing
.. Pull both levers all the way in the direction of
the arrow ¢
fig. 56 .
.. Pull the cover upward to remove .
Installing
.. Place both sides of the cover into the mounts
on the side trim .
.. Push the cover downward until both sides click
into p lace .