ESP AUDI Q3 2020 Workshop Manual
[x] Cancel search | Manufacturer: AUDI, Model Year: 2020, Model line: Q3, Model: AUDI Q3 2020Pages: 278, PDF Size: 72.66 MB
Page 126 of 278

Driver assistance
Take-over
If the message Bo Please take over! appears, the
vehicle has been braked to a stop by Audi pre
sense and you must resume control of the vehi-
cle.
ZA WARNING
— Follow the safety precautions and note the
limits of the assist systems, sensors, and
cameras > page 105.
— Audi pre sense front cannot overcome natu-
ral physical laws. It is a system designed to
assist and it cannot prevent a collision in ev-
ery circumstance. The driver must always in-
tervene. The driver is always responsible for
braking at the correct time. Do not let the
increased safety provided tempt you into
taking risks. This could increase your risk of
a collision.
— Among other things, Audi pre sense front
does not react to pedestrians who are sta-
tionary, stopped, oncoming, and crossing at
an angle. It also does not react to cyclists,
groups of people, animals, crossing vehicles,
or oncoming vehicles and objects, such as
posts, guardrails, and railway vehicles.
— Audi pre sense front may be limited or un-
available when driving in curves.
— Loose objects can be thrown around the ve-
hicle interior during sudden driving or brak-
ing maneuvers, which increases the risk of
an accident. Store objects securely while
driving.
— In trailer mode, the braking behavior of the
trailer can be different than usual during au-
tomatic braking.
G) Tips
— If you switch off the ESC, Audi pre sense al-
so switches off automatically.
— Certain Audi pre sense front functions are
unavailable or have limited availability for
approximately 20 seconds after starting the
vehicle (may be longer depending on the
driving situation).
YD In certain countries
124
Adjusting Audi pre sense
Applies to: vehicles with Audi pre sense
You can adjust the Audi pre sense functions to
your preferences. The settings depend on the ve-
hicle equipment.
> Applies to MMI: Select on the home screen: VE-
HICLE > Driver assistance > Audi pre sense.
Possible settings:
The system can be switched off and on.
Prewarning!) - The prewarning can be switched
off or the Audi pre sense warning time can be set
(Early/Medium/Late).
Set the warning time for the early warning to
Early at first. If you feel that the prewarnings ap-
pear too early, then set the warning time to Me-
dium. The Late warning time should only be set
in special circumstances.
G) Tips
— If Audi pre sense is switched off, it switches
on again automatically once the ignition is
switched on again.)
— Switch Audi pre sense off when you are not
using public streets, when loading the vehi-
cle onto a vehicle carrier, train, ship, or oth-
er type of transportation, or when towing
the vehicle. This can help to prevent an un-
desired intervention from the Audi pre
sense system.
Messages
Applies to: vehicles with Audi pre sense
a | or fal is displayed when there is a malfunc-
tion, the Audi pre sense functions may be un-
available or may be limited.
A message that indicates the cause and possible
solution may appear with some displays. The
weather conditions may be too poor or a sensor
may be covered. Clean the area in front of the
sensors > page 106, fig. 86 and try to turn on
the systems again later.
Page 127 of 278
83A012721BB
Driver assistance
If the malfunction remains, drive to an author-
ized Audi dealer or authorized Audi Service Facili-
ty immediately to have the malfunction correct-
ed.
Side assist
pled f ola Cola)
Applies to: vehicles with side assist
8 5 N g é
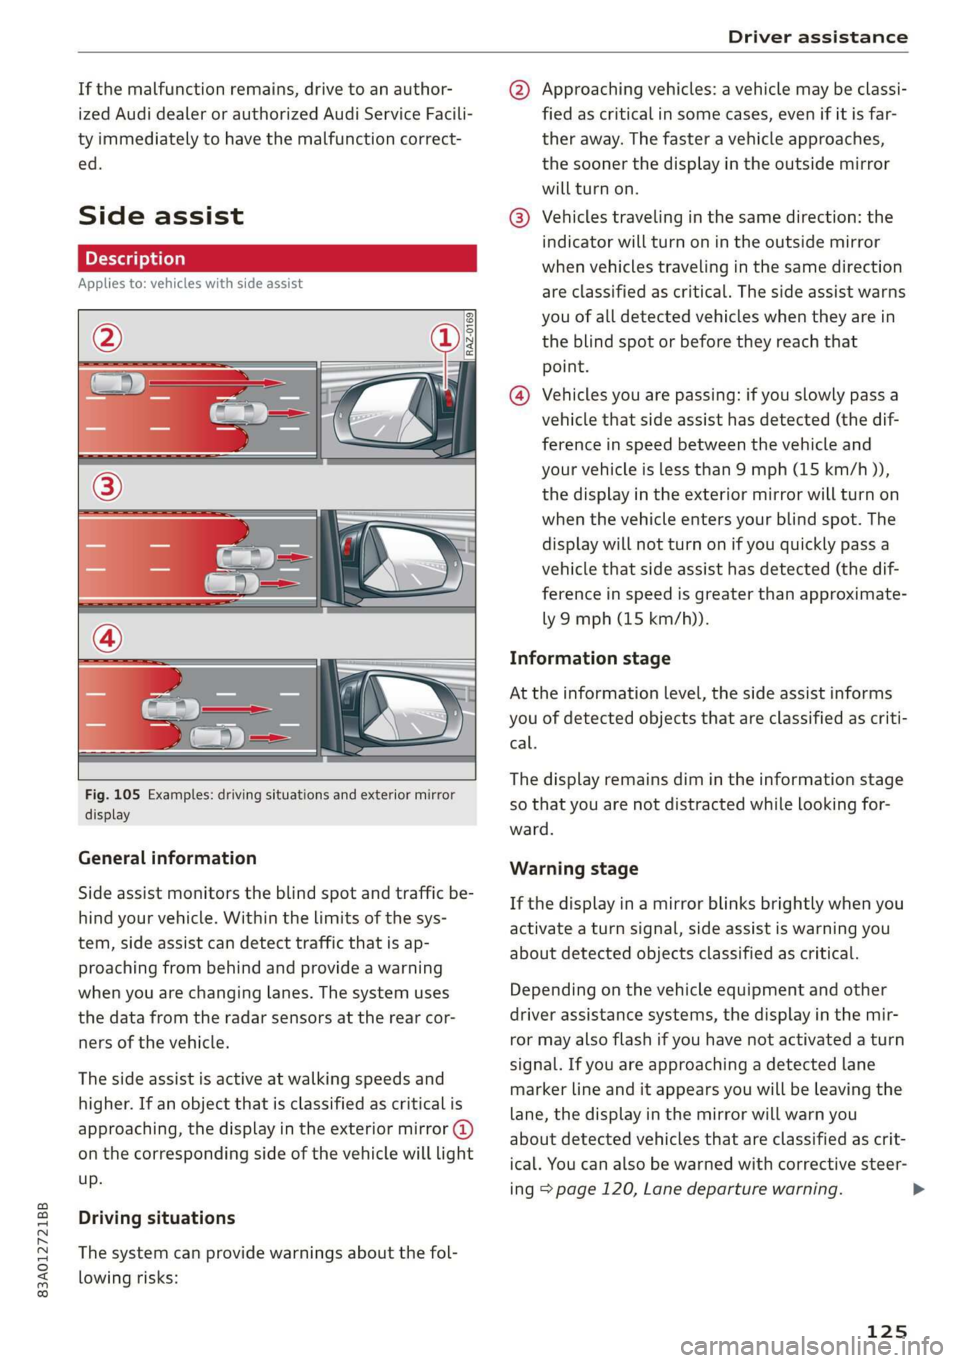
Fig. 105 Examples: driving situations and exterior mirror
display
General information
Side assist monitors the blind spot and traffic be-
hind your vehicle. Within the limits of the sys-
tem, side assist can detect traffic that is ap-
proaching from behind and provide a warning
when you are changing lanes. The system uses
the data from the radar sensors at the rear cor-
ners of the vehicle.
The side assist is active at walking speeds and
higher. If an object that is classified as critical is
approaching, the display in the exterior mirror @)
on the corresponding side of the vehicle will light
up.
Driving situations
The system can provide warnings about the fol-
lowing risks:
@ Approaching vehicles: a vehicle may be classi-
fied as critical in some cases, even if it is far-
ther away. The faster a vehicle approaches,
the sooner the display in the outside mirror
will turn on.
® Vehicles traveling in the same direction: the
indicator will turn on in the outside mirror
when vehicles traveling in the same direction
are classified as critical. The side assist warns
you of all detected vehicles when they are in
the blind spot or before they reach that
point.
@® Vehicles you are passing: if you slowly pass a
vehicle that side assist has detected (the dif-
ference in speed between the vehicle and
your vehicle is less than 9 mph (15 km/h )),
the display in the exterior mirror will turn on
when the vehicle enters your blind spot. The
display will not turn on if you quickly pass a
vehicle that side assist has detected (the dif-
ference in speed is greater than approximate-
ly 9 mph (15 km/h)).
Information stage
At the information level, the side assist informs
you of detected objects that are classified as criti-
cal.
The display remains dim in the information stage
so that you are not distracted while looking for-
ward.
Warning stage
If the display in a mirror blinks brightly when you
activate a turn signal, side assist is warning you
about detected objects classified as critical.
Depending on the vehicle equipment and other
driver assistance systems, the display in the mir-
ror may also flash if you have not activated a turn
signal. If you are approaching a detected lane
marker line and it appears you will be leaving the
lane, the display in the mirror will warn you
about detected vehicles that are classified as crit-
ical. You can also be warned with corrective steer-
ing page 120, Lane departure warning.
125
Page 129 of 278

83A012721BB
Parking and maneuvering
Parking and
maneuvering
Introduction
Depending on the vehicle equipment, various
parking aids will help you when parking and ma-
neuvering.
Parking system
The parking system plus assists you while park-
ing using audio and visual signals to warn you
about objects detected in front of, behind, and
next to* the vehicle > page 127.
The rearview camera shows the area behind the
vehicle in the center display. The lines in the rear-
view camera image help you to park and maneu-
ver > page 129.
The peripheral cameras are an addition to the
rearview camera and help you to see various
areas around the vehicle while parking and ma-
neuvering > page 129.
The rear cross-traffic assist can warn you of ap-
proaching cross traffic when driving in reverse or
exiting a parking space > page 133.
Assisted parking
Park assist helps you to find suitable parking
spaces and to park in and exit these spaces while
the driver monitors the area around the vehicle
and
controls the parking process. Park assist con-
trols the steering movements when parking in
free parking spaces. The driver is still responsible
for accelerating, braking, and shifting gears
=> page 134.
Settings options
You can adjust parking system functions individu-
ally. The adjustment options depend on the vehi-
cle equipment.
— Activating automatically > page 127
— Front and rear volume > page 128
— Entertainment fader > page 128
— Trailer view > page 131
— View > page 132
— Rear cross-traffic assist > page 133
ZX WARNING
Follow the safety precautions and note the
limits of the assist systems, sensors, and
cameras > page 105.
@ Tips
Practicing parking in a traffic-free location or
parking lot to become familiar with the sys-
tems is recommended. Practice parking in
good light and weather conditions.
Parking system plus
ONS eel ete rcs (ae)
Applies to: vehicles with parking system plus
B8V-0643|
Fig. 106 Center console: parking aid button
General information
The parking system assists when parking and ma-
neuvering by providing warnings about obstacles.
If the ultrasonic sensors on the vehicle
= page 106 detect an obstacle, the system will
provide audio and visual warnings.
Activating/deactivating
Requirement: the vehicle speed must be under
approximately 6 mph (10 km/h).
> Press the Pa button in the center console.
When activating, a brief tone will sound and
the LED in the button will turn on.
Automatic activation
> The system activates automatically when re-
verse gear is engaged while the engine is run-
ning. A brief tone will sound.
> If Automatic activation is switched on in the
MMI and if the vehicle approaches ) an obstacle >
127
Page 131 of 278

83A012721BB
Parking and maneuvering
Entertainment fader - The volume of the audio/
video source is Lowered when the parking system
is activated.
The new level is demonstrated briefly* when the
volume is adjusted.
Error messages
If P4 appears, the sensor in the respective area
or the speaker is faulty. Drive immediately to an
authorized Audi dealer or authorized Audi Service
Facility to have the malfunction repaired. The
LED in the Ps button may also flash when the
system is activated.
iff or Ba is displayed when there is a malfunc-
tion, the parking system functions may be un-
available or may be limited.
A message that indicates the cause and possible
solution may appear with some displays. The
weather conditions may be too poor or a sensor
may be covered. Clean the area in front of the
sensors > page 106, fig. 86 and try to turn on
the systems again later.
If the malfunction remains, drive to an author-
ized Audi dealer or authorized Audi Service Facili-
ty immediately to have the malfunction correct-
ed.
ZA WARNING
— Follow the safety precautions and note the
limits of the assist systems, sensors, and
cameras > page 105.
— Sensors and cameras have spots in which
the surrounding area cannot be detected.
Objects, animals, and people may only be
detected with limitations may not be detect-
ed at all. Always monitor the traffic and the
vehicle's surroundings directly and do not
become distracted.
© Note
— Keep enough distance from the curb to
avoid damage to the rims.
— Applies to: vehicles with park assist: If you
park in short parking spaces using park as-
sist, a continuous tone will sound from the
parking system when the distance to an ob-
ject is less than approximately 0.7 ft
(0.20 m). Do not continue driving farther.
G) Tips
— The segments in the side area* are detected
and analyzed when passing. There may have
been changes to the surrounding area after
switching the ignition off and on again, af-
ter opening the doors, or if the vehicle is left
stationary for a long period of time. In this
scenario, the side area* will appear black
until the area has been detected and evalu-
ated.
— If the distance to an obstacle remains con-
stant, the volume of the distance warning
gradually lowers after a few seconds until it
is muted (this does not apply to the continu-
ous tone). If the obstacle comes closer than
it was before the sound was muted, the
tone will sound again. If the obstacle be-
comes farther away than it was before the
sound was muted, no tone will sound. Pay
attention to the vehicle's surroundings
when you start to drive.
— There is no distance warning for the rear
and the sides* when trailer towing mode is
detected. The front sensors remain activat-
ed. The visual display switches to trailer
mode. There is no guarantee the functions
will be deactivated when using a retrofitted
trailer hitch.
Rearview camera and
peripheral cameras
Introduction
Applies to: vehicles with rearview camera/peripheral cameras
B8V-0629
Fig. 108 Orientation line display when parking
129
Page 138 of 278
Parking and maneuvering
be displayed. The system automatically suggests
a parking option @.
If the parking space allows different parking op-
tions, they can be selected manually. Press one of
the suggested parking options (@ in the center
display.
Starting the parking process
As soon as the vehicle has reached the correct po-
sition, a P will appear in the center display above
the selected parking space @). The roof in the
parking system display @) may show the required
braking or driving direction.
> Keep the vehicle as parallel as possible to the
parked vehicles or to the side of the road.
> Make sure that the parking space is suitable for
your vehicle >@).
Start parking using the park assist > page 137.
Maneuvering area
The vehicle can go off course during the parking
process
> A\. If there are obstacles within the
maneuvering area that block or endanger the
parking process, for example on the opposite
side of the street, a message may appear. You
may need to drive farther forward and stay closer
to the row of parking spaces.
ZA WARNING
— Follow the safety precautions and note the
limits of the assist systems, sensors, and
cameras > page 105.
— The driver is always responsible when enter-
ing or exiting a parking space and during
similar maneuvers.
— Sensors and cameras have spots in which
the surrounding area cannot be detected.
Objects, animals, and people may only be
detected with limitations may not be detect-
ed at all. Always monitor the traffic and the
vehicle's surroundings directly and do not
become distracted.
@) Note
— Parking spaces classified as suitable by the
system may have been detected incorrectly.
136
The driver must decide if the parking space
displayed is suitable for the vehicle.
— Certain conditions near the parking space
may cause the parking process to fail, such
as if the parking space is near trees or posts,
or if the ground is covered, for example,
with gravel, snow, or ice.
(i) Tips
— If you did not drive past a suitable parking
space too quickly, the system can also be ac-
tivated afterwards by pressing P@ in the cen-
ter display.
— The Electronic Stabilization Control (ESC)
must not be switched off during the parking
process. If the ESC intervenes, the parking
process will be canceled.
— You can also drive into a perpendicular park-
ing space yourself and then activate the sys-
tem. If this is the case, the front of the vehi-
cle should already be in the space @)
=> page 135, fig. 115 so that the sensors
can measure the space.
— You cannot park with the parking assist sys-
tems when you are towing a trailer or have
the connector inserted in the trailer socket.
— The system is not available when certain as-
sist systems are switched on.
—If there are suitable parking spaces on both
sides of the street, for example on a one-
way street, you can change the side where
the system is searching for parking spaces
by activating the turn signal for the other
side or by pressing on that side in the center
display.
— The park systems do not provide support for
assisted parking on tight curves.
Park assist
General information
Applies to: vehicles with park assist
The park assist helps you when parking and exit-
ing parking spaces after the parking space
search. The park assist takes over the steering of
the vehicle while the driver accelerates, brakes,
and monitors the vehicle's surroundings. Park as-
sist can be interrupted at any time.
Page 139 of 278

83A012721BB
Parking and maneuvering
ZA\ WARNING
— Follow the safety precautions and note the
limits of the assist systems, sensors, and
cameras > page 105.
— The driver is always responsible when enter-
ing or exiting a parking space and during
similar maneuvers.
— Do not use this function if the vehicle cannot
move freely, for example when on a vehicle
jack.
— Sensors and cameras have spots in which
the surrounding area cannot be detected.
Objects, animals, and people may only be
detected with limitations may not be detect-
ed at all. Always monitor the traffic and the
vehicle's surroundings directly and do not
become distracted.
@) Note
— Do not use the park assist systems when
transporting cargo that extends out of the
vehicle, when snow chains are mounted, or
when the parking space is on a hill or in-
cline.
— Park assist guides the vehicle either away
from curbs or onto them if other vehicles
are parked on the curb. Make sure that your
vehicle's tires and rims are not damaged.
Resume control of the vehicle in time or
stop the parking process if needed to pre-
vent damage.
G) Tips
Follow the legal regulations in the country
where you are located when using Park assist.
edema ee cy
Applies to: vehicles with park assist
Requirement: a suitable parking space must be
found and selected > page 134. The vehicle must
initially be stationary.
> Select the reverse gear after stopping briefly.
> Remove your hands from the steering wheel.
> Pay attention to the path of the vehicle. If the
traffic situation permits, accelerate carefully
of.
> Follow the visual instructions in the center dis-
play and the warning tones until the parking
process
has ended.
> The indicators in the center display show the
necessary direction of travel. Drive in the direc-
tion indicated by the arrows or symbols on the
roof in the parking aid image @) > page 135,
fig. 117.
Park assist automatically steers the vehicle into
the parking space while the driver presses the
pedals. The maximum parking speed is approxi-
mately 4 mph (7 km/h).
Z\ WARNING
— Follow the safety precautions and note the
limits of the assist systems, sensors, and
cameras > page 105.
— The park assist is an assist system. The driv-
er is still responsible for monitoring the ve-
hicle's surroundings and preventing colli-
sions when using the system.
— When using park assist to drive into or out
of a parking space, the steering wheel turns
quickly on its own. Reaching into the steer-
ing wheel spokes while this is happening can
result in injury.
@) Tips
You can also cancel the driving direction set
by the system by shifting between D and re-
verse gear. Based on the position of the vehi-
cle, the system then calculates the additional
steering and driving directions for maneuver-
ing.
eaten Elid ie eee
Applies to: vehicles with park assist
If you parked the vehicle in a parallel parking
space, park assist can help you drive out of it.
> Start the engine.
> Press the Pe button > page 135, fig. 116.
> Wait until a message appears in the center dis-
play that specifies the direction of travel re-
quired to exit the parking space.
137
Page 140 of 278
Parking and maneuvering
> Activate the turn signal on the desired side or
press that side next to the vehicle in the center
display.
> Remove your hands from the steering wheel.
> Pay attention to the path of the vehicle. If the
traffic situation permits, accelerate carefully
of.
> Follow the visual instructions in the center dis-
play and the warning tones until the vehicle has
finished exiting the parking space.
> The indicators in the center display show the
necessary direction of travel. Drive in the direc-
tion indicated by the arrows or symbols on the
roof in the parking aid image @) > page 135,
fig. 117.
> The process of exiting the parking space has
ended if additional corrective movements are
no longer necessary and the specified steering
wheel angle is sufficient to drive out of the
parking space. Resume control of the steering
wheel >@).
Park assist automatically steers the vehicle out of
the parking space while the driver presses the
pedals. The maximum speed for exiting a parking
space is 3 mph (5 km/h).
ZA\ WARNING
— Follow the safety precautions and note the
limits of the assist systems, sensors, and
cameras > page 105.
— The park assist is an assist system. The driv-
er is still responsible for monitoring the ve-
hicle's surroundings and preventing colli-
sions when using the system.
— When using park assist to drive into or out
of a parking space, the steering wheel turns
quickly on its own. Reaching into the steer-
ing wheel spokes while this is happening can
result in injury.
@) Note
Resume steering immediately after the last
corrective movement and the takeover
prompt, so that the specified steering wheel
angle is not recentered.
138
Interrupting the park assists
Applies to: vehicles with park assist
Park assist will be canceled automatically in the
following scenarios:
— You switch the system off.
— You start steering.
— The speed is too high.
—The time limit is exceeded.
— An obstacle is detected.
— ESC intervenes.
Resume control of the vehicle, end the parking
process manually, or:
— You can resume the parking process in some sit-
uations. Press the P@ button.
— To continue exiting the parking space, switch
the engine off and on. Press the Pe button.
ZA\ WARNING
Follow the safety precautions and note the
limits of the assist systems, sensors, and
cameras > page 105.
Applies to: vehicles with park assist
If the Poo" or indicator light turns on, park as-
sist is not available or was interrupted.
A message that indicates the cause and possible
solution may appear with some displays. The
weather conditions may be too poor or a sensor
may be covered. Clean the area in front of the
sensors > page 106, fig. 85 and try to turn on
the systems again later.
If the malfunction remains, drive to an author-
ized Audi dealer or authorized Audi Service Facili-
ty immediately to have the malfunction correct-
ed.
Page 148 of 278
Telephone
Accepting or declining a call
You can use the following options on the MMI
when there is an incoming call:
> Answering an incoming call: press Answer.
> Declining a call: press Decline.
> Declining a call with a text message”: press
Decline with text message.
> Silencing the ringtone: press Mute.
@) Tips
The radio or media playback is muted during a
phone call.
During a phone call
Applies to: vehicles with telephone
The following options may be possible during a
call depending on the mobile device being used
and the type of connection:
— End call: end the current phone call.
— Mute: the other person on the call will no lon-
ger be able to hear you. You will still be able to
hear the other person. To switch the micro-
phone back on, press Unmute.
—Hold/Resume: place your current phone call on
hold and answer another.
— Send tone sequence: press Numbers. You can
enter tone sequences (DTMF) and send them to
the other party on the call.
— Accepting an incoming call: if a phone call
comes in during another call, you can either Re-
place the current call with the incoming call, or
use Answer to put the current call on hold. The
incoming call will be answered.
— Declining an incoming call: press Decline to
decline an incoming call.
— Muting the incoming call: press Mute.
— Other call options: press More.
Requirement: two phone calls must be in prog-
ress.
— Conference call*: add a call on hold and up to
five active parties (depending on the cell phone
service provider) to the conference call.
— Swap call: alternate between two phone calls
while one of the calls is on hold. Press on the
respective call. Selecting End call will end the
146
active phone call. A call that was placed on hold
stays on hold and can be taken off hold with Re-
sume.
— Accepting an incoming call: if a phone call
comes in during another call and when there is
a call on hold, you can either Replace the cur-
rent call with the incoming call, or use Answer
to put the current call on hold. The incoming
call will be answered.
Press More.
— Transferring a call*: press Transfer call to mo-
bile device to transfer the existing call from the
MMI to your mobile device or Bluetooth® head-
set*.
— Switch to hands-free mode*: Requirement: you
must have a phone call in progress on your cell
phone. Press Switch to hands-free to transfer
the call from your cell phone back to the MMI.
— Add call: Select: Call list/Contacts/Favorites >
select an entry from the list or press Dial
phone number and enter a phone number.
Then the active call will be on hold.
— Remove conf. member*: Requirement: you
must have started a conference call. You can re-
move conference call members individually
when a conference call is active. Press on the
contact you would like to remove.
— Microphone input level: you can adjust the mi-
crophone input during a phone call using the
slider.
G) Tips
—To be notified of an incoming call during a
phone call, the call waiting function in your
mobile device must be switched on when
using the Handsfree profile.
— When leaving the vehicle, the Bluetooth
connection to the mobile device will auto-
matically disconnect. Depending on your
mobile device, phone calls in progress may
be automatically redirected from the MMI
to your mobile device so that you can con-
tinue the call on your phone.
Page 154 of 278
Audi connect
Audi connect
General information
Applies to: vehicles with Audi connect
Depending on the country and the vehicle equip-
ment, the following functions may be available:
— Audi connect Infotainment
You can also find more information on Audi con-
nect online at www.audi.com.
ZA\ WARNING
—To reduce the risk of an accident, only use
Audi connect services and the Wi-Fi hotspot
only if the traffic situation permits it. Read
and follow the guidelines provided in
= page 18, Traffic safety information.
— It is only safe to use tablets, laptops, mobile
devices and other similar devices when the
vehicle is stationary because, like all loose
objects, they could be thrown around the in-
side of the vehicle in a crash and cause seri-
ous injuries. Store these types of devices se-
curely while driving. Also read the warnings
in the chapter > page 62.
©) Note
— Applies to: embedded SIM card usage: The
connection costs for Audi connect Infotain-
ment services are included in the price of
Audi connect Infotainment during the sub-
scription period with some exceptions.
Please note that there may be additional
charges when using some services. For ex-
ample, this applies to online radio/
podcasts, additional online data, or for In-
ternet connections and services that use the
Wi-Fi hotspot, such as online media sour-
ces. Depending on the country, data plans
may need to be purchased for these services
=> page 155. For additional information, see
my.audi.com.
—Incertain situations, the Wi-Fi hotspot data
connection may be established as a replace-
ment for the SIM card on your Wi-Fi device.
This feature depends on the configuration
of your Wi-Fi device and operating system.
This could result in fees depending on your
152
cell phone service provider, especially if you
are using this feature while abroad. A flat
rate data plan is strongly recommended. For
more information, contact your cell phone
service provider or refer to the owner's man-
ual for your Wi-Fi device.
— You are responsible for all precautions taken
for data protection, anti-virus protection,
and protection against loss of data on mo-
bile devices that are used, for example, to
access the Internet through the Wi-Fi hot-
spot.
— In areas with poor GPS reception or outside
the coverage range of the respective cell
phone service provider, some functions
and/or services may not be available, it may
not be possible to send or receive data, or
functionality may be limited.
@ Tips
— The availability of services depends on the
subscription.
— AUDI AG provides access to services from
third party providers. Permanent availability
cannot be guaranteed, because that de-
pends on the third party provider.
— Use of the most up-to-date mobile network
standard is not available in every country.
Contact an authorized Audi dealer or au-
thorized Audi Service Facility or your cell
phone service provider for additional infor-
mation.
— Availability, scope, providers, screen display,
and costs of services may vary depending on
the country, model, model year, end device
and rates.
Audi connect
Infotainment
Applies to: vehicles with Audi connect Infotainment
With Audi connect Infotainment services, online
information is transmitted directly to the vehicle.
An Internet connection is required to use Audi
connect Infotainment. Depending on the country >
Page 161 of 278
83A012721BB
Navigation
> Applies to: MMI: Select on the home screen:
NAVIGATION > © >G.
> Enter one or more search terms into the input
field.
> The search engine provider shows suggestions
£ to narrow down the search.
> Press on suggestions until the desired destina-
tion appears in the results list. If necessary, use
one finger to swipe upward or downward until
the suggestions © or destinations 9 appear.
> Press on the desired destination 9. The Details
menu will be displayed.
> Press Start.
Route guidance will be activated and the map will
be displayed. > page 163, fig. 125
@) Note
Read the information about Audi connect, and
be sure to note the connectivity costs section
=@ in General information on page 152.
@) Tips
— The MMI input suggestions depend on the
last navigated destinations.
— The navigation system always searches for
the fastest route. You can find information
on alternative routes under > page 165.
uate REL Lee)
Applies to: vehicles with navigation system
As an alternative to the intelligent search, you
can also enter an address in stages.
Opening a menu
> Applies to: MMI: Select on the home screen:
NAVIGATION > (G8) > Enter address.
Enter a destination using an address
> Press on the respective input field and enter an
address.
> Press on Apply. The Details menu will be dis-
played.
> Press Start.
Route guidance will be activated and the map will
be displayed > page 163, fig. 125.
Destination entry for a street intersection
Requirement: you must have entered a street.
> Select: Intersection > enter a street > Start.
Loading previous destinations
Applies to: vehicles with navigation system
Your last destinations and routes can be loaded
directly as a navigation destination.
As soon as you start route guidance, the destina-
tion is automatically saved in the last destina-
tions. Your previous destinations are marked with
the © symbol.
If you have met the requirements for myAudi
navigation, your previous destinations will be
synchronized with your myAudi account
=> page 157.
Accessing previous destinations
> Applies to: MMI: Select on the home screen:
NAVIGATION > (68) > Last destinations > select
a desired destination > Start.
> Applies to: multifunction steering wheel: Select
in the instrument cluster: Navigation tab > [|
button > Last destinations > desired destina-
tion.
Changing and loading a previous destination
> Applies to: MMI: Select on the home screen:
NAVIGATION > (88) > Last destinations > Z >
¥ > change the address > Use address > Start.
Restore last tour
Requirement: a route with at least two stopovers
must have already been canceled.
Your last route is labeled with the ® symbol.
> Applies to: MMI: Select on the home screen:
NAVIGATION > (68) > Last destinations > Re-
store last tour. Route guidance will start imme-
diately.
Deleting previous destinations
> Applies to: MMI: Select on the home screen:
NAVIGATION > (Gs) > Last destinations > Z >
select one or more entries or Select all > Delete
> (Done).
159
>