sensor AUDI Q3 2020 Owners Manual
[x] Cancel search | Manufacturer: AUDI, Model Year: 2020, Model line: Q3, Model: AUDI Q3 2020Pages: 278, PDF Size: 72.66 MB
Page 10 of 278
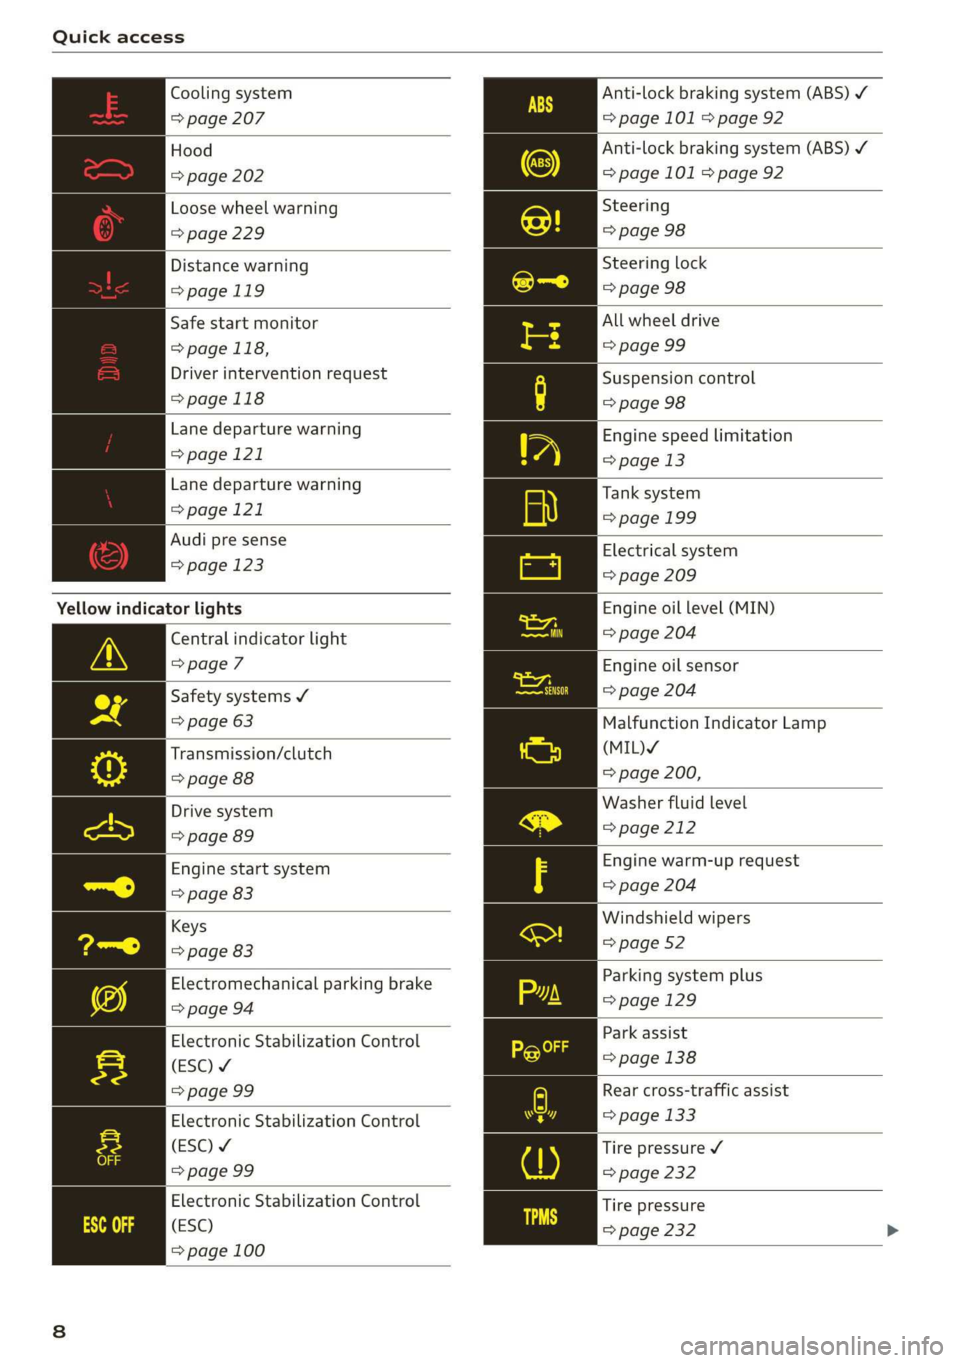
Quick access
Cooling system
=> page 207
Hood
=> page 202
Loose wheel warning
=> page 229
Distance warning
=>page 119
Safe start monitor
=> page 118,
Driver intervention request
=>page 118
Lane departure warning
=> page 121
Lane departure warning
=> page 121
Audi pre sense
=> page 123
Yellow indicator lights
Central indicator light
> page 7
Safety systems ¥
=> page 63
Transmission/clutch
> page 88
Drive system
=> page 89
Engine start system
=> page 83
Keys
=> page 83
Electromechanical parking brake
=> page 94
Electronic Stabilization Control
(ESC) ¥
=> page 99
Electronic Stabilization Control
(ESC) ¥
=> page 99
Electronic Stabilization Control
(ESC)
=> page 100
Anti-lock braking system (ABS) /
=> page 101 > page 92
Anti-lock braking system (ABS) ¥
=> page 101 > page 92
Steering
=> page 98
Steering lock
=> page 98
All wheel drive
=> page 99
Suspension control
=> page 98
Engine speed limitation
=> page 13
Tank system
=> page 199
Electrical system
=> page 209
Engine oil level (MIN)
= page 204
Engine oil sensor
=> page 204
Malfunction Indicator Lamp
(MIL)Y
=> page 200,
Washer fluid level
= page 212
Engine warm-up request
=> page 204
Windshield wipers
=> page 52
Parking system plus
=> page 129
Park assist
=> page 138
Rear cross-traffic assist
=> page 133
Tire pressure ¥
> page 232
Tire pressure
=> page 232
Page 11 of 278
83A012721BB
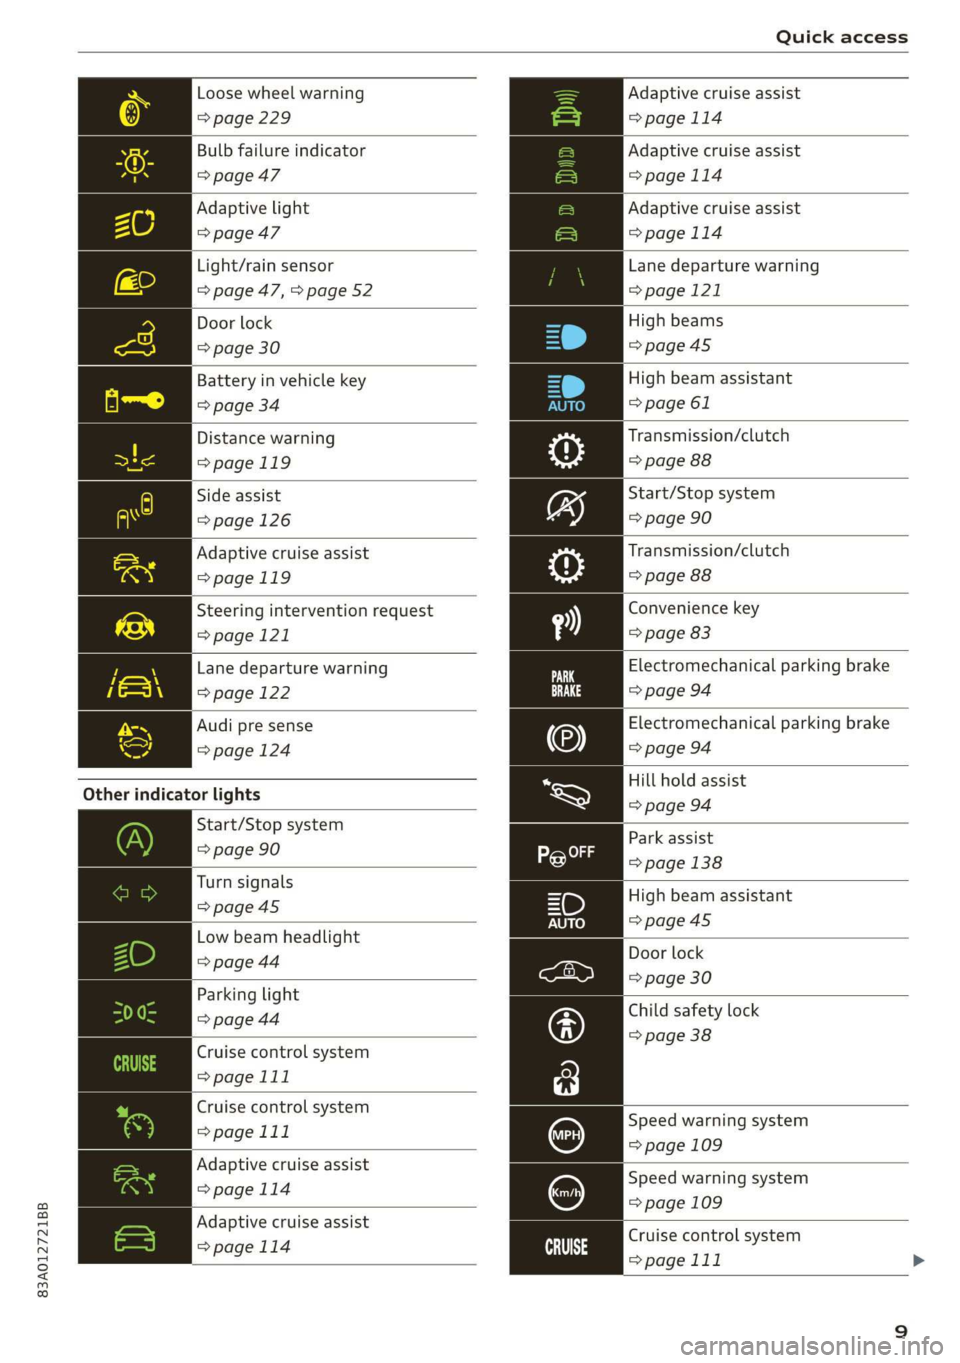
Quick access
Loose wheel warning
=> page 229
Bulb failure indicator
=> page 47
Adaptive light
=> page 47
Light/rain sensor
=> page 47, > page 52
Door lock
=> page 30
Battery in vehicle key
> page 34
Distance warning
>page 119
Side assist
=> page 126
Adaptive cruise assist
=>page 119
Steering intervention request
=>page 121
Lane departure warning
=> page 122
Audi pre sense
=> page 124
Other indicator lights
Start/Stop system
=> page 90
Turn signals
=>page 45
Low beam headlight
> page 44
Parking light
=> page 44
Cruise control system
=> page 111
Cruise control system
=>page 111
Adaptive cruise assist
>page 114
Adaptive cruise assist
=>page 114 ai
Adaptive cruise assist
= page 114
Adaptive cruise assist
=>page 114
Adaptive cruise assist
=>page 114
Lane departure warning
> page 121
High beams
=>page45
High beam assistant
=> page 61
Transmission/clutch
=> page 88
Start/Stop system
= page 90
Transmission/clutch
=> page 88
Convenience key
=> page 83
Electromechanical parking brake
=> page 94
Electromechanical parking brake
> page 94
Hill hold assist
=> page 94
Park
assist
> page 138
High beam assistant
=>page 45
Door lock
=> page 30
Child safety lock
=> page 38
Speed warning system
= page 109
Speed warning system
= page 109
Cruise control system
=> page 111
Page 30 of 278

Opening and closing
Opening and closing
Central locking
erasure)
ZA WARNING
— If you leave the vehicle, switch the ignition
off and take the key with you. This applies
particularly when children remain in the ve-
hicle. Otherwise, children could start the en-
gine or operate electrical equipment (such
as power windows), which increases the risk
of an accident.
— Applies to: vehicles with anti-theft alarm
system: When the vehicle is locked from the
outside, no one - especially children - should
remain in the vehicle, because the windows
can no longer be opened from the inside
= page 31, Anti-theft alarm system.
Locked doors make it more difficult for
emergency workers to enter the vehicle,
which puts lives at risk.
All doors and the luggage compartment lid can
be centrally unlocked and locked at once. You can
select in the MMI if the entire vehicle or only the
driver's door should unlock when unlocking the
vehicle > page 29. The turn signals flash twice
when you unlock the vehicle and flash once when
you lock the vehicle. If they do not flash when
locking, check if all doors and lids are closed.
Depending on the vehicle equipment, you may
have different options for centrally unlocking and
locking your vehicle.
— Vehicle key > page 33
— Sensors in the front door handles > page 33
— Lock cylinder on the driver's door > page 30
— Central locking switch inside > page 29
Key / vehicle key
The term “vehicle key” refers to the remote con-
trol key or convenience key*. The convenience
key* is a remote control key with special func-
tions > page 33 and > page 82.
238
Automatic locking
If you unlock the vehicle but then do not open
any of the doors, the luggage compartment, or
the hood within a short period time, the vehicle
locks again automatically. This feature prevents
the vehicle from being accidentally left unlocked
for a long period of time.
Automatic locking (Auto Lock)
The Auto Lock function locks all doors and the
luggage compartment lid once the speed has ex-
ceeded approximately 9 mph (15 km/h). The ve-
hicle will unlock again if the unlock function in
the central locking switch is pressed, the “P” gear
is engaged, or the ignition is switched off.
You can open the doors individually from the in-
side by pulling the door handle one time. To open
the rear doors individually, you must pull the
door handle twice.
In the event of a crash with airbag deployment,
the doors will also automatically unlock to allow
access to the vehicle.
Unintentionally locking yourself out
Only lock your vehicle when all of the doors and
the luggage compartment lid are closed and
there is no key in the vehicle. This reduces the
risk of locking yourself out accidentally.
The
following features help to reduce the risk of
locking your vehicle key in the vehicle:
— If the driver's door is open, the vehicle cannot
be locked by pressing the & button on the re-
mote control key or by touching the locking
sensor* on one of the front doors.
— If the most recently used convenience key” is
inside the luggage compartment, the luggage
compartment lid will automatically open again
after closing it.
— If the last convenience key* that was used is de-
tected inside the vehicle, the vehicle cannot be
locked from the outside for a brief time >@.
ZA WARNING
Follow the safety precautions > page 28. >
Page 33 of 278
83A012721BB
Opening and closing
> Install the cap in the opening and close the
door.
Once the front passenger’s door or rear doors
close, it will no longer be possible to open them
from the outside. The front doors can be opened
from the inside by pulling the door handle one
time. The rear doors can be unlocked from the in-
side by pulling the door handle one time and
then opened by pulling the door handle again. If
the child safety lock in one of the rear doors is ac-
tivated, you must first pull the door handle from
the inside. Then you can open the door from the
outside.
ZA WARNING
Follow the safety precautions > page 28.
Pee
Applies to: vehicles with anti-theft alarm system
If the anti-theft alarm system detects a vehicle
break-in, audio and visual warning signals are
triggered. The anti-theft alarm system is switch-
ed on or off when locking or unlocking your vehi-
cle. If the alarm is triggered, it will shut off auto-
matically after a certain amount of time.
Switching the alarm off manually
> To switch the alarm off, press the G button on
the vehicle key or switch the ignition on.
Depending on the vehicle equipment, the anti-
theft alarm system may have the following fea-
tures:
Break-in security feature
The alarm will sound if there is a break-in at the
doors, hood, and/or luggage compartment lid.
Interior/towing protection monitor
The alarm will be triggered if there are move-
ments detected in the vehicle interior (for exam-
ple, by animals) or if there is a change in the vehi-
cle angle (for example, when the vehicle is being
towed).
You can prevent the alarm from being triggered
by deactivating the interior/towing protection
monitor.
Deactivating the interior/towing protection
monitor
There are the following options for deactivating
the interior/towing protection monitor:
> Press the ff button on the vehicle key a second
time within two seconds. Or
> Applies to: vehicles with convenience key:
Touch the sensor on a front door handle a sec-
ond time within two seconds. Or
> Turn the vehicle key in the door lock to the close
position a second time within two seconds.
If you lock the vehicle, then the interior/towing
protection monitor will stay off until the next
time the vehicle is unlocked.
ZA\ WARNING
No one, especially children, should stay in the
vehicle when it is locked from the outside, be-
cause the windows can no longer be opened
from the inside. Locked doors make it more
difficult for emergency workers to enter the
vehicle, which puts lives at risk.
@) Tips
The interior/towing protection monitoring on-
ly functions correctly when the windows and
the roof* are closed.
31
Page 35 of 278
83A012721BB
Opening and closing
— You can view the number of keys program-
med to the vehicle by selecting on the home
screen: VEHICLE > Settings & Service > Ve-
hicle information.
— For an explanation on conformity with the
FCC regulations in the United States and the
Industry Canada regulations, see
=> page 259.
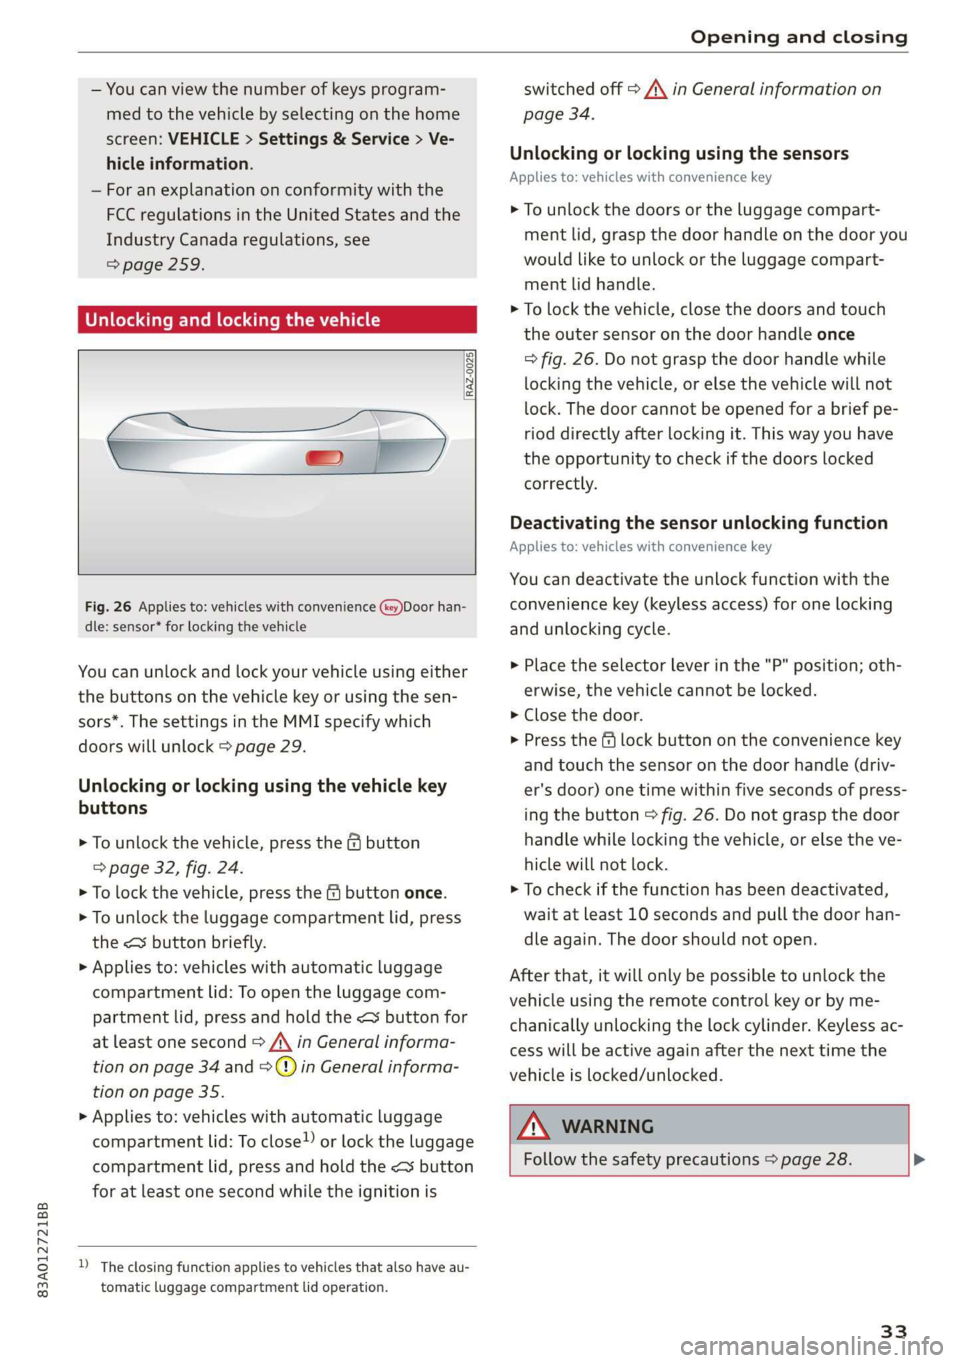
Unlocking and locking the vehicle
RAZ-0025
1
\ ’
Fig. 26 Applies to: vehicles with convenience (key)Door han-
dle: sensor* for locking the vehicle
You can unlock and lock your vehicle using either
the buttons on the vehicle key or using the sen-
sors*. The settings in the MMI specify which
doors will unlock > page 29.
Unlocking or locking using the vehicle key
buttons
> To unlock the vehicle, press the G button
=> page 32, fig. 24.
> To lock the vehicle, press the & button once.
> To unlock the luggage compartment lid, press
the < button briefly.
> Applies to: vehicles with automatic luggage
compartment lid: To open the luggage com-
partment lid, press and hold the < button for
at least one second > /\ in General informa-
tion on page 34 and =>) in General informa-
tion on page 35.
> Applies to: vehicles with automatic luggage
compartment lid: To close) or lock the luggage
compartment lid, press and hold the << button
for at least one second while the ignition is
D_ The closing function applies to vehicles that also have au-
tomatic luggage compartment lid operation.
switched off > A\ in General information on
page 34.
Unlocking or locking using the sensors
Applies
to: vehicles with convenience key
> To unlock the doors or the luggage compart-
ment lid, grasp the door handle on the door you
would like to unlock or the luggage compart-
ment lid handle.
> To lock the vehicle, close the doors and touch
the outer sensor on the door handle once
=> fig. 26. Do not grasp the door handle while
locking the vehicle, or else the vehicle will not
lock. The door cannot be opened for a brief pe-
riod directly after locking it. This way you have
the opportunity to check if the doors locked
correctly.
Deactivating the sensor unlocking function
Applies to: vehicles with convenience key
You can deactivate the unlock function with the
convenience key (keyless access) for one locking
and unlocking cycle.
> Place the selector lever in the "P" position; oth-
erwise, the vehicle cannot be locked.
> Close the door.
> Press the f lock button on the convenience key
and touch the sensor on the door handle (driv-
er's door) one time within five seconds of press-
ing the button > fig. 26. Do not grasp the door
handle while locking the vehicle, or else the ve-
hicle will not lock.
> To check if the function has been deactivated,
wait at least 10 seconds and pull the door han-
dle again. The door should not open.
After that, it will only be possible to unlock the
vehicle using the remote control key or by me-
chanically unlocking the lock cylinder. Keyless ac-
cess will be active again after the next time the
vehicle is locked/unlocked.
ZA WARNING
Follow the safety precautions > page 28. >
33
Page 36 of 278
Opening and closing
@) Tips
— Only use the vehicle key when you can see
the
vehicle.
— The vehicle can only be locked when the "P”
selector lever position is engaged.
— Do not use the vehicle key to lock and un-
lock when you are inside the vehicle. Other-
wise, you could trigger the anti-theft
alarm*. If this happens, press the @ unlock
button.
@ Tips
Applies to: vehicles with convenience key
— When unlocking or locking the vehicle, the
convenience key cannot be more than ap-
proximately 4 feet (1.5 m) away from the
door handle or luggage compartment.
— Unlocking with the convenience key (keyless
access) can be deactivated > page 33.
— To prevent the vehicle battery from dis-
charging, the energy management gradual-
ly switches off convenience functions that
are not needed. You then may no longer be
able to unlock your vehicle with the sensors.
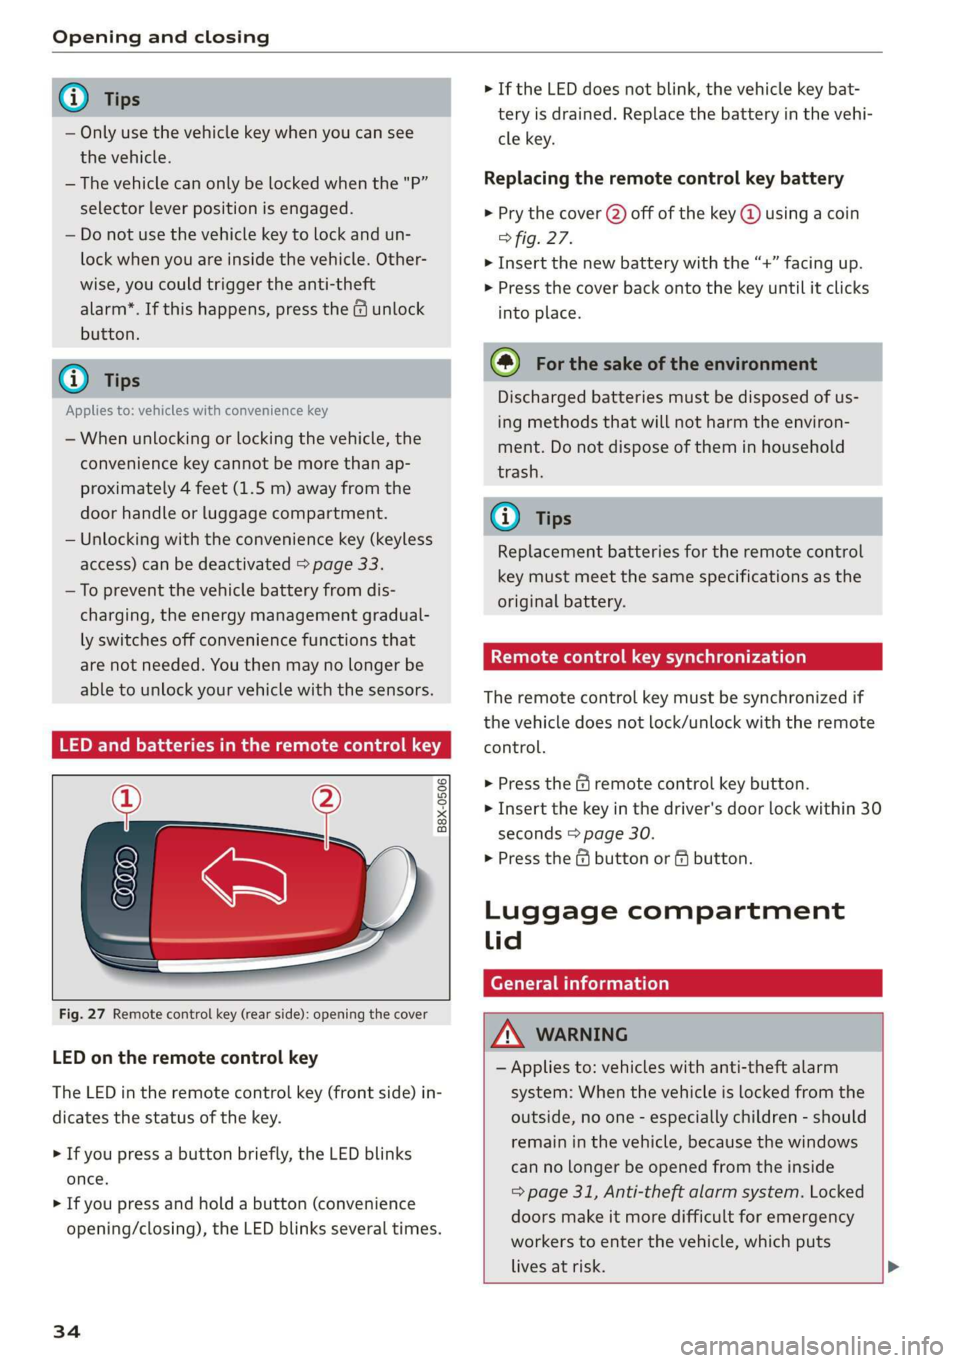
LED and batteries in the remote control key
B8X-0506
Fig. 27 Remote control key (rear side): opening the cover
LED on the remote control key
The LED in the remote control key (front side) in-
dicates the status of the key.
> If you press a button briefly, the LED blinks
once.
> If you press and hold a button (convenience
opening/closing), the LED blinks several times.
34
> If the LED does not blink, the vehicle key bat-
tery is drained. Replace the battery in the vehi-
cle key.
Replacing the remote control key battery
> Pry the cover (2) off of the key @ using a coin
° fig. 27.
> Insert the new battery with the “+” facing up.
> Press the cover back onto the key until it clicks
into place.
@) For the sake of the environment
Discharged batteries must be disposed of us-
ing
methods that will not harm the environ-
ment. Do not dispose of them in household
trash.
G) Tips
Replacement batteries for the remote control
key must meet the same specifications as the
original battery.
etree wate ee Cele)
The remote control key must be synchronized if
the vehicle does not lock/unlock with the remote
control.
> Press the f remote control key button.
> Insert the key in the driver's door lock within 30
seconds > page 30.
> Press the ( button or fj button.
Luggage compartment
lid
General information
ZA WARNING
— Applies to: vehicles with anti-theft alarm
system: When the vehicle is locked from the
outside, no one - especially children - should
remain in the vehicle, because the windows
can no longer be opened from the inside
=> page 31, Anti-theft alarm system. Locked
doors make it more difficult for emergency
workers to enter the vehicle, which puts
lives at risk. >
Page 37 of 278
83A012721BB
Opening and closing
— Always close and lock the luggage compart-
ment lid and the doors when the vehicle is
not in use. Otherwise someone such as a
child could enter the vehicle through the
luggage compartment and become locked
inside it. To reduce the risk of injury, do not
allow children to play in or around the vehi-
cle.
—To reduce the risk of injuries by pinching,
make sure that no one is in the operating
area of the luggage compartment lid, in-
cluding the hinge areas and the upper and
lower edge of the luggage compartment lid.
—
After closing the luggage compartment lid,
make sure that it is latched. The luggage
compartment lid could open suddenly while
driving, which would increase the risk of an
accident.
— Never drive with the luggage compartment
lid ajar or open, because poisonous gases
from the surrounding area can enter the ve-
hicle interior and increase the risk of asphyx-
iation.
— Applies to: vehicles with power-operated or
sensor-controlled luggage compartment lid:
If there is a luggage rack (such as a bicycle
rack) on the luggage compartment lid, the
luggage compartment lid may not open
completely, or it may close by itself if open
due to the extra weight. Therefore, the open
luggage compartment lid must be given ad-
ditional support or the cargo must first be
removed from the luggage rack.
— Applies to: vehicles with power-operated or
sensor-controlled luggage compartment lid:
Pay careful attention when closing the lug-
gage compartment lid. Otherwise, you could
cause serious injury to yourself or others de-
spite the pinch protection.
©) Note
The luggage compartment lid can bump into
objects such as the garage ceiling when open-
ing and become damaged.
@ Tips
When the vehicle is locked, the luggage com-
partment lid can be unlocked separately by
pressing the <3 button on the vehicle key.
The luggage compartment lid locks automati-
cally when it is closed again.
Opening and closing the luggage
compartment lid
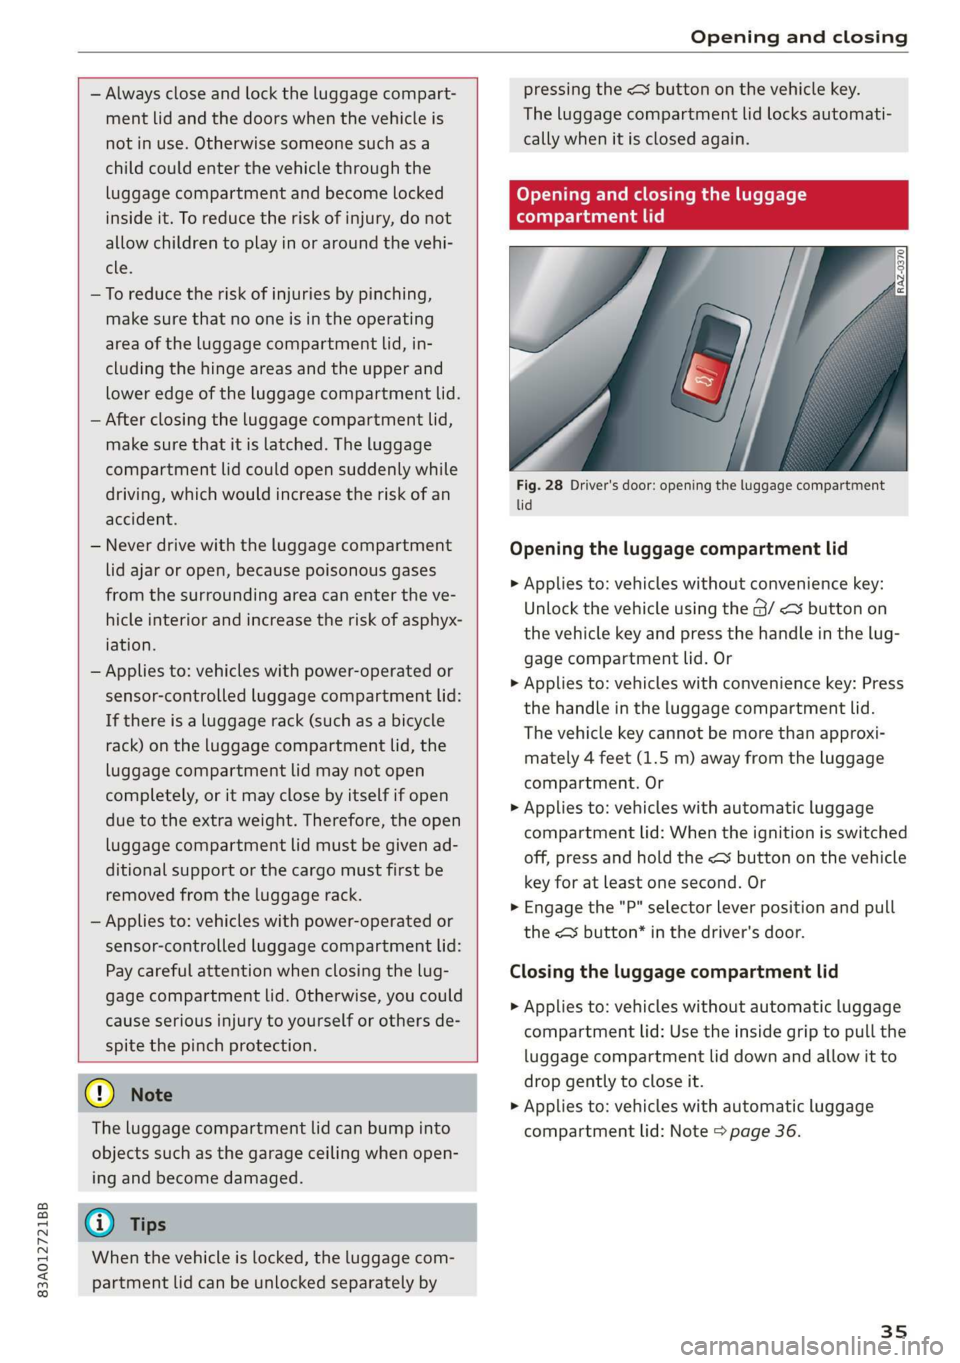
Fig. 28 Driver's door: opening the luggage compartment
lid
Opening the luggage compartment lid
> Applies to: vehicles without convenience key:
Unlock the vehicle using the @/ < button on
the vehicle key and press the handle in the lug-
gage compartment lid. Or
> Applies to: vehicles with convenience key: Press
the handle in the luggage compartment lid.
The vehicle key cannot be more than approxi-
mately 4 feet (1.5 m) away from the luggage
compartment. Or
> Applies to: vehicles with automatic luggage
compartment lid: When the ignition is switched
off, press and hold the << button on the vehicle
key for at least one second. Or
> Engage the "P" selector lever position and pull
the <3 button* in the driver's door.
Closing the luggage compartment lid
> Applies to: vehicles without automatic luggage
compartment lid: Use the inside grip to pull the
luggage compartment lid down and allow it to
drop gently to close it.
> Applies to: vehicles with automatic luggage
compartment lid: Note > page 36.
35
Page 39 of 278
83A012721BB
Opening and closing
necessary to use more force when doing this.
Move the lid slowly to reduce the amount of
force needed.
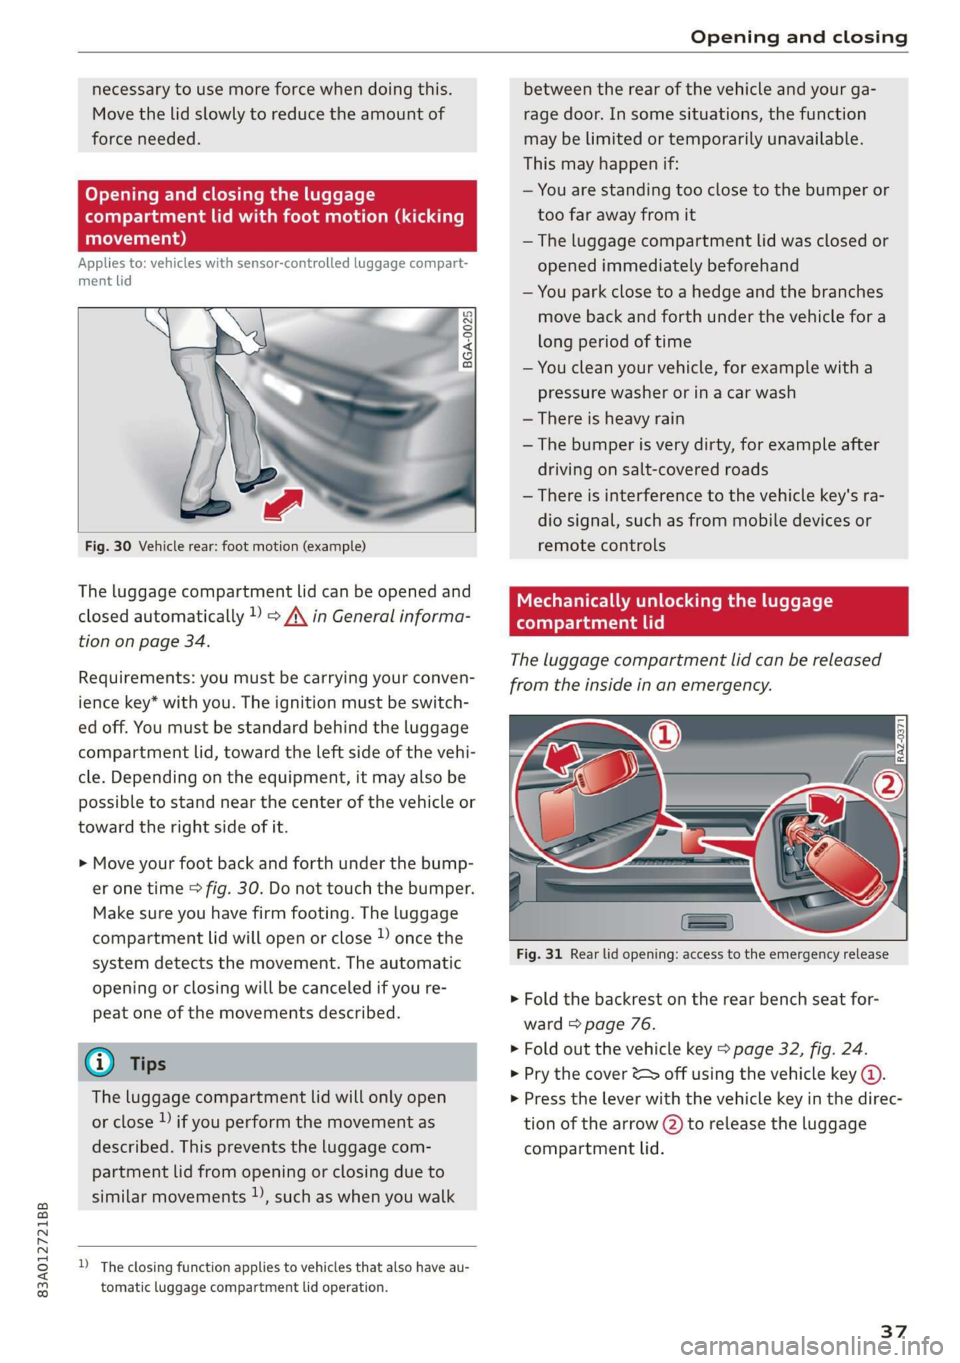
Opening and closing the luggage
compartment lid with foot motion (kicking
movement)
Applies to: vehicles with sensor-controlled luggage compart-
ment lid
BGA-0025
Fig. 30 Vehicle rear: foot motion (example)
The luggage compartment lid can be opened and
closed automatically 1) => A\ in General informa-
tion on page 34.
Requirements: you must be carrying your conven-
ience key* with you. The ignition must be switch-
ed off. You must be standard behind the luggage
compartment lid, toward the left side of the vehi-
cle. Depending on the equipment, it may also be
possible to stand near the center of the vehicle or
toward the right side of it.
> Move your foot back and forth under the bump-
er one time > fig. 30. Do not touch the bumper.
Make sure you have firm footing. The luggage
compartment lid will open or close )) once the
system detects the movement. The automatic
opening or closing will be canceled if you re-
peat one of the movements described.
@ Tips
The luggage compartment lid will only open
or close ) if you perform the movement as
described. This prevents the luggage com-
partment lid from opening or closing due to
similar movements )), such as when you walk
D_ The closing function applies to vehicles that also have au-
tomatic luggage compartment lid operation.
between the rear of the vehicle and your ga-
rage door. In some situations, the function
may be limited or temporarily unavailable.
This may happen if:
— You are standing too close to the bumper or
too far away from it
— The luggage compartment lid was closed or
opened immediately beforehand
— You park close to a hedge and the branches
move back and forth under the vehicle for a
long period of time
— You clean your vehicle, for example with a
pressure washer or in a car wash
— There is heavy rain
—The bumper is very dirty, for example after
driving on salt-covered roads
— There is interference to the vehicle key's ra-
dio signal, such as from mobile devices or
remote controls
Mechanically unlocking the luggage
compartment lid
The luggage compartment lid can be released
from the inside in an emergency.
Fig. 31 Rear lid opening: access to the emergency release
» Fold the backrest on the rear bench seat for-
ward > page 76.
> Fold out the vehicle key > page 32, fig. 24.
> Pry the cover & off using the vehicle key (@.
> Press the lever with the vehicle key in the direc-
tion of the arrow (2) to release the luggage
compartment lid.
37
Page 41 of 278
83A012721BB
Opening and closing
@® Left rear door
@® Right rear door
Opening and closing the windows
The driver can control all power windows. All
power window switches are equipped with a two-
stage function:
> To open or close the window completely, press
the switch down or pull the switch up briefly to
the second level. The operation will stop if the
switch is pressed or pulled again.
> To select a position in between opened and
closed,
press or pull the switch to the first level
until the desired window position is reached.
Correcting a malfunction in the one-touch
up/down function
You can reactivate the one-touch up/down func-
tion if it malfunctions.
> Pull the power window switch up until the win-
dow is completely raised.
> Release the switch and pull it up again for at
least one second.
Z\ WARNING
— Follow the safety precautions > page 28.
— Never close the windows carelessly or in an
uncontrolled manner, because this increases
the risk of injury.
@) Tips
— You can still open and close the windows for
several minutes after turning the ignition
off. The power window switch is not disa-
bled until the driver's door or front passeng-
er's door is opened.
— The power windows are equipped with pinch
protection. The automatic window may stop
closing and will open all the way again even
if no obstacle is detected. Pull the power
window switch up until the window is com-
pletely raised.
Convenience opening and closing
Applies to: vehicles with convenience key
Convenience opening and closing the
windows and roof*
You can set in the MMI if all windows or the roof*
should open or close all at once > page 29, Set-
ting the central locking system.
> Press and hold the & or & button on the vehicle
key until all windows and the roof* have
reached the desired position > /A\.
> Applies to: vehicles with convenience key:
Touch the sensor* on one of the door handles
and continue touching it until all of the win-
dows and the roof* are closed. Do not place
your hand in the door handle when doing this.
When all of the windows and the roof* are
closed, the turn signals will flash once.
Z\ WARNING
— Never close the windows or the roof* care-
lessly or in an uncontrolled manner, because
this increases the risk of injury.
— For security reasons, the windows and the
roof* can only be opened and closed with
the vehicle key at a maximum distance of
approximately 6.5 feet (2 m) away from the
vehicle. Always pay attention when using
the &@ button to close the windows and the
roof* so that no one is pinched. The closing
process will stop immediately when the &
button is released.
39
Page 46 of 278

Lights and Vision
Lights and Vision
Exterior lighting
Sitar MeL Lats eal
Fig. 36 Instrument panel: light button module
@ Light switch &
Press and hold @ until the desired light function
is selected. The selected function is displayed
briefly in the instrument cluster. When switching
on the ignition, the AUTO light function is auto-
matically selected.
— AUTO - The automatic headlights adapt to the
surrounding brightness automatically. The day-
time running lights* will automatically turn on.
In vehicles for certain markets, you can switch
the automatic daytime running lights* on and
off in the MMI.
— 20 - Low beam headlights. As soon as the igni-
tion is switched on, you can switch on the low
beam headlights manually.
— 30a - Parking lights. You can switch on the park-
ing lights at speeds under 20 mph (32 km/h).
— USA models: OFF - You can switch off all light
functions at speeds under 6 mph (10 km/h).
— Canada models: OFF - You can only switch off
all light functions when the vehicle is parked
and the ignition is switched off.
When the low beam headlights or parking lights
are switched on, the respective Ba or Ea indica-
tor light appears in the instrument cluster.
@ All weather light 2
The headlights automatically adjust so that there
will be less glare, for example when the road sur-
face is wet.
44
Automatic headlight range control
Your vehicle is equipped with automatic head-
light range control. It reduces glare for oncoming
traffic if the vehicle load changes. The headlight
range adjusts automatically.
Audi adaptive light
Applies to: vehicles with adaptive light
Audi adaptive light provides better visibility when
driving in the dark. The lights are adapted to the
road conditions based on speed, such as when
driving on expressways, rural roads, at intersec-
tions, and around curves. The adaptive light only
functions when the automatic headlights are ac-
tivated.
A WARNING
— Follow the safety precautions and note the
limits of the assist systems, sensors, and
cameras > page 105.
— Automatic headlights are only intended to
assist the driver. They do not relieve the
driver of responsibility to check the head-
lights and to turn them on manually based
on the current light and visibility conditions.
For example, fog cannot be detected by the
light sensors. So always switch on the low
beams ZO under these weather conditions
and when driving in the dark.
@ Tips
— If the vehicle battery has been discharging
for a while, the parking light may switch off
automatically. Avoid using the parking
lights for several hours.
— Follow the regulations applicable to the
country where you are operating the vehicle
when stopping the vehicle and when using
the lighting systems.
—Awarning tone will sound if you open the
door when the exterior lights are switched
on.
— Only the front headlights turn on when the
daytime running lights are switched on*. In
vehicles in certain markets, the tail lights
will also turn on.
—Incool or damp weather, the inside of the
headlights, turn signals, and tail lights can >