battery location AUDI Q5 2014 Owners Manual
[x] Cancel search | Manufacturer: AUDI, Model Year: 2014, Model line: Q5, Model: AUDI Q5 2014Pages: 316, PDF Size: 78.41 MB
Page 55 of 316

Notes o n these featur es
-The turn signals only work with the ignition
turned on. The indicator lights
II or Ill in
the instrument cluster
¢page 14 also b link.
- After you have turned a corner, the turn sig-
nal switches off automatica lly.
- The
high beam works only when the head
lights are on. The indicator light
II in th e
instrument cluster illuminates when the
high beams are on.
- The
headlight flasher wo rks only as long as
you hold the lever -even if there are no
lights turned on. The indicator light
II in
the instrument cluster illuminates when you
use the headlight flasher.
A WARNING
Do not use the high beam or headlight
flasher if you know that thes e cou ld blind
oncoming traffic.
Interior lights
Front interior lights
-
The front interior lights also contain reading
lights for the driver and passenger .
r ,,,,, , 11111
~8 ,~
G) Gl
,o . . o
I
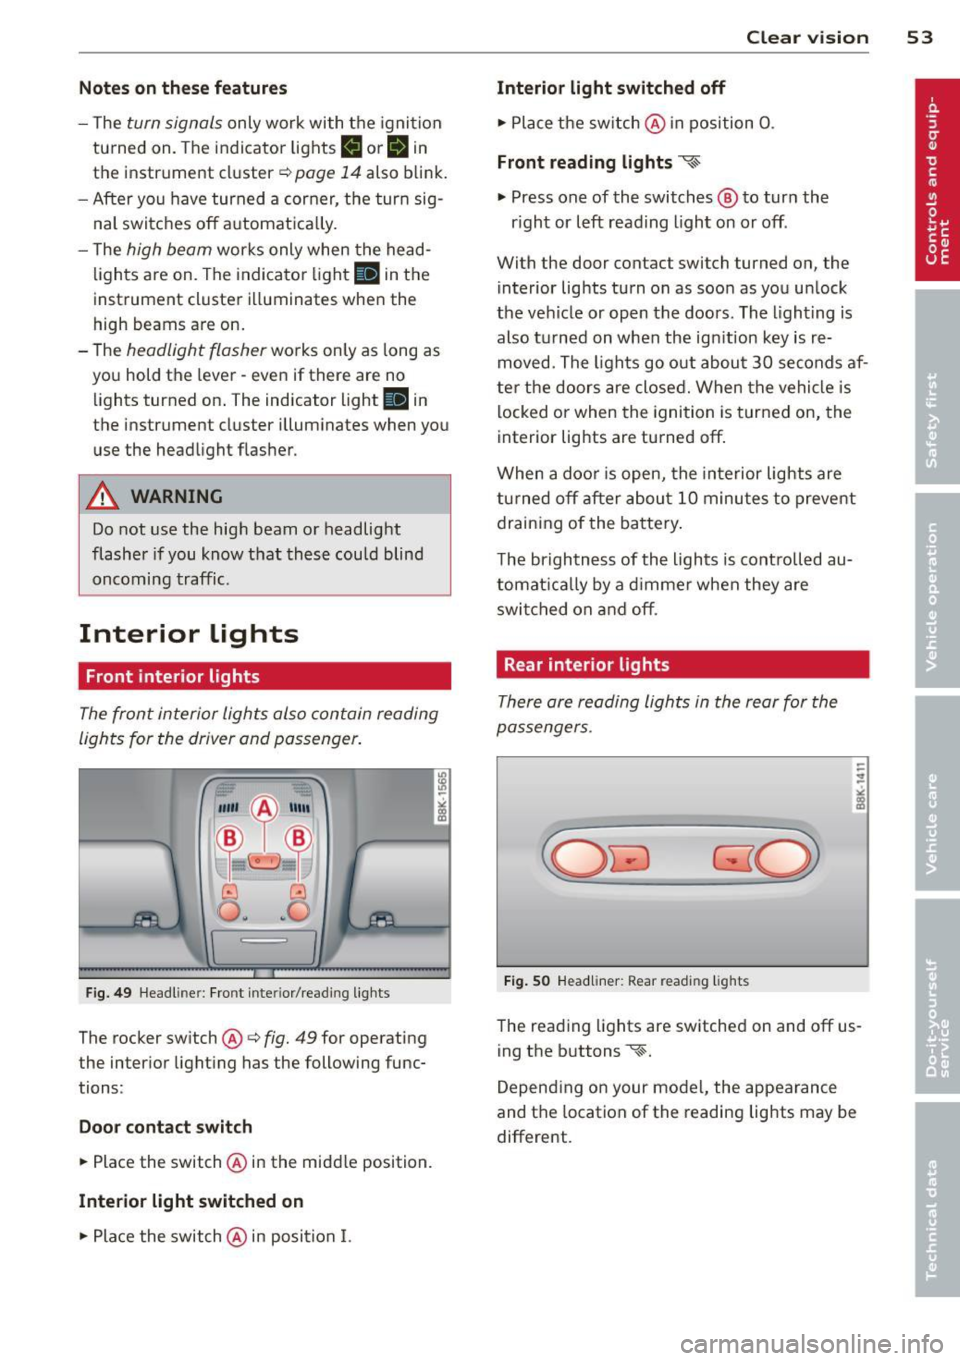
Fig. 49 Headliner: Fro nt inte rior/rea ding lights
The rocker switch @¢ fig. 49 for operating
the interior lighting has the following func
tions :
Door cont act swi tch
.,. Place the switch @ in the midd le position.
Interior light switched on
.,. Pla ce the switch @ in position I.
Clear vision 5 3
Interior light swit ch ed off
.,. Place the switch @ in position 0 .
Front read ing lights ~
.,. Press one of the switches@ to turn the
r ight or left reading light on or off .
With the door contact switch turned on, the
interior lights turn on as soon as you unlock
the vehicle or open the doors. The lighting is
also turned on when the ignition key is re
moved. The lights go out about 30 seconds af
ter the doors are closed. When the vehicle is locked or when the ignition is turned on, the
interior lights are turned off.
When a doo r is open, the interior lights are
tu rned off after about 10 minutes to prevent
draining of the battery .
The brightness of the lights is controlled au
tomat ica lly by a d immer when they are
swi tched on and off.
Rear interior lights
There are reading lights in the rear for the
passengers .
Fig . 50 Headliner: Rear read ing lig hts
The read ing l ights are switched on and off us
ing the buttons ~-
Depending on your model, the appearance
and the location of the reading lights may be
different .
Page 270 of 316

268 What do I do now?
What do I do now?
Jack, tools and
inflatable spare tire
Onboard tool kit and vehicle jack
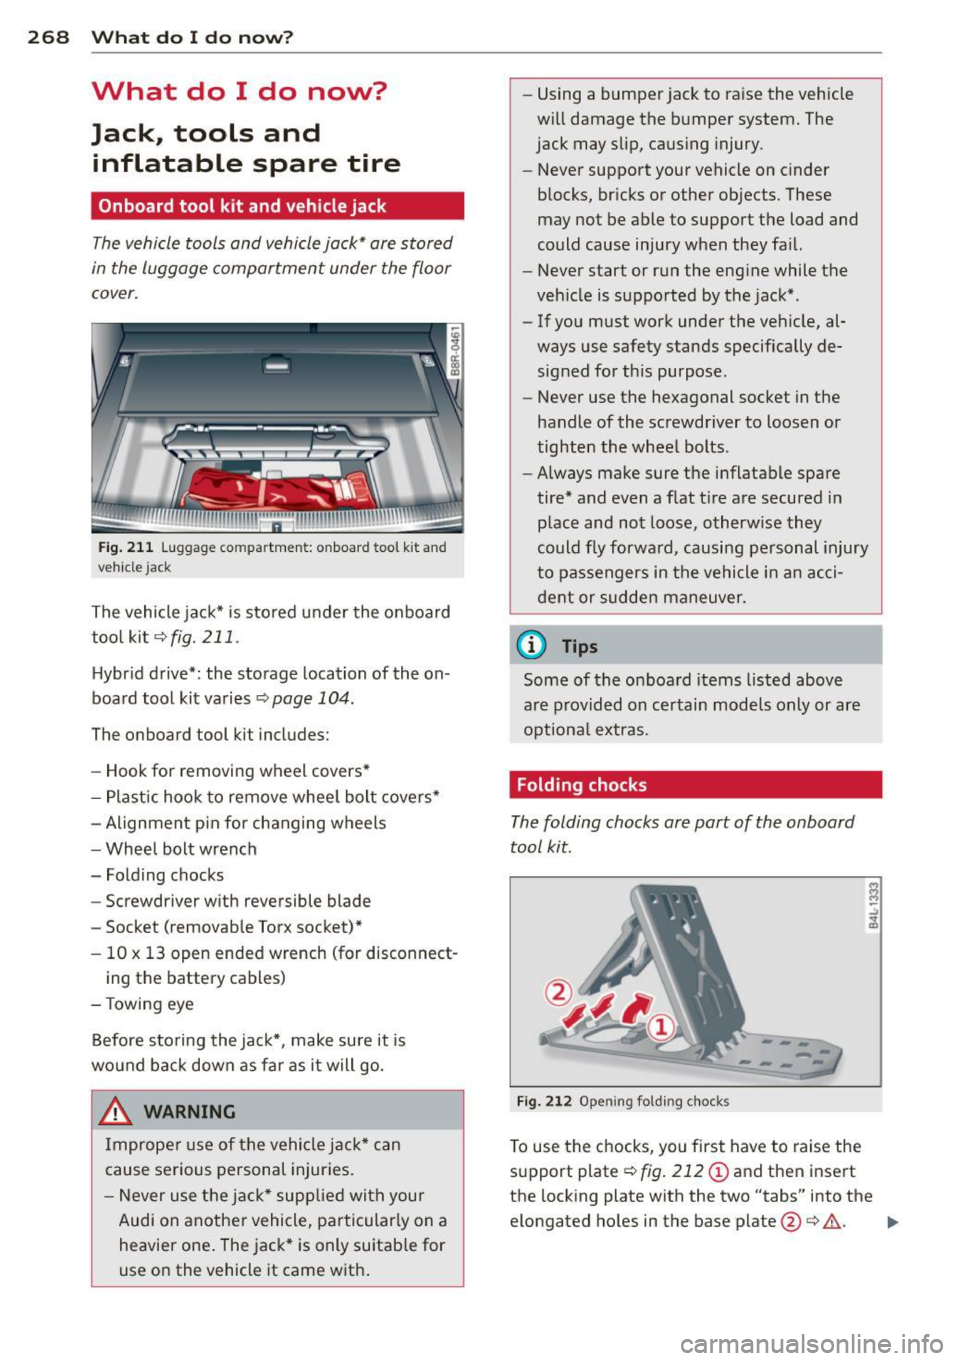
The vehicle tools and vehicle jack* are stored
in the luggage compartment under the floor
cover.
Fig . 211 Luggage compartment: on board tool kit and
vehicle jack
The vehicle jack* is stored under the on board
tool kit¢
fig. 211.
Hybrid drive*: the storage location of the on
board tool kit varies
¢ page 104.
The onboard tool kit includes:
- Hook for removing wheel covers*
- Plastic hook to remove whee l bolt covers*
- Alignment p in for changing wheels
- Wheel bolt wrench
- Folding chocks
- Screwdriver with reversible blade
- Socket (removable Torx socket)*
- 10 x 13 open ended wrench (for disconnect-
ing the battery cables)
-Towing eye
Before storing the jack*, make sure it is
wound back down as far as it will go.
& WARNING
Improper use of the vehicle jack* can
cause serious personal injuries.
- Never use the jack* supplied with your
Audi on another vehicle, particularly on a
heavier one . The jack* is only suitab le for
use on the vehicle it came with . -
Using a bumper jack to raise the vehicle
will damage the bumper system. The
jack may slip, causing injury.
- Never support your vehicle on cinder
blocks, bricks or other objects. These
may not be able to support the load and
could cause injury when they fa il.
- Never start or run the engine while the
veh icle is supported by the jack*.
- If you must work under the vehicle, al
ways use safety stands specifically de
signed for this purpose.
- Never use the hexagonal socket in the
handle of the screwdriver to loosen or
tighten the wheel bolts.
- Always make sure the inflatable spare
tire* and even a flat t ire are secured in
place and not loose, otherw ise they
could fly forward, causing personal injury
to passengers in the vehicle in an acci
dent or sudden maneuver.
@ Tips
Some of the on board items listed above
are provided on certain models only or are
optiona l extras.
Folding chocks
The folding chocks are part of the on board
tool kit.
Fi g. 2 12 Open ing folding choc ks
To use the chocks, you first have to raise the
support plate¢
fig . 212 (D and then insert
the locking plate with the two "tabs" into the
elongated holes in the base plate @¢& .
Ill>
Page 301 of 316

-----------------------------~I~n~d~e~x 299
Audi Service Repair Manuals and Litera-
ture ...... .. ................. .. ... 293
Auto-Check Control ........ .. .. .. .. .. 27
Auto locking ... ........... .. .. .. .... 38
Automatic belt retractor ....... ... .. . 1S2
Automatic driving light control ... ... ... 49
Automatic Shift Lock (ASL) ... ... .. .. . 124
Automatic transmission .............. 123
Automatic Shift Lock (ASL) ... .. .. .. . 124
Driving . . . . . . . . . . . . . . . . . . . . . . . . . . 125
Emergency mode ............ ... .. . 128
Emergency release .............. .. . 128
Hill descent control ................ 126
Kick-down
. . ............. .... .. ... 127
Manual shift program .............. 127
Removal lock (ignition key) . .. .. .. .. .. 83
Selector lever ..................... 123
Shift buttons ............ .... .. ... 127
Automatic wipe/wash system . . . . . . . . . . 54
Auto Safety Hotline .............. .. . 146
AUTO (climate control) . . . . . . . . . . . . . . . . 80
Average speed . . . . . . . . . . . . . . . . . . . . . . . 23
Avoid damaging the vehicle .. .. .. .. .. . 207
B
Bass box .......................... 269
Battery . . . . . . . . . . . . . . . . . . . . . . . . . . . 242
Battery location inside the luggage com-
partment ................ ...... .. 242
Charging . . . . . . . . . . . . . . . . . . . . 105 , 244
Important warnings when working on
the battery . . . . . . . . . . . . . . . . . . . . . . . 242
Jump starting . ........... .. .. .. ... 283
L ow ............................. 203
Replacing the battery ........ ... .. . 245
State of charge .............. ... ... 203
Voltage ........................... 34
Winter operation .................. 242
Working on the battery . . . . . . . . . . . . . 242
Before driving ................. .. ... 139
Bio-ethanol (Fuel) ........... ... ... .. 223
Blended gasoline .......... .. .. .. .. . 222
Blow er (climate control) . . . . . . . . . . . . . . . 80
Booster seats .............. ...... .. 186 Brake fluid
Changing the brake fluid ............ 241
Checking the brake fluid level ...... .. 241
Reservoir . .. .. .. ................. 241
What is the correct brake fluid level? .. 241
What should I do if the brake fluid warn-
ing light comes on? .. .. .. ..... ..... 241
Brake system . ... .. .. ............... 241
Anti-lock brake system . . . . . . . . . . . . . . 17
Brake assist system ................ 197
Brake booster .. .. ................. 200
Brake fluid .. .. .. .. . .. ... .... .... . 241
Brake fluid specifications for refill and re-
placement .. .. .. ................. 241
Brak e light defective . . . . . . . . . . . . . . . . 33
Brak e pads . ... .. .. ............... 205
Electromechanical parking brake ..... . 88
General information .............. . 200
How does moisture or road salt affect the
brakes? ... .. .. .. .... ........... .. 200
Malfunc tion . . . . . . . . . . . . . . . . . . . . . . . 29
Warning/indicator lights ............. 18
Worn brake pads symbol . . . . . . . . . . . . . 33
Braking guard . . . . . . . . . . . . . . . . . 107, 113
Messages . .. .. .. ............... . .
Settings .. .. .. .. ................ .
Switching on and off .............. .
Break-in period . ..... .............. .
Brake pads . ... .. .. .............. .
Tires
B reakover angle ... ............... . .
Bulbs ......... ... .. .............. .
C
California Proposition 65 Warning ... . .
Battery specific ... ............... .
Capacities
Carbon parts 114
114
114
205
205
205
210
282
232
244
290
Cleaning . . . . . . . . . . . . . . . . . . . . 219,220
Care .............................. 217
Cargo area
refer to Load ing the luggage compart
ment
..... .. .. .. .. .. ........... .. 145
Cargo floor . . . . . . . . . . . . . . . . . . . . . . . . . 70
Catalytic converter ... .............. . 206
•
•