ABS AUDI Q5 2015 Owner's Manual
[x] Cancel search | Manufacturer: AUDI, Model Year: 2015, Model line: Q5, Model: AUDI Q5 2015Pages: 302, PDF Size: 75.01 MB
Page 209 of 302
M N
co
a:
co
,...., \!) 1.1'1
N 1.1'1 ,....,
Parking on a slope
Do not pork on a slope with a trailer. If it cannot
be avoided, do so only ofter doing the following:
When parking:
.. Apply the foot brake .
.. Have someone place chocks under both the ve
hicle and the trailer wheels .
.. With chocks in p lace, slowly re lease the brakes
unt il the w heel chocks absorb the load .
.. Turn the wheels towa rds the curb .
.. Apply the pa rking bra ke .
.. Move the selec tor lever to P .
When restarting after parking:
.. Apply the foot brake .
.. Start the eng ine .
.. Move the se lecto r lever to 0/5 .
.,. Re lease the par king b rake a nd slow ly pull ou t
and away from the whee l cho cks .
.. Stop and have someone re trieve the w heel
chocks .
(D Tips
If you move the selector lever of the a utomat
ic transmission to P before applying the par k
ing brake and before blocking the wheels, you
may have to use more force later to move the
lever out of the P position .
Trailer mode
207
Page 213 of 302

M N
co
a:
co
,...., \!) 1.1"1
N 1.1"1 ,....,
Care and cleaning
Component Situation Solution
Te xtile s
Deposits adhering to Vacuum cleaner
artificial leather, the surface
Alcantara Water-based depos its Absorbent
cloth and mild soap solutiona)
such as coffee, tea,
b lood, etc.
Oil-based deposits Apply a m ild soap solutiona>, blot away the dissolved oil or
such as oil, make-up, dye, treat afterward with water, if necessary
etc.
Special deposits such Specia l sta in remover, blot with absorbent material, treat
as ink, na il polish, la- afterward with mild soap solution, if necessarya>
tex paint, shoe pol-
ish, etc.
Natural leather Fresh stains Woo
l cloth with a mild soap solutiona>
Water-based deposits fresh stains : absorbent cloth
such as coffee, tea, dried stains: stain remover suitable for leather
blood, etc.
Oil-based deposits Fresh stains: absorbent cloth and stain remover sui tab le
such as oil, make-up, for leathe r
etc. dried stains: Oil cleaning spray
Special deposits such Spot remover suitable for leather
as ink, nai l polish, la-
t ex paint, shoe po l-
ish, etc.
Ca re Regularly apply conditioning cream that protects from
light and penetrates into the mate rial. Use specially-col-
ored conditioning cream, if necessary.
Carbon parts Deposits clean the same way as plastic parts
a) Mild soap sol ution : maximum two tablespoons of neutral soap in 1 quart (1 liter) of water
.8, WARNING
The windshield may not be treated with wa
ter-repelling windshield coating agents . Un
favorab le conditions such as wetness, dark
ness, or low sun can resu lt in increased glare.
Wiper blade chatter is also possible.
@ Note
- Headlights/tail lights
- Never clean headlights or tail lights with a
dry cloth or sponge.
- Do not use any cleaning product that con
tains alcohol, because they could cause
cracks to form.
- Wheels
-
- Never use any paint polish or other abra
sive materials.
- Damage to the protective layer on the
rims such as stone chips or scratches must
be repaired immediately.
- Sensors/camera lenses
-Never use warm or hot water to remove
snow or ice from the camera lens. This
could ca use the lens to crack.
- Never use abrasive cleaning materials or
alcohol to clean the camera lens. This
could cause scratches and cracks.
- Door windows
-Remove snow and ice on windows and ex-
terior mirrors with a plastic scraper. To
211
Page 232 of 302
Checking and F ill in g
The brake fluid reservoir is located at the rear
partition of the engine compartment on t he left
side ¢
page 223.
The fl uid level may drop slightly after some time
due to the automatic adjustment of the brake
pads. This is not cause for alarm.
If the b ra ke fluid level fal ls considerably below
the "MIN" mark, the brake warn ing/indicator
light (U.S. models:
1111 , Canadian models: . )
will come on¢
page 18 and ¢ page 28 . Do not
continue to operate the vehicle . The complete
brake system shou ld be thoroughly checked by an
author ized Audi dealer or qualif ied workshop and
the cause corrected. If the brake fluid level is too low, the brake warning/indicator light will illum i
nate. Contact an authorized Aud i dealer
immedi
a tel y.
Changing brake fluid
Have the brake fluid changed by an experienced technician.
Brake flu id abso rbs moisture from the a ir . If the
water content in the brake fluid is too high, cor rosion in the b rake system may result after a pe ri
od of time. The boiling point of the bra ke fluid
will also decrease conside rably and decrease
b ra ki ng per fo rmance .
Therefore, th e brake flu id must be changed
ev ery
tw o years .
Always use new b rake fluid w hich con
forms to Fede ra l Motor Vehicle Standa rd " FMVSS
1 16 DOT 4".
The brake fluid rese rvoir can be difficult to reach,
therefo re, we recommend that yo u have the
b rake fluid changed by your authori zed
Audi
dealer .
Your dealer has the cor rect too ls, the
right brake f luid and the know -how to do t his for
you.
A WARNING
- Brake fluid is po isonous. It must be stored
only in the closed orig inal container out of
the reach of children!
- Brake fai lure can result from old or inappro
pr iate brake fluid . Observe these precau
t ions:
230
- Use only brake fluid that meets SAE spec i
ficat io n
J 1703 and conforms to Federal
Motor Vehicle Sta ndard 116 . Always check
with your aut horized Aud i dea ler to make
su re you are using the correct brake fl uid .
The co rrect type of brake f lu id is also ind i
cated on t he b rake fluid reservoir.
- The brake fl uid must be new. Heavy use of
the b rakes can cause a vapor lock if the
brake fluid is left in t he system too long.
This can se riou sly affec t the efficiency of
the b rakes as well as yo ur sa fety. This
could result in an acc ident .
(D Note
Bra ke fluid will damage the pai nt of you r vehi
cle.
@ For the sake of the environment
B ecause of the prob lem of prope r disposal of
b rake fluid as well as the spe cial tools re
q ui red and the necessary ex pert ise, we rec
ommend that you have the brake f lu id
cha nged by yo ur autho rize d Aud i dea le r.
Battery
General information
U nder normal operat ing conditions , the battery
i n you r Aud i does not need any maintenance.
With
high outside tem pera tures or long d aily
drives we recommend that you have the e lectro
l yte level checked by an a utho rized Audi dea le r or
qualified workshop. The electrolyte leve l should
a lso be checked each time the battery is charged
¢ page 232.
Have the battery checked when yo u take your ve
hicle in for service. You a re well advised to re
place a battery that is older than 5 years.
With cer tain types of airbag deployment, t he bat
tery is disconnected from the vehicle elect rical
system for safety reasons
Q &. in Repair, care
and disposal of the airbags on page 165.
Hybrid drive *: yo u can find important information
abo ut the high voltage battery under ¢
page 98 . ..,.
Page 233 of 302
M N
co
a:
co
,...., \!) 1.1'1
N 1.1'1 ,....,
Disconnecting the battery terminals
Some vehicle functions (power window regula
tors , for example) are lost if the battery termi
nals are disconnected. These functions have to be
re learned after th e battery terminals are con
nected again. To prevent this, the batte ry should
only be disconnected from the ve hicle electrical
system when absolutely necessary for repairs.
Vehicles not driven for long periods
If you do not drive your vehicle over a period of
several days or weeks, e lectrica l components are
gradually cut back or switched off. This reduces
energy consumption and maintains starting ca pability over a longer period
c:> page 196.
Take into consideration that when you un lock
your veh icle, some convenience functions, such
as the interior lights or the power seat adjust
ment, may not be available . The convenience
functions will be ava ilable again when you turn
on the ignition and start the engine.
Winter operation
During the winter months, battery capacity tends
to decrease as temperatures drop. This is because
more power is also consumed while starting, and
the headlights, rear window defogger, etc ., are
used more often.
Avoid unnecessary power consumption, part icu
larly in city traffic or when traveling only short
d istances . Let your authorized Aud i dealer check
the capacity of the vehicle battery before w inter
sets in
c:> page 232. A well charged battery will
not only prevent s tarting problems when the
weather is cold, but will also last longer.
Working on the battery
Be especially careful when working on or near
the battery.
The battery is located in the luggage compart
ment under the floor. Before you check anything
in the lug gage compartment,
read and heed all
WARNINGS
c:> ,&. .
Hybr id drive*: you can find important informat ion
about the high vo ltage battery u nder
c:> page 98.
Checking and Filling
Always heed the safety warnings, when working
on the vehicle battery or the vehicle e lectrica l
system to prevent injury.
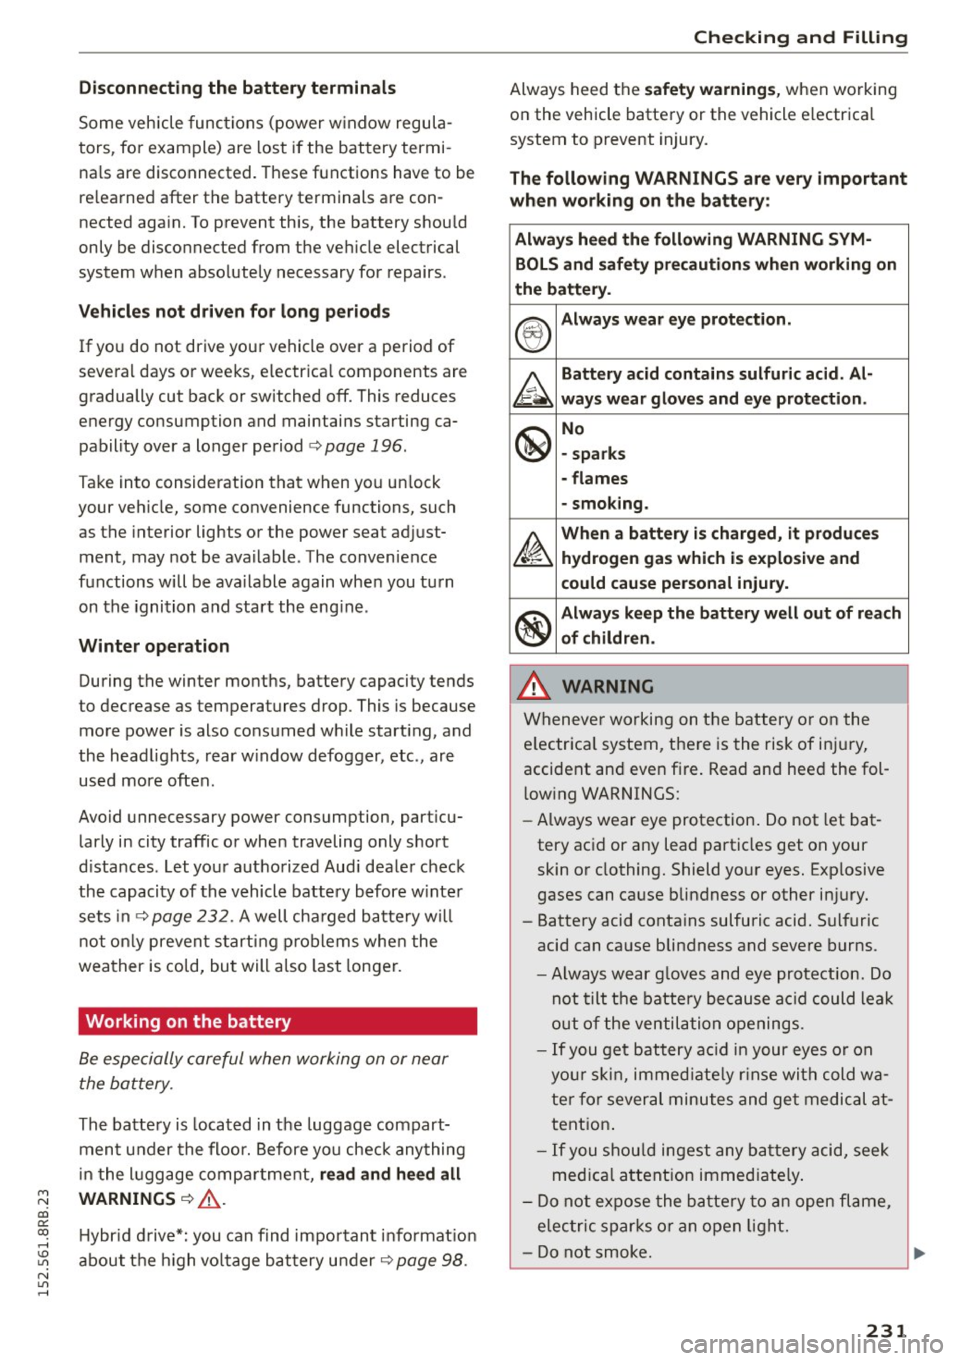
The following WARNINGS are very important
when working on the battery :
Always heed the following WARNING SYM·
BOLS and safety precautions when working on
the battery.
®
Always wear eye protection.
~
Battery acid contains sulfuric acid. Al·
ways wear gloves and eye protection.
@
No
· sparks
· flames
· smoking.
~
When a battery is charged, it produces
hydrogen gas which is explosive and
could cause personal injury.
®
Always keep the battery well out of reach
of children.
A WARNING
= -Whenever working on the battery or on the
e lectrica l system, there is the risk of injury,
accident and even fire . Read and heed the fol
lo w ing WARNINGS:
- Always wear eye protection. Do not let bat
tery acid or any lead particles get on your
skin or clothing. Shield yo ur eyes. Exp losive
gases can cause blindness or other injury.
- Battery acid contains sulfuric acid. Sulfuric
acid can cause blindness and severe burns .
- Always wear g loves and eye protection. Do
not tilt the battery because acid could leak
out of the ventilation openings.
-If you get battery acid in your eyes or on
your skin, immed iately r ins e with cold wa
ter for several minutes and get medical at
tent ion.
- If you should ingest any battery acid, seek
med ical attention immediate ly .
- Do not expose the battery to an open flame,
elec tric sparks or an open light.
- Do not smoke.
~
231
Page 245 of 302
M N ai
"' ~
-"' "' N
"' .....
different tire speeds. For this rea
son, in case of emergency, only
use a spare tire* that is the same
circumference as the regular tires.
A WARNING -
-Only use tire/rim combina
tions and suitable wheel bolts
that have been approved by
Audi. Otherwise, damage to
the vehicle and an accident
could result.
-For technical reasons, it is not possible to use tires from oth
er vehicles - in some cases,
you cannot even use tires from
the same vehicle model.
-Make sure that the tires you select have enough clearance
to the vehicle . Replacement
tires should not be chosen
simply based on the nominal
size, because tires with a dif
ferent construction can differ greatly even if they are the
same size. If there is not
enough clearance, the tires or
the vehicle can be damaged
and this can reduce driving
safety and increase the risk of
an accident.
-Only use tires that are more
than 6 years old when abso-
Wheels
lutely necessary and drive
carefully when doing so.
-Do not use run-flat tires on your vehicle . Using them when
not permitted can lead to ve
hicle damage or accidents.
-If you install wheel covers on
the vehicle, make sure they al low enough air circulation to
cool the brake system. If they
do not, this could increase the
risk of an accident.
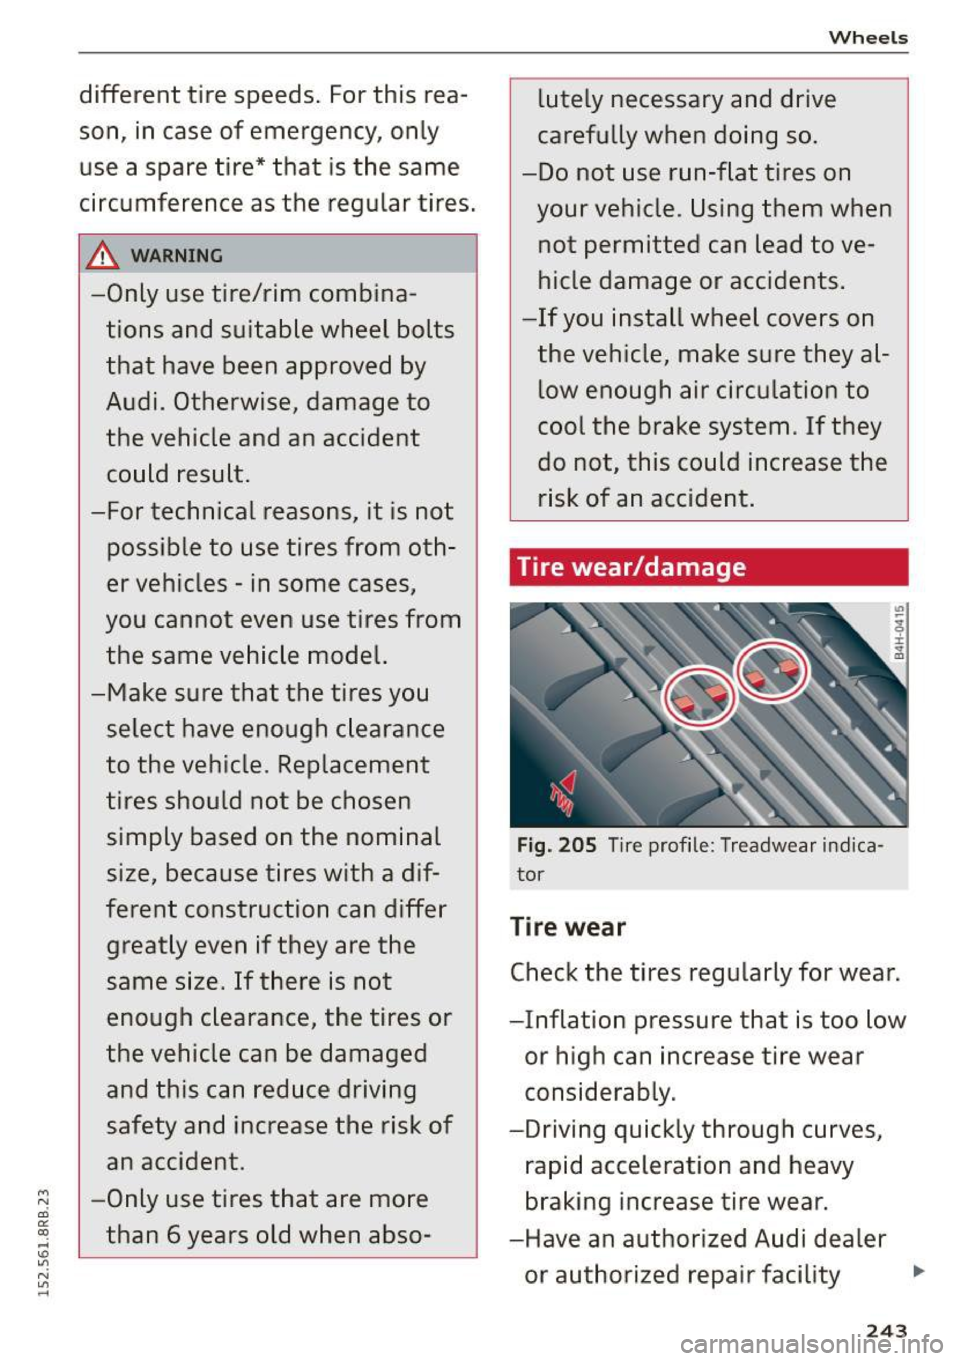
Tire wear/damage
Fig. 205 Tir e profi le : Treadwear indica
tor
Tire wear
Check the tires regularly for wear.
-Inflation pressure that is too low
or high can increase tire wear
considerably .
-Driving quickly through curves,
rapid acceleration and heavy
braking increase tire wear.
-Have an authorized Audi dealer or authorized repair facility
243
...
Page 255 of 302

M N
co
a:
co
,...., \!) ..,.,
N ..,., ,....,
also reduces fuel efficiency and tire tread life,
and may affect the vehicle's handling and stop
ping ability .
Please note that the TPMS is not a substitute for
proper tire maintenance, and it is the driver's re
sponsibility to maintain correct tire pressure,
even if under-inflation has not reached the level
to trigger illumination of the TPMS low tire pres
sure telltale.
Your vehicle has also been equipped with a TPMS malfunction indicator to indicate when the sys
tem is not operating properly. The TPMS mal
function indicator is combined with the low tire pressure telltale . When the system detects a
malfunct ion, the telltale will flash for approxi
mately one minute and then remain continuously
illuminated. This sequence will continue upon
subsequent veh icle start-ups as long as the mal
function exists.
When the malfunction indicator is illuminated,
the system may not be able to detect or signal
low tire pressure as intended. TPMS malfunctions
may occur for a variety of reasons, including the
installation of replacement or alternate tires or
wheels on the vehicle that prevent the TPMS
from functioning properly. Always check the
TPMS malfunction telltale after replacing one or more tires or wheels on your vehicle to ensure
that the replacement or alternate tires and
wheels allow the TPMS to continue to function properly.
Wheels
If the Tire Pressure Monitoring System
indicator appears
Appl ies to vehicles : wi th t ir e p ress ure mo nito rin g system
The tire pressure indicator in the instrument
cluster informs you if the tire pressure is too low
or if there is a system malfunction.
Fig. 208 Instrument cluster: i ndicator light with message
Using the ABS sensors, the tire pressure monitor
ing system compares the tire tread circumference
and vibration characteristics of the individual
tires .
If the pressure changes in one or more
tires, this is indicated in the instrument cluster
display with an indicator light
RIJ and a message
¢fig. 208. If only one tire is affected, the loca
tion of that tire will be indicated.
The tire pressures must be stored in the Infotain
ment system again each time the pressures
change (switching between partial and full load
pressure) or after changing or replacing a tire on
your vehicle ¢
page 254. The tire pressure moni
toring system only monitors the tire pressure you have stored. Refer to the tire pressure label for
the recommended tire pressure for your vehicle
¢ page 245, fig . 207.
Tire tread circumference and vibration character
istics can change and cause a tire pressure warn
ing if:
- the tire pressure in one or more tires is too low .
- the tire has structural damage.
- the tir e was replaced or the tire pressure
changed and it was not stored again
c:!;> page 254.
-the collapsible spare* tire is installed.
253
Page 257 of 302
M N
co ~ co
rl I.O
"' N
"' rl
Emergency assistance
Vehicle jack, vehicle tool kit and collapsible spare
tire
Onboard tool kit and vehicle jack
The vehicle tools ond vehicle jack* are stored in
the luggage compartment under the floor cover.
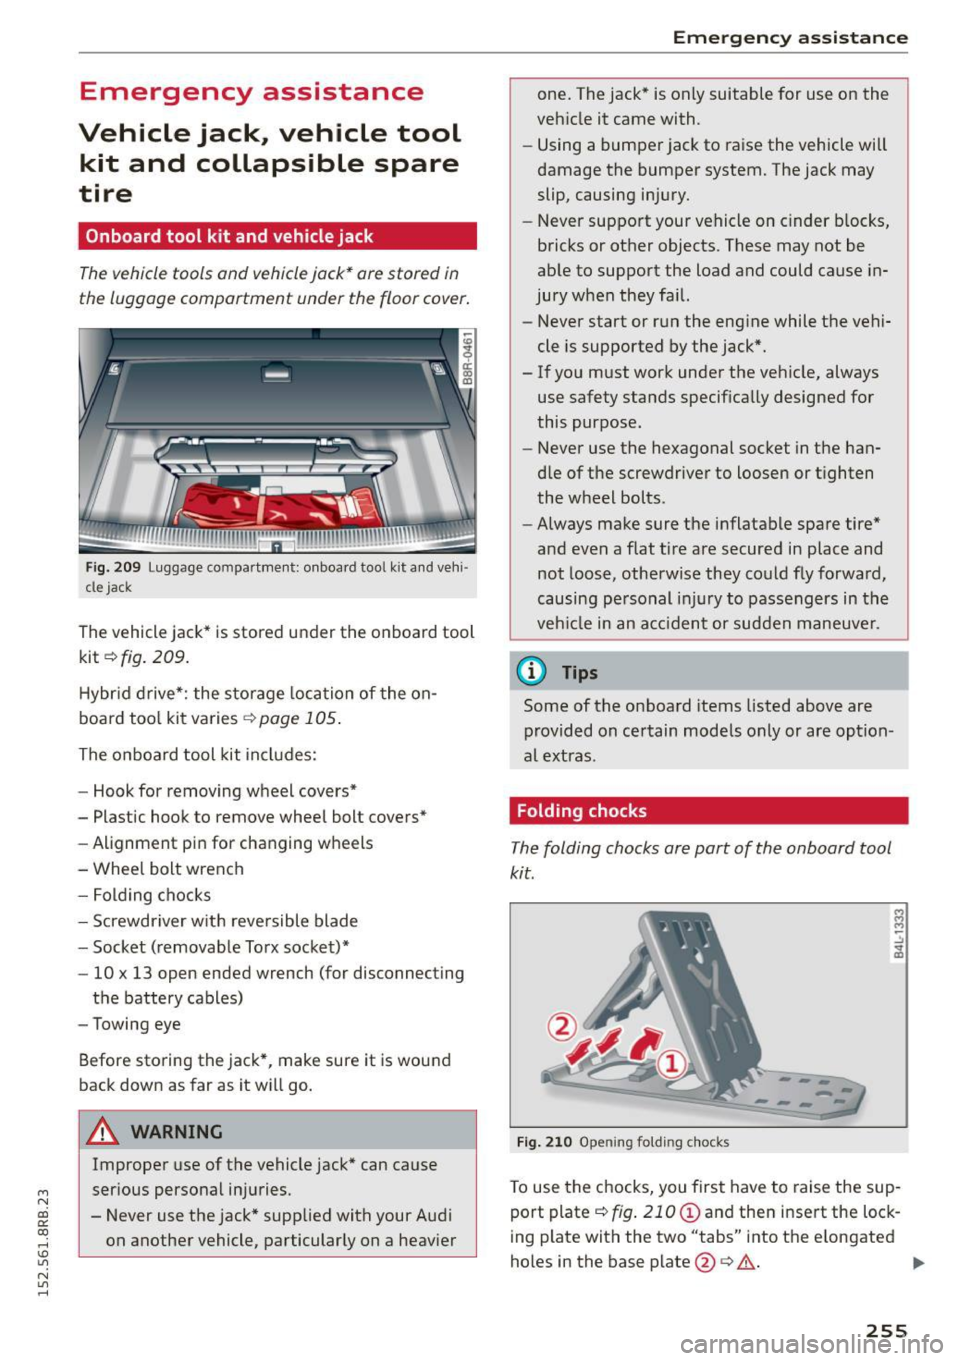
Fig. 209 Luggage compartme nt: on board tool kit and vehi·
cle jack
The vehicle jack* is stored under the on board tool
ki t¢ fig.
209.
Hybrid drive*: the storage location of the on
board too l kit varies ¢
page 105.
The on board tool kit includes:
- Hook for removing wheel covers*
- Plastic hook to remove wheel bolt covers*
- Alignment p in for cha nging wheels
- Wheel bolt wrench
- Folding chocks
- Screwdriver w ith reversible blade
- Socket (removable Torx socket)*
- 10 x 13 open ended wrench (for disconnecting
the battery cables)
- Towing eye
Befo re storing the jack*, make sure it is wound
back down as far as it will go.
A WARNING
Improper use of the vehicle jack* can cause
ser ious personal injuries.
- Never use the jack* supplied with your Audi
on another vehicle, particularly on a heav ier
-
Emergen cy assistance
one. The jack * is only suitable for use on the
veh icle it came with.
- Using a bumper jack to raise the vehicle will
damage the bumper system. The jack may
slip, causing injury.
- Never support your vehicle on c inder b locks,
bricks or other objects. These may not be
able to support the load and could cause in·
jury when they fa il.
- Never start or run the engine while the vehi
cle is supported by the jack*.
- If you must work under the vehicle, always
use safety stands specifically designed for
this purpose.
- Never use the hexagonal socket in the han
dle of the screwdriver to loosen or tighten
the wheel bolts.
- Always make sure the inflatable spare tire*
and even a flat tire are secured in place and
not loose, otherwise they could fly forward,
causing personal injury to passengers in the
veh icle in an acc ident or sudden maneuver.
(D Tips
Some of the on board items listed above are
provided on certain models only or are option
al extras.
Folding chocks
The folding chocks are part of the on board tool
kit.
--.. ,..
Fig. 210 Open ing foldi ng chock s
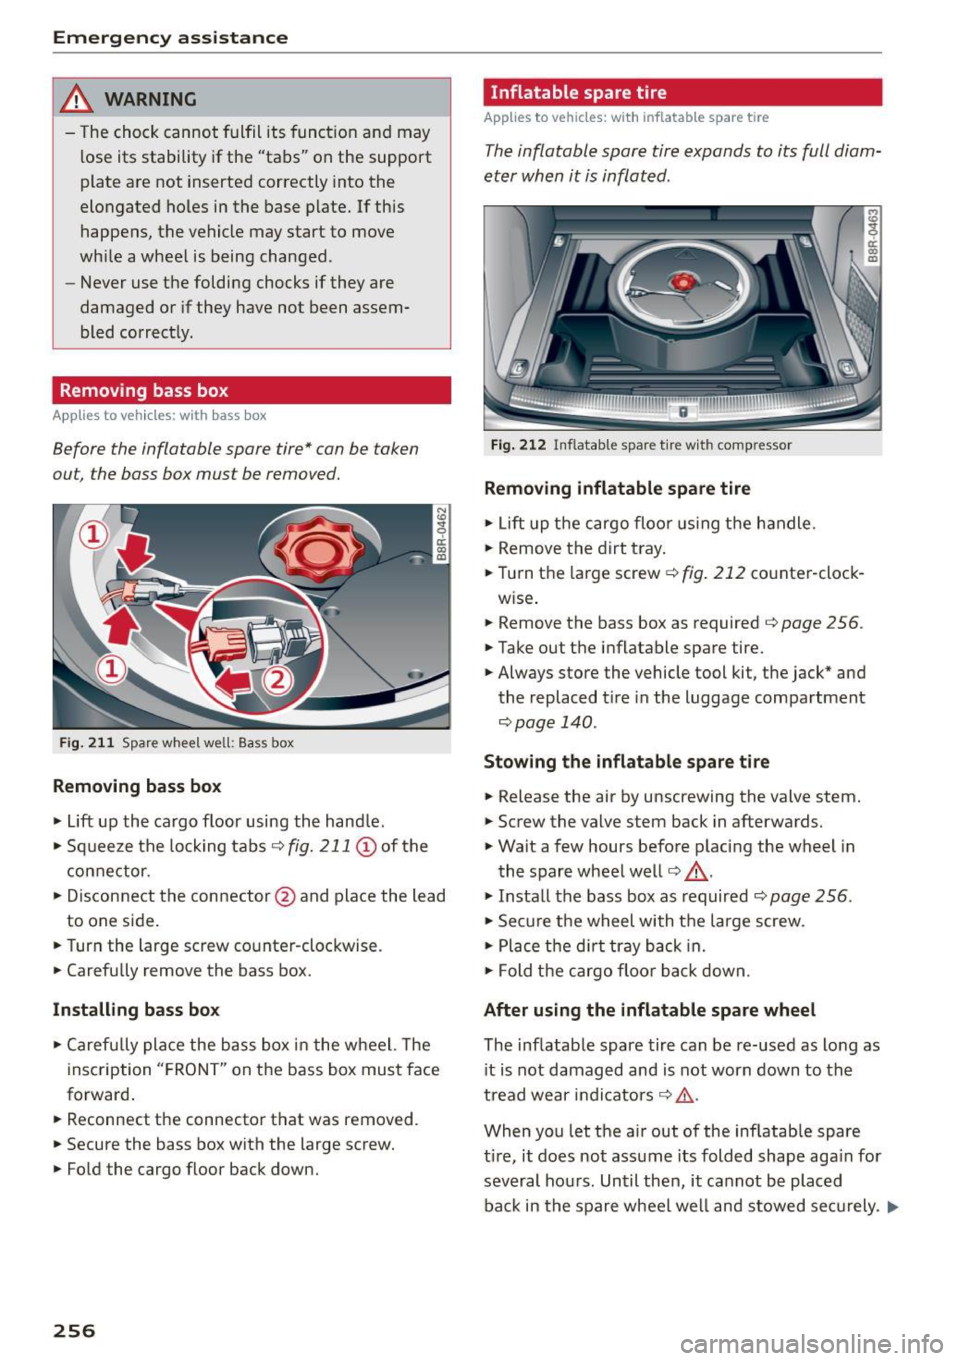
To use the chocks, you first have to rais e the sup ·
port plate r::!,>
fig. 210 (!) and then i nsert the lock
ing plate with the two "tabs" into the e longated
holes in the base pl ate@¢
A. .,.
255
Page 258 of 302
Emergency assistance
_& WARNING
- The chock cannot fulfil its funct io n and may
lose its stability if the "tabs" on the support
plate are not inserted correctly into the
elongated holes in the base plate. If th is
happens, the vehicle may start to
move
wh ile a wheel is being changed .
- Never use the folding chocks if they are
damaged o r if they have not been assem
bled correct ly.
Removing bass box
Applies to veh icles: w ith bass box
Before the inflatable spare tire* can be taken
ou t, the bass box must be removed.
F ig . 211 Spare whee l well: Ba ss box
Removing bass box
" Lift up the cargo floor using the hand le .
" Squ eeze the lock ing tabs
q fig. 211 (D of the
con nector.
" Disconne ct the connector @and place the lead
to one side .
"T urn the large screw co unter -clockwise.
" Carefu lly remove the bass box.
Installing bass box
" Carefully place the b ass box in t he wheel. The
inscription " FRON T" on the bass box mus t face
forward .
" Reconnect the connector that was removed .
" Secure the bass box with the large screw.
" Fo ld the cargo floor back down.
256
Inflatable spare tire
Applies to vehicles: with inflatable spare tire
The inflatable spare tire expands to its full diam
eter when it is inflated .
Fig. 212 In flatable spa re tir e with compressor
Removing inflatable spare tire
" Lift up the cargo floo r using t he h andle .
" Remove the dirt tray .
" Tu rn the large screw
q fig . 212 co unter -clock-
w ise .
" Remove the bass box as required
q page 256 .
"Take out the inflatable spare tire.
" Always store the vehicle tool kit, the jack* and
the replaced t ire in the luggage c ompa rtment
q page 140.
Stowing the inflatable spare tire
" Release the air by unscrewing the valve stem.
" Screw the
valve stem back in afterwards.
" Wait a few hours befo re p lacing the wheel in
the spare wheel well
9 & .
"Insta ll the bass box as required qpage 256.
" Sec ure t he wheel with the large screw .
" Place the dirt tray back in.
" Fold the cargo floo r ba ck down .
After using the inflatable spare wheel
The inflatab le spare tire can be re-used as lo ng as
i t is not damaged and is not worn down to the
tread wear indicators
q &, .
When you let the a ir out of the inf latab le spare
t ir e, it does not assume its folded shape aga in for
several hours. Until then, it ca nnot be placed
back in the spare wheel we ll and stowed se cu rely . .,.
Page 269 of 302

M N
co ~ co
rl I.O
"' N
"' rl
Left cockpit fuse assignment
Fig. 224 Left side of the cockpit: fuse panel with plastic
clip
Fuse panel @ (black )
No. Equipment
1 Dynamic steering
2 ESC control module
A/C system pressure sensor, electrome-
3 chanical park
ing brake, Homelink, auto-
matic dimming interior rearview mirror, air
quality/outside air sensor, ESC button
5 Sound
actuator/exhaust sound tuning
6 Headlight range contro l/cornering light
7 Headlight (cornering light)
Control modu les (e lectromechanical park-
8 ing brake, shock absorber, quattro Sport,
trailer hitch), DCDC converter
9
Adaptive cruise control or high voltage
battery (hybrid drive)
11 Side assist
12 Headlight range control, parking system
13 Airbag
14 Rear w iper
15 Auxi
liary fuse (instrument panel)
1 6 Auxiliary fuse terminal 15 (engine area) Fuses
and bulbs
Fuse panel @ (brown)
No . Equipment
1 Electric exhaust door
2 Brake light sensor or brake pedal
move-
ment sensor (hybr id drive)
3 Fuel pump
4 AdBlue pumps
or brake booster power
supply (hybrid dr ive)
5 Left seat heating with/without seat venti-
lation
6 ESC
7 Horn
8 Left
front door (window regulator, central
locking, mirror, switch, lighting)
9 Wiper motor
10 ESC
11 Left
rear door (window regu lator, switch,
lighting)
12 Rain and light sensor
Fu
se panel © (re d)
No . Equipment
3 Lumbar support
4 Dynamic steering
5 Climatized cupholder
6 Windshie
ld washer system, headlamp
washer system
7 Vehicle electr ical system control module 1
8 Vehicle e
lectrica l system control module 1
9 Panorama sunroof
10 Vehicle e lectrica l system control module 1
11 Sun shade (pano rama sunroof)
12 Anti-theft a
larm system
267
Page 276 of 302
Emergency situation s
When it is no longer needed, unscrew the towing
loop and put it back into the vehicle toolkit . Be
sure to have the tow ing loop stored in the vehicle
at all times .
When re -insta lling the cover be su re to first in
sert the tabs on the cover into the retainers near
the radiator grille . T hen install the other side of
the cover and push it into the retainers
¢f ig. 229 .
The appearance of the cover var ies from the illus
tration for some model versions .
A WARNING
If the towing loop is not screwed in as far as it
w ill go, the thread can pu ll out when the veh i
cle is towed -potential risk of an accident .
(D Note
The cover is attached to the bumper with sev
eral hooks . Do not use excessive force when
remov ing the cover to avoid damaging it.
Rear towing loop
On vehicles without a factory-installed trailer
hitch*, the threaded hole for the towing loop is
on the right side of the rear bumper .
Fig. 2 31 Rear b umper: Cove r
274
N
N
---- ~ a, al
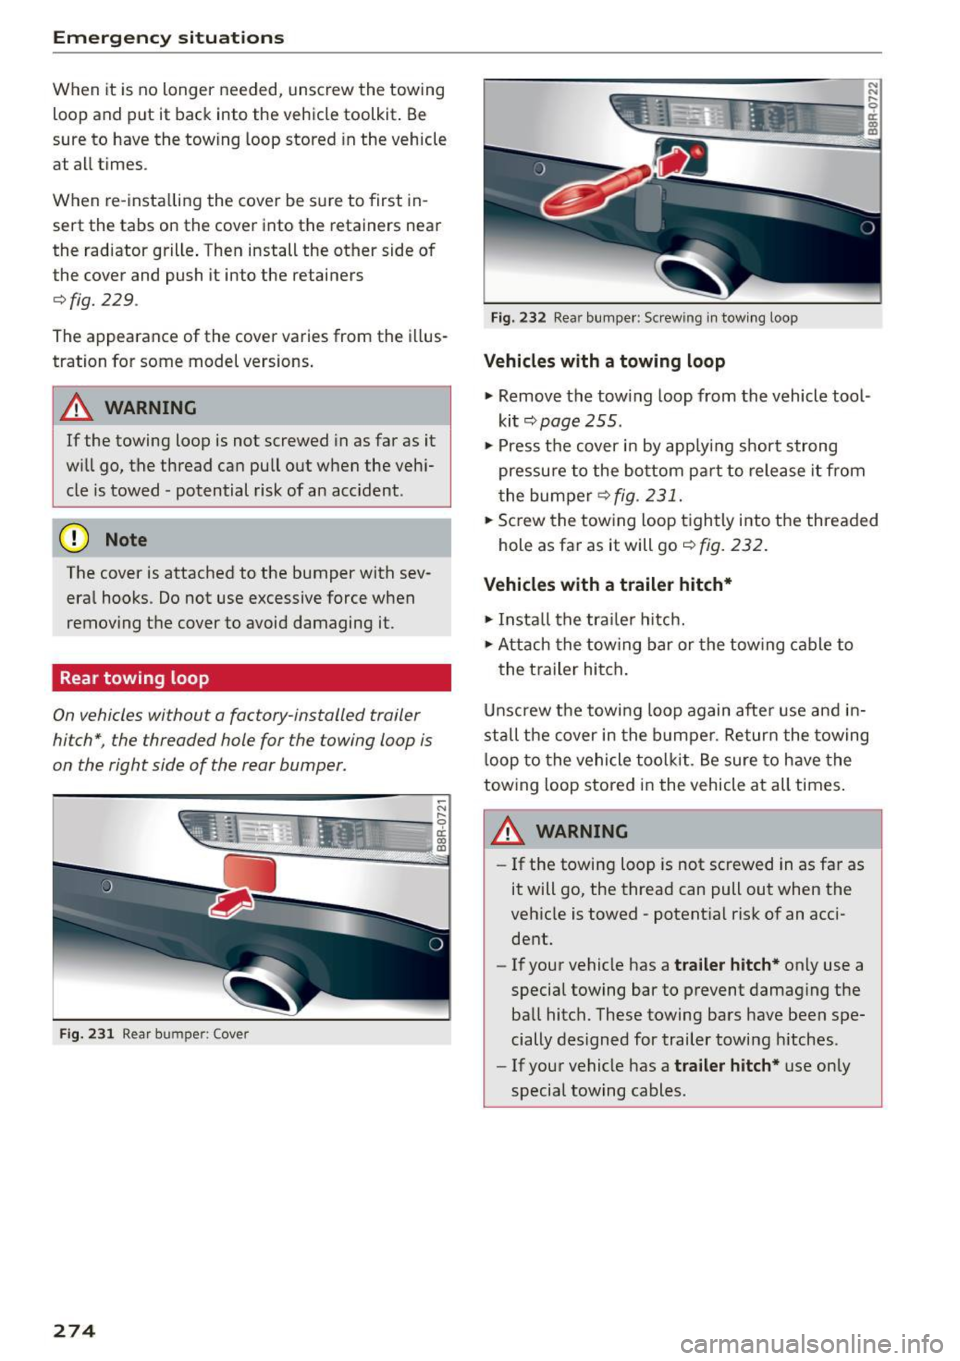
F ig . 232 Rea r bumpe r: S crew ing in t owing loop
Vehicles with a towing loop
~ Remove the tow ing loop from the vehicle tool
ki t
¢ page 255.
~ Press t he cover i n by app lyi ng short strong
pressu re to the bottom pa rt to release it from
t he bumper
¢fig . 231.
~ Sc rew the towing loop t ightly into t he threaded
hole as far as it will go¢
fig. 232.
Vehicles with a trailer hitch*
~ In sta ll the tra ile r hitch.
~ Attach the tow ing bar or the tow ing ca ble to
the t ra iler hi tch .
Unscrew the towi ng loop again afte r use and i n
st all the cover in the b um pe r. Retur n the towing
l oop to the vehicle tool kit . B e sure to have the
tow ing loop stored in the vehicle at all times .
~ WARNING
-If the towin g loop is not screwed in as fa r as
it will go, the thread can pull out when the
veh icle is towed - potent ial risk of an acci
de nt.
- If your vehicle has a
tra iler hitch* only use a
specia l towing bar to p revent damag ing t he
ball hitch. These towing bars have been spe
cially designed for trailer towing h itches .
- If your vehicle has a
tra iler hitch* use on ly
special towing cables .