check engine AUDI Q5 2016 User Guide
[x] Cancel search | Manufacturer: AUDI, Model Year: 2016, Model line: Q5, Model: AUDI Q5 2016Pages: 300, PDF Size: 75.02 MB
Page 36 of 300
Driver information s ystem
the dr iver information system . Keep in m ind that
the engine speed will not exceed the value dis
p layed in the dr iver information system, for ex
ample when downshifting.
Please go to an autho rized Aud i dea le r or other
qualified workshop to have the ma lfunction re
pa ired .
,m.. Diesel particulate filter clogged
Applies to veh icles: w ith diesel e ngi ne and d iesel pa rt icu late
f ilte r
II Particulate filter See owner's manual
When the II symbol illum inates, you can a lter
your driving sty le to assis t the fi lter self-cleaning
p rocess . Drive for approx ima tely 15 minutes with
the selector lever in the S position a t a min imum
speed of 37 mph (60 km/ h) a nd an engine speed
of approximate ly 2,000 RPM . The tempe rature
increase that w ill result from this can burn off
the soot in the fi lter. The symbol will sw itch off
when the clean ing is successful. After a success
fu l cleaning, there is no need to br ing the car to
an author ized deal er or qualified workshop b e
cause this is part of no rm al veh icle oper ation.
If t he symbo l
II does not switch off, see you r
author ized dealer or other qualif ied workshop to
have the prob lem cor rected.
For more information on the diesel particulate
fi lter, refer to
c> page 198.
A WARNING
Always ada pt your speed to the c urrent
w eather, road and traffic conditions . Y ou
should never dis obey traffi c la ws in orde r to
follow driving re co m mend ation s.
~()) Headlight range control defective
II Headlight range control defective!
If th e symbol II ill um ina tes, the dynamic head
lig ht ra nge co ntrol is no longer wo rking prope rly.
H ave t he sys tem checked and repa ired at you r au
t hor ized Audi dealer .
34
~O Adaptive light defective
Applies to vehicles: with adaptive light
mil Audi adaptive light : defe ctive
When this symbol mil ill uminates, it means that
adaptive ligh t is defective. Go to a n author ized
Audi dealer to have the head lights or the contro l
u nit for the adapt ive light repa ired.
@ -Steering malfunction
El! Steering lock: Contact dealer!
If the El! symbo l in t he d isp lay comes on, there
i s a n elect ronic stee ring column lock malfu nc
tion.
D rive to your author ized A udi dealer immed iate ly
to have the malfunc tion cor rected .
A WARNING
Your ve hicl e m ust not be towed in the event
of a m alfunction in the elec tronic s teering
column lo ck bec ause it c an no t b e stee red due
to the lo cked steering. If i t i s towed w ith the
steering locked, there is the risk of an acc i
dent .
~ Ignition lock malfunction
m Ignition lock defective
If the l3 symbo l in the d isplay comes on, the re is
a malfunction i n the elect ronic ignition lock .
Please go to an authorized A udi dealer or other
qualified workshop to have the malfunct ion re
paired.
; Adaptive dampers
App lies to vehicles: with Aud i drive se lect
R Suspension : System fault!
If the R symbol in the d isp lay comes on, the re is
a mal function in the adaptive dampers. Please go
to an authorized Aud i dea le r or other qualified
workshop to have the ma lfunction repaired.
· ~ Windshield wipers faulty
El Windshield wipers defective
Page 38 of 300
Opening and closing
Opening and closing
Keys
Key set
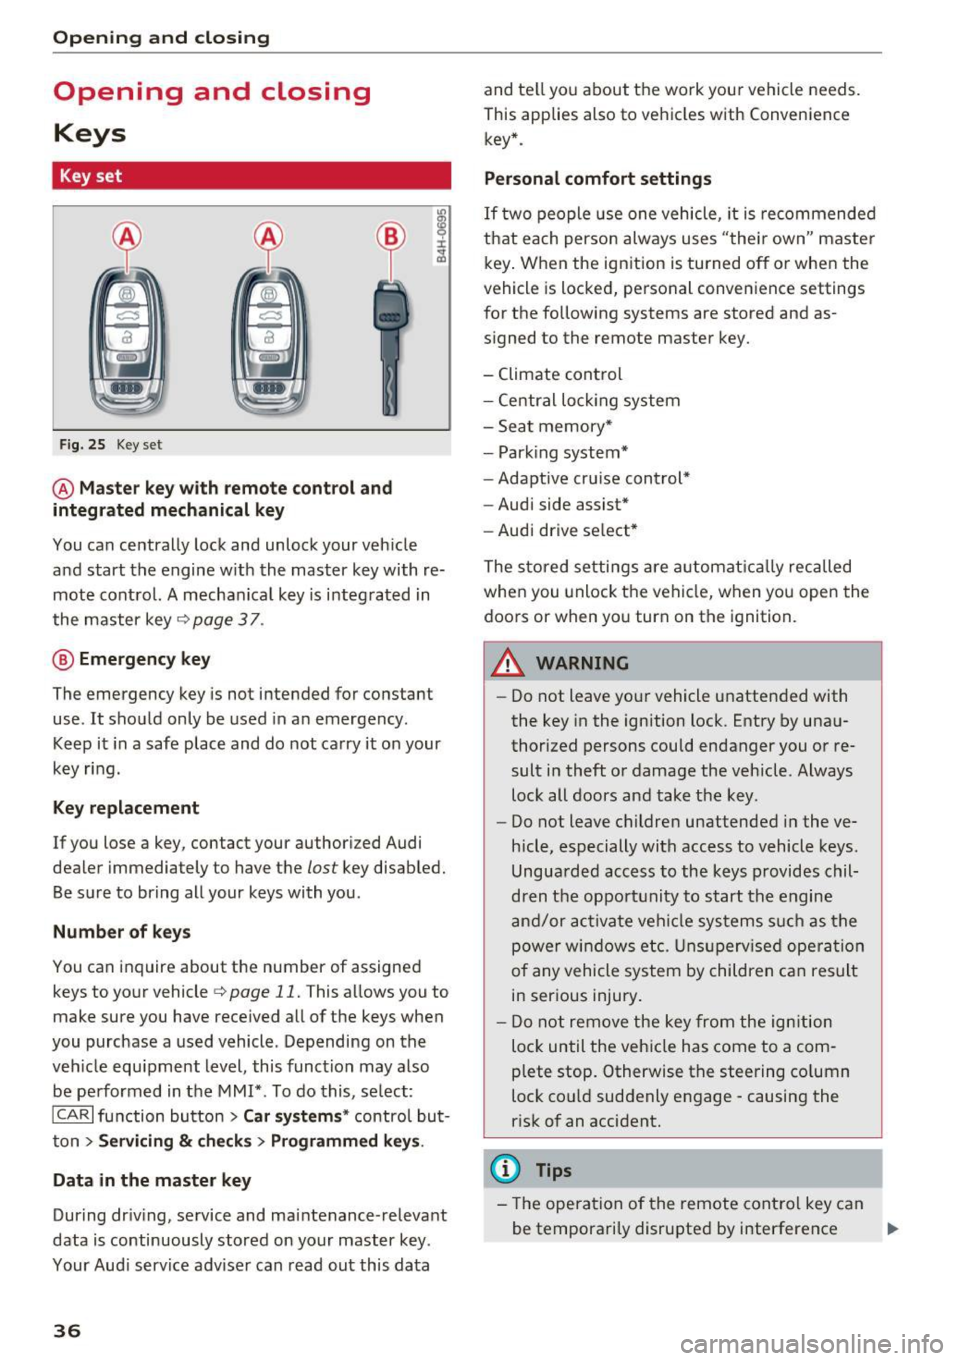
Fig. 25 Key set
@ Master key with remote control and
integrated mechanical key
You can centrally lock and unlock your veh icle
and start the engine w ith the master key with re
mote control. A mechanical key is i ntegrated in
the master key
c> page 3 7 .
@ Emergency key
The emergency key is not intended for constant
use . It should only be used in a n emergency.
Keep it in a safe place and do not carry it on your
key ring.
Key replacement
If you lose a key, contact your authori zed Audi
dealer immediately to have the
lost key disabled.
Be su re to bring all your keys with you .
Number of keys
You can inquire about the number of assigned
keys to your vehicle
c> page 11. This allows you to
make sure you have received all of the keys when
you purchase a used vehicle . Depending on the
veh icle equ ipment level, this function may also
be performed in the MMI*. To do this, select:
ICARI function button > Car systems* control but
ton
> Servicing & checks> Programmed keys .
Data in the master key
Dur ing dr iv ing, service and ma intenance -relevant
data is continuously stored on your master key .
Your Aud i service adviser can read out this data
36
and te ll you about the work your vehicle needs.
This applies also to vehicles with Convenience key* .
Personal comfort settings
If two people use one vehicle, it is recommended
that each person always uses "the ir own" master
key. When the ignition is turned off or whe n the
vehicle is locked, personal convenience settings
for the following systems are stored and as
signed to the remote master key.
- Climate control
- Central loc king system
- Seat memory*
- Park ing system*
- Adaptive cru ise cont rol*
- Audi side assist*
- Audi drive se lect *
The stored settings are automatically recalled
when you unlock the vehicle, when you open the
doors or when yo u turn on the ignition.
A WARNING
-
-Do not leave your vehicle unattended with
the key in the ignition lock. Entry by unau
thorized persons could endanger you or re
sult in theft or damage the vehicle . Always
lock all doors and take the key.
- Do not leave children unattended in the ve
hicle, especially with access to vehicle keys.
Unguarded access to the keys provides chil
dren the opportunity to start the engine
and/or activate vehicle systems s uch as the
power windows etc. Unsupervised operation
of any vehicle system by children can result
in serious injury.
- Do not remove the key from the ignition
loc k until the veh icle has come to a com
plete stop. Otherwise the steering co lumn
lock co uld suddenly e ngage -causing the
risk of an accident.
(D Tips
-Th e operation of the remote control key can
be temporarily disrupted by interference ..,.
Page 86 of 300
Driving
Driving
Steering
Manually adjustable steering wheel
The height and reach of the steering wheel can
be adjusted .
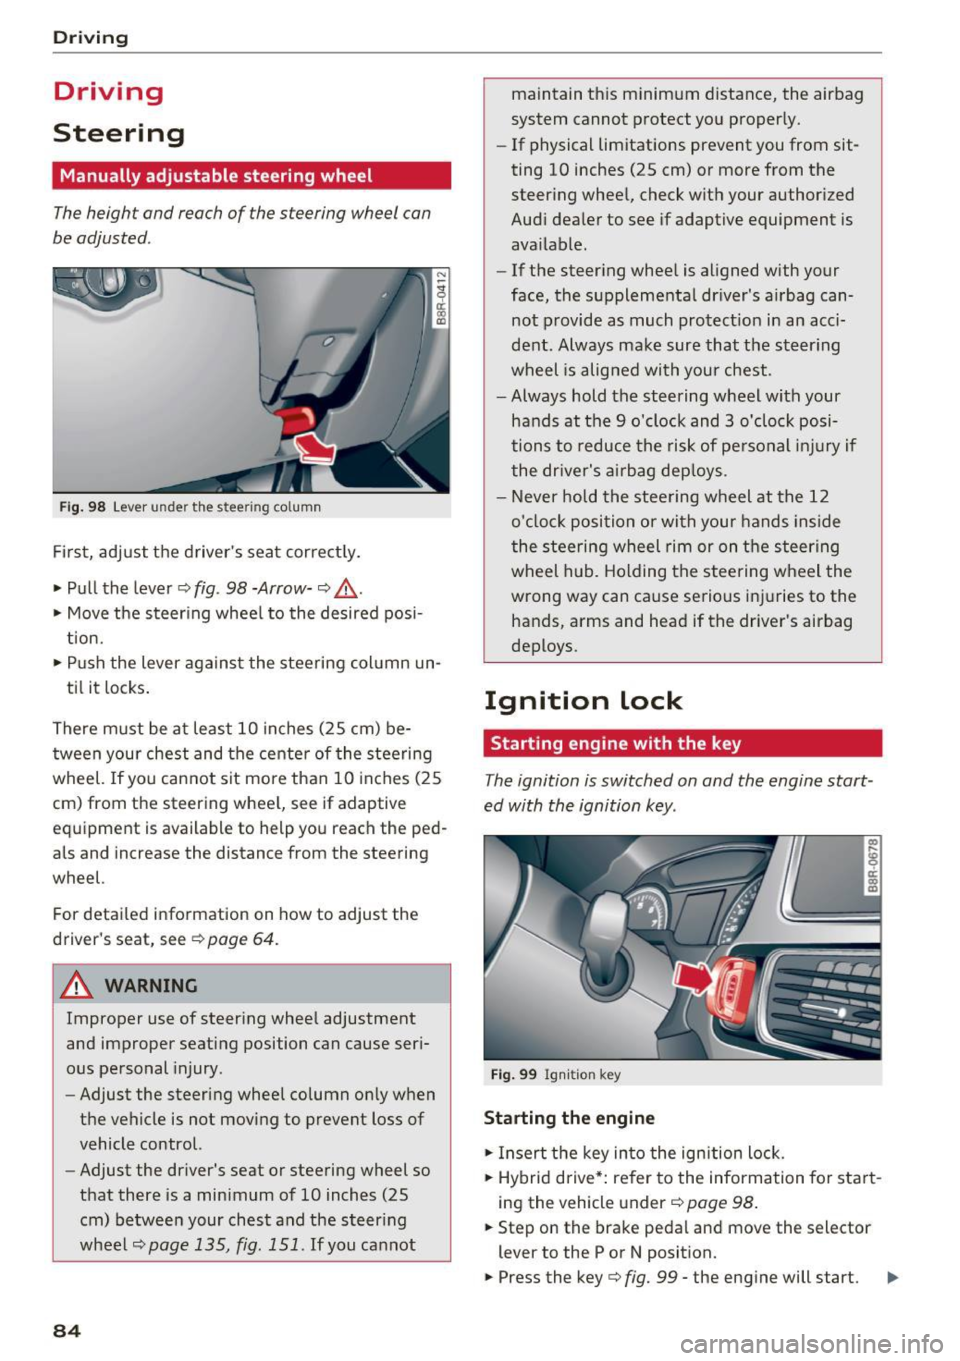
Fig . 98 Lever under the s tee ring column
Fi rs t, adjust t he driver 's sea t cor rect ly.
• Pull the lever¢
fig. 98 -Arrow-¢ &_.
• Move the steer ing whee l to the desired posi
t ion.
• Push the lever agains t the steering col umn un-
ti l it locks .
There m ust be at least 10 inches (25 cm) be
tween your chest and the cente r of the steering
wheel. If you cannot sit more than 10 inches (25
cm) from the steering whee l, see if adaptive
eq uipment is available to help you reach the ped
als and increase the distance from the steering
wheel.
For detailed information on how to adjust the
driver's seat, see ¢
page 64.
A WARNING
Improper use of steering whee l adjustment
and improper seati ng position can cause ser i
ous pe rsonal injury.
- Adjust the steering wheel column on ly when
the vehicle is not moving to prevent loss of
vehicle control.
- Adjust the dr iver's seat o r steering wheel so
that there is a min imum o f 10 inches (25
cm) be twee n your chest and the s teer ing
wheel
¢page 135, fig. 151 . If you ca nnot
84
maintain t his minim um distance, the airbag
system cannot p rotect yo u properly.
- If physical limitations prevent you from sit
ting 10 inches (25 cm) or more from the
steer ing whee l, check with your author ized
Aud i dea ler to see if adaptive equipment is
ava ilable.
- If the steer ing whee l is aligned with your
face, the s upplementa l dr iver's a irbag can
not provide as much protect ion in an acci
dent . Always make sure that the steer ing
wheel is alig ned wi th your chest.
- Always hold the steering w heel with your
hands at the 9 o'clock and 3 o'clock posi
tions to reduce the ris k of pe rsonal injur y if
the dr ive r's ai rb ag de ploys .
- Never ho ld the stee ring w heel at t he 12
o' cl oc k position or with your hands inside
the stee ring wheel rim or on t he steering
wheel hub. Holding the steering w heel the
wrong way can cause se rious i njuries to the
hands, arms and head if the driver's airbag
deploys .
Ignition lock
Starting engine with the key
The ignition is switched on and the engine start
ed with the ignition key.
F ig . 9 9 Ign iti on key
Starting the engine
• In sert the key in to the ignition lock.
• Hybrid d rive *: refer to the information fo r sta rt
i ng the veh icle under ¢
page 98 .
• Step on the brake pedal and move the selector
lever to the P or N posit ion.
• Press the key¢
fig. 99 -the eng ine will start. .,.
Page 94 of 300
Driving
_& WARNING
-Ne ver turn off the engine before the veh icle
has come to a comp lete stop . The f ull func
t ion of the brake booster and the power
steering is not guaranteed. Yo u must use
more force to turn or brake if necessary . Be
ca use you cannot steer and b rake as you
us ually wou ld, this could lead to crashes
and serious injur ies.
- To reduce the risk of inju ries, make s ure that
t h e S tart -Stop-System is turned off whe n
wor king in the eng ine compart ment
9page 93 .
(D Note
Always sw itch off the Start-Stop-System
when dr iv ing th rough water
9 page 93 .
Starting/stopping the engine
Applies to veh icles: w ith Start -Stop -System
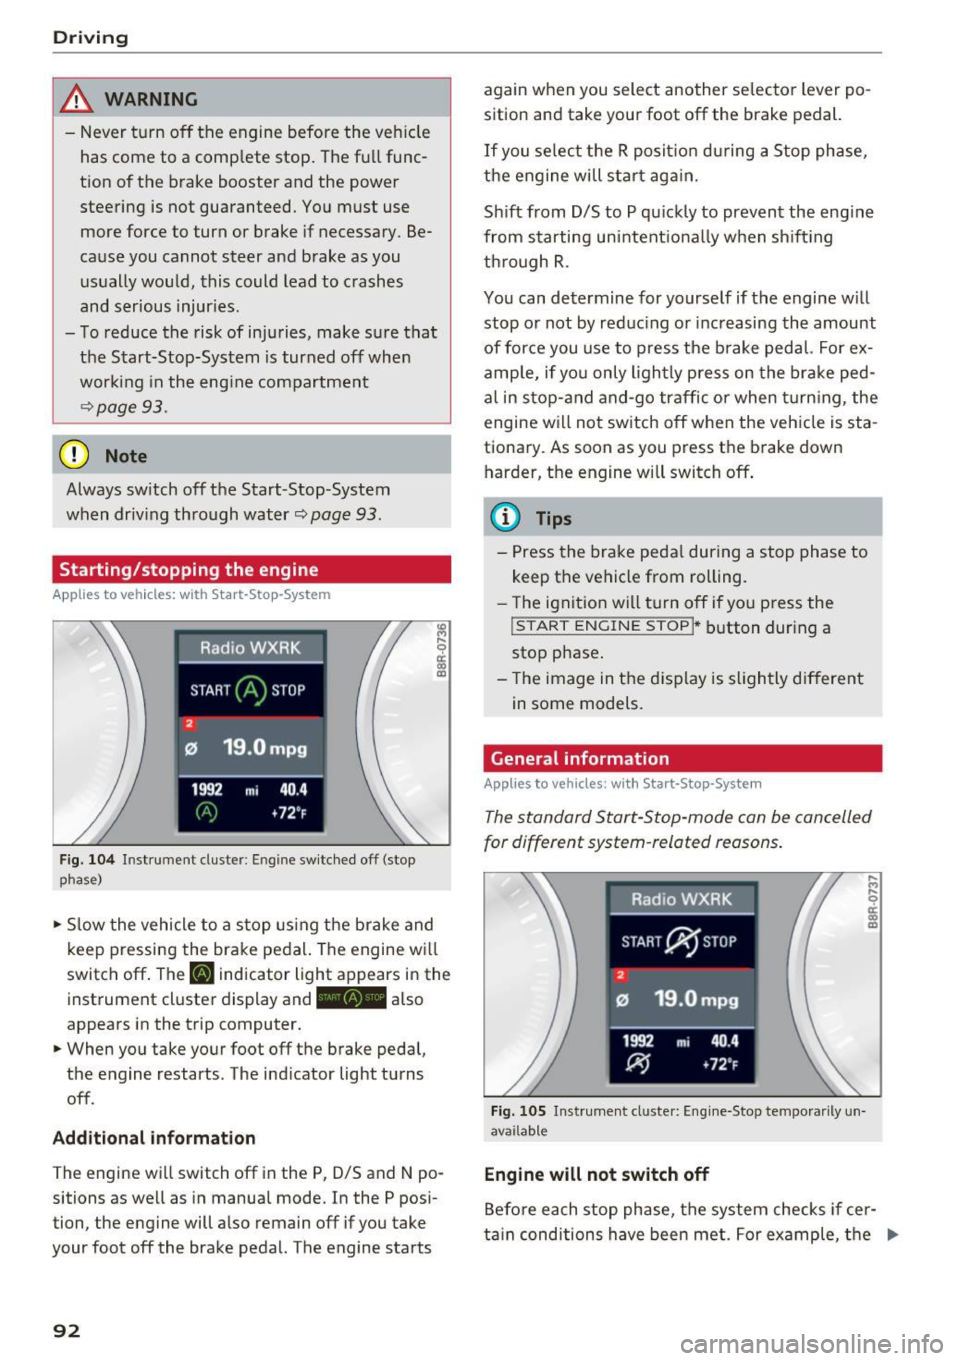
F ig . 104 In strum ent cluste r: En gin e sw itc hed off (stop
phase}
• Slow the vehicle to a s top using the brake and
k eep pressing the bra ke pe dal. The engine w ill
switc h off . The
[I] ind icator light appears in the
i nst rument cluste r display and -also
appears in the t rip computer.
• When you take yo ur foot off the b rake peda l,
the engine restarts . The ind icator light tu rns
off .
Add itional informat ion
The eng ine wi ll switch off in the P, D/S and N po
sitions as we ll as in manua l mode. In the P pos i
tion, the eng ine will a lso remain off if you take
your foot off the brake pedal. The engine starts
92
again w hen you select another se lecto r lever po
sition and take your foot off the brake pedal.
If you se lect t he R posit io n dur ing a Stop phase,
the e ngine will sta rt ag ain.
Sh ift from D/S to P qu ic kl y to prevent the eng ine
from starting uni ntent io na lly when sh if ti ng
th rough R.
You can determine for yourself if t he engine w ill
stop o r not by re duc ing or inc reasing the amount
of force you use to p ress the b rake pedal. Fo r ex
amp le, if yo u only ligh tly press o n the brake ped
a l in s top- and and-go traffic or when turning, the
engine will not switch off when the veh icle is sta
tiona ry. As soon as you press the brake down
h arder, the engine will switch off .
{i) Tips
-Press the brake peda l during a stop phase to
keep the vehicle from rolling.
- The igni tio n wi ll turn off if y ou press the
! START ENGINE STOPI * button dur ing a
stop p hase .
- Th e image in the displ ay is s ligh tly d ifferent
in some models.
General information
Applies to vehicles: with Start-Stop-System
The standard Start-S top-mode can be can celled
for different system -related reasons .
Fig. 1 05 In str um ent cl uste r: E ngi ne-Stop te mpo rari ly un
ava ilab le
Engine will not switch off
.... .., .... 0
~ m
Befo re each sto p phase, t he system checks if cer
ta in conditions have been met. For example, t he .,.
Page 127 of 300
,....,
N
co
er::
co
,....,
running while in gear. If you must leave
your vehicle when the engine is running, ac tivate the parking brake and move the selec
tor lever to P.
- Power is still transmitted to the wheels
when the engine is running at idle. To pre
vent the vehicle from "creeping", you must keep your foot on the brake when the en
gine is running and the selector lever is in D/
5 or R or "tiptronic" mode is selected .
- Do not press the accelerator pedal when
changing the selector lever position while
the vehicle is stationary and the engine is running.
- Never shift into R or P while driving.
- Before driving down a steep slope, reduce
your speed and shift into a lower gear with "tiptronic" .
- Do not ride the brakes or press the brake
pedal too often or too long when driving
down a hill. Constant braking causes the
brakes to overheat and substantially re
duces braking performance, increases brak
ing distance or causes complete failure of
the brake system .
- To prevent the vehicle from rolling back
when stopping on inclines, always hold it in
place with the brake pedal or parking brake.
- Never hold the vehicle on an incline with a
slipping clutch. The clutch opens automati
cally when it becomes too hot from the
overload . An indicator lamp
[ijJ illuminates
and a driver message appears
c> page 126
when the clutch is overloaded .
- If the engine must remain running, never
have any driving position engaged when
checking under the hood.
Make sure these
lector lever has securely engaged and is
locked in P with the parking brake set
c> page 220. Otherwise, any increase in en
gine speed may set the vehicle in motion,
even with the parking brake applied.
(D Note
- When stopping on an incline, do not try to
hold the vehicle in place by pressing the ac
celerator pedal while a driving gear is se-
Automatic transmission
lected. This can cause the transmission to
overheat and can damage it. Activate the
parking brake or press the brake pedal to
prevent the vehicle from rolling.
- Allowing the vehicle to roll when the engine
is stopped and the selector lever is in N will
damage the transmission because it is not
lubricated under those circumstances.
(!) Tips
For safety reasons, the parking brake is re
leased automatically only when the driver's
safety belt is engaged in the buckle.
Hill descent control
The hill descent control system assists the driver
when driving down decline s.
Hill descent control is activated when the selec
to r lever is in D/S and you press the brake pedal.
The transmission automatically selects a gear
tha t is suitable for the incline. Hill descent con
trol tries to maintain the speed achieved at the
time of braking, within physical and technical
limitations. It may still be necessary to adjust the
speed with the brakes .
Hill descent control switches off once the decline
levels out or you press the accelerator pedal.
When the speed is set in the cruise control sys
tem
c> page 95 , hill descen t control is also ac ti
vated .
A WARNING
Hill descent control cannot overcome physical
limitations, so it may not be able to maintain
a constant speed under all conditions . Always
be ready to apply the brakes.
125
Page 201 of 300
..... N
co
er::
co
.....
give you some tips on how you can he lp the envi
ronment and your pocketbook.
(D Tips
T he consumpt ion estimates as published by
ENVIRONMENTAL PROTECTION AGENCY
(EPA) and Transport Canada may not corre
spond to your act ual consumption on the
road, which will vary depending upon vehicle
load and speed, road and weather conditions,
trip length, etc.
Drive smoothly and keep a lookout ahead
Vehicles use the most fuel when they are acceler
ating .
.. Avoid unnecessary accelerating and braking.
Vehicles use the most fuel when they are acceler
ating . If you anticipate what is going to happen
next, you will need to brake less and, thus, accel
erate less . Let the vehicle coast whenever possi
b le -for example when you see that the next traf
fic light is red .
Avoid full throttle
Driving a t moderate speeds saves fuel and im
proves your mileage .
.. Try and keep well be low your car's max imum
speed.
Accelerating gent ly reduces f uel consumption,
engine wear, and does not disturb the environ
ment.
F ue l cons umption, exha ust emissions and engine
noise increase d isproportionately at high speeds.
If yo u drive at approximately three quarters of
top speed, fuel consumpt ion w ill be reduced by
one ha lf. Never drive faster than the posted
speed limit and weather conditions perm it .
Driving and the envir onment
Reducing unnecessary idling
Even when your car is just idling it burns up fuel .
.. Shut the eng ine off when you are not driving
the vehicle.
.. Do not warm up t he vehicle by lett ing the en-
gine run at idle .
The idling phase is automatically reduced for
vehicles with the Start-Stop-System*. It is effi c ient to sw itch off the engine in veh icles without
the Start-Stop-System* when stopped at ra ilroad
c ross ings and long red lights . T urning the engine
off fo r just 30-40 seconds saves mo re fue l th an is
bur ned by s tarti ng the eng ine again .
It takes a long time for the eng ine to warm up
fully when it is ru nning at id le. However, wea r
and noxious emissions are especially high w hen
t h e engine is war ming up. So yo u should dr ive
aw ay as soon as you star t the eng ine and avoid
runn ing at high rpms w hile the engine is sti ll
warming up .
(D Note
Do not leave eng ine idling unatt ended after
start ing. If wa rning lights sho uld come on to
i ndicate impro per operation, they would go
u nheeded. Extended idling also prod uces
heat, which could result in overheating or
other damage to the vehicle o r othe r proper
ty .
Regular maintenance
A badly tuned engine unnecessarily wastes a lot
of fuel .
.. Have your vehicle serviced at regular interva ls.
By hav ing your vehicle regular ly serv ice d by an
authorized Aud i dea ler helps to ensure that it
runs properly and economically . T he cond ition o f
yo ur vehicle not on ly affects its safety and ability
to hold its value , it also affects
fuel consump
tion .
Check your oil each time you fill your tank.
T he amou nt o f oil used is related to engine load
and speed. .,,.
199
Page 203 of 300
,....,
N
co
er::
co
,....,
conditions and off-road
General information
The operation of the Electronic Stabilization Con
trol (ESC) is expanded for operation away from paved roads. In situations where slip or a differ
ential locking fun ction is required , the offroad
mode can be activated ¢
page 190. Your Audi al
so has permanent all-wheel drive in addition .
However, your Audi is not a pure offroad vehicle.
It was not built for driving under extreme condi
tions, e.g. for tr ips that are in the nature of an
expedition .
Drive only on roads and offroad sections which
match the design of your vehicle and your abili
ties as a driver. Never take risks!
Before driving offroad
-Check the engine oi l level, tire pressure, coo l
ant level, and the fluid level in the windshield
washer reservo ir.
- Stow luggage items and other objects in the
luggage compartment, and secure them
against sliding around.
After driving offroad
-After trips offroad, remove any twigs and other
foreign objects from the gri ll, the underbody
and the wheels. Pay special attention to foreign
objects (stones) which have become lodged in
the tire tread.
- Clean the body and the vehicle underside, and
inspect the vehicle for possible damage.
- Clean dirty windows, headlamp lenses, rear
lights, and license plates.
- Perform a brake check (particularly after travel
ling through water).
A WARNING
-Drive especially attentively and plan ahead
in difficult road condit ions and when off
road. Excessive speed or incorrect maneu
vers can cause injuries and damage to the
vehicle .
Offroad driving
-Always adapt your speed and driving style to
road, offroad, traffic, and weather condi
tions. Drive especially slowly offroad when
your view is restricted.
- Please be aware that in offroad mode, par
ticularly on a smooth and slippery road, the
wheels may have an increased tendency to spin and the vehicle may break away - dan
ger of skidd ing!
- Stability is lim ited in the offroad mode .
@) For the sake of the environment
Avoid damage to the environment and re
spect nature.
(D Tips
Only drive where it is permitted and stay on
marked roads and paths.
Explanation of some technical terms
The following data refer to ideal conditions. De
pending on vehicle load and ground conditions
and the environment, the numbers may vary. It is
the driver's responsibility to decide whether ave
hicle can overcome a specific s ituation
¢ ,&. .
Gradient angle
The number of meters in altitude gained over a
distance of 109.4 yards or 100 meters (grade)
are given as a percentage or degrees. Informa
t ion about the gradient the vehicle can cl imb un
der its own power (depends in part on the road
s ur face and eng ine power). Maximum permitted
grade: 31
°
Ground clearance
The distance between the road surface and the
lowest point of the vehicle underbody. Ground
clearance 7.9 in (200 mm)
_& WARNING
-
Exceeding the stated maximum figures can
result in severe injuries or vehicle damage.
- All the information was gathered on level,
firm and non-slippery road surfaces, and un-
der dry weather conditions.
~
201
Page 204 of 300
Offroad dri ving
- Ideal conditions do not prevai l offroad . Nev
er utilize the maximum readings to their
fullest, always leave a safety reserve.
Driving tips
On poor rood ond offroad, there is always only
one motto: Plan ahead and drive slowly!
Pl ease observe the following when driv ing away
from paved roads:
.,. Drive only on roads and off road sections which
ma tch the des ign of your vehicle and yo ur abili
ties as a driver . Neve r take risks!
... Drive slowly and p lan ahead!
... Take into consideratio n the
ground clearan ce
of your veh icle.
.,. Activate the
offro ad mode Q page 190 as need
ed .
.,. Use the
hill desc ent a ssis t Q page 192 when
driv ing down steep sections on hills .
Unpaved roads and offroad
Drive s low ly on unfam iliar roads and unknown
offroad sections, and look out for unexpected ob
stacles (e .g. potholes, rocks, tree stumps, etc .) .
To prevent the veh icle from bottoming and avoid
damage to the underbody, you should d rive
stra ight across severe bumps in the ground with
only one side of the vehicle so that only two of
your wheels cross the b umps.
Drive briskly through sandy or marshy offroad
sections and do not stop , if at all possible .
Driving through water
Note the following to avoid vehicle damage when
driving throug h water, fo r example on flooded
roads:
- T he wate r must no t be any higher than the bot-
tom of the vehicle body .
- Do no t drive fas ter than wa lking spee d.
Driving on a slope
If you ever find yo urself not able to cl imb a s lope,
do not try to turn around, d rive back down in
re
verse .
Otherw ise, you run the risk of tipping over.
202 If the vehicle thre
atens to tip o ver when dr iving
across a slope, you must immediately stee r
downhill in the direction of the slope.
Do no t pa rk you r vehi cle on steep s lopes or
grades .
To reduce the risk of tipping over, drive on slopes
i n the d irect io n of the downwa rd slope (fa ll line) -
not cros swi se .
& WARNING
After driving thro ugh water, mud, slush, etc.,
the brakes may be slow to take effect beca use
of wet brake rotors and pads. Dry the brakes
f irst by braking carefu lly to restore the full
braking effect .
(D Note
- Vehicle components such as the engine,
transmiss ion, suspension or electrical sys
tem can be seve rely damaged by driving
throug h water.
-Always switch off the Start-Stop-System *
when driving through water Qpage 93.
(D Tips
-Check the de pth of the water before driving
through it.
- Do not stop the vehicle, drive in reverse or
switch the engine of f whe n driving through
water.
- Keep in mind that oncom ing vehicles may
create waves that raise the water level and
make it too deep fo r your vehicle to drive
t h roug h safe ly.
-Avoid driv ing through salt water beca use it
can cause corrosion.
Page 206 of 300
Trailer mod e
Operating instructions
6"
~ 2
. 1/2 "
.(. '-I} 1-1/2"
-
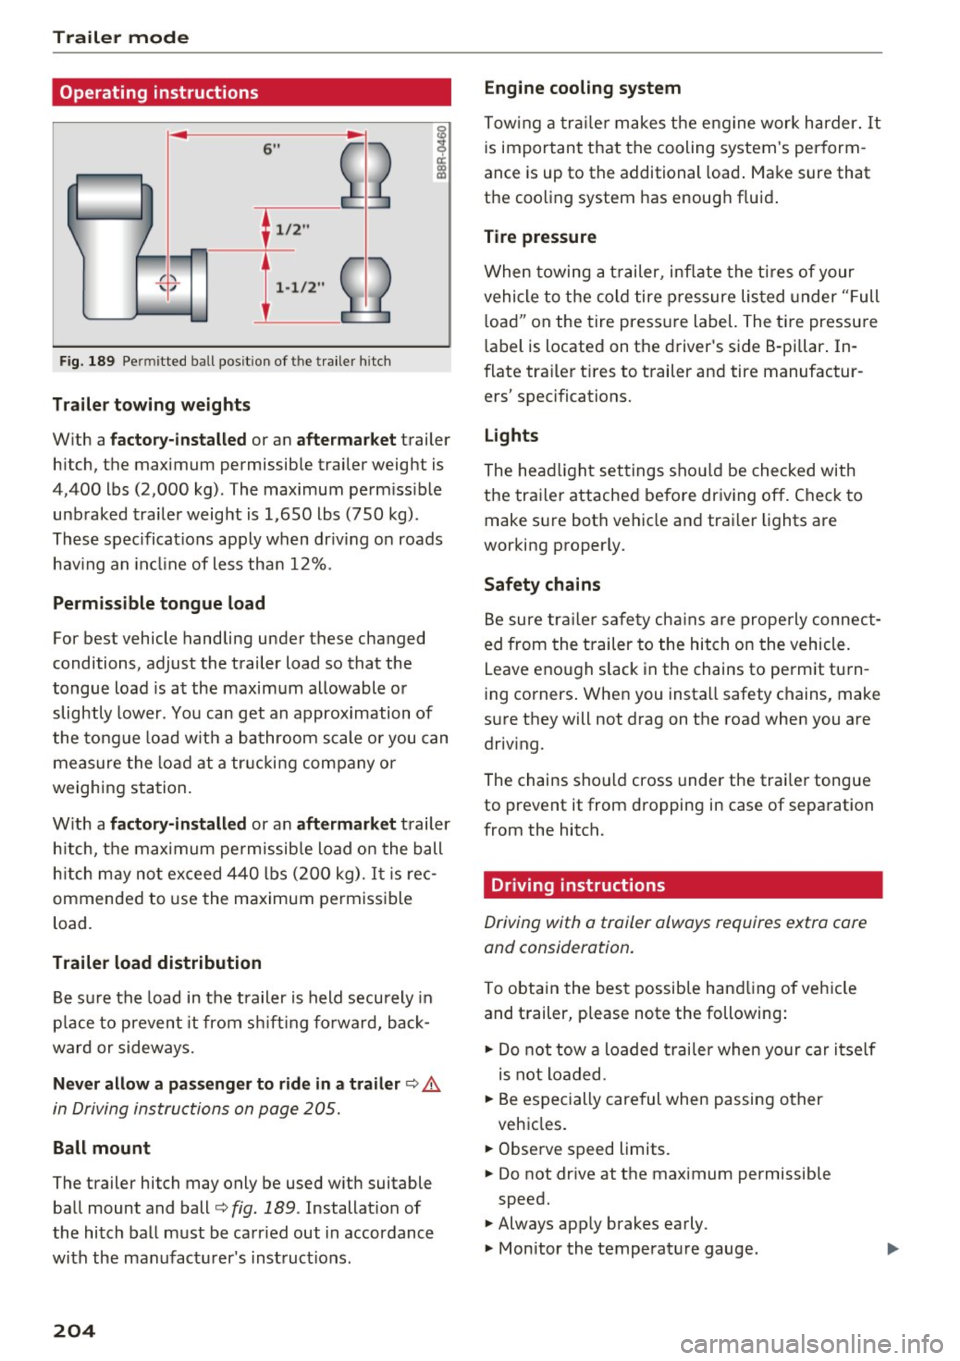
F ig. 189 Pe rmi tted ball posit io n of the traile r hi tch
Tr aile r to wing weights
With a f ac tor y-inst all ed or an a ft er ma rket trailer
h itch, the maximum permissib le trailer weight is
4,400 lbs (2,000 kg) . The maximum perm iss ible
unb raked trailer weight is 1,650 lbs (750 kg) .
These spec ificat ions apply when dr iv ing on roads
hav ing an incl ine of less tha n 12%.
Perm is sible tongue load
For best vehicle handling under these changed
conditions, adjust the trailer load so that the
tongue load is at the maxim um allowable or
slightly lower. You can get an approx imation of
the tongue load w ith a bathroom scale or you can
measure the load at a tr ucking company or
weighing station.
W ith a
fa ctor y-installed or an aftermarket trailer
h itch, t he maximum permissib le load on the ball
h itch may not exceed 440 lbs (200 kg).
It is rec
ommended to use the maximum permissible
load.
Trailer load di stribution
B e su re the load in the trailer is held securely in
p lace to prevent it from s hift ing fo rwa rd, back
ward or sideways.
Nev er allo w a p assenge r to ride in a trail er c::> A
in Driving instructions on page 205.
Ball mount
The trailer hitch may only be used w ith suitable
ball mount and ball
c::> fig. 189 . Installat ion of
the hitch ball must be carr ied out in accordance
w ith the manufacturer 's inst ruct ions.
204
Engine cooling system
Towing a tra ile r makes t he engine work harder. It
is important that the cooling system's perform
ance is up to the additional load . Make sure that
the cooling system has enough fluid .
Tire pressure
When towing a t railer, inflate the ti res of your
vehicle to the cold tire pressure listed under "Full
l oad" on the tire press ure label. The tire pressure
l abel is located on the driver 's side B-pillar . In
flate tra iler tires to trailer and tire manufactur
ers' specifications.
Lights
The head light settings shou ld be checked with
the trailer attached before driving off. Check to
make s ure both vehicle and trailer lights are
working properly.
Safety chains
Be sure tra ile r safety cha ins a re properly connect
ed from the trailer to the hitch on the vehicle.
Leave enough slack in the chains to permit tu rn
i ng corners . When you install safety chains, make
s u re they will not drag on the road when you are
driv ing.
The chains should cross under the trai ler tongue
to prevent it from dropping in case of separation
from the hitch.
Driving instructions
Driving with a trailer always requires extra care
and consideration.
To obtain the best possible handling of veh icle
and t railer, p lease note the following:
.., Do not tow a loaded trai ler when your car itself
is not loaded.
.., Be especially care ful when passing other
vehicles .
.., Observe speed limits.
.., Do not drive at the maximum permissible
speed.
.., Always app ly brakes early.
.., Monitor the temperature gauge.
Page 216 of 300
Fuel and R efu eli ng
Gasoline additives
Applies to veh icles: w ith gaso li ne engine
A major concern among many auto manufactur
ers is carbon deposit build- up ca used by the type
of gasoline you use.
Although gasoline grades d iffer from one manu
facturer to another, they have certain things in
common. All gaso line grades contain substances
that can cause deposits to collect on v ita l engine
parts, such as fue l injectors and intake valves . Al
though most gasoline brands include additives to keep engine and fuel systems clean, they are not
equally effective.
Audi recommends using TOP TIER Detergent Gas
oline. For more information on TOP TIER Deter
gent Gasoline, please go to the official website (www.toptiergas.com).
After an extended pe riod of using inadequate
fue ls, built-up carbon depos its can rob your en
gine of peak performance.
(D Note
- Damage or ma lfunction due to poor fue l
quality is not covered by the Audi New Vehi
cle Limited Warranty.
- Do not add aftermarket fuel additive prod
ucts to yo ur fuel tank.
Diesel fuel
Applies to veh icles: w ith d iese l e ngine
Always use ULSD (Ultra Low Su lfur Diesel) No. 2 .
The ULSD No . 2 meets the ASTM D97S.
Diese l fuel with concentrations of biodiesel high
er than S % such as 811,820 or 8100 are strictly prohibited.
Service station f uel pumps are labeled with the
correct fue l information for easy recognition by
the user.
If the diesel fuel pump is not labeled
ask the station operator what fuel is be ing dis
pensed before filling up your vehicle .
ULSD No . 2 may not be availab le outside the USA
and Canada . Be sure to check before traveling to
other countries .
214
ULSD No. 2 can become thicke r in very cold tem
peratures, and this can impair the engine's start
i ng and running. Depend ing on the season, gas
stations provide ULSD No. 2 that flows better in
cold temperatures so that you can continue oper
at ing your vehicle as usual.
(D Note
- Your vehicle's diese l eng ine was designed
so ley for use w ith ULSD No. 2. Therefore,
never use gasoline, heating oil, other fuels
or flow improvers. These contain substances
that will severely damage the fuel system and the engine. Such damage will no t be
c ove red by your New Vehicle Limited War
ranty .
-If you pu t any amo unt of inco rre ct fuel in
the fuel tank, do not start the engine u nder
any circumstances. Immed iate ly contact the
nearest authorized Audi dealer or author
ized Audi Serv ice Facility for ass istance .
These fuels contain substances that can se
verely damage the fuel system and the en gine if the engine is started .
Refueling
Fuel filler neck
The fuel filler neck is located on the right rear
s ide panel behind the fuel filler flap .
If the power lock ing system shou ld fai l, you can
still open the flap manually -fo r detailed instruc
tions see
¢ page 216 .
You can find the fuel tan k capacity of your vehicle
in ¢ page277.
The label on the inside of the fuel filler flap tells
you the correct fuel for your veh icle. For more in
fo rmat ion about fuel specifications, see
¢ page 212.
Your vehicle f uel tank has an on-board refuelling
vapor recovery system . Th is feature helps to pre
ven t fue l vapors from escaping from the tank and
po lluting the environment wh ile you refue l yo ur
vehicle. In order to fill the tank properly wh ile
protecting the environment, p lease follow this
refue ling procedure carefully .