ESP AUDI Q5 2016 Repair Manual
[x] Cancel search | Manufacturer: AUDI, Model Year: 2016, Model line: Q5, Model: AUDI Q5 2016Pages: 300, PDF Size: 75.02 MB
Page 203 of 300
,....,
N
co
er::
co
,....,
conditions and off-road
General information
The operation of the Electronic Stabilization Con
trol (ESC) is expanded for operation away from paved roads. In situations where slip or a differ
ential locking fun ction is required , the offroad
mode can be activated ¢
page 190. Your Audi al
so has permanent all-wheel drive in addition .
However, your Audi is not a pure offroad vehicle.
It was not built for driving under extreme condi
tions, e.g. for tr ips that are in the nature of an
expedition .
Drive only on roads and offroad sections which
match the design of your vehicle and your abili
ties as a driver. Never take risks!
Before driving offroad
-Check the engine oi l level, tire pressure, coo l
ant level, and the fluid level in the windshield
washer reservo ir.
- Stow luggage items and other objects in the
luggage compartment, and secure them
against sliding around.
After driving offroad
-After trips offroad, remove any twigs and other
foreign objects from the gri ll, the underbody
and the wheels. Pay special attention to foreign
objects (stones) which have become lodged in
the tire tread.
- Clean the body and the vehicle underside, and
inspect the vehicle for possible damage.
- Clean dirty windows, headlamp lenses, rear
lights, and license plates.
- Perform a brake check (particularly after travel
ling through water).
A WARNING
-Drive especially attentively and plan ahead
in difficult road condit ions and when off
road. Excessive speed or incorrect maneu
vers can cause injuries and damage to the
vehicle .
Offroad driving
-Always adapt your speed and driving style to
road, offroad, traffic, and weather condi
tions. Drive especially slowly offroad when
your view is restricted.
- Please be aware that in offroad mode, par
ticularly on a smooth and slippery road, the
wheels may have an increased tendency to spin and the vehicle may break away - dan
ger of skidd ing!
- Stability is lim ited in the offroad mode .
@) For the sake of the environment
Avoid damage to the environment and re
spect nature.
(D Tips
Only drive where it is permitted and stay on
marked roads and paths.
Explanation of some technical terms
The following data refer to ideal conditions. De
pending on vehicle load and ground conditions
and the environment, the numbers may vary. It is
the driver's responsibility to decide whether ave
hicle can overcome a specific s ituation
¢ ,&. .
Gradient angle
The number of meters in altitude gained over a
distance of 109.4 yards or 100 meters (grade)
are given as a percentage or degrees. Informa
t ion about the gradient the vehicle can cl imb un
der its own power (depends in part on the road
s ur face and eng ine power). Maximum permitted
grade: 31
°
Ground clearance
The distance between the road surface and the
lowest point of the vehicle underbody. Ground
clearance 7.9 in (200 mm)
_& WARNING
-
Exceeding the stated maximum figures can
result in severe injuries or vehicle damage.
- All the information was gathered on level,
firm and non-slippery road surfaces, and un-
der dry weather conditions.
~
201
Page 206 of 300
Trailer mod e
Operating instructions
6"
~ 2
. 1/2 "
.(. '-I} 1-1/2"
-
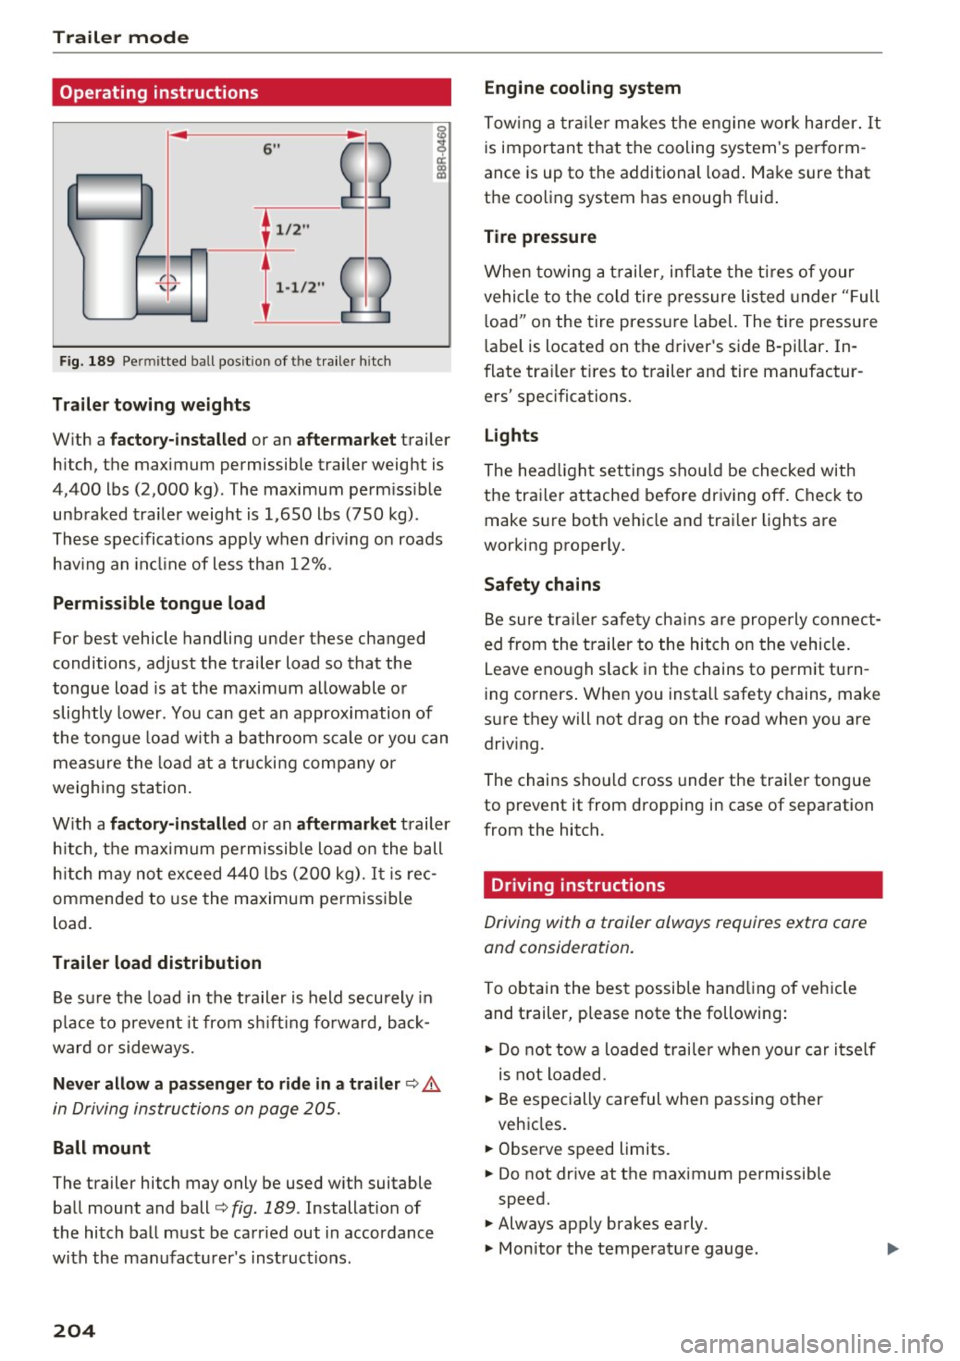
F ig. 189 Pe rmi tted ball posit io n of the traile r hi tch
Tr aile r to wing weights
With a f ac tor y-inst all ed or an a ft er ma rket trailer
h itch, the maximum permissib le trailer weight is
4,400 lbs (2,000 kg) . The maximum perm iss ible
unb raked trailer weight is 1,650 lbs (750 kg) .
These spec ificat ions apply when dr iv ing on roads
hav ing an incl ine of less tha n 12%.
Perm is sible tongue load
For best vehicle handling under these changed
conditions, adjust the trailer load so that the
tongue load is at the maxim um allowable or
slightly lower. You can get an approx imation of
the tongue load w ith a bathroom scale or you can
measure the load at a tr ucking company or
weighing station.
W ith a
fa ctor y-installed or an aftermarket trailer
h itch, t he maximum permissib le load on the ball
h itch may not exceed 440 lbs (200 kg).
It is rec
ommended to use the maximum permissible
load.
Trailer load di stribution
B e su re the load in the trailer is held securely in
p lace to prevent it from s hift ing fo rwa rd, back
ward or sideways.
Nev er allo w a p assenge r to ride in a trail er c::> A
in Driving instructions on page 205.
Ball mount
The trailer hitch may only be used w ith suitable
ball mount and ball
c::> fig. 189 . Installat ion of
the hitch ball must be carr ied out in accordance
w ith the manufacturer 's inst ruct ions.
204
Engine cooling system
Towing a tra ile r makes t he engine work harder. It
is important that the cooling system's perform
ance is up to the additional load . Make sure that
the cooling system has enough fluid .
Tire pressure
When towing a t railer, inflate the ti res of your
vehicle to the cold tire pressure listed under "Full
l oad" on the tire press ure label. The tire pressure
l abel is located on the driver 's side B-pillar . In
flate tra iler tires to trailer and tire manufactur
ers' specifications.
Lights
The head light settings shou ld be checked with
the trailer attached before driving off. Check to
make s ure both vehicle and trailer lights are
working properly.
Safety chains
Be sure tra ile r safety cha ins a re properly connect
ed from the trailer to the hitch on the vehicle.
Leave enough slack in the chains to permit tu rn
i ng corners . When you install safety chains, make
s u re they will not drag on the road when you are
driv ing.
The chains should cross under the trai ler tongue
to prevent it from dropping in case of separation
from the hitch.
Driving instructions
Driving with a trailer always requires extra care
and consideration.
To obtain the best possible handling of veh icle
and t railer, p lease note the following:
.., Do not tow a loaded trai ler when your car itself
is not loaded.
.., Be especially care ful when passing other
vehicles .
.., Observe speed limits.
.., Do not drive at the maximum permissible
speed.
.., Always app ly brakes early.
.., Monitor the temperature gauge.
Page 207 of 300
,....,
N
co
er::
co
,....,
Towing a loaded trailer with an empty car res ults
in a high ly unstable distribution of weight. If this
cannot be avoided, drive at very low speeds only
to avoid the risk of losing steering control.
A "balanced" rig is eas ier to operate and control.
This means that the tow vehicle should be loaded
to the extent possible and permissible, while
keeping the trailer as light as possible under the
circumstances. Whenever possible, transfer
some cargo to the luggage compartment of the
tow vehicle while observ ing tongue load require
ments and vehicle loading considerat ions.
Speed
The higher the speed, the more difficult it be
comes for the driver to contro l the rig. Do not
drive at the maximum permiss ible speed . Reduce
your speed even more if load, weather or wind
conditions are unfavorable - part icularly when
going downhill.
Reduce veh icle speed
immediately if the tra iler
shows the slightest sign of swaying .
Do not try
to stop the swaying by accelerating.
Observe speed lim its . In some areas, speeds for
veh icles towing trai lers are lower than for regular
veh icles.
Always apply brakes early. When driving down
h ill , shift into a lower gear to use the engine
braking effect to slow the veh icle. Use of the
brakes alone can cause them to overheat and fa il.
Coolant temperature
The coolant temperature gauge r=;, page 10 must
be observed carefully . If the needle moves close
to the upper end of the scale, reduce speed im mediately and/or turn off the air conditioner.
If the coolant temperature warning light in the
instrument cluster starts flashing., pull off
the road, stop and let the engine
idle for about
two minutes to prevent heat build-up.
A WARNING
Anyone not properly restrained in a moving
vehicle is at a much greater risk in an acci-
-
Trailer mode
dent. Never let anyone ride in your car who is
not properly wear ing the restraints provided
by Aud i.
Trailer mode notes
Important to know
Your vehicle handles differently when towing a
t railer because o f the additional weight and dif
ferent weight distribution. Safety, performance
and economy will greatly depend on how carefu l
ly you load your trai ler and operate your rig.
Before you actually tow your trailer, practice
tu rning, stopping and backing up in an area away
from traffic. Keep practicing until you have be
come comp lete ly familiar w ith the way your vehi
cle-tra iler combination behaves and responds.
Backing up is difficu lt and requires practice.
Backing up with a t railer generally requires steer
ing action opposite to that when backing up your
vehicle without a trailer.
Maintain a greater distance between your vehicle
and the one in front of you . You will need more
room to stop. To compensate for the trailer, you
will need a larger than normal turning radius.
When passing, remember that you cannot accel
erate as fast as you normally would because of
the added load. Make sure you have enough room
to pass. After passing, allow p lenty of room for
your trailer before c hanging lanes again.
Avoid jerky starts, sharp turns or rapid lane
changes.
(D Tips
- Do not tow a trailer during the break-in peri
od of your veh icle.
- If you tow a trailer, your Audi may requ ire
more frequent maintenance due to the ex
tra load
r=;, page 280.
205
Page 209 of 300
..... N
co
er::
co
.....
General information
Regular, proper care helps to maintain your vehi
cle's value.
It can a lso be a requirement when
submitting warranty claims for corrosion damage
and paint defects on the body.
The necessary care products can be obtained
from your authorized Audi dealer or authorized
Audi Service Facility . Read and follow the instruc
tions for use on the packaging.
A WARNING
- Us ing clean ing and care products incorrectly
can be dangerous to your health.
- Always store clean ing and care products out
of reach of children to reduce the r isk of po i
soning .
@ For the sake of the environment
- Preferably use environmentally-friendly
products when buying cleaning agents.
- Do not dispose of leftover cleaning and care
products with household trash.
Car washes
The longer that deposits such as insects, bird
droppings, tree sap or road salt remain on the ve
h icle, the more the surface can be damaged. High
temperatures such as those caused by sunlight
i ncrease the damag ing effect .
Before washing, r inse off heavy depos its with
p lenty of water.
Stubborn deposits such as bird droppings or tree
sap are best removed with plenty of wate r and a
microfiber cloth.
Also, wash the underside of your vehicle once road sa lt stops being used for the season .
Pressure washers
When washing your ve hicles w ith a pressure
washer, always follow the ope ra ting inst ructions
p rovided w ith the pressure washe r. This is espe
cially important in regard to the pressure and
spraying distance. Do not aim the spray directly
Ca re and cleaning
at seals on side w indows, doo rs, the hood, the
lu ggage compartment lid or the sunroof* or at
t ires, rubber hoses, insulating material, sensors *
or camera lenses*. Keep a distance of at least 16 inches (40 cm) .
Do not remove snow and ice with a pressure
washer.
Never use rota ry nozzles or high pressure noz
zles .
T he wate r temperatu re must not be above 140 °F
(60 °() .
Automat ic car washes
Spray off the vehicle before washing .
Make s ure that the windows and roof * are closed
and the windsh ield wipers are off. Follow instruc
t ions from the car wash operator, especially if
there are accessories attached to your vehicle.
If possible, use car washes that do not have
brushes.
Washing by hand
Clean the ve hicle starting from the top and work
ing down using a soft sponge or cleaning br ush .
U se solvent-free cleaning products.
Washing vehicles with matte finish paint by
hand
To avoid damaging the paint when washing, first
remove d ust and large particles from your vehi
cle. Insects, grease spots and f ingerprints are
best removed w ith a special cleaner for matte
finish paint.
Apply the product using a microfiber cloth . To
avo id damag ing the pa int surface, do not use too
much pressure .
Rinse the vehicle thorough ly with water. Then
clean using a neutra l shampoo and a soft mic ro
fiber cloth.
Rinse the ve hicl e thorough ly agai n an d let it air
dry. Remove any water residue using a sham my.
IIIJ,,
207
Page 212 of 300
Care and cleaning
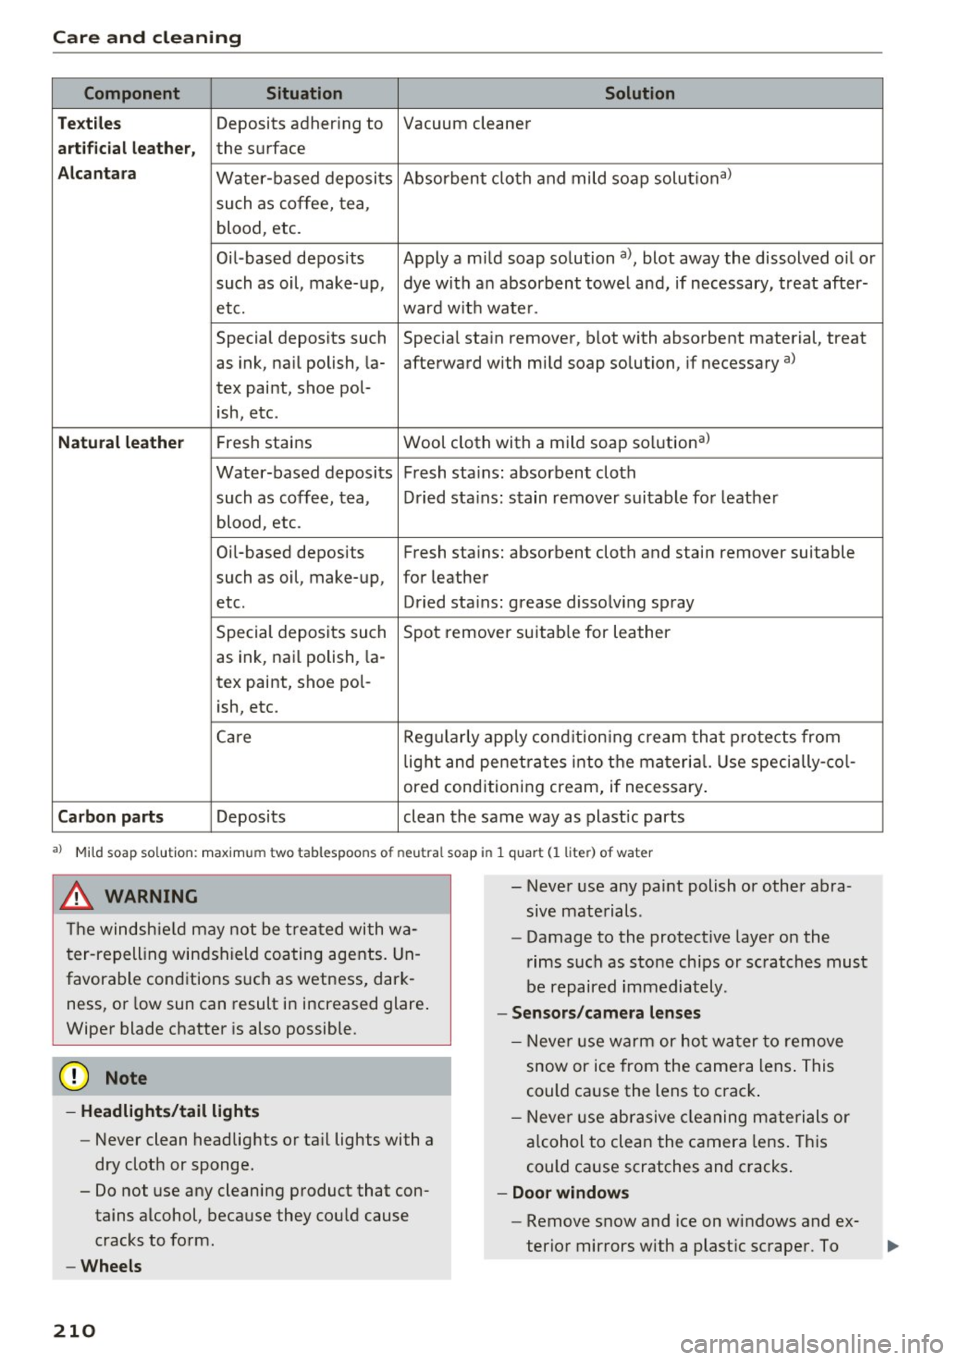
Component Situation Solution
Te xtil es
Deposits adhering to Vacuum cleaner
a rt ifici al le ather , the surface
Alcant ara Water-based deposits Absorben
t cloth and mild soap solutiona>
such as coffee, tea,
blood, etc.
O il-based deposits Apply a m ild soap solution a), blot away the dissolved oil or
such as oil, make-up, dye with an absorbent towel and, if necessary, treat after-
etc. ward wit h water.
Special deposits such Special stain remover, b lot with absorbent material, treat
as ink, na il polish, la- afterward with mild soap solution, if necessary a)
tex paint, shoe pol-
ish, etc.
Natural leather Fresh stains Wool cloth with a mild soap so
lutiona)
Water-based deposits Fresh sta ins : absorbent cloth
such as coffee, tea, Dried sta ins: stain remover suitable fo r leather
blood, etc.
Oil-based deposits Fresh stains: absorbent cloth and stain remover suitable
such as oil, make-up, for leather
etc. Dried sta ins : grease dissolv ing spray
Special deposits such Spot remover suitab le for leather
as ink, nai l polish, la -
tex paint, shoe pol-
ish, etc.
Ca re Regularly apply cond ition ing cream that protects from
light and penet rates into the materia l. Use specia lly-co l-
ored conditioning cream, if necessary.
Carbon parts Deposits clean the same way as plastic parts
a) Mild soap solution: maximum two tablespoons of neutral soap in 1 quart (l liter) of water
_& WARNING
The windshie ld may not be trea ted with wa
ter-repelling windshield coating agents. Un
favorable conditions s uch as wetness, dark
ness, or low sun can result in increased glare .
Wiper blade chatter is also possible.
(D Note
- Headlights/tail light s
-Never clean headlights or tail lights with a
dry cloth or sponge.
- Do not use any cleaning product that con
tains alcohol, because they could cause
cracks to form.
- Wheels
210
-
- Never use any paint polish or other abra
sive materials.
- Damage to the protect ive layer on the
rims such as stone chips or scratches must
be repaired immediately.
- Sensors /camera lenses
- Neve r use wa rm or ho t wa ter to remove
snow or ice from the camera lens . This
could cause the lens to crack .
- N eve r use ab rasive cleaning materials or
a lcohol to clea n the camera lens . This
could cause scratches and cracks .
-Doo r window s
-Remove snow and ice on windows and ex-
terior mirrors with a plast ic scraper. To
Page 215 of 300
,....,
N
co
er::
co
,....,
pecia lly we ll for winter or summer driving. Dur
ing seasona l change-over, we suggest that you
f ill up at busy gas stations where the seasonal
adjustment is more likely to be made in time.
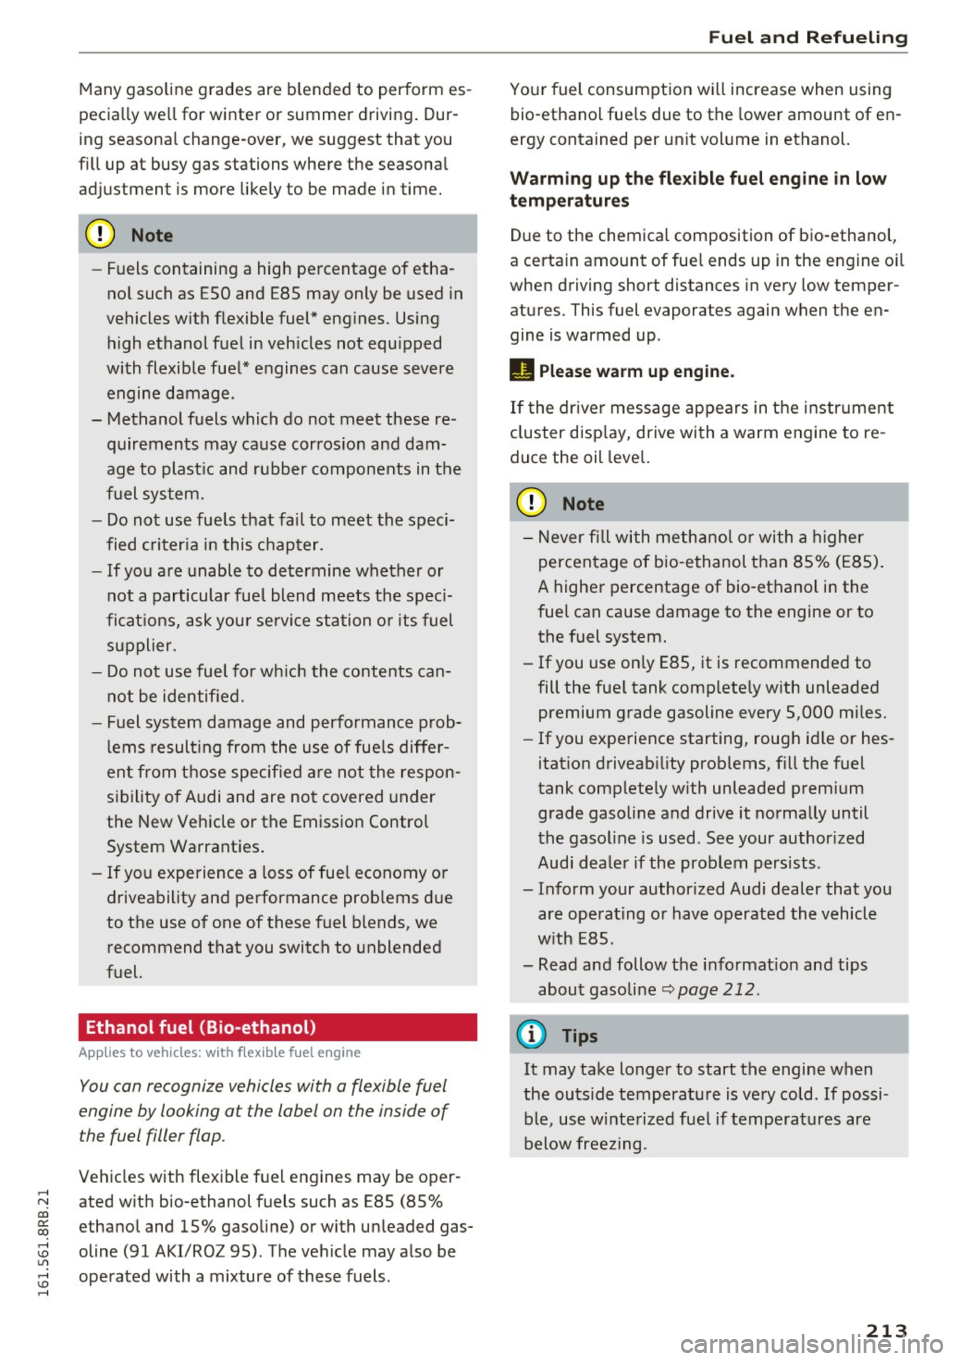
- Fuels containing a high percentage of etha
no l such as ESO and E85 may only be used in
vehicles with flexible fuel* eng ines. Using
high ethanol fuel in veh icles not equ ipped
with flexible fuel* engines can cause severe
engine damage .
- Methanol fuels which do not meet these re quirements may ca use corros io n and dam
age to plast ic and r ubber components in the
fuel system.
- Do not use fuels that fail to meet the spec i
fied c rit er ia i n this c hapter.
- If you a re unable to determine whether or
not a particular fue l blend meets the spec i
fi cat ions, ask your service station o r its fuel
su pplier.
- Do not use fue l fo r w hich the contents can
not be identified.
- Fuel sys tem damage and performance prob
l ems result ing from the use of fue ls diffe r
ent from those specified are not the respon
s ibility o f Audi and are no t covered under
the New Vehicle or the Emissio n Contro l
System Wa rranties .
- If you experience a loss of fue l economy o r
driveability an d performance prob lems d ue
to the use o f one of these fuel b lends, we
r ecommend that you switch to unblended
fuel.
Ethanol fuel (Bio-ethanol)
App lies to vehicles: with flexib le fuel engine
You con recognize vehicles with a flexible fuel
engine by looking a t the label on the inside of
the fuel filler flop.
Veh icles with flexibl e fu el engines may be op er
ated w ith bio -ethanol fuels such as E85 (85%
ethano l and 15% gasoline) or with un leaded gas
oline (9 1 AKI/RO Z 95). The ve hicle may a lso be
ope rated with a mixture of these fuels.
Fuel and R efueling
Your fuel consumpt ion w ill increase when using
bio-ethano l fue ls due to th e lower amount of en
ergy conta ined per un it vol ume in ethanol.
Warming up the flexible fuel engine in low
temperature s
Due to the chemica l composition of b io -ethanol ,
a certa in amount of fue l ends up in the engine o il
when driving short distances in very low temper
atures . This fuel evaporates again when the en
gine is warmed up.
II Please warm up eng ine .
If the drive r message appears in the instr ume nt
cluster disp lay, drive with a warm engine to re
duce the oil leve l.
(D Note
- N ever fill wi th metha nol o r with a higher
percentage of b io -ethanol than 85% (E85).
A highe r percentage of bio-ethanol in the
fuel can cause damage to the engine or to the fuel system.
- If you use on ly E85, it is recommended to
fill the fue l tank complete ly w ith unleaded
premium grade gasoline every 5,000 mi les.
- If you expe rience starting, rough id le or hes
itat ion d riveab ility prob lems, f ill the fuel
tank complete ly w ith unleaded p remium
grade gaso line and drive it norma lly until
the gaso line is used. See your author ized
Audi dea ler if the problem persists.
- Inform your author ized Audi dealer that you
are operating o r have operate d the vehicle
w ith E8S.
- Read and follow the i nformat ion and tips
abou t gasoli ne <=:>
page 212 .
(D Tips
It may take longer to start the engine when
the outs ide temperatu re is very cold . If possi
ble, use w inte rized fue l if tempe ratures are
below free zing .
213
Page 218 of 300
Fuel and Refueling
Static electricity can cause sparks that can
ignite fuel vapors released during refueling .
- Never smoke or have an open flame any
where in or near your vehicle when refueling
or filling a portable fuel container.
- For your safety, we strongly recommend
that you do not travel with a portable fue l
container in your vehicle. The container, full
or empty may leak and could cause a fire, especially in a crash.
- If, under exceptional circumstances , you
must transport a portable fuel container,
please observe the follow ing :
- Never fill a portable fuel container while it
is anywhere in or on the vehicle (for exam
ple, in the luggage compartment, or on
the trunk) . Static electricity can build up
while filling and can ignite fuel vapors
causing a fire.
- Always place a portable fuel container on
the ground before filling .
- Always keep the filler nozzle completely
inside the portable container before and
during filling .
- If filling a portable container made of
metal, the filler nozzle must always be in
contact w ith the container . This will help
prevent static electric ity from discharg ing
and cause a fire.
- Never spill fuel inside the vehicle or lug
gage compartment . Fuel vapors are highly
f lam mable.
- Always observe local and state/provincial
laws regard ing the use, storage and trans
portation of fuel containers.
- Make certain the fuel conta iner meets in
dustry standards (ANSI/ ASTM F852-86).
(D Note
If any fuel has spilled onto the car, it should
be removed immediately to prevent damage
to the paint .
@ For the sake of the environment
As soon as the correctly operated nozzle switches off automatically for the first time,
the tank is full. Do not try to add more fuel
216
because fuel may spill out. In addition, the
expansion space in the fuel tank will be filled -
causing the fue l to overf low when it becomes
warm and pollute the environment.
(D Tips
- Running your engine white refuelling may
cause vapors to escape or even cause fuel to
spill out of the tank. This wou ld then shut
off the fuel nozzle before the tank is full.
- Do not refuel your vehicle with the ignition
turned on. The fuel gauge may otherwise not indicate the correct fuel level after refu
elling .
- Diesel vehicles* are equipped with a diesel
misfueling protector. It allows the vehicle
to be fueled only with a diesel fuel pump
nozzle. A worn or damaged nozzle or a noz
zle that is too small may not be able to open
the diesel misfueling protector . If this is the
case, try turning the nozzle before inserting
it in the fuel filler neck, use a different fuel
pump or see your authorized Audi dealer or
authorized repair facility for assistance.
- Th e fue l fi ller f lap of your vehicle is not
locked when you lock the vehicle from the
inside.
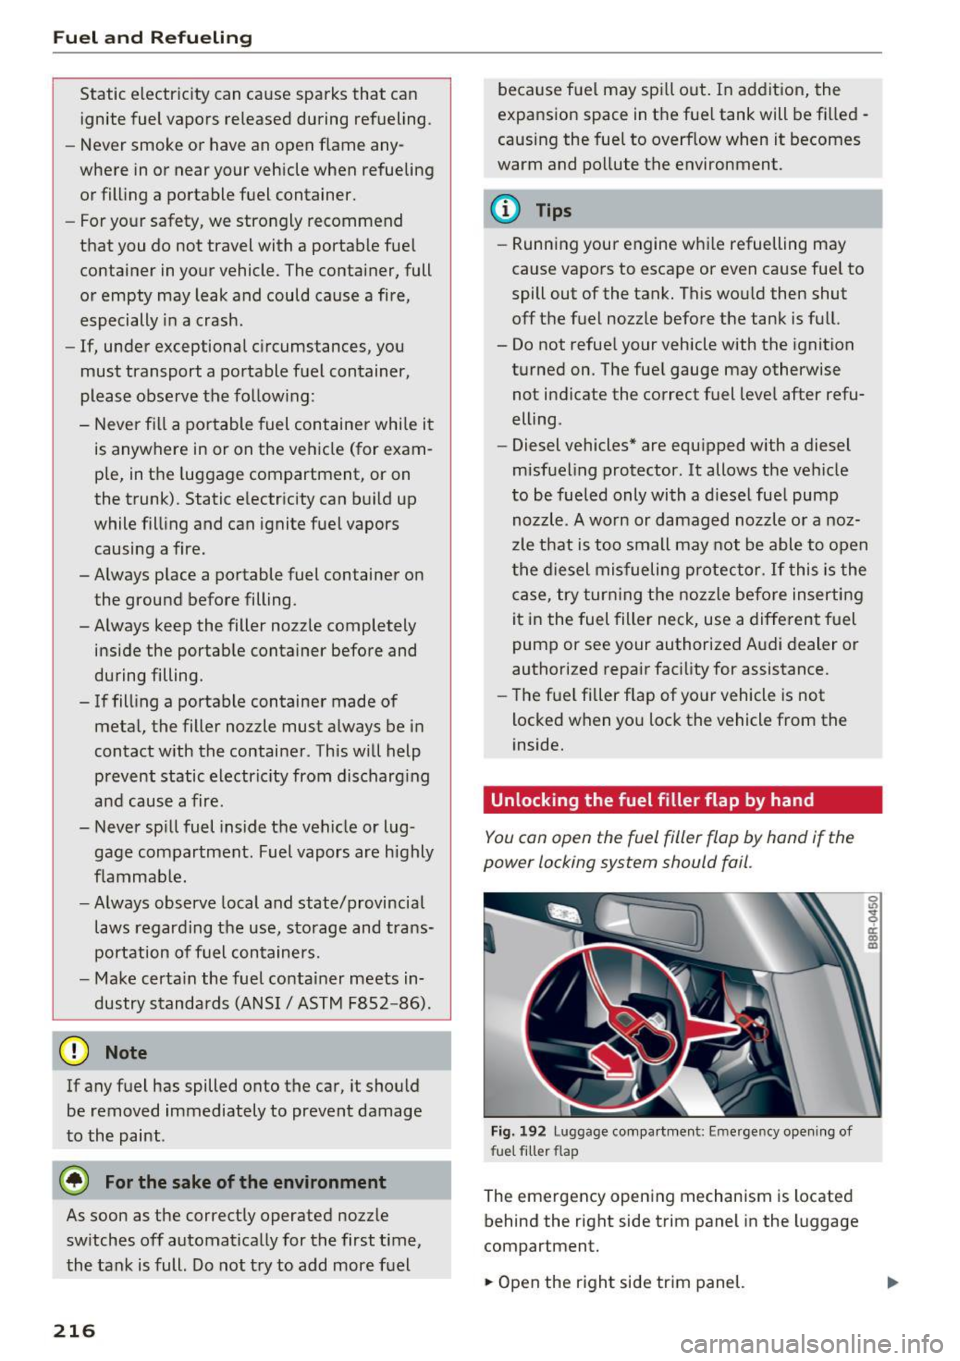
Unlocking the fuel filler flap
by hand
You can open the fuel filler flap by hand if the
pow er locking syst em should fail .
Fig. 192 Lu ggage compa rt men t: Em ergency open ing of
fu el filler fl ap
Th e emergency open ing mechanism is located
behind the right side trim panel in the luggage
compar tment.
.. Open the right side trim panel.
Page 220 of 300
Fuel and R efue li ng
Filling AdBlue
Applies to veh icles: w ith selective cata ly ti c reduction
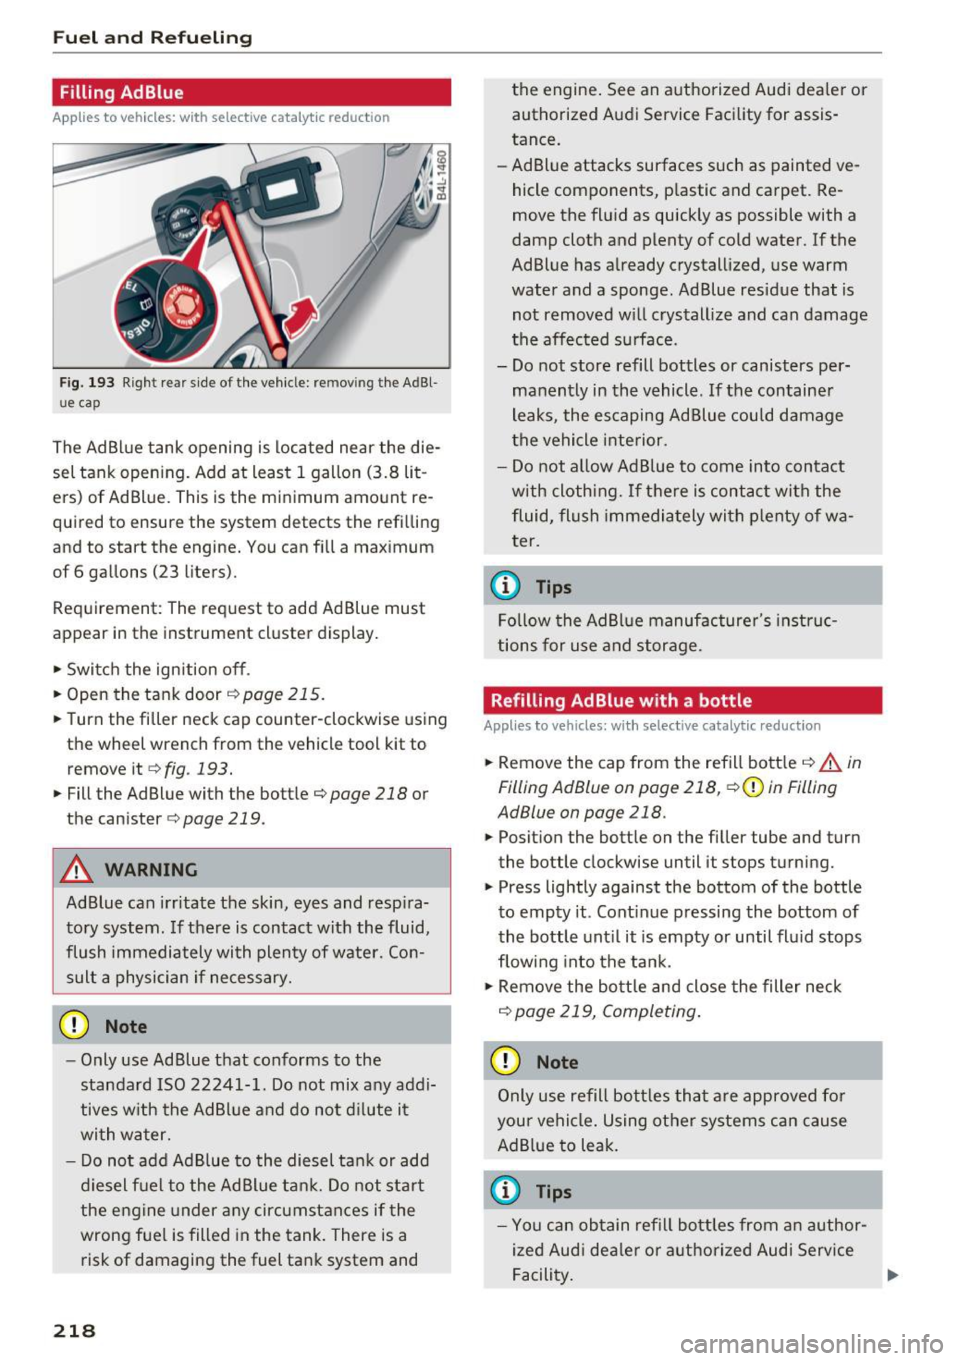
Fig. 193 Right rear side of the vehicle: removing the AdBl
ue cap
The Ad Blue tank opening is located near the die
sel tank opening. Add at least 1 gallon (3.8 lit
ers) of Ad Blue. This is the minimum amount re
quired to ensure the system detects the refilling
and to start the engine. You can fill a maximum
of 6 gallons (23 liters).
Requirement: The request to add Ad Blue must
appear in the instrument cluster display.
• Switch the ignition off.
• Open the tank door
r::!) page 215.
• Turn the filler neck cap counter-clockwise using
the wheel wrench from the vehicle tool kit to
remove it
¢ fig . 193.
• Fill the Ad Blue with the bottle¢ page 218 or
the canister ¢
page 219.
A WARNING
AdBlue can irr itate the skin, eyes and resp ira
tory system. If there is contact with the fluid,
flush immediately with plenty of water. Con sult a physician if necessary.
CD Note
- Only use Ad Blue that conforms to the
standard ISO 22241-1. Do not mix any addi
tives w ith the AdBl ue and do not d ilute it
wi th water.
- Do not add Ad Blue to the diesel ta nk or add
diesel f uel to the AdBlue tan k. Do not start
the engine under any circumstances if the
wrong fue l is filled in the tank. There is a
risk of damaging the fuel tank system and
218
the engine . See an authorized Audi dea le r or
authorized Audi Service Facility for assis
tance.
- Ad Blue attacks surfaces such as painted ve
hicle components, p lastic and carpet. Re
move the fluid as quickly as possible with a
damp cloth and plenty of cold water. If the
AdBlue has a lready crystall ized, use warm
water and a sponge. Ad Blue residue that is
not removed w ill crystall ize and can damage
t he affected s urface.
- Do not store refill bottles or canisters per
manently in the vehicle. If the container
leaks, the escaping Ad Blue could damage
the vehicle inte rior.
- Do not allow Ad Blue to come into contact
with cloth ing. If t here is contac t w ith the
fluid, flush immediately wi th plenty of wa
ter.
(0 Tips
Fo llow the AdBlue manufacture r's instruc
tions for use and storage.
Refilling Ad Blue w ith a bottle
App lies to vehicles : wi th selec tive cata lyt ic reduct ion
• Remove the cap from the refill bott le ¢ &. in
Filling AdBlue on page 218,
¢ 0 in Filling
AdBlue on page 218.
• Posit ion the bottle on the filler tube and turn
the bottle clockwise until it stops turning.
• Press lightly against the bottom of the bottle
to empty it . Cont inue pressing the bottom of
the bottle unt il it is empty or until fluid stops
flowing into the tank.
• Remove the bottle and close the filler neck
¢ page 219, Completing .
CD Note
Only use refill bott les tha t are approved for
you r vehicle. Using other systems can cause
Ad B lue to leak.
(0 Tips
- You can obtain refill bottles from an author
ized Audi dea le r or authorized Audi Service
Facility.
Page 222 of 300
Checking and Filling
Checking and Filling Hood
Releasing the engine hood
The engine hood is released from inside the vehi
cle .
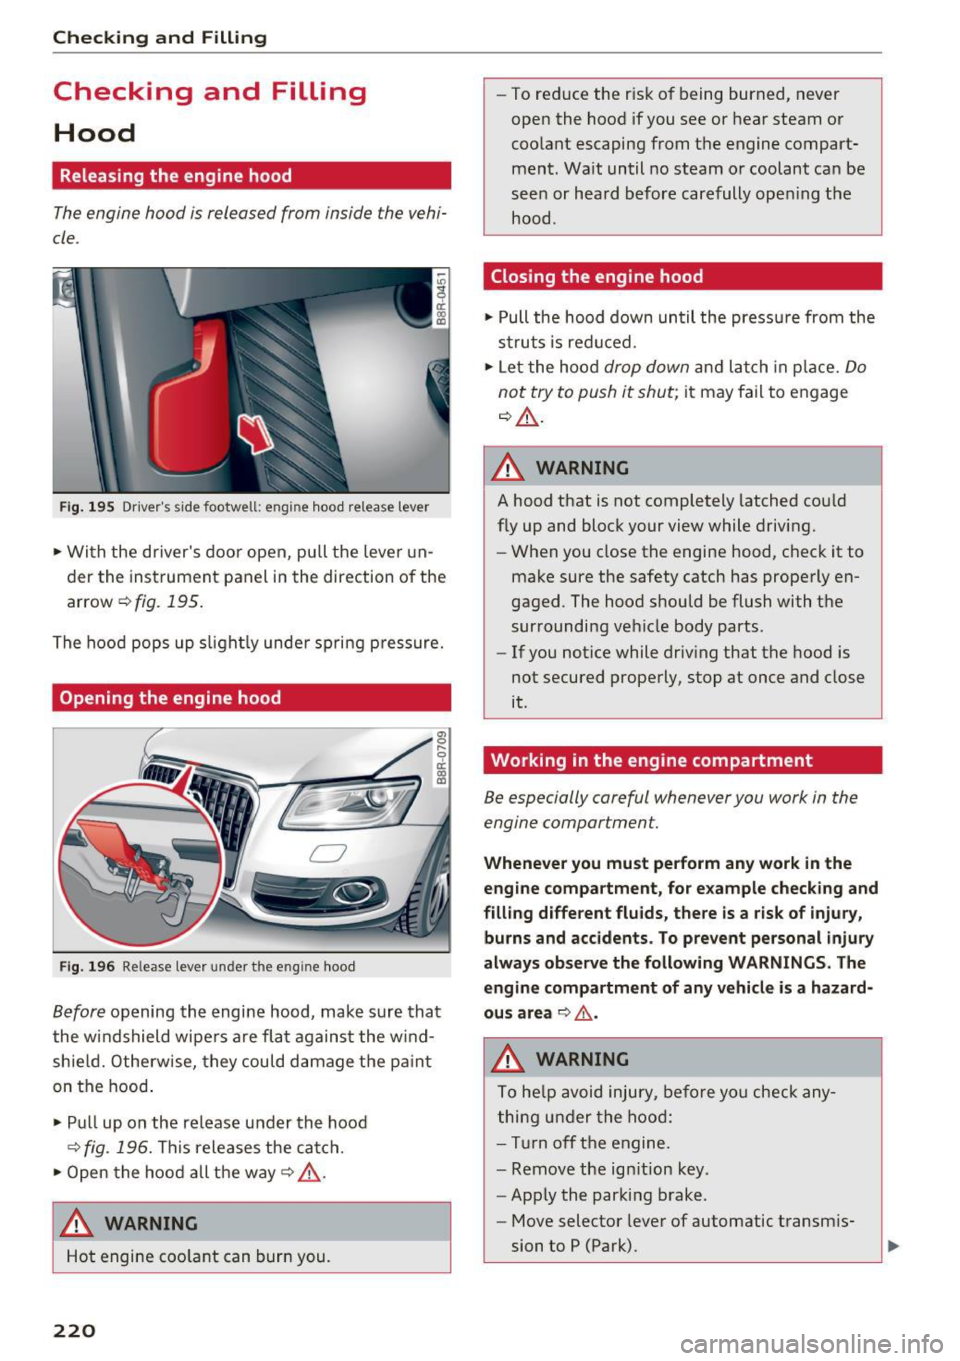
Fig. 195 Driver's side footwell : eng ine hood release lever
.. With the driver's door open, pull the lever un
der the instrument panel in the direction of the
arrow ¢
fig. 195.
The hood pops up slightly under spring pressure.
Opening the engine hood
CJ
Fig. 196 Release lever under t he e ngi ne hood
Before opening the engine hood, make sure that
the windshield wipers are flat against the w ind
shield. Otherwise, they could damage the paint
on the hood.
.,. Pull up on the release under the hood
¢
fig . 196. This releases the catch.
.,. Open the hood all the way ¢.&_ .
,& WARNING
Hot engine coo lant can burn you.
220
-To reduce the r isk of being burned, never
open the hood if you see or hear steam or
coo lant escaping from the engine compart
ment. Wait until no steam or coolant can be
seen or heard before carefully opening the
hood .
Closing the engine hood
.,. Pull the hood down until the pressu re from the
struts is reduced .
.. Let the hood
drop down and latch in place. Do
not try to push it shut;
it may fail to engage
~A -
A WARNING
A hood that is not completely latched could
fly up and block your view while driving.
- When you close the engine hood, check it to
make sure the safety catch has properly en
gaged . The hood should be flush with the
surrounding vehicle body parts .
- If you notice while driv ing that the hood is
not secured properly, stop at once and close
it .
Working in the engine compartment
Be especially careful whenever you work in the
engine compar tment.
-
Whenever you must perform any work in the
engine compartment , for example checking and
filling different fluids, there is a risk of injury,
burns and accidents. To prevent personal injury
always observe the following WARNINGS. The
engine compartment of any vehicle is a hazard
ous area ¢.&, .
A WARNING
To help avoid injury, before you check any
thing und er the hood:
- Turn off the engine.
- Remove the ign ition key .
- Apply the parking brake.
- Move selector lever of automatic transm is-
sion to P (Park).
-
Page 228 of 300
Checking and Filling
areas, into open streams or down sewage
drains.
- Recycle used engine oil by taking it to a used
engine oil collection facility in your area, or
contact a service station .
Cooling system
Coolant
The engine coolant performs two functions: it
keeps the engine from overheating and it pro tects the engine from freezing in the winter.
The cooling system is sealed and generally re
qu ires little attention .
The cooling system has been filled at the factory
with a permanent coolant which does not need to
be changed. The coolant consists of
a mixture of
specially conditioned water and the manufactur
er's g lycol-basedcoo lant additive G 13 antifreeze
w ith anticorrosion addi tives (50% for USA mod
e ls· 60% for Canadian mode ls). This m ix ture
'
both ass ures the ne cess ary fros t protection and
p rotects metal com ponents in the engi ne's coo l
ing system from corrosion and scaling .
It also
raises the boiling point of the coolant.
Do not red uce the concent ra tion of the cool ant in
the s ummer by addi ng p la in water.
The propor
tion of coolant additive must be at lea st 50 %
but not more than 60 %
to maintain antifreeze
protection and cooling efficiency. If the coolant
frost protection is too low, the coo lant could
freeze and damage the vehicle heat ing and en
g ine cooling system .
For year -round driving, antifreeze is added at the
factory for temperatures down to:
- -3 1 °F
c -3s0c) usA
- -4 0° F ( -40°C) Canad a.
I f you must add coolant, use a m ixt ure of wa ter
and coolant add it ive. M ixing the coolant additive
with d istilled water is recommen ded.
_& WARNING
B efore you che ck anyt hing i n the engine com
partmen t, a lways read and heed all WARN -
226
INGS ~ & in Working in the engine compart
ment on page 220.
(D Note
- Be fore w inter sets in, have the coolan t
checked to see if the coo lant additive in your
vehicle is suff ic ient to meet the climate con
ditions. This is especially important if you
live in a region where the winter is extreme
ly cold. If necessary, increase the proportion
of coolant addi tive to 60% .
- Whe n adding coolant additive to your cool
ing system, remember:
- We re commend usin g on ly coo lant addi
tive G12++ o r G13 fo r yo ur vehicle. This
coolant ad dit ive is availab le at authorized
Audi dealers. Other types of antifreeze can
significantly reduce corrosion protection.
The resulting corrosion can cause a loss of
coolant and serio us engine damage.
- Do not add any type of radiato r leak sealant
to your vehicle's engine coolant. Adding ra
diator repair fluid may adversely affect the
function and perfo rmance of yo ur cooling
system and cou ld resu lt in damage not cov
ered by your New Ve hicle Li mited War ranty.
Checking the engine coolant level
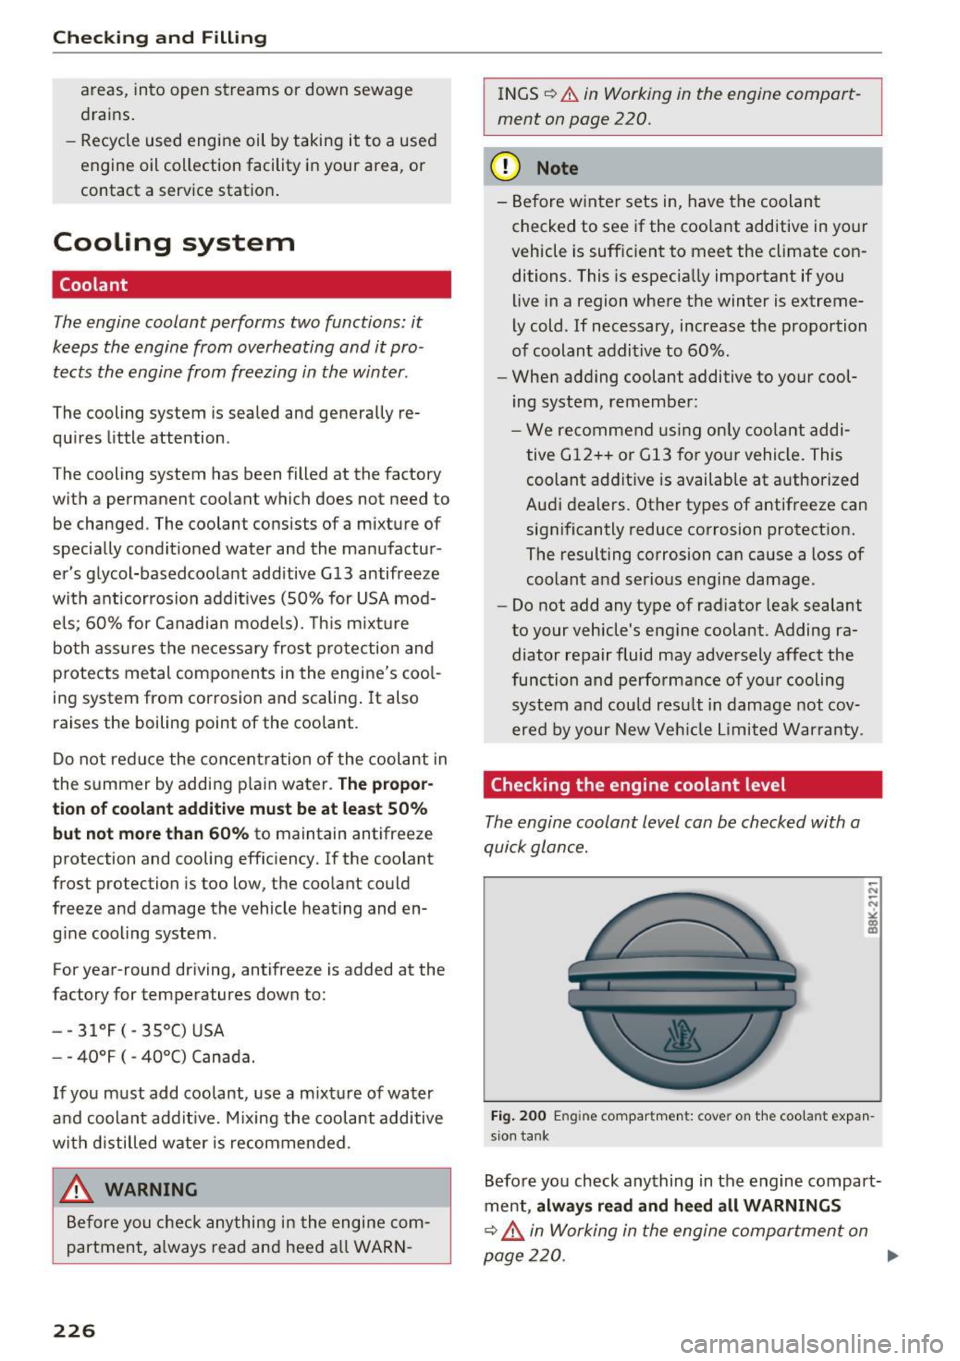
The engine coolant level can be checked with a
quick glance.
Fi g. 20 0 Eng ine compartment: cover on the coo lant expan
s io n tank
Befo re yo u check anything in the engine compart
ment,
always read and heed all WARNINGS
~ ,& in Working in the engine compart,nen t on
page 220. ..,.