belt AUDI Q5 2016 Owners Manual
[x] Cancel search | Manufacturer: AUDI, Model Year: 2016, Model line: Q5, Model: AUDI Q5 2016Pages: 300, PDF Size: 75.02 MB
Page 5 of 300
.... N
co
er::
co
....
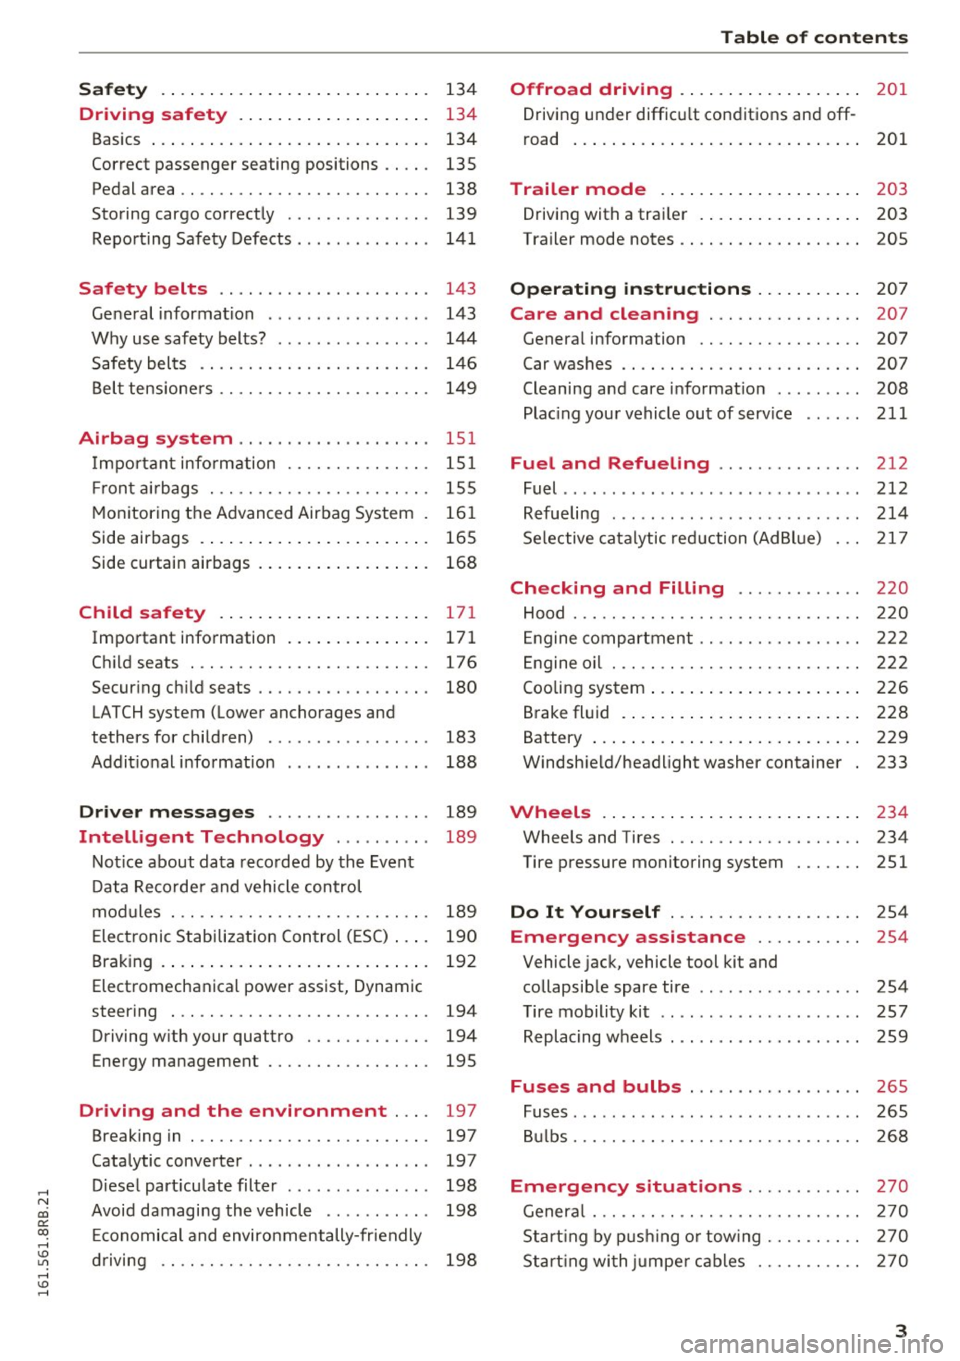
Driving safety . . . . . . . . . . . . . . . . . . . . 134
Basics . . . . . . . . . . . . . . . . . . . . . . . . . . . . . 134
Correct passenger seating positions . . . . . 135
Pedal area . . . . . . . . . . . . . . . . . . . . . . . . . . 138
Storing cargo correct ly . . . . . . . . . . . . . . . 139
Repo rt ing Safety Defects . . . . . . . . . . . . . . 14 1
Safety belts . . . . . . . . . . . . . . . . . . . . . . 143
Ge ne ral information . . . . . . . . . . . . . . . . . 143
Why use safety belts? . . . . . . . . . . . . . . . . 144
S afety belts . . . . . . . . . . . . . . . . . . . . . . . . 14 6
Bel t tensione rs . . . . . . . . . . . . . . . . . . . . . . 14 9
Airbag system .......... .... ... .. . 15 1
I mportant info rm ation . . . . . . . . . . . . . . . 151
Fr on t air bags . . . . . . . . . . . . . . . . . . . . . . . 155
M oni toring the A dvanced Airbag Sys tem . 16 1
Side airbags . . . . . . . . . . . . . . . . . . . . . . . . 165
Side curtain airbags . . . . . . . . . . . . . . . . . . 168
Child safety . . . . . . . . . . . . . . . . . . . . . . 171
Important information . . . . . . . . . . . . . . . 17 1
Ch ild seats . .. ............... .. .... . 17 6
Secur ing child seats . . . . . . . . . . . . . . . . . . 180
LATCH system (Lower anchorages and
tethers for children) . . . . . . . . . . . . . . . . . 183
Addit ional information 188
Driver messages . . . . . . . . . . . . . . . . . 189
Intelligent Technology . . . . . . . . . . 189
Not ice about data reco rded by the Event
D ata Recorde r and vehicle control
mod ules . . . . . . . . . . . . . . . . . . . . . . . . . . . 189
E lectronic Stabilization Con trol ( ESC) . . . . 190
Braking . . . . . . . . . . . . . . . . . . . . . . . . . . . . 192
Elect romechanica l power assist, Dynam ic
steering . . . . . . . . . . . . . . . . . . . . . . . . . . . 194
Driving w ith your quattro . . . . . . . . . . . . . 194
Energy management . . . . . . . . . . . . . . . . . 195
Driving and the environment . . . . 197
Breaking in . . . . . . . . . . . . . . . . . . . . . . . . . 197
Cata lytic converte r . . . . . . . . . . . . . . . . . . . 197
D iese l part icu late filter . . . . . . . . . . . . . . . 198
Avoid damagi ng the vehicle . . . . . . . . . . . 198
E conomical and environmentally-fr iendly
driving . . . . . . . . . . . . . . . . . . . . . . . . . . . . 198
Table of contents
Offroad driving . . . . . . . . . . . . . . . . . . .
201
Driving under diffic ult con ditions and off -
road . . . . . . . . . . . . . . . . . . . . . . . . . . . . . . 201
Trailer mode . . . . . . . . . . . . . . . . . . . . . 203
Driving with a trai ler . . . . . . . . . . . . . . . . . 203
Trailer mode notes . . . . . . . . . . . . . . . . . . . 205
Operating instructions . . . . . . . . . . . 207
Care and cleaning . . . . . . . . . . . . . . . . 207
Genera l information . . . . . . . . . . . . . . . . . 207
Car washes . . . . . . . . . . . . . . . . . . . . . . . . . 207
Cleaning and care informat ion . . . . . . . . . 208
Plac ing your vehicle out of serv ice . . . . . . 211
Fuel and Refueling ............... 212
Fuel ......... ...................... 212
Refue ling . . . . . . . . . . . . . . . . . . . . . . . . . . 214
Se lective cata lytic red uction (AdBlue) 217
Checking and Filling . . . . . . . . . . . . . 220
Hood . . . . . . . . . . . . . . . . . . . . . . . . . . . . . . 220
En gine compartment . . . . . . . . . . . . . . . . . 22 2
En gine oi l . . . . . . . . . . . . . . . . . . . . . . . . . . 2 22
Cooling sys tem . . . . . . . . . . . . . . . . . . . . . . 2 26
Brake fl uid . . . . . . . . . . . . . . . . . . . . . . . . . 228
Battery . . . . . . . . . . . . . . . . . . . . . . . . . . . . 229
Windsh ield/headlight washer container 233
Wheels .. .. .. .. .. ... .. ..... ... .. .. 234
Wheels and Tires . . . . . . . . . . . . . . . . . . . . 234
Tire p ressure mon itoring system
251
Do It Yourself . . . . . . . . . . . . . . . . . . . . 254
Emergency assistance . . . . . . . . . . . 254
Vehicle jack, vehicle tool kit and
collapsib le spare tire . . . . . . . . . . . . . . . . . 254
T ire mobility kit . . . . . . . . . . . . . . . . . . . . . 257
Replacing w heels . . . . . . . . . . . . . . . . . . . . 259
Fuses and bulbs . . . . . . . . . . . . . . . . . . 265
Fuses . . . . . . . . . . . . . . . . . . . . . . . . . . . . . . 265
B ulbs. . . . . . . . . . . . . . . . . . . . . . . . . . . . . . 268
Emergency situations . . . . . . . . . . . . 270
Genera l . . . . . . . . . . . . . . . . . . . . . . . . . . . . 270
Start ing by p ushi ng o r tow ing . . . . . . . . . . 270
Sta rt ing wi th ju mpe r cab les . . . . . . . . . . . 270
3
Page 16 of 300
Instruments and indicator lights
Indicator lights
Overview
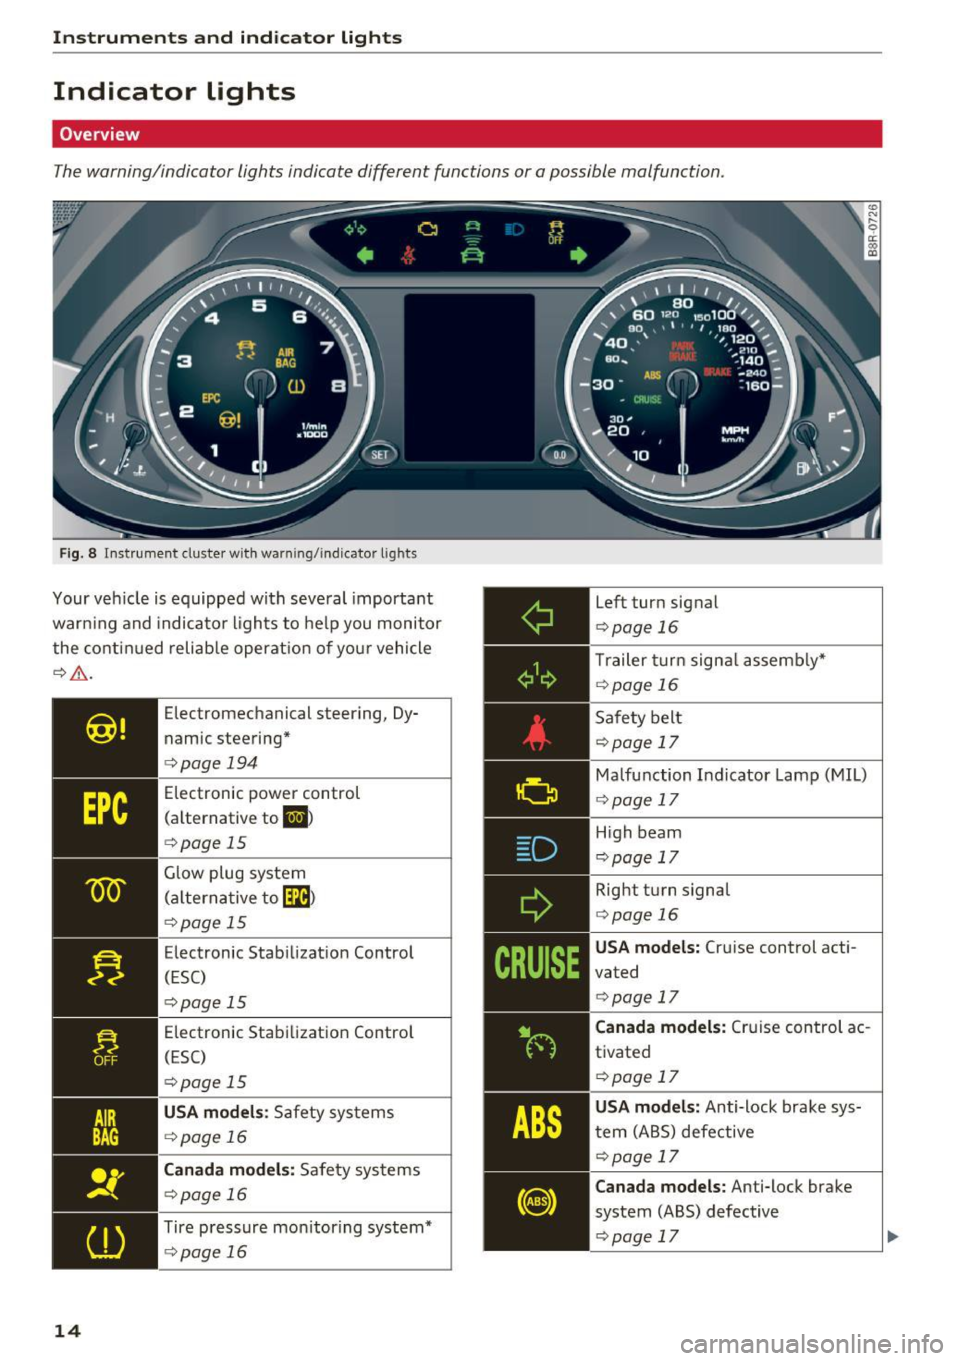
The warning/indicator lights indicate different functions or a possible malfunction.
Fig. 8 Instrument cluster w ith warn ing/indicator lights
Your vehicle is equipped with several important
warn ing and indicator lights to help you monitor
the continued reliable operation of yo ur vehicle
¢ ,6. .
14
Electromechanical steering, Dy
namic steering*
¢page 194
Electronic power control
(alternative to
El >
¢ page 15
Glow plug system
(alterna tive to~)
¢page 15
Electronic Stabilization Control
(ESC)
¢pag e 15
Electronic Stabilization Control
(ESC)
¢ page 15
USA models: Safety systems
¢page 16
Canada models: Safety systems
¢page 16
Tire pressure monitoring system*
¢page 16
Left turn signal
¢page 16
Trailer turn signal assembly*
¢page 16
Safety belt
¢page 17
Malfunction Indicator Lamp (MIL)
¢ page 17
High beam
¢pag e 17
Right turn signal
¢ page 16
USA models: Cruise control acti
vated
¢ page 17
Canada models: Cruise control ac
tivated
¢page 17
USA models: Anti-lock brake sys
tem (ABS) defective
¢page 17
Canada models: Anti-lock brake
system (ABS) defective
¢page 17
Page 19 of 300
,....,
N
co
er::
co
,....,
For vehicles with a factory insta lled towing
hitch o r a tra iler hitch that was installed later
according to factory specifications, the trailer
turn signa l assembly is actuated .
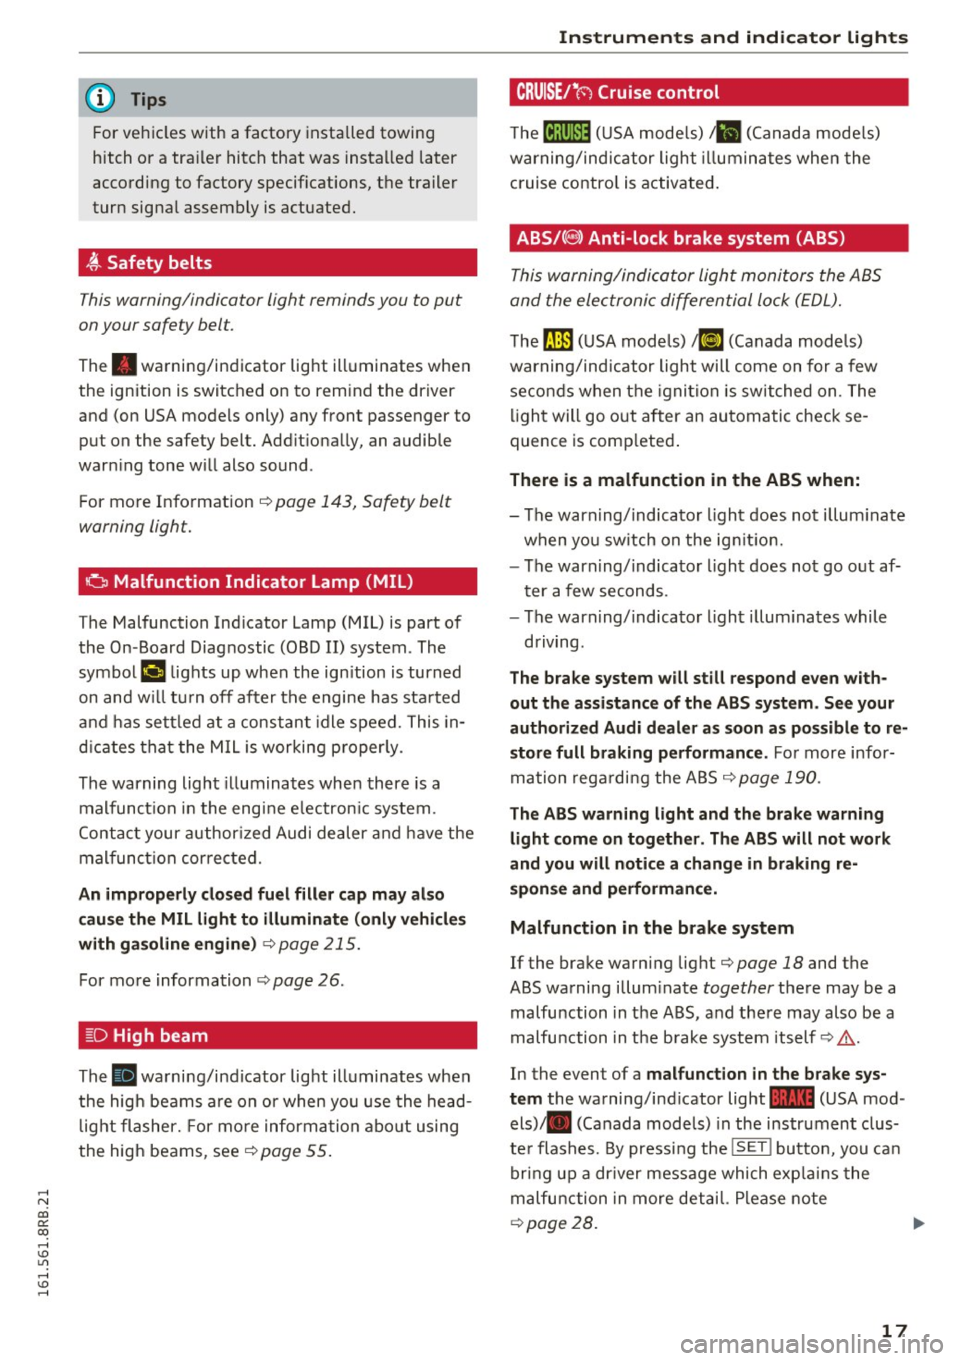
~ Safety belts
This warning/indicator light reminds you to put
on your safety belt.
The . warning/in dicator lig ht ill uminates when
the ign ition is switc hed on to remin d the driver
and (on USA models only) any front passenger to put on the safety belt. Add it iona lly, an audib le
war ning tone w ill also so und .
For mo re Info rmat ion ¢
page 143, Safety belt
warning light.
o Malfunction Indicator Lamp (MIL)
The Malfunction Ind icator Lamp (MIL) is part o f
the On -Board Diagnostic (OBD II) system . The
symbo l ¢4 lights up when the ign ition is turned
on an d w ill tur n off aft er the engi ne has st arted
a nd has set tled at a cons tan t idle speed. This in
d icat es that t he MIL is workin g pro p erl y.
The warning light illuminates when there is a
malfunct io n in the eng ine e lec tron ic system .
Cont act your au thor ized A udi de aler an d have the
mal func tion cor re cted.
An improperly closed fuel filler cap may also
cause the MIL light to illuminate (only vehicles
with gasoline engine)
c:> page 215.
For mo re information c:> page 26 .
[D High beam
The. warni ng/indicator lig ht ill uminates when
the hig h beams a re on o r when yo u use the head
l igh t fl asher. For mor e inform ation a bo ut using
the high beams, see
c:> page 55 .
Instruments and ind icator lights
CRUISE/• (-) Cruise control
The (~jll)~i* (U SA mode ls) tlil (Canada mode ls)
w arni ng/ind icator ligh t illumin ates whe n the
cr uise contro l is activated.
ABS/{ @) Anti-lock brake system (ABS)
This warning/indicator light monitors the AB S
and the elec troni c differen tial lock ( EDL).
T he ~ (USA mode ls) l [iJ (Canada mode ls)
warni ng/indica tor light will come on for a few
se co nd s when t he ig nition i s sw itc hed on. The
lig ht will go o ut a fter an au toma tic check se
quence is comp lete d.
There is a malfunction in the ABS when:
-The warning/ indica to r li ght does no t illum inate
when y ou switch on the ig nitio n.
- The warn ing/ indica to r li gh t does no t go out af
t er a few seconds .
- The warning/ indica to r li ght illum ina tes while
driv ing .
The brake system will still respond even w ith ·
out the assistan ce of the ABS system. See your
authorized Audi dealer as soon as possible to re
store full braking performance .
For more info r
mation reg arding the ABS
c:> page 190 .
The ABS warning light and the brake warning
light come on together. The ABS will not work
and you will notice a change in braking re
sponse and performance.
Malfunction in the brake system
If the brake warn ing lig ht ¢page 18 and the
ABS wa rning illum inate
together the re may be a
malfu nction in t he A BS, and th ere may also be a
malfu nction in t he b rake system itself ¢&. .
In the event of a
malfunction in the brake sys
tem
the warning/ind icator light 1111 (USA mod
els) . (Canada models) in the instrument clus
te r flashes. By pressi ng the
!SET I button, you ca n
bri ng u p a driver message which exp lains the
m alfu nction in more det ail. Please note
¢ page 28.
17
Page 65 of 300
..... N
co
er::
co
.....
General information
Why is your seat adjustment so important?
The safety belts and the airbag system can only
provide maximum protection if the front seats are corr ectly adjusted .
There are various ways of adjusting the front
seats to provide safe and comfortable support
for the driver and the front passenger . Adjust
your seat properly so that:
- you can easily and quickly reach all the switches
and controls in the instrument panel
- your body is properly supported thus reducing
physical stress and fatigue
- the safety belts and a irbag system can offer
maximum protection
<=:> page 151.
In the following sections, you will see exact ly
how you can best adjust your seats.
There are spec ial regulations and instr uctions for
installing a child safety seat on the front pas
senger's seat . Always fo llow the information re
garding child safety provided in
¢ page 171,
Child safety.
A WARNING
Incorrect seating position of the driver and all
other passengers can result in serious person
al injury .
- Always keep your feet on the floor when the
vehicle is in motion - never put your feet on
top of the instrument pane l, o ut of the win
dow or on top of the seat cushion. This ap
plies especially to the passengers.
If your
seating pos it ion is inco rrect, yo u increase
the risk of injury in the case of sudden brak
ing or an accident. If the ai rbag inf lates and
the seating position is incorrect, this cou ld
result in personal injury or even death.
- It is important for both the driver and front
passenger to keep a d istance o f at least
10 inches (25 cm) between themselves and
the steering wheel and/or instrument pan el. If you're s itting any closer than this, the
airbag system can not protect you properly .
Seat s and sto rage
In addition, the front seats and head re
stra ints must be adjusted to your body
he ight so that they can g ive you maximum
protection .
- Always try to keep as much distance as pos
sible between yourself and the steer ing
wheel or instrument panel.
- Do not adjust the driver's or front passeng
er's seat while the veh icle is moving . Your
seat may move unexpectedly, causing sud
den loss of vehicle contro l and personal in
jury.
If yo u ad just yo ur seat while the veh icle
is moving, you a re o ut of pos ition.
Driver's seat
The correct seat position is important for safe
and relaxed driving.
We recommend that you adjust the dr iver 's seat
i n the following manner:
.. Adjust the seat in fore and aft direction so that
you can eas ily push the pedals to the floor
while keeping yo ur knees slightly bent<=:>.&,
in
Why is your seat adjustment so important? on
page 63 .
.,. Adjust the seatback so that when yo u sit with
your back agains t the se atback , you can still
grasp the to p of the steering wheel.
.,. Adjust the head res traint so the uppe r edge is
as even as possib le with the top of you r head. If
that is not possible, try to adjust the head re
straint so that it is as close to this posit ion as
possible
<=:> page 67.
A WARNING
--
Neve r place any objects in the dr iver's foot
well. An object could ge t into the pedal a rea
and inte rfe re with pedal function. In case of
su dd en braking or an accident, you would no t
be ab le to br ake or accelera te.
63
Page 66 of 300
Sea ts and stor age
Front passenger 's seat
Always move the front passenger seat into the
rearmost position.
To avoid contact with the airbag wh ile it is de
ploying, do not sit any closer to the instrument
panel than necessary and always wear the three
point safety belt prov ided adjusted correctly. We
recommend that yo u adj ust the passenger's seat
i n t he following ma nner:
.. Move the front passenger seat into the rear
most position of the fore and aft adjustment
range
c:> .&. in Why is your seat adjustment so
important? on page 63.
.. Bring the back rest up to a n (a lmost) upright
position .
Do not ride with the seat recl ined.
.. Adjust the head restraint so the upper edge is
as even as possible with the top of your head . If
that is not possible, try to adjust the head re
straint so that it is as close to this position as
poss ible<=>
page 67 .
.. Place your feet on the floor in front of the pas
senger's seat .
Front seats
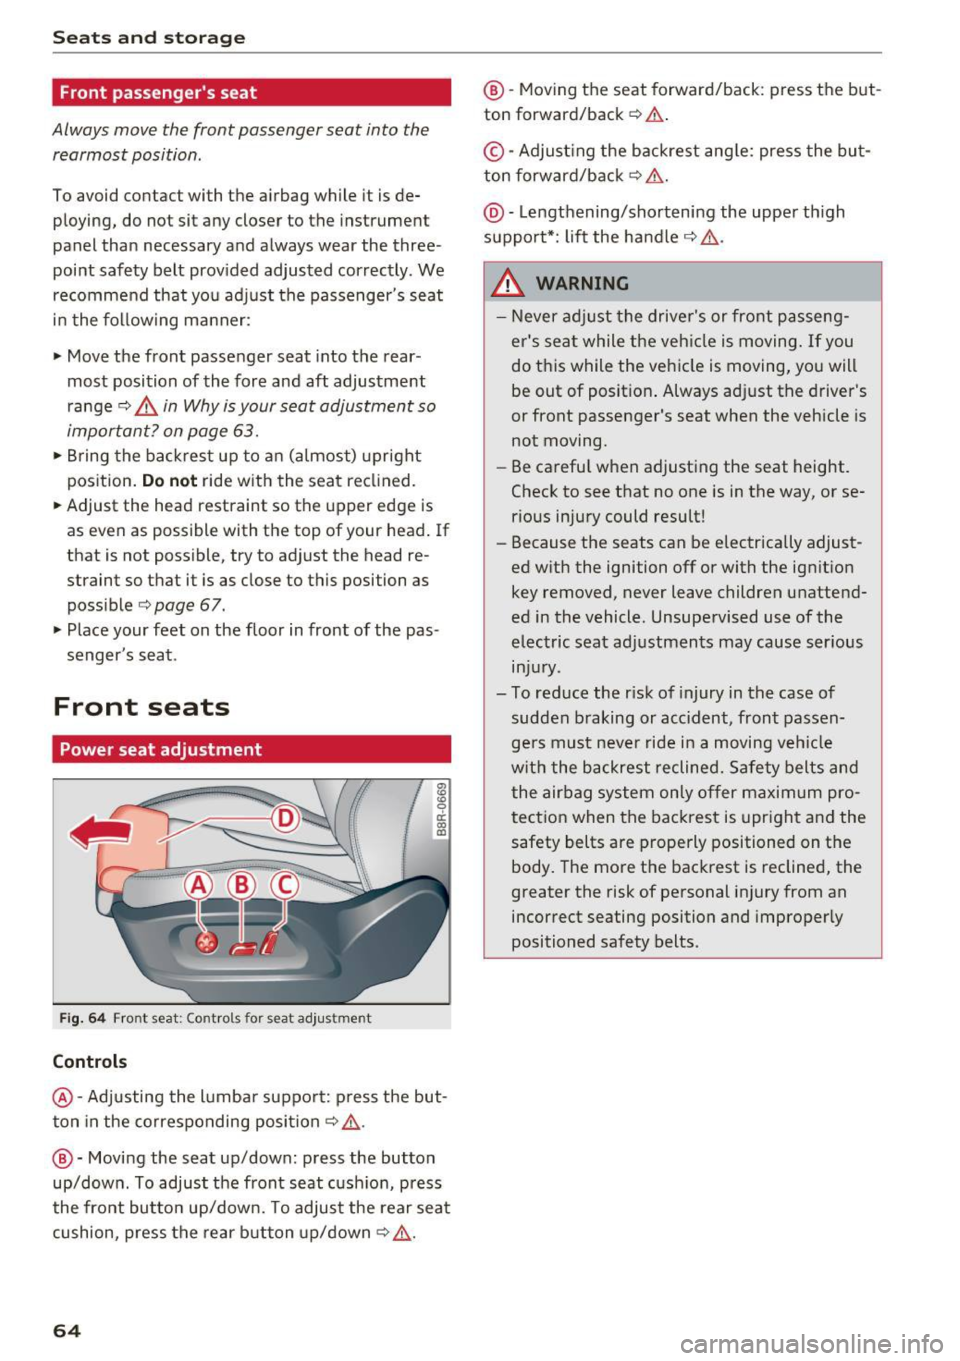
Power seat adjustment
Fig. 64 Front seat: Cont rols for seat adju stment
Controls
~ a: a, a:,
@-Adjusting the l umba r suppo rt: p ress the but
ton in the correspo nding position
c:> ,& .
@ -Movi ng the seat up/down: p ress the button
up/down. To adjust the front seat c ush ion, press
the front bu tton up/ down. To adjus t the rear sea t
cushion, press the rear b utton up/down
c:> ,& .
64
@ -Moving the seat forward/back: press the but
ton forward/back
c:> .&..
©-Adjust ing the b ackrest ang le: press the bu t
ton forward/back
c:> &. .
@ -Lengthening/sho rteni ng the upper th igh
suppo rt*: lift the handle
c:> &,.
.&, WARNING
- Never adjust the drive r's or front p asseng
er 's sea t while t he veh icle is moving.
If you
do t his while the vehicle is moving, yo u will
be out of posit ion . Always ad just the driver 's
or front passenger's seat when the vehicle is
not moving .
- Be carefu l when adjusting the seat height.
Check to see that no one is in the way, or se
rious injury could resu lt!
- Because the seats can be electrically adjust
ed w ith the ignition off or with the ign ition
key removed, never leave children unattend
ed in the vehicle. Unsupe rvised use of the
electric seat ad justmen ts may cause serious
in ju ry.
- To reduce the r isk of injury in the case of
sudden b raking or accident, front passen
ge rs must neve r ride i n a moving ve hicle
w it h the backrest reclined. Safety belts a nd
the airbag system only o ffer maxim um pro
t ection when the bac krest is upr igh t and the
safety belts are properly positioned on the
body. The mo re the bac krest is reclined, the
greater the risk of personal injury from an
incorrect seating position and improperly
positioned safety belts.
-
Page 69 of 300
,...,
N
co ~ CX) ,...,
I.Cl U"I ,...,
I.Cl ,...,
- Exercise caution when adjustin g the seat .
Adjusting t he seat w ithout checking or pay
ing attention can pinch fingers or limbs -
danger of injury!
Head restraints
Front head restraints
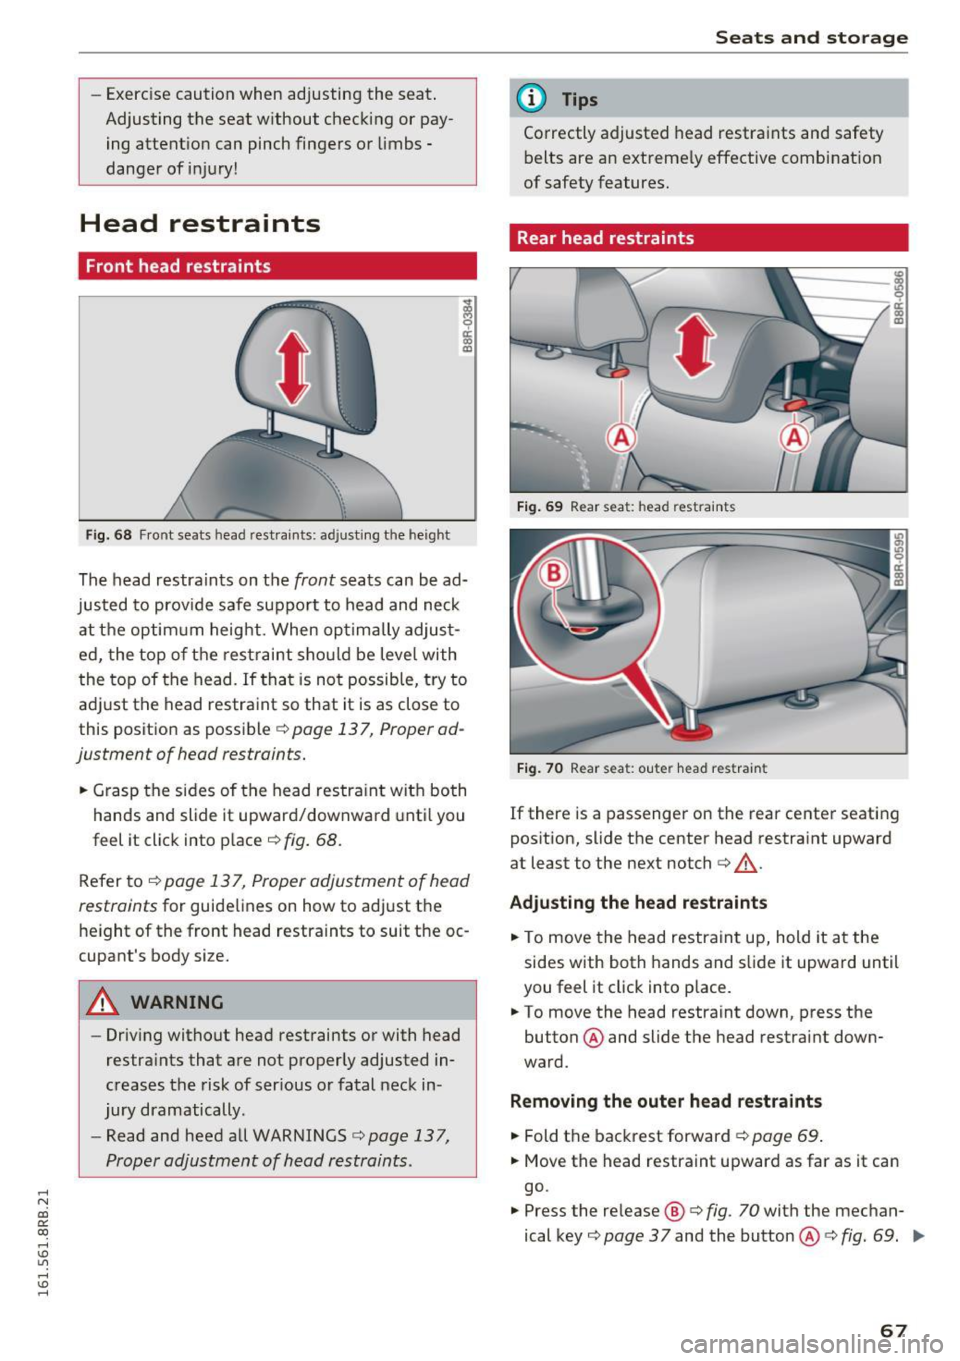
F ig. 68 Fro nt seats hea d restrai nts: adjusti ng the he ight
The head restraints on the front seats can be ad
justed to prov ide safe suppo rt to head and neck
at the optim um height. When optimally adjus t
ed, the top of t he restraint sho uld be leve l with
the top of the head. If that is not possib le, try to
ad just the head restraint so that it is as close to
this position as possible
<:!) page 137, Proper ad
justment of head restraints.
.. Grasp the sides of the head res tra int wit h both
hands and slide it upward/downward unt il you
feel it click into p lace
¢ fig. 68.
Refer to ¢ page 13 7, Proper adjustment of head
restraints
for guidelines on how to adjust t he
h e ight of the front head restra ints to suit the oc
cupant's body size.
A WARNING
- Driv ing without head rest raints or with head
restra ints that are not properly adjusted in
creases the risk of ser ious or fatal neck in
jury dramatically.
- Read and heed all WARNINGS
r:.> page 137,
Proper adjustment of head restraints.
Seats and storag e
(D Tips
Correctly adjusted head restraints and safety
belts are an extremely effective combinat ion
of safety features.
Rear head restraints
F ig . 6 9 Rear seat : head restra ints
Fig. 70 Rear seat: o ute r head restraint
If there is a passenger on the rear center seating
pos it ion, slide the center head restra int upward
at least to the next notch
c:> ,A .
Adju sting the head restraints
.. To move the head restrain t up, hold it a t the
sides with both hands and s lide it upward until
you feel it click into p lace.
.. To move the head restraint down , press the
button @ and slide the head restraint down
ward.
Removing the outer h ead restra ints
.. Fold t he backrest forward c:!) page 69 .
.. Move the head restraint upward as far as it can
go.
.. Press the re lease ®
c:> fig. 70 with the mec han
ical key
c> page 37 and the button @ c:> fig. 69. IIJJ,
67
Page 70 of 300
Seats and storage
Pull the head restraint out of the backrest at
the same time c::>
.&_.
Installing the outer head restraints
• Slide the posts on the head restraint down into
the guides unti l yo u feel the posts click into
place.
• Press the button @~
fig. 69 and slide the head
restraint all the way down. You should not be
able to pull the head restraint out of the back
rest.
Removing the center head restraint
• Move the head restraint upward as far as it can
go .
• Press the button@c::>
fig. 69 and pull the head
restraint out of the backrest
c::> .&_ .
Installing the center head restraint
• Slide the posts on the head res tra int down into
the guides until you feel the posts click into
place .
• Press the button@c::>
fig. 69 and slide the head
restraint all the way down. You should not be
able to pull the head restraint out of the back
rest .
So that the driver can have a better view to the
rear, the head restraints should be pushed down
completely when the rear seats are not occupied.
A WARNING
- Only remove the rear seat head restraints
when necessary in order to install a child
seat. Install the head restraint again imme
diately once the child seat is removed. Driv
ing without head restraints or with head re
straints that are not properly adjusted in
creases the risk of ser ious or fatal neck in
jury dramatically .
- Read and heed all WARNINGS
c::>page 137,
Proper adjustment of head restraints .
© Tips
Correctly adjusted head restraints and safety
belts are an extremely effective combination
of safety feat ures .
68
Center armrest
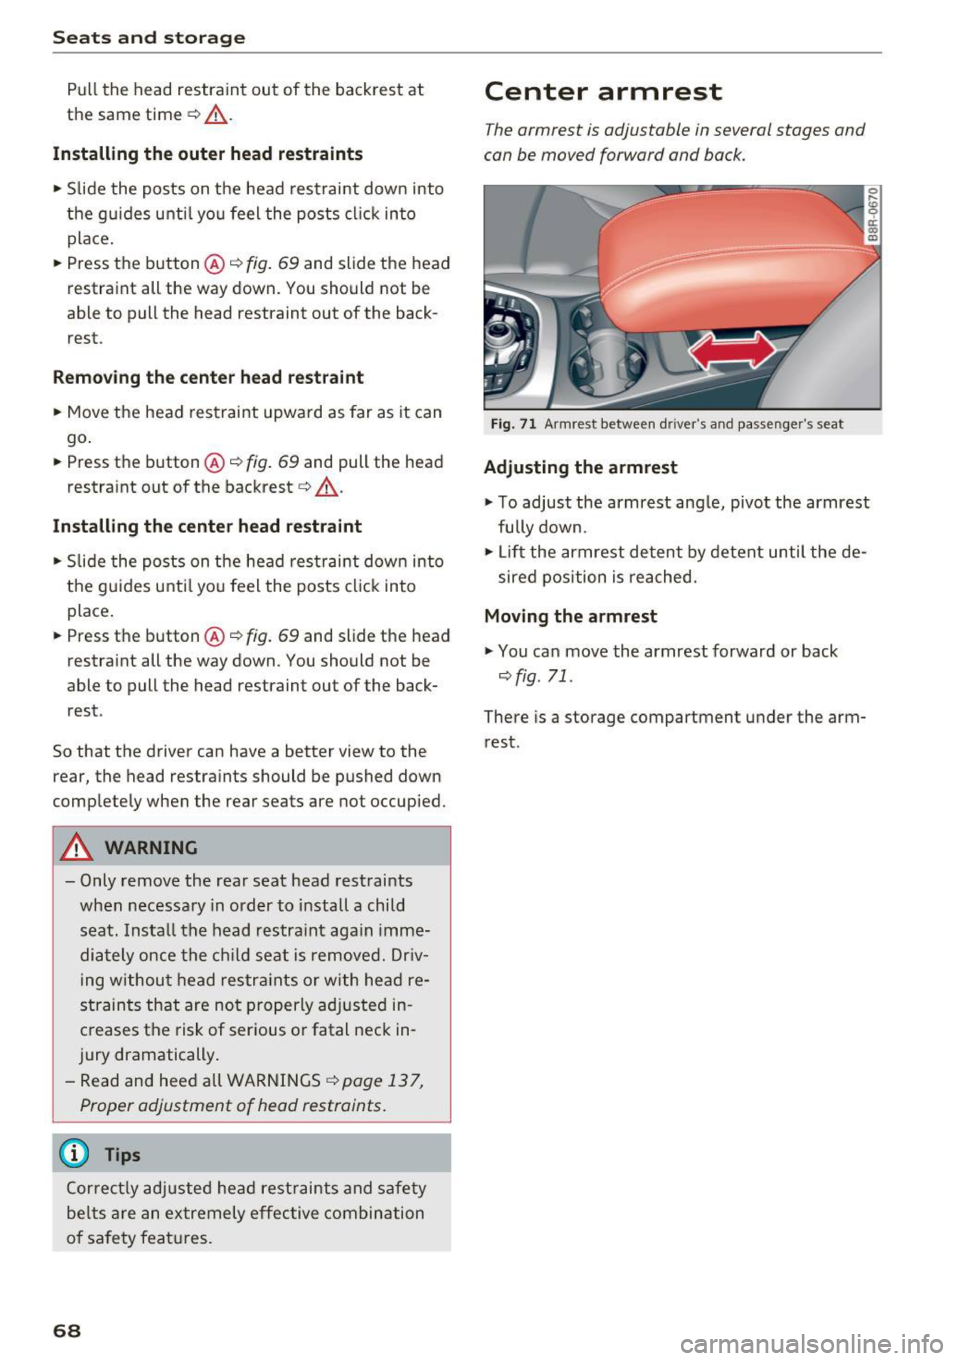
The armrest is adjustable in several stages and
can be moved forward and back.
Fig. 71 Armrest between driver 's and passenger's seat
Adjusting the armrest
• To adjust the armrest ang le, pivot the armrest
fully down.
• Lift the armrest detent by detent until the de
sired position is reached.
Moving the armrest
• You can move the armrest forward or back
c::>fig . 71 .
There is a storage compartment under the arm
rest.
Page 71 of 300
..... N
co ~ CX)
..... I.Cl U"I
..... I.Cl .....
Luggage compartment
Expanding the passenger compartment
The rear seat backrests can be folded forward
separately or together.
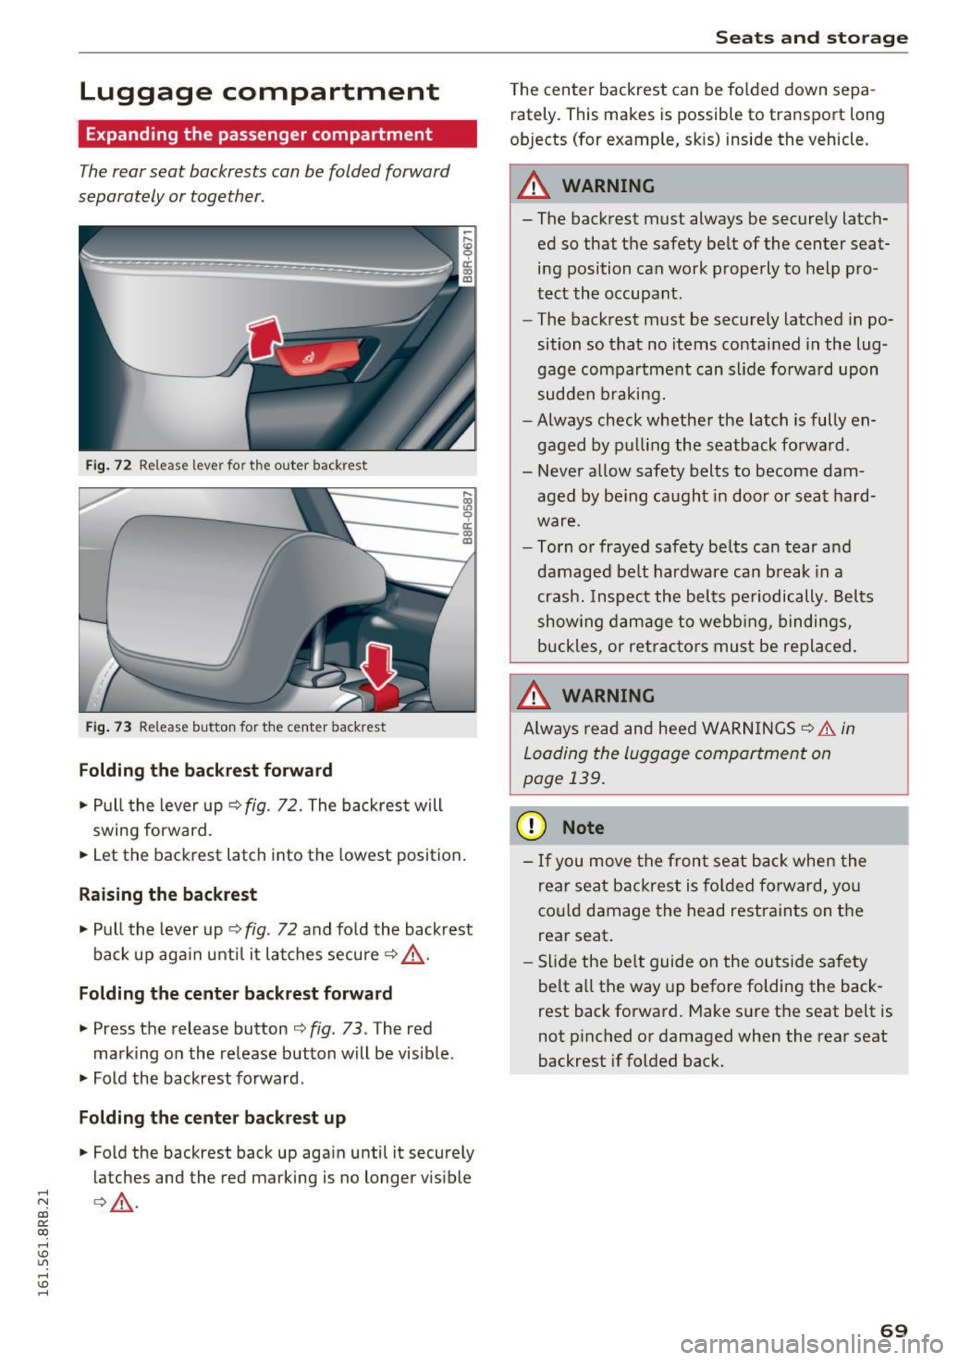
Fi g. 72 Release lever for the outer backrest
....
ill 9
~---- 1:i ID
Fig. 73 Release button fo r the center backrest
Folding th e ba ckre st forward
... Pull the lever up ¢ fig . 72. The backres t will
swing forward .
... Let the backrest latch into the lowest position .
Raising the backrest
... Pull the lever up Q fig . 72 and fold the backrest
back up aga in until i t lat ches secure
Q &_ .
Folding the center back re st forw ard
... Press the release button ¢ fig. 73 . The red
mark ing on the release button will be visible.
... Fold the backrest forward.
Folding the cen ter backre st up
... Fold the backrest back up aga in until it secure ly
latches and the red marking is no longer v isible
¢ .&_ .
Seats and storag e
The center backrest can be fo lded down sepa
rately. This makes is possible to transport long
objects (for example, sk is) inside the vehicle.
A WARNING
=
- The backrest must always be secure ly latch-
ed so that the safety be lt of the center seat
i n g position can wo rk properly to help pro
tect the occupant.
- The backrest must be securely latched in po
sition so that no items contained in the lug
gage compartment can slide fo rwa rd upon
sudden b raking.
- Always check whether the latch is fully en
gaged by p ulli ng the seatback fo rwa rd .
- Never allow safety belts to become dam aged by be ing caught in door or seat hard
ware.
- To rn o r frayed safety be lts can tear a nd
damaged be lt hardware can break in a
cras h. Inspect the belts pe riodically. Belts
show ing dam age to webb ing, bindings,
buckles, or re trac to rs mus t be replaced.
A WARNING
= -
Always read and heed WARN INGS Q &. in
Loading the luggage compartment on
page 139 .
(D Note
- If you move the front seat back when the
rear seat backrest is fo lded fo rwa rd, yo u
co uld damage the head restraints on the
rear seat .
- Slide the be lt guide on the outside safety
belt a ll the way up before folding the back
rest back forward. Make su re the seat belt is
not p inched or damaged when the rear seat
backrest if folded back .
69
Page 72 of 300
Sea ts and stor age
Expanding the luggage compartment
The rear seat backrests can be folded forward
separately or together .
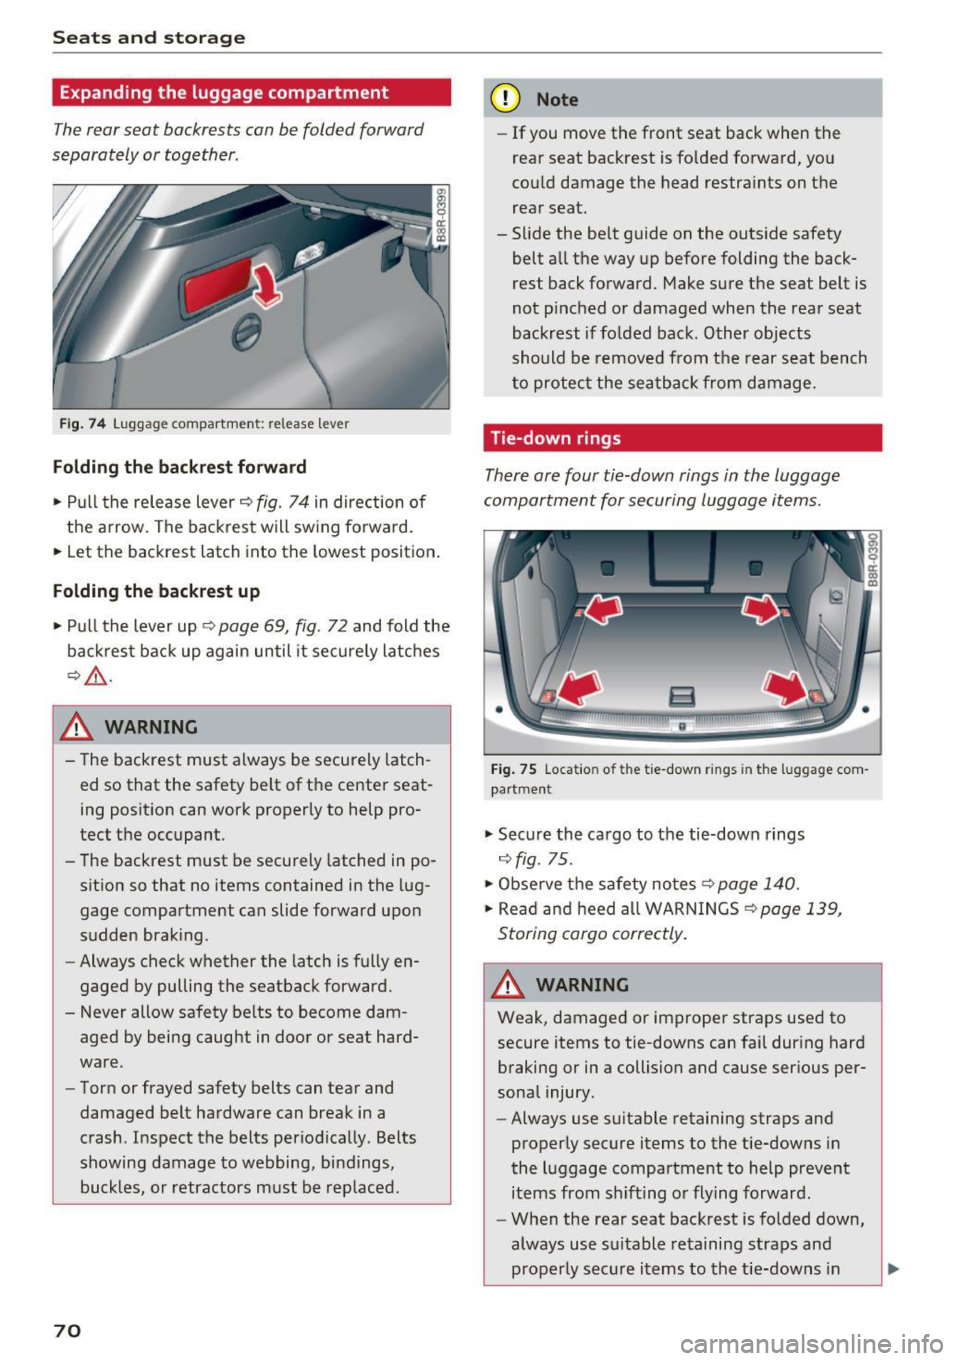
Fig . 74 Luggage compartment: release lever
Folding the ba ckrest forward
• Pull the release lever ¢ fig. 74 in direction of
the a rrow . The back rest will swing fo rward.
• Let the backrest latch into the lowest position .
Folding the backrest up
• Pull the lever up ¢ page 69, fig. 72 and fold the
backrest bac k up again until it securely latches
¢ _& .
& WARNING
- The backrest must always be securely latch
ed so that the safety belt of the center seat
ing position can work properly to help pro
tect the occupant.
- The backrest must be securely latched in po
sition so that no items contained in the lug
gage compartment can slide forward upon
sudden brak ing.
- Always check whether the latch is fully en
gaged by pulling the seatback forward.
- Never allow safety be lts to become dam
aged by being caught in door or seat hard
ware .
- Torn or frayed safety belts can tear and
damaged belt hardware can break in a
crash . Inspect the belts periodically . Belts
showing damage to webbing, bind ings,
buck les, or retractors must be rep laced.
70
(D Note
- If you move the front seat back when the
rear seat backrest is folded forward, you
cou ld damage the head restraints on the
rear
seat.
- Slide the belt guide on the outside safety
belt all the way up before folding the back
rest back forward. Make sure the seat belt is
not pinched or damaged when the rear seat
backrest if fo lded back. Other objects
sho uld be removed from the rear seat bench
to protect the seatback from damage .
Tie-down rings
There are four tie-down rings in the luggage
compartment for securing luggage items.
Fig . 75 Locat io n of the tie -down rings in the luggage com
pa rtment
.,. Secure the cargo to the tie-down rings
¢ fig. 75.
.,. Obse rve the safety notes ¢ page 140.
• Read a nd heed a ll WARNINGS ¢ page 139,
Storing cargo correctly .
& WARNING
Weak, damaged or improper straps used to
secure items to tie-downs can fail dur ing hard
braking or in a collision and cause ser ious per
sonal injury.
- Always use suitable retaining straps and
properly secure items to the tie-downs in
the luggage compartment to help prevent items from s hifting o r fly ing forward .
- When the rear seat backrest is folded down,
always use suitable retaining straps and
proper ly sec ure items to the tie-downs in
-
Page 93 of 300
,....,
N
co
er::
co
,....,
that you are developing enough driving force at
the wheels by depressing the accelerator .
Depending on the weight of the r ig (vehi cle and
tra iler) and the severity of the incline, you may
ro ll backwards as you start . You can prevent roll
ing backwards by holding the parking brake
switch pulled out and accelerating -just as you
wou ld when starting on a hill with a conventiona l
h and brake .
Emergency braking
In the event that the conven tional brake system
fails or locks .
~ In an emergency, pull the sw itch and cont inue
to pull it to slow your veh icle down with the
parking b rake.
~ As soon as you release the switch or accelerate,
the b raking process stops .
If you pull the sw itch and hold it above a speed of
about 5 mph (8 km/h) , the eme rgency braking
function is in it iated . The vehicle is braked at all
four wheels by activating the hydraulic brake sys
te m. T he b rake perfo rman ce is sim ila r t o making
an em ergen cy sto p ~ ,& .
In o rder not to activate the emergency brak ing by
mista ke, an audib le wa rn ing tone (buzze r)
sounds w hen the sw itch is p ulled. As soon as t he
sw itch is rele ased, or the acce le ra to r p edal is de
p ressed, eme rgency bra king stops.
A WARNING
Emergency bra king should only be use d in an
emergency, w hen the normal foot brake has
fai led or the bra ke pedal is obstructed . Using
the par king b rake to perfo rm emergency
brak ing will slow your vehicle down as if you
had made a full bra ke ap plication . The laws of
physics cannot be suspended even wi th ESC
a n d its associated components (A BS, ASR,
E DS). In c orn ers and when road or weath er
c ondi tions are bad, a full brake ap plication
c an ca use the vehicle to sk id or the rear end to
break away· r isking an accident .
Driving
Driver messages in the instrument cluster
Caution: Vehicle parked too steep
T h is message appears when the pa rking bra ke is
applie d on an in cl in e that exceeds about 30%.
In this case the braki ng power o f the pa rking
brake may not be adequate to prevent the ve hi
cle from roll ing uninten tionally.
Press b rake pedal to release park ing brake
This dr iver message appears when the sw itch to
re lease the par king brake was pressed. The park
ing brake can only be released if you step o n the
brake pedal and at the same time press the
switch or you automatica lly re lease the park ing
bra ke w ith the sta rting ass ist ~
page 90 .
r.lJ Parking brake malfunction!
This dr iver message appears together w ith the
yellow
rlJ symbol whe n there is a parki ng brake
malfu nction .
Start/Stop system
Description
Applies to vehicles: wit h Start-Stop-Syste m
The Start -Stop -System can he lp increase f uel
economy and reduce CO2 emissions.
In the Start -S top -mode, the engine sh uts off au
tomat ica lly when the vehicle is stoppe d, such as
at a t raff ic light. The ignition remains switched
on d uring this stop phase. The eng ine will be a u
tomat ically restarted when needed.
T he last Start-Stop -System setting (on/off usin g
the b utton
10~ 1) will be restored when the ign i
t ion is turned on. The LED in the
10'" 1 button turns
on when the Start-Stop-System is switched off
manua lly .
Ba sic requirements for the Start-Stop mode
- The d river 's door is closed.
- The driver 's sea t belt is latc hed.
- The hood is closed.
- The vehicle must have bee n driven fast er than
2.5 mph (4 km/h) s in ce the last s top.
- A t railer is not hitched to the vehicle . .,.
91