ECU AUDI Q5 2017 Owners Manual
[x] Cancel search | Manufacturer: AUDI, Model Year: 2017, Model line: Q5, Model: AUDI Q5 2017Pages: 296, PDF Size: 74.43 MB
Page 5 of 296
CD
CD
.... N ,-... N ..... 0 0 C<'. 00
Storing cargo correctly . . . . . . . . . . . . . . . 136
R epo rting Safety Defects . . . . . . . . . . . . . . 138
Safety belts . . . . . . . . . . . . . . . . . . . . . . 14 0
General information . . . . . . . . . . . . . . . . . 140
Why use safety belts? . . . . . . . . . . . . . . . . 141
Safety belts . . . . . . . . . . . . . . . . . . . . . . . . 143
Belt tensioners . . . . . . . . . . . . . . . . . . . . . . 146
Airbag system . . . . . . . . . . . . . . . . . . . . 148
Important information . . . . . . . . . . . . . . . 148
Front airbags . . . . . . . . . . . . . . . . . . . . . . . 1S2
Monitoring the Advanced Airbag System . 158
Side airbags . . . . . . . . . . . . . . . . . . . . . . . . 162
Side curtain airbags . . . . . . . . . . . . . . . . . . 165
Child safety . . . . . . . . . . . . . . . . . . . . . . 168
Important information . . . . . . . . . . . . . . . 168
Ch ild seats . . . . . . . . . . . . . . . . . . . . . . . . . 174
S ecur ing ch ild seats . . . . . . . . . . . . . . . . . . 178
L ATCH system (lower anchorages and
tethers for chi ldren) . . . . . . . . . . . . . . . . . 181
Additional in fo rma tion
185
Driver messages . . . . . . . . . . . . . . . . . 186
Intelligent Technology . . . . . . . . . . 186
Elect ronic Stabilization Control (ESC) . . . . 186
Notice about data recorded by the Event
Data Recorder and vehicle control
modules . . . . . . . . . . . . . . . . . . . . . . . . . . . 188
B rak ing . . . . . . . . . . . . . . . . . . . . . . . . . . . . 190
E lect romechanical power assist, Dynamic
steering . . . . . . . . . . . . . . . . . . . . . . . . . . . 191
Dri ving with your quattro . . . . . . . . . . . . . 192
En erg y management . . . . . . . . . . . . . . . . . 192
Driving and the environment . . . . 194
Br eak ing in . . . . . . . . . . . . . . . . . . . . . . . . . 194
Catalytic converter . . . . . . . . . . . . . . . . . . . 194
Di ese l particulate filter . . . . . . . . . . . . . . . 195
Avoid damaging the vehicle . . . . . . . . . . . 195
Economical and environmentally-friendly
driving . . . . . . . . . . . . . . . . . . . . . . . . . . . . 195
Table of contents
Offroad driving . . . . . . . . . . . . . . . . . . .
198
Driving under difficult conditions and off-
ro ad . . . . . . . . . . . . . . . . . . . . . . . . . . . . . . 198
Trailer towing . . . . . . . . . . . . . . . . . . . . 200
Driving with a traile r . . . . . . . . . . . . . . . . . 200
Trailer towing information . . . . . . . . . . . . 202
Operating instructions . . . . . . . . . . . 204
Care and cleaning . . . . . . . . . . . . . . . . 204
Genera l information . . . . . . . . . . . . . . . . . 204
Car washes . . . . . . . . . . . . . . . . . . . . . . . . . 204
Cleaning and care information . . . . . . . . . 205
Plac ing your vehicle out of service . . . . . . 208
Fuel and Refueling . . . . . . . . . . . . . . . 209
Fuel .. .. .. .. .. .. .. ... .. ..... ... .. .. 209
Refueling ... .. .. .. .... .. ... .... .. .. 211
Selective catalytic reduct ion (Ad Blu e/
DEF) . . . . . . . . . . . . . . . . . . . . . . . . . . . . . . 214
Checking and Filling ........... .. 2 17
Hood ..... .. .. .. ................. .. 217
Eng ine compartm ent . . . . . . . . . . . . . . . . . 219
Eng ine oil . . . . . . . . . . . . . . . . . . . . . . . . . . 219
Cooling system . . . . . . . . . . . . . . . . . . . . . . 223
Brake fluid . . . . . . . . . . . . . . . . . . . . . . . . . 224
Battery . . . . . . . . . . . . . . . . . . . . . . . . . . . . 225
Windshield/headlight washer container
229
Wheels ........................... 230
Wheels and Tires . . . . . . . . . . . . . . . . . . . . 230
Tire pressure monitoring system 247
Do It Yourself . . . . . . . . . . . . . . . . . . . . 250
Emergency assistance . . . . . . . . . . . 250
Vehicle jack, vehicle tool kit and
collapsible spare tire . . . . . . . . . . . . . . . . . 250
T ire mobility kit . . . . . . . . . . . . . . . . . . . . . 253
Replacing wheels . . . . . . . . . . . . . . . . . . . . 255
Fuses and bulbs . . . . . . . . . . . . . . . . . . 261
Fuses . . . . . . . . . . . . . . . . . . . . . . . . . . . . . . 261
Bulbs . . . . . . . . . . . . . . . . . . . . . . . . . . . . . . 264
Emergency situations . . . . . . . . . . . . 266
General . . . . . . . . . . . . . . . . . . . . . . . . . . . . 266
Starting by pushing or tow ing . . . . . . . . . . 266
3
Page 36 of 296
Opening and clo sin g
vehicle working in the same frequency range
(e .g . a cell phone, rad io equipment) .
- If you open the dr iver's door with the key
l eft in the ignition lock, a chime will sound .
This is your reminder to remove the key and
l ock the door.
- For security reasons, replacement keys are
on ly available from Audi dealers.
- Fo r Decla ration of Comp liance to United
States FCC and Industry Canada regu lations
c:> page 279.
Check light and battery in the master key
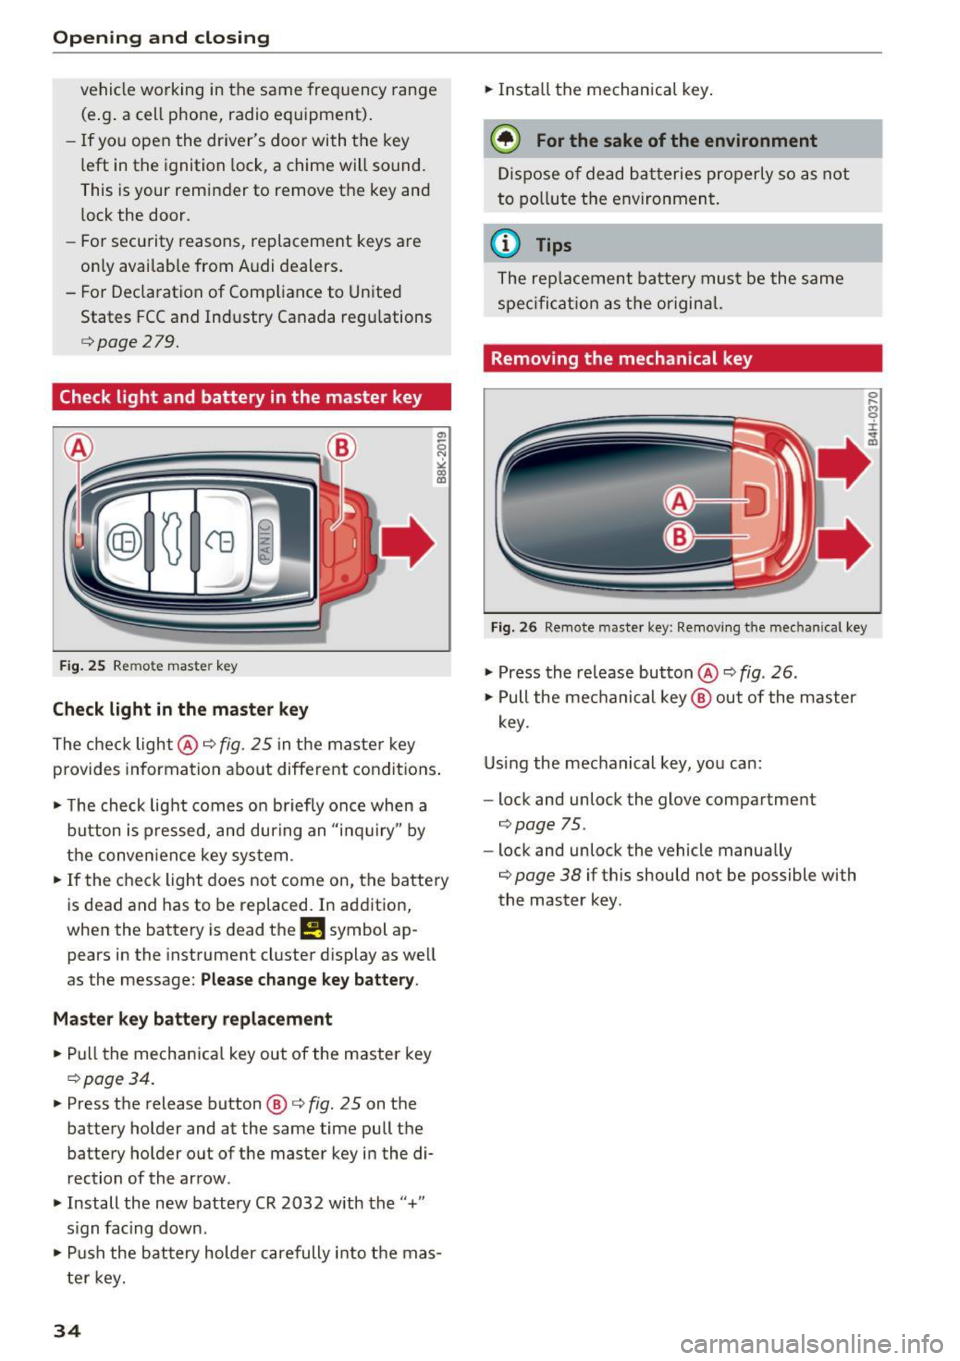
Fig. 25 Rem ote mas ter key
Check light in the maste r key
The check light@c::> fig. 25 in the maste r key
provides information about different condit io ns.
• The check light comes on b riefly once when a
button is pressed, and during an "i nq ui ry" by
the conven ience key system .
• If the check light does not come on, the battery
is dead and has to be replaced. In addition,
when the batt ery is dead the
!I symbol ap
pears in the instrument cl uster display as well
as the message:
Ple ase chang e ke y batter y.
M ast er key batt ery replacement
• Pull the mechanica l key out of the master key
c::> page34.
• Press the release button @ c::> fig. 25 on the
battery holder and at the same time pull the
battery holder out of the master key in the di
rection of the arrow .
• Install the new battery CR 2032 with the "+"
s ign facing down .
• Pu sh the battery holder carefully into the mas
ter key.
34
• Install the mechanical key .
@ For the sake of the environment
Dispose of dead bat teries properly so as not
to po llute the e nvironment .
(D Tips
The replacement batte ry must be the same
spec ificat ion as the original.
Removing the mechanical key
Fig. 26 Remote master key : Remov ing t he mec hanical key
• Press the release but ton @ c:> fig. 26 .
• Pull the mechanical key @ out of the master
key .
Using the mechanical key, you can:
- lock and unlock the glove compartme nt
¢ page 75 .
-lock and unlock the vehicle manually
¢ page 38 if this should not be possible wi th
the master key .
0 .... (') 9 ::c ~ m
Page 38 of 296
Opening and closin g
Tu rn sign als
When you unlock the vehicle , the turn signa ls
flash twice. When you lock the vehicle, the turn
signals flash once. If they do not flash, one of the
doors, the rear lid or the hood is not locked .
Unintentionally locking your self out
In the following cases there safegua rds to pre
vent you lock ing your remote master key in the
vehicle:
- T he vehicle does not lock with the power lock
ing switch
r:!> page 39 if a doo r is open.
- On vehicles with Convenience key*, if the most
recently used master key is in the luggage com
partment, the rear l id is automa tically unlocked
again after it is closed.
Do not lock yo ur vehicle with the
re mot e ma st e r
ke y or Convenien ce key*
unti l all doors and the
rear lid are closed. In th is way you avoid locking
yourse lf out accidenta lly.
A WARNING
- When you leave the vehicle, always remove
the ignition key and take it with you . This
will prevent passengers (children, for exam ple) from accidentally being locked in the
vehicle should they acc identally press the
power locking switch in the front doors .
- Do not leave children inside the vehicle un
superv ised . In an emergency it would be im
poss ible to open the doors from the outs ide
without the key .
@ Tips
-In the event of a crash with airbag deploy
ment all locked doors will be automat ically
unlocked to give access to the veh icle occu
pants from the outside .
- If the power lock ing system should mal
funct ion, you can lock the driver's door us
i ng the mechanical key
r:::.>page 39.
-If the power lock ing system should fail, you
can still open the fuel tank flap in an emer
gency
r::!> page 213.
-You are well adv ised not to keep val uables
i nside an unattended vehicle, v is ible or not.
3 6
Even a proper ly locked veh icle cannot pro
vide the security of a safe.
- If the LED in the upper edge of the driver's
door panel comes on for about 30 seconds
after the vehicle is locked, there is a mal
function in the power locking or the anti
theft warning system. Have the malfunction corrected by an authorized Aud i dealership
or qualified repair fac ility .
Setting power locking
The driver can determine the functions for power
locking in the radio or in the MM!*.
.. Select: !CAR ! function button> Centr al lo cking .
Or
.. Select:
I CAR ! function button > Car s yste ms *
control button > Vehicl e sett ing s> (C entral
lo cking )*.
Un locking single door /Unloc k doo rs -
you can
spec ify which doors unlock when you open the ve
hicle .
- Select ing Off /All and pressing the~ button on
the remote control key unlocks the ent ire vehi
cle .
- Select ing
On /Dr iver and pressing the [§] button
on the remo te control key once unlocks only
the driver's door. In veh icles w ith a convenience
key*, only the door whose handle you pull will
unlock. If you press the
l@J button tw ice, the en
tire veh icle will unlock.
If you press the l@J but
ton, the entire ve hicle wi ll always lock .
Trunk lid/tailg ate /L o ck e xter ior trun k handl e -if
you select
O n, the rea r lid handle locks
r:::.> page 40, fig. 34 . In this case, the rear lid can
be opened with the
l = I bu tton on the master key
r:::.> page 3 7, fig. 2 8 o r with the~ button in the
driver's door
r:::.> page 40, fig . 33.
F o ld mirr ors* -if you se lect On , the outside mir
r ors will fold in automatically when you press the
lil button on the remote contro l key r:::.> page 56.
Confirmation ton e/Tone wh en lockin g -if you
select
On , a tone w ill sound when yo u lock the ve
hicle.
Page 41 of 296
a,
a,
..... N r-N ..... 0 0
0:
co
Locking and unloc king the vehicle from
inside
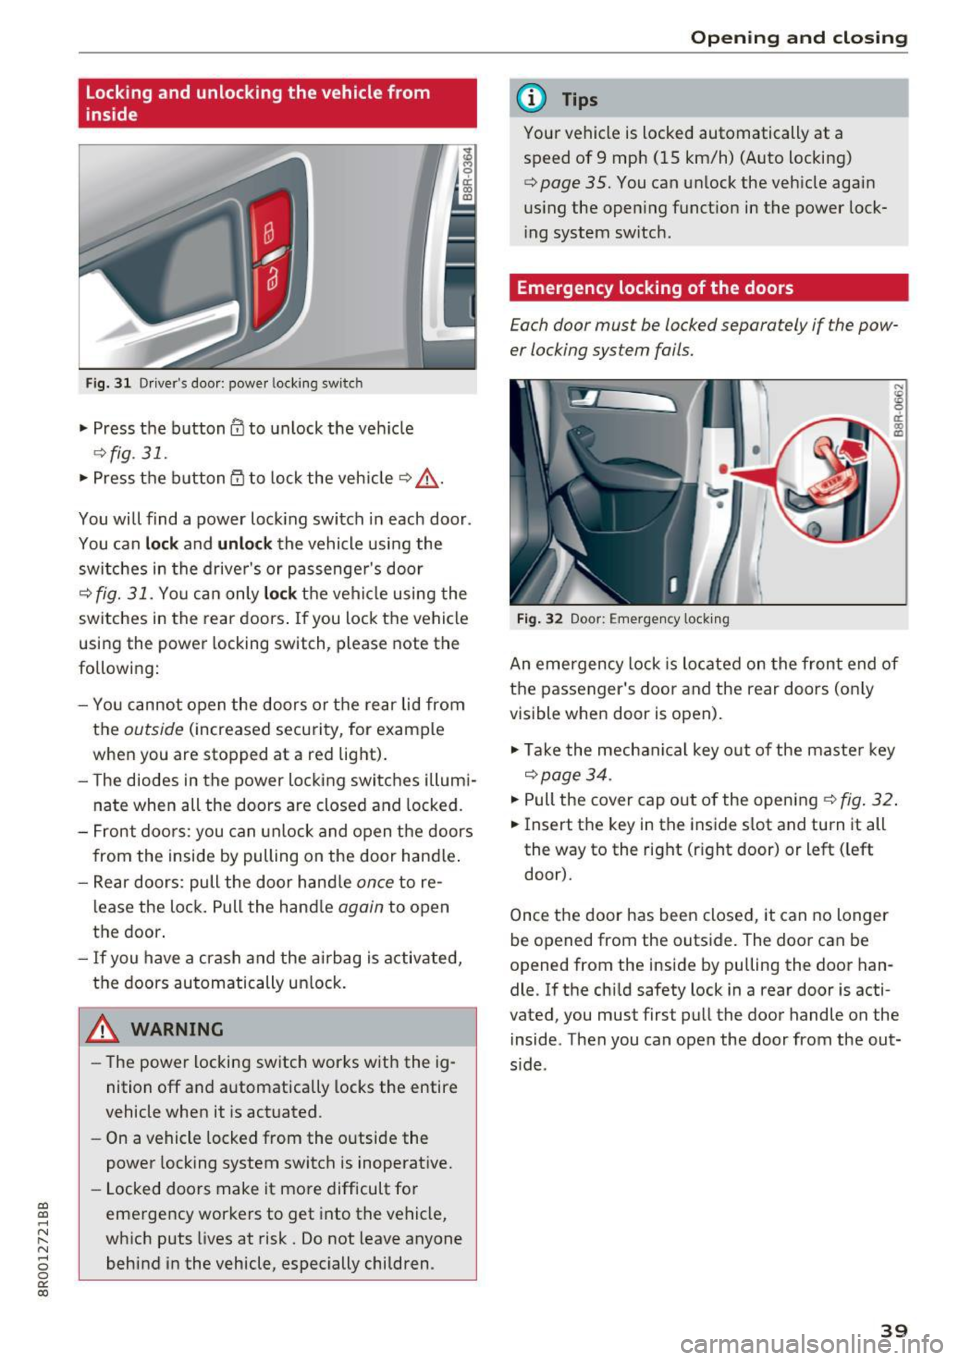
F ig. 3 1 Driver 's doo r: powe r locking sw it c h
.. Press the button@ to unlock the veh icle
9fig . 31 .
.. Press the button 53 to lock the vehicle 9 .&_ .
You will find a power lock ing switch in each door .
You can
lock and unlock the vehicle using the
sw itches in the drive r's or passenge r's door
c=;, fig. 31. Yo u can only lock th e vehicle using the
switches in the rear doors . If you lock the vehicle
using the power locking switch, please note the
following:
- You cannot open the doors or the rear lid from
the
outside (increased security, for example
when you are stopped at a red light).
- The diodes in the power locking switches illum i
nate when all the doors are closed and locked.
- Front doors: you can unlock and open the doors
from the inside by pulling on the door handle .
- Rear doors: pull the doo r hand le
once to re
lease the lock. Pull the hand le
again to open
the door.
- If you have a crash and the airbag is activated,
the doors automatically unlock.
A WARNING
-The power locking switch works with the ig
nition off and automatically locks the entire
vehicle when it is actuated .
- On a vehicle locked from the outside the
power locking system switch is inoperative.
- Locked doors make it more difficult for
emergency workers to get into the vehicle,
which puts Lives at risk. Do not leave anyone
behind in the vehicle, especially children .
Opening and closing
(D Tips
Your vehicle is locked automatically at a
speed of 9 mph (15 km/h) (Auto locking)
¢
page 35. You can unlock the vehicle again
us ing the open ing function in the power lock
i ng system switch .
Emergency locking of the doors
Each door must be locked separately if the pow
er locking sys tem fails.
Fig. 32 Door: E mergency locking
An eme rgency lock is located on the front end of
the passenger's door and the rear doors (o nly
visible when door is open).
"' Take the mechanical key out of the master key
c=;, page 34.
"'P ull the cover cap out of the opening ¢ fig. 32.
.. Insert the key in the inside slot and turn it all
the way to the right (rig ht door) or left ( left
door).
Once the door has been closed, it can no longer
be opened from the outside. The door can be
opened from the inside by pu lling the door han
dle. If the child safety lock in a rear door is acti
vated , you must first pull the door handle on the
inside . Then you can open the door from the out
s ide .
39
Page 47 of 296
Opening and closing th e sunshade
• To automat ica lly open the sunshade complete
l y, briefly press the switch@ in the desired ar
row direction .
• To stop the sunshade in an intermediate posi
tion, press the switch again, or
• Press and hold the switch in the desired arrow
direction.
• Release the switch when sunshade is at desired
pos it ion .
After the ign ition is switched off, you can still op
erate the Panoramic sliding sunroof for about 10
minutes . As soon as the driver's or passenger's
door is opened, the switch is inoperative.
The power sunshade can also be closed when the
Panoram ic sliding sunroof is open.
A WARNING
Pay careful attent ion when closing the Panor
am ic sliding sunroof -otherwise ser ious injury
could result! For this reason, always remove
the ignition key when leaving the vehicle.
@ Note
Always close your Panoramic sl iding sunroof
when leaving your vehicle . Sudden rain can
cause damage to the interior equipment of
your veh icle, particular ly the electronic equip
ment .
@ Tips
Information regarding convenience opening/
clos ing
~ page 44.
Emergency closing of the Panoramic sliding
sunroof
Applies to: veh icles with Panoramic sliding sunroof
If the Panoramic sliding sunroof detects an ob
ject in its path when it is closing, it will open
again automat ically. In this case, you can close
the roof with the power emergency closing func
tion .
a,
~ • Within five seconds after the sunroof opens au-
~ tomatically, pull the switch until the roof
8 closes . 0
0:
co
Openin g an d clos ing
Garage door opener
(Homelink)
Description
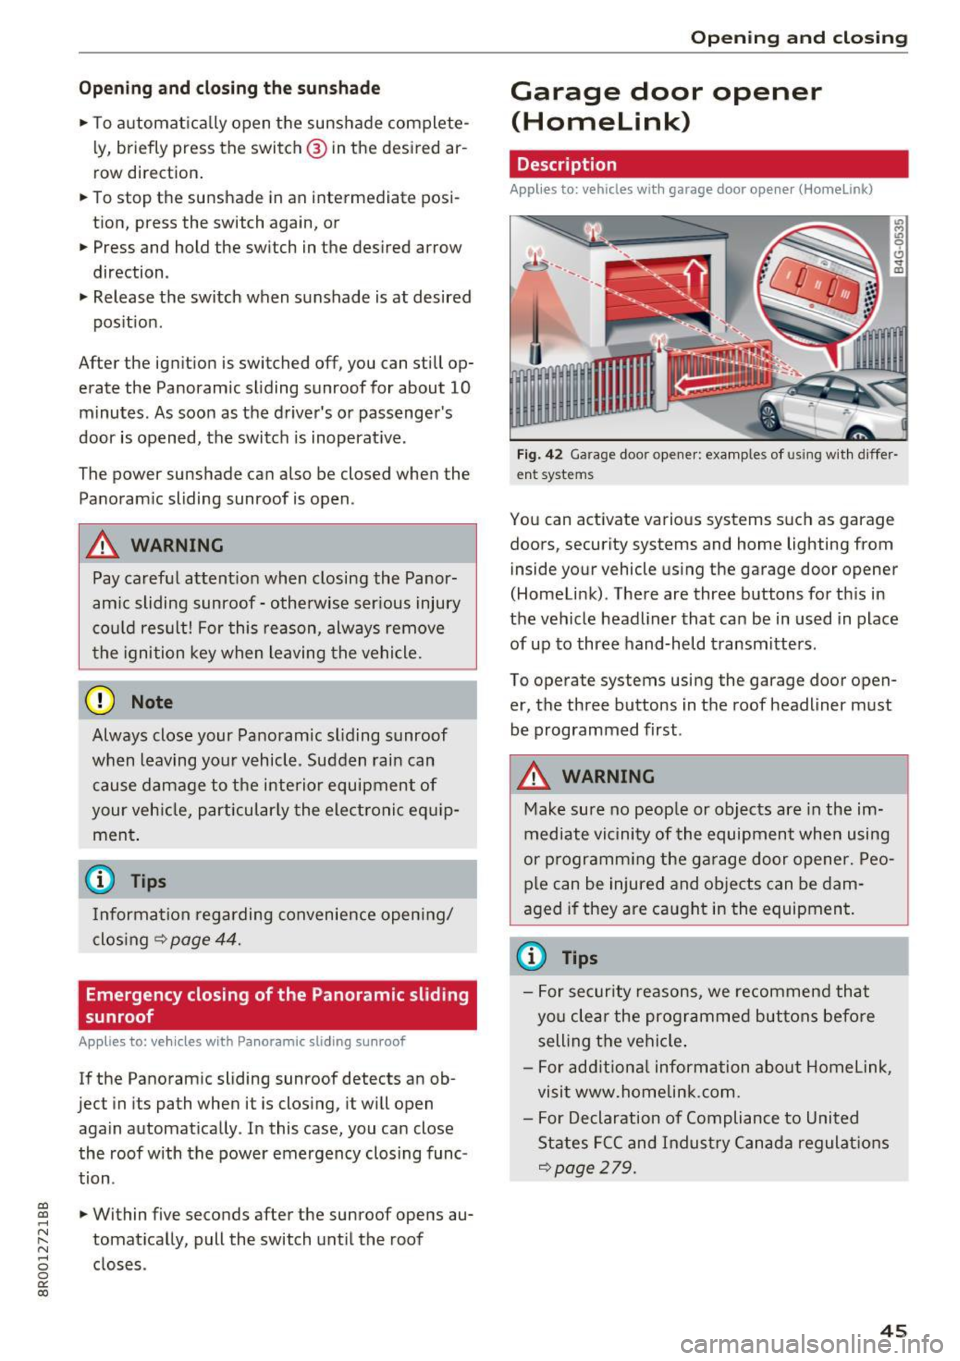
Applies to: vehicles with garage door opener (Home link)
Fig. 42 Garage door opener: examples of using with differ
ent systems
You can activate various systems such as garage
doors, security systems and home lighting from
inside your vehicle using the garage door opener
(Homelink) . There are three buttons for th is in
the vehicle headliner that can be in used in place
of up to three hand-held transmitters .
To operate systems using the garage door open
er, the three buttons in the roof headliner must
be programmed first.
A WARNING
-
Make sure no peop le or objects are in the im-
mediate vicinity of the equipment when using
or p rogramm ing the ga rage door opener. Peo
p le can be injured and objects can be dam
aged if they are caught in the equipment.
(¼} Tips
- For security reasons, we recommend that
you clear the programmed buttons befo re
selling the vehicle .
- For add itiona l information about Homelink,
visit www.homelink.com.
- For Declaration of Compliance to United
States FCC and Indust ry Canada regulations
~page 279.
45
Page 68 of 296
Sea ts and stor age
Luggage compartment
Expanding the passenger compartment
The rear seat backrests can be folded forward
separately or together .
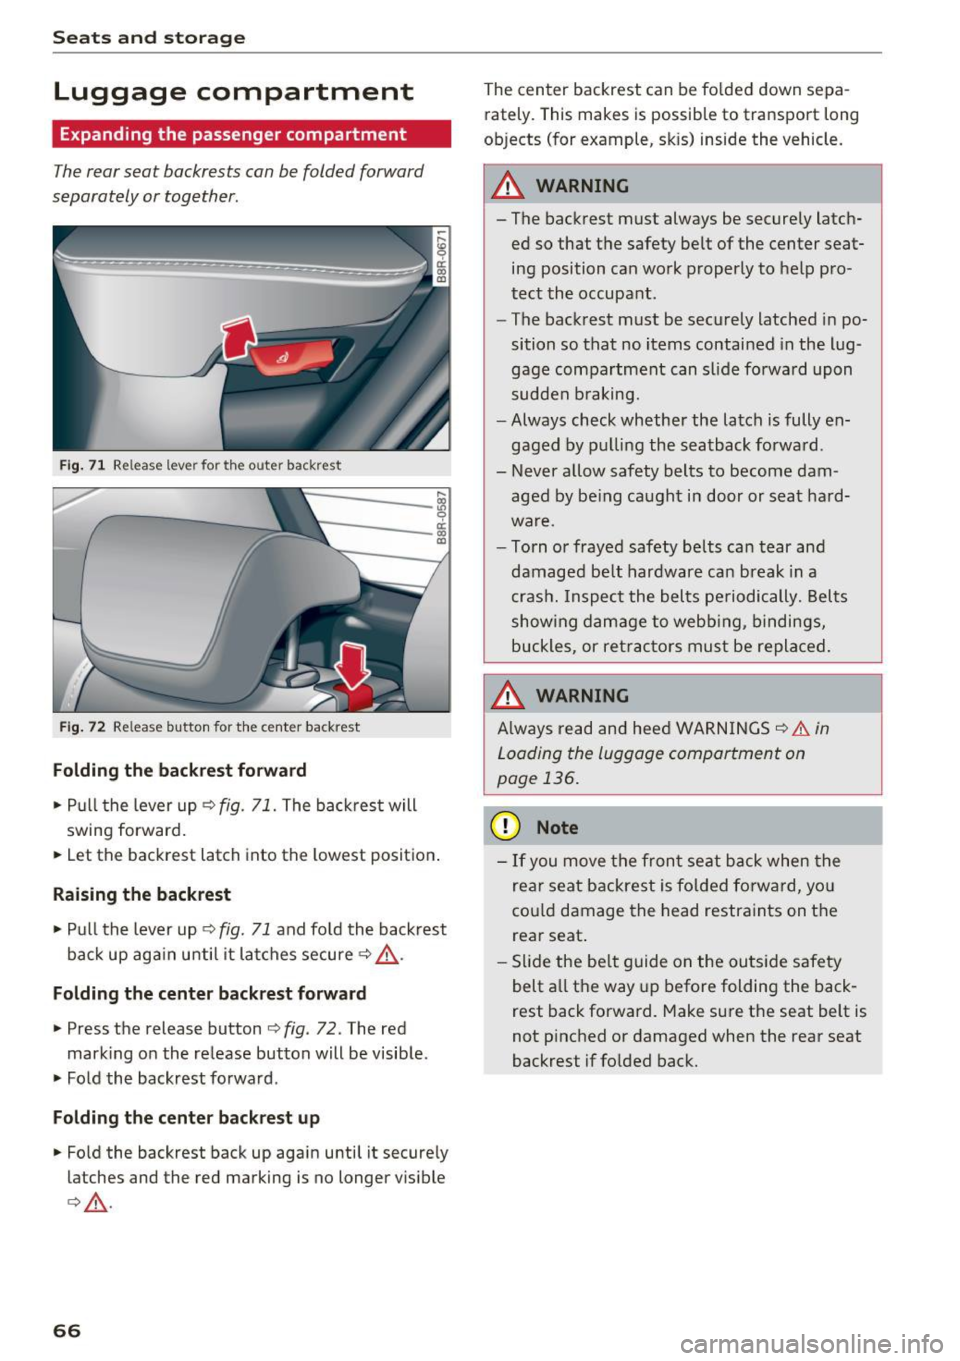
Fig. 71 Re lease lever for the outer back rest
~
~----i m
Fig . 72 Re lease button for the center backrest
Folding the ba ckrest forward
• Pull the lever up c:::> fig. 71. The backrest will
swing forward.
• Let the backrest latch into the lowest position .
Raising the backrest
• Pull the lever up c:::> fig. 71 and fo ld the backrest
back up aga in until it la tches secure
c:::> ,&. .
Folding the center ba ck rest f orward
• Press the release button c:::> fig . 72. The red
mark ing on the release button will be visib le .
• Fold the backrest forward .
Folding th e ce nter back re st up
• Fo ld the backrest back up again until it securely
latches and the red marking is no longer v isible
c:::> ,&. .
66
The center backrest can be fo lded down sepa
rately. This makes is possible to transport long
ob jects (for example, skis) inside the vehicle.
_& WARNING
-The backrest must always be securely latch
ed so that the safety belt of the center seat
ing position can work properly to help pro
tect the occupant .
- The backrest must be securely latched in po
sition so that no items contained in the lug
gage compartment can sl ide forwa rd upon
sudden b raking.
- Always check whether the latch is fully en
gaged by pu lling the seatback forward .
- Never allow safety belts to become dam
aged by be ing caught in door or seat hard
ware.
- Torn or frayed safety belts can tear and
damaged be lt hardware ca n break in a
cras h. Inspect the belts pe riodically. Bel ts
show ing damage to webb ing, bindings,
buckles, or ret rac tors must be replaced.
_& WARNING
A lways read and heed WARNINGS c:::> &. in
Loading the luggage compartment on
page 136.
(D Note
- If you move the fron t seat back when the
rea r seat b ackrest is fo lded forward, you
cou ld damage the head restraints on t he
rear seat.
-
- Slide the be lt guide on the outside safety
belt a ll the way up before folding the back
rest back forward. Make sure the seat belt is
not p inched or damaged when the rear seat
backrest if folded back.
Page 69 of 296
a,
a,
..... N r-N ..... 0 0
0:
co
Expanding the luggage compartment
The rear seat backrests can be folded forward
separately or together.
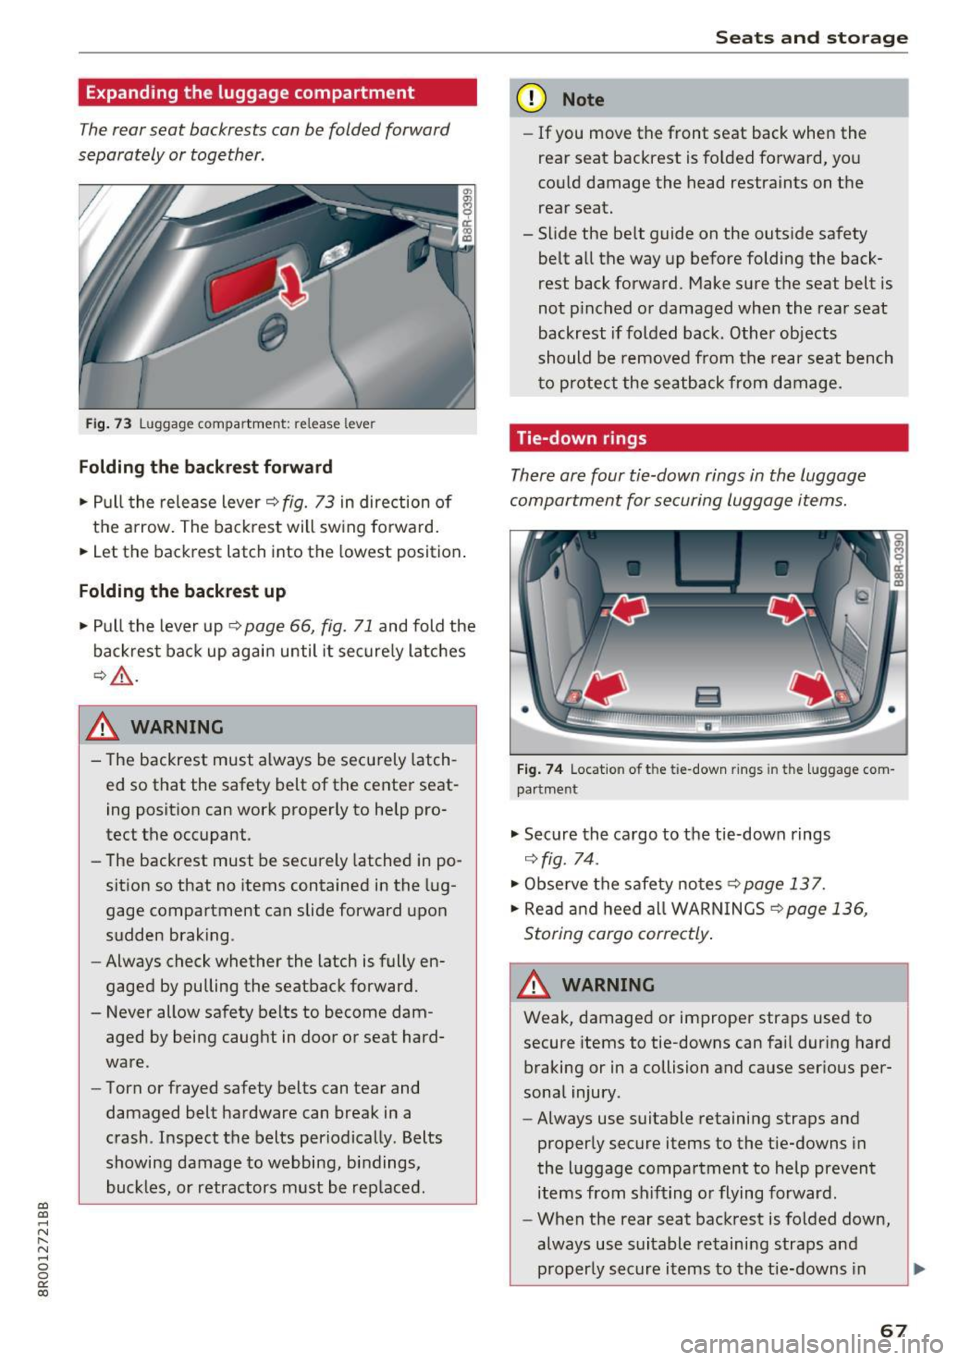
Fi g. 73 Luggage compartment : release leve r
Folding the backrest forward
... Pull the release lever c::> fig. 73 in direction of
the arrow . The back rest will sw ing forward .
... Let the back rest latch into the lowest position .
Folding the backrest up
... Pull the lever up c::> page 66, fig. 71 and fold the
backrest back up again until it sec ure ly latches
¢ _&. .
& WARNING ,-
- The backrest must always be secu rely latch-
ed so that the safety belt of the center seat
ing position can work proper ly to help pro
tect the occupant.
- The backrest must be securely latched in po
sit ion so that no items contained in the l ug
gage compartment can slide forward upon
sudden braking.
- Always check whether the latch is fully en
gaged by pulling the seatback forward.
- Never allow safety belts to become dam
aged by being caught in door or seat hard
wa re.
- Torn or frayed safety belts can tear and
damaged belt hardware can break in a
c rash. Inspect the belts periodically . Belts
showing damage to webbing, bi ndings,
buckles, or retractors must be rep lac ed .
Seats and storag e
(D Note
-If you move the front seat back when the
rear seat backrest is fo lded forward, you
cou ld damage the head restraints on t he
rear seat.
- Slide the be lt guide on the outside safety
belt a ll the way up before folding the back
rest back forward . Make sure the seat belt is
not p inched o r damaged when the rea r seat
backrest if folded back. Other objects
should be removed from the rear seat b ench
t o p rotect the seatback from d amage.
Tie-down rings
There are four tie-down rings in the luggage
compartment for se curing luggage items .
F ig . 74 Locat io n of the tie-dow n rings in the luggage com
pa rt me nt
.,. Secure the c argo to the tie-down rings
c::> fig. 74 .
.,. Observe the safety notes <=:> page 13 7.
... Rea d and heed a ll WARN INGS c::> page 136 ,
Storing cargo correctly .
A WARNING
Weak, damaged or improper straps used to
secure items to tie-downs can fai l dur ing hard
braking or in a collision and cause ser ious per
sona l injury .
- Always use suitable retaining straps and
properly secure items to the tie-downs in
the l uggage compartment to help prevent
ite ms from shi ft ing or flying forward.
- When the rear seat backrest is folded down,
always use suitable re taini ng straps and
proper ly secure i tems to the tie-downs in
-
67
Page 70 of 296
Seats and storage
the luggage compartment to help prevent
items from flying forward into the passen
ger compartment.
- Never attach a child safety seat tether strap
to a tie-down.
Luggage compartment cover
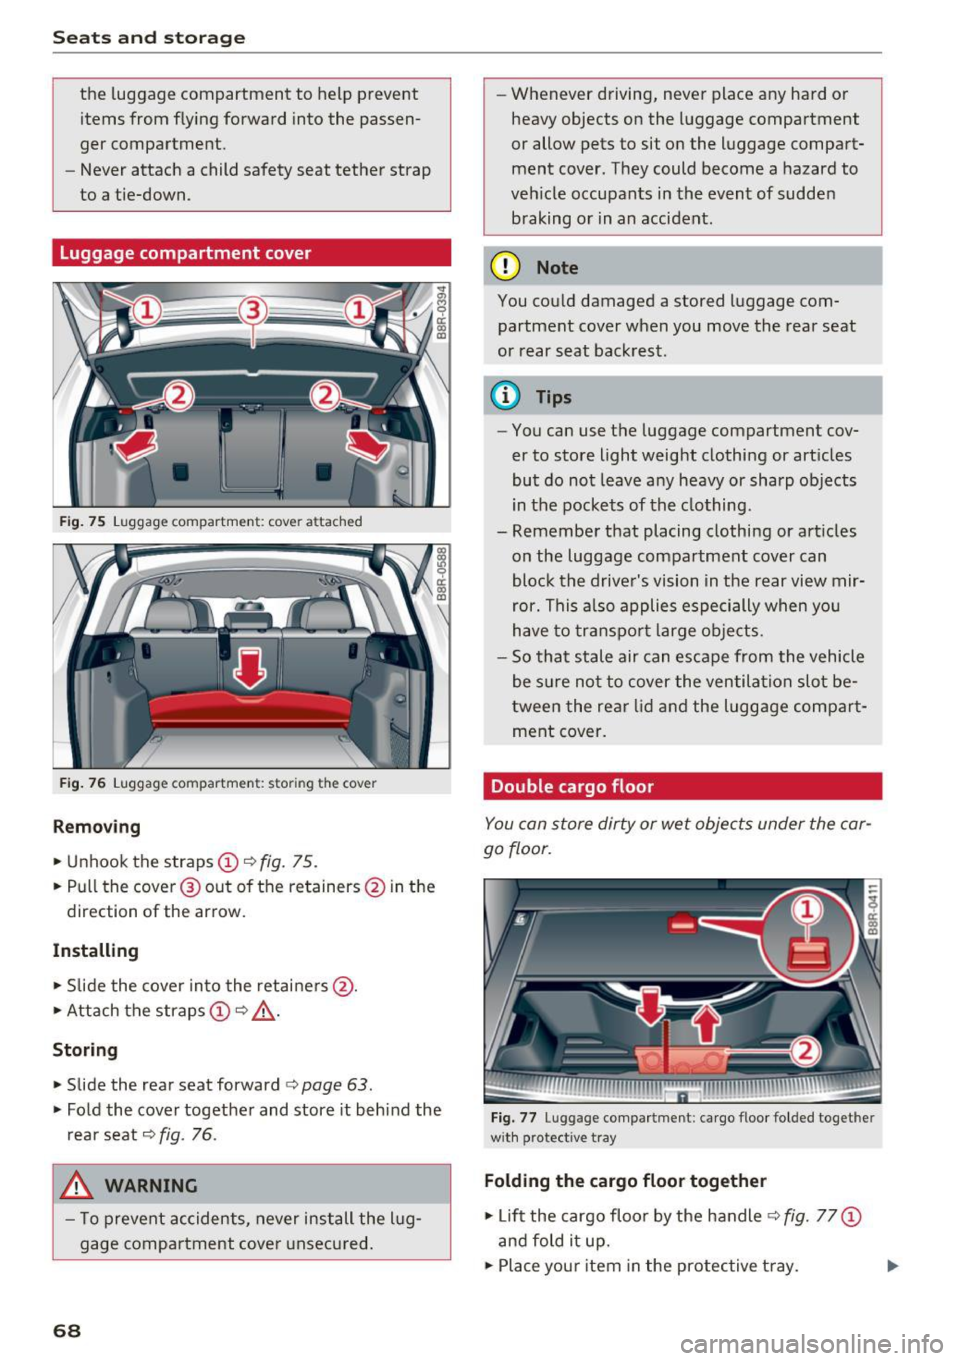
Fig. 75 Luggage compartment: cover attached
Fig. 76 Luggage compartment: storing the cover
Removing
• Unhook the straps@ c::> fig. 75.
• Pull the cover @out of the retainers @ in the
direction of the arrow.
Installing
• Slide the cover into the retainers @.
• Attach the straps
(D c::> & .
Storing
• Slide the rear seat forward <=> page 63.
• Fold the cover together and store it behind the
rear seat
c::> fig. 76 .
_&. WARNING
-To prevent accidents, never install the lug
gage compartment cover unsecured.
68
-
-Whenever driving, never place any hard or
heavy objects on the luggage compartment
or allow pets to sit on the luggage compart
ment cover. They could become a hazard to
vehicle occupants in the event of sudden braking or in an accident.
(D Note
You could damaged a stored luggage com
partment cover when you move the rear seat
or rear seat backrest.
@ Tips
- You can use the luggage compartment cov
er to store light weight clothing or articles
but do not leave any heavy or sharp objects
in the pockets of the clothing.
- Remember that placing clothing or articles on the luggage compartment cover can
block the driver's vision in the rear view mir
ror. This also applies especially when you
have to transport large objects.
- So that stale air can escape from the vehicle
be sure not to cover the ventilation slot be
tween the rear lid and the luggage compart
ment cover.
Double cargo floor
You can store dirty or wet objects under the car
go floor.
Fig. 77 Luggage compartment: cargo floor folded toget her
wit h protective tray
Folding the cargo floor together
• Lift the cargo floor by the handle c::> fig. 77 (D
and fold it up.
• Place your item in the protective tray.
Page 71 of 296
a,
a,
..... N r-N ..... 0 0
0:
co
Removing the cargo floor , installing
• To remove, lift t he cargo floor folded together
and pull it toward the rear lid .
• To install, place the folded cargo floor into
both retainers and unfold it.
Grab the protective tray on the ha ndles and pu ll
it out. You can also install a divider to divide @
the storage area. Depending on the vehicle
equipment level, the protective tray can have dif
ferent sizes and shapes .
Cargo net and storage hooks
Fig. 78 Luggage compartment:
F ig . 79 Luggage compartment: Storage hooks
Storage net
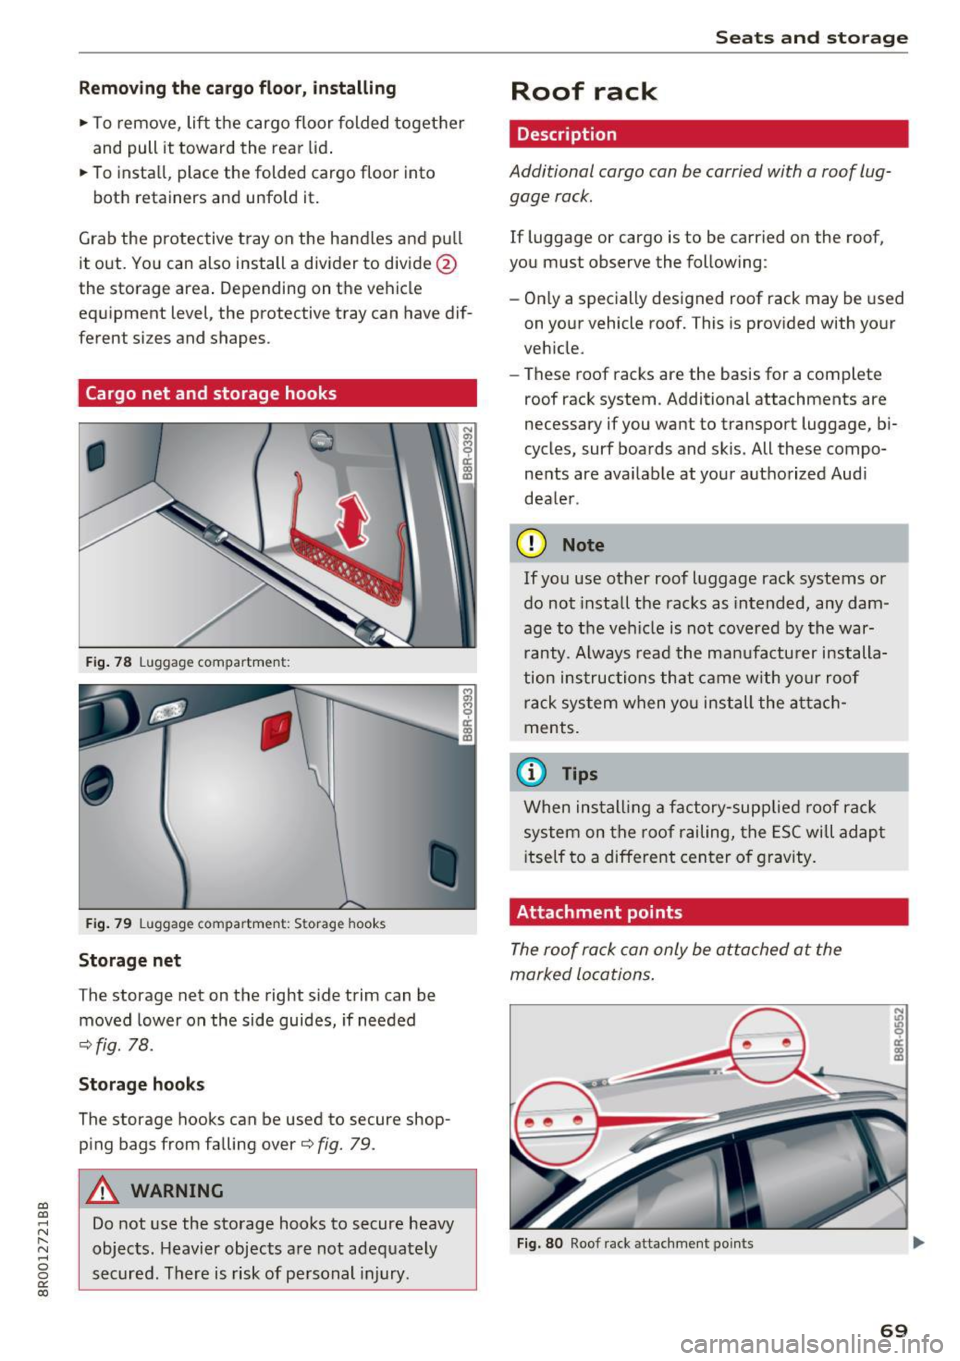
The storage net on the right side trim can be
moved lower on the side guides, if needed
c:>fig. 78.
Storage hook s
The storage hooks can be used to secure shop
ping bags from falling over
c:> fig. 79.
A WARNING
Do not use the storage hooks to secure heavy
objects. Heavier objects are not adequately
secured. There is risk of pe rsonal injury.
Seats and storag e
Roof rack
Description
Additional cargo can be carried with a roof lug
gage rack .
If luggage or cargo is to be carried on the roof,
you must observe the following:
- On ly a specially designed roof rack may be used
on your vehicle roof. This is provided with your
veh icle .
- These roof racks are the basis for a complete
roof rack system . Additional attachments are
necessary if you want to transport luggage, bi
cycles, surf boards and skis. All these compo
nents are ava ilable at your a uthorized Aud i
dea le r.
(D Note
If you use other roof luggage rack systems or
do not install the racks as intended, any dam
age to the vehicle is not covered by the war
r anty. Always read the ma nufactu rer installa
tion ins tructions that came with yo ur roof
rack system when yo u install the atta ch
ments.
(D Tips
When ins tall ing a factory-supp lied roof rac k
system on the roof railing, the ESC will adapt
i tself to a differe nt center of gravity .
Attachment points
The roof rack can only be attached at the
marked locations .
Fig . 80 Roof rack attachment points
69
Page 72 of 296
Seats and storage
Attach the roof rack only at the attachment
points on the roof railing. On the inside of the
roof railing there are two holes for attaching the
rear end of the roof rack. To prevent confusing
the front and rear roof rack attachments, there
are three holes on the left and two holes on the
right for mounting the front part of the roof rack
~ fig . 80.
The roof racks have a sticker on the left side un
derneath to identify front and rear .
A WARNING
When installing the roof rack, make sure the
sticker is on the left side of the vehicle and
faces the stamped arrow in the drive direc
tion.
Installing a roof rack
Fig . 81 Roof ra iling : pos ition ing the roof rack
Fig . 82 Roof railing : installing a roof rack
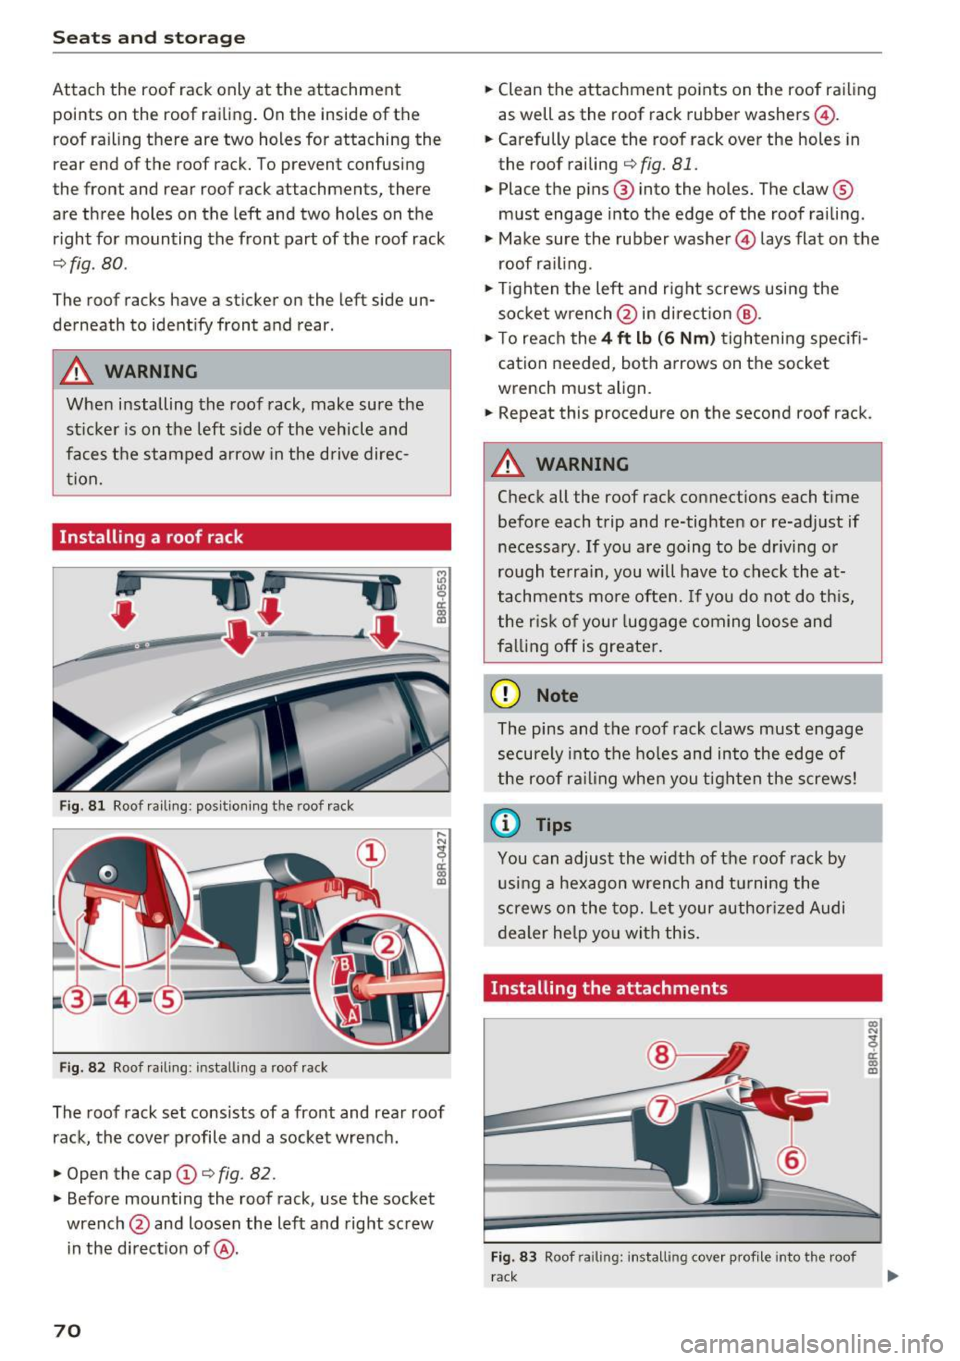
The roof rack set consists of a front and rear roof
rack, the
cover profile and a socket wrench.
~ Open the cap (D c:> fig. 82.
~ Before mounting the roof rack, use the socket
wrench @and loosen the left and right screw
in the direction of@ .
70
~ Clean the attachment points on the roof railing
as well as the roof rack rubber washers@.
~ Carefully place the roof rack over the holes in
the roof railing
c:> fig. 81.
~ Place the pins@ into the holes. The claw®
must engage into the edge of the roof railing .
~ Make sure the rubber washer© lays flat on the
roof railing .
~ Tighten the left and right screws using the
socket wrench @ in direction @.
~ To reach the 4 ft lb (6 Nm) tightening specifi
cation needed, both arrows on the socket
wrench must align .
~ Repeat this procedure on the second roof rack.
A WARNING
Check all the roof rack connections each time
before each trip and re-tighten or re-adjust if
necessary .
If you are going to be driving or
rough terrain, you will have to check the at
tachments more often. If you do not do this,
the risk of your luggage coming loose and
falling off is greater.
(D Note
The pins and the roof rack claws must engage
securely into the holes and into the edge of
the roof railing when you tighten the screws!
(D Tips
You can adjust the width of the roof rack by
using a hexagon wrench and turning the
screws on the top. Let your authorized Audi
dealer help you with this.
Installing the attachments
Fig. 83 Roof railing: installing cove r profile into the roof
rack
co
"' ~ er co a,