ad blue AUDI Q5 2017 Owners Manual
[x] Cancel search | Manufacturer: AUDI, Model Year: 2017, Model line: Q5, Model: AUDI Q5 2017Pages: 296, PDF Size: 74.43 MB
Page 27 of 296
CD
CD
.... N ,-... N ..... 0 0 c:<: 00
The driver message disappears after a few sec
onds. The driver message can be disp layed again
by briefly pressing the
! SE T! button .
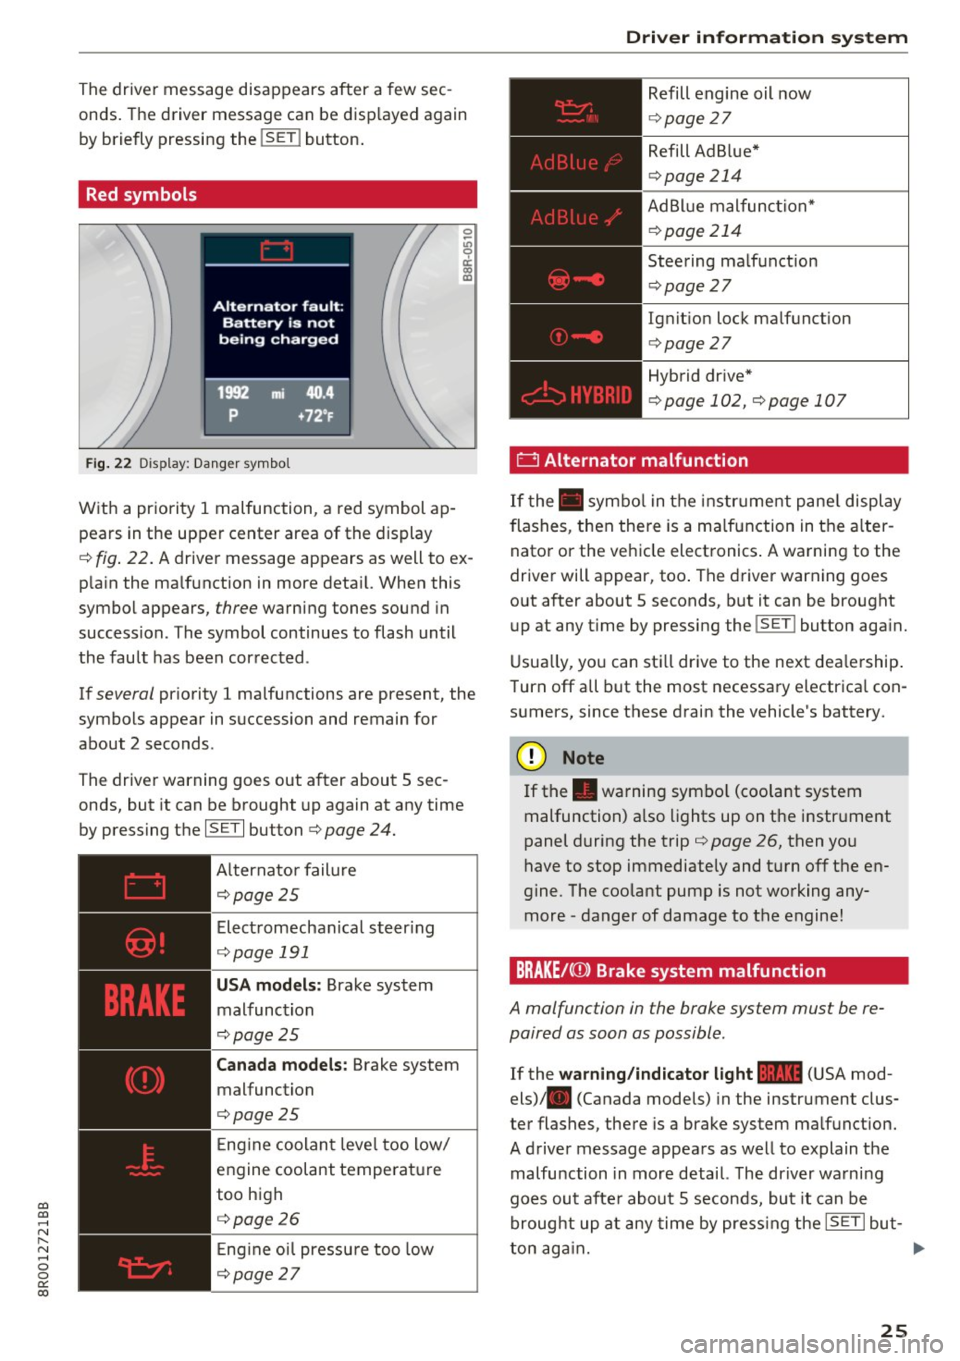
Red symbols
Fig . 22 Display: Danger symbol
With a priority 1 malfunction, a red symbol ap
pears in the upper center area of the display
0 ~
"' 9 a: CX) IX)
c:::> fig. 22 . A driver message appears as well to ex
p la in the ma lfunction in more deta il. When this
symbol appears,
three warning tones sound in
succession. The symbol continues to flash until
the fault has been corrected .
If
several pr iority 1 malfunctions are present, the
symbols appear in succession and remain for
about 2 seconds .
The driver warning goes out after about 5 sec
onds, but it can be brought up again at any time
by pressing the
ISETI button c:> page 24.
Alternator failure
c:::> page 2 5
Electromechanical steering
c:::> page 191
USA models : Brake system
malfunction
c:>page 25
Canada models: Brake system
malfunction
c:> page 25
E ng ine coolant level too low/
engine coolant temperature
too high
c:::> page 2 6
En gin e o il pressure too low
c:::> page 2 7
Driver information system
Refill engine oil now
c:::> page 2 7
Refill Ad B lue*
c:> page 214
AdBlue malfunction*
c:::> page 214
Steering malfunction
c:::> page 2 7
Ignition lock malfunction
c:> page 27
Hybrid dr ive*
c:> page 102, c:> page 107
' 0 Alternator malfunction
If the . symbo l in the instr um ent panel display
flashes, then the re is a malfunction in the alter
nator or the vehicle electronics . A warning to the
driver will appear, too . The driver warning goes
out after about 5 seconds, but it can be brought
up at any t ime by pressing the
!SET ! button aga in.
Usually, you can still drive to the next dea lership .
T urn off all but the most necessary e lectrica l con
sumers, since these drain the vehicle's battery.
(D Note
If the . warning symbo l (coolant system
malfunction) also lights up on the instrument
panel during the trip
c:> page 26, then you
have to stop immediately and turn off the en
gine. The coolant pump is not working any
more -danger of damage to the engine!
BRAKE/C(D) Brake system malfunction
A ma/function in the brake system must be re
paired as soon as possible .
If the warning/indicator light 11111 (USA mod
els) . (Canada models) in the instrument clus
ter flashes, there is a brake system malfunction.
A driver message appears as well to explain the
malfu nction in more detail. The driver wa rning
goes out after about 5 seconds, but it can be
brought up at any time by pressing the
ISETI but-
ton again. ..,.
25
Page 74 of 296
Sea ts and stor age
Open ing rear beve rag e hold ers
.. To open the rear c upholder, press on the sym
bol~ @~
fig. 85 .
Holding beverages at the rear
• To adju st the arm @, swing it in the direct ion
of the ar row .
• Place the beverage in the holde r and re lease
the a rm . T he arm swings back by itself and au
tomat ically secures the bev erage.
Clo sing the rear cupholders
• To close the rear cupholder, press on the center
section between the two arms and p ush the c u
pholder in the s lot as far as it will go.
The ho ld ing arm must be adjusted such that it
lies closely against the cupholder.
A max imum o f two beve rages can be pla ced in
the center armrest .
A WARNING
Spilled hot liquid can cause an accident and
personal inju ry .
- Never carry any beverage containers with
hot liquids, such as hot coffee or hot tea, in
the vehicle while it is moving . In case of an
acc ident, sudden braking or other vehicle
movement, hot liquid could spill, causing
sca ld ing burns . Spilled hot liquid can also
cause a n accident and personal in ju ry.
- U se only soft c ups in the cupholder. Hard
cups and g lasses can cause injury in an acci
dent.
- Never use the cupholder or adapter as an ashtray -risk of fire .
CD Note
Only dr ink con tainers with lids should be car
r ied in the cupholder. Liquid co uld sp ill out
and damage your vehicle's elec tronic equip
ment or stain the upho lstery, etc .
72
-
Climatized cupholders
Applies to: vehicles with climatized beverage holders
Th e dr iv e r sid e beve rag e hold er can k eep your
beverage warm or cold.
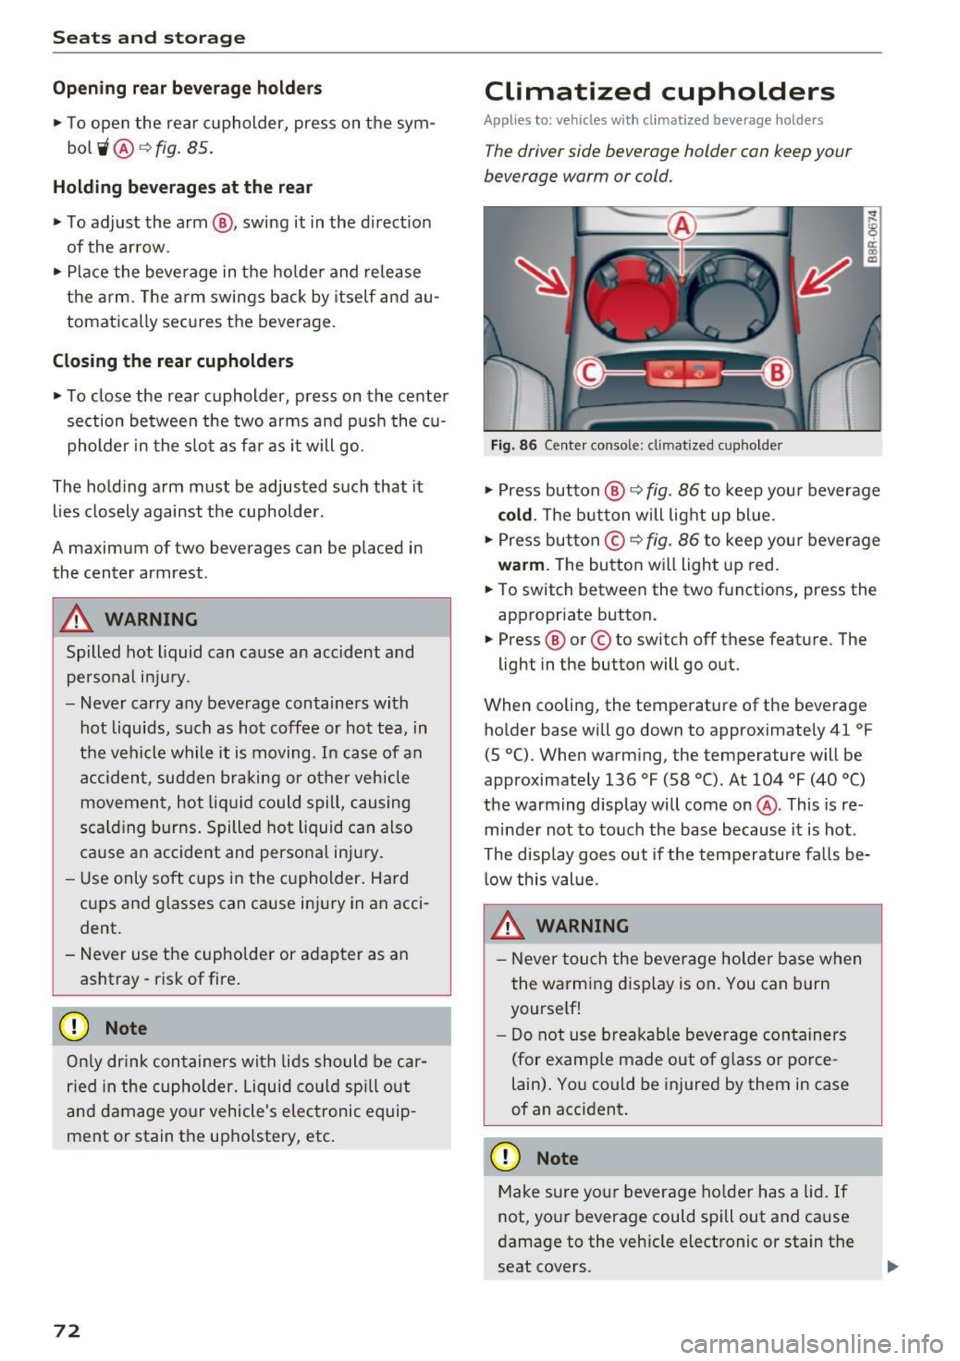
Fig. 8 6 Ce nter co nsole : cl im atize d cu pholder
• Press button @~ fig. 86 to keep your beverage
cold . The button will light up blue .
• Press button ©~
fig. 86 to keep you r beverage
warm . The button wi ll light up red.
• To switch between the two functio ns, press th e
appropr iate button .
• Press @ or© to sw itch off these fea ture . The
ligh t in the bu tton will go ou t.
When cooling, the temperature of the bev erage
holder base will go down to approximately 41
°F
(5 °C) . When warm ing , the temperatu re will be
a ppro ximately 136
°F (58 °(). At 104 °F (40 °()
the warming display will come on@. This is re
minder not to touch the base because it is hot .
The display goes out if the temperature falls be l ow this val ue.
A WARNING
- Never touch the beve rage holder base when
the warming d isplay is on. You can b urn
yourse lf!
- Do not use breakab le beve rage containers
(for examp le made out of g lass or porce
la in). Yo u could be injured by them in case
of an accident.
CD Note
M ake sure your beverage ho lder has a lid. If
not, your beverage could spill out and cause
damage to the veh icle electronic or stain the
seat covers .
Page 81 of 296
![AUDI Q5 2017 Owners Manual CD
CD
.... N ,-... N .... 0 0 C<. 00
[i] Adjusting seat heating*
Pressing the button switches the seat heating on
at the highest setting (level 3) . The LEDs indicate
the temperat AUDI Q5 2017 Owners Manual CD
CD
.... N ,-... N .... 0 0 C<. 00
[i] Adjusting seat heating*
Pressing the button switches the seat heating on
at the highest setting (level 3) . The LEDs indicate
the temperat](/img/6/57633/w960_57633-80.png)
CD
CD
.... N ,-... N .... 0 0 C<'. 00
[i] Adjusting seat heating*
Pressing the button switches the seat heating on
at the highest setting (level 3) . The LEDs indicate
the temperature level. To reduce the tempera
ture, press the button again. To switch the seat heating off, press the button repeatedly until the
LED turns off.
After 10 minutes, the seat heating automatically
switches from level 3 to level 2.
lil Adjusting seat ventilation*
Pressing the button switches the seat ventilation
on at the highest sett ing (level 3). The LEDs indi
cate the venti lation level. To reduce the ventila
tion level, press the button again. To switch the
seat v entilation off, press the button repeatedly
until the LED turns off.
I ..., FRONT I Switch the defroster on/off
The windshield and side windows are defrosted
or cleared of condensation as quickly as possib le.
The maximum amount of air flows mainly from
the vents below the windshield. Recirculation
mode switches off. The temperature should be
set to 72 °F (22 °() or higher. The temperature is
controlled automatically .
T he
IAUTOI button switches the defroster off.
llliil REARI Switching rear window heater on/
off
The rear window heater on ly operates when the
engine is running. It switches off automatica lly
after a few minutes, depending on the outs ide
temperature.
To prevent the rear window heater from switching off automatically, press and hold the
!llil> REAR I
button for more than 2 seconds . This remains
s tored until the ignition is switched off .
Air vents
You can open and close the center and rear air
vents using the thumbwheels . The levers adjust
the direction of the airflow from the vents.
You can adjust the air temperature in the rear by
turning the thumbwheel toward the red side to
Warm and cold
make it warmer or toward the blue s ide to make
it coo ler.
A WARNING
-~
- Do not use the recirculation for extended
periods of time. The windows could fog up
since no fresh air can enter the vehicle . If
the windows fog up, press the air rec ircula
tion button again immed iately to switch off
the air rec irculat ion function or select de
frost.
- Individuals with reduced sensit ivity to pain
or temperature could develop burns when
using the seat heating* function. To reduce
the risk of injury, these individua ls should
not use seat heating.
(D Note
To avoid damage to the heating elements* in
the seats, do not kneel on the seats or place heavy loads on a small area of the seat.
Setup
The basic climate control settings can be adjust
ed in the radio or MMI*.
"'Select: !CAR I function button> A/C control but
ton. Or
"' Select:
!CAR ! function button> Car systems*
control button >
A/C.
Automatic recirculation
When switched on, automat ic rec irculat ion con
trols the recirculation mode automatically. If the
windows fog up, press the
I@ F RON T I button.
Synchronization
When synchronization is switched on, the same
settings are appl ied to both the driver and front
passenger , except for the seat heating/ventila
t ion* . Synchronization switches off when you ad
just the settings on the front passenger's sid e.
You can also sw itch synchronizat ion on by press-
i ng and holding the knob on the driver's side. ..,.
79
Page 130 of 296
Parking aid
Reverse Parking
Applies to: vehicles w ith Aud i park ing system p lus w ith rear
view c amera
Parking mode 1 con be used when parking in a
garage or into a parking space.
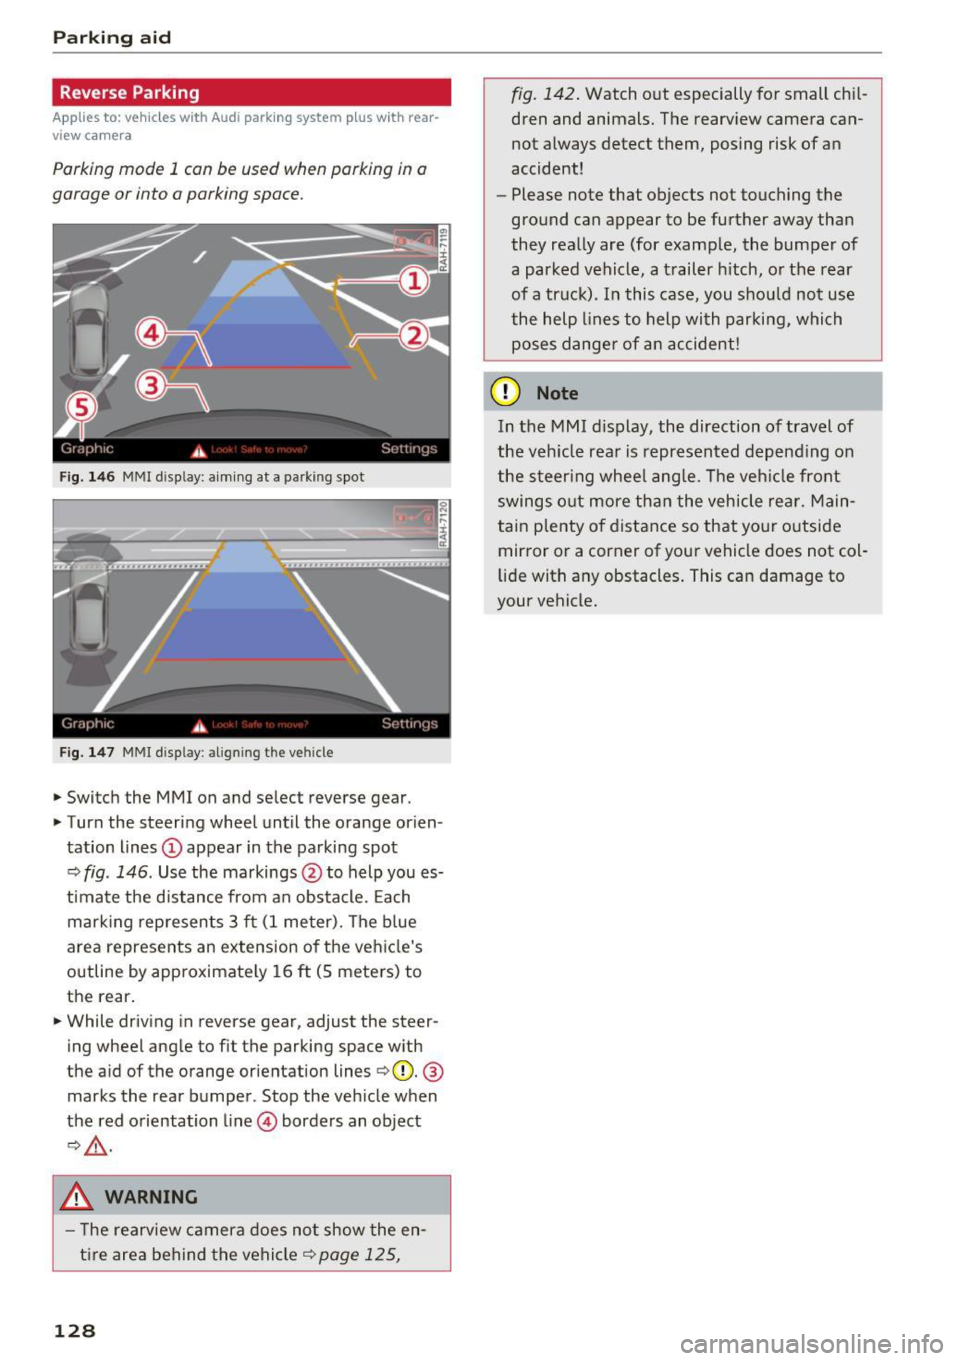
Fig. 146 MMI disp lay: a iming at a parking spot
Fig. 147 MMI disp lay: align ing the vehicle
.,. Switch the MMI on and se lect reverse gear .
.,. Turn the steering wheel until the orange orien
tation lines
(D appear in the parking spot
¢ fig . 146. Use the markings @to help you es
timate the distance from an obstacle. Each
marking represents 3 ft (1 meter). The blue
area represents an extension of the vehicle's
outline by approximately 16
ft (S meters) to
the rear .
.,. While driving in reverse gear, adjust the steer
ing wheel angle to fit the parking space with
the a id of the orange orientation lines ¢(D.
®
marks the rear bumper . Stop the vehicle when
the red orientation line© borders an object
¢,&. .
.&_ WARNING
- The rearview camera does not show the en
tire area behind the vehicle¢
page 125,
128
fig. 142. Watch out especially for small chil
dren and animals. The rearview camera can
not always detect them, posing risk of an
accident!
- Please note that objects not touching the
ground can appear to be further away than
they really are (for example, the bumper of
a parked vehicle, a trailer hitch, or the rear
of a truck). In this case, you should not use
the help lines to help with parking, which
poses danger of an accident!
(D Note
In the MMI display, the direction of travel of
the vehicle rear is represented depending on
the steering wheel angle. The vehicle front
swings out more than the vehicle rear. Main
tain plenty of distance so that your outside
mirror or a corner of your vehicle does not col
lid e with any obstacles. This can damage to
your vehicle.
Page 131 of 296
a,
a,
..... N ,....
N ..... 0 0
0:
co
Parallel Parking
Applies to: vehicles with Aud i parking system plus with rear
view camera
Use parking mode 2 to help you porollel pork
along the side of a street.
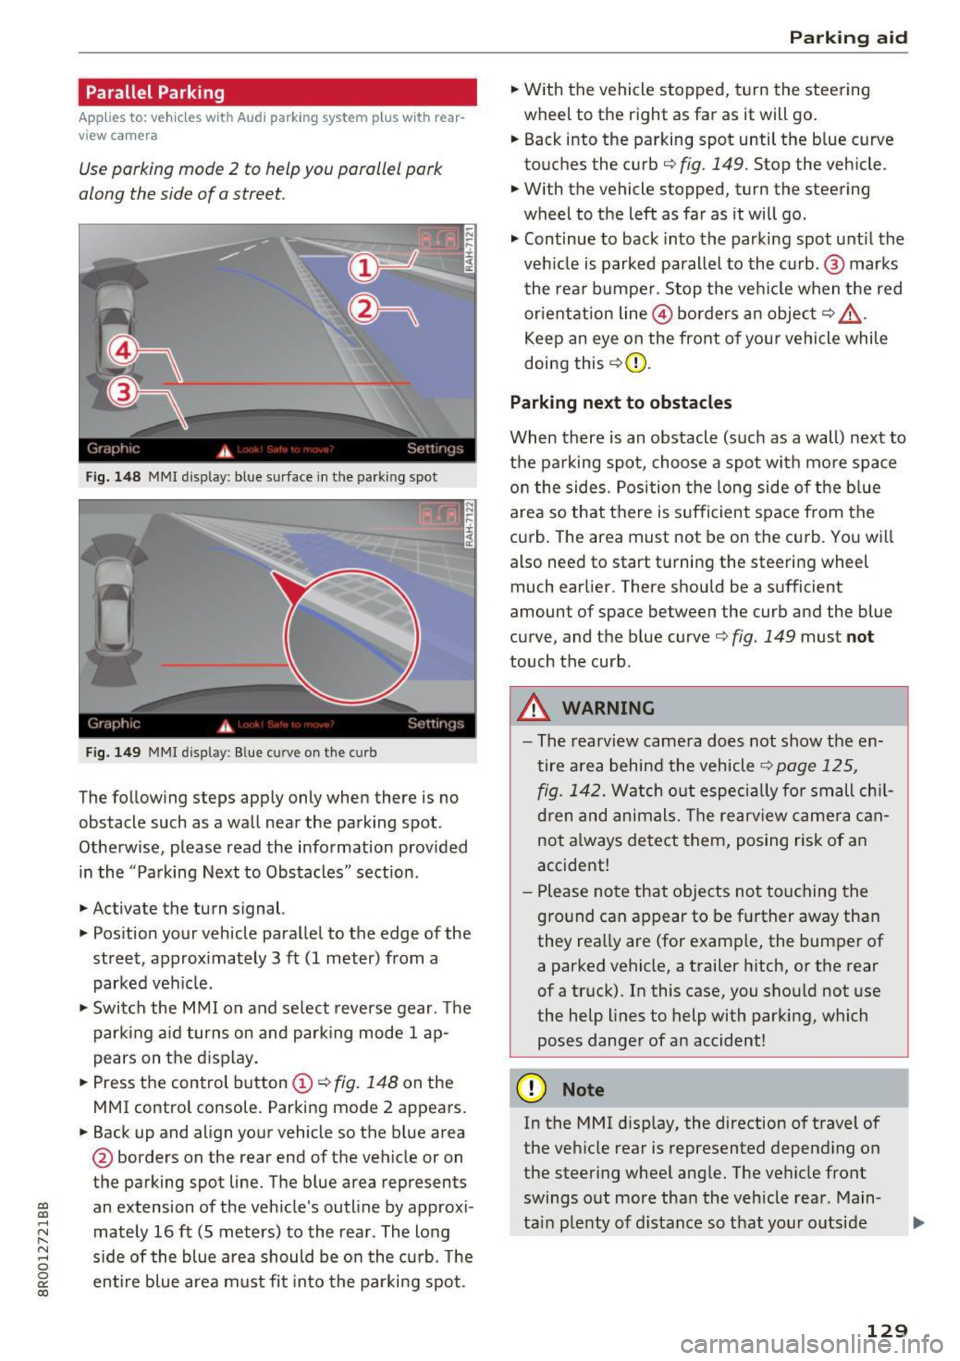
Fig. 148 MMI display: blue surface in the parking spot
Fig. 1 49 MMI display : Blue curve on the curb
The following steps apply only when there is no
obstacle such as a wall near the parking spot.
Otherwise, please read the information prov ided
in the "Parking Next to Obstacles" sect ion.
.,. Activate the turn signal.
.,. Pos ition your vehicle paralle l to the edge of the
street, approx imately 3 ft (1 meter) from a
parked veh icle.
.,. Swi tch the M MI on and se lect reverse gear. The
park ing a id turns on and park ing mode 1 ap
pears on the d isplay .
.,. Press the control button
(D ¢ fig. 148 on the
MMI control console. Parking mode 2 appears.
.,. Back up and align yo ur vehicle so the b lue area
@ borders on the rear end of the vehicle or on
the parking spot line. The blue area represents
an extension of the vehicle's outline by approxi
mately 16 ft (S meters) to the rear. The long
s ide of the blue area should be on the curb. The
en tire blue area must fit into the parki ng spot.
P ark ing aid
.,. With the vehicle stopped, turn the steering
wheel to the right as far as it will go.
.,. Back into the parking spot until the b lue curve
touches the curb¢
fig. 149. Stop the vehicle.
.,. With the vehicle stopped, turn the steering
wheel to the left as far as it will go .
.,. Continue to back into the parki ng spot unt il the
veh icle is parked parallel to the c urb. @ marks
the rear bumpe r. Stop the ve hicle when the red
orientat ion line @ borders an object¢
&
Keep an eye on the front of yo ur vehicle while
doing this ¢(D.
Parking next to obstacles
When there is an obstacle (such as a wall) next to
th e parking spot, choose a spot with mo re space
o n t he sides. Pos ition the long side of the b lue
area so that there is sufficient space from the
curb. The area must not be on the curb. You wi ll
also need to start turning the steering wheel
much earlier. There should be a sufficient
amount of space between the curb and the blue
curve, and the blue curve¢
fig. 149 must not
touch the curb.
A WARNING
-The rearview camera does not show the en
tire area behind the vehicle¢
page 125 ,
fig. 142.
Watch o ut especially fo r small ch il
d ren and animals. The rearview came ra can
not a lways detect them, posing risk of an
accide nt!
- P lease note that o bjects no t touching the
g ro und can appear to be further away tha n
they rea lly are (for e xamp le, the bumper of
a parked vehicle, a trailer h itch, or the rear
of a truck). In this case, you shou ld not use
the help lines to help with parking, which poses danger of an accident!
(D Note
In the M Ml d is play, the direction o f travel of
the veh icle rear is represented depend ing on
the steer ing whee l ang le. The ve hicle front
swings o ut more tha n the vehicle rea r. Main
ta in plenty of distance so that your o utside
129
Page 132 of 296
Parking aid
mirror or a corne r of your veh icle does not col
lide with any obstacles. This can damage to
your vehicle.
(D Tips
The left or right orientation lines and surfaces
will be displayed, depending on the turn sig
nal being used .
Adjusting the display
and warning tones
A pp lies to : ve hicles w ith Audi park ing system plus w ith rea r
view ca mera
The display and warning tones can be adjusted in
the MMI.
~ Select: ICARlfunction button> Parking system.
Or
~ Select: I CARI funct ion button > Car systems*
control button > Driver assist> Parking aid .
Display
-Off -when the parking system is switched on,
only audible signals are g iven.
- On -when the parking system is switched on,
either the visual disp lay or the picture from the
rearview camera is displayed .
Warning tones
-Front volume -front sensor volume
-Front frequency -front sensor frequency
- Rear volume -rear sensor volume
-Rear frequency -rear sensor frequency
-In -car entertainment fader/Music volume
while parking -
when the parking system is
switched on, the volume of the active audio
source is lowered .
The newly adjusted value is briefly heard from
the signal generator.
(D Tips
- The warning tones can also be adjusted di
rectly by the v isual disp lay or the picture
from the rearview camera. S imply press the
Settings control button.
- Changed settings are act ivated when park
in g system is switched on again .
130
-Th e settings are automatically stored and
assigned to the remote control key.
Trailer hitch
Applies to : vehicles wi th Audi parking sys te m plus wi th rear
v iew camera an d tra il er hitc h
For vehicles with a factory installed trailer hitch,
o r a trailer hitch installed according to factory
spec ifications, the parking system rear sensors
do not come on whenever you shift into reverse
gear or when you press the
p, qA switch. Remem
ber, there is no warning for distances to the rear.
The front sensors remain activated. The visual
display switches to the trailer tow ing mode. The
picture from the rearview camera w ill not show
the or ientat ion lines nor the blue surfaces .
If you install a hitch yourself, this function may
not work.
Error messages
App lies to: vehicles wi th Audi parking sys te m plus with rear
v iew camera
There is an error in the system if the LED on the
PJJJA switch is blinking and you hear a continuous
alarm for a few seconds after switching on the parking system or when the parking system is al
ready activated . Have your authorized Audi dealer
correct the error.
(D Tips
If the error is not corrected before you switch
off the ign ition, when you switch on the park
ing system again, the LED in the
Pw.o. switch
will blink.
Page 216 of 296
Fuel and Refueling
"'Loosen the strap from its bracket and pu ll on it
¢
fig. 191 . Now you can open the fuel filler flap
as usual.
Selective catalytic reduction (AdBlue/DEF)
General information
Applies to: veh icles w ith selective catalyt ic reduction
In vehicles with selective catalytic reduction, a
urea solution (Ad B lue/DEF) is injected into the
exhaust system before a nitrogen oxide catalytic
converter to reduce nitrogen emissions. The urea
solution is known as Ad Blue or DEF (Diesel Ex
haust Fluid) . AdBlue is used in the following.
The AdBlue is carried in a separate tank in the ve
hicle. The Ad Blue usage accounts for approxi mately 0 .5% to 2.5% of the diesel fuel that is
used.
When a message about refilling the Ad Blue ap
pears in the instrument cluster display, you must
refill the Ad Blue yourself or have it refilled by an
authorized Audi dealer or authorized Audi Service
Facility ¢ page 215.
(D} Tips
-The display indicates the distance remaining
that can be driven¢
page 214. If the Ad Bl
ue tank is completely empty, the engine will
not start again after the ignition is switched
off.
-Ad Blue is required by law to operate this ve
hicle.
Messages in the instrument cluster display
Applies to: vehicles with selective catalytic reduction
The display indicates if the Ad Blue level is low or
if there is a system malfunction.
AdBlue level low
You will be informed if the Ad Blue in the tank
drops below a certain level.
Ad Blue /9 Refill Ad Blue. See owner's manual
214
This message appears when there is only enough
Ad Blue left to drive the distance indicated in the
i nstrument cluster. Fill the Ad Blue.
AdBlue /9 Refill Ad Blue! No restart in x mi
(x km)! See owner's manual
This message appears when there is only enough
Ad Blue left to dr ive the distance indicated in the
i nst rument cluster. Fill the Ad Blue. Otherw ise
the engine will not start again if you stop it once
the distance indicated has been driven.
Refill Ad Blue! No restart! See own
er's manual
This message appears when the Ad Blue tank is
empty . Fill the Ad Blue. Otherwise you will not be
able to start the engine again once you stop it.
The Ad Blue must be refilled when the amount in
the tank has reached the minimum leve l
¢ page 215, Filling AdBlue .
Incorrect filling/system malfunction
A message appears if the Ad Blue tank was filled
with a flu id other than Ad Blue and the system
has detected that the tank was filled incorrectly,
or if there is a system malfunction .
Ad Blue -I' AdBlue: Fault! No restart in x mi
(x km)! See owner's manual
This message appears when it is on ly possible to
drive the distance indicated in the instrument
cluster. Drive to the nearest authorized Audi
dealer or authorized Audi Service Facility to have
the malfunct ion corrected. Otherw ise the eng ine
will not start again if you stop it once the dis
tance indicated has been driven.
AdBlue: System fault No restart!
See owner's manual
This message appears if the system has detected
that the tank was filled incorrectly or that there
is a malfunction . Drive immediately to the near
est authorized Audi dealer or authorized Audi
Service Facility to have the malfunction correct
ed . Otherwise you will not be able to star t the en
gine again once you stop it.
Page 217 of 296
a,
a,
..... N r-N ..... 0 0
0:
co
Filling AdBlue
Applies to: vehicles with selective catalytic reduction
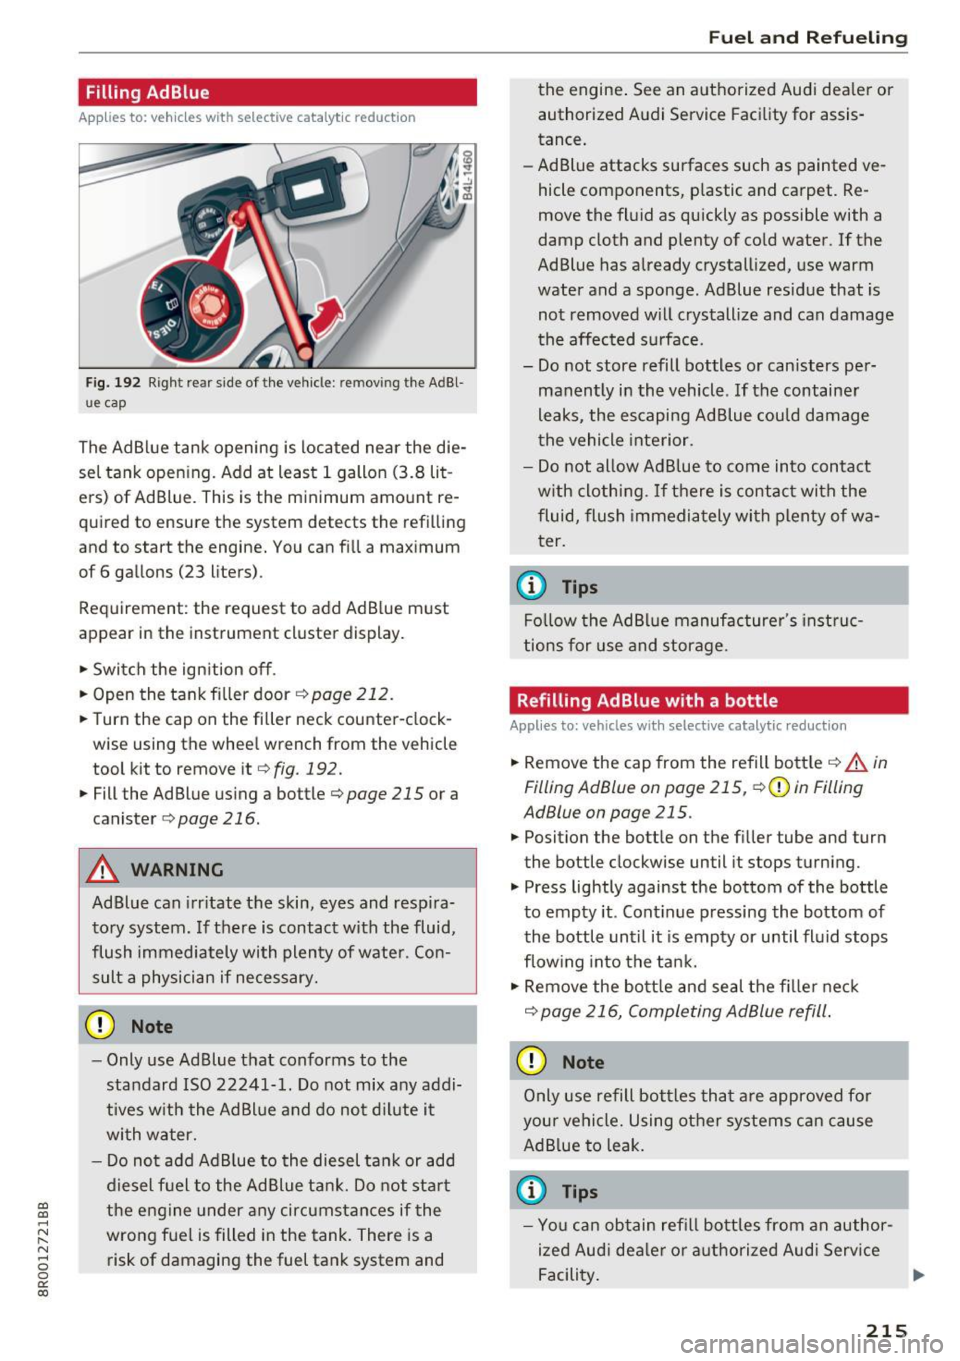
Fig. 192 Right rear side of the vehicle : remov ing the AdBl
ue cap
The Ad Blue tank opening is located nea r the die
sel tank open ing. Add at least 1 gallon (3.8 lit
e rs) of Ad Blue. This is the minimum amount re
quired to ensure the system detects the refilling
and to start the engine. You can fill a maximum
of 6 gallons (23 liters) .
Requirement: the request to add Ad Blue must
appear in the instrument cluster display.
• Switch the ignition off.
• Open the tank fi ller door ¢
page 212.
• Turn the cap on the filler neck counter-clock
wise using the whee l wrench from the vehicle
tool kit to remove it¢
fig . 192.
• Fill the Ad Blue using a bottle¢ page 215 or a
canister
c> page 216.
A WARNING
Ad Blue can irr itate the skin, eyes and resp ira
tory system. If there is contact with the fluid,
flush immediately with plen ty of wate r. Con
sult a physician if necessary.
CD Note
- Only use Ad Blue that conforms to the
standard ISO 22241-1. Do not mix any addi
tives w ith the Ad Blue and do not d ilute it
with water.
- Do not add Ad B lue to the diesel tank or add
diesel fuel to the Ad Blue tank. Do not start
the engine under any circumstances if the
wrong fuel is filled in the tank. There is a
risk of damaging the fuel tank system and
Fue l an d Re fuelin g
the engine . See an authorized Audi dea ler or
authorized Audi Service Facility for assis
tance.
- Ad Blue attacks surfaces such as painted ve
hicle components, p lastic and carpet. Re
move the fluid as quickly as possible with a
damp cloth and plenty of cold water . If the
Ad Blue has already crystallized, use warm
water and a sponge. Ad Blue residue that is not removed w ill crystallize and can damage
the affected surface.
- Do not store refill bottles or canisters per
manently in the vehicle . If the container
leaks, the escaping Ad Blue could damage
the vehicle interior.
- Do not al low Ad Blue to come into contact
w ith clothing.
If there is contact with the
fluid, flush immediately with plenty of wa
ter.
© Tips
Fo llow the AdBl ue manufacturer's instruc
tions for use and storage.
Refilling AdBlue with a bottle
Applies to: vehicles wit h selective catalytic reduction
• Remove the cap from the refill bott le ¢ A in
Filling AdBlue on page 215,
c> (D in Filling
AdBlue on page 215.
• Position the bottle on the filler tube and turn
the bottle clockwise until it stops turning.
• Press lightly against the bottom of the bottle
to empty it . Cont inue pressing the bottom of
the bottle until it is empty or until fluid stops
f low ing into the tank.
• Remove the bott le and seal the f iller neck
¢ page 216, Completing AdBlue refill .
CD Note
Only use refill bottles that are approved for
your vehicle. Using other systems can cause AdB lue to leak.
(0 Tips
- You can obtain refill bo ttles from an author
ized Aud i dea le r or authorized Audi Serv ice
Facility.
215
Page 218 of 296
Fuel and Refueling
-A permitted refill bott le contains approxi
mately 0 .5 gallons (1.9 liters) of Ad Blue.
Refilling Ad Blue with a canister
A ppl ies to: ve hicles w ith select ive ca talyt ic reduction
®
+®
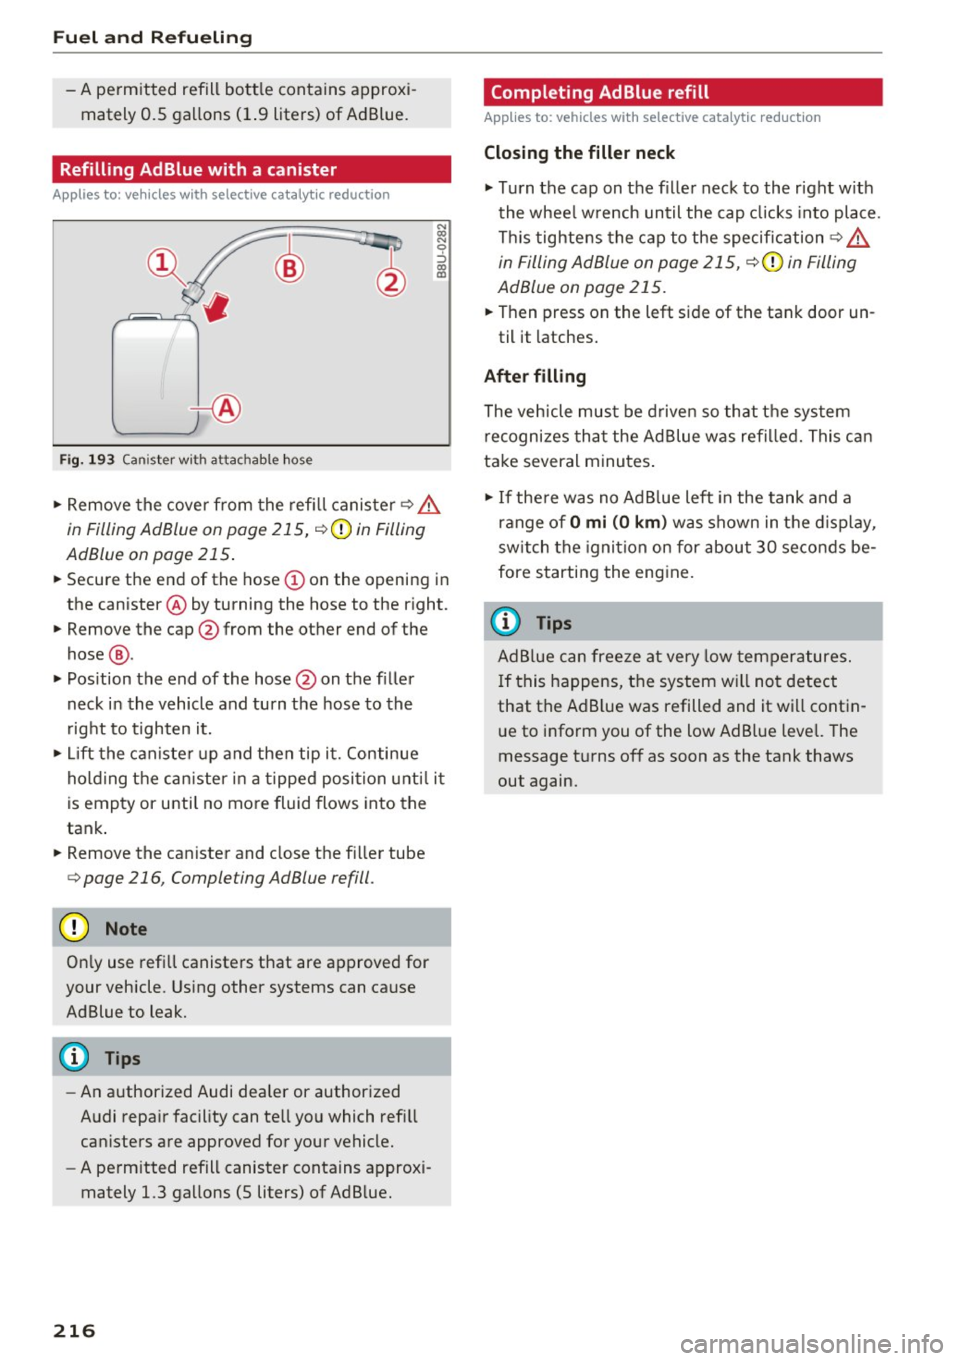
F ig. 193 Canister wit h attac hab le hose
N
~ 0 :::, a:, m
.., Remove the cover from the refill canister~ A
in Filling AdBlue on page 215, c>(D in Filling
AdBlue on page 215 .
... Secure the end of the hose (Don the opening in
the canister @ by turning the hose to the right.
... Remove the cap @from the other end of the
hose @.
"' Pos ition the end of the hose@ on the f iller
neck in the vehicle and turn the hose to the
right to tighten it.
.., Lift the canister up and then tip it. Continue
holding the can ister in a tipped position unti l it
is empty or until no mo re fluid flows into the
tank .
... Remove the canister and close the fi ller tube
c> page 216 , Completing AdBlue refill .
(D Note
Only use refill canisters that are approved for
your vehicle. Using other systems can cause
Ad Blue to leak.
@ Tips
- An authorized Audi dealer or authorized
Audi repair facility can tell you which refill
can isters are approved for your vehicle.
- A permitted refill canister contains approxi
mately 1.3 gallons (5 liters) of Ad B lue.
216
· Completing AdBlue refill
App lies to : vehicles with selective cata lyt ic re du ction
Closing the filler neck
... Turn the cap on the filler neck to the right w ith
the wheel w rench until the cap clicks into place .
This tightens the cap to the specification ~
A
in Filling AdBlue on page 215, c>(D in Filling
AdBlue on page 215 .
... Then press on the left side of the tank door un-
til it latches.
After filling
The vehicle must be driven so that the system
recognizes that the Ad Blue was refilled. This can
take several minutes .
.., If there was no AdB lue left in the tank and a
range of
O mi (0 km ) was shown in the display,
sw itch the ignition on for about 30 seconds be
fore starting the engine .
(D Tips
Ad Blue can freeze at very low temperatures.
If this happens, the system will not detect
that the Ad B lue was refilled and it will contin
ue to inform you of the low Ad Blue level. The
message turns off as soon as the tank thaws
out again.
Page 263 of 296
a,
a,
..... N r-N ..... 0 0
0:
co
Fuses and bulbs
Fuses
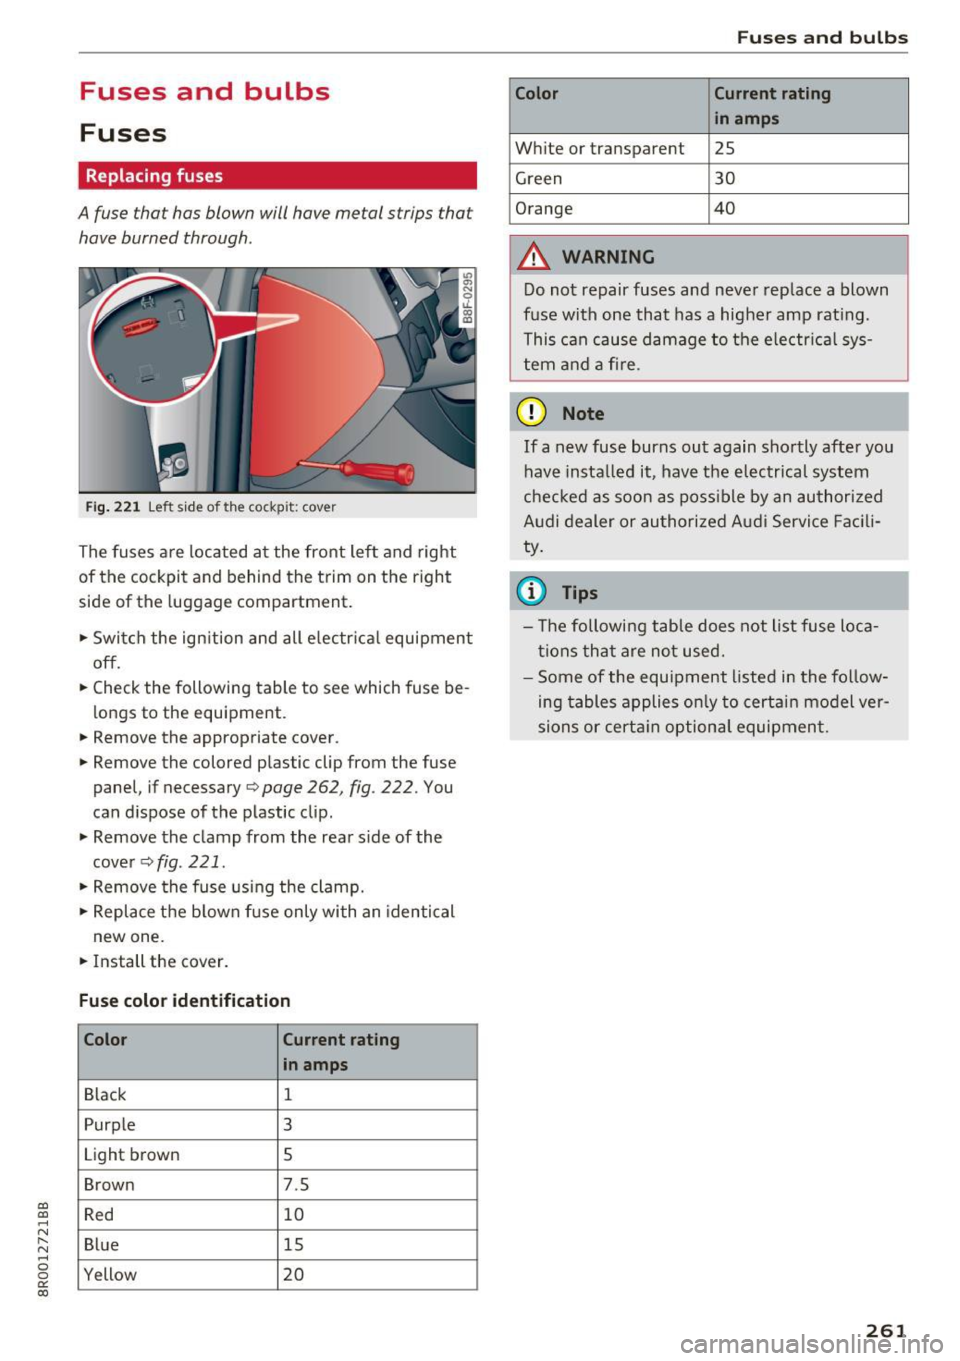
Replacing fuses
A fuse that has blown will have metal strips that
have burned through .
Fig. 221 Left side of the cockpit: cover
The fuses are located at the front left and right
of the cockpit and behind the trim on the right
side of the luggage compartment.
.,. Switch the ign ition and all e lectr ica l equipment
off.
.,. Check the following table to see which fuse be
longs to the equipment .
.,. Remove the appropriate cover .
.,. Remove the colored plastic clip from the fuse
panel, if necessary
c> page 262, fig. 222. You
can dispose of the plastic clip .
.,. Remove the clamp from the rear s ide of the
cover
c> fig . 221 .
.,. Remove the fuse using the clamp .
.,. Replace the b lown fuse only with an identical
new one .
.,. Install the cover.
Fuse colo r identification
Color Cur rent rating
in amp s
Black 1
Purple 3
Light brown 5
Brown 7.5
Red 10
Blue 15
Yellow 20
Fu ses a nd bulb s
C olor Current rating
in amps
White or transparent 25
Green 30
Orange 40
A WARNING
Do not repair fuses and never replace a blown
fuse with one that has a higher amp rat ing.
This can cause damage to the e lectr ica l sys
tem and a fire.
0 Note
If a new fuse burns out again shortly after you
have instal led it, have the electrical system
checked as soon as possible by an authorized
A udi dealer or authorized Audi Service Facili
ty.
(0 Tips
- T he following table does not list fuse loca
tions that are not used.
- Some of the equipment listed in the fo llow
ing tables applies on ly to certa in model ver
sions or certa in optional equipment .
261