display AUDI Q5 2018 Owners Manual
[x] Cancel search | Manufacturer: AUDI, Model Year: 2018, Model line: Q5, Model: AUDI Q5 2018Pages: 392, PDF Size: 60.56 MB
Page 248 of 392
System settings
wait for the sig nal t one (bee p) to say a new
command.
Volume : you can a djust th e vol ume of th e
p romp ts by turning the con tro l k no b.
Individual speech training (on ly when the v ehi
cle is s ta ti onary): yo u ca n ad apt the vo ice recog
ni tion sy ste m to your voic e or pro nunciati on in
or der to im prove the sys tem's a bili ty to re co gni ze
your speec h. Indivi dua l speech train ing is com
p rised of 20 s peech ent ries t hat consist o f com
mands and sequences of numbers . You can de
lete the p rogrammed voice t rain ing with the
Re
set individual speech training
function.
Display brightness
You can a djust the brigh tness o f the Info tain
ment system disp lay by t urning the cont ro l knob.
Factory settings
D epe ndi ng on t he ve hicle eq uipme nt, th e fo llow
i ng fu nctio ns ca n b e rese t to factory se ttings :
-Sound settings
- Radio
- Media settings
- Jukebox *
- Directory
-Telephone
- Bluetooth and Wi-Fi*
- Navigation settings*
- Navigation and online memory *
- Speech dialog system*
- Shortcut keys
- Message settings *
-Apps *
- Tool tips
- Audi connect *
- Audi smartphone interface *
You can select the desi red functio ns i nd ividua lly
or all at once with the option
Select all entries .
Select and confirm Restore factory settings .
(D Tips
Make sure that not o nly the sett ings were de
leted but a lso the sto red data, if ap plicable.
246
Connection manager
Introduction
The connection manager gives you an overview
of your conn ected devic es and th eir network sta
tus .
Settings Conne -ction manager I
-====- ,.· • Prima hone: MyPhone .,.
c M yPhone
• Second ary phone :
• Data conn ection :
• MM I
connect App :
• Audi smartphone:
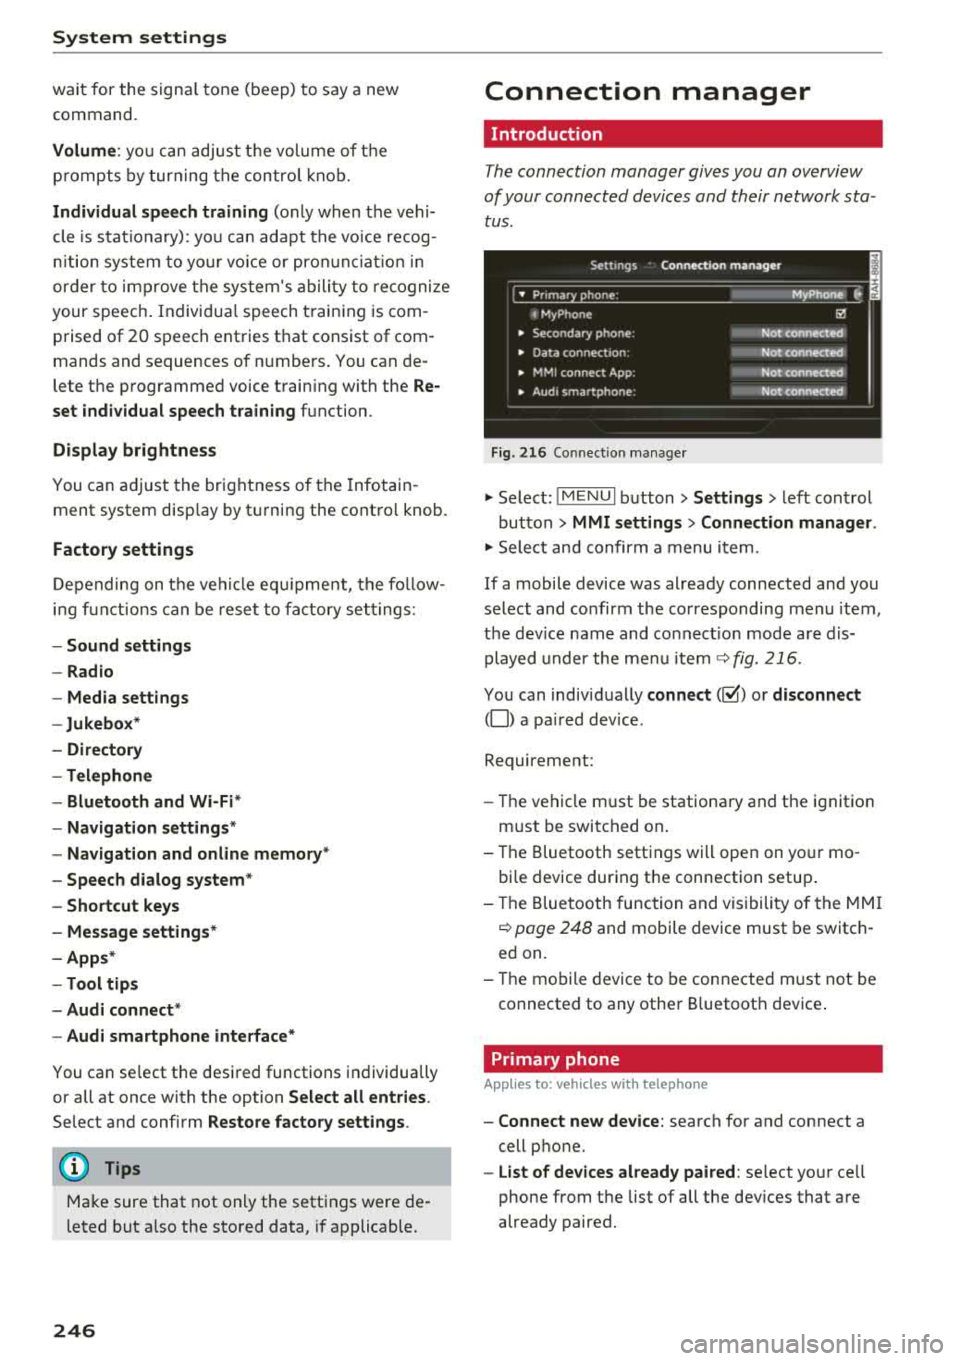
Fig. 216 Co nnec tion man ag er
Ii'!
Not connected
Not
conn.,ct.,d
Not connected
Not
conn..cted
"' Select : !ME NUI bu tton> Settings > left con trol
bu tton >
MMI settings > Connection manager .
"'Sele ct a nd confirm a menu item.
If a mobile device was already connected and you
select and co nfirm the co rresponding menu item,
t h e dev ice name and co nnect ion mode a re dis
p layed under the menu i tem
r:!;> fig. 216.
Yo u can indiv id ually connect (~) or disconnect
(0) a pa ired device .
Requirement:
- The ve hicl e m ust be statio na ry and the ignit io n
m ust be switc hed on .
- Th e Bluetooth sett ings will open on yo ur mo
bi le device dur ing the connection setup .
- T he Blue tooth func tion and v is ibili ty of the MMI
c:!;> page 24 8 and mobile device must be switc h
ed on.
- T he mo bile device to be con nected m ust not be
connected to any othe r Bluetoot h dev ice .
Primary phone
App lies to: vehicles wit h telepho ne
- Connect new device: search for and connect a
cell p hone.
- List of devices already paired : select yo ur cell
phone from the list of all the dev ices that a re
already paired.
Page 249 of 392
u co ..... N r--N ..... 0 <( 0 00
Secondary phone
Applies to: vehicles with telephone
-Connect new device : search for and connec t a
c e ll phone.
- List of devices already paired : selec t your cell
p hone fro m the lis t of all the devices t hat are
al re ad y p aired.
Data connection
Applies to vehicles with Audi connect (Infotainment)
- T he data conne ct ion is made using the em bed
ded SIM car d
ll i=>page 187. You do not need to
adjust a ny a ddit io n al sett ings.
{Ll) Note
Always follow t he inf ormat ion foun d in i=> @ in
Wi-Fi hotspot on page 19 4.
MMI connect app
Applies to vehicles with Audi connect (Infotainment)
Requirement: the Audi MMI connect app m ust
be installed and open on your mobile device.
- Connect new device : search for and connect a
mobile device (s uch as a smartp hone) .
-List of devices already paired : selec t your mo
bile device from the list of a ll the devices that
are already paire d.
Audio player
Applies to vehicles with Bluetooth or Wi-Fi audio player
Bluetooth player*
Requirement: the Bluetooth funct ion and v is ibili
ty must be sw itched on in the MMI
i=> page 248
and on the B luetoot h aud io player.
- Connect new device : press the control knob.
Se lect
Bluetooth audio player . Search fo r and
connect a mobile device .
-List of devices already paired : select a Bl ue
tooth device from the list of a ll the devices that
are already paire d.
ll SIM card inst alle d in t he v eh icle at the fa ctory.
System settings
Wi-Fi audio player*
R eq uiremen t: th e W i-Fi h otspo t* on the M MI
i=> page 193 an d on yo ur Wi -Fi audio playe r must
be switched o n.
-Connect new device: press the co ntrol knob.
Se arch for and conne ct a W i-Fi ca pabl e dev ice.
- Disconnect Wi-Fi audio player: de activate t he
W i-Fi on you r W i-Fi capa ble dev ice. The devi ce
w ill be au tom atic a lly removed from the lis t.
@ Note
Alway s follo w the inf ormat ion foun d in i=> @ in
W i-F i h ots pot on p age 194.
Directory
Applies to: vehicles with telephone
Display contacts from a cell phone (or an addi
tiona l cell phone).
Requirement: no ce ll phones can be connec ted to
the MMI using the
Handsfree pro file.
- Connect new device: search for and connect a
new ce ll phone .
-List of devices already paired : select yo ur cell
phone from t he list of all the cell phones that
are a lready paired .
Audi smartphone
Applies to: vehicles with Audi smartphone interface
-Connect yo ur cell phone to the A udi music in
t erface
i=> page 232 using a USB adap ter
i=> page 231, fig. 2 08 .
- Sel ect your cell p ho ne from t he list of cell
p ho nes th at h ave already bee n con nec ted.
Additional options
D epen ding on the sele cted fun ct ion, yo u ca n use
t h e righ t contro l bu tton to access the ava ila bl e
additional options in t he connection mana ger .
.,.
247
Page 252 of 392
System settings
(D Tips
Volumes that are too high o r too low are a u
tomatically ad justed to a set leve l w hen the
M MI is switched on .
Adjusting the system volume
"'Se lect : IMENUI button> Sound > left contro l
button .
Telephone
App lies to: ve hicles w ith telep hone
Mute telephone: messages and ringtones are set
to mute.
Ringtone : seer:=.> page 185, Ringtone and volume
settings .
Ringtone volume :
you can adjus t th e volume of
t he sele cte d r ing to ne by turning the con tro l
knob.
Message volume : you ca n adju st t he volume of
t he not ifi cat io n fo r an in comi ng tex t message by
t ur ning t he con trol knob.
Microphone input level : you can adjust the call
volume du ring a phone c all by tu rning the co ntro l
knob.
Navigation
A pp lies to: ve hicles w ith navigation system
Voice guidance: see r=> page 212 .
Voice guidance during phone call: see
r=>
page 212.
Voice guidance volume : you can adjust the vo ice
gu idance vo lume by tur ning t he control kno b.
Or:
you can a djust the vo ice guidance volume during
active route g uidance by turning the On/Off
knob.
Entertainment fader : the volume of au dio play
bac k can be tem porarily lowe red w hen the pa rk
ing system or vo ice g uidance is active .
Voice recognition system
App lies to: ve hicles w ith vo ice recogni tion sys te m
Command display : seer=> page 245 .
Short dialog : seer=> page 245 .
250
Volume: seer=> page 245.
Individual speech training : seer:=.> page 245.
Parking aid*
You can adjust the vol ume of the signa l tone by
turning the co ntro l knob .
-Adjusting the Front volume : select and con
firm
High , Medium or Low .
- Adjusting
the Rear volume : select a nd co nfirm
High , Medium or Low .
MMI touch*
Turn the cont rol knob to adju st th e volu me o f th e
spo ken p rompts from the MMI touch *.
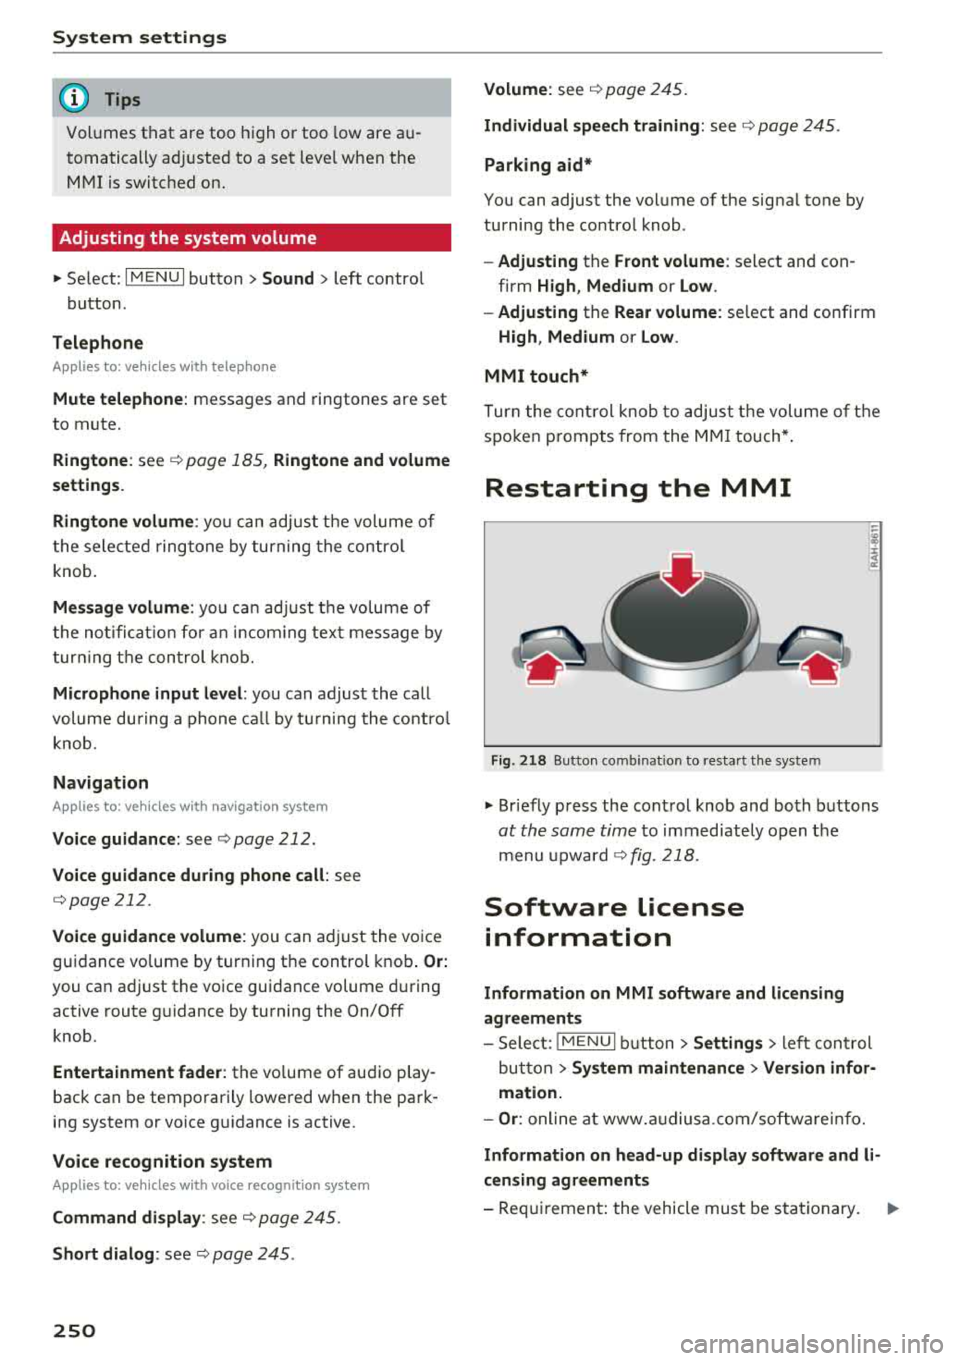
Restarting the MMI
Fig. 218 Sutto n co mbin at ion to res ta rt t he syste m
"' Brief ly p ress the con trol knob and bo th bu ttons
at th e same time to immediate ly open t he
menu upward
<=.>fig. 218.
Software license
information
Information on MMI software and licensing
agreements
~-~
- Sele ct: !ME NUI bu tton> Settings > left co ntrol
bu tton >
System maintenance > Version infor
mation.
- Or : onli ne a t www .a udiu sa. com/softwa rei nf o.
Information on head-up display software and li
censing agreements
- Req uiremen t: the vehicle mus t be sta tionary .
Page 319 of 392
u co .... N r--N .... 0 <( 0 00
A WARNING
Read and follow all WARNINGS before check
ing anything in the eng ine compartment
9poge 314.
Engine oil
If the engine oil level is too low
If you need to add engine oil, use an oil that is
listed on the sticker.
The sticker is located at the
front of the engine compartment
9 poge 316,
fig. 260.
I f the recommended engine oil is not available,
in an emergency you may add a maximum of 1
quart
Cl liter) of ACEA C3 or API SN engine oil
one time until the next oil change.
F or more information on the correct engine oil
for your ve hicle, contact an authorized Audi dea l
er or authorized Audi Service Facility. Have the oil
changed by an authorized Audi dealer or author ized Service Fac ility.
Audi recommends
~cas jjjjfl /[email protected] Fr,w.::«:J.o,-JAl.
Audi recommends using the Long Life high
performance engine oil from Audi Genuine
Parts.
Checking the engine oil level
The engine oil level con be checked in the Info
tainment system
Observe the safety precautions c::> & in Working
in the engine comportment on page 314.
~ Park your vehicle on a level surface.
~ S hu t the engine off when it is warm.
~ Switch only the ignition back on.
~ Wait approx imately two minutes.
~ Select in the Infotainment system: the I MENU I
button > Vehicle > left control button > Service
& checks
> Oil level.
~ Read the oi l level in the display. Add engine oil
if the bar in the oil leve l indicator is just before
"min"
c::> page 318.
Checking and Filling
@ Note
The engine oi l level must not be under the
"min" marking, as th is w ill increase the risk of
engine damage.
(D Tips
The oil leve l indicator in the display is only an
informational display.
If the oil leve l is too
l ow, a min imum oil warning appears in the in
strument cluster. Add oil and close the hood.
The current oil level is displayed in the Info
tainment system the next time the ignition is
switched on .
(D Tips
The engine oil consumption may be up to
0.5 quart/600 miles (0.5 liter/1,000 km), de
pending on driv ing sty le and operat ing cond i
tions. Consumption may be higher dur ing the
first 3,000 miles (5,000 km). Because of this,
the engine o il level must be checked regular
l y . It is best to check each time you refuel
your vehicle and before long drives.
- In order to provide effective lubrication and
cooling of internal engine components, a ll
internal combustion engines consume acer
tain amount of oil. Oil consumption varies
from engine to engine and may change sig
nifica ntly over the life of the engine. Typ i
cally, eng ines with a specified break-in peri
od consume more oil during the break-in pe
r iod than they consume after oil cons ump
t ion has stabilized.
- Under normal conditions, the rate of oil
consumption depends on the quality and
viscos ity of the oil, the RPM (revo lutions per
min ute) at which the engine is operated, the
ambient temperature and road conditions.
Further factors are the amount of oil dilu
tion from water condensation or fue l resi
due and the oxidation level of the oil. As any
eng ine is subject to wear as m ileage builds
up, the oil consumption may increase over
time until replacement of worn components
may become necessary.
.,..
317
Page 326 of 392
Checking and Filling
-Never add radiator anti-freeze or other addi
tives to the washer fluid.
-Do not use a glass cleaner that contains
paint solvents, because this could damage
the paint .
Service interval display
The service interval display detects when your ve
hicle is due for service.
Checking service intervals
You can check the remaining distance or time un
til the next oil c hange or next inspection in the
Infotainment system .
.,. Select in the Infot ainment system: the I MENU I
button > Vehicle > left contro l button > Service
& checks > Service intervals.
Resetting the indicator
An author ized Audi dealer or authorized Audi
Service Facility will reset the service interval dis
p la y after performing serv ice.
If you have changed the oil yourself, you must re
set the oil c hange interva l.
.,. Select in the Infotainment system: the lMENUI
button
> Vehicle > left control button > Service
& checks > Service intervals > Reset oil change
interval.
If an oil change or inspection is due, you can ac
cess it in the Infotainment system . The display
works in two stages:
-Service reminder: after a certain distance is
driven, a message appears in the instrument
cluster display every time the ign ition is switch
ed on. The remaining distance and t ime is dis
played br iefly.
-Service due : if your vehicle has reached a serv
ice interval, a message appears briefly after
switching the ignition on.
0 Note
-Only reset the oil change indicator if the oil
was c hanged.
-Following the service inter vals is critical to
maintain ing the service life and value of
324
your vehicle, especially the engine . Even if
the mileage on the ve hicle is low, do not ex
ceed t he time for the next service .
Page 345 of 392
individual tires. If the pressure changes in one or
more tires, this is indicated in the instrument
cluster display with an indicator light
[IJ and a
message . If only one tire is affected, the location
of that tire will be indicated.
The tire pressures must be stored in the Infotain ment system again each time the pressures
change (switching between partial and full load
pressure) or after changing or replacing a tire on
your vehicle
¢ page 343 . The tire pressure moni
toring system only monitors the tire pressure you
have stored. Refer to the tire pressure label for
the recommended tire pressure for your vehicle
¢ page 335, fig. 269.
Tire tread circumference and vibration character
istics can change and cause a tire pressure warn
ing if:
- the tire pressure in one or more tires is too low
- the tires have structural damage
- the tire was replaced or the tire pressure was
changed and it was not stored
¢ page 343
- tires that are only partially used are replaced
with new tires
Indicator lights
[IJ-loss of pressure in at least one tire¢,&. .
Check the tires and replace or repair if necessary.
Check/correct the pressures of all four tires and
store the pressure again in the Infotainment sys
tem
¢ page 343 .
mm (Tire Pressure Monitoring System) Tire
pressure: malfunction! See owner's manual.
If
mm appears after switching the ignition on or
while driving and the
[IJ indicator light in the in
strument cluster blinks for approximately one minute and then stays on, there is system mal
function . Try to store the correct tire pressures
~ page 343 . In some cases , you must drive for
several minutes after storing the pressures until
the indicator light turns
off. If the indicator light
does turn off or turns on again after a short peri
od of time, drive to an authorized Audi dealer or
authorized Audi Service Facility immediately to
~ have the malfunction corrected. .... N ,..._
N ..... 0 <( 0 00
Wheels
A WARNING
--- If the tire pressure indicator appears in the
display, reduce your speed immediately and
avoid any hard steering or braking maneu
vers. Stop as soon as possible and check the
tires and their pressure.
- The driver is responsible for maintaining the
correct tire pressure. You must check the
tire pressure regularly .
- Under certain conditions (such as a sporty
driving style, winter conditions or unpaved
roads), the tire pressure monitoring system
indicator may be delayed.
@ Tips
- The tire pressure monitoring system can al
so stop working when there is an ESC mal
function.
- Using snow chains may result in a system
malfunction.
- The tire pressure monitoring system in your
Audi was calibrated with
"Audi Original
Tires"~ page 332. Using these tires is rec
ommended.
Storing tire pressures
App lies to: vehicles wi th Tir e Pr essure Mo nito ring Syste m in
dica tor
If the tire pressure changes or a tire is replaced ,
it must be confirmed in the Infotainment sys tem .
.. Before storing the tire pressures, make sure the
tire pressures of all four tires meet the speci
fied values and are adapted to the load
¢page 335 .
.. Switch the ignition on .
.. Select in the Infotainment system: I MENU ! but
ton
> Vehicle > Service & checks > Tire pres
sure monitoring
> Store tire pressure > Yes,
store now.
(D Tips
Do not store the tire pressures if snow chains
are installed .
343
Page 348 of 392
Care and cleaning
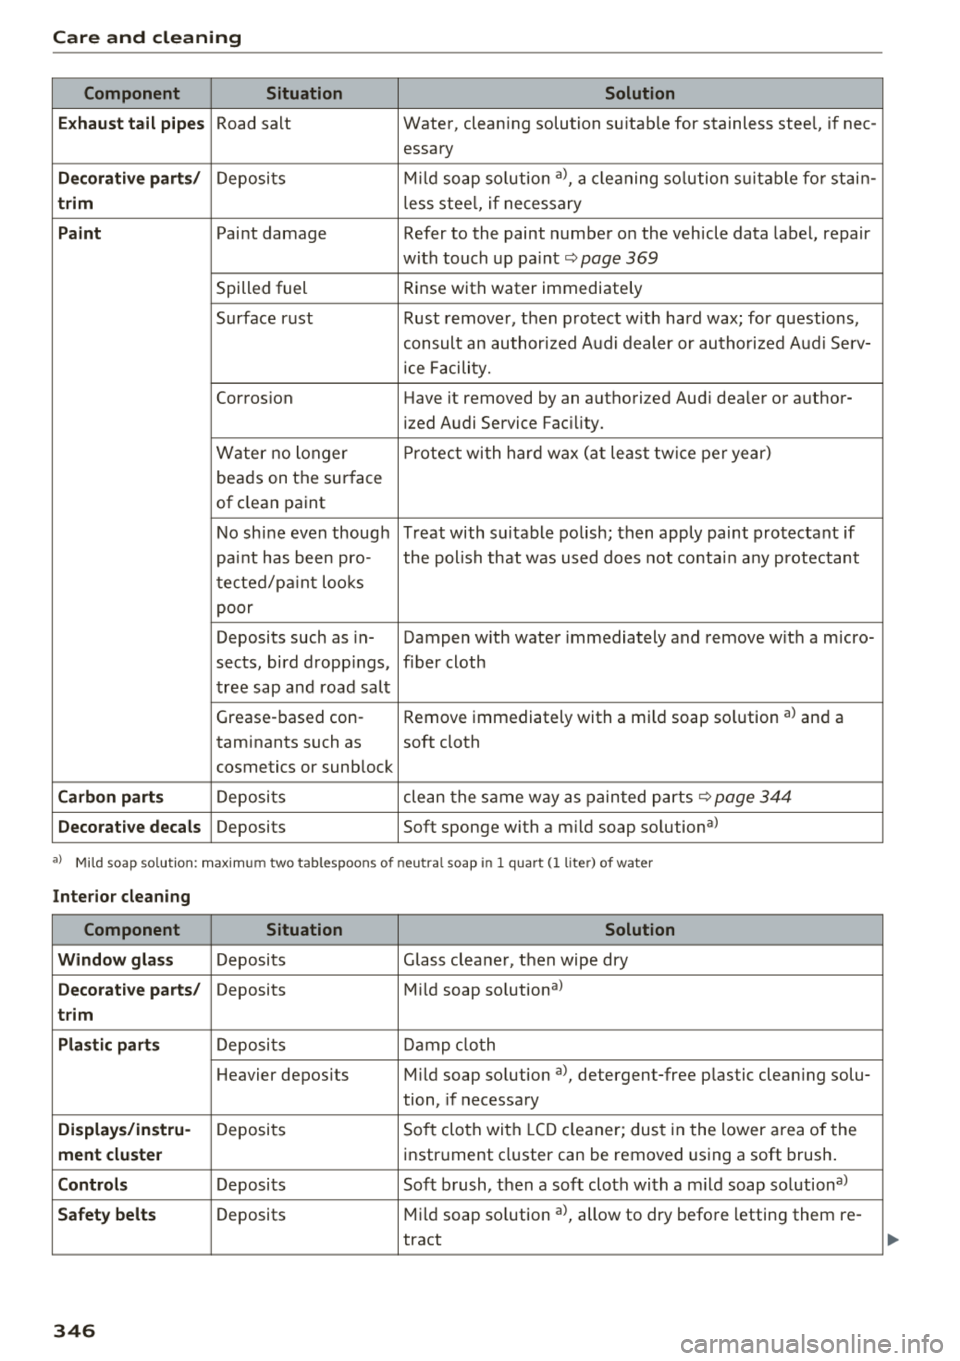
Component Situation Solution
Exhaust tail pipes
Road salt Water, cleaning solution suitab le for stainless steel, if nee-
essary
Decorative parts/ Deposits Mild
soap solution al, a cleaning solution suitab le for stain-
trim less stee l, if necessary
Paint Paint damage Refer to t he paint number on the vehicle data label, repair
with touch up
paint ~ page 369
Spilled fuel Rinse
with water immediately
Surface rust Rust remover, then protect with hard wax; for questions,
consult an author ized Audi dealer or authorized Aud i Serv-
i ce Facility.
Corros ion Have it removed by an authori zed Aud i dea ler or author-
ized Audi Service Fac ility.
Water no longer Pr
otect with hard wax (at least twice per year)
beads on the surface
of clean paint
No shine even though Treat wit h suitable polish; then apply paint protectant if
pa int has been pro- the polish that was used does not contain any protectant
tected/paint looks
poor
Deposits such as in- Dampen w ith water immediately and remove with a micro-
sects, bird dropp ings, f iber cloth
tree sap and road salt
Grease -based con- Remove immediately with a mild soap solution
al and a
taminants such as soft cloth
cosmetics or sunb lock
Carbon parts Deposi ts clean the same way as painted parts ~ page 344
Decorative decals Deposits Soft sponge with a mild soap solutiona l
•> Mi ld soap so lution: maxim um two tablespoo ns o f neu tra l s oap in 1 quart (1 lite r) of water
Interior cleaning
Component Situation Solution
Window glass
Deposits Glass cleaner, then wipe dry
Decorative parts/ Deposits Mild soap so lution al
trim
Plastic parts
Deposits Damp clo1th
Heavier deposits Mild soap solution
al, detergent-free p lastic clean ing solu-
tion, if necessary
Display s/instru-Deposi ts Soft cloth with LCD cleaner; dust in the lower area of the
ment cluster instrument cluster can be removed using a soft brush.
Controls Deposits Soft brush, then a soft cloth with a m ild soap solutional
Safety belts Deposits Mild
soap so lution a l, allow to dry before letting them re -
tract
346
Page 350 of 392
Care and cl eaning
avoid scratches, move the scraper on ly in
one direction and not back and forth.
- Never remove snow o r ice from door win
dows and mirrors using warm or hot water
because this could cause cracks to form .
- To avoid damage to the rear w indow de
fogger, do not apply any stickers on the heating wires on the inside of the window .
-Deco rati ve parts /trim
- Never use chrome care or cleaning prod-
ucts.
- Paint
-To red uce the risk of scratches, the vehicle
must be free of dirt and dus t before pol
ishing or waxing .
- To prevent pa int damage, do not pol ish or
w ax the veh icle in dire ct sunlight.
- To red uce the risk of pa int damage, do not
polish away rust spots.
- Remove cosmetics and sunscreen immedi
a tely
-these could damage the p aint.
- Displays /instrument cluster
- Make sure that the instrument cluster is
switched off and
has cooled off before
cleaning it.
- Displays, the instrument cluster and the
trim surrounding it must not be cleaned
w ith dry cleaning methods beca use they
cou ld become scratched.
- Make sure no fluids enter the spaces be
tween the instrument cluster and the
trim, because that could cause damage.
- Controls
- Make sure tha t no fluids enter the con-
trols, because this could ca use damage.
- Safety belts
- Do not remove the safety belts to clean
them .
- N ever clean sa fe ty belts o r their compo
nents chemically or wi th cor rosive fl uids
or so lvents and neve r allow sharp objects
to come into contact w ith the sa fety belts.
Th is could cause damage to the belt web
bing.
- If there is damage to the webbing, the
connect ions, the retractors or the b uck les,
348 have them replaced by an authorized Aud
i
dealer or authorized Aud i Serv ice Facility.
- Te xtile s/artificial leather/ Alcantara
- Never treat art ificial leather/ A lcantara
with leathe r ca re products, solvents, floor
polish, shoe polish, spot remove o r similar
p roducts.
- Have a spec ialist remove stubborn stains
to prevent damage .
- Never use steam cleaners, brushes, hard
sponges, etc. when cleaning.
- Do not turn on the seat heating* to dry the
seat .
- Objects w ith sharp edges, such as zippers
or rivets on clothing or belts, can cause
damage to the surface .
- Open hook and loop fastene rs, for exam
p le on clothing, can damage seat covers .
Make sure hook and loop fastene rs a re
closed.
- Natural l eather
- N eve r trea t le ather wi th solvents, floor
polish, shoe polish, spot remover or sim i
lar products .
- Obje cts w ith sharp edges, such as zippe rs
or rive ts on clothing or belts, can cause
damage to the surface .
- N eve r use s team cleaners, brushes, hard
spon ges, etc . when cleaning .
- D o not turn on the seat he ating * to dry the
seat.
- T o he lp prevent the le ather from f ading,
d o not leave the vehicle in d irec t sunlight
for long periods of time . If leav ing the ve
h icle parked for long periods of time, you
should cove r the leathe r to protect it from
d irect sunlight.
(D Tips
- Insects are easier to remove from paint that
has been freshly waxed.
- Regular waxing can prevent rust spots from
forming.
Page 363 of 392
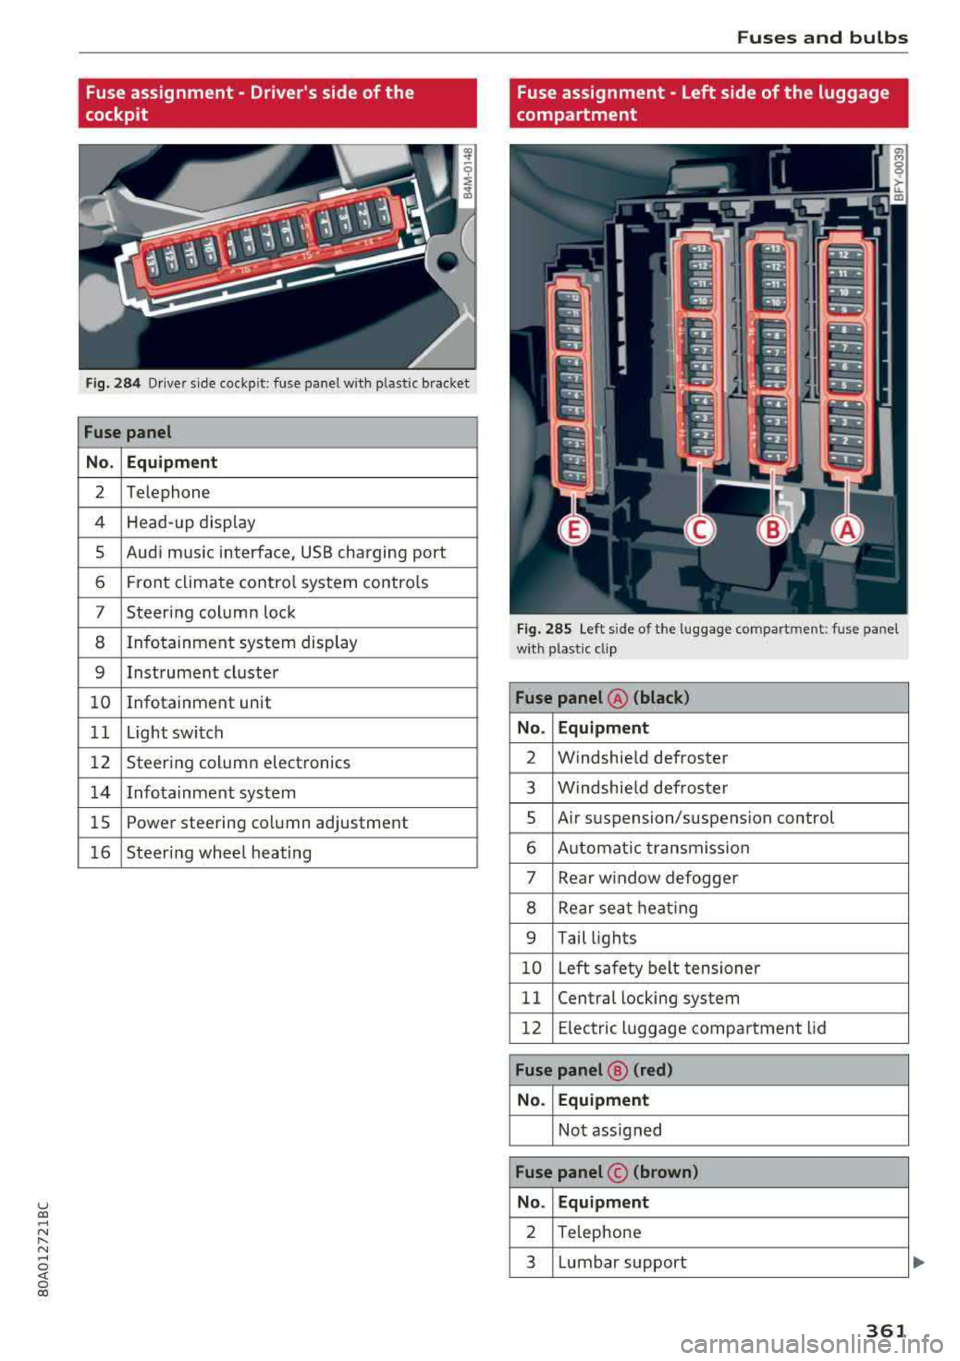
u co ..... N r-N .....
~ 0 co
Fuse assignment - Driver's side of the
cockpit
Fig. 284 Driver s ide cockpit: fuse panel wit h plastic bracket
Fuse panel
No . Equipment
2 Telephone
4 Head-up display
5 Audi music interface, USB charging port
6 Front climate control system controls
7 Steering column lock
8 Infotainment system display
9 Instrument cluster
10 Infotainment unit
11 Light switch
12 Steering column electronics
14 Infotainment system
15 Power steering column adjustment
16 Steering wheel heating
Fuses and bulbs
Fuse assignment - Left side of the luggage
compartment
Fig. 285 Left side of the l uggage compartment: fuse panel
wi th plastic cl ip
Fuse panel @ (black)
No. Equipment
2 Windshield defroster
3 Windshield defroster
5 Air su spension/s uspension control
6 Automatic transmission
7 Rear window defogge r
8 Rear seat h eating
9 Tail lights
10 Left safety belt tensioner
11 Central locking system
12 Electr ic luggage compartment lid
Fuse panel@ (red)
No. Equipment
Not assigned
Fuse panel © (brown)
No. Equipment
2 Telephone
3 Lumbar support
361
Page 377 of 392
u co ..... N ,..._
N ..... 0 <( 0 00
A
A/C MAX (button) . . . . . . . . . . . . . . . . . . . . . . 71
A/C (button) . . . . . . . . . . . . . . . . . . . . . . . . .
. 70
ABS .. .. .. .. .. ..
· · · · · · · · · · · · · · · · · · · · 140
Accessories . . . . . . . . . . . . . . . . . . . . . . . 60 , 373
Active lane assist
Cleaning the camera area .......... ..
.
also refer to Audi active lane assist .. .. .
Adaptive air suspension
refer to Air suspension ........ .. .. .. .
Adaptive cruise control ................ .
C leaning the sensors ................ .
Messages .... ................ ..... .
Predictive control ............. .. .. .. .
Adapt ive dampers ............ .. .. .. .. .
Additional accessories .............. ..
.
Adjusting air distribution (automatic climate 345
117
125
102
345
110
100
125
373
control) ..... .. ................ ..... . · 71
Adjusting the additional display . . . . . . . . . . 14
Adjusting the sound . . . . . . . . . . . . . . . . . . . 249
Adjusting the temperature (automatic climate
control) ..... .. ................ ..... . · 71
Adjusting the volume . . . . . . . . . . . . . . . . . . . 14
Advanced key
refer to Convenience key . . . . . . . . . . . . . . . 76
Airbag . . . . . . . . . . . . . . . . . . . . . . . . . . . . . . 269
Airbag system . . . . . . . . . . . . . . . . . . . . 269 , 287
Advanced Airbag System components . . . 276
Care .. .. .. .. ..... · · · · · · · · · · · · · · · · ·
Children ..... ................ .....
.
Child restraints .................... .
Components (front airbags) .......... .
Danger of fitting a child safety seat on the
front passenger seat .......... .. .. .. .
Disposal ... .. ................ ... ..
.
Front airbags ................. ... .. .
How do the front airbags work? ..... .. .
How many airbags does my vehicle have?
H ow the Advanced Airbag System compo-
nents work together .......... .. .. .. .
Indicator light ................ .....
.
284
293 293
276
270 284
274
279
276
278
281
Monitoring . . . . . . . . . . . . . . . . . . . . . . . . . 281
PASSENGER AIR BAG light . . . . . . . . . . . . 281
Repairs .. .. .. ............... .. .. ..
.
Safety instructions ............ .. .. .. .
When must the system be inspected? .. . 284
283 281
Index
Air suspension . . . . . . . . . . . . . . . . . . . . . . . 125
Alarm system
refer to Anti-theft alarm system . . . . . . . . . 36
Alignment pin (changing the wheel) . . . . . . 350
All-weather lights . . . . . . . . . . . . . . . . . . . .
. . 45
All season tires . . . . . . . . . . . . . . . . . . . . . .
. 340
All wheel drive
Indicator light
. .. .. ............... .. . 28
also refer to quattro . . . . . . . . . . . . . . . . . 144
AM I
refer to Audi music interface . . . . . . . 231, 232
Andro id Auto
refer to Aud i smartphone interface ... .. 243
Anti-freeze Windshield washer system ...........
. 323
Anti-Lock Braking System
refer to ABS ... .. .. ............... . . 140
Anti-Slip Regulation
refer to ASR . . . . . . . . . . . . . . . . . . . . . . . . 140
Anti-theft alarm system . . . . . . . . . . . . . . .
. . 36
Apple CarPlay
refer to Audi smartphone interface . . . . . 243
Arrow view . .. .. .. .. ............... .
.
ASR ........ ... .. .. ................ ·
Audi active lane assist ................ .
Messages . .. .. .. .. .............. · · ·
Audi adaptive cruise control
Distance display, distance warning ..... .
T raffic jam assist ... ................
.
Audi connect emergency call and service ..
Online roadside assistance .......... . .
Audi connect vehicle control .......... . .
Parking location .. .. ................
.
Remote locking and unlocking ........ .
164
140
117
118
110
109
201
202
197
198
198
Vehicle status report . . . . . . . . . . . . . . . .
. 198
Audi connect (Infotainment) ........ 187, 194 Data protection . . . . . . . . . . . . . . . . . . . . . 19S
Services overview . . . . . . . . . . . . . . . . . . .
. 188
Starting ...... .. .. ................ . 188
Audi drive select . . . . . . . . . . . . . . . . . . . . .
. 12S
Audi Entertainment mobile . . . . . . . . . . . . . 234
Audi music interface . . . . . . . . . . . . . . . . . . . 231
Audi music stream
refer to Wi-Fi . ..... ................ .
229
Audio files . . . . . . . . . . . . . . . . . . . . . . . . . . . 234
375